ソフトウェア開発とMQL5におけるデザインパターン(第1回):生成パターン

はじめに
プログラミングの分野では、問題を解決するという重要な目的がありますが、同じソフトウェアまたは異なるソフトウェアの異なる領域で同じ問題に直面する可能性があります。この種の繰り返しの問題に直面するたびに、同じ手順と時間をかけて解決するとします。このアプローチは、車輪の再発明を続けることを意味します。多くの時間と労力を消費するため、これが無駄なアプローチであることは間違いありません。したがって、この場合、この非効率な時間と労力を節約できる方法があるかどうかが重要になります。
その答えは「はい」です。特定の問題を解決するために使用できる方法(パターンと言いましょう)があります。これがデザインパターンです。デザインパターンは、車輪の再発明を回避できるという、DRY (Do not Repeat Yourself)の概念を適用するのに非常に役立ちます。問題があり、それを効果的に解決するために使用できるパターンがある場合は、そのパターンを使用して問題を解決し、時間と労力を節約します。
デザインパターンのトピックでは、その目的に基づいてそのタイプの1つを共有し、MQL5を使用したソフトウェアのデザインでそれらをどのように使用できるかについて実践的なガイドの提供を試みます。
次のトピックについて説明します。
ソフトウェア開発者がパフォーマンスと生産性を向上させる必要がある場合、これから説明するデザインパターンは、学習して使用する非常に重要なトピックです。この興味深く重要なトピックの概念を、初心者にもよく理解できるようにできる限り単純化するように努めます。また、必要に応じてMQL5でこれらのパターンを使用する方法についての簡単な例も示し、この重要なトピック全般を学習する必要がある人に実用的なガイドを提供します。
これらのパターンのすべてのタイプを要約し、これを省略すると理解が難しくなる可能性があるものを無視せずに、できる限り要点を押さえるように努めます。この分野に慣れていない方にとって、この記事が洞察力に富み、プログラミングの世界で新しいことを学べることを願っています。
この記事の内容を理解するには、オブジェクト指向のトピックに関する知識が不可欠であることにも言及することが重要です。オブジェクト指向プログラミング(OOP)について知りたい場合は、「MQL5オブジェクト指向プログラミング(OOP)について」稿をご覧ください。
デザインパターンの定義
このセクションでは、デザインパターンについて説明します。これらは、ソフトウェア開発において記述され、繰り返される特定の問題に対する解決策として使用できるパターンにすぎません。すべてのデザインパターンは、特定のオブジェクト指向の問題に焦点を当てています。これらのパターンは、C++などの主流のオブジェクト指向プログラミング言語で簡単に実装できます。デザインパターンについて話すとき、このパターンには次の4つの重要な要素があります。
- パターン名:説明されている特定の問題を解決するために使用できるパターンの名前
- 問題:私たちが直面する可能性のある、記述され、繰り返される、具体的な問題
- 解決策:記載されている特定の問題を解決するために記載されている解決策
- 結果:問題を解決するためにパターンを適用した後の結果
デザインパターンには、目的に基づいて次の3つの主なカテゴリがあります。
- 生成パターン:オブジェクトを作成、構成、表現することによって、独立したシステムの作成を支援
- 構造パターン:作成されたオブジェクトを使用してより大きな構造を形成
- 振る舞いパターン:オブジェクト間の通信を担当
生成パターン
このセクションでは、生成デザインパターンに関する情報と、それがソフトウェアの作成にどのように役立つかを紹介します。前に述べたのと同じように、このタイプのデザインパターンは、オブジェクトを作成、構成、表現することによって独立したシステムを作成するのに役立ちます。これらのパターンは、問題や課題を効率的に解決するのに役立つだけでなく、クリーンなコードの作成を支援することで、ソフトウェアが再利用可能で拡張可能であり、適切かつ簡単にテストできることを確認する効果的な方法でソフトウェアを構築するのにも役立ちます。
生成パターンのクラスは継承の概念を使用してクラスをインスタンスとして変更しますが、生成パターンのオブジェクトはインスタンス化のタスクを別のオブジェクトに渡します。ソフトウェアがクラスの継承よりもオブジェクトの構成に重点を置く場合、生成パターンの重要性が高まります。
生成パターンには2つの繰り返しのテーマがあると言えます。
- システムで使用できる具象クラスに関する知識にカプセル化の概念を使用する
- クラスのインスタンスを作成し、それらを組み合わせて隠ぺいする方法を作成
生成パターンは、いつ作成するかだけでなく、何を、誰が、どのように作成するかについて柔軟性を適用するのに役立ちます。
同じ実装を繰り返さずにオブジェクトを作成できるため、インスタンス化プロセスの抽象化にも役立ち、コードをより柔軟かつシンプルにするのに役立ちます。
この記事では、次の生成パターンをカバーします。
- Abstract Factory:クラスを言及せずにオブジェクトのファミリーを作成するためのインターフェイスを提供できるようにする
- Builder:複雑なオブジェクトを作成し、オブジェクトの構築をその表現から分離して、同じ構築プロセスで同じオブジェクトの異なる表現を作成できるようにする
- Factory Method:オブジェクトを作成するためのインターフェイスを定義するのに役立ち、そのサブクラスがどのクラスをインスタンス化するかを決定できるようにする
- Prototype:Prototypeのインスタンスを使用し、このPrototypeをコピーして新しいオブジェクトを作成することで、作成するオブジェクトの型を指定できるようにする
- Singleton:クラスのインスタンスが1つだけであることを確認し、グローバルなアクセスポイントを与えられるようにする
これらのパターンについて詳しく学び、次のアプローチを通じてそれらをMQL5ソフトウェアに適用して使用する方法を学びます。
- パターンの役割
- 解決されるデザイン上の問題
- MQL5での使用方法
Abstract Factory
このセクションでは、生成パターンの1つであるAbstract Factoryを見ていきます。Abstract Factoryパターンで説明するように、このパターンの主役はFactory(ファクトリー)とProduct(プロダクト)であり、クラスを直接インスタンス化せずに関連するProductオブジェクトのファミリーを作成するためのガイドとして使用できます。Productオブジェクトの数と一般的なタイプが一定であるが、特定のProductファミリーでは異なる場合に使用できます。
パターンの役割
このパターンは、クラスを指定せずにオブジェクトのファミリーを作成するためのインターフェイスを提供します。これらの作成されたオブジェクトは、関連するオブジェクトまたは独立したオブジェクトにすることができます。「Kit」としても知られています。以下は、このパターンがどのように機能し、何をおこなうかを説明する図です。

例のように多くの異なるProductやFactoryで同じようなアイテムが多数生産された場合、Abstract Factoryパターンを使用しないと、将来の変更を加えるのが難しいことが図でわかります。Abstract Factoryパターンを使用すれば、それをおこなうのは簡単かつスムーズです。
このパターンでは、抽象Productを作成する操作のインターフェイスを宣言するAbstract Factoryクラスを定義します。また、各Factoryには2つのProductのサブクラスを持つ抽象クラスがあり、各Factoryは、クライアントによって呼び出されるProductに基づいてそのProductを返します。
解決されるデザイン上の問題
このパターンは次の場合に使用できます。
- 独立したシステムが必要
- 多くのProductのファミリーのいずれかを使用して構成されたシステムが必要
- 関連するProductオブジェクトのファミリーをそのデザインに従って一緒に使用し、この制約を強制することが必要
- 提供されたクラスの実装ではなく、インターフェイスのみを明らかにすることが必要
以下は、このパターンを適用する利点の例です。
- 作成されたオブジェクトクラスの制御に役立つため、具象クラスの分離の実行に役立つ:これは、オブジェクトを作成する責任とプロセスのカプセル化、実装クラスからのクライアントの分離、インスタンスを操作できるクライアントの抽象インターフェイス全体を通じておこなうことができます。Factoryの具象実装内では、Productクラス名は分離されており、クライアントコードには表示されません。
- これにより、Productファミリー間の交換が容易になります。
MQL5での使用方法
このセクションでは、IncludeファイルでAbstract Factoryの構造をコード化する方法を説明します。ただし、ここでは構造をコード化しますが、読者は取引フィールドに基づいて適切なものをコード化できることを言及しておきます。
以下の手順で構造をコード化します。
namespaceキーワードを使用して、AbstractFactory関数を宣言して、その中に必要なすべての関数をリストします。
namespace AbstractFactory Interfaceキーワードを使用して、AbstractProductA関数を宣言します。
interface AbstractProductA
  {
  };
Interfaceキーワードを使用して、関数本体にvoid Interact変数を含むAbstractProductB関数を宣言します。
interface AbstractProductB
  {
   void Interact(AbstractProductA*);
  };
抽象Productを作成するための操作のインターフェイスを宣言します。
interface AbstractFactory
  {
   AbstractProductA* CreateProductA(void);
   AbstractProductB* CreateProductB(void);
  };
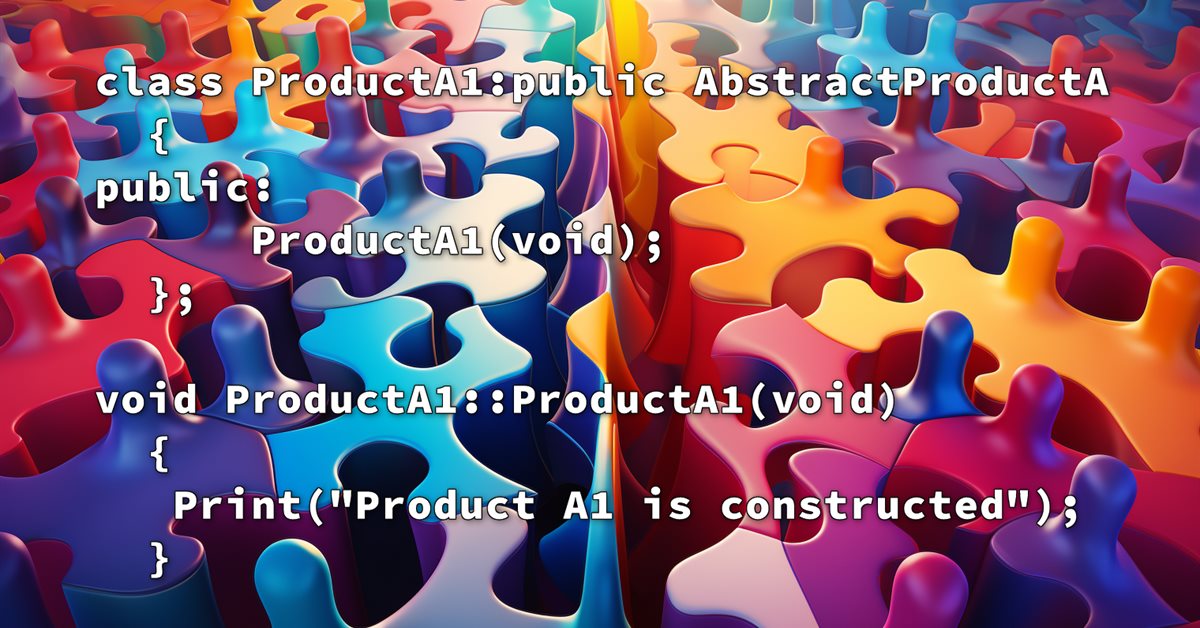
抽象Productインターフェイスを介して具象Factoryとその実装によって作成する必要があるProductオブジェクトを定義することにより、Product A1とProduct A2を構築します。
class ProductA1:public AbstractProductA
  {
public:
                     ProductA1(void);
  };
void ProductA1::ProductA1(void)
{
Print("Product A1 is constructed");
}
class ProductA2:public AbstractProductA
  {
public:
                     ProductA2(void);
  };
void ProductA2::ProductA2(void)
{
Print("Product A2 is constructed");
}
具象Product B1とProduct B2を構築し、AbstractProductAと対話させます。
class ProductB1:public AbstractProductB
  {
public:
                     ProductB1(void);
   void              Interact(AbstractProductA*);
  };
void ProductB1::ProductB1(void)
{
Print("Product B1 is constructed");
}
void ProductB1::Interact(AbstractProductA*src)
  {
   Print("Product B1: ",&this," is interacting with Product A: ",src);
  }
class ProductB2:public AbstractProductB
  {
public:
                     ProductB2(void);
   void              Interact(AbstractProductA*);
  };
void ProductB2::ProductB2(void)
{
Print("Product B2 is constructed");
}
void ProductB2::Interact(AbstractProductA*src)
  {
   Print("Product B2: ",&this," is interacting with Product A: ",src);
  }
具象Factory Factory1およびProduct A1、A2、B1、B2を作成して返すFactory2を宣言します。
class Factory1:public AbstractFactory
  {
public:
                     Factory1(void);
   AbstractProductA* CreateProductA(void);
   AbstractProductB* CreateProductB(void);
  };
void Factory1::Factory1(void)
  {
   Print("Factory 1: ",&this," is constructed");
  }
AbstractProductA* Factory1::CreateProductA(void)
  {
   Print("Factory 1 creates and returns Product A1");
   return new ProductA1;
  }
AbstractProductB* Factory1::CreateProductB(void)
  {
   Print("Factory 1 creates and returns Product B1");
   return new ProductB1;
  }
class Factory2:public AbstractFactory
  {
public:
                     Factory2(void);
   AbstractProductA* CreateProductA(void);
   AbstractProductB* CreateProductB(void);
  };
void Factory2::Factory2(void)
  {
   Print("Factory 2: ",&this," is constructed");
  }
AbstractProductA* Factory2::CreateProductA(void)
  {
   Print("Factory 2 creates and returns Product A2");
   return new ProductA2;
  }
AbstractProductB* Factory2::CreateProductB(void)
  {
   Print("Factory 2 creates and returns Product B2");
   return new ProductB2;
  }
FactoryClientクラスを宣言し、Abstract Factoryと抽象Productによって宣言されたインターフェイスを使用します。
class FactoryClient
  {
public:
   void              Run(void);
   void              Switch(AbstractFactory*);
                     FactoryClient(AbstractFactory*);
                    ~FactoryClient(void);
protected:
   AbstractProductA* apa;
   AbstractProductB* apb;
   AbstractFactory*  factory;
   void              Delete(void);
  };
void FactoryClient::FactoryClient(AbstractFactory* af)
  {
   Print("Factory client created and received Abstract Factory ",af);
   Print("Factory client requests to accept/switch the factories");
   Switch(af);
  }
void FactoryClient::~FactoryClient(void)
  {
   Delete();
  }
void FactoryClient::Run(void)
  {
   Print("Factory client runs the abstract Product B");
   apb.Interact(apa);
  }
void FactoryClient::Delete(void)
  {
   delete apa;
   delete apb;
   delete factory;
  }
void FactoryClient::Switch(AbstractFactory *af)
  {
   string sFactory;
   StringConcatenate(sFactory,sFactory,factory);
   int iFactory=(int)StringToInteger(sFactory);
   if(iFactory>0)
     {
      Print("Factory client switches the old factory ",factory," to the new one ",af);
     }
   else
     {
      Print("Factory client accepts the new factory ",af);
     }
   Delete();
   factory=af;
   Print("Factory client saved the new factory");
   Print("Factory client requests its new factory to create the Product A");
   apa=factory.CreateProductA();
   Print("Factory client requests its new factory to create the Product B");
   apb=factory.CreateProductB();
  }
Clientクラスを定義し、パターンを実行します。
class Client
  {
public:
   string            Output(void);
   void              Run(void);
  };
string Client::Output(void) {return __FUNCTION__;}
void Client::Run(void)
  {
   Print("The client requests to create the Factory 1");
   Print("The client requests to create the Factory client");
   Print("The client requests the Factory client to manage the Factory 1");
   FactoryClient client(new Factory1);
   Print("The client requests the Factory client to operate");
   client.Run();
   Print("The client requests to create the new factory 2 and asks the factory client to switch factories");
   client.Switch(new Factory2);
   Print("The client requests the Factory client to run again");
   client.Run();
  }
完全なコードは次のように1つのブロックになります。
namespace AbstractFactory
{
interface AbstractProductA
  {
  };
interface AbstractProductB
  {
   void Interact(AbstractProductA*);
  };
interface AbstractFactory
  {
   AbstractProductA* CreateProductA(void);
   AbstractProductB* CreateProductB(void);
  };
class ProductA1:public AbstractProductA
  {
public:
                     ProductA1(void);
  };
void ProductA1::ProductA1(void)
{
Print("Product A1 is constructed");
}
class ProductA2:public AbstractProductA
  {
public:
                     ProductA2(void);
  };
void ProductA2::ProductA2(void)
{
Print("Product A2 is constructed");
}
class ProductB1:public AbstractProductB
  {
public:
                     ProductB1(void);
   void              Interact(AbstractProductA*);
  };
void ProductB1::ProductB1(void)
{
Print("Product B1 is constructed");
}
void ProductB1::Interact(AbstractProductA*src)
  {
   Print("Product B1: ",&this," is interacting with Product A: ",src);
  }
class ProductB2:public AbstractProductB
  {
public:
                     ProductB2(void);
   void              Interact(AbstractProductA*);
  };
void ProductB2::ProductB2(void)
{
Print("Product B2 is constructed");
}
void ProductB2::Interact(AbstractProductA*src)
  {
   Print("Product B2: ",&this," is interacting with Product A: ",src);
  }
class Factory1:public AbstractFactory
  {
public:
                     Factory1(void);
   AbstractProductA* CreateProductA(void);
   AbstractProductB* CreateProductB(void);
  };
void Factory1::Factory1(void)
  {
   Print("Factory 1: ",&this," is constructed");
  }
AbstractProductA* Factory1::CreateProductA(void)
  {
   Print("Factory 1 creates and returns Product A1");
   return new ProductA1;
  }
AbstractProductB* Factory1::CreateProductB(void)
  {
   Print("Factory 1 creates and returns Product B1");
   return new ProductB1;
  }
class Factory2:public AbstractFactory
  {
public:
                     Factory2(void);
   AbstractProductA* CreateProductA(void);
   AbstractProductB* CreateProductB(void);
  };
void Factory2::Factory2(void)
  {
   Print("Factory 2: ",&this," is constructed");
  }
AbstractProductA* Factory2::CreateProductA(void)
  {
   Print("Factory 2 creates and returns Product A2");
   return new ProductA2;
  }
AbstractProductB* Factory2::CreateProductB(void)
  {
   Print("Factory 2 creates and returns Product B2");
   return new ProductB2;
  }
class FactoryClient
  {
public:
   void              Run(void);
   void              Switch(AbstractFactory*);
                     FactoryClient(AbstractFactory*);
                    ~FactoryClient(void);
protected:
   AbstractProductA* apa;
   AbstractProductB* apb;
   AbstractFactory*  factory;
   void              Delete(void);
  };
void FactoryClient::FactoryClient(AbstractFactory* af)
  {
   Print("Factory client created and received Abstract Factory ",af);
   Print("Factory client requests to accept/switch the factories");
   Switch(af);
  }
void FactoryClient::~FactoryClient(void)
  {
   Delete();
  }
void FactoryClient::Run(void)
  {
   Print("Factory client runs the abstract Product B");
   apb.Interact(apa);
  }
void FactoryClient::Delete(void)
  {
   delete apa;
   delete apb;
   delete factory;
  }
void FactoryClient::Switch(AbstractFactory *af)
  {
   string sFactory;
   StringConcatenate(sFactory,sFactory,factory);
   int iFactory=(int)StringToInteger(sFactory);
   if(iFactory>0)
     {
      Print("Factory client switches the old factory ",factory," to the new one ",af);
     }
   else
     {
      Print("Factory client accepts the new factory ",af);
     }
   Delete();
   factory=af;
   Print("Factory client saved the new factory");
   Print("Factory client requests its new factory to create the Product A");
   apa=factory.CreateProductA();
   Print("Factory client requests its new factory to create the Product B");
   apb=factory.CreateProductB();
  }
class Client
  {
public:
   string            Output(void);
   void              Run(void);
  };
string Client::Output(void) {return __FUNCTION__;}
void Client::Run(void)
  {
   Print("The client requests to create the Factory 1");
   Print("The client requests to create the Factory client");
   Print("The client requests the Factory client to manage the Factory 1");
   FactoryClient client(new Factory1);
   Print("The client requests the Factory client to operate");
   client.Run();
   Print("The client requests to create the new factory 2 and asks the factory client to switch factories");
   client.Switch(new Factory2);
   Print("The client requests the Factory client to run again");
   client.Run();
  }
}
Builder
Builderパターンは、複雑なオブジェクトを作成する必要がある場合に使用できる生成パターンであり、オブジェクトの構築とその表現を分離します。これは、同じ構築プロセスで同じオブジェクトの異なる表現を作成する場合に役立ちます。
パターンの役割
以下は、その構造を示すことで、この生成パターンがどのように機能するかを示す図です。

Builderの構造に基づいてわかるように、Productオブジェクトの一部を作成するためのインターフェイスを指定するBuilder、Builderのインターフェイスを使用してオブジェクトを構築するDirector、以下を実行するために使用できるConcreteBuilderがあります。
- Builderのインターフェイスの実装を通じてProductの部品を構築および組み立てる
- 表現を定義し、それを追跡する
- インターフェイスを提供してProductを取得する
最後に、構築中の複雑なオブジェクトを表すProductが完成します。
解決されるデザイン上の問題
このパターンは、次のような場合に使用できます。
- オブジェクトの一部のコンポーネントとそのアセンブリからなる複雑なオブジェクトを作成するための独立したアルゴリズムがある
- 構築プロセスによるオブジェクトのさまざまな表現を許容する
次の利点があります。
- Productの内部表現に基づいて、それらを変更する許可が与えられる
- 複雑なオブジェクトを構築および表現するメソッドをカプセル化することにより、モジュール性が向上する(コードの構築と表現が分離される)
- Productの製造プロセスをより正確に制御できるようになる
MQL5での使用方法
このセクションでは、Builderパターンの構造のコードを示します。
namespace機能を使用して、Builder関数を宣言します。
namespace Builder 関数の本体では、次のようなProductクラスを作成します。
class Product
  {
public:
   void              Add(string);
   void              Show();
protected:
   string            parts[];
  };
パーツを追加します。
void Product::Add(string part)
  {
   int size=ArraySize(parts);
   ArrayResize(parts,size+1);
   parts[size]=part;
   Print("The product added ",part," to itself");
  }
Productのすべてのパーツを表示します。
void Product::Add(string part)
  {
   int size=ArraySize(parts);
   ArrayResize(parts,size+1);
   parts[size]=part;
   Print("The product added ",part," to itself");
  }
ProductパーツA、B、Cを作成するためのBuilder抽象インターフェイスを作成します。
interface Builder
  {
   void BuildPartA();
   void BuildPartB();
   void BuildPartC();
   Product* GetResult();
  };
クラス関数を使用してBuilderインターフェイスでオブジェクトを構築するDirectorクラスを作成します。
class Director
  {
public:
   void              Construct();
                     Director(Builder*);
                    ~Director();
protected:
   Builder*          builder;
  };
以下の関数を作成することで、DirectorによるBuilderを作成して受信します。
void Director::Director(Builder *b)
  {
   builder=b;
   Print("The director created and received the builder ",b);
  }
void Director::~Director(void)
  {
   delete builder;
  }
DirectorによるProductパーツA、B、Cの構築を開始します。
void Director::Construct(void)
  {
   Print("The director started the construction");
   Print("The director requestd its builder to build the product parts");
   builder.BuildPartA();
   builder.BuildPartB();
   builder.BuildPartC();
   Print("The director's builder constructed the product from parts");
  }
3つのpublicメンバー(Productのパーツ)と1つのprotectedメンバー(Product)を持つConcreteBuilderクラスを作成します。
class ConcreteBuilder:public Builder
  {
public:
   void              BuildPartA();
   void              BuildPartB();
   void              BuildPartC();
   Product*          GetResult();
protected:
   Product           product;
  };
BuilderによってパーツA、B、CがProductに追加され、次の関数でProductが返されます。
void ConcreteBuilder::BuildPartA(void)
  {
   Print("The builder requests the product to add part A to itself");
   product.Add("part a");
   Print("The builder made the part of A and added it to the product");
  }
void ConcreteBuilder::BuildPartB(void)
  {
   Print("The builder requests the product to add part B to itself");
   product.Add("part b");
   Print("The builder made the part of B and added it to the product");
  }
void ConcreteBuilder::BuildPartC(void)
  {
   Print("The builder requests the product to add part C to itself");
   product.Add("part c");
   Print("The builder made part C and added it to the product");
  }
Product* ConcreteBuilder::GetResult(void)
  {
   Print("The builder is returns the product");
   return &product;
  }
OutputコンストラクタとRunコンストラクタの2つのpublicメンバーを含みClientを実行する、Clientクラスを作成します。
class Client
  {
public:
   string            Output();
   void              Run();
  };
string Client::Output() {return __FUNCTION__;}
void Client::Run()
  {
   Print("The client requests to create a new concrete builder");
   Builder* builder=new ConcreteBuilder;
   Print("The client requests to create a director and give him the builder");
   Director director(builder);
   Print("The client requests the director to perform the construction");
   director.Construct();
   Print("The client requests the builder to return the result product");
   Product* product=builder.GetResult();
   Print("The client is requests the product to describe itself");
   product.Show();
  }
Builder構造の完全なコードは次のように1つのブロックになります。
namespace Builder
{
class Product
  {
public:
   void              Add(string);
   void              Show();
protected:
   string            parts[];
  };
void Product::Add(string part)
  {
   int size=ArraySize(parts);
   ArrayResize(parts,size+1);
   parts[size]=part;
   Print("The product added ",part," to itself");
  }
void Product::Show(void)
  {
   Print("The product shows all parts that it is made of");
   int total=ArraySize(parts);
   for(int i=0; i<total; i++)
      Print(parts[i]);
  }
interface Builder
  {
   void BuildPartA();
   void BuildPartB();
   void BuildPartC();
   Product* GetResult();
  };
class Director
  {
public:
   void              Construct();
                     Director(Builder*);
                    ~Director();
protected:
   Builder*          builder;
  };
void Director::Director(Builder *b)
  {
   builder=b;
   Print("The director created and received the builder ",b);
  }
void Director::~Director(void)
  {
   delete builder;
  }
void Director::Construct(void)
  {
   Print("The director started the construction");
   Print("The director requestd its builder to build the product parts");
   builder.BuildPartA();
   builder.BuildPartB();
   builder.BuildPartC();
   Print("The director's builder constructed the product from parts");
  }
class ConcreteBuilder:public Builder
  {
public:
   void              BuildPartA();
   void              BuildPartB();
   void              BuildPartC();
   Product*          GetResult();
protected:
   Product           product;
  };
void ConcreteBuilder::BuildPartA(void)
  {
   Print("The builder requests the product to add part A to itself");
   product.Add("part a");
   Print("The builder made the part of A and added it to the product");
  }
void ConcreteBuilder::BuildPartB(void)
  {
   Print("The builder requests the product to add part B to itself");
   product.Add("part b");
   Print("The builder made the part of B and added it to the product");
  }
void ConcreteBuilder::BuildPartC(void)
  {
   Print("The builder requests the product to add part C to itself");
   product.Add("part c");
   Print("The builder made part C and added it to the product");
  }
Product* ConcreteBuilder::GetResult(void)
  {
   Print("The builder is returns the product");
   return &product;
  }
class Client
  {
public:
   string            Output();
   void              Run();
  };
string Client::Output() {return __FUNCTION__;}
void Client::Run()
  {
   Print("The client requests to create a new concrete builder");
   Builder* builder=new ConcreteBuilder;
   Print("The client requests to create a director and give him the builder");
   Director director(builder);
   Print("The client requests the director to perform the construction");
   director.Construct();
   Print("The client requests the builder to return the result product");
   Product* product=builder.GetResult();
   Print("The client is requests the product to describe itself");
   product.Show();
  }
}
Factory Method
Factory Methodパターンは、もう1つの生成デザインパターンです。オブジェクトを作成するインターフェイスを定義し、インスタンス化するクラスを決定する権限をサブクラスに与え、さらに、クラスがサブクラスへのインスタンス化を延期できるようにします。Virtual Constructor.(仮想コンストラクタ)とも呼ばれます。
パターンの役割
以下は、Factory Methodパターンの構造図です。

図からわかるように、次があります。
- Product:Factory Methodによって作成されるオブジェクトのインターフェイスを定義する
- ConcreteProduct:Productインターフェイスの実装を担当する
- Creator:Factory Methodの宣言後にProductオブジェクトを返し、ConcreteProductのデフォルトオブジェクトを返すFactory Methodのデフォルトとして実装を提供でき、Factory Methodを呼び出すことでProductのオブジェクトを作成できる
- ConcreteCreator:Factory MethodをオーバーライドしてConcreteProductインスタンスを返す
解決されるデザイン上の問題
Factory Methodパターンは、次の場合に使用できます。
- 作成する必要があるオブジェクトのクラスが何であるかを予測できないクラスがある
- クラスは、そのサブクラスによって作成されるオブジェクトを指定したいと考えている
- ヘルパーサブクラスのうちの1つがクラスによって担当として委任されており、どのヘルパーサブクラスが委任されているかを知る必要がある
MQL5での使用方法
次の手順で、MQL5のFactory Methodの構造をインクルードファイルとしてコード化できます。
namespaceを使用してFactoryMethodドを宣言し、構造の内部で関数をリストします。
namespace FactoryMethod Factory MethodによるProductオブジェクトインターフェイスを作成します。
interface Product
  {
  };
ConcreteProductクラスを作成し、Productインターフェイスを実装します。
class ConcreteProduct:public Product
  {
public:
                     ConcreteProduct(void);
  };
ConcreteProduct::ConcreteProduct(void)
  {
   "The concrete product: ",&this," created");
  }
Creatorクラスを作成してProductタイプのオブジェクトを戻し、具象Productを戻し、Productオブジェクトを作成します。
class Creator
  {
public:
   virtual Product*  FactoryMethod(void)=0;
   void              AnOperation(void);
                    ~Creator(void);
protected:
   Product*          product;
  };
Creator::~Creator(void) {delete product;}
void Creator::AnOperation(void)
  {
   Print("The creator runs its operation");
   delete product;
   product=FactoryMethod();
   Print("The creator saved the product that received from the virtual factory method");
  }
Factory Methodを実行し、新しい具象Productを作成して戻します。
class ConcreteCreator:public Creator
  {
public:
   Product*          FactoryMethod(void);
  };
Product* ConcreteCreator::FactoryMethod(void)
  {
   Print("The creator runs the factory method");
   Print("The concrete creator creates and returns the new concrete product");
   return new ConcreteProduct;
  }
OutputとRun2つのpublicメンバーを持つClientクラスを作成します。
class Client
  {
public:
   string            Output(void);
   void              Run(void);
  };
string Client::Output(void) {return __FUNCTION__;}
Clientクラスを実行してCreatorの作成を要求し、Productを返し、Creatorの操作を実行します。
void Client::Run(void)
  {
   Print("requests to make the creator");
   ConcreteCreator creator;
   Print("requests the creator to run its factory method to return the product");
   Product* product=creator.FactoryMethod();
   Print("requests the creator to run its operation");
   creator.AnOperation();
   delete product;
  }
Factory Method構造の完全なコードは次のように1つのブロックになります。
namespace FactoryMethod
{
interface Product
  {
  };
class ConcreteProduct:public Product
  {
public:
                     ConcreteProduct(void);
  };
ConcreteProduct::ConcreteProduct(void)
  {
   Print("The concrete product: ",&this," created");
  }
class Creator
  {
public:
   virtual Product*  FactoryMethod(void)=0;
   void              AnOperation(void);
                    ~Creator(void);
protected:
   Product*          product;
  };
Creator::~Creator(void) {delete product;}
void Creator::AnOperation(void)
  {
   Print("The creator runs its operation");
   delete product;
   product=FactoryMethod();
   Print("The creator saved the product that received from the virtual factory method");
  }
class ConcreteCreator:public Creator
  {
public:
   Product*          FactoryMethod(void);
  };
Product* ConcreteCreator::FactoryMethod(void)
  {
   Print("The creator runs the factory method");
   Print("The concrete creator creates and returns the new concrete product");
   return new ConcreteProduct;
  }
class Client
  {
public:
   string            Output(void);
   void              Run(void);
  };
string Client::Output(void) {return __FUNCTION__;}
void Client::Run(void)
  {
   Print("requests to make the creator");
   ConcreteCreator creator;
   Print("requests the creator to run its factory method to return the product");
   Product* product=creator.FactoryMethod();
   Print("requests the creator to run its operation");
   creator.AnOperation();
   delete product;
  }
}
Prototype
Prototypeはあと1つの生成パターンです。Prototypeインスタンスを使用して指定されたタイプのオブジェクトを作成し、このPrototypeをコピーして新しいオブジェクトを作成します。
パターンの役割
以下は、Prototypeデザインパターンの構造図です。

図からわかるように、次があります。
- Prototype:自身のクローンを作成できるインターフェイスを作成する
- ConcretePrototype:その操作を実装することで自分自身を複製する
- Client:Prototypeに自身のクローンを作成して新しいオブジェクトを作成するように要求する
解決されるデザイン上の問題
Prototypeパターンは次の場合に使用できます。
- インスタンス化または作成する必要があるクラスが実行時に指定される
- Productクラス階層と並行する可能性のあるFactoryクラス階層の構築を避ける必要がある
- 数少ない異なる状態の組み合わせのうちの1つを持つことができるクラスインスタンスがある
Prototypeパターンを適用した結果は次のようになります。
- クライアントはPrototypeをインストールおよび削除できるため、実行時にProductを簡単に追加または削除できるようになります。
- オブジェクトの変数の値を指定することで、新しいオブジェクトを指定できるようになります。
- 構造の変化を通じて新しいオブジェクトを指定できるようになります。
- 新しいオブジェクトを作成する代わりに、PrototypeはPrototypeのクローンを作成するので、サブクラス化が削減します。
- アプリケーションがクラスを動的に構成できると便利です。
MQL5での使用方法
Prototypeパターン構造のコードの書き方は以下の通りです。
namespaceキーワードを使用してPrototypeを宣言し、その中のすべての関数をリストします。
namespace Prototype Prototypeクラスまたはインターフェイスを作成してそれ自体を複製します。
class Prototype
  {
public:
   virtual Prototype* Clone(void)=0;
                     Prototype(int);
protected:
   int               id;
  };
Prototype::Prototype(int i):id(i)
  {
   Print("The prototype ",&this,", id - ",id," is created");
  }
concretePrototype1と2を作成すると、自身のクローンを作成する操作が実装されます。
class ConcretePrototype1:public Prototype
  {
public:
                     ConcretePrototype1(int);
   Prototype*        Clone(void);
  };
ConcretePrototype1::ConcretePrototype1(int i):
   Prototype(i)
  {
   Print("The concrete prototype 1 - ",&this,", id - ",id," is created");
  }
Prototype* ConcretePrototype1::Clone(void)
  {
   Print("The cloning concrete prototype 1 - ",&this,", id - ",id);
   return new ConcretePrototype1(id);
  }
class ConcretePrototype2:public Prototype
  {
public:
                     ConcretePrototype2(int);
   Prototype*        Clone(void);
  };
ConcretePrototype2::ConcretePrototype2(int i):
   Prototype(i)
  {
   Print("The concrete prototype 2 - ",&this,", id - ",id," is created");
  }
Prototype* ConcretePrototype2::Clone(void)
  {
   Print("The cloning concrete prototype 2 - ",&this,", id - ",id);
   return new ConcretePrototype2(id);
  }
Clientクラスを作成して、Prototypeをそれ自体にクローンして新しいオブジェクトを作成します。
class Client
  {
public:
   string            Output(void);
   void              Run(void);
  };
string Client::Output(void) {return __FUNCTION__;}
Prototypeに自身のクローンを作成するように要求するクライアントを実行します。
void Client::Run(void)
  {
   Prototype* prototype;
   Prototype* clone;
   Print("requests to create the concrete prototype 1 with id 1");
   prototype=new ConcretePrototype1(1);
   Print("requests the prototype ",prototype," to create its clone");
   clone=prototype.Clone();
   delete prototype;
   delete clone;
   Print("requests to create the concrete prototype 2 with id 2");
   prototype=new ConcretePrototype2(2);
   Print("requests the prototype ",prototype," to create its clone");
   clone=prototype.Clone();
   delete prototype;
   delete clone;
  }
Prototypeパターン構造の完全なコードは次のように1つのブロックになります。
namespace Prototype
{
class Prototype
  {
public:
   virtual Prototype* Clone(void)=0;
                     Prototype(int);
protected:
   int               id;
  };
Prototype::Prototype(int i):id(i)
  {
   Print("The prototype ",&this,", id - ",id," is created");
  }
class ConcretePrototype1:public Prototype
  {
public:
                     ConcretePrototype1(int);
   Prototype*        Clone(void);
  };
ConcretePrototype1::ConcretePrototype1(int i):
   Prototype(i)
  {
   Print("The concrete prototype 1 - ",&this,", id - ",id," is created");
  }
Prototype* ConcretePrototype1::Clone(void)
  {
   Print("The cloning concrete prototype 1 - ",&this,", id - ",id);
   return new ConcretePrototype1(id);
  }
class ConcretePrototype2:public Prototype
  {
public:
                     ConcretePrototype2(int);
   Prototype*        Clone(void);
  };
ConcretePrototype2::ConcretePrototype2(int i):
   Prototype(i)
  {
   Print("The concrete prototype 2 - ",&this,", id - ",id," is created");
  }
Prototype* ConcretePrototype2::Clone(void)
  {
   Print("The cloning concrete prototype 2 - ",&this,", id - ",id);
   return new ConcretePrototype2(id);
  }
class Client
  {
public:
   string            Output(void);
   void              Run(void);
  };
string Client::Output(void) {return __FUNCTION__;}
void Client::Run(void)
  {
   Prototype* prototype;
   Prototype* clone;
   Print("requests to create the concrete prototype 1 with id 1");
   prototype=new ConcretePrototype1(1);
   Print("requests the prototype ",prototype," to create its clone");
   clone=prototype.Clone();
   delete prototype;
   delete clone;
   Print("requests to create the concrete prototype 2 with id 2");
   prototype=new ConcretePrototype2(2);
   Print("requests the prototype ",prototype," to create its clone");
   clone=prototype.Clone();
   delete prototype;
   delete clone;
  }
}
Singleton
このパターンの主な目的は、クラスのインスタンスが1つだけ存在することを確認し、グローバルポイントを提供することでそのインスタンスにアクセスすることです。
パターンの役割
以下は、Singletonデザインパターンの構造図です。

前の図でわかるように、クライアントによるインスタンスへのアクセス許可を与えるインスタンスの操作を定義するSingletonがあります。Singletonパターンは、独自の単一インスタンスの作成にも使用できます。
解決されるデザイン上の問題
Singletonデザインパターンは、次の場合に使用できます。
- クラスインスタンスは1つだけ存在することが必須であり、クライアントは既知のアクセスポイントを介してアクセスできる必要があります。
- これはサブクラス化によって拡張された単一インスタンスとして必要であり、変更せずに使用できます。
次に、Singletonパターンを適用したときに生じる可能性のある結果の例をいくつか示します。
- このパターンではクラスからその単一インスタンスへのカプセル化により、このインスタンスへのアクセスを制御できます。
- Singletonパターンを適用する場合、クラス操作を使用するよりも柔軟性が高くなります。
MQL5での使用方法
以下は、MQL5でSingletonパターンの構造をコード化する手順です。
namespaceキーワードを使用してSingletonを宣言し、その中のすべての関数をリストします。
namespace Singleton Singletonクラスを作成します。
class Singleton
  {
public:
   static Singleton* Instance(void);
   void              SingletonOperation(void);
   string            GetSingletonData(void);
protected:
                     Singleton(void);
   static Singleton* uniqueInstance;
   string            singletonData;
  };
Singleton* Singleton::uniqueInstance=NULL;
Singletonオブジェクトを作成します。
Singleton::Singleton(void)
  {
   Print("The singleton ",&this," is created");
  }
Singleton操作を実行し、そのデータを設定します。
void Singleton::SingletonOperation(void)
  {
   Print("runs the singleton operation > setting singleton data");
   singletonData="singleton data";
  }
Singletonデータを読み取り・取得します。
string Singleton::GetSingletonData(void)
  {
   Print("reads and returns the singleton data");
   return singletonData;
  }
一意のインスタンスを取得または戻します。
Singleton* Singleton::Instance(void)
  {
   Print("The singleton instance method runs");
   if(!CheckPointer(uniqueInstance))
     {
      Print("The unique instance of the singleton is an empty");
      uniqueInstance=new Singleton;
      Print("singleton assigned to unique instance");
     }
   Print("The unique instance contains singleton: ",uniqueInstance);
   Print("returns the unique instance ",uniqueInstance," of the singleton");
   return uniqueInstance;
  }
Clientクラスを作成します。
class Client
  {
public:
   string            Output(void);
   void              Run(void);
  };
string Client::Output(void) {return __FUNCTION__;}
クライアントはインスタンスを通じてSingletonにアクセスします。
void Client::Run(void)
  {
   Print("requests the singleton instance 1");
   Singleton* instance1=Singleton::Instance();
   Print("requests the singleton instance 2");
   Singleton* instance2=Singleton::Instance();
   string compareInstances=
      (instance1==instance2)?
      "instances 1 and instance 2 are the same objects":
      "instances are different objects";
   Print(compareInstances);
   Print("requests singleton operation on the instance 1");
   instance1.SingletonOperation();
   Print("requests singleton data by the singleton instance 2");
   string singletonData=instance2.GetSingletonData();
   Print(singletonData);
   delete instance1;
  }
Singleton構造の完全なコードは次のように1つのブロックになります。
namespace Singleton
{
class Singleton
  {
public:
   static Singleton* Instance(void);
   void              SingletonOperation(void);
   string            GetSingletonData(void);
protected:
                     Singleton(void);
   static Singleton* uniqueInstance;
   string            singletonData;
  };
Singleton* Singleton::uniqueInstance=NULL;
Singleton::Singleton(void)
  {
   Print("The singleton ",&this," is created");
  }
void Singleton::SingletonOperation(void)
  {
   Print("runs the singleton operation > setting singleton data");
   singletonData="singleton data";
  }
string Singleton::GetSingletonData(void)
  {
   Print("reads and returns the singleton data");
   return singletonData;
  }
Singleton* Singleton::Instance(void)
  {
   Print("The singleton instance method runs");
   if(!CheckPointer(uniqueInstance))
     {
      Print("The unique instance of the singleton is an empty");
      uniqueInstance=new Singleton;
      Print("singleton assigned to unique instance");
     }
   Print("The unique instance contains singleton: ",uniqueInstance);
   Print("returns the unique instance ",uniqueInstance," of the singleton");
   return uniqueInstance;
  }
class Client
  {
public:
   string            Output(void);
   void              Run(void);
  };
string Client::Output(void) {return __FUNCTION__;}
void Client::Run(void)
  {
   Print("requests the singleton instance 1");
   Singleton* instance1=Singleton::Instance();
   Print("requests the singleton instance 2");
   Singleton* instance2=Singleton::Instance();
   string compareInstances=
      (instance1==instance2)?
      "instances 1 and instance 2 are the same objects":
      "instances are different objects";
   Print(compareInstances);
   Print("requests singleton operation on the instance 1");
   instance1.SingletonOperation();
   Print("requests singleton data by the singleton instance 2");
   string singletonData=instance2.GetSingletonData();
   Print(singletonData);
   delete instance1;
  }
}
結論
この記事の最後では、デザインパターンのトピックに関する簡単な情報を提供し、再利用、拡張、テストできるオブジェクト、つまりクリーンなコードの作成に役立つパターンの作成を支援する生成パターンタイプについて学びました。
次の生成パターンを特定しました。
- Abstract Factory
- Builder
- Factory Method
- Prototype
- Singleton
どのようなデザインパターンがオブジェクト指向ソフトウェアを作成する際にソフトウェアでどの程度役立つのか、これらのデザインパターンがどのような構造になっていてどのようなソフトウェアまたはデザインの問題が解決できるのかを特定した後、作成デザインパターンについて学びました。
デザインパターンのトピックはソフトウェア開発において重要であり、その概念をよく理解して使用することは、ソフトウェア開発に大いに役立ち、コード内で発生する可能性のある多くの問題を解決することができます。したがって、車輪の再発明の中でこれらのデザインパターンのいずれかによって解決される可能性がある問題を克服できるように、この重要なトピックについて読んでさらに学ぶことをお勧めします。
詳細を知るために使用できるリソースは次のとおりです。
- Design Patterns - Elements of Reusable Object-Oriented Software(Eric Gamma、Richard Helm、Ralph Johnson、John Vlissides著)
- Design Patterns for Dummies(Steve Holzner著)
- Head First Design Patterns (Eric Freeman、Elisabeth Robson、Bert Bates、Kathy Sierra著)
この記事が読者の役に立ち、読者がデザインパターンのトピックについて新しいことを学べたことを願っています。また、この記事が、コードの変革をもたらす可能性のあるこの興味深いトピックについて読者がさらに学ぶきっかけとなることを願っています。また、まずオブジェクト指向プログラミング(OOP)について学ぶことも非常に重要です。そうすることで、デザインパターンのトピックをよく理解できるようになります。これについては、私の以前の「MQL5オブジェクト指向プログラミング(OOP)について」稿をご覧ください。MQL5で最も人気のあるテクニカル指標に基づいて取引システムをデザインする方法や、MQL5に関するその他のトピックについてさらにお読みになりたい場合は、私の出版物ページから詳細をご覧ください。関連する記事がたくさん見つかりますので、お役に立てるかと思います。
MetaQuotes Ltdにより英語から翻訳されました。
元の記事: https://www.mql5.com/en/articles/13622
警告: これらの資料についてのすべての権利はMetaQuotes Ltd.が保有しています。これらの資料の全部または一部の複製や再プリントは禁じられています。
この記事はサイトのユーザーによって執筆されたものであり、著者の個人的な見解を反映しています。MetaQuotes Ltdは、提示された情報の正確性や、記載されているソリューション、戦略、または推奨事項の使用によって生じたいかなる結果についても責任を負いません。

- 無料取引アプリ
- 8千を超えるシグナルをコピー
- 金融ニュースで金融マーケットを探索
翻訳者が抽象ファクトリーに関する サブセクションでちょっとしたミスをしたのかと思ったが、そうではなく、著者自身がミスをしたのだ。
Какую проблему проектирования он решает?
つまり、このテンプレートは次のような場合に使えるということだ:
このような抽象ファクトリーの使用例:
英語のソースコードでは
どのような設計上の問題を解決するのか?
つまり、次のような場合にこのパターンを使うことができる:
もう少し不機嫌になりそうだが...。
用語の正確を期すために、記事の英語ソースを見て みる。そこで著者は、各テンプレートについて「MQL5でどう使えるか」と書いて いる。ここで注意しなければならないのは、MQL5が応用特殊言語であるということだ。では、それは何なのか? 私たちは この教材から、MQL5でのテンプレートの使い方を本当に 学んで いるのだろうか?いいえ、MQL5におけるテンプレートの実装を見るだけです。テンプレートなのだから、まず擬似コードで記述し、それからMQL5で記述するべきだと思う。理想を言えば、MQL5 でデザインパターンを使用する実践的な例を見てみたいものだ。もしかしたら、私は先走りすぎていて、著者は各テンプレートを別の作品として検討するつもりなのかもしれない。しかし、今のところ、私たちが持っているものは......。
MQLを知っていて、OOPもある程度知っていて使って いるが、デザインパターンについては全く知らない者として、あなたが説明してくれたことを理解できなかったと言わざるを得ない。
私がこの記事から学び続ける方法は、あなたのコード例だけに固執し、そこからコンセプトを理解しようとすることでしょう。
私は純粋にフィードバックを共有するためにこれを書きました。
ありがとうございました。
この方法は理解できない。
なぜ、この2つのポインタが同じかどうかを比較できないのか:
if (factory != ap) factory = ap;
また、ドキュメントには
ファクトリーは単純型ではありません。