
Continuous walk-forward optimization (Part 8): Program improvements and fixes

Introduction
The program has been modified based on comments and requests from users and readers of this article series. This article contains a new version of the auto-optimizer. This version implements requested features and provides other improvements, which I found when working with the program. Optimizations are now performed many times faster than in the previous version, which is the result of the decision to work without mutexes and to avoid some other actions which slowed down the report generation process. Now, optimization can be used for a set of assets. Also, the problem with memory occupied at the optimization time has been resolved.
The previous articles within this series:
- Continuous Walk-Forward Optimization (Part 1): Working with optimization reports
- Continuous Walk-Through Optimization (Part 2): Mechanism for creating an optimization report for any robot
- Continuous Walk-Forward Optimization (Part 3): Adapting a Robot to the Auto Optimizer
- Continuous Walk-Forward Optimization (Part 4): Optimization Manager (Auto Optimizer)
- Continuous Walk-Forward Optimization (Part 5): Auto optimizer project overview and creation of a GUI
- Continuous Walk-Forward Optimization (Part 6): Auto optimizer's logical part and structure
- Continuous Walk-Forward Optimization (Part 7): Connecting Auto Optimizer's logical part with graphics and controlling graphics from the program
Adding date auto-complete
The previous program version had a phased input of dates for forward and historical optimizations, which was inconvenient. This time, I have implemented automated input of the required time ranges. The details of the functionality can be described as follows. The selected time interval should be automatically broken into forward and historic optimization. The step for both optimization types is fixed and is set before splitting into intervals. Each new forward range must start on the next day following the previous range. Shift of historical intervals (which overlap) is equal to the step of forward windows. Unlike historic optimizations, forward ones do not overlap, and they implement a continuous trading history.
To implement this task, I decided to transfer this functionality into a separate graphic window and to make it independent and not directly related to the main interface. As a result, we have the following hierarchy of objects.
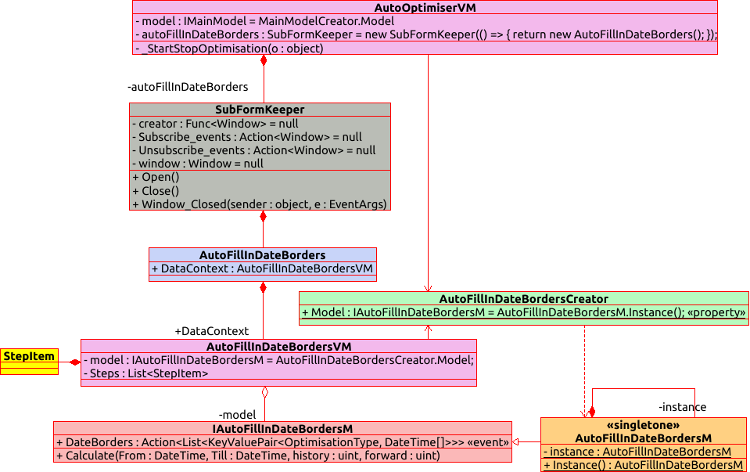
Let us consider how this functionality is connected and view its implementation examples. Let us start with the graphical interface of the created extension, i.e. everything on the chart from the AutoFillInDateBorders object, which represents the graphics window, and below. The image shows the GUI elements, XAML markup, and the fields from the ViewModel part represented by the AutoFillInDateBordersVM class.
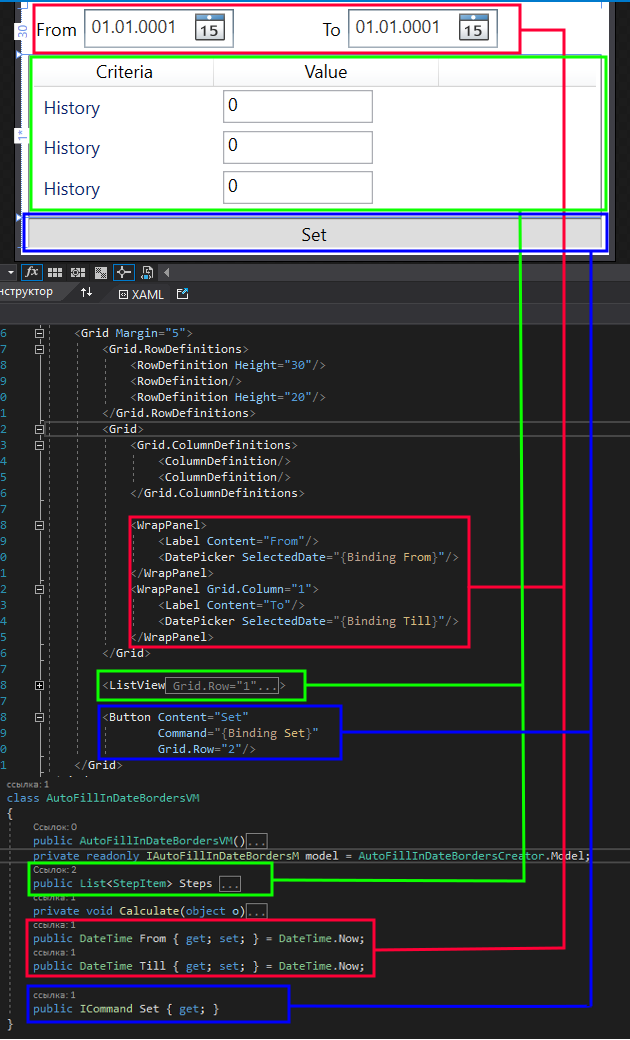
As you can see, the GUI has three main sections. These include two calendars for entering the optimization period beginning and ending dates, tables for specifying the boundaries of the forward and historical intervals, as well as the "Set" button a click on which will split the specified range to the appropriate historic and forward windows. The table in the screenshot contains three duplicate lines, however actually there are only two lines: the first one is responsible for the historical date range and the second one sets the forward range.
'Value' in the table is the step of the corresponding optimization type in days. For example, if Value of the historical interval is 360 days, and forward Value is 90, this means that the time interval specified in the calendars will be divided into historical optimization intervals of 360 days and forward intervals of 90 days. The beginning of each next historical optimization window will be shifted by the forward interval step.
class AutoFillInDateBordersM : IAutoFillInDateBordersM
{
    private AutoFillInDateBordersM() { }

    private static AutoFillInDateBordersM instance;

    public static AutoFillInDateBordersM Instance()
    {
        if (instance == null)
            instance = new AutoFillInDateBordersM();

        return instance;
    }

    public event Action<List<KeyValuePair<OptimisationType, DateTime[]>>> DateBorders;

    public void Calculate(DateTime From, DateTime Till, uint history, uint forward)
    {
        if (From >= Till)
            throw new ArgumentException("Date From must be less then date Till");

        List<KeyValuePair<OptimisationType, DateTime[]>> data = new List<KeyValuePair<OptimisationType, DateTime[]>>();

        OptimisationType type = OptimisationType.History;

        DateTime _history = From;
        DateTime _forward = From.AddDays(history + 1);

        DateTime CalcEndDate()
        {
            return type == OptimisationType.History ? _history.AddDays(history) : _forward.AddDays(forward);
        }

        while (CalcEndDate() <= Till)
        {
            DateTime from = type == OptimisationType.History ? _history : _forward;
            data.Add(new KeyValuePair<OptimisationType, DateTime[]>(type, new DateTime[2] { from, CalcEndDate() }));

            if (type == OptimisationType.History)
                _history = _history.AddDays(forward + 1);
            else
                _forward = _forward.AddDays(forward + 1);

            type = type == OptimisationType.History ? OptimisationType.Forward : OptimisationType.History;
        }

        if (data.Count == 0)
            throw new ArgumentException("Can`t create any date borders with set In sample (History) step");

        DateBorders?.Invoke(data);
    }
}
The model class for the window data is an object written using the Singletone pattern. This enables the interaction of the ViewModel part of the main window with the data model, while bypassing the graphics window of the extension. Among interesting methods, the object contains only "Calculate", which calculates the date ranges, and an event called after the completion of the above procedure. The event receives the collection of paired values as a parameter, in which the key is the type of the analyzed interval (forward or historic optimization), and the value is an array of two DateTime values. The first date indicates the start of the selected interval, and the second indicates the end.
The method calculating date ranges calculates them in one loop, alternatively changing the type of the calculated window (forward or historical). Firstly, the historical window type is set as the starting point of all calculations. The initial date values for each of the window types are also set before loop start. At each iteration of a loop, the extreme border of the selected window type is calculated using the nested function, and then this value is verified with the extreme range date. If this date is exceeded, then this is a loop exiting condition. An optimization window range is formed in a loop. Then, the next window beginning date and the window type switcher are updated.
After all operations, if no errors occurred, an event is called with the passed date range. All further actions are performed by the class. The execution of the above method is initiated by the "Set" button press callback.
The data model factory for our extension is implemented in the simplest way:
class AutoFillInDateBordersCreator
{
    public static IAutoFillInDateBordersM Model => AutoFillInDateBordersM.Instance();
}
Basically, when we call the 'Model' static property, we constantly refer to the same instance of the data model object, and then we cast it to an interface type. Let us use this fact in the ViewModel part of our main window.
public AutoOptimiserVM()
{
    ...
    AutoFillInDateBordersCreator.Model.DateBorders += Model_DateBorders;
    ....
}

~AutoOptimiserVM()
{
    ...
    AutoFillInDateBordersCreator.Model.DateBorders -= Model_DateBorders;
    ....
}
Both in the constructor and in the destructor of the main window's ViewModel object, we have the opportunity not to store a pointer to an instance of this class, but to call it through a static data model factory. Pay attention that the ViewModel part of the main window works with the considered class without knowing that it works with this class. Because references to this object are not mentioned anywhere, except in the class constructor and destructor. The callback that subscribes to the mentioned event first empties all the previously entered date ranges, and then, in a loop, adds new date ranges obtained through the event, one at a time. The method adding date ranges to the collection, is also implemented on the ViewModel side of the main graphical interface. It looks like this:
void _AddDateBorder(DateTime From, DateTime Till, OptimisationType DateBorderType)
{
    try
    {
        DateBorders border = new DateBorders(From, Till);
        if (!DateBorders.Where(x => x.BorderType == DateBorderType).Any(y => y.DateBorders == border))
        {
            DateBorders.Add(new DateBordersItem(border, _DeleteDateBorder, DateBorderType));
        }
    }
    catch (Exception e)
    {
        System.Windows.MessageBox.Show(e.Message);
    }
}
The creation of a DateBorder object is wrapped in a 'try - catch' construction. This is done because an exception may occur in the object constructor, and it must be handled somehow. I have also added the ClearDateBorders method:
ClearDateBorders = new RelayCommand((object o) =>
{
    DateBorders.Clear();
});
It enables quick deletion of all entered date ranges. In the previous version, each date needed to be deleted separately, which was inconvenient for a large number of dates. The main GUI window buttons calling the described innovations have been added in the same line with the previously existing date range controls.
![]()
A click on Autoset triggers a callback that calls the Open method on the SubFormKeeper class instance. This class was written as a wrapper that encapsulates the nested window creation process. This eliminates unnecessary properties and fields in the ViewModel of the main window, as well as prevents us from directly accessing the created auxiliary window, because it should not be interacted directly.
class SubFormKeeper
{
    public SubFormKeeper(Func<Window> createWindow, Action<Window> subscribe_events = null, Action<Window> unSubscribe_events = null);

    public void Open();
    public void Close();
}
If you look at the class signature, you can see that from the public methods it provides exactly the listed set of possibilities. Further, all auxiliary auto optimizer windows will be wrapped in this particular class.
New features and bug fixes in the library for working with optimization results
This part of the article describes changes in the library for working with optimization reports - "ReportManager.dll". In addition to the introduction of a custom coefficient, the new feature provides faster unloading of optimization reports from the terminal. It also fixes an error in data sorting.
- Introducing a custom optimization coefficient
One of the improvement suggestions in comments to previous articles was the ability to use a custom coefficient for filtering optimization results. To implement this option, I had to make some changes in existing objects. Nevertheless, to support old reports, the class that reads optimizations data can work both with reports that have a custom coefficient, and with those that were generated in previous versions of the program. Therefore, the report format remained unchanged. It has an additional parameter - a field for specifying the custom coefficient.
The "SortBy" enumeration now features the new parameter "Custom", and the appropriate field has been added to the "Coefficients" structure. This adds the coefficient to the objects responsible for storing data but does not add it to the objects that unload and read data. Data writing is performed by two methods and one class with static methods which is used from MQL5 to save reports.
public static void AppendMainCoef(double customCoef,
                                  double payoff,
                                  double profitFactor,
                                  double averageProfitFactor,
                                  double recoveryFactor,
                                  double averageRecoveryFactor,
                                  int totalTrades,
                                  double pl,
                                  double dd,
                                  double altmanZScore)
{
    ReportItem.OptimisationCoefficients.Custom = customCoef;
    ...
}
Firstly, a new parameter identifying the custom coefficient has been added to the AppendMainCoef method. Then, it is added to the ReportWriter.ReportItem structure, like other passed coefficients. Now, if you try to compile the old project with the new "ReportManager.dll" library, you will get an exception, because the AppendMainCoef method signature has changed. This error can be fixed by slightly editing the object that unloads the data - we will move on to the MQL5 code a little later.
To enable correct compilation with the current dll version, replace the "History Manager" in the Include directory with a new one attached below in this article - this will be enough to compile robots with the old and new methods.
Also, I have changed the signature of the Write method, which now does not throw exceptions but returns an error message. This was added because the program no longer uses the named mutex, which significantly slowed down the data unloading process but was required for generating reports in the old version of the unloading class. However, I have not deleted the method that writes data using a mutex, to maintain compatibility with the previously implemented data export format.
In order for a new record to appear in the report file, we need to create a new <Item/> tag with the Name attribute equal to "Custom".
WriteItem(xmlDoc, xpath, "Item", ReportItem.OptimisationCoefficients.Custom.ToString(), new Dictionary<string, string> { { "Name", "Custom" } });
Another modified method is OptimisationResultsExtentions.ReportWriter: a similar line was added here, which adds the <Item/> tag with the custom coefficient parameter.
Now, let us consider the addition of custom coefficients to the data and to the MQL robot code. First, let us consider the old version of data downloading functionality, in which code working with the ReportWriter class is located in the CXmlHistoryWriter class in the XmlHistoryWriter.mqh file. A reference to the following signature was created to support custom coefficients:
typedef double(*TCustomFilter)();
The 'private' field in the above class stores this function.
class CXmlHistoryWriter { private: const string _path_to_file,_mutex_name; CReportCreator _report_manager; TCustomFilter custom_filter; void append_bot_params(const BotParams ¶ms[]);// void append_main_coef(PL_detales &pl_detales, TotalResult &totalResult);// //double get_average_coef(CoefChartType type); void insert_day(PLDrawdown &day,ENUM_DAY_OF_WEEK day);// void append_days_pl();// public: CXmlHistoryWriter(string file_name,string mutex_name, CCCM *_comission_manager, TCustomFilter filter);// CXmlHistoryWriter(string mutex_name,CCCM *_comission_manager, TCustomFilter filter); ~CXmlHistoryWriter(void) {_report_manager.Clear();} // void Write(const BotParams ¶ms[],datetime start_test,datetime end_test);// };
The value of this 'private' field is filled from the class constructor. Further, in the append_main_coef method, when calling the "ReportWriter::AppendMainCoef" static method from the dll library, call the passed function by its pointer and thus receive the custom coefficient value.
The class is not used directly, as there is a wrapper which was described earlier, in the third article - it is the CAutoUploader class.
class CAutoUploader { private: datetime From,Till; // Testing start and end dates CCCM *comission_manager; // Commission manager BotParams params[]; // List of parameters string mutexName; // Mutex name TCustomFilter custom_filter; public: CAutoUploader(CCCM *comission_manager, string mutexName, BotParams ¶ms[], TCustomFilter filter); CAutoUploader(CCCM *comission_manager, string mutexName, BotParams ¶ms[]); virtual ~CAutoUploader(void); virtual void OnTick(); // Calculating testing start and end dates };
double EmptyCustomCoefCallback() {return 0;}

//+------------------------------------------------------------------+
//| Constructor                                                         |
//+------------------------------------------------------------------+
CAutoUploader::CAutoUploader(CCCM *_comission_manager,string _mutexName,BotParams &_params[], TCustomFilter filter) : comission_manager(_comission_manager),
   mutexName(_mutexName),
   From(0),
   Till(0),
   custom_filter(filter)
  {
   CopyBotParams(params,_params);
  }
//+------------------------------------------------------------------+
//| Constructor                                                         |
//+------------------------------------------------------------------+
CAutoUploader::CAutoUploader(CCCM *_comission_manager,string _mutexName,BotParams &_params[]) : comission_manager(_comission_manager),
   mutexName(_mutexName),
   From(0),
   Till(0),
   custom_filter(EmptyCustomCoefCallback)
  {
   CopyBotParams(params,_params);
  }
The "EmptyCustomCoefCallback" function has been created to save the old version of the constructor. This function returns zero as a custom coefficient. If the previous constructor of this class is called, pass exactly this function to the CXmlHistoryWriter class. If we take an example used in article 4, we can add a custom coefficient to the robot as follows:
//+------------------------------------------------------------------+
//|                                                     SimpleMA.mq5 |
//|                        Copyright 2019, MetaQuotes Software Corp. |
//|                                             https://www.mql5.com |
//+------------------------------------------------------------------+
#property copyright "Copyright 2019, MetaQuotes Software Corp."
#property link      "https://www.mql5.com"
#property version   "1.00"

#include <Trade/Trade.mqh>
#include <History manager/AutoLoader.mqh> // Include CAutoUploader
#define TESTER_ONLY

input int ma_fast = 10; // MA fast
input int ma_slow = 50; // MA slow
input int _sl_ = 20; // SL
input int _tp_ = 60; // TP
input double _lot_ = 1; // Lot size

// Comission and price shift (Article 2)
input double _comission_ = 0; // Comission
input int _shift_ = 0; // Shift

int ma_fast_handle,ma_slow_handle;
const double tick_size = SymbolInfoDouble(_Symbol,SYMBOL_TRADE_TICK_SIZE);
CTrade trade;
CAutoUploader * auto_optimiser;// Pointer to CAutoUploader class (Article 3)
CCCM _comission_manager_;// Comission manager (Article 2)

double CulculateMyCustomCoef()
{
   return 0;
}

//+------------------------------------------------------------------+
//| Expert initialization function                                   |
//+------------------------------------------------------------------+
int OnInit()
  {
//---

   ...

   // Add Instance CAutoUploader class (Article3)
   auto_optimiser = new CAutoUploader(&_comission_manager_,"SimpleMAMutex",params,CulculateMyCustomCoef);
//---
   return(INIT_SUCCEEDED);
  }

  double OnTester()
  {
     return(CulculateMyCustomCoef());
  }

//+------------------------------------------------------------------+
Here, I have removed the implementation except for the part associated with the introduction of the custom coefficient, in order not to provide too much code here. The full code is available in the attachment. First, it is necessary to create a function, which will calculate the custom coefficient. In the above example, the function returns zero and has no implementation, but the custom coefficient calculation must be described in it. So, calculations will not be made in OnTester callback - the described function will be called instead. During CAutoUploader class creation, we only need to call a new constructor overload and specify the custom coefficient in it. This completes the addition of a custom coefficient.
- Faster uploading of optimization pass data in the new data upload format
The decision to exclude the mutex has increased the data loading speed, but it this increase is not enough. In the previous version, we had to perform a number of operations with each new record in order to add data to a file:
- Read a file
- Save the read data into the RAM
- Add a new optimization pass to the read data into memory
- Delete the old file
- Create a new, clean file in place of the old one
- Save the entire data array to the created file
This is the standard procedure of the used XmlDocument class from the C# standard library. This procedure is time consuming. Furthermore, the amount of time for this operations increases as the file grows. We had to accept this feature in the previous version, because we could not accumulate all the data in one place. Instead, we saved the data after completion of each optimization. In the current implementation, the data is accumulated using frames, and thus we can convert all data to the required format at once. This is implemented using the previously written "OptimisationResultsExtentions.ReportWriter" method. This is an extension method for the array of optimization passes. Unlike ReportWriter.Write, this method does not add data to a file, but creates one file and writes all optimization passes to it line by line. Thus, the data array that took several minutes when written by ReportWriter.Write, can now be written in a couple of seconds.
A wrapper in the ReportWriter class has been created to enable the use of the OptimisationResultsExtentions.ReportWriter method from MQL5.
public class ReportWriter
{
    private static ReportItem ReportItem;
    private static List<OptimisationResult> ReportData = new List<OptimisationResult>();
    public static void AppendToReportData(string symbol, int tf,
                                          ulong StartDT, ulong FinishDT)
    {
        ReportItem.Symbol = symbol;
        ReportItem.TF = tf;
        ReportItem.DateBorders = new DateBorders(StartDT.UnixDTToDT(), FinishDT.UnixDTToDT());

        ReportData.Add(ReportItem);
        ClearReportItem();
    }
    public static void ClearReportItem()
    {
        ReportItem = new ReportItem();
    }
    public static void ClearReportData() { ReportData.Clear(); }
    public static string WriteReportData(string pathToBot, string currency, double balance,
                                         int laverage, string pathToFile)
    {
        try
        {
            ReportData.ReportWriter(pathToBot, currency, balance, laverage, pathToFile);
            ClearReportData();
        }
        catch (Exception e)
        {
            return e.Message;
        }
        ClearReportData();
        return "";
    }
}
In the ReportWriter class, we have created the ReportData field, which will store a collection of ReportItem elements, so this will be a collection of optimization passes. The idea is to write all the required data from MQL5 to the ReportItem structure, using the methods described in the first article. Then, by calling the AppendToReportData method, add them to the collection of optimization passes. This way the required data collection will be formed on the C# side. Once all the optimization passes have been added to the collection, call the WriteReportData method which quickly forms the optimization report using the OptimisationResultsExtentions.ReportWriter method.
- Bug fix
Unfortunately, I made an error in the previous program version, which I noticed quite late. This error is related to the optimizations sorting mechanism described in the first article. Since data sorting can be performed according to a number of criteria, it is necessary to determine which of these criteria will be maximized and which will be minimized. For example, no one would maximize the number of losing trades.
To avoid confusion, optimization sorting has a bit different direction meaning:
- Descending - from the best to the worst parameters
- Ascending - from the worst to the best parameters
In order for the data sorting method to be able to determine which criteria should be maximized and which ones should be minimized, a separate method returning appropriate variables has been created. The previous method implementation was as follows:
private static SortMethod GetSortMethod(SortBy sortBy)
{
    switch (sortBy)
    {
        case SortBy.Payoff: return SortMethod.Increasing;
        case SortBy.ProfitFactor: return SortMethod.Increasing;
        case SortBy.AverageProfitFactor: return SortMethod.Increasing;
        case SortBy.RecoveryFactor: return SortMethod.Increasing;
        case SortBy.AverageRecoveryFactor: return SortMethod.Increasing;
        case SortBy.PL: return SortMethod.Increasing;
        case SortBy.DD: return SortMethod.Decreasing;
        case SortBy.AltmanZScore: return SortMethod.Decreasing;
        case SortBy.TotalTrades: return SortMethod.Increasing;
        case SortBy.Q_90: return SortMethod.Decreasing;
        case SortBy.Q_95: return SortMethod.Decreasing;
        case SortBy.Q_99: return SortMethod.Decreasing;
        case SortBy.Mx: return SortMethod.Increasing;
        case SortBy.Std: return SortMethod.Decreasing;
        case SortBy.MaxProfit: return SortMethod.Increasing;
        case SortBy.MaxDD: return SortMethod.Decreasing;
        case SortBy.MaxProfitTotalTrades: return SortMethod.Increasing;
        case SortBy.MaxDDTotalTrades: return SortMethod.Decreasing;
        case SortBy.MaxProfitConsecutivesTrades: return SortMethod.Increasing;
        case SortBy.MaxDDConsecutivesTrades: return SortMethod.Decreasing;
        case SortBy.AverageDailyProfit_Mn: return SortMethod.Increasing;
        case SortBy.AverageDailyDD_Mn: return SortMethod.Decreasing;
        case SortBy.AverageDailyProfitTrades_Mn: return SortMethod.Increasing;
        case SortBy.AverageDailyDDTrades_Mn: return SortMethod.Decreasing;
        case SortBy.AverageDailyProfit_Tu: return SortMethod.Increasing;
        case SortBy.AverageDailyDD_Tu: return SortMethod.Decreasing;
        case SortBy.AverageDailyProfitTrades_Tu: return SortMethod.Increasing;
        case SortBy.AverageDailyDDTrades_Tu: return SortMethod.Decreasing;
        case SortBy.AverageDailyProfit_We: return SortMethod.Increasing;
        case SortBy.AverageDailyDD_We: return SortMethod.Decreasing;
        case SortBy.AverageDailyProfitTrades_We: return SortMethod.Increasing;
        case SortBy.AverageDailyDDTrades_We: return SortMethod.Decreasing;
        case SortBy.AverageDailyProfit_Th: return SortMethod.Increasing;
        case SortBy.AverageDailyDD_Th: return SortMethod.Decreasing;
        case SortBy.AverageDailyProfitTrades_Th: return SortMethod.Increasing;
        case SortBy.AverageDailyDDTrades_Th: return SortMethod.Decreasing;
        case SortBy.AverageDailyProfit_Fr: return SortMethod.Increasing;
        case SortBy.AverageDailyDD_Fr: return SortMethod.Decreasing;
        case SortBy.AverageDailyProfitTrades_Fr: return SortMethod.Increasing;
        case SortBy.AverageDailyDDTrades_Fr: return SortMethod.Decreasing;
        default: throw new ArgumentException($"Unaxpected Sortby variable {sortBy}");
    }
}
The current implementation is the following:
private static OrderBy GetSortingDirection(SortBy sortBy)
{
    switch (sortBy)
    {
        case SortBy.Custom: return OrderBy.Ascending;
        case SortBy.Payoff: return OrderBy.Ascending;
        case SortBy.ProfitFactor: return OrderBy.Ascending;
        case SortBy.AverageProfitFactor: return OrderBy.Ascending;
        case SortBy.RecoveryFactor: return OrderBy.Ascending;
        case SortBy.AverageRecoveryFactor: return Or-derBy.Ascending;
        case SortBy.PL: return OrderBy.Ascending;
        case SortBy.DD: return OrderBy.Ascending;
        case SortBy.AltmanZScore: return OrderBy.Descending;
        case SortBy.TotalTrades: return OrderBy.Ascending;
        case SortBy.Q_90: return OrderBy.Ascending;
        case SortBy.Q_95: return OrderBy.Ascending;
        case SortBy.Q_99: return OrderBy.Ascending;
        case SortBy.Mx: return OrderBy.Ascending;
        case SortBy.Std: return OrderBy.Descending;
        case SortBy.MaxProfit: return OrderBy.Ascending;
        case SortBy.MaxDD: return OrderBy.Ascending;
        case SortBy.MaxProfitTotalTrades: return OrderBy.Ascending;
        case SortBy.MaxDDTotalTrades: return OrderBy.Descending;
        case SortBy.MaxProfitConsecutivesTrades: return OrderBy.Ascending;
        case SortBy.MaxDDConsecutivesTrades: return OrderBy.Descending;
        case SortBy.AverageDailyProfit_Mn: return OrderBy.Ascending;
        case SortBy.AverageDailyDD_Mn: return OrderBy.Descending;
        case SortBy.AverageDailyProfitTrades_Mn: return OrderBy.Ascending;
        case SortBy.AverageDailyDDTrades_Mn: return OrderBy.Descending;
        case SortBy.AverageDailyProfit_Tu: return OrderBy.Ascending;
        case SortBy.AverageDailyDD_Tu: return OrderBy.Descending;
        case SortBy.AverageDailyProfitTrades_Tu: return OrderBy.Ascending;
        case SortBy.AverageDailyDDTrades_Tu: return OrderBy.Descending;
        case SortBy.AverageDailyProfit_We: return OrderBy.Ascending;
        case SortBy.AverageDailyDD_We: return OrderBy.Descending;
        case SortBy.AverageDailyProfitTrades_We: return OrderBy.Ascending;
        case SortBy.AverageDailyDDTrades_We: return OrderBy.Descending;
        case SortBy.AverageDailyProfit_Th: return OrderBy.Ascending;
        case SortBy.AverageDailyDD_Th: return OrderBy.Descending;
        case SortBy.AverageDailyProfitTrades_Th: return OrderBy.Ascending;
        case SortBy.AverageDailyDDTrades_Th: return OrderBy.Descending;
        case SortBy.AverageDailyProfit_Fr: return OrderBy.Ascending;
        case SortBy.AverageDailyDD_Fr: return OrderBy.Descending;
        case SortBy.AverageDailyProfitTrades_Fr: return OrderBy.Ascending;
        case SortBy.AverageDailyDDTrades_Fr: return OrderBy.Descending;
        default: throw new ArgumentException($"Unaxpected Sortby variable {sortBy}");
    }
}
As you can see from the code, the sorting direction for the selected coefficients has changed. In the previous implementation, they were marked as sorted in descending order. However, I did not take into account that these data have a negative value and that they should be sorted in ascending, not descending order. To understand the logic, please look at the following code which implements sorting for each of the passed values:
// If the minimum is below zero, shift all data by the negative minimum valueif (mm.Min < 0) { value += Math.Abs(mm.Min); mm.Max += Math.Abs(mm.Min); } // If the maximum is greater than zero, calculate if (mm.Max > 0) { // Calculate the coefficient according to the sorting method if (GetSortingDirection(item.Key) == OrderBy.Descending) { // Calculate the coefficient to sort in descending order data.SortBy += (1 - value / mm.Max) * coef; } else { // Calculate the coefficient to sort in ascending order data.SortBy += value / mm.Max * coef; } }
'Value" is a numeric value of a certain coefficient. Before sorting the data, check if the minimum value from the array of the coefficient selected for sorting is negative. If it is, convert these values into the positive plane by shifting them up by the value of the minimum coefficient. Thus, we will have an array of values in the range [0 ; (Max + |Min|)]. When calculating the resulting coefficient by which the final sorting will be performed, we shift the data array to the range [0; 1] by dividing each i-th value by the maximum value from the sorting data array. If the sorting method is descending, then subtract the resulting value from one, thereby inverting the array of the resulting weights. That is why the previous data sorting version is incorrect: due to the implemented multifactor sorting logic, we simply reversed the array of weights, which was not needed for the coefficients marked in the above code. The sorting method is described in more detail in the first article. For convenience, the method name and return type have been changed to more appropriate ones, but this does not affect the application logic in any way.
The second error was the part of the code that sorted the array of optimization results in the case when only one sorting criterion was selected. The previous implementation was as follows:
if (order == OrderBy.Ascending)
    return results.OrderBy(x => x.GetResult(sortingFlags.ElementAt(0)));
else
    return results.OrderByDescending(x => x.GetResult(sortingFlags.ElementAt(0)));
The current one looks like this:
if (order == GetSortingDirection(sortingFlags.ElementAt(0)))
    return results.OrderBy(x => x.GetResult(sortingFlags.ElementAt(0)));
else
    return results.OrderByDescending(x => x.GetResult(sortingFlags.ElementAt(0)));
The previous version did not take into account the directions specified by the GetSortingDirection method. The new one sorts according to this criterion. For example, if we select descending sorting (best results on top), then for SortBy.PL, the requested descending sorting will be performed, and the highest value will be at the top. However, for the SortBy.MaxDDTotalTrades parameter (total number of unprofitable deals) the smallest value will be on top, and the array will be sorted in ascending order. This preserves the logical structure. For example, if we select SortBy.MaxDDTotalTrades as a criterion, we would have received the worst passes according to the previous sorting logic.
Automated loading of robot parameters and new Expert Advisors writing rules
The new parameter loading logic is provided in the "AutoUploader2.mqh" file. The mechanism description will be followed by an example based on the Expert Advisor presented in the fourth article.
class CAutoUploader2 { private: CAutoUploader2() {} static CCCM comission_manager; static datetime From,Till; static TCustomFilter on_tester; static TCallback on_tick, on_tester_deinit; static TOnTesterInit on_tester_init; static string frame_name; static long frame_id; static string file_name; static bool FillInData(Data &data); static void UploadData(const Data &data, double custom_coef, const BotParams ¶ms[]); public: static void OnTick(); static double OnTester(); static int OnTesterInit(); static void OnTesterDeinit(); static void SetUploadingFileName(string name); static void SetCallback(TCallback callback, ENUM_CALLBACK_TYPE type); static void SetCustomCoefCallback(TCustomFilter custom_filter_callback); static void SetOnTesterInit(TOnTesterInit on_tester_init_callback); static void AddComission(string symbol,double comission,double shift); static double GetComission(string symbol,double price,double volume); static void RemoveComission(string symbol); }; datetime CAutoUploader2::From = 0; datetime CAutoUploader2::Till = 0; TCustomFilter CAutoUploader2:: EmptyCustomCoefCallback; TCallback CAutoUploader2:: EmptyCallback; TOnTesterInit CAutoUploader2:: EmptyOnTesterInit; TCallback CAutoUploader2:: EmptyCallback; CCCM CAutoUploader2::comission_manager; string CAutoUploader2::frame_name = "AutoOptomiserFrame"; long CAutoUploader2::frame_id = 1; string CAutoUploader2::file_name = MQLInfoString(MQL_PROGRAM_NAME)+"_Report.xml";
The new class has only static methods. This avoids the need to instantiate it, which simplifies the EA development process by removing unnecessary code. This class has a number of static fields, including date ranges similar to the previously used class, for details please read the third article), function references for testing completion callbacks, optimization frames and new tick arrival callback, a commission manager class (for details please see article #2), frame name and id, and the name of the file for downloading optimization results.
To connect the auto optimizer, add to the EA a link to the file in which some of the callbacks are already defined. If the EA uses any of the callbacks defined in this file, the easiest solution will be to create a function with the signature of the used callback and its implementation, and then to add it to function references for callbacks using special static functions.
#ifndef CUSTOM_ON_TESTER
double OnTester() { return CAutoUploader2::OnTester(); }
#endif

#ifndef CUSTOM_ON_TESTER_INIT
int OnTesterInit() { return CAutoUploader2::OnTesterInit(); }
#endif

#ifndef CUSTOM_ON_TESTER_DEINIT
void OnTesterDeinit() { CAutoUploader2::OnTesterDeinit(); }
#endif

#ifndef CUSTOM_ON_TICK
void OnTick() { CAutoUploader2::OnTick(); }
#endif
Each of the specific callbacks is wrapped in a preprocessor condition, which allows avoiding its definition in this file by defining the appropriate preprocessor condition. Implementation details will be provided in an example further.
If you decide to describe these callbacks on your own, do not forget to call the static methods of the CAutoUploader2 class (as done in this code snippet) at the beginning of the defined callback. This is required for a correct operation of the report generation mechanism.
To enable a custom callback to data downloading (if you have not implemented your own callback), pass a pointer of the function containing implementation description into the CAutoUploader2::SetCustomCoefCallback static method. To manage commissions, use one of the following methods.
static void       AddComission(string symbol,double comission,double shift);
static double     GetComission(string symbol,double price,double volume);
static void       RemoveComission(string symbol);
This is all about the functionality. Now, let us see how it works.
int CAutoUploader2::OnTesterInit(void) { return on_tester_init(); }
The Expert Advisor calls in the OnTesterInit callback the CAutoUploader2::OnTesterInit method (if optimization has been started), where it calls the passed function pointer or an empty function if it was substituted by default.
void CAutoUploader2::OnTick(void)
  {
   if(MQLInfoInteger(MQL_OPTIMIZATION)==1 ||
      MQLInfoInteger(MQL_TESTER)==1)
     {
      if(From == 0)
         From = iTime(_Symbol,PERIOD_M1,0);
      Till=iTime(_Symbol,PERIOD_M1,0);
     }

   on_tick();
  }
Then, at every tick, the real time of the optimization start is saved to the corresponding variables. Then, the EA calls the on_tick method that has been sent as a new tick arrival callback, or a default empty callback. Optimization time is saved only if the EA is running in the tester.
double CAutoUploader2::OnTester(void)
  {
   double ret = on_tester();

   Data data[1];
   if(!FillInData(data[0]))
      return ret;

   if(MQLInfoInteger(MQL_OPTIMIZATION)==1)
     {
      if(!FrameAdd(frame_name, frame_id, ret, data))
         Print(GetLastError());
     }
   else
      if(MQLInfoInteger(MQL_TESTER)==1)
        {
         BotParams params[];
         UploadData(data[0], ret, params, false);
        }
   return ret;
  }
When the tester operation completes, the CAutoUploader2::OnTester static method is called in the OnTester callback, where the frames are saved (if it is an optimization), or the frames are written to a file (if it is a test). If it is a test, then the process ends at the current step and the terminal is closed via the command passed in the configuration file. However, if it is an optimization process, the following final stage is preformed:
input bool close_terminal_after_finishing_optimisation = false; // MetaTrader Auto Optimiser param (must be false if you run it  from terminal)

void CAutoUploader2::OnTesterDeinit(void)
  {
   ResetLastError();
   if(FrameFilter(frame_name,frame_id))
     {
      ulong pass;
      string name;
      long id;
      double coef_value;
      Data data[];

      while(FrameNext(pass,name,id,coef_value,data))
        {
         string parameters_list[];
         uint params_count;
         BotParams params[];
         if(FrameInputs(pass,parameters_list,params_count))
           {
            for(uint i=0; i<params_count; i++)
              {
               string arr[];
               StringSplit(parameters_list[i],'=',arr);
               BotParams item;
               item.name = arr[0];
               item.value = arr[1];
               ADD_TO_ARR(params,item);
              }
           }
         else
            Print("Can`t get params");

         UploadData(data[0], coef_value, params, true);
        }

      CheckRetMessage(ReportWriter::WriteReportData(get_path_to_expert(),
                      CharArrayToString(data[0].currency),
                      data[0].balance,
                      data[0].laverage,
                      TerminalInfoString(TERMINAL_COMMONDATA_PATH)+"\\"+file_name));
     }
   else
     {
      Print("Can`t select apropriate frames. Error code = " + IntegerToString(GetLastError()));
      ResetLastError();
     }
   on_tester_deinit();

   if(close_terminal_after_finishing_optimisation)
     {
      if(!TerminalClose(0))
        {
         Print("===================================");
         Print("Can`t close terminal from OnTesterDeinit error number: " +
               IntegerToString(GetLastError()) +
               " Close it by hands");
         Print("===================================");
        }
     }
   ExpertRemove();
  }
The final optimization step is the call of the CAutoUploader2::OnTesterDeinit() static method. All saved frames are read in this method and the final file with the optimization report is formed. First, reset the previous error and filter the frames by names and ids. Then, read each frame in a loop and obtain its saved data which then will be written to a file.
After reading the data, read the EA's input parameters for this optimization pass and add the received information into the collection of the static class on the C# side. After exiting the loop, write the formed collection to a file using the ReportWriter::WriteReportData method call. Then, the passed custom callback or a default empty reference is called. This approach has one problem: for the auto-optimizer to operate, it must be able to restart the terminal, for which the terminal should first be shut down.
Previously, the flag of the configuration file was set to true in order to solve this problem. However, this cannot be done when working with frames, since their final processing starts after the optimization is stopped and if the required flag of the configuration file is set to true, then we will not be able to process them, because the terminal will be shut down before the OnTerderDeinit method completes. To solve the problem, I have added an input variable that will be added to the Expert Advisor together with the include file. This variable is modified from the auto-optimizer and should not be modified manually or in code. If it is set to true, then the terminal closing method is called from MQL5, otherwise the terminal does not close. After all the described situations, the EA that processes frames, is removed from the chart.
The UploadData method acts both as a method adding data to the collection and as a method downloading a certain tester pass to a file if it was a test, not an optimization.
void CAutoUploader2::UploadData(const Data &data, double custom_coef, const BotParams ¶ms[], bool is_appent_to_collection) { int total = ArraySize(params); for(int i=0; i<total; i++) ReportWriter::AppendBotParam(params[i].name,params[i].value); ReportWriter::AppendMainCoef(custom_coef,data.payoff,data.profitFactor,data.averageProfitFactor, data.recoveryFactor,data.averageRecoveryFactor,data.totalTrades, data.pl,data.dd,data.altmanZScore); ReportWriter::AppendVaR(data.var_90,data.var_95,data.var_99,data.mx,data.std); ReportWriter::AppendMaxPLDD(data.max_profit,data.max_dd, data.totalProfitTrades,data.totalLooseTrades, data.consecutiveWins,data.consequtiveLoose); ReportWriter::AppendDay(MONDAY,data.averagePl_mn,data.averageDd_mn, data.numberProfitTrades_mn,data.numberLooseTrades_mn); ReportWriter::AppendDay(TUESDAY,data.averagePl_tu,data.averageDd_tu, data.numberProfitTrades_tu,data.numberLooseTrades_tu); ReportWriter::AppendDay(WEDNESDAY,data.averagePl_we,data.averageDd_we, data.numberProfitTrades_we,data.numberLooseTrades_we); ReportWriter::AppendDay(THURSDAY,data.averagePl_th,data.averageDd_th, data.numberProfitTrades_th,data.numberLooseTrades_th); ReportWriter::AppendDay(FRIDAY,data.averagePl_fr,data.averageDd_fr, data.numberProfitTrades_fr,data.numberLooseTrades_fr); if(is_appent_to_collection) { ReportWriter::AppendToReportData(_Symbol, data.tf, data.startDT, data.finishDT); return; } CheckRetMessage(ReportWriter::Write(get_path_to_expert(), CharArrayToString(data.currency), data.balance, data.laverage, TerminalInfoString(TERMINAL_COMMONDATA_PATH)+"\\"+file_name, _Symbol, data.tf, data.startDT, data.finishDT)); }
If the is_appent_to_collection flag is true, the pass is simply added to the collection. If it is false, then upload the current pass to a file. It can be seen from the above code that the flag is only equal to true when we read frames and add them to a collection for quick report downloading. If we run the Expert Advisor in testing mode, then this method will be called with the 'false' parameter, which means that the report should be saved to a file.
Now, let us see how to add a link to downloading optimization reports using the new logic. Consider the previously created file with a test Expert Advisor from the fourth article. Connection of the new method (apart from the reference to the include file) takes only 3 code lines, instead of 16 line from the example used in article 4. As for the callbacks used for data downloading, now the EA has the implementation of the "OnTick" callback while all other callbacks ("OnTester", "OnTesterInit", "OnTesterDeinit") are implemented in the include file.
//+------------------------------------------------------------------+
//|                                                     SimpleMA.mq5 |
//|                        Copyright 2019, MetaQuotes Software Corp. |
//|                                             https://www.mql5.com |
//+------------------------------------------------------------------+
#property copyright "Copyright 2019, MetaQuotes Software Corp."
#property link      "https://www.mql5.com"
#property version   "1.00"

#include <Trade/Trade.mqh>

#define CUSTOM_ON_TICK // Tell to uploading system that we implement OnTick callback ourself
#include <History manager/AutoUpLoader2.mqh> // Include CAutoUploader
#define TESTER_ONLY

input int ma_fast = 10; // MA fast
input int ma_slow = 50; // MA slow
input int _sl_ = 20; // SL
input int _tp_ = 60; // TP
input double _lot_ = 1; // Lot size

// Comission and price shift (Article 2)
input double _comission_ = 0; // Comission
input int _shift_ = 0; // Shift

int ma_fast_handle,ma_slow_handle;
const double tick_size = SymbolInfoDouble(_Symbol,SYMBOL_TRADE_TICK_SIZE);
CTrade trade;
//+------------------------------------------------------------------+
//| Custom coeffifient`s creator                                     |
//+------------------------------------------------------------------+
double CulculateMyCustomCoef()
  {
   return 0;
  }

//+------------------------------------------------------------------+
//| Expert initialization function                                   |
//+------------------------------------------------------------------+
int OnInit()
  {
//---

   ...

   CAutoUploader2::SetCustomCoefCallback(CulculateMyCustomCoef);
   CAutoUploader2::AddComission(_Symbol,_comission_,_shift_);
//---
   return(INIT_SUCCEEDED);
  }
//+------------------------------------------------------------------+
//| Expert tick function                                             |
//+------------------------------------------------------------------+
void OnTick()
  {
   CAutoUploader2::OnTick(); // If CUSTOM_ON_TICK was defined


...

  }
//+------------------------------------------------------------------+
Red shows the addition of data downloading interface using the new method. As you can see from the example, the OnTester callback is still implemented in the data downloading file. To enable the calculation of the custom coefficient, we passed to it the CulculateMyCustomCoef method, which should contain the custom logic for the implementation of this callback. The OnTick callback implementation remains in the robot. For this, the CUSTOM_ON_TICK variable is defined before a reference to the file in which the data downloading procedure is described. You can use the attached file to study the EA implementation in more detail, as well as to compare it with the default implementation and with an implementation of the previous data downloading method.
Changes in the optimization launch method and other improvements
The new version has a number of other improvements. One of them is the ability to schedule optimizations on multiple assets.
- Optimization schedule for the passed asset list
This improvement allows saving time by performing optimizations on a number of assets. The scheduled tasks will run day and night until the specified list ends. To enable this feature, I had to change the optimization launch process described in previous articles. Previously, after pressing the "Start / Stop" button, the ViewModel instantly redirected the task to the data model method, which called a full cycle, from starting the optimization to saving the results. Now, we first call the method, which loops through the passed list of parameters, and then it starts the optimizations and saves them to the appropriate directory.
public async void StartOptimisation(OptimiserInputData optimiserInputData, bool isAppend, string dirPrefix, List<string> assets)
{

    if (assets.Count == 0)
    {
        ThrowException("Fill in asset name");
        OnPropertyChanged("ResumeEnablingTogle");
        return;
    }

    await Task.Run(() =>
    {
        try
        {
            if (optimiserInputData.OptimisationMode == ENUM_OptimisationMode.Disabled &&
               assets.Count > 1)
            {
                throw new Exception("For test there must be selected only one asset");
            }
            StopOptimisationTougle = false;

            bool doWhile()
            {
                if (assets.Count == 0 || StopOptimisationTougle)
                    return false;

                optimiserInputData.Symb = assets.First();
                LoadingOptimisationTougle = assets.Count == 1;

                assets.Remove(assets.First());

                return true;
            }

            while (doWhile())
            {
                var data = optimiserInputData; // Copy input data
                StartOptimisation(data, isAppend, dirPrefix);
            }
        }
        catch (Exception e)
        {
            LoadingOptimisationTougle = true;
            OnPropertyChanged("ResumeEnablingTogle");м
            ThrowException?.Invoke(e.Message);
        }
    });
}
After passing the list of assets and checking its completeness, move on to the asynchronous part of this method. In a loop, call the previously considered optimizations launch method, which is now synchronous and thus it waits for the optimization process to complete. Since the passed structure for the optimization parameters may change in the optimizer class, copy it before starting each new optimization and feed the initial data to each new optimization.
The condition of continuation, as well as of the substitution of the asset on which the optimization will be performed, is executed by the nested doWhile() function. In the function body, check the loop exiting condition, assign the value of the next asset, and then delete the last assigned asset from the list. Thus, at each new loop iteration, we first indicate the asset on which the optimization will be performed, and then we run the optimization, and so on until the list is empty, or until an optimization completion signal is sent. In previous implementations, the optimization process could be terminated urgently by simply finishing the running process. However, in the current implementation, the process would switch to the next iteration instead of stopping. That is why appropriate adjustments were made to the optimization termination method.
/// <summary>
/// Complete optimization from outside the optimizer
/// </summary>
public void StopOptimisation()
{
    StopOptimisationTougle = true;
    LoadingOptimisationTougle = true;

    Optimiser.Stop();

    var processes = System.Diagnostics.Process.GetProcesses().Where(x => x.ProcessName == "metatester64");
    foreach (var item in processes)
        item.Kill();
}

bool StopOptimisationTougle = false;
Now, when stopping optimization, we simply switch this flag to true. The asset loop sees the flag and exits running iterations. Further, after redirecting the optimization stop process to the optimizer class, we must terminate the running tester processes, because when the terminal is closed urgently, these processes often freeze and remain in a running state until the computer is restarted.
For this purpose, the additional flag LoadingOptimisationTougle is used. This flag indicates whether the currently performed optimization should be loaded into the graphical interface, as it was implemented earlier. To speed up the process, this flag is always "false" until the process is forcedly stopped, or until the last item from the passed list of assets is reached. And only after that, when we exit the optimization process, the data will be loaded into the graphical interface.
- Saving a configuration file with optimization launch parameters and clearing the memory of loaded optimizations
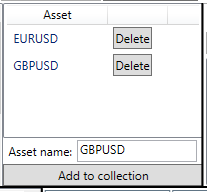
The ability to append new passes to previous ones during repeated optimization instead of performing it anew has been available since the very first version of the program. However, to ensure a smooth picture, new optimizations should be launched with the same parameters. For this purpose, I have introduced the option saving the parameters of previously performed optimizations in the same directory where the optimization results are stored. A separate button has been added to GUI, allowing to upload these settings for a new configuration.
![]()
The following method of the AutoOptimiserVM class triggers after a click on the button:
private void SetBotParams()
{
    if (string.IsNullOrEmpty(SelectedOptimisation))
        return;

    try
    {
        Status = "Filling bot params";
        OnPropertyChanged("Status");
        Progress = 100;
        OnPropertyChanged("Progress");

        var botParams = model.GetBotParamsFromOptimisationPass(OptimiserSettings.First(x => x.Name == "Available experts").SelectedParam,
                                                                       SelectedOptimisation);
        for (int i = 0; i < BotParams.Count; i++)
        {
            if (!botParams.Any(x => x.Variable == BotParams[i].Vriable))
                continue;

            BotParams[i] = new BotParamsData(botParams.First(x => x.Variable == BotParams[i].Vriable));
        }
    }
    catch (Exception e)
    {
        MessageBox.Show(e.Message);
    }

    Status = null;
    OnPropertyChanged("Status");
    Progress = 0;
    OnPropertyChanged("Progress")
}
First, we request the list of EA parameters from the data model. Then, loop through all parameters loaded to the GUI and check if the parameter is available in the list of received parameters. If the parameter was found, it is replaced with a new value. The data model method returning correct parameters of the settings file reads it from a directory selected in ComboBox where the file is stored under the name of "OptimisationSettings.set". This file is generated by the method that starts the optimization, upon completion of this process.
- Removing previously loaded optimization passes from memory
An option has also been added to clear optimization passes after loading them. They take up too much RAM space. If the computer has low RAM, multiple forward and historical tests can slow down it noticeably. To minimize the resource usage, the duplication of data on forward and historical optimization passes has been removed. Now they are stored only in the data model. A special button "Clear loaded results" has been added to GUI, which refers to the ClearResults method from the data model.
void ClearOptimisationFields()
{
    if (HistoryOptimisations.Count > 0)
        dispatcher.Invoke(() => HistoryOptimisations.Clear());
    if (ForwardOptimisations.Count > 0)
        dispatcher.Invoke(() => ForwardOptimisations.Clear());
    if (AllOptimisationResults.AllOptimisationResults.Count > 0)
    {
        AllOptimisationResults.AllOptimisationResults.Clear();
        AllOptimisationResults = new ReportData
        {
            AllOptimisationResults = new Dictionary<DateBorders, List<OptimisationResult>>()
        };
    }

    GC.Collect();
}
public void ClearResults()
{
    ClearOptimisationFields();
    OnPropertyChanged("AllOptimisationResults");
    OnPropertyChanged("ClearResults");
}
The mentioned method refers to the ClearOptimisationFields private method which empties collections of optimization reports in the AutoOptimiserM class. However, since we use C#, in which memory is managed not manually, but automatically, it is also necessary to clear memory from all deleted objects in order to apply array clearing and deletion of data from the memory. This can be done by calling the static Collect method of the Garbage Collector (GC) class. After the performed actions, the previously existing objects are erased from the RAM.
- Generation of a *.set file of the desired pass.
After viewing the generated optimization passes, we need to generate a *set file to input the desired parameters into an Expert Advisor. Previously, we had to enter the found parameters manually or to form a file from the tester, by double-clicking on the selected optimization line to launch a test.

The table above the button contains a key-value list storing optimization parameters. By clicking on the button, call a method from the data model, to which the list from the table above is passed.
public void SaveBotParams(IEnumerable<KeyValuePair<string, string>> data, string path)
{
    SetFileManager setFileManager = new SetFileManager(path, true)
    {
        Params = data.Select(x => new ParamsItem { Variable = x.Key, Value = x.Value }).ToList()
    };

    setFileManager.SaveParams();
}
This method receives the path to the created file, converts the key-value array into a structure with EA parameters and saves them at the specified path. The path to the file is set through the standard file saving interface from ViewModel.
Conclusion
The article came out much later than I planned, but I hope that it will be interesting and useful for everyone who followed this project. I will continue to develop it and to implement further improvement ideas. One of them is to add automatic filtering of optimizations, to implement search for the best parameters based on the retrospective results of walk-forward optimizations, as well as to enable the collection of a portfolio of performed optimizations. Dear readers, if this project is interesting to you, I will continue its developments. The project in its current state is ready for use, allowing to load the processor by 100% and to optimize using multiple assets at once, using both walk-forward and regular historical optimizations.
The attachment includes the full auto-optimizer project with a test Expert Advisor considered in article 4. If you want to use the EA, compile the auto-optimizer project and the test robot. Then copy ReportManager.dll (described in the first article) to the MQL5/Libraries directory, and you can begin to test the EA. Please refer to articles 3 and 4 within this series for details on how to connect the auto-optimizer to your Expert Advisors.<
Here is the description of the compilation process for all those who have not worked with Visual Studio. The project can be compiled in VisualStudio in different ways, here are three of them:
- The easiest is to press CTRL+SHIFT+B.
- A more visual method is to click on the green array in the editor — this will launch the application in the code debug mode and will perform the compilation (if the Debug compilation mode is selected).
- Another option is to use the Build command from the menu.
The compiled program will then depend in the folder MetaTrader Auto Optimiser/bin/Debug (or MetaTrader Auto Optimiser/bin/Release — depending on the selected compilation method).
Translated from Russian by MetaQuotes Ltd.
Original article: https://www.mql5.com/ru/articles/7891
 Neural networks made easy (Part 3): Convolutional networks
 Basic math behind Forex trading
 Parallel Particle Swarm Optimization
 Advanced resampling and selection of CatBoost models by brute-force method
- Free trading apps
- Over 8,000 signals for copying
- Economic news for exploring financial markets
You agree to website policy and terms of use
Hello,
Amazing project. Thank you so much for this.
I have a problem with compiling the DealHistoryGetter.mqh and the error message is: 'calcContracts' - member function not defined line 488.
Thank you very much again.