
Continuous Walk-Forward Optimization (Part 5): Auto Optimizer project overview and creation of a GUI

Introduction
In the previous articles, we considered the project part directly related to the terminal as well as the part describing the general application of the project. The previous article was ahead of the rest of the series. This was done for two reasons. Firstly, it serves as an instruction for using the application. Secondly, it illustrates the app creation idea and logic, knowing which helps in understanding the code.
The articles are available at the following links:
- Continuous Walk-Forward Optimization (Part 1): Working with optimization reports
- Continuous Walk-Forward Optimization (Part 2): Mechanism for creating an optimization report for any robot
- Continuous Walk-Forward Optimization (Part 3): Adapting a Robot to the Auto Optimizer
- Continuous Walk-Forward Optimization (Part 4): Optimization Manager (Auto Optimizer)
Earlier articles, materials from which are also used in the application:
- Optimization management (Part I): Creating a GUI
- Optimization management (Part II): Creating key objects and add-on logic
The current article provides a description of the project structure in the Visual Studio IDE and its components. This part is devoted to the creation of the app's GUI. It also considers the structure of the managed directory in which the optimizations are stored, and changes in the optimization process managing classes taken from the previous project.
Project structure overview
Since this part of the article is also devoted to C#, let's start with the consideration of its file structure:

Solution attached below contains two projects. One of them was considered in the first article, the second one was analyzed in later articles. This project is the Auto Optimizer.

Since the project has a GUI, this time the MVVM (ModelViewViewModel) approach is used again. The project template is divided into appropriate sections. Since the project logic should be implemented in the model part, the classes which are not related to the graphical part of the project are located in the Model subdirectory and are further divided into directories.
- Classes responsible for orientation on the managed directory and terminal directories are located in the Model/DirectoryManagers folder.
- File managing classes are located under Model/FileReaders.
- Object with the optimization logic and the appropriate instantiating class are located under Model/OptimisationManagers
- The objects managing the terminal and its configuration files are under Model/Terminal
Let's begin with the objects from the previous article series that have been modified. This description will also be useful for all those who are not familiar with the previous part.
Creating the graphical part of the application
Let's move on to the graphical interface. Earlier, we considered a method for creating an add-on for the MetaTrader 5 in the C# language and ways of combining its functions with an Expert Advisor by using a DLL and the OnTimer callback. In the current implementation, the auto optimizer will be implemented outside the terminal. Now it runs as an external optimizations manager and imitates the work of a trader who launches optimizations and processes the results. Furthermore, by avoiding simultaneous optimizations in several terminals running on the same computer and by implementing the auto optimizer as a separate application, we can access absolutely all terminals that are installed on the computer, including the computer on which the optimizer is running. This computer could not be used in the previous project.
That is why the current project is not implemented entirely as a DLL, but it is now divided into a DLL and an executable file of the auto optimizer project.
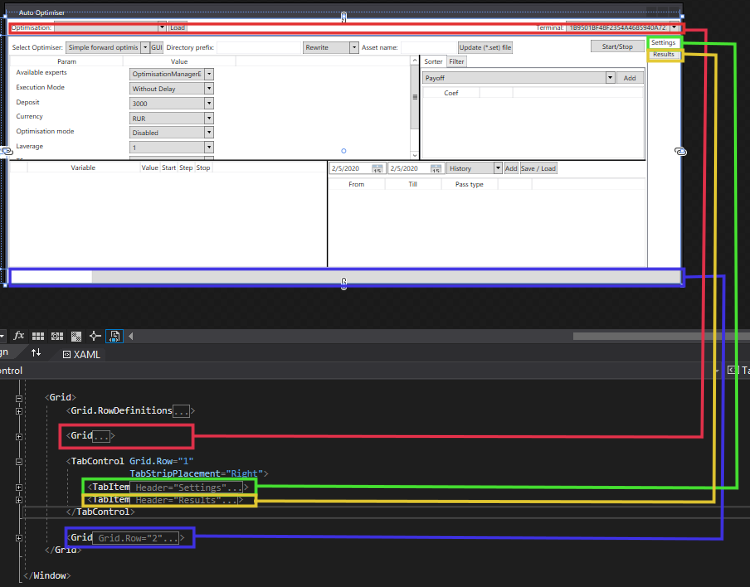
As can be seen from the above screenshot, the project window consists of a Header, a Footer, and a TabControl with two tabs: Settings and Reports. The header part and the footer of the window are not changed, no matter which tab is selected in the central part, providing easy access to all control elements located in these parts.
The header part of the window is created by the following XAML markup:
<Grid>
        <Grid.ColumnDefinitions>
                <ColumnDefinition/>
                <ColumnDefinition/>
        </Grid.ColumnDefinitions>
        <WrapPanel Margin="2">
            <Label Content="Optimisation:"/>
            <ComboBox Width="200"
                      ItemsSource="{Binding SelectedOptimisationNames,UpdateSourceTrigger=PropertyChanged}"
                      SelectedItem="{Binding SelectedOptimisation}"
                      SelectedIndex="0"
                      IsEnabled="{Binding EnableMainTogles, UpdateSourceTrigger=PropertyChanged}"/>
            <Button Content="Load"
                    Margin="2,0,0,0"
                    Width="34"
                    Command="{Binding LoadResults}"
                    IsEnabled="{Binding EnableMainTogles, UpdateSourceTrigger=PropertyChanged}"/>
        </WrapPanel>

        <WrapPanel HorizontalAlignment="Right"
                   Margin="2"
                   Grid.Column="1">
            <Label Content="Terminal:"/>
            <ComboBox Width="200"
                      SelectedIndex="{Binding SelectedTerminalIndex}"
                      ItemsSource="{Binding Terminals,UpdateSourceTrigger=LostFocus}"
                      IsEnabled="{Binding EnableMainTogles, UpdateSourceTrigger=PropertyChanged}"/>
        </WrapPanel>
</Grid>
The Grid container which contains all control elements available in the considered area, is divided into 2 columns. The following elements are added to the first column: parameter name (Optimisation), combo box with a list of available optimizations, as well as the optimizations load button. The second column contains the parameter name and a drop-down list with the IDs of available terminals.
The Grid container representing the graphical window footer (with ProgressBar) has a similar structure:
<Grid Grid.Row="2">
        <Grid.ColumnDefinitions>
                <ColumnDefinition Width="150"/>
                <ColumnDefinition/>
        </Grid.ColumnDefinitions>

        <Label Content="{Binding Status, UpdateSourceTrigger=PropertyChanged}"/>
        <ProgressBar Grid.Column="1"
                     Value="{Binding Progress, UpdateSourceTrigger=PropertyChanged}"
                     Minimum="0"
                     Maximum="100"/>
</Grid>
It divides its area into 2 parts, limiting the size of the first part. As a result, the largest container part is used by ProgressBar. Furthermore, the ProgressBar width will adapt in case the width of the whole window changes. All the three components are placed in the <Window/> container, according to XAML markup rules.
<Window x:Class="Metatrader_Auto_Optimiser.AutoOptimiser"
        xmlns="http://schemas.microsoft.com/winfx/2006/xaml/presentation"
        xmlns:x="http://schemas.microsoft.com/winfx/2006/xaml"
        xmlns:d="http://schemas.microsoft.com/expression/blend/2008"
        xmlns:mc="http://schemas.openxmlformats.org/markup-compatibility/2006"
        xmlns:vm="clr-namespace:Metatrader_Auto_Optimiser.View_Model"
        xmlns:v="clr-namespace:Metatrader_Auto_Optimiser.View"
        mc:Ignorable="d"
        Title="Auto Optimiser" Height="500" Width="1200"
        MinHeight="500" MinWidth="1200">

    <Window.DataContext>
        <vm:AutoOptimiserVM/>
    </Window.DataContext>


    ...


</Window>
This container defines namespace references:
- Metatrader_Auto_Optimiser.View_Model, which stores callbacks that describe the reaction of the program to user actions (ViewModel).
- Metatrader_Auto_Optimiser.View, which stores the class that converts the double-click event of the ListView object to a command. This is needed to enable the combined use of the event with the ICommand interface from ViewModel.
Also, the following window sizes are set: the minimum size and the initial size with which the window will be opened at program launch. Then, DataContext is installed for the graphical interface, using the above mentioned alias for the namespace containing ViewModel.
The central part of the panel consists of a TabControl element containing 2 tabs. It serves as the main part, as the "Body" of our graphical element. The structure of the "Settings" tab is as follows:
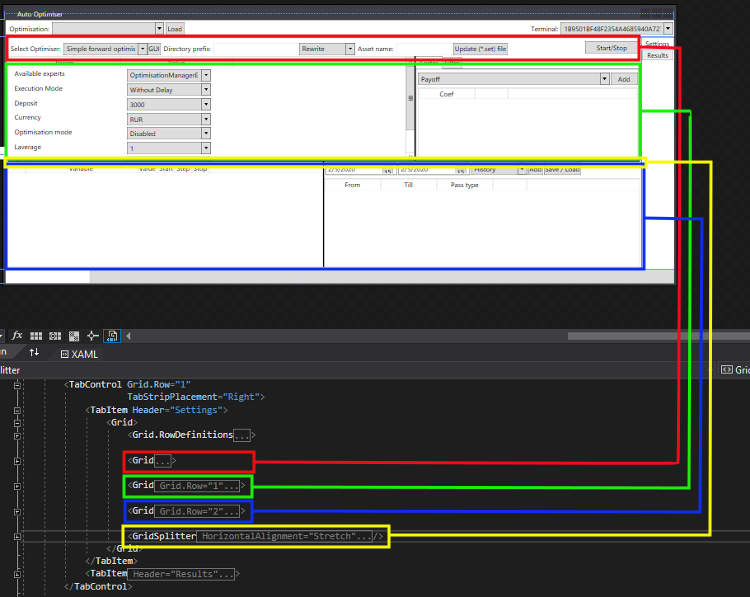
This tab is also divided into three parts. The upper part of the tab features a panel allowing to set up parameters of the auto optimizer report to be saved. It also includes selection of the asset name and a button for updating the *set file. The middle part of the "Settings" tab contains the optimizer settings and options for selecting filtering and sorting parameters during the auto optimizer process. The last part allows setting Expert Advisor parameters and selecting optimization and forward dates. For greater convenience, the GridSplitter element is located between the first two parts. By dragging it, you can resize these tabs. This is especially convenient when you need to fill optimization parameters for a robot having a lengthy list of inputs.
Let us view in detain the markup code of the first part of the "Settings" tab:
<Grid>
        <Grid.ColumnDefinitions>
                <ColumnDefinition/>
                <ColumnDefinition Width="100"/>
        </Grid.ColumnDefinitions>

        <WrapPanel HorizontalAlignment="Left"
                VerticalAlignment="Bottom">
        <Label Content="Select Optimiser:"/>
        <ComboBox Width="150"
                IsEnabled="{Binding EnableMainTogles, UpdateSourceTrigger=PropertyChanged}"
                ItemsSource="{Binding Optimisers}"
                SelectedIndex="{Binding SelectedOptimiserIndex}"/>
        <Button Content="GUI"
                Command="{Binding ShowOptimiserGUI}"
                IsEnabled="{Binding EnableMainTogles, UpdateSourceTrigger=PropertyChanged}"/>
        <Label Content="Directory prefix:"/>
        <TextBox Width="150"
                IsEnabled="{Binding EnableMainTogles, UpdateSourceTrigger=PropertyChanged}"
                Text="{Binding DirPrefix}"/>
        <ComboBox Width="100"
                Margin="2,0,0,0"
                SelectedIndex="0"
                ItemsSource="{Binding FileFillingType}"
                IsEnabled="{Binding EnableMainTogles, UpdateSourceTrigger=PropertyChanged}"
                SelectedItem="{Binding FileWritingMode}"/>
        <Label Content="Asset name:"/>
        <TextBox Width="100"
                IsEnabled="{Binding EnableMainTogles, UpdateSourceTrigger=PropertyChanged}"
                Text="{Binding AssetName}"/>
        <Button Content="Update (*.set) file"
                Margin="2,0,0,0"
                IsEnabled="{Binding EnableMainTogles}"
                Command="{Binding UpdateSetFile}"/>
        </WrapPanel>
        <Button Content="Start/Stop"
                Grid.Column="2"
                Margin="2"
                Command="{Binding StartStopOptimisation}"/>

</Grid>
The described part includes the division into two columns. The width of the first column can be changed dynamically; the second column width is fixed and is equal to 100 pixels. The first column includes all controls located in the panel. All of them are provided in the WrapPanel, allowing to arrange elements one after another. First come the controls that are responsible for the auto optimizer selection and setup. These are followed by parameters related to the naming of the folder with the optimizations report, as well as by the report generation ways (Rewrite, Append). The last part is the specification of the asset name, which is used for optimization, and a button for updating the *set file with robot parameters. The column with the fixed width is occupied by the "Start/Stop" button which serves as the starting point for launching the optimization and stopping it.
The second part of the "Settings" tab is divided into 2 parts.
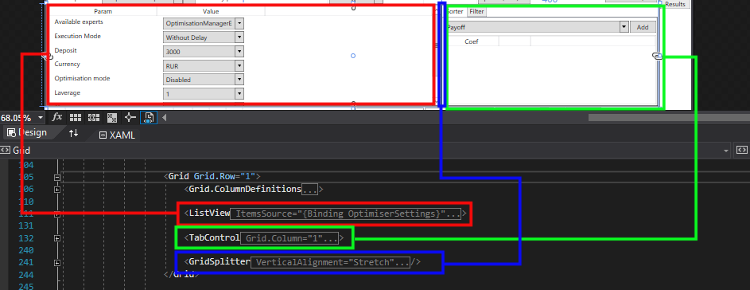
The first one contains ListView with the list of optimizer setting parameters. Here, the names and the values of parameters correspond to the optimizer setup fields in the terminal. The second part contains the specification of data sorting and filter coefficients. The columns also have the GridSplitter element which separates the described areas. The code creating the elements is simple, therefore I will not provide it here. The full code is attached below. The lower part of the tab is fully similar to the upper one, with the only exception being that the right part containing optimization dates, is divided into two parts. The first one features controls for adding data to a list. The second one is used for showing the created list.
The final element of the graphical interface is the "Results" tab, which is designed for viewing the optimizations result, as well as the results of forward and historical tests.
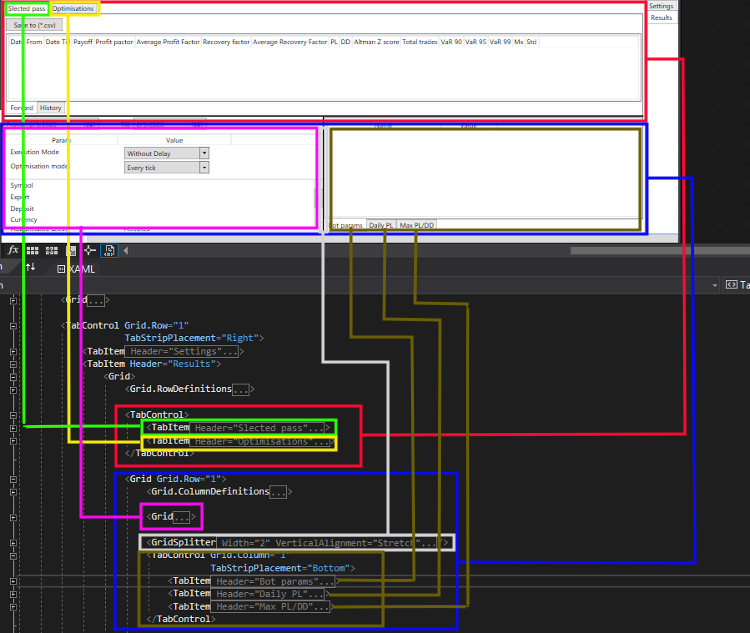
As can be seen from the attached picture, the tab has a more interesting structure than the previous one. It is divided into two parts and is separated by the GridSplitter element, due to which the parts can be resized enabling a more detailed study of the optimization results. The upper part contains two elements of the TabItem grouping, one nested in the other. The "Selected pass" tab in which forward and historical tests are located, is not as interesting as the "Optimisations" tab, however we'll get back to it later.
The lower part of the tab contains two fields separated by a vertical GridSplitter. The first one is intended for specifying dates and modes for a test selected from one of the tables in the upper part, and the other one shows a number of variables summarized in tables for ease of display and reading. It also features the list of parameters of the selected optimization pass ("Bot Params" tab).
Comparison of markup elements with its results in the "Optimisations" tab has the following structure:
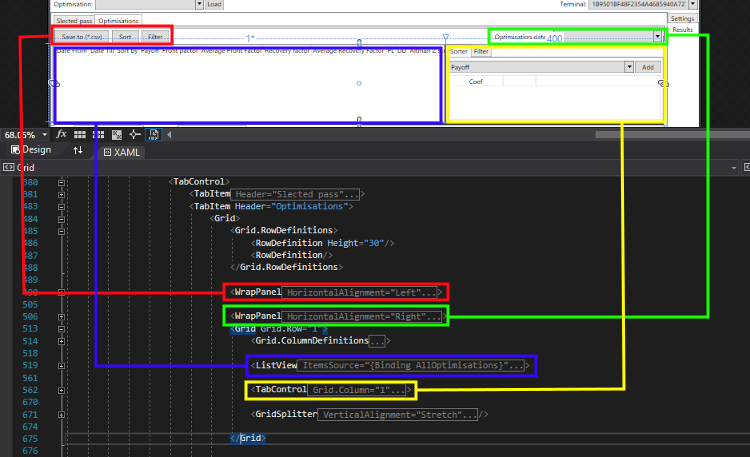
Similarly to "Selected pass", this tab has the "Save to (*csv)" button which saves to a file the results of all completed optimizations for the selected date. There are two more buttons for sorting and filtering the data in the table that shows the results of all optimizations. The structure of the results table is similar to the tables located in tabs "Selected pass.History" and "Selected pass.Forward". The part of markup that creates the table data is shown below:
<ListView ItemsSource="{Binding AllOptimisations}"
          SelectedIndex="{Binding SelecterReportItem}"
          v:ListViewExtention.DoubleClickCommand="{Binding StartTestReport}">
        <ListView.View>
                <GridView>
                        <GridViewColumn Header="Date From" DisplayMemberBinding="{Binding From}"/>
                        <GridViewColumn Header="Date Till" DisplayMemberBinding="{Binding Till}"/>
                        <GridViewColumn Header="Sort by" DisplayMemberBinding="{Binding SortBy}"/>
                        <GridViewColumn Header="Payoff" DisplayMemberBinding="{Binding Payoff}"/>
                        <GridViewColumn Header="Profit pactor" DisplayMemberBinding="{Binding ProfitFactor}"/>
                        <GridViewColumn Header="Average Profit Factor" DisplayMemberBinding="{Binding AverageProfitFactor}"/>
                        <GridViewColumn Header="Recovery factor" DisplayMemberBinding="{Binding RecoveryFactor}"/>
                        <GridViewColumn Header="Average Recovery Factor" DisplayMemberBinding="{Binding AverageRecoveryFactor}"/>
                        <GridViewColumn Header="PL" DisplayMemberBinding="{Binding PL}"/>
                        <GridViewColumn Header="DD" DisplayMemberBinding="{Binding DD}"/>
                        <GridViewColumn Header="Altman Z score" DisplayMemberBinding="{Binding AltmanZScore}"/>
                        <GridViewColumn Header="Total trades" DisplayMemberBinding="{Binding TotalTrades}"/>
                        <GridViewColumn Header="VaR 90" DisplayMemberBinding="{Binding VaR90}"/>
                        <GridViewColumn Header="VaR 95" DisplayMemberBinding="{Binding VaR95}"/>
                        <GridViewColumn Header="VaR 99" DisplayMemberBinding="{Binding VaR99}"/>
                        <GridViewColumn Header="Mx" DisplayMemberBinding="{Binding Mx}"/>
                        <GridViewColumn Header="Std" DisplayMemberBinding="{Binding Std}"/>
                </GridView>
        </ListView.View>
</ListView>
TabItem which contains optimization result filters and sorting parameters is fully identical to the same item in the "Settings" tab. Although they are separated in the markup, ViewModel is arranges so that changes in one of them are instantly rendered in the other one. The changes rendering mechanism will be considered in the next article.
As can be seen from this section, the graphical interface markup is quite simple. I did not provide the appropriate visual effects in the program, because the main task was the functionality. If you wish to beautify the application, edit the App.xaml file which serves as the centralized project storage.
Classes borrowed from the "Optimization Management" series of articles and their modifications
In this project, I used the objects that were created earlier for the "Optimization Management" series. I will not provide a detailed description of each of the objects, since they are available in the above articles. However, let us dwell deeper on some of them, especially on those which have been modified within this projects. The full list of borrowed objects is as follows:
- RelayCommand — implements the ICommand interface, via which all GUI actions performed by the user are passed to the ViewModel project part.
- ListViewExtention — passes the event of a double-click on a ListView element to the ICommand interface. Thus, we can use ListView containers and stick to the used MVVM template. The class serves as a wrapper for a double-click event.
- DirectoryInfoExtention — the class containing an extension method for the DirectoryInfo class.
- Config — the class serves as a wrapper for the terminal configuration files. The class allows working with a file as if we were working with a Config type object. This reduces the number of code lines and eliminates errors.
- TerminalManager — the class is responsible for starting and stopping the terminal from a third-party application. It is created specifically for the MetaTrader 5 terminal and supports all terminal configuration methods before launch.
- SetFileManager — class for working with *.set files of tester configuration.
- TerminalDirectory — the class is a manager of the terminals directory. It provides access to key directories and eliminates the need to write the full path to the desired folder.
The last four objects from the list can be regarded as a proprietary API for working with the terminal from C# code. The changes described in this part of the article were only internal. In other words, the external interface for working with these classes (public methods and properties) remained unchanged in their signature. Accordingly, even if you replace the previous implementations of these objects in the previous project with new ones, the project will be compiled and will work.
The first of the objects with the modified structure is the Config class. The class presents a table described in the appropriate section of terminal documentation. It contains all the table fields in its properties. By changing a property you change the value of a specific key in a particular section of the terminal initialization file. The initialization files *.ini represent a common used format. The Windows OS kernel provides functions for working with this format. We have imported two of them into our C# code. In the previous implementation of this class, the used methods were imported directly to the Config class. In the current implementation, the methods are implemented in a separated IniFileManager class.
class IniFileManager
{
    private const int SIZE = 1024; //Maximum size (for reading the value from the file)

    public static string GetParam(string section, string key, string path)
    {
        //To get the value
        StringBuilder buffer = new StringBuilder(SIZE);

        //Get value to buffer
        if (GetPrivateProfileString(section, key, null, buffer, SIZE, path) == 0)
            ThrowCErrorMeneger("GetPrivateProfileStrin", Marshal.GetLastWin32Error(), path);

        //Return the received value
        return buffer.Length == 0 ? null : buffer.ToString();
    }
    /// <summary>
    /// Return error
    /// </summary>
    /// <param name="methodName">Method name</param>
    /// <param name="er">Error code</param>
    private static void ThrowCErrorMeneger(string methodName, int er, string path)
    {
        if (er > 0)
        {
            if (er == 2)
            {
                if (!File.Exists(path))
                    throw new Exception($"{path} - File doesn1t exist");
            }
            else
            {
                throw new Exception($"{methodName} error {er} " +
                    $"See System Error Codes (https://docs.microsoft.com/en-us/windows/desktop/Debug/system-error-codes) for details");
            }
        }
    }

    public static void WriteParam(string section, string key, string value, string path)
    {
        //Write value to the INI-file
        if (WritePrivateProfileString(section, key, value, path) == 0)
            ThrowCErrorMeneger("WritePrivateProfileString", Marshal.GetLastWin32Error(), path);
    }
}
The resulting Config file only features the fields contained in the configuration file. The full description of this object was provided in previous articles related to optimization management.
The next modified class is TerminalManager. The class content remains unchanged. We will not consider the class operation method and components, since it is a borrowed class. However, the class plays an important role in the application as it starts and stops the terminal operation. So, here is the full code of the class implementation.
class TerminalManager
{
    /// <summary>
    /// Constructor
    /// </summary>
    /// <param name="TerminalChangeableDirectory">
    /// Path to the directory with mutable files (the one in AppData)
    /// </param>
    public TerminalManager(DirectoryInfo TerminalChangeableDirectory) :
        this(TerminalChangeableDirectory, new DirectoryInfo(File.ReadAllText(TerminalChangeableDirectory.GetFiles().First(x => x.Name == "origin.txt").FullName)), false)
    {
    }
    /// <summary>
    /// Constructor
    /// </summary>
    /// <param name="TerminalChangeableDirectory">
    /// Path to the directory with mutable files
    /// </param>
    /// <param name="TerminalInstallationDirectory">
    /// Path to the terminal folder
    /// </param>
    public TerminalManager(DirectoryInfo TerminalChangeableDirectory, DirectoryInfo TerminalInstallationDirectory, bool isPortable)
    {
        this.TerminalInstallationDirectory = TerminalInstallationDirectory;
        this.TerminalChangeableDirectory = TerminalChangeableDirectory;

        TerminalID = TerminalChangeableDirectory.Name;

        CheckDirectories();

        Process.Exited += Process_Exited;

        Portable = isPortable;
    }
    /// <summary>
    /// Destructor
    /// </summary>
    ~TerminalManager()
    {
        Close();
        Process.Exited -= Process_Exited;
    }
    /// <summary>
    /// Terminal startup process
    /// </summary>
    private readonly System.Diagnostics.Process Process = new System.Diagnostics.Process();
    /// <summary>
    /// Running process completion event
    /// </summary>
    public event Action<TerminalManager> TerminalClosed;

    #region Terminal start Arguments
    /// <summary>
    /// Login for start - flag /Login
    /// </summary>
    public uint? Login { get; set; } = null;
    /// <summary>
    /// Platform launch under a certain profile.
    /// The profile must be created in advance and located in the /profiles/charts/ folder of the trading platform
    /// </summary>
    public string Profile { get; set; } = null;
    /// <summary>
    /// Config file as a /Config object
    /// </summary>
    public Config Config { get; set; } = null;
    /// <summary>
    /// Flag of terminal launch in /portable mode
    /// </summary>
    private bool _portable;
    public bool Portable
    {
        get => _portable;
        set
        {
            _portable = value;
            if (value && !TerminalInstallationDirectory.GetDirectories().Any(x => x.Name == "MQL5"))
            {
                WindowStyle = System.Diagnostics.ProcessWindowStyle.Minimized;

                if (Run())
                {
                    System.Threading.Thread.Sleep(1000);
                    Close();
                }
                WaitForStop();
                WindowStyle = System.Diagnostics.ProcessWindowStyle.Normal;
            }
        }
    }
    /// <summary>
    /// window style of the launched process
    /// </summary>
    public System.Diagnostics.ProcessWindowStyle WindowStyle { get; set; } = System.Diagnostics.ProcessWindowStyle.Normal;
    #endregion

    #region Terminal directories
    /// <summary>
    /// Path to terminal installation folder
    /// </summary>
    public DirectoryInfo TerminalInstallationDirectory { get; }
    /// <summary>
    /// Path to terminal folder with variable files
    /// </summary>
    public DirectoryInfo TerminalChangeableDirectory { get; }
    /// <summary>
    /// Path to the MQL5 folder
    /// </summary>
    public DirectoryInfo MQL5Directory => (Portable ? TerminalInstallationDirectory : TerminalChangeableDirectory).GetDirectory("MQL5");
    #endregion

    /// <summary>
    /// Terminal ID folder name in AppData directory
    /// </summary>
    public string TerminalID { get; }
    /// <summary>
    /// Flag of whether the terminal is currently running or not
    /// </summary>
    public bool IsActive => Process.StartInfo.FileName != "" && !Process.HasExited;

    #region .ex5 files relative paths
    /// <summary>
    /// List of full EA names
    /// </summary>
    public List<string> Experts => GetEX5FilesR(MQL5Directory.GetDirectory("Experts"));
    /// <summary>
    /// List of full indicator names
    /// </summary>
    public List<string> Indicators => GetEX5FilesR(MQL5Directory.GetDirectory("Indicators"));
    /// <summary>
    /// List of full script names
    /// </summary>
    public List<string> Scripts => GetEX5FilesR(MQL5Directory.GetDirectory("Scripts"));
    #endregion

    /// <summary>
    /// Terminal launch
    /// </summary>
    public bool Run()
    {
        if (IsActive)
            return false;
        // Set path to the terminal
        Process.StartInfo.FileName = Path.Combine(TerminalInstallationDirectory.FullName, "terminal64.exe");
        Process.StartInfo.WindowStyle = WindowStyle;
        // Set data for terminal launch (if any data were set)
        if (Config != null && File.Exists(Config.Path))
            Process.StartInfo.Arguments = $"/config:{Config.Path} ";
        if (Login.HasValue)
            Process.StartInfo.Arguments += $"/login:{Login.Value} ";
        if (Profile != null)
            Process.StartInfo.Arguments += $"/profile:{Profile} ";
        if (Portable)
            Process.StartInfo.Arguments += "/portable";

        // Notify the process of the need to call an Exit event after closing the terminal
        Process.EnableRaisingEvents = true;

        // Run the process and save the launch status to the IsActive variable
        return Process.Start();
    }
    /// <summary>
    /// Wait for the terminal operation to complete
    /// </summary>
    public void WaitForStop()
    {
        if (IsActive)
            Process.WaitForExit();
    }
    /// <summary>
    /// Stop the process
    /// </summary>
    public void Close()
    {
        if (IsActive)
            Process.Kill();
    }
    /// <summary>
    /// Wait for the terminal operation to complete for a certain time
    /// </summary>
    public bool WaitForStop(int miliseconds)
    {
        if (IsActive)
            return Process.WaitForExit(miliseconds);
        return true;
    }
    /// <summary>
    /// Search for files with the Ex5 extension
    /// Search is performed recursively - files are searched in the specified folder and in all subfolders
    /// </summary>
    /// <param name="path">Path to the folder where search begins</param>
    /// <param name="RelativeDirectory">Folder relative to which oath is returned</param>
    /// <returns>List of paths to the found files</returns>
    private List<string> GetEX5FilesR(DirectoryInfo path, string RelativeDirectory = null)
    {
        if (RelativeDirectory == null)
            RelativeDirectory = path.Name;
        string GetRelevantPath(string pathToFile)
        {
            string[] path_parts = pathToFile.Split('\\');
            int i = path_parts.ToList().IndexOf(RelativeDirectory) + 1;
            string ans = path_parts[i];

            for (i++; i < path_parts.Length; i++)
            {
                ans = Path.Combine(ans, path_parts[i]);
            }

            return ans;
        }

        List<string> files = new List<string>();
        IEnumerable<DirectoryInfo> directories = path.GetDirectories();

        files.AddRange(path.GetFiles("*.ex5").Select(x => GetRelevantPath(x.FullName)));

        foreach (var item in directories)
            files.AddRange(GetEX5FilesR(item, RelativeDirectory));

        return files;
    }
    /// <summary>
    /// Terminal closing event
    /// </summary>
    /// <param name="sender"></param>
    /// <param name="e"></param>
    private void Process_Exited(object sender, EventArgs e)
    {
       TerminalClosed?.Invoke(this);
    }
    /// <summary>
    /// Check the correctness of the passed terminal path
    /// </summary>
    private void CheckDirectories()
    {
        if (!TerminalInstallationDirectory.Exists)
            throw new ArgumentException("PathToTerminalInstallationDirectory doesn`t exists");
        if (!TerminalChangeableDirectory.Exists)
            throw new ArgumentException("PathToTerminalChangeableDirectory doesn`t exists");
        if (!TerminalInstallationDirectory.GetFiles().Any(x => x.Name == "terminal64.exe"))
            throw new ArgumentException($"Can`t find terminal (terminal64.exe) in the instalation folder {TerminalInstallationDirectory.FullName}");
    }
}
Now, the class does not implement the ITerminalManager interface (as it was the last time). I decided not to use Unit tests when implementing the described application, in an effort to speed up the development process and to minimize the number of projects. As a result, no interfaces are needed for this object.
The next modification concerns a new way for determining of whether the terminal is running or not. In the previous version, the property received a value from Run methods (in which false value was assigned) and from the optimization completion callback. However, it was not a very good decision and it might not work at times. Therefore, I revised the IsActive property getter. Now, the getter directly accesses the HasExited property of the Process object. However, an attempt to access the property before the first launch will generate an error message. I studied the Process class specifics and noticed that when you start the process via the described object, its StartInfo.FileName property is filled with a path to the executable file. Before the first launch it is equal to an empty value (""). That is why the IsActive getter looks strange. First, the getter checks if the name exists, and then it checks the Process.HasExited property. In other words, we assume by default that the terminal is closed and can only be started through our TerminalManager class. Therefore, if StartInfo.FileName == "", return false (it means that the terminal is not running). If the terminal has ever been launched, compare the value of the HasExited property. The property value changes every time the terminal is started, if it is started from our object, and when it is shut down. Due to this feature you should always have the terminal closed when using the auto optimizer.
The description is completed by the last object with a modified internal structure. It is the SetFileManager class and its UpdateParams method.
/// <summary>
/// Clear all recorded data in Params and load data from the required file
/// </summary>
public virtual void UpdateParams()
{
    _params.Clear();

    using (var file = FileInfo.OpenText())
    {
        string line;
        while ((line = file.ReadLine()) != null)
        {
            if (line[0].CompareTo(';') != 0 && line[0].CompareTo('#') != 0)
            {
                string[] key_value = line.Replace(" ", "").Split('=');
                string[] value_data = key_value[1].Split(new[] { '|' }, StringSplitOptions.RemoveEmptyEntries);

                ParamsItem item = new ParamsItem
                {
                    Variable = key_value[0],
                    Value = (value_data.Length > 0 ? value_data[0] : null),
                    Start = (value_data.Length > 1 ? value_data[1] : null),
                    Step = (value_data.Length > 2 ? value_data[2] : null),
                    Stop = (value_data.Length > 3 ? value_data[3] : null),
                    IsOptimize = (value_data.Length > 4 ? value_data[4].CompareTo("Y") == 0 : false)
                };

                _params.Add(item);
            }
        }
    }
}
Changes in this class only concern one method, and thus I will not provide the full class code here. I found during application testing, that sometimes the *.set file with robot parameters generated by the terminal for the optimizer can be half empty for some of the parameters. For example, the terminal can fill the Value field and fail to fill the initial or the final value for the optimization. This depends on the parameter type. For example, string parameters only fill the Value fields. The purpose of implementing the changes in the below code was to avoid the above issue.
The Data directory structure
In earlier articles we already mentioned the local "Data" directory that stores optimization reports and other working files created by the auto optimizer. Now, it is time to consider the directory in more detail. The Data directory is created near the executable file during the terminal start. The directory is only created if it does not exist at the auto optimizer launch time. Otherwise, its path is saved in the appropriate property of the below class. The directory serves as a working folder and a storage at the same time. If you ever need to access files and to store them, do it inside this directory. The following object creates and stores the directory:
/// <summary>
/// The object describing the Data directory with the auto optimizer's mutable files.
/// </summary>
class WorkingDirectory
{
    /// <summary>
    /// Default constructor
    /// </summary>
    public WorkingDirectory()
    {
        // Create a root directory with mutable files
        WDRoot = new DirectoryInfo("Data");
        if (!WDRoot.Exists)
            WDRoot.Create();
        // Create a subdirectory with optimization reports
        Reports = WDRoot.GetDirectory("Reports", true);
    }
    /// <summary>
    /// Nested directory with optimization reports
    /// </summary>
    public DirectoryInfo Reports { get; }
    /// <summary>
    /// Root directory with mutable files and folders
    /// </summary>
    public DirectoryInfo WDRoot { get; }

    /// <summary>
    /// Get or create (if not previously created) a directory nested inside the Reports directory.
    /// The resulting directory stores the results of a particular optimization pass.
    /// </summary>
    /// <param name="Symbol">The symbol on which the optimization was performed</param>
    /// <param name="ExpertName">Robot name</param>
    /// <param name="DirectoryPrefix">Prefix added to the directory name</param>
    /// <param name="OptimiserName">The name of the use optimizer</param>
    /// <returns>
    /// Path to the directory with the optimization results.
    /// The name of the directory is formed as follows: public DirectoryInfo WDRoot { get; }
    /// {DirectoryPrefix} {OptimiserName} {ExpertName} {Symbol}
    /// </returns>
    public DirectoryInfo GetOptimisationDirectory(string Symbol, string ExpertName,
                                                  string DirectoryPrefix, string OptimiserName)
    {
        return Reports.GetDirectory($"{DirectoryPrefix} {OptimiserName} {ExpertName} {Symbol}", true);
    }

    /// <summary>
    /// Path to Data/Tester
    /// Needed to temporarily move files from the terminal directory of the same name
    /// </summary>
    public DirectoryInfo Tester => WDRoot.GetDirectory("Tester", true);

}
The class serves as a manager for the described directory. It is very convenient, because no matter where the auto optimizer executable is, we can always obtain the correct path to the desired directory by accessing the WDRoot property of this object. In this constructor, we create the Data directory if it does not yet exist. Otherwise, save its address in the above property. Also, save path to the "Reports" subdirectory. The passed true parameter indicates that if the directory does not exist, it should be created.
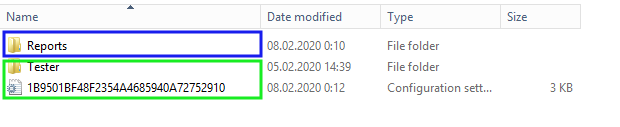
As a result, the Data directory is created immediately after the first launch. After creation the directory has only one subdirectory "Reports" which is empty. During the first launch of an optimization or a test, the Tester subdirectory is created by a call to the appropriate property of the described object. The configuration file {Terminal ID}.ini is created by copying the configuration file which you selected by default. Thus, you avoid overwriting of the source configuration file. The Tester directory is created for a temporary copying of cache of earlier performed optimizations. It partially resembles the relevant Tester directory available among the mutable terminal directories.

The directory only contains the "cache" folder. All files from the same directory of the selected terminal are moved to this cache folder. After the end of the optimization process, the files are returned to the previous location. This operation ensures the execution of the optimization process. According to the optimizer logic, if the terminal directory has files that describe the optimization process, the optimizer will load the previously performed optimizations instead of starting a new process. This is a great solution that saves a lot of time. But it is completely unsuitable for our purposes. Since we store our own copy of the optimizations report adjusted for our auto optimizer (articles 3 and 1 of the current series), we must create a report. In order to generate a report, we need to launch the optimization process. That is why we emulate the absence of this files. To do this, temporary move these files to our local directory. Upon successful completion of the optimization process, a subdirectory is created in the Reports directory using the GetOptimisationDirectory method.
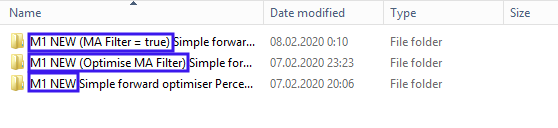
In the above screenshot, the color shows the directory prefix which is specified in the auto optimizer settings before the optimization launch. It allows distinguishing between different optimizations of the same Expert Advisor. Each directory stores three files with the results of performed optimizations:
- Forward.xml — only forward tests
- History.xml — only historical tests
- Report.xml — all executed optimizations for all passed historical time periods.
The files have a similar structure, which was described in the first article within this series. When you click the Load button in the GUI, the auto optimizer loads all the three files from the selected directory to the appropriate tables. If any of the three files is not found or all of the files do not exist, an appropriate message is generated. Tables corresponding to missing files are displayed blank.
If you need to move optimization results from the auto optimizer program located on one computer into the auto optimizer program located on another computer, simply copy the Reports directory and move it to the relevant directory on the second computer. After launch, the auto optimizer will access the desired directories with the results. Thus, the results will be available for download and further analysis.
Conclusion
In the first articles within this series, we examined the creation and uploading of optimization reports. Then, we proceeded to considering the auto optimizer project. In the previous article, we analyzed the ready project. The idea was to present the ultimate purpose of this series. Also, the previous article provides instructions for using the finished auto optimizer. In this article, we considered technical aspect in the auto optimizer implementation. Before moving on to analyzing the logical part of the project, we have considered the graphical interface and modifications in files borrowed from the previous series of articles. Links to the previous series of articles are provided in the introduction to this article. In the next article, we will consider the implementation of the logical part of the program.
The attachment contains the auto optimizer project with a trading robot analyzed in article 4. To use the project, please compile the auto optimizer project file and the testing robot file. Then copy ReportManager.dll (described in the first article) to the MQL5/Libraries directory, and you can begin to test the EA. Please refer to articles 3 and 4 within this series for details on how to connect the auto optimizer to your Expert Advisors.
Translated from Russian by MetaQuotes Ltd.
Original article: https://www.mql5.com/ru/articles/7583
Warning: All rights to these materials are reserved by MetaQuotes Ltd. Copying or reprinting of these materials in whole or in part is prohibited.
This article was written by a user of the site and reflects their personal views. MetaQuotes Ltd is not responsible for the accuracy of the information presented, nor for any consequences resulting from the use of the solutions, strategies or recommendations described.

 Applying OLAP in trading (part 4): Quantitative and visual analysis of tester reports
- Free trading apps
- Over 8,000 signals for copying
- Economic news for exploring financial markets
You agree to website policy and terms of use
I always get the message "There are no optimisation data to save".
My working directory is empty "D:\Projects\privat\Börse\MSQL5\Auto_Optimiser_2\Auto_Optimiser\Auto Optimiser\MetaTrader-Auto-Optimiser\Metatrader Auto Optimiser\bin\Debug\Data\Reports\ Simple forward optimiser xxxx EURUSD".
optimiser.AllOptimisationResults.Count = 0
optimiser.HistoryOptimisations.Count = 0
optimiser.ForwardOptimisations.Count = 0
I can see the Optimisation in Terminal.
It means that there are no optimisations that corresponds with your filters. Or you didn't connect optimisation`s data uploading into your expert
Sorry, I'm a newbie. I'm using an expert from market. Maybe it doesn't support connect optimisation's data uploading. I also tried with Advisors/ExpertMACD and get same result. Have I to write a own expert? I will read more deeply into the matter.
Sorry, I'm a newbie. I'm using an expert from market. Maybe it doesn't support connect optimisation's data uploading. I also tried with Advisors/ExpertMACD and get same result. Have I to write a own expert? I will read more deeply into the matter.
You need an expert with source code. The 4th article describes how to add data uploading into your expert and also there are given an example.