
Fast Auto Lot Size Calculator Algo
- Utilities
-
BCB Elevate Trading
 BCB Elevate Trading builds MT5 Expert Advisors and trading tools for XAUUSD and forex: Aegis Grid Algo, Raptor EA, Smart Trader Plus, SnowBall Algo and Trade Manager. Free lot size calculator, prop firm calculator and forex market hours tools on our website. Custom EA and indicator development
 - Version: 4.90
- Updated: 1 July 2026
- Activations: 5
🚀 Trade Manager By BCB Elevate: Features & Benefits
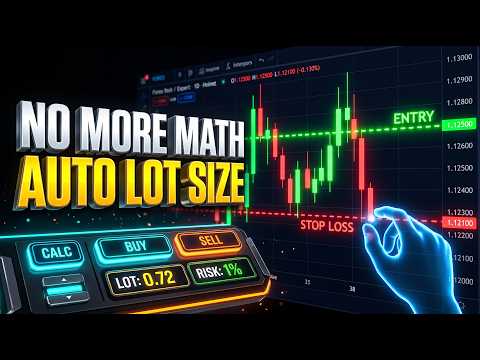
The Trade Manager is an interactive, on-chart dashboard designed to take the math and emotions out of trading. Instead of using clunky default menus, you control your trades directly on the chart using simple drag-and-drop lines and smart buttons.
Here is how this tool helps you become a better, more efficient trader:
1. 🧮 Automatic Risk & Lot Size Calculation
-
What it does: You simply type in how much of your account you want to risk (e.g., 1%). The tool instantly calculates the exact Lot Size for your trade based on where you place your Stop Loss.
-
How it helps: You never have to use a separate lot size calculator again. It prevents "fat-finger" mistakes (like accidentally entering 10 lots instead of 1.0) and ensures you never lose more money than you planned, protecting your account from blown capital.
2. 🖱️ Visual Drag-and-Drop Trading
-
What it does: When you want to trade, a Red Dashed Line appears on your chart. You simply drag this line to where you want your Stop Loss to be. The dashboard instantly updates the exact price and lot size in real-time.
-
How it helps: It saves you valuable time. You don’t have to manually read prices on the right side of the screen and type long numbers into an order window. You trade visually, which is much faster in fast-moving markets.
3. ⏱️ Market & Pending Orders Made Simple
-
What it does: By default, clicking "Execute Trade" enters the market instantly. But if you click the ➕ Button next to the Entry Price, a Green Dashed Line appears. You can drag this green line to set a future Entry Price.
-
How it helps: It automatically figures out if you need a Buy Limit, Buy Stop, Sell Limit, or Sell Stop based on where you put the green line. No more confusing MT5 order types—just place the line where you want to enter, and the EA does the rest!
4. 📈 Auto Risk:Reward (RR) Trailing
-
What it does: If you turn on the Auto Trail button, the EA manages your trade while you are away. When your trade reaches a 1:1 Risk-to-Reward profit, it automatically moves your Stop Loss to Breakeven. When it reaches 1:2 profit, it moves the Stop Loss to lock in 1:1 profit. This continues as the trade grows (1:3 locks in 1:2, etc.).
-
How it helps: It eliminates the emotion of managing trades. You don't have to stare at the screen nervously deciding when to move your Stop Loss. It secures your profits automatically and guarantees a risk-free trade as soon as it hits 1:1.
5. 🛡️ Spread Buffer Protection
-
What it does: When the Spread Buffer is turned ON, the tool takes your broker's current spread and automatically adds it to your Stop Loss distance when placing the trade.
-
How it helps: Have you ever been stopped out of a trade by just one pip, only to watch the market reverse and go in your direction? That happens because of the spread. This feature gives your trade a tiny bit of extra breathing room to protect you from those frustrating spread spikes.
6. 🎯 One-Click Custom Price Alerts
-
What it does: Clicking the Target Icon (🎯) drops a bright blue line on your chart. You can drag this line to a point of interest. The moment the price touches that line, a sound plays on your computer, and the line deletes itself automatically so your chart stays clean.
-
How it helps: Instead of staring at the screen waiting for the price to reach a certain zone, you can set an alert in one click, go watch a video or do some work, and come back exactly when the market is ready for you.
7. 🔊 Trade Execution Sounds
-
What it does: The Bell Icon (🔔) toggles trade sounds on and off. When ON, you will hear a specific sound the exact moment your trade enters the market, and different sounds when your trade hits Stop Loss or Take Profit.
-
How it helps: You don't need to constantly check your phone or screen to see if your pending order triggered or if your trade closed. The audio cues keep you informed while you focus on other things.
8. 🎯 Automatic Take Profit via R:R Target
-
What it does: You set your desired Risk:Reward ratio (e.g., 2.0 for a 1:2 trade). The EA automatically calculates and places your Take Profit exactly at that distance.
-
How it helps: It enforces strict trading discipline. You always know you are aiming for a specific, mathematically sound target without having to measure it manually with crosshairs or drawing tools.
9. ❌ "Panic" Close Trades Button
-
What it does: A big red Close Trades button sits on the dashboard. One click instantly closes all open positions and deletes all pending orders for the chart you are currently looking at.
-
How it helps: If major, unexpected news hits the market and you need to get out immediately, you don't have to right-click and close trades one by one. One click saves you in an emergency.
10. 🧹 Clean, Uncluttered Interface
-
What it does: The Hide Chart Lines button temporarily makes your red and green trading lines invisible, and you can freely drag the dashboard anywhere on your screen.
-
How it helps: Traders need a clear view of the candles to read price action. This allows you to hide the tools when you are analyzing, and bring them back instantly when you are ready to pull the trigger.
💡 Summary: Why Traders Need This
The Trade Manager bridges the gap between analyzing a chart and executing a trade. It removes human error (like typing wrong numbers), protects capital (strict risk % and spread buffers), and manages trades automatically (auto RR trailing). It allows you to spend less time calculating math, and more time focusing on finding good trade setups.






































User didn't leave any comment to the rating