

Multi-currency trading panel for MetaTrader 4/5 with fast order management across 16 financial instruments simultaneously, risk control, and an intuitive interface for manual and semi-automated trading.
Ideal for:
- Forex, CFD, and Futures trading
- Scalping
- Multi-symbol trading
- Rapid position management
👉 Get for MetaTrader 5: GTC Pro Powerful One Click Multi Symbol MT5
👉 Get for MetaTrader 4: GTC Pro Powerful One Click Multi Symbol MT4
Panel configuration per individual symbol: For example, a scalping strategy can be used on EURUSD while other currency pairs operate with standard trading. Each instrument can be assigned individual parameters — Stop Loss and Take Profit levels, trailing stop, lot size, break-even conditions, and other position management settings.
Important: The panel is configured individually for each account and symbol chart. It is recommended to run only one instance of the panel per terminal.
Operating Modes: Real Account / Demo Account.
Recommended Minimum Version: MetaTrader 5 - build 5836, MetaTrader 4 - build 1471
⚠️ DISCLAIMER: Trading on financial markets involves a high risk of capital loss. The panel is not a signaling system or an automated trading advisor. All trading decisions are made solely by the user.
2. Installation
- Drag the panel from the Experts -> Market folder onto any chart. In the dialog box, confirm:
- For MetaTrader 4 — select "Allow live trading".
- For MetaTrader 5 — select "Allow algorithmic trading". - In the MetaTrader 5 toolbar, enable "Algo Trading" or "Auto Trading" in MetaTrader 4.
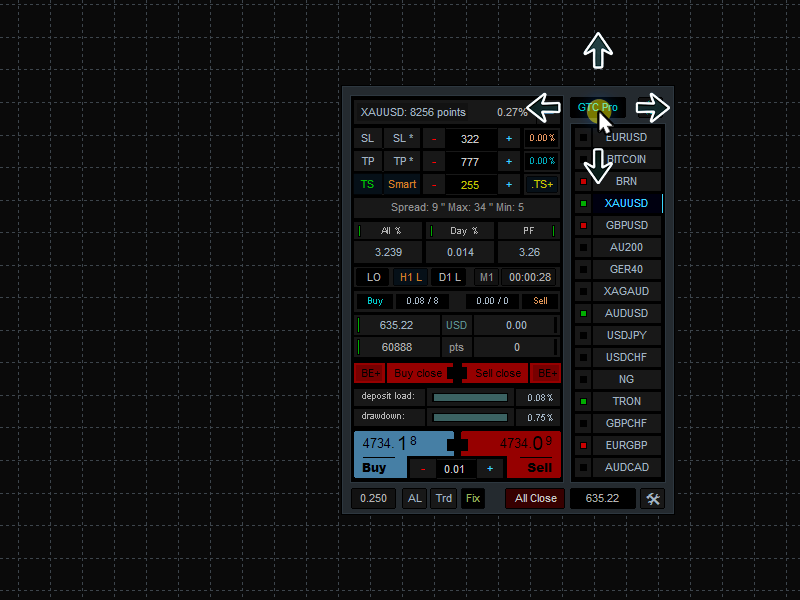
Moving the Panel: To move the panel anywhere on the chart, hover over the "GTC Pro" title bar, press and hold the left mouse button, and drag it to the desired location.
Figure 2.2 — Moving the Panel
3. Controls & Interface
Figure 3.1 — Control Elements

3.1 Control Functions (Fig. 3.1)
- SL — Sets the Stop Loss level when opening a new position.
- SL* — Sets a global Stop Loss level for all open positions meeting specific criteria.
- TP — Sets the Take Profit level when opening a new position.
- TP* — Sets a global Take Profit level for all open positions meeting specific criteria.
- TS — Activates Trailing Stop mode.
- SMART — "Smart" trailing: dynamically adjusts distance based on market volatility.
- TS+ — Automatic calculation of trailing distance.
- LO — Opens the pending order management panel (place/delete).
- H1 L — Hourly time period indicator (visible only on M1).
- D1 L — Daily time period indicator (visible only on M1 to H1).
- BE+ (BUY) — When active, any BUY position for the current symbol will be closed at break-even. Tracks each position individually.
- Buy Close — Closes all BUY positions for the current symbol.
- Sell Close — Closes all SELL positions for the current symbol.
- BE+ (SELL) — When active, any SELL position for the current symbol will be closed at break-even. Tracks each position individually.
- BUY — Opens a new BUY position.
- SELL — Opens a new SELL position.
- AL — Activates automatic lot calculation.
- Trd — Show/hide trade history on the chart.
- Fix — Activates chart locking function.
- All Close — Closes all BUY/SELL positions for the current symbol.
- Settings — Opens the panel's main settings page.
Figure 3.2 — Trading Panel Interface
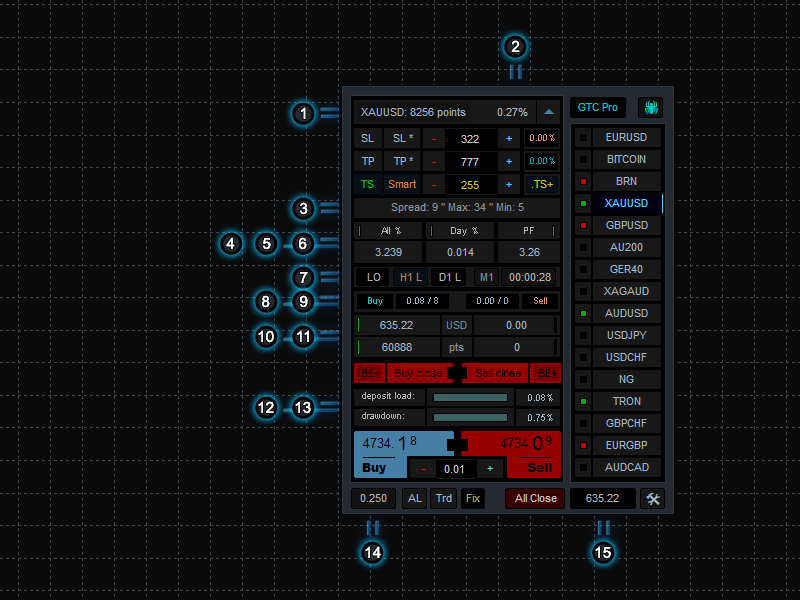
3.2 Interface Elements Description (Fig. 3.2)
- Currency pair name and daily range in points (High to Low).
- Daily price change (percentage and direction).
- Spread in points (current/max/min).
- All % — Total TWR Return (%) — cumulative profit/loss as a percentage of initial deposit over the entire period.
- Day % — Daily TWR Return (%) — balance/equity percentage change for the current trading day.
- PF (Profit Factor) — Gross profit divided by gross loss.
- Bar timer — countdown until the next candle forms. Display period is adjustable in panel settings.
- (BUY) — Total volume of all BUY positions for the current symbol / number of open BUY positions.
- (SELL) — Total volume of all SELL positions for the current symbol / number of open SELL positions.
- Current P/L for BUY positions on the current symbol: in deposit currency * / in points.
- Current P/L for SELL positions on the current symbol: in deposit currency * / in points.
- Deposit load — % of utilized margin (across all symbols).
- Drawdown — Current account drawdown (cumulative across all positions).
- Tick interval — time (in ms) between the latest price updates. Indicates market activity and quote frequency.
- Total current P/L for all positions on the current symbol in deposit currency. Includes all open trades (BUY + SELL) for the selected instrument *.
* Important: Values update in real time and include floating profit/loss, commissions, and swaps (if applied).
💡 Tip: If the spread significantly exceeds the average and Day % shows extreme values, refrain from trading until the market stabilizes.
4. Settings
This section allows you to configure a watchlist of 16 instruments, monitor their current status, and apply unique trading parameters to each currency pair or asset individually.
To access the settings menu, click the settings icon in the bottom-right corner (see Figure 4.1, #5).
Figure 4.1 — Settings (Main Page)
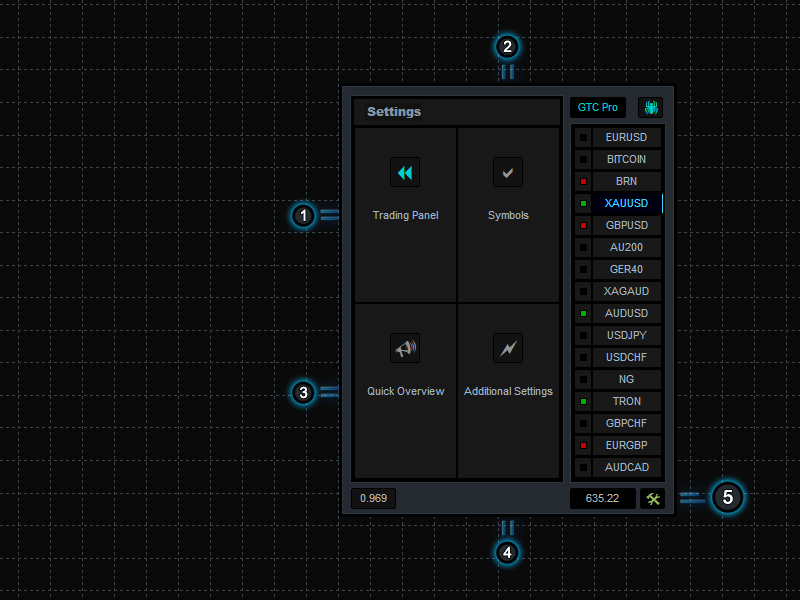
4.1 Settings Menu Description (Fig. 4.1)
- [«] — Return to the Trading Panel.
- Symbols — Manage instrument list (add/remove).
- Quick Overview — Monitor market data for all added symbols: daily range (High-Low), %, spread.
- Advanced Settings — Individual settings for each symbol.
- Return to Trading Panel — Go back to the main panel.
4.2 Symbols — Managing the Instrument List (Add & Remove)
The panel supports simultaneous monitoring of up to 16 symbols.
To open the symbol selection and removal menu, click the "Symbols" section (see Figure 4.1, #2).
- Add Symbol: Click the "Select" button in the desired slot. For example, XAUUSD will be automatically added to the panel.
- Remove Symbol: Click the "Delete" button next to the selected instrument.
Figure 4.2.1 — Adding & Removing Symbols
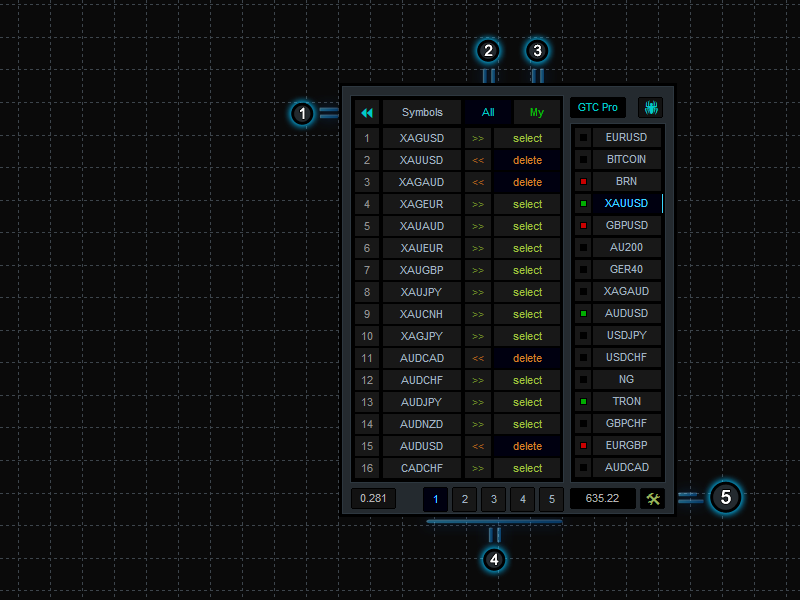
4.2.1 Section Description (Fig. 4.2.1)
- [«] icon — Return to settings (main page).
- All — All symbols available in the MetaTrader Market Watch.
- My — All symbols you have added to the panel for trading and monitoring.
- Pagination — Navigate between pages of financial instruments.
- Exit Settings — Opens the Trading Panel.
💡 Tip: The easiest way to add a financial instrument is to drag it from the Market Watch onto the chart area. Dragging it onto an existing chart will replace the chart's symbol and add the instrument to the panel.
4.3 Advanced Settings — Individual Configuration per Symbol
Since different instruments have varying pip values and volatility, the panel allows you to customize trading parameters for each symbol individually.
To open settings, click the "Advanced Settings" section (see Figure 4.1, #4).
Figure 4.3.1 — Individual Settings

4.3.1 Section Description (Fig. 4.3.1)
- [«] icon — Return to settings (main page).
- By Stop Loss — Auto-lot calculated from Stop Loss level: position size is determined based on set risk and SL distance *.
- By Balance — Auto-lot calculated from current balance: position size depends on the set risk percentage *.
- By Equity — Auto-lot calculated from equity: position size depends on current equity and set risk percentage *.
- Risk % — Risk percentage for position sizing. Determines how much capital you are willing to risk per trade *.
- Distance — Distance in points for trailing stop. Defines how far from the current price the SL will trail.
Important: Functions only when Smart mode is inactive. - Step — Distance in points the price must move before the SL is adjusted. If set to 1, SL updates on every point.
Important: Functions only when TS+ is inactive. - Trall Off w/ TP — Trailing stop automatically disables for positions with a set Take Profit.
- ON — Trailing disables only for positions with TP.
- OFF — Trailing works for all positions regardless of TP.
Important: When enabled (ON), the panel's TS button changes to TS ! to indicate the active restriction. - Trade ID — Unique trade identifier. Used to distinguish orders/positions.
- Comment — Text note for the trade. Can be used for filtering or trade description.
* Important: These features work only when auto-lot calculation is enabled (AL button on the panel).
💡 Tip: Switching between financial instruments via the right-hand menu allows you to configure each symbol individually without leaving the menu.
5. Trading Scenarios (WORKING WITH THE PANEL)
5.1 Quick Start: First Trade in 2 Steps
This section is designed to help you start trading quickly after installing the panel.
Important: It is highly recommended to execute your first trades on a demo account.
- Activation & Symbol Selection — Ensure Algo Trading is enabled in the terminal (green/red button). In the right panel, click the desired instrument (e.g., XAUUSD). The active symbol will be highlighted in blue.
- Execution — Click the large Buy or Sell button. The panel will send the order to the server. Open the Trade tab in MT4/5 to confirm the position appears.
⚠️ Important: Before switching to a live account, perform at least 20 test trades on a demo account. Check how the panel handles requotes, margin changes, and connection drops.
5.2 Opening a Position (Market Order)
The panel sends market orders via the standard MT4/5 trading server. The process is optimized to minimize latency and execution errors.
Step-by-Step Guide:
- Select Instrument:
- Choose the desired instrument in the right panel.
- The panel automatically loads individual settings for this symbol (auto-lot, SL/TP, trailing). - Set Volume:
- Manual: Use [-] 0.01 [+] buttons or enter a value in the lot field.
- Automatic: Enable AL (Auto-Lot) mode. The panel calculates volume based on risk percentage relative to current SL or balance (configurable in settings). - Set Protection (Optional):
If your strategy requires Stop Loss and Take Profit levels, activate the corresponding buttons on the panel (SL/TP) and specify the levels. - Execute Trade:
Click BUY (blue button) or SELL (red button) to open the position.
MT4/5 Execution Nuances:
- Execution Type: SL/TP are attached after position opening.
- Margin: If Deposit load approaches 100% or a "Not enough money" message appears, open a smaller lot or close some positions.
5.3 Setting & Modifying SL / TP / Trailing Stop / Break-Even
Protective orders are the foundation of risk management. The panel allows you to manage them both before opening a trade and while holding a position.
A. Pre-Trade Setup:
- Set base SL and TP values for each instrument. If needed, activate SL/TP buttons — these levels will auto-apply when switching symbols.
- Manual adjustment: In the main panel window, modify SL and TP values before clicking Buy/Sell. Use +/- buttons for quick steps.
- Constraint check: The panel automatically validates entered levels and adjusts them if they violate your broker's SYMBOL_TRADE_STOPS_LEVEL (minimum SL distance) and SYMBOL_TRADE_FREEZE_LEVEL (modification freeze zone).
B. Modifying Open Positions:
- Via terminal: Drag SL/TP lines on the chart or modify them in the Trade window. The panel tracks changes and updates the interface automatically.
- Via panel: When the function is active, use Modify SL * / TP * buttons to globally adjust levels across all open positions for the selected symbol.
C. Trailing Stop
The panel implements client-side trailing: it monitors price in real time and sends SL modification requests to the server.
Trailing control is managed via the following panel elements:
TS | Smart | [Distance, pts] | TS+
- TS — Enables trailing stop.
- Smart — "Smart" trailing: dynamically adjusts distance from price based on current volatility. If disabled, fixed distance from global settings is used (see Section 4.3.1, param 6 "Distance").
- [Distance, pts] — Field for manual distance input (in points) from current price to activate trailing. Becomes inactive when TS+ is enabled.
- TS+ — Automatic calculation of optimal trailing distance based on the panel's algorithm.
⚠️ Important: Smart and TS+ are supplementary distance calculation modes. They only work when the TS button is active.
D. Break-Even
This function automatically closes a position as soon as its current financial result reaches zero. Unlike standard tools, it does not move SL but executes a market close.
💡 How BE+ Works: The button is context-sensitive. Pressing BE+ on the Buy side monitors only BUY positions; pressing on the Sell side monitors only SELL positions. When active, a yellow indicator lights up in the profit zone.
Operation Algorithm:
- The panel analyzes each position individually, independent of other open trades.
- Real-time calculation of total position result accounts for:
- Price difference (floating P/L)
- Accumulated swaps (if applied)
- Broker commissions - Once calculated profit reaches ≥ 0, the panel automatically sends a close order.
- After execution, monitoring for that position stops. Other positions continue to be tracked independently.
⚠️ Important:
- The function guarantees a "zero loss" exit, preventing loss fixation under normal market conditions.
- All costs are accounted for: commissions and swaps. Closure occurs strictly without loss at the moment of order execution.
- Slippage is possible: execution price may slightly differ from the calculated price (positive or negative), depending on broker liquidity and speed.
- Behavior during symbol switch: when switching instruments, the function continues tracking and closing positions it was activated for, even if they belong to another symbol.
- Requires active server connection (terminal running, advisor enabled).
6. Placing Pending Orders
LO (Limit Order Panel) is designed for pre-placing buy/sell orders at prices different from the current market rate. You can select order type (Buy/Sell Limit or Buy/Sell Stop), set parameters like lot size, and define Stop Loss and Take Profit levels if needed. Orders are placed by clicking on the chart.
Figure 6.1 — LO (Limit Orders)

6.1 Section Description (Fig. 6.1)
- LO — Open pending order panel; click again to close.
- Select Order Type:
:Buy L — Buy Limit — buy below market price.
:Sell L — Sell Limit — sell above market price.
:Buy S — Buy Stop — buy above market price.
:Sell S — Sell Stop — sell below market price. - Delete — Remove all pending orders of the selected type.
To open the limit order panel, click the "LO" button (see Figure 6.1 #1). Click again to close.
Key Features:
- Limit Orders: Buy Limit (buy below market) and Sell Limit (sell above market) for reversal trading.
- Stop Orders: Buy Stop (buy on upward breakout) and Sell Stop (sell on downward breakout) for trend trading.
- Delete: Removes all pending orders of the specified type.
Risk Management & Chart Placement
Risk Management (SL/TP): Set Stop Loss and Take Profit levels that will be attached to the order upon creation. Activate SL/TP buttons, specify levels, then select lot size.
Visual Placement: Orders are placed directly on the chart using the left mouse button. Select your desired price level and click to place the pending order.
7. Example Trading Strategy
A ready-to-use panel scenario: from trade entry to automatic break-even closure and profit trailing. Minimal manual intervention, maximum risk control.
7.1 Scalping Strategy
Low-timeframe trading scenario: rapid position entry, automatic break-even exit, or profit fixation via trailing. The panel ensures fast execution and background monitoring, allowing traders to focus on entry analysis.
Preliminary Settings:
- Account type: ECN with minimal spread and commission.
- Timeframe: M1.
- Highly liquid currency pair, e.g., EURUSD, 5-digit quotes.
- Panel configuration:
1. Add EURUSD to the panel and switch to it.
2. Lock the chart for convenience (FIX button at panel bottom).
3. Activate H1 L — hourly period indicator.
4. Activate Stop Loss (SL button on panel).
5. Set Stop Loss to 60 points (or per your strategy).
6. Activate TS+ — automatic trailing distance calculation.
7. Activate SMART — smart trailing.
8. Activate TS — trailing stop mode.
9. Set lot size (bottom panel between BUY/SELL). Start with minimum — 0.01 (or per your strategy).
Market Entry
⚠️ Important: In scalping, wait for a strong impulsive market move in one direction.
Determine market direction. Use the built-in BlackForce Trend (BFT) indicator in the bottom-left panel corner.
Buy Signal:
BFT Indicator = 100% BUY — confirms strong upward momentum.
Wait for a downward pullback:
BFT reads 96.43% BUY, while M1 shows a brief SELL signal (red) indicating a local correction.
Once the pullback ends and upward momentum resumes, enter the market — click BUY on the trading panel.
Entry Logic
Entry occurs after the corrective dip ends and upward momentum is confirmed.
If market direction is correct and position opened properly, Trailing Stop activates at the auto-calculated profit level, closing the position in profit at the SL level. SMART dynamically adjusts distance based on volatility, maximizing profit extraction from the move.
Sell Signal:
Similarly: BFT = 100% SELL — strong downward momentum. Wait for an upward pullback (BFT may temporarily show 96.43% SELL)
After correction ends and downtrend resumes, click SELL on the panel
⚠️ Important: Always test your strategy on a demo account before switching to live trading.



![[EURUSD]: Weekly Liquidity Activation Points (LAP), October 12-16, 2026](https://c.mql5.com/6/1035/splash-preview-777305.png "[EURUSD]: Weekly Liquidity Activation Points (LAP), October 12-16, 2026")