

GRID KING
GRID KING
Product page: https://www.mql5.com/en/market/product/33065
Grid King is a revolution in grid trading. The main focus when developing the EA was safety, by eliminating the margin-call risk which is usually associated with most grid systems on the market. It also strives to achieve much higher returns than the average grid system, by spreading risk amongst multiple pairs and strategies which all have a limited effect on the account-equity. Where almost all grid systems will blow your account when things get bad, Grid King will only take a small loss and recover very fast. More details about this in the blog.
The EA has been stress-tested for a period of 18 years and passes all those years succesfully without any high drawdown. (*Please use recommended accountsize guidelines -> see below)
The EA is also already optimized for 20 pairs, and more will follow in the future. In theory, any pair or market can be optimized for the algorithm.
The EA uses a unique Spread Equalizer Algorithm (S.E.A.), which dramatically decreases the impact of spread and slippage on the stability.
At the moment, 2 strategies are used for entry:
- "Volatility breakout" strategy, where the EA will trade in the direction of strong price movements.
- "Return to Mean" strategy, where the EA will exploit the fact that price always returns to the mean.
PROMO -> A nice offer for those who bought Grid King
I will give a very nice discount on my 2 very well performing scalpers:
- Night Owl -> 150$ instead of the normal 290$
- Advanced Scalper -> 190$ instead of the normal 350$
- Or Both EA's at 290$ instead of the normal 640$!
Interested? Just give me a PM...
(Offer also valid for new Grid King customers!)
Night Owl -> https://www.mql5.com/en/market/product/20248
Night Owl Live Performance:
Advanced Scalper -> https://www.mql5.com/en/market/product/24254
Advanced Scalper Live Performance:
GRID KING
Key Characteristics:
- very stable growth curve as result of smart averaging techniques
- "safety first" approach in development
- optimizable for any market
- ONLY grid-system on the market that passes 18 years of stress-tests on historical data on multiple pairs
- fully automatic
- Not sensitive to spread, commission, or account type, but ofcourse a low spread ECN broker will always work better and is recommended!
- On-Chart visualisation of TP zones
- Optimized pairs: EURUSD, GBPUSD, USDCAD, USDCHF, USDJPY, EURJPY, GBPJPY, AUDUSD, NZDUSD, EURAUD, EURCAD, EURGBP, AUDNZD, EURCHF, AUDCAD, AUDJPY, GBPCHF, AUDCHF, CHFJPY AND XAUUSD
- One of a kind S.E.A. (Spread Equalizer Algorithm), which greatly improves stability for bigger spreads and slippages. Recommended to use on all pairs
- Easy Setup: With the OneChartSetup, you can run all pairs from a single chart!
Recommended Setup:
- Enable autosettings and run only the optimized pairs
- run only on H1 timeframe
- Run 1 chart for each pair or use the OneChartSetup to run all pairs from 1 chart.
- Use leverage of 1:300 or bigger. The EA will need enough free margin from time to time, so a high leverage is necessary.
- works on all brokers (non FIFO only for now)
- All account types are ok (standard, ECN, STP, Micro)
- As with any EA, it is recommended you run it first on a demo account to get to know the trading style of the EA
- It is recommended to start with default risk setting (conservative) until you understand how the EA is working
- Recommended to run on accounts nominated in EUR or USD for best performance of AutoSafety feature.
- You can use the same magic numbers for different pairs. But the 2 strategies must use a different magicnumber
ACCOUNTSIZE RECOMMENDATIONS:
- balance > 100$ but < 1000$ -> use cent account!
- balance >= 1000$ (or 100$ Cent) -> run low DD pairs only - Set 'Max Pairs'=1
- balance >= 2000$ (or 200$ Cent) -> Set 'Max Pairs'=2 - 'Min equity/margin'=95
- balance >= 3000$ (or 300$ Cent) -> Set 'Max Pairs'=4 - 'Min equity/margin'=95
- balance >= 4000$ (or 400$ Cent) -> Set 'Max Pairs'=6 - 'Min equity/margin'=95
- balance >= 5000$ (or 500$ Cent) -> Set 'Max Pairs'=8 - 'Min equity/margin'=95
- balance >= 7500$ (or 750$ Cent) -> Set 'Max Pairs'=10 - 'Min equity/margin'=90
- balance >= 10000$ (or 1000$ Cent) -> default settings all pairs
- It is only advised to run "Aggressive" or "Very Aggressive" mode when using only very few pairs (1-3)
- When running all pairs, "Very Conservative" or "Conservative" mode is advised
- Recommendation: the more pairs you run, the lower your risk setting should be.
How to run backtests:
- Use tickdata 99.90% for most accurate testing
- use fixed spread or variable spread
- Choose H1 timeframe
- Choose period (for example 2007-2018)
- Use default parameters, or set risk settings to your taste.
- Use EUR or USD as account currency in tests
- When using Tickdata 99.90% -> use GMT=2 or 3
- All Backtests -> Click here
Doing your own optimizations:
- Optimization sets are attached to this blog (scroll all the way down)
- There is a seperate optimization set for each strategy
- you can use 'control points' for optimization, and then confirm results with tickdata
- Optimization sets: Strategy A: DOWNLOAD ; Strategy B: DOWNLOAD
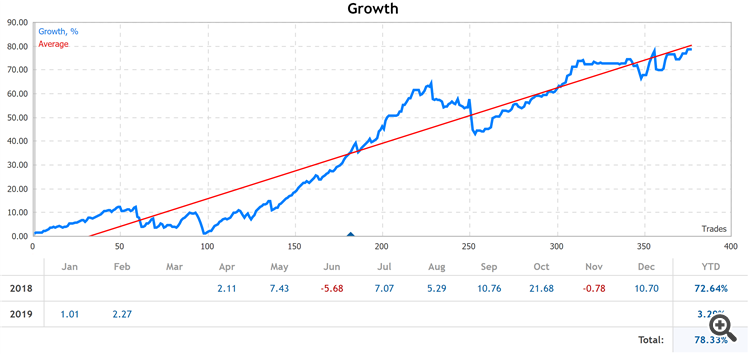
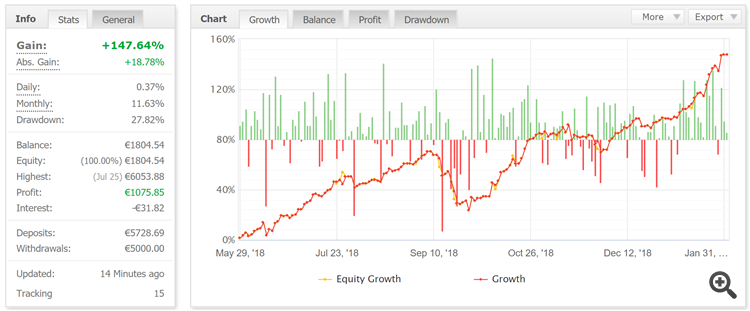
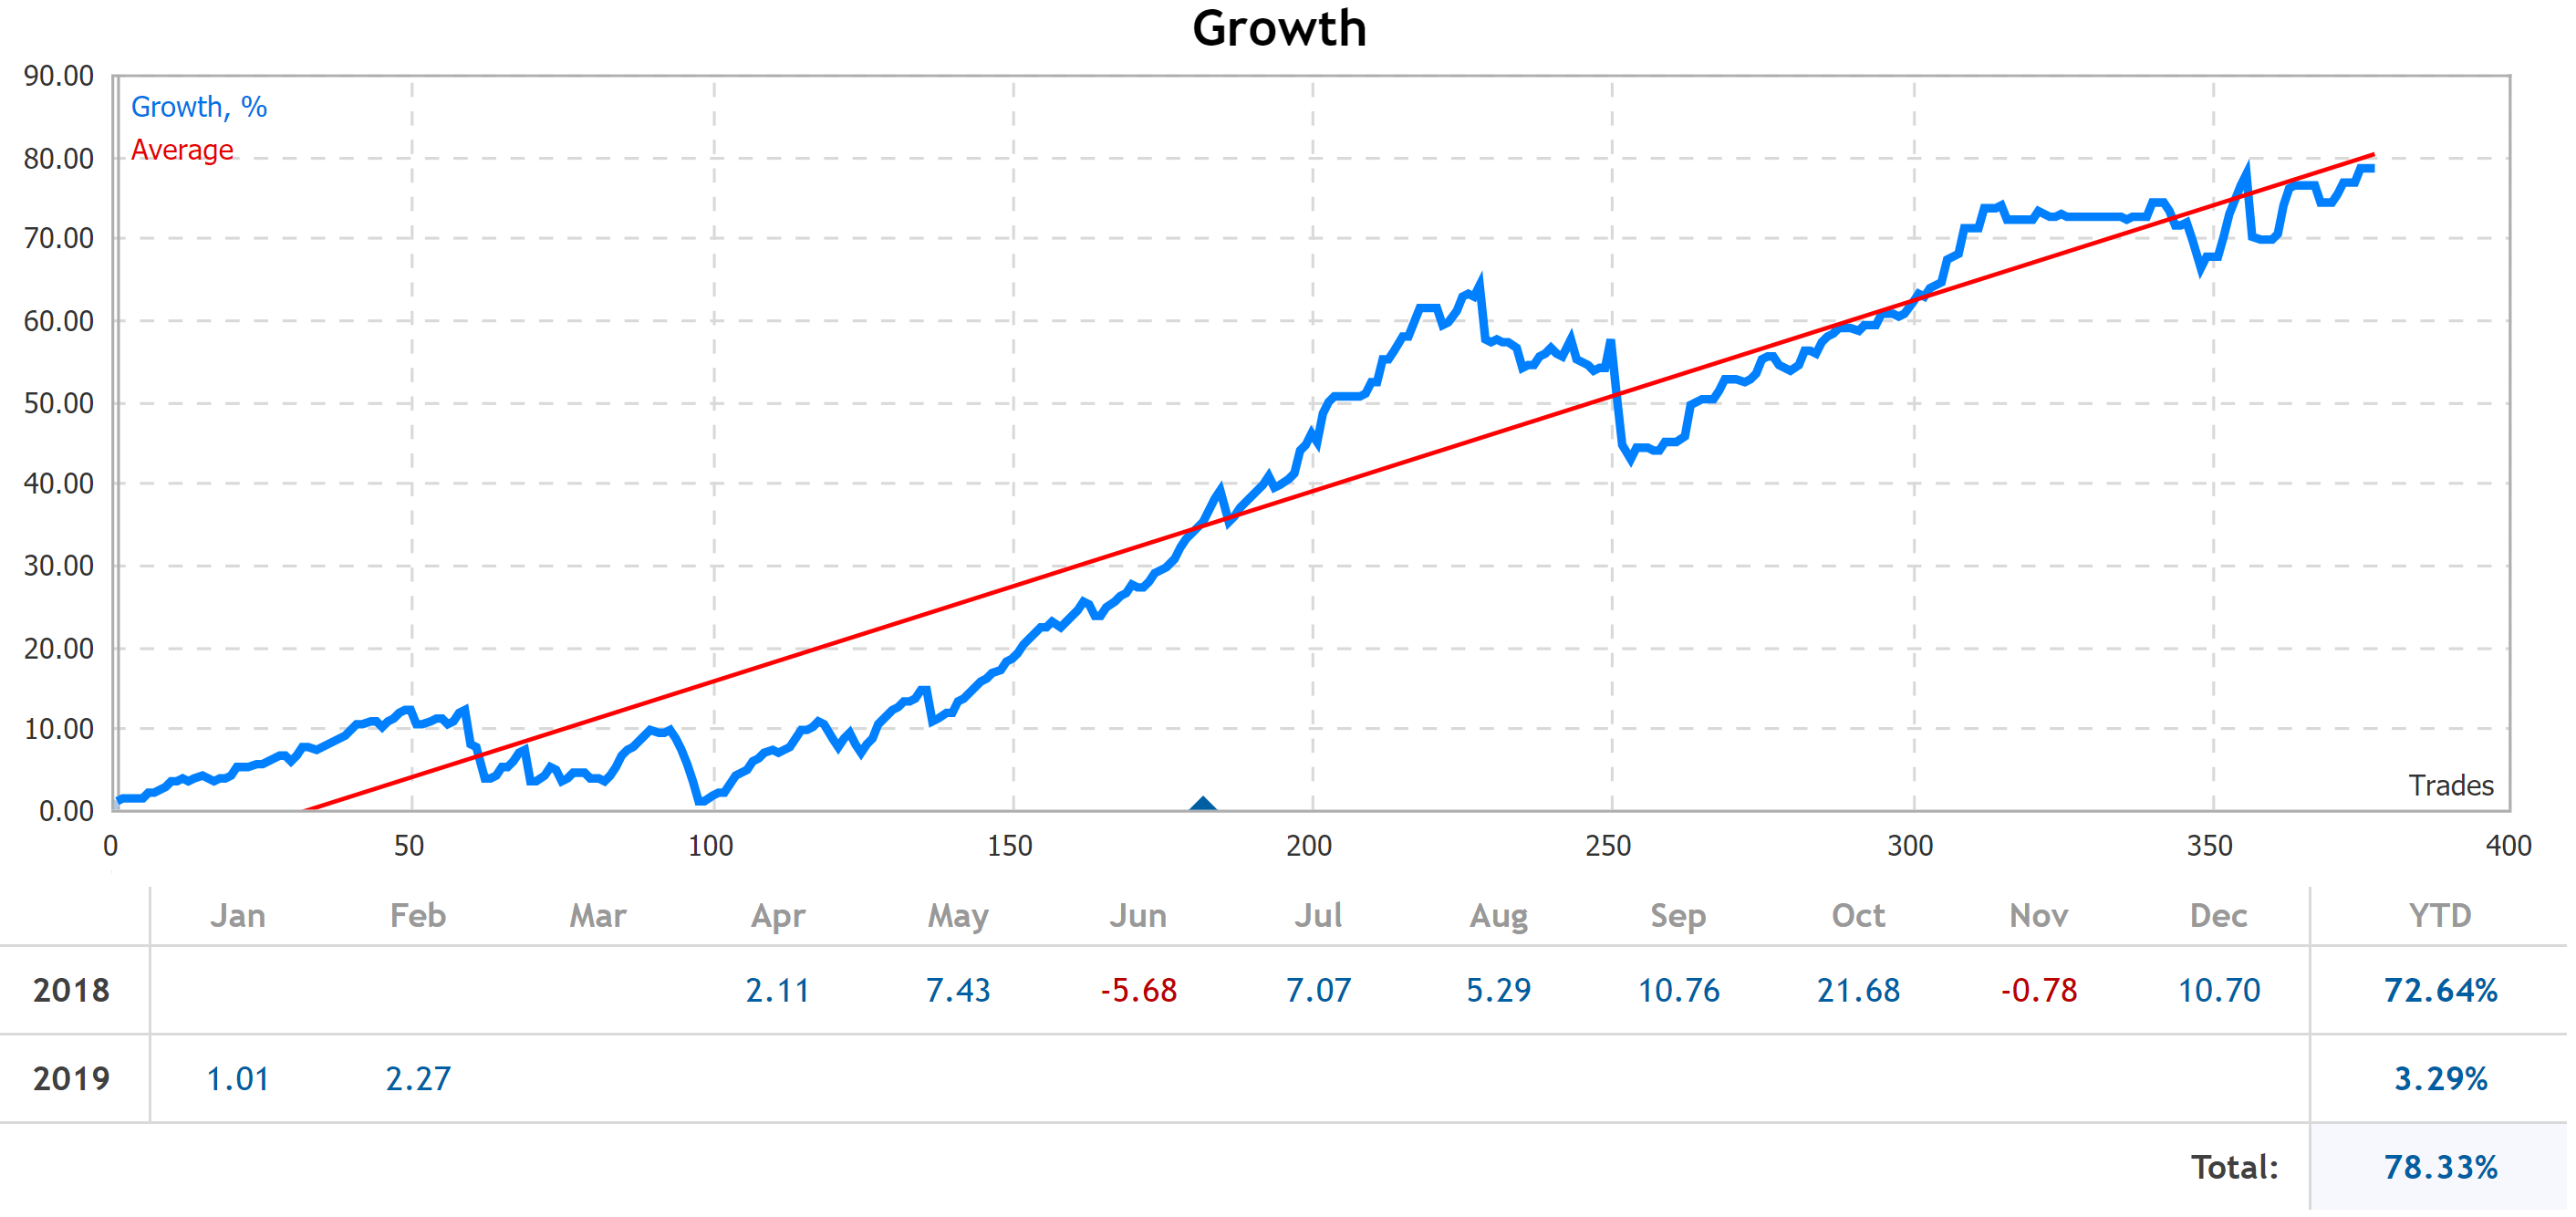
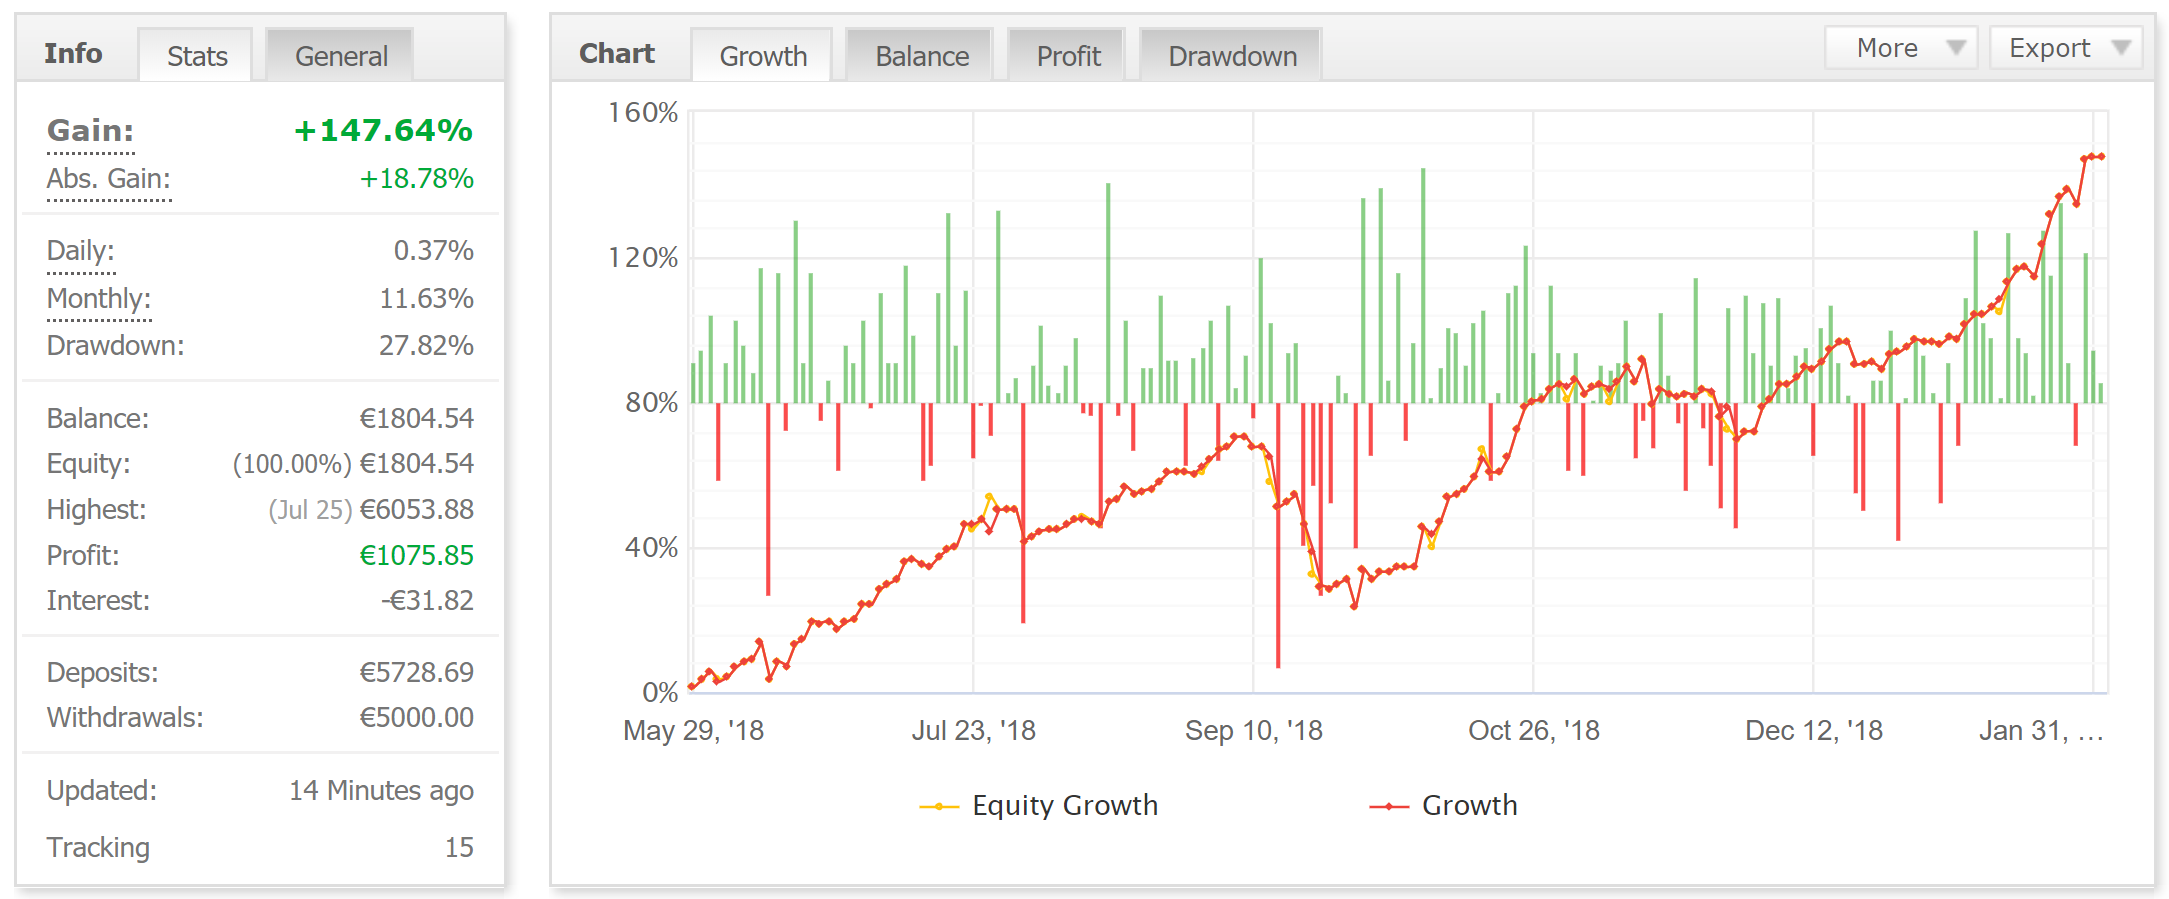
Current live results:
- LIVE ACCOUNT (Low Risk) -> https://www.mql5.com/en/signals/505670
- DEMO ACCOUNT (Low Risk, Autosafety Off) -> https://www.mql5.com/en/signals/512858
- DEMO ACCOUNT (High Risk) -> https://www.mql5.com/en/signals/510731
- Grid King Low Balance multipair TEST -> https://www.mql5.com/en/signals/531880
- Grid King OneChartSetup 15% risk -> https://www.mql5.com/en/signals/535084
- DEMO ACCOUNT (Medium Risk) -> https://www.mql5.com/en/signals/510836
Grid King Safety explained:
As with all grid systems, the EA will use up margin when opening a grid, and there will be equity drawdown when the grid gets bigger. The EA survives without any problem 18 years of historical stress-tests, but I believe we should always be prepared for the worst-case-scenario. In Forex, you must always assume the best AND the worst are still to come! Most grid systems will horribly fail when this occurs, but Grid King is prepared! :-)
So lets assume that the market really goes against our original trade-position, and the grid keeps getting bigger and bigger. For a normal grid system, that usually means a margin call. This is the main reason why almost all grid system eventually result in a complete wipe-out of the account. This is where Grid King makes the big difference. Grid King runs on (currently) 14 pairs, with each having a maximum historical equity-drawdown of between 10-15% of the account's balance. The EA is programmed to protect the account from the worst case scenario by killing all trades from a pair, should somewhere in the future, that maximum 18 year historical "equity drawdown" or "total drawdown in pips" be exceeded. So even if something would happen, that almost never happened during the last 18 years, you would still only lose between 10-15% of your balance (when using my recommended account setup). Keep in mind that these events almost never even happen with Grid King for the last 18 years! But when it DOES happen in the future, and most grid systems would simply keep on increasing margin-usage and use up all equity, resulting in the complete destruction of your account, Grid King only takes a small loss. But if market continues to roll like it did the last 18 years, it will be a very smooth ride :-)
The default setting (AutoSafety) will use max historical DD values taken from the 99.90% tickdata tests using variable spread and commission (7$/lot). They were also tested against Alpari 90% historical data, which is also a very good quality dataset.
These are the values that will be used automatically for "Maximum total pips in loss (per 0.01lots) allowed" when using AutoSafety:
So Please keep in mind, when using the AutoSafety feature, that you account can handle the potential loss when a rare event should occur that causes the grid to become bigger than historically! F
Also, what we can learn from this overview, is that EURUSD for example has the best return VS drawdown ratio. This means that EURUSD is likely to recover the fastest from a possible loss. This list can come in handy when selecting the pairs you want to run on your account.
All these values are based on a lotsize of 0.01lots (for the first trade of the grid) so keep in mind the historical max DD for each pair when chosing it for your accountsize.

You can also choose to disable the autosafety, and use a manual setting here (parameter "Maximum equity drawdown allowed (based on 0.01 startlots!)", and for example set the maximum loss per pair to 1200$. This will cause some pairs to have some losses in the last 18 years, but it is also a good value for keeping your account safe. With the default settings, none of the pairs would have had a single day of loss in the last 18 years, and like mentioned before, and still safeguard your account for the future. For a grid trading system, this safety system is unique and will make sure your account can survive all markets. Make sure to use my recommended accountbalance settings! Or contact me if you need help with the setup.
Here is a comparison for GBPUSD, without the "dramatic event" and then also "with the dramatic event" using the safety feature:
without any extreme equity drawdown:

When the historical maximum drawdown is exceeded at some point:

As you can see, the 'dent' in the growth curve is no disaster. These events are not to be "expected" in the future, but it is nice to know that when it DOES happen, your account is still in safe hands.
When having multiple random "worst case scenario's" on multiple pairs, the longterm growth curve will look something like this:

Recovery is always very quick and so it is still a very smooth ride!
Does this mean the EA can not wipe out your account? Sadly the answer is no. But only when you don't follow my guidelines regarding accountsize and which pairs to run at what lotsize. If you would try to run all pairs on a 1000$ account for example, one day it will have a margin call. But follow my guidelines and there should be no problem... ever! In case of doubt, ask my help!
Tickdata (90%) historical tests from 2000-2018, minimum lotsize:
EURUSD:

GBPUSD:

USDCHF:

USDCAD:

USDJPY:

EURJPY:

AUDUSD:

NZDUSD:

EURAUD:

EURCAD:

EURGBP:

GBPJPY:

AUDNZD:

EURCHF:

AUDCAD:

AUDJPY:

GBPCHF:

XAUUSD:

AUDCHF:

CHFJPY:

All Pairs together:

Some interesting facts when analyzing these numbers:
- Max loss for all pairs is 1500$ or less when using 0.01lots. (In the future, I will try to get this max loss even lower, but for now I believe it is already a very good start.)
- Average monthly profit using all pairs is 1372$/month using 0.01lots
- That means that, even if we would hit a GRID-Close (worst case scenario for a grid) because max historical DD was exceeded, it would be recovered in less than 2 months time
- I would also mean that even if a max loss of 1500$ would be hit, that month will still only suffer a 500$ loss (since the average profit of 1372$ would still also be accumulated that month)
- While losses did not occur in historical performance with version 3.1, they might happen in the future. BUT: Even if we would hit a loss even every 2 months, the EA would still make profits based on annual performance.
- Average montly profit is actually higher than 1372$, because some pairs don't have historical data before 2005, so the years 2003-2004 are lacking a lot of profits in the overview
Reminder: Grid King is a GRID system. A grid system uses an averaging technique to avoid losses, and thus create a very stable growth curve. However, there is no way to avoid losses in Forex, and even the best grid systems eventually will have that loss. For most grid systems, that loss usually means margin call and losing all profits and also initial balance. With Grid King, as explained above, the loss will be very quickly recovered and the account will never be in danger. But you must follow the correct risk management, as to my recommendations. If you run many pairs at high risk setting, a margin call will surely be a possibility somewhere in the future. The good news is, you don't need aggressive settings to make very good returns. So as a general rule of risk recommendation: the more pairs you run, the lower you should set your risk. If you want to run aggressive risk settings, do it with only a few pairs. When in doubt about how to set your risk, please contact me in PM, and I'll help you out.
Parameter List:
- Suffix: fill in the suffix that your broker uses
- Use OneChartSetup (run multiple pairs from 1 chart): if you want to run multiple pairs from a single chart, you must enable this
- OneChartSetup_Pairs: here you can set which pairs to run from a single chart using the OneChartSetup. Pair-names must be in CAPITAL and seperated by a ";"
- Running Mode: Here you can choose to run the automatic mode (recommended) for the optimized pairs, or manual setup. The automatic mode will use automatically the best settings for the optimized pairs and will run both strategies from 1 chart. You can choose a risk level which will automatically choose the best lotsize for your account.
The different risk settings will basically determine the LotsizeStep based on the pair's historical max DD. Ofcourse, a lotsize smaller than 0.01lots is not possible, so Low Risk on a 1000$ account will still trade with 0.01lots, even thought that might be higher risk! (So please follow the accountsize guidelines).
So for example for EURUSD, the Max Loss allowed is 1500$ (on USD account) (see futher down below for more information about these values).
For Very Conservative Risk, the lotsizeStep will be 10X 1500 = 17700. So "first trade" lotsize would be 0.01 until account reaches 15000X2= 30000$. This basically means that the max loss would be 10% (if your accountsize is at least the size of the LotsizeStep
For Conservative Risk, the lotsizeStep will be 5X 1500 = 8850. So "first trade" lotsize would be 0.01 until account reaches 8850X2 = 15000$
For Medium Risk, the lotsizeStep will be 3X 1500 = 4500. So "first trade" lotsize would be 0.01 until account reaches 4500X2= 9000$
For Aggressive Risk, LotsizeStep would be 2X 1500
For Very Aggressive risk, lotsizestep would be 1500. And this would mean your maximum loss could be around 67% of your account for that pair. So use this information when setting up the EA and choosing your pairs!
There is also the option "Use Max Risk parameter". This will allow the user to set a maximum risk (loss in %) for the pair. You can set that risk in the parameter "Max Risk (% loss) for worst case scenario". For example, by default the value is 15 (%) so that means that the EA will select a lotsize for the pair, so that if the max historical loss is reached, it will not be more than 15% loss in the account. Ofcourse, minimum lotsize will always be 0.01lots, so the minimum risk will always be the maximum historical DD based on 0.01lots. There is an overview of these maximum historical DD for all pairs a bit further in the blog!
Ofcourse, you can also choose manual lotsize selection. You must then set either the lotsize you want to use in "StartLots" (Autolotsize=false), or you simply choose the LotsizeStep (Autolotsize=true), which will link a fixed amount of money to 0.01lots
When setting the autosettings=OFF -> the EA will use manual selected parameters for entry and grid. When selecting any other autosettings-mode, the EA will disregard the parameters from the entry and grid section, and will use all pre-optimized settings for each of the recommended pairs. - Do not trade pair if possible loss > Max Risk: When you enable this parameter, the EA will NOT trade the pair, if the possible loss would be bigger than the maximum allowed loss (set automatically by the AutoSafety feature, or manually with the parameter "Maximum equity drawdown allowed (based on 0.01 startlots!)", which is explained further down.
- AutoSafety Options: Here you can set HOW the EA will act when historical max DD is reached. There are 4 options:
- A) do not use autosafety;
- B) Close the grid when Max Loss is hit.
- C) Hedge grid when max loss is hit and stop trading the pair.
- D) don't close or hedge, but show a warning to the user
- AutoSafety Value, per 0.01 lots (0=use optimized value): This will overide my default optimized Max Loss values when using the Autosafety. You can set the value here that you want to use.
- Allow autosafety extra room (in% 0-100) before triggering closing of grid: this will give the autosafety grid closing some extra room. So if the autosafety would normally close the grid at 1000$ equity DD, and you put in this parameter "20", it will close the grid at 1200 instead of 1000$.
- Run Strategy 1 when using autosettings: enable strategy 1 when running autosettings
- Run Strategy 2 when using autosettings: enable strategy 2 when running autosettings
- Portion of Balance to use (0-1: percentage; >1:fixed $/€ amount): Here you can limit the portion of balance to be used by the EA. A value between 0 and 1 (for example 0.5) will use a percentage of the balance (this case 50%). A value bigger than 1 will be used as absolute value (so a value of "10000" would mean the EA will use 10000$/€ from your account for the EA)
- StartLots: lotsize for the first trade when not using autolotsize
- autolotsize: enable automatic lotsize calculations based on balance
- LotsizeStep: the EA will use 0.01lots for every X amount of balance. For example LotsizeStep=5000 -> lotsize for first trade will be 0.01lots on a 5000$ account, 0.02 on a 10000$ account and so on.
- Maximum number of trades allowed : Maximum number of open trades (per trade direction)
- Maximum lotsize for the first trade: Maximum lotsize for the first trade
- Maximum lotsize for the biggest trade: Maximum lotsize for the biggest trade
- WaitForNewCandle: the EA will wait until the next candle opens before setting trades
- RetryFailedTrades: the EA will retry trades that failed (for example during market swap)
- Entry Mode Selection: Select the entry strategy -> Volatility breakout; Return to the mean or Manual Trading
- entry trigger based on pips: minimum candle size for entry based on absolute pip-value
- entry trigger based on ATR: minimum candle size for entry based on ATR
- Atr Period: ATR Period
- Atr Timeframe: Timeframe used for ATR
- MA_Timeframe: Timeframe used for Moving Average
- MA_Period: Period of Moving Average
- MA_Price: Applied Price for Moving Average
- MA_Mode: Mode selction for Moving Average
- entry trigger based on pips: minimum candle size for entry based on absolute pip-value
- entry trigger based on ATR: minimum candle size for entry based on ATR
- Enable automatic grid expansion: This is for the Manual Trading mode. When disabled, the EA will only put new grid trades when the user manually does it with the on-chart buttons. When enabled, the EA will also automatically add trades to the grid once the first trade is set by the user.
- Grid_Timing: Timeframe used for consecutive trades
- GridStep: Minimum distance between trades
- GridInitialStep: Minimum distance between first 2 trades
- TP for first trade: TP for first trade at candle closing
- flash TP for first trade: TP for first trade at every tick
- TP for grid trades: TP for open grid at candle closing
- flash TP for grid trades: TP for open grid at every tick
- UseFlashTP_HardTP: This will make the EA set HARD TP at the Flash TP level
- ExtraPipHardTP: here you can set the number of pips to add to the HARD FlashTP level
- Grid_Mode: Select how consecutive trades must increase in size
- Hedge open grid, instead of taking loss, and stop trading: When using this option, the EA will NOT close the grid in case of the maximum allowed equity drawdown, or maximum allowed drawdown in pips is exceeded. Instead, it will hedge the open trades from the grid to prevent further drawdown. And the trading will be stopped for that pair. This way, the experienced trader can manage the grid+hedge himself further.
- Minimum equity (in %) compared to balance: Do not trade (first trade) when equity is below this number. So for example when you use the default value (70) that means that a pair will not start setting its first trade if equity is lower than 70% of the balance. This is to protect the account from opening another grid, if there is already a bigger grid open from another pair or pairs.
- Minimum free Margin (in %) compared to balance: Do not trade (first trade) when free margin is below this number. So for example when you use the default value (70) that means that a pair will not start setting its first trade if free margin is lower than 70% of the balance. This is to protect the account from opening another grid, if there is already a bigger grid open from another pair or pairs.
- NO-GO Correlated Pairs: here you can put the pairs which you would NOT like the pair of the chart to correlate with. so when one of these pairs have already trades opened, the pair you are trading will not open the first trade in the same direction. !! THE EA MUST USE THE SAME MAGICNUMBERS FOR DIFFERENT PAIRS FOR THIS TO WORK !!
- Maximum number of other pairs allowed before starting to trade: this will limit the number of maximum number of pairs that can open trades together. !! THE EA MUST USE THE SAME MAGICNUMBERS FOR DIFFERENT PAIRS FOR THIS TO WORK !!
This option can be used when you want to run more pairs then the recommended number, on smaller accounts. For example on a 3000$ account, you could run 6 pairs (select non-correlated pairs!) but set this parameter=2. So then the EA will only run 3 pairs at the same time - Do not trade strategies in same direction: this will make the EA trade only 1 strategy per trade direction. So if one of the strategy has already long trade, the second strategy will not open trades until they are closed.
- Use Spread-Equalizer algorithm (recommended!): this enables the S.E.A. algorithm for much more stable performance on bad spread or slippage.
- Magicnumber for strategy A: Magicnumber for "Volatility Breakout" strategy
- Magicnumber for strategy B: Magicnumber for "Return to the Mean" strategy
- comment: Trade comment
- Draw TP Lines ("false" for faster backtesting..): Draw TP lines on chart
- Show chart info ("false" for faster backtesting..): show trade info on chart
- Color TP line ST1: color selection
- Color Flash TP line ST1: color selection
- Color TP line ST2: color selection
- Color Flash TP line ST2: color selection
Chart overview:

21/11/2018: Newly added "Manual Trading" mode:

In this mode, there will be 2 new buttons on the chart: "Open Buy" and "Open Sell". With these buttons, the user can start trading and start adding grid trades manually. The EA will NOT run any entry algorithm in this mode, but there is the option to automatically trade the grid once the first trade is opened by the user. To enable this mode, you must set "Running Mode=manual settings for entry and grid" and then "Entry Mode Selection=Manual Trading". the EA will use MagicnumberA for all trades. In this mode, no automatic settings will be used, so make sure you set your grid parameters like you want them to be.
A) Set Running Mode=manual settings for entry and grid
B) Set Entry Mode Selection=Manual Trading
C) Set you lotsize settings in the "Manual Lotsize Setup" section
D) Set you grid parameters (all of them like you want your grids to unfold)
E) Set the parameter "Enable automatic grid expansion" to your liking. "true" would mean the EA will automatically add trades to the grid once you started a trade. It will use the grid parameters that you set in your grid settings. "False" would mean that the EA will not automatically add grid trades, but will wait for the user to add another trade
The user can add trades with the "open buy" and "open sell" buttons on the chart (they will only appear after you setup the EA for manual trading)


")
")
![[XAUUSD]: Weekly Liquidity Activation Points (timings), June 22-26, 2026](https://c.mql5.com/6/1013/splash-preview-771790.png "[XAUUSD]: Weekly Liquidity Activation Points (timings), June 22-26, 2026")