
Developing graphical interfaces based on .Net Framework and C# (part 2): Additional graphical elements

Contents
- Introduction
- Arranging the test of new elements
- MessageBox
- TabControl
- CheckBox
- Radio Button
- Combo Box
- NumericUpDown (numerical listing window)
- DataTimePicker (date selection window)
- ElementHide and ElementEnable - hiding and disabling an arbitrary element
- AddItem - adding subelements
- Exception - event of receiving exceptions
- Summary tables of available graphical elements and events
- Conclusion
Introduction
Since October 2018, MetaTrader 5 supports integration with Net Famework libraries. This set of libraries is actually much more than a framework or a specialized system for performing a specific range of tasks, like drawing graphical windows or implementing a network interaction. Net Framework has literally everything. It allows developing websites (Net Core, MVC), creating system applications having a unified professional interface (Windows Forms), building complex distributed systems with data exchange between nodes and working with databases (Entity Framework). Besides, Net Framework is a huge community of programmers and companies with thousands of various open source projects. If the interaction is organized properly, all this can be available in MQL today.
In this article, we will continue to develop the functionality of GuiController created in the first part. This functionality is aimed at interacting with the graphical functionality of the Net Framework based on the Windows Forms technology. Currently, plenty of info is available on MQL graphical features. There are a lot of various libraries that do more or less the same by means of MQL. Therefore, I do not want this material to be perceived by readers as "another library for working with forms". In fact, this material is only a part of a large series of articles describing interaction with Net Framework and gradually revealing boundless features of this software platform. Windows Forms is only one of the building blocks within this platform, although a very convenient and comprehensive one, just like any part of the Net technology. The Windows Forms graphical subsystem is a great starting point for exploring this framework. After proper studying, it can be applied in other interactions with Net Framework. Besides, it also allows creating quite efficient and, most importantly, easy-to-implement trading panels, EA configuring windows, advanced graphical indicators, robot control systems and other things related to interaction between users and the trading platform.
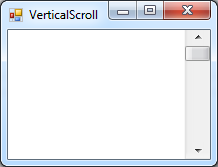
However, in order to implement all these exciting features, it is necessary to significantly improve the module of interaction between an MQL program and C# library. As you may remember, in the first section, the GuiController module was only able to interact with a few WinForms elements, such as buttons (Button), text labels (Label), text fields for entering the text (TextBox) and the vertical scroll bar. Despite this meager support, we managed to create a complete and fairly functional graphical panel:
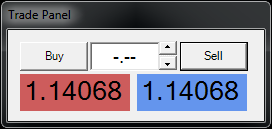
Fig. 1. Trading panel created in the first part of the article
Despite a rather impressive result, we will not stop there and continue to improve our controller. In this article, we will provide it with additional graphical elements allowing users to create most types of forms.
Arranging the test of new elements
To introduce support for new elements, it is necessary to organize a kind of "test bench". This allows us to fine-tune working with new elements and eliminate potential errors that appear when introducing new functionality. Our "test bench" is to consist of the controller, forms with the necessary sets of graphical elements and the EA that is to handle these elements. All forms are to be located inside a single DemoForm.exe. Inside the EA, we will develop a custom parameter that is to specify what graphical form from DemoForm.exe should be downloaded:
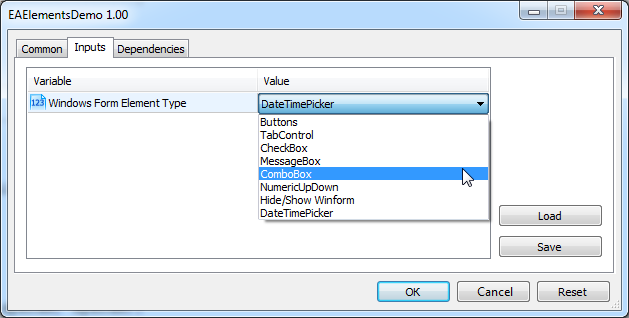
Fig. 2. Selecting the downloaded custom form with necessary elements
The test EA itself is quite simple. In fact, it is to consist of two parts: download function (standard OnInit initialization function) and graphical events handler function (event loop in the OnTimer function). As you may remember, work in GuiController is performed via calling static methods. There are only four main methods:
- Show Form - launch a form from a specific build;
- HideForm - hide the form;
- GetEvent - get an event from the form;
- SendEvent - send an event to the form.
In the OnInit function, we will download the necessary window depending on a selected element. The function prototype is shown below:
int OnInit()
{
   switch(ElementType)
   {
      case WINFORM_TAB:
         GuiController::ShowForm("DemoForm.exe", "tab_form");
         break;
      case WINFORM_BUTTON:
         GuiController::ShowForm("DemoForm.exe", "button_form");
         break;
      ...
   }
   ...
}
In the OnTimer function, we will handle events coming from the form:
//+------------------------------------------------------------------+
//| Timer function                                                   |
//+------------------------------------------------------------------+
void OnTimer()
{
   //-- get new events by timer
   for(static int i = 0; i < GuiController::EventsTotal(); i++)
   {
      int id;
      string el_name;
      long lparam;
      double dparam;
      string sparam;
      GuiController::GetEvent(i, el_name, id, lparam, dparam, sparam);
      ...
      if(id == TabIndexChange)
         printf("Selecet new tab. Index: " + (string)lparam + " Name: " + sparam);
      else if(id == ComboBoxChange)
         printf("ComboBox '" + el_name + "' was changed on " + sparam);
      ...
   }
}
Thus, for each of the graphical elements, we will create a short working example illustrating interaction with it. We will also describe in detail the events it supports.
MessageBox
Starting with the second version, the controller supports message boxes. This is a standard user information element. It also offers users several options and receives a response in the form of a selected option.
To launch demonstration of message windows, select the 'Buttons and MessageBox' option in the Windows Form Element Type parameter when launching the EA. After launching the EA, a form appears prompting to choose one of the options:
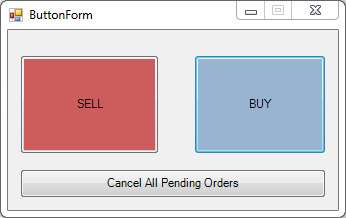
Fig. 3. Sample form calling message boxes
This form, as well as all subsequent ones, is a demonstration one, therefore it is not equipped with trade logic. However, after pressing any of the buttons, the EA sends a warning message requesting confirmation of selected actions. For example, the following message window is displayed when clicking SELL:
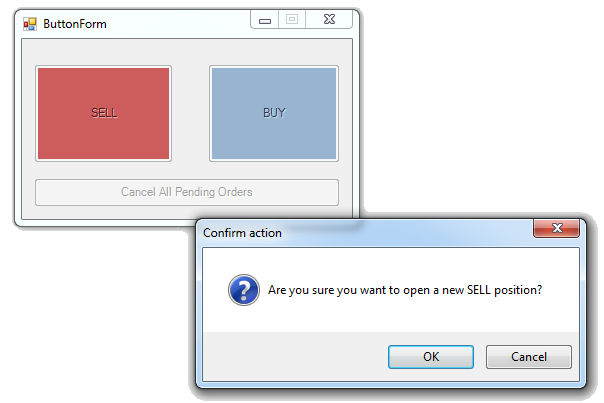
Fig. 4. Trading EA requests confirmation to open a new short position
After a user has clicked one of the buttons, the clicking event is remembered and recorded in the GuiController event buffer. The EA surveys the event buffer with a specified frequency and starts handling it as soon as it finds out that a new event has entered the buffer. Thus, the EA needs to receive the "Button clicking" event and react to it by sending the 'MessageBox' oncoming event.
for(static int i = 0; i < GuiController::EventsTotal(); i++)
   {
      int id;
      string el_name;
      long lparam;
      double dparam;
      string sparam;
      //-- Get a new event
      GuiController::GetEvent(i, el_name, id, lparam, dparam, sparam);
      //-- Define its type - button clicking
      if(id == ClickOnElement)
      {
         //-- Display the names of the clicked button in the terminal console
         printf("You press '" + sparam + "' button");
         string msg;
         //-- Depending on the clicked button type, form the MessageBox message
         if(el_name != "btnCancelAll")
            msg = "Are you sure you want to open a new " + sparam + " position?";
         else
            msg = "Are you sure you want to close all positions?";
         //-- Send an ongoing event with the MessageBox display command
         GuiController::SendEvent("ButtonForm", MessageBox, LockControl, OKCancel, msg);
      }
      ...
   }
Let's analyze the signature of sending an event:
GuiController::SendEvent("ButtonForm", MessageBox, LockControl, OKCancel, msg);
It means that the EA asks to display the message box with the main text in the 'msg' variable showing OK and Cancel buttons (OKCancel). In the first part of the article, we mentioned that the first parameter of the SendEvent method contains the name of the sent event receiver's graphical element. However, this field works differently with MessageBox. Message boxes are not bound to a specific graphical window or element (although Windows Frorms allows such binding). Therefore, GuiController creates the new message window and it does not need a destination address. Generally, after displaying the message, the window it is related to should be blocked. Indeed, it would be strange if, when displaying a message, it was possible to repeatedly click the BUY or SELL button ignoring appearing MessageBox. Therefore, in GuiController, the name of the first parameter for this event stands for the element that should be blocked until the user clicks one of the MessageBox buttons. The blocking function of an arbitrary graphical elements is optional. It is specified using the integer lparam variable: 0 - no window blocking, 1 - blocking is present. However, it is much more convenient to operate with constants rather than zeros and ones. To achieve this, two constants are defined in GuiController using the BlockingControl enumeration:
- LockControl;
- NotLockControl
The first one blocks the window before a user presses the button, the second one does nothing allowing the graphical window to remain accessible to the user.
Apart from the text, the message window may also contain various button combinations. By clicking these buttons, a user agrees with a certain choice. The button sets are defined using the System.Windows.Forms.MessageBoxButtons system enumeration. Enumeration elements are not available to MQL users since they are defined in the external build. To simplify the work of MQL programmers dealing with GuiController, we have implemented the new enumeration — the clone of System.Windows.Forms.MessageBoxButtons with the same parameters. The enumeration is defined in IController.cs:
//
// Summary:
//     Specifies constants defining which buttons to display on a System.Windows.Forms.MessageBox.
public enum MessageBoxButtons
{
    //
    // Summary:
    //     The message box contains an OK button.
    OK = 0,
    //
    // Summary:
    //     The message box contains OK and Cancel buttons.
    OKCancel = 1,
    //
    // Summary:
    //     The message box contains Abort, Retry, and Ignore buttons.
    AbortRetryIgnore = 2,
    //
    // Summary:
    //     The message box contains Yes, No, and Cancel buttons.
    YesNoCancel = 3,
    //
    // Summary:
    //     The message box contains Yes and No buttons.
    YesNo = 4,
    //
    // Summary:
    //     The message box contains Retry and Cancel buttons.
    RetryCancel = 5
}
The constants of these enumeration are available in MQL Editor directly, for example via IntelliSens, making configuring MessageBox quite convenient. For example, if we replace OKCancel with YesNoCancel in SendEvent, the dialog window receives another set of buttons:
GuiController::SendEvent("ButtonForm", MessageBox, LockControl, YesNoCancel, msg);
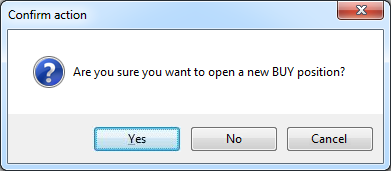
Fig. 5. The standard combination of three buttons - Yes/No/Cancel
Apart from button sets, GuiController supports configuring message icons, as well as the window header text. Since the SendEvent method has a fixed number of parameters, it is quite problematic to pass all settings through it, so an alternative solution was found. A message text line can be divided into sections using the " |" symbol. In this case, each section is responsible for a certain additional parameter. Number of sections may vary from one (no separators) to three (two separators). Let's consider a few examples. Suppose you want to display a simple message without an icon or additional caption. In this case, the message sending format is as follows:
GuiController::SendEvent("ButtonForm", MessageBox, LockControl, OK, "This is a simple message");
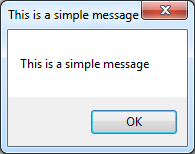
Fig. 6. The simple message with no icons and additional text in the window name
An icon can be added to a message by using a special constant in the additional section. Suppose that we want to display a message with the Warning icon. To do this, replace the message text format with the following one:
GuiController::SendEvent("ButtonForm", MessageBox, LockControl, OK, "Warning|Your action can be dangerous");
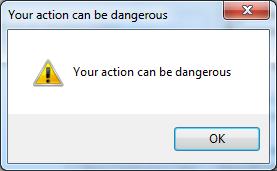
Fig. 7. The message with the warning icon
An icon can be set not only using key words but also by the pseudonym icon. If we enter "?" instead of Warning, the effect will be as follows. Apart from Warning, we can set info, question and error icons. Below is a table of key words and pseudonyms for the icons:
| Icon | Keyword | Pseudonym |
|---|---|---|
| | Warning | ! |
| | Error | !!! |
| | Info | i |
| | Question | ? |
Apart from icons, we can also set a name of a message window. To do this, separate the text by "|" and enter the window name. Here is an example of a complete definition of a window with an error message:
GuiController::SendEvent("ButtonForm", MessageBox, LockControl, OK, "!!!|The operation was cancelled|Critical Error");

Fig. 8. The named message window with the error icon
The controller features the smart line analysis. If we enter "!!!|The operation was cancelled", the critical error icon with an appropriate message is displayed. If we indicate the two sections "The operation was cancelled|Critical Error" in the line, no icon is displayed, but the window name is changed to Critical Error.
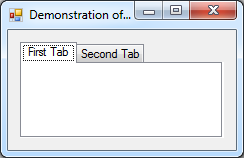
TabControl
Tabs are a convenient tool for arranging elements into groups:
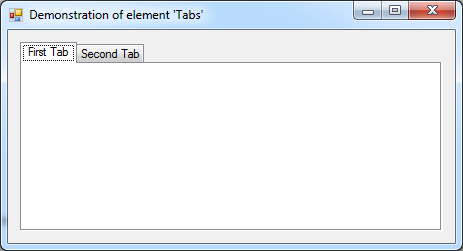
Fig. 9. Panel with two tabs
The tab control element supports a single TabIndexChange event. It informs that a user has moved to another tab. The test EA features the code tracking tabulation changes on the form. Let's have a look at the code fragment:
for(static int i = 0; i < GuiController::EventsTotal(); i++)
{
  int id;
  string el_name;
  long lparam;
  double dparam;
  string sparam;
  GuiController::GetEvent(i, el_name, id, lparam, dparam, sparam);
  if(id == TabIndexChange)
     printf("Selecet new tab. Index: " + (string)lparam + " Name: " + sparam);
}
TabIndexChange event passes the two parameters: lparam and sparam. The first one contains the index of a user-selected tab. The second one contains the name of a selected tab. For example, if a user selects the first tab, the EA types the following message:
Selecet new tab. Index: 0 Name: tabPage1
Tabs are extremely useful graphical elements. It is not always necessary to track tabulation. WindowsForm requires all elements of a single form to have unique names. Thus, two elements of the same type located in different tabs are unique, and according to WindForms, should be named differently. On the other hand, it is usually necessary to track the pressing of direct controls. A tab such an element is located at is not always important. However, it is sometimes necessary to track such events, and therefore, GuiController provides a necessary interaction interface sufficient for this element.
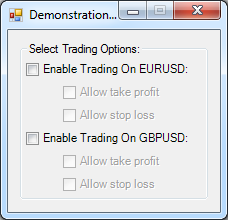
CheckBox
A checkbox is one of the key elements of any graphical interface. Despite its simplicity, it is used in a wide variety of interfaces starting with older versions of Windows and ending with web and mobile applications. It allows for intuitive indication of any option. Besides, it is possible to show options that are not available for some reason allowing users to intuitively select options that do not contradict each other:
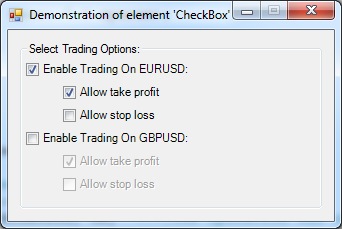
Fig. 10. Selecting options using the combination of checkboxes
A checkbox has three states: checked (Checked), unchecked (Unchecked) and partially checked (Indeterminate). Windows Forms features the System.Windows.Forms.CheckState structure describing these states:
namespace System.Windows.Forms
{
    //
    // Summary:
    //     Specifies the state of a control, such as a check box, that can be checked, unchecked,
    //     or set to an indeterminate state.
    public enum CheckState
    {
        //
        // Summary:
        //     The control is unchecked.
        Unchecked = 0,
        //
        // Summary:
        //     The control is checked.
        Checked = 1,
        //
        // Summary:
        //     The control is indeterminate. An indeterminate control generally has a shaded
        //     appearance.
        Indeterminate = 2
    }
}
Each time a user clicks this check box, GuiController passes its status to the MQL EA using the CheckBoxChange event via the lparam variable. Its values correspond to one of the enumeration options: 0 — Unchecked, 1 — Checked, 2 — Indeterminate.
In the demonstration example, the EA tracks selection of 'Enable Trading On EURUSD' and 'Enable Trading On GBPUSD' checkboxes. As soon as one of the options becomes available, it unlocks its 'Allow take profit' and 'Allow stop loss' sub-options as well. Conversely, if a user removes the flag from one of the main options, its sub-options are locked at once. This is achieved thanks to the two events: ElementEnable and CheckBoxChange. The code below presents the algorithm of handling checkboxes by the EA:
void OnTimer()
{
   //-- get new events by timer
   for(static int i = 0; i < GuiController::EventsTotal(); i++)
   {
      int id;
      string el_name;
      long lparam;
      double dparam;
      string sparam;
      GuiController::GetEvent(i, el_name, id, lparam, dparam, sparam);
      if(id == CheckBoxChange)
         ChangeEnableStopAndProfit(el_name, id, lparam, dparam, sparam);
   }
}

//+------------------------------------------------------------------+
//| Change enable stops and profit                                   |
//+------------------------------------------------------------------+
void ChangeEnableStopAndProfit(string el_name, int id, long lparam, double dparam, string sparam)
{
   int id_enable = ElementEnable;
   if(el_name == "EURUSDEnable")
   {
      GuiController::SendEvent("EURUSDProfit", id_enable, lparam, dparam, sparam);
      GuiController::SendEvent("EURUSDStop", id_enable, lparam, dparam, sparam);
   }
   else if(el_name == "GBPUSDEnable")
   {
      GuiController::SendEvent("GBPUSDProfit", id_enable, lparam, dparam, sparam);
      GuiController::SendEvent("GBPUSDStop", id_enable, lparam, dparam, sparam);
   }
}
As soon as the EA is notified that a user has checked one of the checkboxes, it sends the ongoing ElementEnable event equal to 'true' to GuiController. If, on the contrary, a user unchecks the box, the ElementEnable equal to 'false' is sent. Due to this interaction of the EA and the form with the help of different events, an interactivity effect is created: the form begins to change the accessibility of subelements depending on a user choice, although the control logic itself is located directly in the EA.
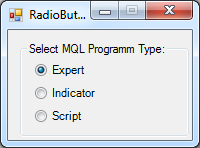
Radio Button
A radio button is a simple graphical element allowing users to select a necessary point from predefined ones:
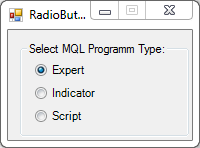
Fig. 11. Radio buttons
When users change their choice, the EA receives the change event twice: from the unchecked button and from the checked one. Both events are tracked using the same RadioButtonChange identifier. Here is an example of its use:
for(static int i = 0; i < GuiController::EventsTotal(); i++)
{
  int id;
  string el_name;
  long lparam;
  double dparam;
  string sparam;
  GuiController::GetEvent(i, el_name, id, lparam, dparam, sparam);
  else if(id == RadioButtonChange)
  {
      if(lparam == true)
         printf("Your have selected " + sparam);
      else
         printf("Your have deselected " + sparam);
  }
}
The lparam parameter contains the flag informing of what happened to the button: whether it was checked (plaram = true) or unchecked (lparam = false). When clicking the buttons, the EA displays similar messages in the terminal:
Your have deselected Expert
Your have selected Indicator
Your have deselected Indicator
Your have selected Script
...
Combo Box
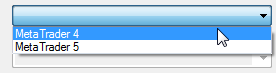
A combo box is one of the most common elements. Along with CheckBox, it is applied both in web development and in modern mobile applications. It is also one of the most commonly used elements in Windows:
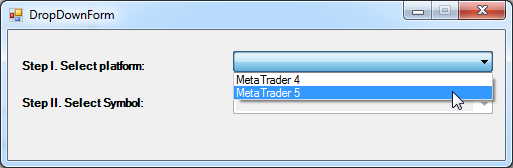
Fig. 12. Combo box and available menu items
The combo box is used in two main modes. The first one allows users to enter new values apart from existing ones:

Fig. 13. Selecting a symbol with the ability to enter a new one
The second mode offers users only predefined menu items without the ability to select custom ones (see Fig. 11). There is also the third mode that hides the menu items, but it is rarely used, so we will not dwell on it.
All ComboBox display modes are set using the DropDownStyle property. This property is usually set once when developing the graphical interface, therefore GuiController has no event that allows you to change ComboBox type. However, the controller allows tracking the selection of an element from the combo box, as well as entering a new value. Thus, ComboBox supports two events: its own ComboBoxChange and TextChange. Our demonstration form consists of the two ComboBox elements. The first one offers to select the platform (MetaTrader 4/MetaTrader 5), while the second one selects the symbol. The second element is blocked by default. However, as soon as users select a platform, they are able to select a trading symbol. Below is the code implementing the functionality:
for(static int i = 0; i < GuiController::EventsTotal(); i++)
{
  int id;
  string el_name;
  long lparam;
  double dparam;
  string sparam;
  GuiController::GetEvent(i, el_name, id, lparam, dparam, sparam);
  if(id == ComboBoxChange)
  {
     if(el_name == "comboBox1")
        //-- Unblock the list of symbols as soon as the user selects the platform:
        GuiController::SendEvent("comboBox2", ElementEnable, 1, 0.0, "");
     printf("ComboBox '" + el_name + "' was changed on " + sparam);
  }
}
If we start selecting combo box elements, the demo EA starts displaying parameters of the user-made choice in the terminal:
ComboBox 'comboBox1' was changed on MetaTrader 5
ComboBox 'comboBox2' was changed on GBPUSD
ComboBox 'comboBox2' was changed on USDJPY
...
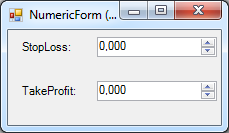
NumericUpDown (numerical listing window)
A numerical listing window is often used in analytical systems, including trading panels. That is why this element was among the first to be included in GuiController. A numerical listing window allows setting a certain value controlling the input type. Only numbers can be entered. The value changing step can be modified using a special mini-scroll. The number's digit capacity is configurable as well:
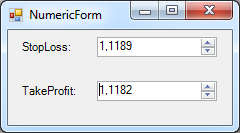
Fig. 14. Numerical listing window
GuiController supports four events for this element type:
- NumericChange receives or sends an event containing a new numeric value of a window;
- NumericFormatChange sends an event specifying the number's digit capacity (in the lparam variable) and its change step (in the dparam variable);
- NumericMaxChange sends an event specifying the maximum possible value;
- NumericMinChange sends an event specifying the least possible value.
NumericUpDown interacts with users via a single NumericChange event. When a user changes the numerical value in this window, the EA receives an appropriate notification via the event. This is the only possible user interaction. However, the EA can configure the window setting the most significant parameters: digit capacity, change step, as well as maximum and minimum acceptable values. All these parameters depend on the EA logic and type of data it works with, therefore, it is impossible to define them directly in the form settings. They should be defined during the program launch.
The test EA includes a small example that illustrates working with NumericUpDown. The code of uploading the form from Fig. 13 is provided below.
//+------------------------------------------------------------------+
//| Expert initialization function                                   |
//+------------------------------------------------------------------+
int OnInit()
{
   if(ElementType != WINFORM_HIDE)
      EventSetMillisecondTimer(100);
   else
      EventSetMillisecondTimer(1000);
   switch(ElementType)
   {
      ...
      case WINFORM_NUMERIC:
      {
         GuiController::ShowForm(assembly, "NumericForm");
         double ask = SymbolInfoDouble(Symbol(), SYMBOL_ASK);
         double bid = SymbolInfoDouble(Symbol(), SYMBOL_BID);
         double price_step = NormalizeDouble(SymbolInfoDouble(Symbol(), SYMBOL_TRADE_TICK_SIZE), Digits());
         long digits = (long)Digits();
         GuiController::SendEvent("NumericForm", TextChange, 0, 0.0, "NumericForm (" + Symbol() + ")");
         NumericSet("StopLoss", Digits(), ask, (double)LONG_MAX, 0.0, price_step);
         NumericSet("TakeProfit", Digits(), bid, (double)LONG_MAX, 0.0, price_step);
         break;
      }
      ...
   }
   return(INIT_SUCCEEDED);
}
As can be seen from the code, during the upload, the EA receives data on the current symbol: its Ask and Bid prices, digit capacity and price step. After that, these parameters are set for NumericUpDown form elements using the special auxiliary NumericSet function. Let's have a look at its code:
//+------------------------------------------------------------------+
//| Set NumericUpDownParameter                                       |
//| name - name of NumericUpDown element                             |
//| digits - digits of symbol                                        |
//| init - init double value                                         |
//| max - max value                                                  |
//| min - min value                                                  |
//| step - step of change                                            |
//+------------------------------------------------------------------+
void NumericSet(string name, long digits, double init, double max, double min, double step)
{
   int id_foramt_change = NumericFormatChange;
   int id_change = NumericChange;
   int id_max = NumericMaxChange;
   int id_min = NumericMinChange;
   long lparam = 0;
   double dparam = 0.0;
   string sparam = "";
   GuiController::SendEvent(name, id_max, lparam, max, sparam);
   GuiController::SendEvent(name, id_min, lparam, min, sparam);
   GuiController::SendEvent(name, id_change, lparam, init, sparam);
   GuiController::SendEvent(name, id_foramt_change, digits, step, sparam);
}
The code works adaptively. Depending on the symbol it is launched on, we will see different price formats:
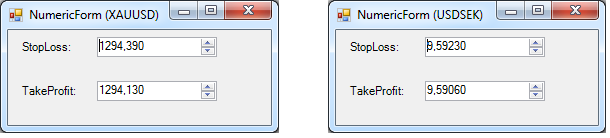
Fig. 15. Separate price formats for each symbol
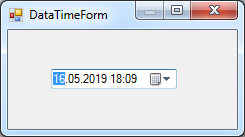
DataTimePicker (date selection window)
This element is similar in concept to NumericUpDown with the only difference that it allows users to safely select dates, not numbers:
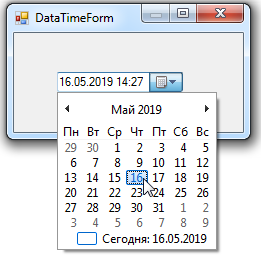
Fig. 16. Selecting an exact time in the DataTimePicker element
Interaction with DataTimePicker is simpler compared to the NumericUpDown element. This is due to the fact that, unlike the number format depending on the EA’s current trading environment, the date format is more or less universal. It can be set when developing the form and left intact afterwards. Therefore, DataTimePicker supports a single DateTimePickerChange event passing and receiving an exact date via the lparam parameter. Here is an example of using the element:
for(static int i = 0; i < GuiController::EventsTotal(); i++)
{
  int id;
  string el_name;
  long lparam;
  double dparam;
  string sparam;
  GuiController::GetEvent(i, el_name, id, lparam, dparam, sparam);
  if(id == DateTimePickerChange)
     printf("User set new datetime value: " + TimeToString((datetime)lparam));
}
If we launch the demo EA and select DateTimePicker as a demonstration element, the window similar to the one shown in Fig. 15 appears. If we start changing the date and time in various ways, the EA responds to these events displaying new date and time values in the log:
User set a new datetime value: 2019.05.16 14:21
User set a new datetime value: 2019.05.16 10:21
User set a new datetime value: 2021.05.16 10:21
However, interaction with the element is somewhat more complicated than it might seem. MQL and C# have different time formats. MQL features a simplified POSIX time format with a resolution of 1 second and the earliest possible date of 1970.01.01, while C# features a more advanced time format with a resolution of 100 nanoseconds. Thus, to interact with different systems, we need to develop the time converter converting one time format into another. Such a converter is used in GuiController. It is designed as the MtConverter public static class:
/// <summary>
/// System Converter MetaTrader - C#
/// </summary>
public static class MtConverter
{
    /// <summary>
    /// Convert C# DateTime format to MQL (POSIX) DateTime format.
    /// </summary>
    /// <param name="date_time"></param>
    /// <returns></returns>
    public static long ToMqlDateTime(DateTime date_time)
    {
        DateTime tiks_1970 = new DateTime(1970, 01, 01);
        if (date_time < tiks_1970)
            return 0;
        TimeSpan time_delta = date_time - tiks_1970;
        return (long)Math.Floor(time_delta.TotalSeconds);
    }
    /// <summary>
    /// Convert MQL (Posix) time format to sharp DateTime value.
    /// </summary>
    /// <param name="mql_time">MQL datetime as tiks</param>
    /// <returns></returns>
    public static DateTime ToSharpDateTime(long mql_time)
    {
        DateTime tiks_1970 = new DateTime(1970, 01, 01);
        if (mql_time <= 0 || mql_time > int.MaxValue)
            return tiks_1970;
        TimeSpan time_delta = new TimeSpan(0, 0, (int)mql_time);
        DateTime sharp_time = tiks_1970 + time_delta;
        return sharp_time;
    }
}
Currently, it consists of only two methods: ToMqlDateTime converts DateTime into MQL. The second method does exactly the opposite converting MQL time value into C# DateTime structure. Since datetime (mql) and DateTime(C#) types are incompatible with each other, the conversion is performed via the general 'long' type, which is the same for all systems. Thus, upon receiving the DateTimePickerChange event, we need to explicitly convert lparam to datetime to receive correct time value:
//-- Convert long value to datetime explicitly. It is completely safe
printf("User set new datetime value: " + TimeToString((datetime)lparam));
We can not only get new values, but also set them ourselves in a similar way. For example, we can use the following command to set the current terminal time:
GuiController::SendEvent("DateTimePicker", DateTimePickerChange, ((long)TimeCurrent()), 0.0, "");
ElementHide and ElementEnable - hiding and disabling an arbitrary element
There are universal events allowing you to control any WinForms element. The ElementHide and ElementEnable events are among of them. To hide the element, use ElementHide in the following way:
GuiController::SendEvent("HideGroup", ElementHide, true, 0.0, "");
where HideGroup is a name of the element to be hidden. To display the element, call the following respectively:
GuiController::SendEvent("HideGroup", ElementHide, false, 0.0, "");
Pay attention to the name of the used element. A single element in WindowsForm may contain internal elements. This is called the elements nesting. Such an arrangement allows managing all elements at the group level. In the demonstration example, a text box is used with the 'label' caption nested into it. With a given frequency, the box disappears with all the elements inside it and then appears again:
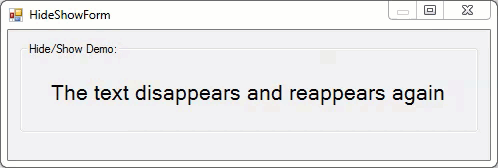
Fig. 17. Hiding an arbitrary graphical element from the EA
Also, each element can be made unavailable. While it does not disappear, working with it becomes impossible. This is a useful option allowing to design more complex and intuitive interfaces. We have already mentioned working with this event in the flags description. The element can be made unavailable by sending the following event:
GuiController::SendEvent("element", ElementEnable, false, 0.0, "");
The element can be activated again by simply replacing the 'false' flag with 'true':
GuiController::SendEvent("element", ElementEnable, true, 0.0, "");
AddItem — adding subelements
Some elements may contain other elements. The content of these subelements is often unknown before the program starts. Suppose that we need to display a list of trading symbols, so that users are able to select the one they need. For these purposes, it is most reasonable to use ComboBox:
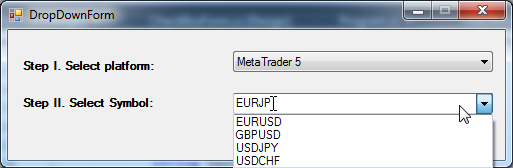
Fig. 18. List of preset symbols
However, symbols cannot be entered in advance at the stage of compiling a graphical form, because the lists of available symbols may differ from broker to broker. Therefore, the contents of this type should be formed dynamically. The AddItem command is used for that. The easiest way is to list all available symbols in MarketWatch and add them as menu items:
//+------------------------------------------------------------------+
//| Expert initialization function                                   |
//+------------------------------------------------------------------+
int OnInit()
{
   EventSetMillisecondTimer(100);
   GuiController::ShowForm(assembly, "SendOrderForm");
   for(int i = 0; i < SymbolsTotal(true); i++)
   {
      GuiController::SendEvent("SymbolComboBox", AddItem, 0, 0, SymbolName(i, true));
   }
   return(INIT_SUCCEEDED);
}
As you can see, this command is very easy to use. Although the command is universal, not all elements allow adding subelements to them. Currently, GuiController supports this event only for ComboBox. However, this is enough to build efficient graphical interfaces. This list may be expanded in the future.
Exception — event of receiving exceptions
It is not always possible to write a program without errors. In addition, there are situations when something went wrong, and the program was executed according to an unforeseen scenario. In these cases, a feedback with the possibility of obtaining data on what happened is necessary. The Exception event is provided for this kind of interactions. It is generated by GuiController itself and sent to the MQL EA. GuiController creates an error message in two cases:
- In case of a system exception interception;
- In case an event sent from the EA does not support an element selected for it or the event itself has invalid values.
Let's analyze these options one by one. To illustrate the first option, let's return to our demonstration code, namely to the option displaying NumericUpDown elements. In this launch option, a special NumericSet function is called. It sets working ranges of NumericUpDown elements:
void NumericSet(string name, long digits, double init, double max, double min, double step)
{
   int id_foramt_change = NumericFormatChange;
   int id_change = NumericChange;
   int id_max = NumericMaxChange;
   int id_min = NumericMinChange;
   long lparam = 0;
   double dparam = 0.0;
   string sparam = "";
   // GuiController::SendEvent(name, id_max, lparam, max, sparam);
   GuiController::SendEvent(name, id_min, lparam, min, sparam);
   GuiController::SendEvent(name, id_change, lparam, init, sparam);
   GuiController::SendEvent(name, id_foramt_change, digits, step, sparam);
}
This function has been slightly changed, so that no maximum value for the element is set (the corresponding string in it is commented out). If you run this form after compiling on the gold chart, it suddenly stops displaying the current prices:
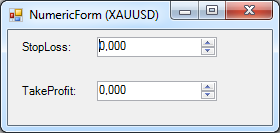
Fig. 19. Zero values in the price setting form
What happened? The system of exceptions is used to answer this question. Each exception can be obtained via GuiController::GetEvent, just like any other message:
//-- get new events by timer
for(static int i = 0; i < GuiController::EventsTotal(); i++)
{
  int id;
  string el_name;
  long lparam;
  double dparam;
  string sparam;
  GuiController::GetEvent(i, el_name, id, lparam, dparam, sparam);
  ...
  if(id == Exception)
     printf("Unexpected exception: " + sparam);

}
The message output already speaks a lot:
Unexpected exception: '1291,32' value is unacceptable for 'Value'. 'Value' should lie in the range from 'Minimum' to 'Maximum'.
Parameter name: Value
Unexpected exception: '1291,06' value is unacceptable for 'Value'. 'Value' should lie in the range from 'Minimum' to 'Maximum'.
Parameter name: Value
The fact is that NumericUpDown by default has a working range from 0 to 100. Accordingly, setting the current price of gold ($1292 per troy ounce) results in the error. To avoid it, expand the range of acceptable values by program means using the NumericMaxChange event. This is what the commented out string in the NumericSet function does.
The second option of calling an exception is possible when sending an incorrect event. For example, it is possible to send an event to a non-existent destination:
GuiController::SendEvent("empty", ElementEnable, 0, 0.0, "");
The response will be as follows:
Unexpected exception: SendEvent: element with name 'empty' not find
We can also try sending an event that does not support the item. For example, let's try to add the following text to the stop loss level input field (NumericUpDown element type):
GuiController::SendEvent("StopLoss", AddItem, 0, 0.0, "New Text");
The answer will be quite concise:
Unexpected exception: Element 'StopLos' doesn't support 'Add Item' event
The system of exceptions provides invaluable assistance in creating complex graphic applications. Errors in such applications are inevitable. The development speed and convenience depend on how quickly a programmer is able to discern them.
Summary tables of available graphical elements and events
It is reasonable to systematize the supported graphic elements to work with GuiController. To do this, let's create a table containing summary information about these elements and ways of using them in GuiController. The "Sample usage" column contains a brief sample code illustrating how this element can be used from the MQL program. The code in question should be considered as part of the overall pattern of working with elements. For example, the code of the first example (MessageBox):
string msg = "!!!|The operation was cancelled|Critical Error";
GuiController::SendEvent("ButtonForm", MessageBox, LockControl, OK, msg);
should be considered in the following context:
void OnTimer
{
   //...
   //-- get new events by timer
   for(static int i = 0; i < GuiController::EventsTotal(); i++)
   {
     int id;
     string el_name;
     long lparam;
     double dparam;
     string sparam;
     GuiController::GetEvent(i, el_name, id, lparam, dparam, sparam);
     if(id == MessageBox)
     {
        string msg = "!!!|The operation was cancelled|Critical Error";
        GuiController::SendEvent("ButtonForm", MessageBox, LockControl, OK, msg);
     }
  }
}
The pattern is applied to other sample usages in a similar way.
| Graphical element | Element or event name | Key event IDs | Sample usage |
|---|---|---|---|
 | MessageBox | MessageBox | string msg = "!!!|The operation was cancelled|Critical Error"; GuiController::SendEvent("ButtonForm", MessageBox, LockControl, OK, msg); |
 | Tabs | TabIndexChange | GuiController::GetEvent(i, el_name, id, lparam, dparam, sparam); printf("Selecet new tab. Index: " + (string)lparam + " Name: " + sparam); |
 | CheckBox | CheckBoxChange | GuiController::GetEvent(i, el_name, id, lparam, dparam, sparam); printf("Checked " + sparam + " " + lparam); |
 | RadioButton | RadioButtonChange |
|
 | ComboBox | ComboBoxChange | GuiController::GetEvent(i, el_name, id, lparam, dparam, sparam); printf("ComboBox '" + el_name + "' was changed on " + sparam); |
 | NumericUpDown | NumericChange NumericFormatChange NumericMaxChange NumericMinChange | GuiController::GetEvent(i, el_name, id, lparam, dparam, sparam); printf("Numeric '" + el_name + "' was changed, new value: " + DoubleToString(dparam, 4)); |
 | DateTimePicker | DateTimePickerChange |
|
| | Vertical Scroll | ScrollChange | GuiController::GetEvent(i, el_name, id, lparam, dparam, sparam); printf("Vertical Scroll has new value: " + (string)lparam); |
| | TextBox | TextChange | GuiController::GetEvent(i, el_name, id, lparam, dparam, sparam); printf("new value entered: " + sparam); |
| | Button | ClickOnElement | GuiController::GetEvent(i, el_name, id, lparam, dparam, sparam); printf("Button " + sparam + " is pressed"); |
 | Label | TextChange | GuiController::GetEvent(i, el_name, id, lparam, dparam, sparam); printf("Label has new text: " + sparam); |
Apart from graphical elements, GuiController supports universal events for working with them. Let's arrange these events in the form of a table as well:
| Event | Description | Sample usage |
|---|---|---|
| ElementHide | Hide/restore an element | GuiController::SendEvent("HideGroup", ElementHide, true, 0.0, ""); |
| ElementEnable | Enable/disable an element | GuiController::SendEvent("HideGroup", ElementEnable, true, 0.0, ""); |
| AddItem | Add a new subelement to a selected element | GuiController::ShowForm(assembly, "SendOrderForm"); for(int i = 0; i < SymbolsTotal(true); i++) GuiController::SendEvent("SymbolComboBox", AddItem, 0, 0, SymbolName(i, true)); |
| Exception | Get an exception called inside CLR | GuiController::GetEvent(i, el_name, id, lparam, dparam, sparam); printf("Unexpected exception: " + sparam); |
Conclusion
We have analyzed the main graphical elements of Windows Forms and examples of interacting with them. These elements are few, but they represent the backbone of any graphic application. Although, they do not include tables (another extremely important element in trading), still you can already use them to create functional graphic applications.
The last GuiController version is attached below. Also, this version can be copied from the GitHub repository system. The library version can be found here: https://github.com/PublicMqlProjects/MtGuiController.git. You can also copy the demonstration form project. It is located at https://github.com/PublicMqlProjects/GuiControllerElementsDemo.git. Read the first part of the article to find out how to obtain the latest library version via the version control system. The attached file contains complete source codes of all projects. There are three of them: the EA calling the form with elements, the set of forms in the DemoForm.exe build and the compiled GuiController (Source\MQL5\Libraries\GuiController.dll) along with the one in the form of source codes (Source\Sharp\GuiController). Also, note that the demo EA requires an absolute path to a launched form. On your PC, it will be different from the one specified in the 'assemble' EA parameter, therefore replace it with your actual path.
Translated from Russian by MetaQuotes Ltd.
Original article: https://www.mql5.com/ru/articles/6549
Warning: All rights to these materials are reserved by MetaQuotes Ltd. Copying or reprinting of these materials in whole or in part is prohibited.
This article was written by a user of the site and reflects their personal views. MetaQuotes Ltd is not responsible for the accuracy of the information presented, nor for any consequences resulting from the use of the solutions, strategies or recommendations described.

 Applying OLAP in trading (part 1): Online analysis of multidimensional data
 Applying OLAP in trading (part 2): Visualizing the interactive multidimensional data analysis results
 Selection and navigation utility in MQL5 and MQL4: Adding data to charts
- Free trading apps
- Over 8,000 signals for copying
- Economic news for exploring financial markets
You agree to website policy and terms of use
Error in ClickOnElement;
'ClickOnElement' - undeclared identifier GuiMtController.mq5 57 16
Can you please tell me how to solve the error reported in the following code? Thanks !!!!!!!
GuiController::SendEvent("ButtonForm", MtGuiController .MessageBox,LockControl, YesNoCancel, msg);
thanks for the comprehensive info. Does this also work as a WPF class library in the new .NET Core?
Here are the links:
to the repo: https://github.com/5nail000/MtGui_ProfitCalculator/tree/master/mql5
mql5-script code: https://github.com/5nail000/MtGui_ProfitCalculator/raw/refs/heads/master/mql5/CalculateHistoryProfit.mq5
MtGuiController.dll : https://github.com/5nail000/MtGui_ProfitCalculator/raw/refs/heads/master/mql5/MtGuiController.dll
The library was a bit modified by me, and the panel was implemented not as a separate library, but integrated into the base library. In the repo the code of the library and the form is also available...