
From Basic to Intermediate: FOR Statement

Introduction
The content presented here is intended solely for educational purposes. Under no circumstances should the application be viewed for any purpose other than to learn and master the concepts presented.
In the previous article, From Basic to Intermediate: SWITCH Statement, I explained and demonstrated how to use the SWITCH operator in its most basic and simple form. It is very important that you strive to understand how each of the statements covered so far works. Not in a way that encourages rote memorization, but rather in a way that enables you to think about how to apply each statement and concept presented up to this point.
I understand that some of you may find this material overly simple or lacking in depth. After all, we could be exploring more advanced topics. However, based on my years of programming experience, I have come to realize that when foundational concepts are well understood, more complex and sophisticated topics become significantly easier to grasp even at first glance. That is precisely what I aim to achieve with these articles. I want you, dear reader, to understand how each element functions at its most basic and fundamental level. So that when we eventually delve into more advanced material, you'll be able to comprehend it much more quickly and with fewer difficulties.
Very well. Among all the statements available in MQL5 for controlling the execution flow of an application, there is only one left to cover. This is the final operator in MQL5 designed for this purpose. Yes, I'm referring to FOR. However, as you've likely noticed by now, I prefer to introduce topics separately. This approach makes it easier to follow along the explanations. With that said, let's begin a new topic.
Premises of the FOR Statement
Although many beginners tend to imagine that there is an overwhelming number of statements to be learned, most programming languages actually rely on only a few. At least when it comes to control flow commands. Don't confuse these with library calls or reserved keywords; they are entirely different. Control flow statements are usually quite limited in number. On the other hand, library calls, reserved keywords, as well as helper functions and procedures, can easily reach into the thousands even within one programming language. Take C/C++, for example. The number of control flow commands is small. Yet the number of available helper functions and procedures, without even counting library calls, is so big that it's practically impossible for anyone to master the entire language. What actually happens is that a programmer specializes in a specific area. But because they have a solid foundational understanding of the language, they are able to tackle any problem as long as they're given enough time to adapt their knowledge to the task at hand.
This is why even highly experienced programmers are constantly studying. They never stop learning or seeking to stay up to date with emerging trends. This differs greatly from what many people assume when they begin studying programming. Many believe that simply knowing a few things already makes them programmers. In reality, it doesn't work that way. One must continually study and refine older techniques. Only then can you reach a level of excellence worthy of declaring: I AM A PROGRAMMER.
So, why am I saying all this? The reason is simple, dear reader. With everything we've covered so far, if you take the time to study and deepen your understanding of just what has already been presented, you'll be capable of tackling virtually any programming challenge. That's because the FOR statement is, in essence, a loop construct. But we've already explored loops using WHILE and DO WHILE. So why would we need yet another statement for loops? It doesn't seem to make much sense, does it?
Well, in truth, there is a valid reason why the FOR statement exists alongside WHILE and DO WHILE. And the reason is simple: there are scenarios where using WHILE or DO WHILE is not ideal. I know it may sound a bit odd, but yes, there are situations where it is more appropriate to use FOR instead of WHILE or DO WHILE. Many of these cases are related to whether or not the CONTINUE statement is used within the loop.
However, it's very important to understand: the FOR statement is by far the favorite among programmers. Why? Because code written with it tends to be clearer and more readable than the same loop written using WHILE or DO WHILE. And why is that? The reason is that the FOR statement typically (and this is crucial) contains all elements related to loop control within its declaration. In contrast, with WHILE and DO WHILE, the control logic tends to be scattered somewhere within the loop's body. This simple distinction is what makes programmers prefer FOR, as it becomes much easier to fix, modify, or even understand the loop just by looking at the FOR declaration itself, without having to dig through the loop to find the control logic.
But wait a second. If the FOR statement is simpler and more efficient for controlling loops, why are we only discussing it now? Wouldn't it have made more sense to introduce it earlier? This is, admittedly, a somewhat controversial point, dear reader. While the FOR statement is indeed simpler at first glance, it has certain characteristics that can make it quite complex. That's why I chose to introduce WHILE and DO WHILE first, and leave FOR as the last control statement to be covered.
Even though we'll begin by looking at FOR in its most basic and simple form, it will be much easier for both of us (assuming you've studied the previous statements) to understand how FOR works. Perhaps I should have postponed this explanation even further, since we haven't yet discussed operator precedence rules, which have a significant impact on programming as a whole. Nonetheless, even without having explored those rules, we can still do quite a lot using control flow statements. This allows me to create content suited for readers who are truly just beginning their programming journey, using these articles and the MQL5 documentation as their foundation. That would be the ideal scenario. But since I know that many already have some exposure to programming, though not necessarily a deep understanding, I aim to strike a balance and bring everyone to a common level for what we'll explore later on.
Very well, the time has come to see the FOR statement in action. But let's proceed to a new topic, as I want this first encounter to be smooth and enjoyable for everyone.
The FOR Statement
The simplest way to introduce a new command is by using something we've already seen. So here's what we'll do: initially, we'll reuse the scripts presented in the article where we discussed the WHILE statement and the DO WHILE pair. This will allow for a smoother transition. Consider this first exposure to be more like a translation of those previous codes into a new form - this time using only the FOR statement.
Let's start with the simplest code:
01. //+------------------------------------------------------------------+
02. #property copyright "Daniel Jose"
03. //+------------------------------------------------------------------+
04. void OnStart(void)
05. {
06.     char info = 10;
07.
08.     Print(__FUNCTION__, " ", __LINE__, " It will be executed anyway...");
09.
10.     while (info)
11.     {
12.         info = info - 1;
13.         Print(__FUNCTION__, " : ", info);
14.     }
15.
16.     Print(__FUNCTION__, " ", __LINE__, " It will be executed anyway...");
17. }
18. //+------------------------------------------------------------------+
Code 01
Since this is the simplest of all the examples, before we look at how to rewrite this code using the FOR statement, it's essential that you understand the concept of a variable's lifetime, as well as the difference between global and local variables. These concepts were covered in the early articles in this series. So, if you are not yet familiar with the difference between global and local variables, I suggest you revisit those first articles to better follow what will be explained here. Start with From Basic to Intermediate: Variables (I).
Assuming you already have the necessary background, let's now translate Code 01 to use the FOR statement. There are multiple ways to do this, and each approach introduces or changes something in the code. We'll begin with one that closely mirrors Code 01. It is shown below:
01. //+------------------------------------------------------------------+
02. #property copyright "Daniel Jose"
03. //+------------------------------------------------------------------+
04. void OnStart(void)
05. {
06.     char info = 10;
07.
08.     Print(__FUNCTION__, " ", __LINE__, " It will be executed anyway...");
09.
10.     for( ; info; )
11.     {
12.         info = info - 1;
13.         Print(__FUNCTION__, " : ", info);
14.     }
15.
16.     Print(__FUNCTION__, " ", __LINE__, " It will be executed anyway...");
17. }
18. //+------------------------------------------------------------------+
Code 02
This Code 02 illustrates the first way to work with the FOR statement. Notice that we've only changed line 10. However, the result remains the same for both Code 01 and Code 02. You can see this outcome in the image that follows:
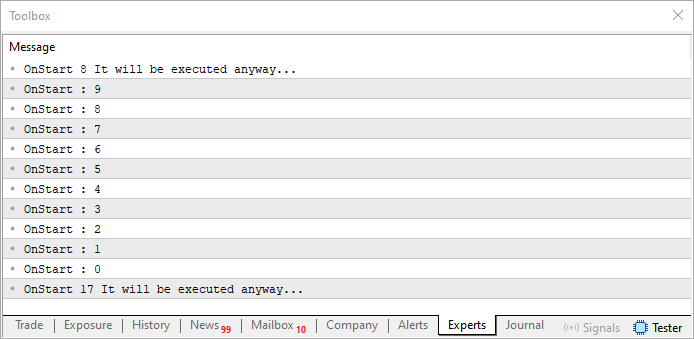
Figure 01
Now, looking at Code 02, you might feel a bit confused. That's because, if you've encountered other FOR statements before, the one shown on line ten probably looks quite different from what you're used to seeing in most examples. And that's exactly why it's crucial for you, dear reader, to truly absorb the knowledge presented in the previous articles. FOR isn't just any ordinary operator. It's actually composed of three parts, each with a specific purpose that must be well understood. Before we proceed to details, let's explore a second alternative for rewriting that same Code 01. This alternative can be found just below:
01. //+------------------------------------------------------------------+
02. #property copyright "Daniel Jose"
03. //+------------------------------------------------------------------+
04. void OnStart(void)
05. {
06.     char info = 10;
07.
08.     Print(__FUNCTION__, " ", __LINE__, " It will be executed anyway...");
09.
10.     for( ; info; info = info - 1)
11.         Print(__FUNCTION__, " : ", info);
12.
13.     Print(__FUNCTION__, " ", __LINE__, " It will be executed anyway...");
14. }
15. //+------------------------------------------------------------------+
Code 03
Now, consider the following, dear reader. What you see in Code 03 is not the same as before. This is because the value of the variable 'info' will not be modified in the way you might expect. Yes, it will be modified, but the result will be different. So, when you run Code 03, what you'll actually get is the outcome shown below:
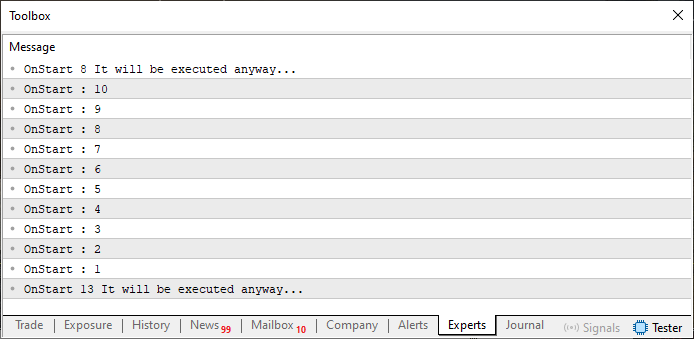
Figure 02
But why did the result turn out differently? It might seem a bit strange. Shouldn't we be able to use the FOR operator in this case to create the loop? Well, dear reader, let's take it step by step. First of all, it is possible to use the FOR loop to create this iteration in a way that matches the result shown in Figure 01. However (and this is where things can start to get confusing for many) it's important to understand the role of the variable 'info'. Because everything depends on it, not necessarily on the FOR loop itself. And why do I say this? Because depending on the specific case, we may need to use one method or another in order for the FOR statement in Code 03 to produce the same result as seen in Code 02. For this reason, you should not try to memorize how to use the statement. Instead, you should focus on understanding how it works. This is the point where things often become confusing.
And this is where many people give up trying to learn how to properly use the FOR statement. But I'm going to do my best to explain it in the simplest way possible. Let's suppose that the variable 'info' really needs to be declared on line six. The reason doesn't matter for now; we simply want it to be defined at that point. Secondly, we want info to be modified by the loop, so that its final value is the one that causes the loop to terminate. At this stage, there is a small issue, but we won't worry about it just yet. Let's stick to our assumptions for the time being. If you check the value of the 'info' variable in Code 01 after it passes through the loop, you'll see that its value is zero. The same happens in Code 02. However, in Code 03, the value is one. But as you can see in Figure 02, the first value shown is ten, not nine, as you might have expected.
So then you might think: What if we change the value declared on line six from ten to nine? What would happen then? Well, dear reader, I'll leave that as a little exercise for you to explore on your own. But here's something important to keep in mind: by changing the value on line six, some calculation or condition that depends on the 'info' variable might be affected. That's why it's not a good idea to modify things in the code without first understanding what's really going on. The goal here isn’t to randomly tweak any part of the code, but rather to focus specifically on what is being done in line ten.
Alright. We could simply stick with Code 02 and be done with it as it works. Or even go back to Code 01, which also works. But is there perhaps another way to use the FOR loop to solve our problem? In fact, there is a way. However, it's a bit more advanced than what I intend to cover at this point in the series. Still, I can show you another approach. It will at least bring the result closer to what we expect. i.e. closer to what is shown in Figure 01.
So, considering all of the assumptions we've discussed so far, we can write a version of the code similar to the one shown below.
01. //+------------------------------------------------------------------+
02. #property copyright "Daniel Jose"
03. //+------------------------------------------------------------------+
04. void OnStart(void)
05. {
06.     char info = 10;
07.
08.     Print(__FUNCTION__, " ", __LINE__, " It will be executed anyway...");
09.
10.     for(info = info - 1; info; info = info - 1)
11.         Print(__FUNCTION__, " : ", info);
12.
13.     Print(__FUNCTION__, " ", __LINE__, " It will be executed anyway...");
14. }
15. //+------------------------------------------------------------------+
Code 04
This Code 04 still falls within what I consider to be basic material. Although we're beginning to touch on other concepts, this is still a basic way to use the FOR loop. The idea is to ensure that the flowchart we'll look at shortly makes sense. When you run this code, you'll see the following result:
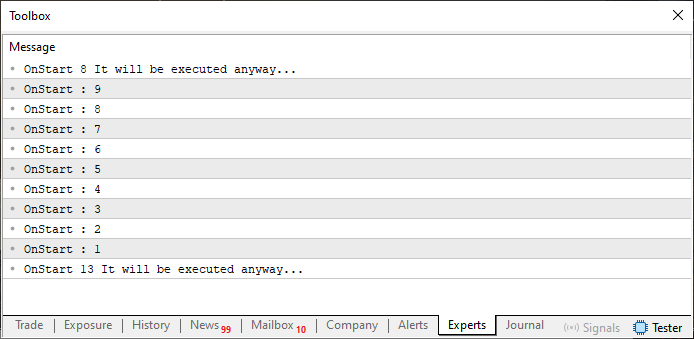
Figure 03
Wait, I don't get it. Now the count starts at nine, just like in Figure 01. However, the count stops at one, just like in Figure 02. Why? Could it be that the value of the variable 'info', after the loop has run, is different from the value found in the other codes, especially in Code 01? No, dear reader. The value of the 'info' variable, after passing through the loop, is and continues to be zero in all of these codes. The issue here is something else. What we're printing is not the actual final value of the 'info' variable. Instead, we're printing the value during that specific iteration of the FOR loop. This might sound a bit confusing, but that's exactly what's happening. To really understand this, we'll need to look at a slightly different version of the code. But before we do that, let's take a closer look at the execution flow within the FOR statement. To do this, let's move on to a new topic.
Execution Flow
At first glance, the execution flow of the FOR loop may seem a bit more confusing than the other loops we've studied. However, once you understand it, it becomes much easier to grasp why we saw such different outputs in the previous topic. You can see the flowchart below:
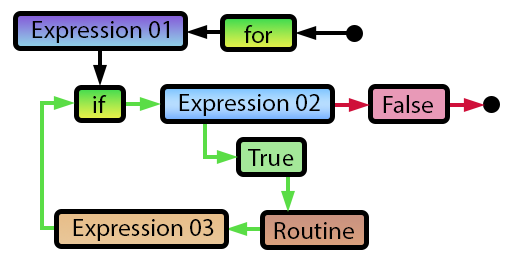
Figure 04
Here, I’ve used different colors on the arrows to help explain in detail how the FOR loop works. You might be surprised to see an IF statement inside the flowchart. But including the IF here makes it much easier to explain what's going on.
Alright, let's take it step by step. The first part is the reserved word 'for', which marks the beginning of the loop's body. Right after that, we have Expression 01. This can be many things. But note that it is executed only once, when the loop starts. Typically, we use Expression 01 to initialize variables inside the loop. But we can also use it to adjust a global value, as we did in Code 04. It's worth pointing out that Expression 01 can also be left empty, like we saw in Codes 02 and 03. In such cases, the compiler just skips over it, doing nothing: no initialization, no declarations. There are some specific rules when declaring variables here, but for now we'll keep things basic. So we'll either use global variables or leave the expression empty.
Once Expression 01 is executed, we proceed to the next step which is shown as an IF in the flowchart. At this point, Expression 02 is checked. Strictly speaking, it would be more accurate to represent this as a WHILE, not an IF. But since WHILE is itself a loop statement, it could be confusing to show it in a diagram explaining FOR. Anyway, if Expression 02 evaluates to false, the loop is terminated. If it evaluates to true, then the code block inside the loop is executed. This would be line 11 in Codes 03 and 04, or the block from lines 11 to 14 in Code 02. After the loop body runs, we move to Expression 03. This part is very interesting in many situations, as we'll soon see. Depending on how the loop is structured and what goal it serves, we can create many slightly different versions of this structure. What makes Expression 03 especially valuable is that, if used, it makes the FOR loop safer than the other types of loops. This is because you don't run the risk of forgetting to update the variable being checked in Expression 02.
To be honest, this flowchart is much simpler to understand in practice than it seems in that figure. But if you look closely, you'll notice I used some green arrows. These green arrows indicate how the loop flows. The red arrows, on the other hand, show how the loop ends.
So if you observe carefully and take a moment to analyze, you'll notice it actually makes sense that the variable info, after going through the loop, ends up with the value zero. But it also makes sense that the value we see printed in the terminal (looking at Code 03) is always info + 1. In all the other versions of the code, the printed result is quite different from what we might have expected at first.
Cool. I think I'm starting to get this FOR loop thing. It really does seem like something simple to work with, although, it can be a bit confusing at times. But between us: we mentioned earlier that the IF in the flowchart should actually be a WHILE. How can we achieve that? Let me explain. This point - at least the way I see it - is relatively simple to understand, even without getting into more advanced FOR loop details. Yes, there are more complicated aspects, especially for beginners. But if you want to understand why I said that the IF in the flowchart should actually be a WHILE, just compare Code 01 and Code 02. Since Expressions 01 and 03 are empty, the only thing really working there is the loop condition which is basically the same way a WHILE loop works. That's why I mentioned that this IF in the flowchart should actually represent a WHILE.
Now, I don't know if you noticed this, dear reader, but I'm doing my best not to dive too deep into more advanced FOR loop topics just yet. That's because I don't want this first contact you're having with the FOR loop to become something discouraging. Still, I don't want you to walk away thinking the FOR loop is unnecessary or that it can always be replaced with WHILE or DO WHILE. To prove this, I'm going to show you a situation where you can't just swap it out. But we'll cover that in the next section.
The Empty FOR Loop
What we're about to see should be taken more as a curiosity than as something you're expected to use in practice. Honestly, what I'm going to show you here is rarely used in real code. I've been a programmer for many years now, and I can count on one hand the times I've used this technique. Still, you might stumble upon a very unusual FOR loop someday - one that looks weird but still works. And because we probably won't talk about this again for a while, and you might run into it sooner than expected, I need to show it to you now. Otherwise, I might forget. To explain what I'm talking about, let's start with a very simple code snippet. And we'll be extra careful not to run into problems. So, when we discussed the WHILE loop, we used a code like the one below:
01. //+------------------------------------------------------------------+
02. #property copyright "Daniel Jose"
03. //+------------------------------------------------------------------+
04. void OnStart(void)
05. {
06.     char info = 10;
07.
08.     do
09.     {
10.         if (((info / 5) * 5) == info) Print("Press ESC to finish counting...");
11.         info = info - 1;
12.         Sleep(200);
13.         Print(__FUNCTION__, " : ", info);
14.     }while (!TerminalInfoInteger(TERMINAL_KEYSTATE_ESCAPE));
15.
16.     Print(__FUNCTION__, " ", __LINE__, " It will be executed anyway...");
17. }
18. //+------------------------------------------------------------------+
Code 05
The purpose of this code was to create a kind of infinite loop with a clearly defined exit: using the ESC key. Great. However, it is also possible to use a completely empty FOR loop for this same purpose - to create an infinite loop. To demonstrate this, we'll use the code shown below:
01. //+------------------------------------------------------------------+
02. #property copyright "Daniel Jose"
03. //+------------------------------------------------------------------+
04. void OnStart(void)
05. {
06.     char info = 10;
07.
08.     for (; ; )
09.     {
10.         if (((info / 5) * 5) == info) Print("Press ESC to finish counting...");
11.         info = info - 1;
12.         Sleep(200);
13.         Print(__FUNCTION__, " : ", info);
14.         if (TerminalInfoInteger(TERMINAL_KEYSTATE_ESCAPE)) break;
15.     }
16.
17.     Print(__FUNCTION__, " ", __LINE__, " It will be executed anyway...");
18. }
19. //+------------------------------------------------------------------+
Code 06
Now pay very close attention, because I will not be repeating this. Looking back at the previous examples in this article, you'll notice that all of them included some condition in what is known as expression 02. This made it possible for the FOR loop to eventually terminate. However, there are situations where you may need the FOR loop not to terminate, at least, not due to a condition within the loop header itself. In this case, you can leave expression 02 empty. When that happens, THE LOOP WILL NOT BE TERMINATED, at least, not because of any condition declared in the loop structure. If a condition does exist, it will be placed inside the loop's routine. As shown in Code 06, the condition to exit the loop is defined on line 14. Contrary to what many might assume (that a FOR loop must contain some form of expression) this is not the case. A FOR loop can be written exactly as shown in Code 06, on line eight. When you do this, the compiler interprets it as an infinite loop. And any experienced programmer will understand this as well.
That's why, back when we talked about loops using the WHILE statement, I mentioned that loops are something to handle with care. If you're not careful, you can end up with a serious issue in your code. So always be mindful when creating loops.
To prove that Code 06 works and that it does not fall into an uncontrolled infinite loop, the result of running it can be seen in the animation below:
Animation 01
Nevertheless (and I say this for clarity's sake) I'm bringing this up so that, should you come across a piece of code with an empty FOR loop, you won't panic or be left wondering what's going on. Because now, you should understand what will happen, and how the loop will eventually terminate - if it terminates at all.
Final considerations
In this article, we've covered the very basics of the FOR loop. Everything you've seen here must be thoroughly understood. Unlike other commands, the FOR loop includes a few peculiarities that can quickly make it quite complex. So don't let stuff like this accumulate. Begin studying and practicing what you've learned here. To do that, revisit the examples from earlier articles and try to adapt them, replacing the existing loops with FOR loops wherever applicable.
Since this was the last basic control structure we had to cover, everything from this point onward will build upon the foundational concepts we've explored up until now. That said, we're not yet ready to move on to intermediate topics, as there are still several fundamental concepts left to discuss - each just as important as what you've learned so far. However, I now feel more at ease introducing slightly more advanced coding techniques. This will allow us to present the remaining basic topics more effectively, without the same limitations we had before.
So, study all the material we've covered thoroughly. I'll see you in the next article. Wishing you all the best in your studies!
Translated from Portuguese by MetaQuotes Ltd.
Original article: https://www.mql5.com/pt/articles/15406
Warning: All rights to these materials are reserved by MetaQuotes Ltd. Copying or reprinting of these materials in whole or in part is prohibited.
This article was written by a user of the site and reflects their personal views. MetaQuotes Ltd is not responsible for the accuracy of the information presented, nor for any consequences resulting from the use of the solutions, strategies or recommendations described.

 Building a Custom Market Regime Detection System in MQL5 (Part 2): Expert Advisor
 Websockets for MetaTrader 5: Asynchronous client connections with the Windows API
- Free trading apps
- Over 8,000 signals for copying
- Economic news for exploring financial markets
You agree to website policy and terms of use