

Building a Dynamic and Customizable Table in MQL5
 285
285
 0
0

Introduction
If you display multiple metrics on a MetaTrader 5 chart (RSI, moving averages, spread, signals, etc.), you'll quickly run into a common problem: a table built from native chart objects becomes a scattered set of RectLabel/Edit objects with manual coordinate math, per-object styling, and fragile synchronization. Every added row, column, or theme change forces tedious adjustments and is a frequent source of alignment bugs and duplicated code.
This article presents a reusable CTable class that addresses these issues by separating cell state from visual objects, centralizing layout and lifecycle management, and exposing a clear API for creation, updates, and structural changes. The class is designed for practical algorithmic trading needs (dashboards, screeners, and signal monitors): it creates/updates/destroys tables on the chart, supports headers, per‑cell customization, dynamic row and column changes, and efficient updates—so you can focus on the data, not on dozens of manual object updates. 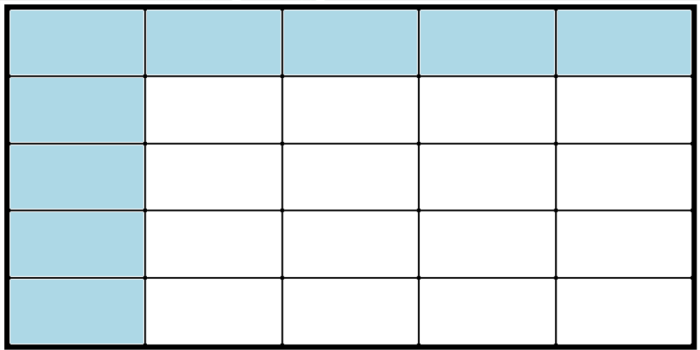
Figure 1: Basic appearance of the table with the class's default colors.
Table Architecture
The table architecture is based on separating the data stored for each cell from the chart objects used to display those cells. Each cell stores its own properties (size, colors, alignment, and read-only status). The CTable class manages the table structure, background objects, cell objects, and their relationships. The STRUCT_CELL structure stores the properties of each cell. These properties include the text, background, and border color, as well as the text alignment and other details. The class methods also synchronize this data with the chart objects so that each cell's stored properties remain consistent with its visual representation.
This approach separates data management from rendering and makes the class easier to extend and reuse.
//+------------------------------------------------------------------+
//| Minimum width and height of a table cell and the margin          |
//+------------------------------------------------------------------+
#define Table_Cell_Width_Minimum 10
#define Table_Cell_Height_Minimum 10
#define Table_Inner_Margin 10
First, we define the minimum width and height of a table cell, as well as the inner margin used to control the spacing within the table.
//+------------------------------------------------------------------+
//| Include files                                                    |
//+------------------------------------------------------------------+
#include <ChartObjects\ChartObjectsTxtControls.mqh>
We then include the ChartObjectsTxtControls.mqh file, which provides the chart object classes required to create and manage the table.
//+------------------------------------------------------------------+
//| Structure for storing cell properties                            |
//+------------------------------------------------------------------+
struct STRUCT_CELL
  {
   int                   s_width;               //cell width
   int                   s_height;              //cell height
   color                 s_border_color;        //cell border color
   bool                  s_custom_border_color; //has custom border color
   color                 s_back_color;          //cell background color
   bool                  s_custom_back_color;   //has custom background color
   color                 s_text_color;          //cell text color
   bool                  s_custom_text_color;   //has custom text color
   bool                  s_read_only;           //cell read-only property
   ENUM_ALIGN_MODE       s_alignment;           //cell alignment property
   string                s_description;         //cell description

   //+------------------------------------------------------------------+
   //| Constructor of the STRUCT_CELL structure                         |
   //+------------------------------------------------------------------+
                     STRUCT_CELL()
     {
      s_width               = 0;
      s_height              = 0;
      s_border_color        = clrNONE;
      s_custom_border_color = false;
      s_back_color          = clrNONE;
      s_custom_back_color   = false;
      s_text_color          = clrNONE;
      s_custom_text_color   = false;
      s_read_only           = true;
      s_alignment           = ALIGN_CENTER;
      s_description         = "";
     }
  };
The STRUCT_CELL structure stores all properties of an individual table cell. Each cell has its own width and height, border, background, and text colors, as well as its read-only state, text alignment, and description. For each color property, the structure also stores a corresponding custom-color flag that determines whether the cell uses its own color or the default color defined for the table or header. The structure also has a constructor that initializes all these properties with their default values when a new STRUCT_CELL object is created. This allows every cell to start with a defined and consistent initial state.
Next, we define the CTable class, which provides the functionality needed to create and manage the table and its cells.
//+------------------------------------------------------------------+
//| CTable class for creating and managing a table                   |
//+------------------------------------------------------------------+
class CTable
  {
private:
   CChartObjectEdit      m_cell_object[];                                           //array of cell objects
   string                m_prefix;                                                  //prefix used for all table objects

   bool                  m_created;                                                 //table creation status

   bool                  m_has_horizontal_header;                                   //horizontal header status
   bool                  m_has_vertical_header;                                     //vertical header status

   color                 m_color_background_border;                                 //background border color
   color                 m_color_background_back;                                   //background color
   color                 m_color_cell_border;                                       //cell border color
   color                 m_color_cell_back;                                         //cell background color
   color                 m_color_cell_text;                                         //cell text color
   color                 m_color_header_border;                                     //header border color
   color                 m_color_header_back;                                       //header background color
   color                 m_color_header_text;                                       //header text color

   int                   m_x_coordinate;                                            //table x-coordinate
   int                   m_y_coordinate;                                            //table y-coordinate
   int                   m_width;                                                   //table width
   int                   m_height;                                                  //table height
   int                   m_rows;                                                    //number of table rows
   int                   m_columns;                                                 //number of table columns
   int                   m_gap;                                                     //gap between cells

   CChartObjectRectLabel m_labels[];                                                //array of background labels
   STRUCT_CELL           m_cells[];                                                 //array storing cell properties

   int               CellXFind(int cell_index);                                     //find the x-coordinate of a cell
   int               CellYFind(int cell_index);                                     //find the y-coordinate of a cell
   void              Refresh(void);                                                 //refresh all table objects
   void              CopyCellData(STRUCT_CELL &src_cell, STRUCT_CELL &dst_cell);    //copy cell properties from source to destination
   void              ApplyCellStyle(int index);                                     //apply the appropriate style to a cell
public:
                     CTable(void);                                                  //constructor
                    ~CTable(void);                                                  //destructor

   bool              Create(void);                                                  //create table objects on the chart
   bool              Destroy(bool Empty_Data);                                      //delete table objects

   void              PrefixSet(string prefix);                                      //set the prefix for table objects
   string            PrefixGet(void);                                               //get the prefix of table objects

   void              CoordinatesSet(int x, int y);                                  //set the table coordinates
   void              WidthHeightSet(int width, int height);                         //set the table width and height
   int               CoordinateXGet(void);                                          //get the table x-coordinate
   int               CoordinateYGet(void);                                          //get the table y-coordinate
   int               WidthGet(void);                                                //get the table width
   int               HeightGet(void);                                               //get the table height

   void              HeaderSet(bool horizontal, bool vertical);                        //set horizontal and vertical header status

   void              BackgroundColorSet(color back, color border);                     //set background colors
   void              HeadersColorSet(color back, color border, color text);            //set header colors
   void              CellsColorSet(color back, color border, color text);              //set cell colors

   void              CellsInitialize(int rows, int columns);                           //initialize the table cells
   int               RowsGet(void);                                                    //get the number of table rows
   int               ColumnsGet(void);                                                 //get the number of table columns

   int               IndexToColumn(int index);                                         //return the column index of a cell
   int               IndexToRow(int index);                                            //return the row index of a cell
   int               ColumnRowToIndex(int column, int row);                            //return the cell index from column and row

   void              AddRow(int after);                                                //add a row after the specified row
   void              AddColumn(int after);                                             //add a column after the specified column
   void              DeleteRow(int row);                                               //delete the specified row
   void              DeleteColumn(int column);                                         //delete the specified column

   void              CellSetBorderColor(int cell, color border, bool custom);          //change the border color of a cell
   void              CellSetBackColor(int cell, color back, bool custom);              //change the background color of a cell
   void              CellSetTextColor(int cell, color text, bool custom);              //change the text color of a cell
   void              CellSetReadOnly(int cell, bool read_only);                        //change the read-only property of a cell
   void              CellSetAlignment(int cell, ENUM_ALIGN_MODE align);                //change the alignment of a cell
   void              CellSetDescription(int column_index, int row_index, string text); //set the description using column and row
   void              CellSetDescription(int index, string text);                       //set the description using the cell index

   color             CellGetBorderColor(int cell);                                     //get the border color of the cell
   color             CellGetBackColor(int cell);                                       //get the background color of a cell
   color             CellGetTextColor(int cell);                                       //get the text color of a cell
   bool              CellGetReadOnly(int cell);                                        //get the read-only mode of a cell
   ENUM_ALIGN_MODE   CellGetAlignment(int cell);                                       //get the text alignment of a cell
   string            CellGetDescription(int cell);                                     //get the text of a cell

  };
The class contains a set of methods and member variables. The list of methods and variables used by the CTable class is shown above. All class variables should be initialized in the constructor. In the destructor, the Destroy() function should be called to delete all table objects and optionally release the stored cell data. The Destroy() function is explained in more detail later in the article.
In the following code you can see the constructor and the destructor.
//+------------------------------------------------------------------+
//| Constructor of the CTable class.                                 |
//+------------------------------------------------------------------+
CTable::CTable(void)
  {
   m_prefix                  = "Table";
   m_created                 = false;
   m_has_horizontal_header   = false;
   m_has_vertical_header     = false;
   m_color_background_border = clrWhite;
   m_color_background_back   = clrBlack;
   m_color_cell_border       = clrWhite;
   m_color_cell_back         = clrWhite;
   m_color_cell_text         = clrBlack;
   m_color_header_border     = clrWhite;
   m_color_header_back       = clrLightBlue;
   m_color_header_text       = clrBlack;
   m_x_coordinate            = 5;
   m_y_coordinate            = 25;
   m_width                   = 200;
   m_height                  = 200;
   m_rows                    = 0;
   m_columns                 = 0;
   m_gap                     = 2;
  }
//+------------------------------------------------------------------+
//| Destructor of the CTable class                                   |
//+------------------------------------------------------------------+
CTable::~CTable(void)
  {
//--- Delete all table objects and stored cell data.
   Destroy(true);
  }
Managing Table Dimensions
The table object needs a position and dimensions to determine where it is displayed on the chart and how much space it occupies. Therefore, before creating the table, we need to define its X and Y coordinates, width, height, and number of rows and columns. The CTable class provides three methods for managing these properties: CoordinatesSet(), WidthHeightSet(), and CellsInitialize().
If you do not call these functions, the default values defined in the constructor are used. In this case, the table will be created in the upper-left corner of the chart with the default width and height. Both functions are optional because default values are already defined in the constructor. It is recommended to call both functions at the beginning. The CellsInitialize() function is mandatory, because a table cannot exist without a defined number of rows and columns.
//+------------------------------------------------------------------+
//| Set the table coordinates                                        |
//+------------------------------------------------------------------+
void CTable::CoordinatesSet(int x, int y)
  {
//--- Set the x-coordinate to zero when it is less than zero
   if(x<0)
     {
      x = 0;
     }
//--- Adjust the x-coordinate when the table exceeds the chart width
   else
      if(m_width!=0)
        {
         if(x+m_width>(int)ChartGetInteger(ChartID(), CHART_WIDTH_IN_PIXELS, 0))
           {
            x = MathMax((int)ChartGetInteger(ChartID(), CHART_WIDTH_IN_PIXELS, 0) - m_width, 0);
           }
        }
//--- Set the y-coordinate to zero when it is less than zero
   if(y<0)
     {
      y = 0;
     }
//--- Adjust the y-coordinate when the table exceeds the chart height
   else
      if(m_height!=0)
        {
         if(y+m_height>(int)ChartGetInteger(ChartID(), CHART_HEIGHT_IN_PIXELS, 0))
           {
            y = MathMax((int)ChartGetInteger(ChartID(), CHART_HEIGHT_IN_PIXELS, 0) - m_height, 0);
           }
        }
//--- Store the previous table coordinates and calculate the differences
   int PreviousX  = m_x_coordinate;
   int PreviousY  = m_y_coordinate;
   m_x_coordinate = x;
   m_y_coordinate = y;
   int DiffX      = m_x_coordinate-PreviousX;
   int DiffY      = m_y_coordinate-PreviousY;
//--- Update the object positions when the table has already been created
   if(m_created)
     {
      //--- Move all background labels by the calculated coordinate differences
      for(int a=0; a<ArraySize(m_labels); a++)
        {
         m_labels[a].X_Distance(m_labels[a].X_Distance()+DiffX);
         m_labels[a].Y_Distance(m_labels[a].Y_Distance()+DiffY);
        }
      //--- Move all cell objects by the calculated coordinate differences
      for(int a=0; a<ArraySize(m_cells); a++)
        {
         m_cell_object[a].X_Distance(m_cell_object[a].X_Distance()+DiffX);
         m_cell_object[a].Y_Distance(m_cell_object[a].Y_Distance()+DiffY);
        }
     }
  }
CoordinatesSet() Function
The CoordinatesSet() function is used to define the position of the table on the chart. It receives two parameters: x and y. The x parameter specifies the horizontal distance from the left edge of the chart, while the y parameter specifies the vertical distance from the top edge of the chart. If the specified coordinates are negative, the function automatically adjusts them to valid values. It also checks the chart dimensions to prevent the table from extending beyond the visible area of the chart.
The function also handles the table position when the table has already been created. If the new coordinates are different from the current ones, the function calculates the difference between the previous and new positions and moves all table objects by the same amount. This keeps the table synchronized and prevents misalignment between the background and cell objects.
//+------------------------------------------------------------------+
//| Set the table width and height                                   |
//+------------------------------------------------------------------+
void CTable::WidthHeightSet(int w, int h)
  {
//--- Calculate the minimum allowed width and height of the table
   int MinimumWidth = Table_Inner_Margin*2 + m_columns * (Table_Cell_Width_Minimum + m_gap);
   if(w<MinimumWidth)
      w = MinimumWidth;
   int MinimumHeight = Table_Inner_Margin*2 + m_rows * (Table_Cell_Height_Minimum + m_gap);
   if(h<MinimumHeight)
      h = MinimumHeight;
//--- Store the new table width and height
   m_width  = w;
   m_height = h;
//--- we need to check the boundaries again to keep the table within the chart boundaries
   int width = (int) ChartGetInteger(ChartID(),CHART_WIDTH_IN_PIXELS,0);
   int height = (int) ChartGetInteger(ChartID(),CHART_HEIGHT_IN_PIXELS,0);
//--- the table can only stay on the chart if its width is smaller than the chart's width
   if(m_x_coordinate+m_width>(int)width && m_width<width)
      m_x_coordinate = width-m_width;
//--- the table can only stay on the chart if its height is smaller than the chart's height
   if(m_y_coordinate+m_height>(int)height && m_height<height)
      m_y_coordinate = height-m_height;
//--- Update the cell sizes when the table has already been created
   if(m_created)
     {
      //---
      if(m_columns==0 || m_rows==0)
         return;
      //--- Calculate the width and height of each cell
      int CellWidth  = (m_width-Table_Inner_Margin*2) / m_columns;
      int CellHeight = (m_height-Table_Inner_Margin*2) / m_rows;
      //--- Update the width and height of all cells
      for(int a=0; a<ArraySize(m_cells); a++)
        {
         m_cells[a].s_width  = MathMax(CellWidth - m_gap, Table_Cell_Width_Minimum);
         m_cells[a].s_height = MathMax(CellHeight - m_gap, Table_Cell_Height_Minimum);
        }
      Refresh(); //Refresh all table objects
     }
  }
WidthHeightSet() Function
The WidthHeightSet() function is used to define the width and height of the table in pixels. It receives two parameters: w and h. The w parameter specifies the table width, while the h parameter specifies its height. The function also checks the minimum required dimensions based on the number of rows, columns, and the gap between cells.
If the specified width or height is smaller than the calculated minimum, the function automatically increases it to the minimum valid value. If the table has already been created, the function recalculates the width and height of all cells based on the new table dimensions and then calls the Refresh() function to update the table objects on the chart.
//+------------------------------------------------------------------+
//| Initialize the table cells and add new cells when required       |
//+------------------------------------------------------------------+
void CTable::CellsInitialize(int rows, int columns)
  {
//--- Prevent initialization when the table is already created
   if(m_created)
     {
      Print("Destroy the table before initializing cells");
      return;
     }
//--- Check whether the specified row and column counts are valid
   if(rows<1 || columns<1)
     {
      Print("You entered invalid row or column number");
      return;
     }
//--- Store the table dimensions and calculate the cell counts
   int TotalCells      = rows*columns;                 //Calculate the new number of cells
   m_rows    = rows;                                   //Update the number of rows
   m_columns = columns;                                //Update the number of columns
//--- Resize the cell arrays to accommodate the new cells
   ArrayResize(m_cells, TotalCells);
   ArrayResize(m_cell_object, TotalCells);
//--- Calculate the dimensions of the new cells
   int CellWidth  = (m_width-Table_Inner_Margin*2)/columns;
   int CellHeight = (m_height-Table_Inner_Margin*2)/rows;
//--- Initialize the newly added cells with the default properties
   for(int a=0; a<ArraySize(m_cells); a++)
     {
      m_cells[a].s_width               = MathMax(CellWidth - m_gap, Table_Cell_Width_Minimum);   //Set the cell width
      m_cells[a].s_height              = MathMax(CellHeight - m_gap, Table_Cell_Height_Minimum); //Set the cell height
      m_cells[a].s_border_color        = m_color_cell_border;                  //Set the border color
      m_cells[a].s_back_color          = m_color_cell_back;                    //Set the background color
      m_cells[a].s_text_color          = m_color_cell_text;                    //Set the text color
      m_cells[a].s_custom_border_color = false;                                //Set the custom border color mode
      m_cells[a].s_custom_back_color   = false;                                //Set the custom back color mode
      m_cells[a].s_custom_text_color   = false;                                //Set the custom text color mode
      m_cells[a].s_read_only           = true;                                 //Set the read-only mode
      m_cells[a].s_alignment           = ALIGN_CENTER;                         //Set the alignment mode
      m_cells[a].s_description         = "";                                   //Clear the description
     }
  }
CellsInitialize() Function
The CellsInitialize() function is used to initialize the table by defining the number of rows and columns. It receives two parameters: rows and columns. The rows parameter specifies the number of rows, while the columns parameter specifies the number of columns.
Before initializing the cells, the function checks whether the table has already been created and whether the specified numbers of rows and columns are valid.
After determining the new table size, the function resizes the cell arrays and calculates the width and height of each cell based on the table dimensions and the number of rows and columns. The cells are then initialized with the default cell properties, such as colors, alignment, read-only mode, and description.
Creating the Table
After defining the table position, dimensions, and number of rows and columns, the table is ready to be created on the chart. In this section, we will see how the Create() function creates the required chart objects and how the position of each cell is calculated.
//+------------------------------------------------------------------+
//| Create the table objects on the chart                            |
//+------------------------------------------------------------------+
bool CTable::Create(void)
  {
//--- Check that at least one row has been initialized
   if(m_rows<=0)
     {
      Print("Set number of rows before creation of table");
      return(false);
     }
//--- Check that at least one column has been initialized
   if(m_columns<=0)
     {
      Print("Set number of columns before creation of table");
      return(false);
     }
//--- Prevent creating the table when it has already been created
   if(m_created)
     {
      Print("Object is created already");
      return(false);
     }
//--- Initialize the creation status and allocate the background labels
   bool Created = true;
   ArrayResize(m_labels, 2);
//--- Create the two background labels.
   if(!m_labels[0].Create(ChartID(), m_prefix+"-background-1", 0, m_x_coordinate, m_y_coordinate, m_width, m_height))
     {
      Created = false;
     }
   else
     {
      m_labels[0].Color(m_color_background_border);
      m_labels[0].BackColor(m_color_background_border);
      m_labels[0].BorderType(BORDER_FLAT);
     }
   if(!m_labels[1].Create(ChartID(), m_prefix+"-background-2", 0,
                          m_x_coordinate+(Table_Inner_Margin/2), m_y_coordinate+(Table_Inner_Margin/2),
                          m_width-Table_Inner_Margin, m_height-Table_Inner_Margin))
     {
      Created = false;
     }
   else
     {
      m_labels[1].Color(m_color_background_back);
      m_labels[1].BackColor(m_color_background_back);
      m_labels[1].BorderType(BORDER_FLAT);
     }
//--- Calculate the total number of cells and allocate the required arrays
   int TotalCells = m_columns * m_rows;
   if(ArraySize(m_cells)<TotalCells)
     {
      ArrayResize(m_cells, TotalCells);
      ArrayResize(m_cell_object, TotalCells);
     }
//--- Create each cell object and apply its stored properties
   for(int a=0; a<TotalCells; a++)
     {
      //--- Calculate the cell position and retrieve its stored dimensions
      int X      = CellXFind(a);
      int Y      = CellYFind(a);
      int W      = m_cells[a].s_width;
      int H      = m_cells[a].s_height;
      //--- Create the cell object on the chart.
      if(!m_cell_object[a].Create(ChartID(), m_prefix+"-cell-"+IntegerToString(a), 0, X, Y, W, H))
        {
         Created = false;
         break;
        }
      else
        {
         //--- Apply the stored cell properties to the created object
         m_cell_object[a].BackColor(m_cells[a].s_back_color);
         m_cell_object[a].BorderColor(m_cells[a].s_border_color);
         m_cell_object[a].Color(m_cells[a].s_text_color);
         m_cell_object[a].ReadOnly(m_cells[a].s_read_only);
         m_cell_object[a].TextAlign(m_cells[a].s_alignment);
         m_cell_object[a].Description(m_cells[a].s_description);
        }
     }
//--- Mark the table as created when all objects were created successfully
   if(!Created)
     {
      //--- Remove all objects created before the failure
      m_created = true; //we set it to true so that Destroy deletes all objects from the chart
      Destroy(false);
      m_created = false;
      return(false);
     }
   else
     {
      m_created = true;
      return(true);
     }
  }
Create() Function
The Create() function is responsible for creating the table and all of its required chart objects. Before starting the creation process, it checks whether at least one row and one column have been initialized. It also prevents the function from creating the table again if the table has already been created.
The function then creates two background objects for the table frame . The first object represents the outer border, while the second object represents the inner background area. After that, it calculates the total number of cells and prepares the arrays required to store the cell data and cell objects.Next, the function loops through all cells and calculates the position of each cell using its column and row indexes. It then creates a chart object for each cell and applies the properties stored in the corresponding cell structure, including its background color, border color, text color, read-only state, alignment, and description.
If all objects are created successfully, the function marks the table as created. If an error occurs while creating any object, the function removes the objects that were created before the error and returns false. This prevents the table from being left in an incomplete state.
//+------------------------------------------------------------------+
//| Find the X-coordinate of a cell                                  |
//+------------------------------------------------------------------+
int CTable::CellXFind(int cell_index)
  {
//--- Define the indentation variable
   int indentation = m_gap/2;
//--- Calculate the distance from the left side of the table
   for(int a=cell_index-1; a>=0; a--)
     {
      if(a%m_columns==m_columns-1)
        break;
      //--- adding to the indentation
      indentation += m_cells[a].s_width + m_gap;
     }
//--- Return the X-coordinate of the cell
   return(m_x_coordinate + Table_Inner_Margin + indentation);
  }
CellXFind() Function
The CellXFind() function calculates the X-coordinate of a cell based on its cell index. It starts from the left side of the table and adds the width of the preceding cells together with the defined gap between them. The calculated position is then combined with the table's X-coordinate and the table's inner margin to determine the final X-coordinate of the cell. To find the X-coordinate of a cell, the calculation starts from the beginning of the same row.
This function is used by the Create() function when creating the cell objects and by the Refresh function when updating their positions.
//+------------------------------------------------------------------+
//| Find the Y-coordinate of a cell                                  |
//+------------------------------------------------------------------+
int CTable::CellYFind(int cell_index)
  {
//--- Define the indentation variable
   int indentation = m_gap/2;
//--- Calculate the distance from the top of the table
   for(int column=IndexToColumn(cell_index); column<ArraySize(m_cells); column+=m_columns)
     {
      if(column>=cell_index)
        break;
      indentation += m_cells[column].s_height + m_gap;
     }
   return(m_y_coordinate + Table_Inner_Margin + indentation);
  }
CellYFind() Function
The CellYFind() function calculates the Y-coordinate of a cell based on its cell index. It starts from the top of the table and calculates the required vertical offset by adding the height of each preceding cell together with the gap between the cells. The table's Y-coordinate and inner margin are then added to determine the final Y-coordinate of the cell.
This function is used by the Create function when creating the cell objects and by Refresh() when updating their positions.
//+------------------------------------------------------------------+
//| Set the prefix used for table objects                            |
//+------------------------------------------------------------------+
void CTable::PrefixSet(string prefix)
  {
//--- Use the default prefix when an empty string is provided
   if(prefix=="")
     {
      prefix = "Table";
     }
//--- checking for inconsistent character from - to _
   StringReplace(prefix,"-","_");
   m_prefix = prefix;
//--- Rename existing table objects when the table has already been created
   if(m_created)
     {
      //--- Update the names of the background objects
      for(int a=0; a<ArraySize(m_labels); a++)
        {
         string SplitedName[];
         StringSplit(m_labels[a].Name(), '-', SplitedName);
         //--- Rebuild the object name when it contains a prefix and suffix
         if(ArraySize(SplitedName)>1)
           {
            string Name = m_prefix;
            //--- Append the existing name components to the new prefix
            for(int b=1; b<ArraySize(SplitedName); b++)
              {
               Name = Name + "-" + SplitedName[b];
              }
            m_labels[a].Name(Name);
           }
        }
      //--- Update the names of the cell objects
      for(int a=0; a<ArraySize(m_cells); a++)
        {
         string SplitedName[];
         StringSplit(m_cell_object[a].Name(), '-', SplitedName);
         //--- Rebuild the object name when it contains a prefix and suffix
         if(ArraySize(SplitedName)>1)
           {
            string Name = m_prefix;
            //--- Append the existing name components to the new prefix
            for(int b=1; b<ArraySize(SplitedName); b++)
              {
               Name = Name + "-" + SplitedName[b];
              }
            m_cell_object[a].Name(Name);
           }
        }
     }
  }
//+------------------------------------------------------------------+
//| Get the prefix used for table objects                            |
//+------------------------------------------------------------------+
string CTable::PrefixGet(void)
  {
   return(m_prefix);
  }
PrefixSet() and PrefixGet() Functions
The PrefixSet() function is used to define the prefix for the names of all table objects. If an empty string is provided, the function uses "Table" as the default prefix. It also replaces any hyphens (-) in the specified prefix with underscores (_) to keep the prefix compatible with the naming convention used by the class. If the table has already been created, the function updates the names of the existing background and cell objects by replacing the previous prefix while preserving their existing suffixes, such as background-1, background-2, and cell-0. This keeps the names of all objects belonging to the table organized and identifiable on the chart.
The PrefixGet() function is used to retrieve the current prefix assigned to the table. It returns the prefix stored in the class without modifying the table or any of its objects.
Managing Cells
After creating the table, we need a way to access and modify individual cells. Each cell has its own properties, such as colors, alignment, read-only state, and description. In this section, we will examine the functions that allow us to modify these properties and keep the stored cell data synchronized with the corresponding chart objects.
//+------------------------------------------------------------------+
//| Set the border color of a cell                                   |
//+------------------------------------------------------------------+
void CTable::CellSetBorderColor(int cell, color border, bool custom)
  {
//--- Checking for invalid index
   if(cell<0 || cell>=ArraySize(m_cells))
      return;
//--- changing the data
   m_cells[cell].s_border_color        = border; //resetting the border color
   m_cells[cell].s_custom_border_color = custom; //resetting the custom border color mode
//--- change the border color property of the cell if the objects are created
   if(m_created)
     {
      m_cell_object[cell].BorderColor(m_cells[cell].s_border_color); //resetting the border color
     }
  }
//+------------------------------------------------------------------+
//| Get the border color of a cell                                   |
//+------------------------------------------------------------------+
color CTable::CellGetBorderColor(int cell)
  {
//---Checking if the size of cells array is greater than the index for valid number
   if(ArraySize(m_cells)>cell && cell>=0)
     {
      return(m_cells[cell].s_border_color);
     }
   else
     {
      return(clrNONE);
     }
  }
CellSetBorderColor() and CellGetBorderColor() Functions
The CellSetBorderColor() function is used to change the border color of a specific cell by its cell index. The specified color is stored in the class and if the table has already been created, it is applied to that cell. The custom flag determines whether the cell's color is preserved when CellsColorSet() or HeadersColorSet() is called.
The CellGetBorderColor() function retrieves the border color assigned to a specific cell. It returns the stored color without modifying the cell object.
//+------------------------------------------------------------------+
//| Set the background color of a cell                               |
//+------------------------------------------------------------------+
void CTable::CellSetBackColor(int cell, color back, bool custom)
  {
//--- Checking for invalid index
   if(cell<0 || cell>=ArraySize(m_cells))
      return;
//--- changing the data
   m_cells[cell].s_back_color        = back;   //resetting the back color
   m_cells[cell].s_custom_back_color = custom; //resetting the custom back color mode
//--- change the back color property of the cell if the objects are created
   if(m_created)
     {
      m_cell_object[cell].BackColor(m_cells[cell].s_back_color); //resetting the back color
     }
  }
//+------------------------------------------------------------------+
//| Getting the background color of a cell                           |
//+------------------------------------------------------------------+
color CTable::CellGetBackColor(int cell)
  {
//---Checking if the size of cells array is greater than the index for valid number
   if(ArraySize(m_cells)>cell && cell>=0)
     {
      return(m_cells[cell].s_back_color);
     }
   else
     {
      return(clrNONE);
     }
  }
CellSetBackColor() and CellGetBackColor() Functions
The CellSetBackColor() function sets the background color of a specific cell.
The CellGetBackColor() function is used to retrieve the current background color assigned to a specific cell.
//+------------------------------------------------------------------+
//| Set the text color of a cell                                     |
//+------------------------------------------------------------------+
void CTable::CellSetTextColor(int cell, color text, bool custom)
  {
//--- Check whether the cell index is valid
   if(cell<0 || cell>=ArraySize(m_cells))
      return;
//--- Store the text color in the cell data
   m_cells[cell].s_text_color = text;          //resetting the text color
   m_cells[cell].s_custom_text_color = custom; //resetting the custom text color mode
//--- Update the text color of the cell object when the table is created
   if(m_created)
     {
      m_cell_object[cell].Color(m_cells[cell].s_text_color);
     }
  }
//+------------------------------------------------------------------+
//| Getting the text color of a cell                                 |
//+------------------------------------------------------------------+
color CTable::CellGetTextColor(int cell)
  {
//---Checking if the size of cells array is greater than the index for valid number
   if(ArraySize(m_cells)>cell && cell>=0)
     {
      return(m_cells[cell].s_text_color);
     }
   else
     {
      return(clrNONE);
     }
  }
CellSetTextColor() and CellGetTextColor() Functions
The CellSetTextColor() function defines the text color of a specific cell. It works the same way as the previous function but applies to the text color instead.
The CellGetTextColor() function is used to retrieve the current text color assigned to a specific cell.
//+------------------------------------------------------------------+
//| Set the read-only property of a cell                             |
//+------------------------------------------------------------------+
void CTable::CellSetReadOnly(int cell, bool read_only)
  {
//--- Check whether the cell index is valid
   if(cell<0 || cell>=ArraySize(m_cells))
      return;
//--- Store the read-only mode in the cell data
   m_cells[cell].s_read_only = read_only;
//--- Update the read-only mode of the cell object when the table is created
   if(m_created)
     {
      m_cell_object[cell].ReadOnly(m_cells[cell].s_read_only);
     }
  }
//+------------------------------------------------------------------+
//| Getting the read-only mode of a cell                             |
//+------------------------------------------------------------------+
bool CTable::CellGetReadOnly(int cell)
  {
//---Checking if the size of cells array is greater than the index for valid number
   if(ArraySize(m_cells)>cell && cell>=0)
     {
      return(m_cells[cell].s_read_only);
     }
   else
     {
      return(false);
     }
  }
CellSetReadOnly() and CellGetReadOnly() Functions
The CellSetReadOnly() function is used to change whether a specific cell can be edited by the user. It first checks whether the specified cell index is valid. If the index is valid, the new read-only state is stored in the cell's data. If the table has already been created, the function also updates the read-only property of the corresponding chart object immediately. This allows the cell's editability to be changed dynamically without recreating the table.
The CellGetReadOnly() function is used to retrieve the current read-only status of a specific cell.
//+------------------------------------------------------------------+
//| Set the alignment of a cell                                      |
//+------------------------------------------------------------------+
void CTable::CellSetAlignment(int cell, ENUM_ALIGN_MODE align)
  {
//--- Check whether the cell index is valid
   if(cell<0 || cell>=ArraySize(m_cells))
      return;
//--- Store the alignment mode in the cell data
   m_cells[cell].s_alignment = align;
//--- Update the alignment of the cell object when the table is created
   if(m_created)
     {
      m_cell_object[cell].TextAlign(m_cells[cell].s_alignment);
     }
  }
//+------------------------------------------------------------------+
//| Getting the alignment mode of a cell                             |
//+------------------------------------------------------------------+
ENUM_ALIGN_MODE CTable::CellGetAlignment(int cell)
  {
//---Checking if the size of cells array is greater than the index for valid number
   if(ArraySize(m_cells)>cell && cell>=0)
     {
      return(m_cells[cell].s_alignment);
     }
   else
     {
      return(ALIGN_CENTER);
     }
  }
CellSetAlignment() and CellGetAlignment() Functions
The CellSetAlignment() function is used to change the text alignment of a specific cell. This allows the alignment of a cell to be changed dynamically without recreating the table.
The CellGetAlignment() function is used to retrieve the current text alignment of a specific cell.
//+------------------------------------------------------------------+
//| Set the description of a cell using its index                    |
//+------------------------------------------------------------------+
void CTable::CellSetDescription(int index, string text)
  {
//--- Check whether the cell index is valid
   if(index < 0 || index >= ArraySize(m_cells))
      return;
//--- Store the description in the cell data
   m_cells[index].s_description = text;
//--- Update the description of the cell object when the table is created
   if(m_created)
      m_cell_object[index].Description(text);
  }
//+------------------------------------------------------------------+
//| Set the cell description using its column and row                |
//+------------------------------------------------------------------+
void CTable::CellSetDescription(int column_index, int row_index, string text)
  {
//--- Convert the column and row to a cell index
   int index = ColumnRowToIndex(column_index, row_index);
//--- Check whether the cell index is valid
   if(index<0 || index>=ArraySize(m_cells))
      return;
//--- Store the description in the cell data
   m_cells[index].s_description = text;
//--- Update the description of the cell object when the table is created
   if(m_created)
      m_cell_object[index].Description(text);
  }
//+------------------------------------------------------------------+
//| Getting the description mode of a cell                           |
//+------------------------------------------------------------------+
string CTable::CellGetDescription(int cell)
  {
//---Checking if the size of cells array is greater than the index for valid number
   if(ArraySize(m_cells)>cell && cell>=0)
     {
      return(m_cells[cell].s_description);
     }
   else
     {
      return("");
     }
  }
CellSetDescription() and CellGetDescription() Functions
The CellSetDescription() function is used to set the description of a specific cell. The class provides two versions of this function. The first version identifies the cell using its index, while the second version identifies it using the column and row indexes. First, both versions verify that the specified cell is valid and then store the description in the cell data. If the table has already been created, the description of the corresponding chart object is also updated immediately.
The CellGetDescription() function is used to retrieve the current description of a specific cell.
//+------------------------------------------------------------------+
//| Set the cell colors while preserving the header colors           |
//+------------------------------------------------------------------+
void CTable::CellsColorSet(color back, color border, color text)
  {
//--- Replace invalid colors with the default cell colors
   if(back==clrNONE)
      back = clrWhite;
   if(border==clrNONE)
      border = clrWhite;
   if(text==clrNONE)
      text = clrBlack;
//--- Store the new cell colors
   m_color_cell_back   = back;
   m_color_cell_border = border;
   m_color_cell_text   = text;
//--- Update the cell colors when the table is already created
   if(m_created)
     {
      //--- Apply the new colors to all non-header cells
      for(int a=0; a<ArraySize(m_cells); a++)
        {
         //--- Skip cells that belong to the horizontal header
         if(m_has_horizontal_header && a<m_columns)
            continue;
         //--- Skip cells that belong to the vertical header
         if(m_has_vertical_header && a%m_columns==0)
            continue;
         //--- Apply the cell style to the current cell
         ApplyCellStyle(a);
        }
     }
  }
CellsColorSet() Function
The CellsColorSet() function is used to set the default background, border, and text colors for regular cells. Before storing the new colors, the function replaces any clrNONE values with the predefined default colors. If the table has already been created, the function updates the appearance of all regular cells immediately. Cells that belong to a horizontal or vertical header are skipped so that their header colors remain unchanged.
//+------------------------------------------------------------------+
//| Set the header colors                                            |
//+------------------------------------------------------------------+
void CTable::HeadersColorSet(color back, color border, color text)
  {
//--- Replace invalid colors with the default header colors
   if(back==clrNONE)
      back = clrLightBlue;
   if(border==clrNONE)
      border = clrLightBlue;
   if(text==clrNONE)
      text = clrBlack;
//--- Store the new header colors
   m_color_header_back   = back;
   m_color_header_border = border;
   m_color_header_text   = text;
//--- Update the header cells when the table is already created
   if(m_created)
     {
      if(m_has_horizontal_header)
        {
         //--- Apply the header style to all cells in the first row
         for(int a=0; a<=m_columns-1; a++)
            ApplyCellStyle(a);
        }
      if(m_has_vertical_header)
        {
         //--- Apply the header style to all cells in the first column
         for(int a=0; a<=(m_columns*m_rows)-1; a+=m_columns)
            ApplyCellStyle(a);
        }
     }
  }
HeadersColorSet() Function
The HeadersColorSet() function is used to set the background, border, and text colors of the table headers. It first replaces any clrNONE values with the predefined default header colors and then stores the new colors. If the table has already been created, the function immediately updates the cells belonging to the horizontal and vertical headers. Regular cells are not affected, so their existing colors remain unchanged.
//+------------------------------------------------------------------+
//| Set the background and border colors                             |
//+------------------------------------------------------------------+
void CTable::BackgroundColorSet(color back, color border)
  {
//--- Replace invalid background and border colors with default colors
   if(back==clrNONE)
      back = clrBlack;
   if(border==clrNONE)
      border = clrWhite;
//--- Store the new background and border colors
   m_color_background_back   = back;
   m_color_background_border = border;
//--- Update the background objects when the table is already created
   if(m_created)
     {
      //--- Update the colors of the two background objects
      for(int a=0; a<ArraySize(m_labels); a++)
        {
         //--- Set the border color for the outer background
         if(a==0)
           {
            m_labels[a].Color(m_color_background_border);
            m_labels[a].BackColor(m_color_background_border);
           }
         //--- Set the background color for the inner background
         if(a==1)
           {
            m_labels[a].Color(m_color_background_back);
            m_labels[a].BackColor(m_color_background_back);
           }
        }
     }
  }
BackgroundColorSet() Function
The BackgroundColorSet() function sets the background and border colors of the table itself. These colors are separate from the colors of individual cells and are applied to the two background objects that form the table's outer border and inner background. The function first checks the provided colors and replaces any clrNONE values with the default background and border colors. It then stores the new colors in the class variables.If the table has already been created, the function immediately updates the two background objects. The first object uses the border color, while the second object uses the background color. This allows the table's overall appearance to be changed without recreating the table.
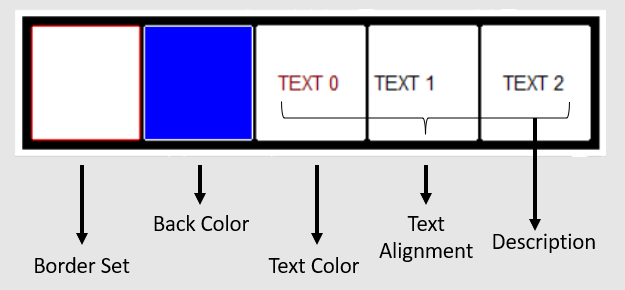
Figure 2: The properties of the selected cell are shown in the image above.
Working with Headers
Headers help distinguish important rows and columns from regular table cells. The CTable class supports both horizontal and vertical headers, allowing the first row, the first column, or both to be used as headers. In this section, we will see how to enable or disable these headers and how the class automatically applies the appropriate header style to the corresponding cells.
//+------------------------------------------------------------------+
//| Set the horizontal and vertical header status                    |
//+------------------------------------------------------------------+
void CTable::HeaderSet(bool horizontal, bool vertical)
  {
//--- Return if rows or columns are not initialized
   if(m_rows<=0 || m_columns<=0)
      return;
//--- Define variables
   bool PreviousRowHeader = m_has_horizontal_header; //Store the previous horizontal header status
   m_has_horizontal_header = horizontal;             //Set the new horizontal header status
//--- Update the first row when the table is already created
   if(m_created)
     {
      //--- Remove the horizontal header style when it is disabled
      if(PreviousRowHeader && !m_has_horizontal_header)
        {
         for(int a=0; a<=m_columns-1; a++)
            ApplyCellStyle(a);
        }
      //--- Apply the horizontal header style when it is enabled
      if(!PreviousRowHeader && m_has_horizontal_header)
        {
         //--- Apply the style to all cells in the first row
         for(int a=0; a<=m_columns-1; a++)
            ApplyCellStyle(a);
        }
     }
   else
     {
      //--- Apply the horizontal header style to the cell data
      if(m_has_horizontal_header)
        {
         //--- Apply the style to all cells in the first row
         for(int a=0; a<=m_columns-1; a++)
            ApplyCellStyle(a);
        }
     }
   bool PreviousColumnHeader = m_has_vertical_header; //Store the previous vertical header status
   m_has_vertical_header = vertical;                  //Set the new vertical header status
//--- Update the first column when the table is already created
   if(m_created)
     {
      //--- Remove the vertical header style when it is disabled
      if(PreviousColumnHeader && !m_has_vertical_header)
        {
         //--- Apply the regular cell style to all cells in the first column
         for(int a=0; a<=(m_columns*m_rows)-1; a+=m_columns)
            ApplyCellStyle(a);
        }
      //--- Apply the vertical header style when it is enabled
      if(!PreviousColumnHeader && m_has_vertical_header)
        {
         //--- Apply the style to all cells in the first column
         for(int a=0; a<=(m_columns*m_rows)-1; a+=m_columns)
            ApplyCellStyle(a);
        }
     }
   else
     {
      //--- Apply the vertical header style to the cell data
      if(m_has_vertical_header)
        {
         //--- Apply the style to all cells in the first column
         for(int a=0; a<=(m_columns*m_rows)-1; a+=m_columns)
            ApplyCellStyle(a);
        }
     }
  }
HeaderSet() Function
The HeaderSet() function is used to enable or disable the horizontal and vertical headers of the table. It receives two Boolean parameters: the first determines whether the horizontal header is enabled, and the second determines whether the vertical header is enabled. The function stores the previous header states before applying the new settings. This allows it to determine whether a header has been enabled or disabled and apply the appropriate style only when necessary.
If the table has already been created, the function immediately updates the affected cells. When a header is enabled, the corresponding row or column receives the header style. When a header is disabled, the affected cells return to the regular cell style. If the table has not yet been created, the header settings are still stored, and the corresponding cell data is updated so that the correct styles are applied when the table is created.
Headers can be configured either before or after the Create function. If configured before creation, the style is stored in the cell data and will be applied during creation. If configured after creation, the affected cells are updated immediately.
//+------------------------------------------------------------------+
//| Apply the appropriate style to a cell                            |
//+------------------------------------------------------------------+
void CTable::ApplyCellStyle(int index)
  {
//--- check the validity of the index
   if(index<0 || index>=ArraySize(m_cells))
      return;
//--- Find the row and column of the cell and initialize the header status
   int  column    = IndexToColumn(index);
   int  row       = IndexToRow(index);
   bool is_header = false;
//--- Check whether the cell belongs to a header
   if(m_has_horizontal_header && row == 0)
      is_header = true;
   if(m_has_vertical_header && column == 0)
      is_header = true;
//--- Apply the header style when the cell belongs to a header and normal cell
   if(is_header)
     {
      if(!m_cells[index].s_custom_back_color)
         m_cells[index].s_back_color   = m_color_header_back;
      if(!m_cells[index].s_custom_border_color)
         m_cells[index].s_border_color = m_color_header_border;
      if(!m_cells[index].s_custom_text_color)
         m_cells[index].s_text_color   = m_color_header_text;
      if(m_created)
        {
         m_cell_object[index].BackColor(m_cells[index].s_back_color);
         m_cell_object[index].BorderColor(m_cells[index].s_border_color);
         m_cell_object[index].Color(m_cells[index].s_text_color);
         m_cell_object[index].ReadOnly(m_cells[index].s_read_only);
        }
     }
   else
     {
      if(!m_cells[index].s_custom_back_color)
         m_cells[index].s_back_color   = m_color_cell_back;
      if(!m_cells[index].s_custom_border_color)
         m_cells[index].s_border_color = m_color_cell_border;
      if(!m_cells[index].s_custom_text_color)
         m_cells[index].s_text_color   = m_color_cell_text;
      if(m_created)
        {
         m_cell_object[index].BackColor(m_cells[index].s_back_color);
         m_cell_object[index].BorderColor(m_cells[index].s_border_color);
         m_cell_object[index].Color(m_cells[index].s_text_color);
        }
     }
  }
ApplyCellStyle() Function
This function is used to apply the current style settings to the cells of the table. It updates the background, text, and border colors of each cell according to their stored properties. If a cell is in custom color mode, its individually assigned color is preserved and is not replaced by the corresponding default table color.
If the cell belongs to a header, the function applies the header background, border, and text colors. Otherwise, it applies the regular cell colors. When the table has already been created, the corresponding chart object is updated immediately as well.
Adding and Removing Rows and Columns
A flexible table should allow its structure to change after initialization. The CTable class provides functions for adding and removing rows and columns while preserving the existing cells' content and style properties and recalculating cell dimensions for the new table geometry. In this section, we will examine how the class modifies the internal cell array, initializes newly added cells, removes the selected cells, recalculates their dimensions, and recreates the table with the updated structure.
All functions in this section follow the same overall approach. They preserve the existing cell data, but they do not update the table incrementally. Instead, each function builds a temporary STRUCT_CELL array, copies the surviving cells into their new positions, calls Destroy() to remove the current chart objects, resizes and refills the main cell arrays, and finally calls Create() to rebuild the table from scratch. This is a reasonable implementation for relatively small dashboard tables, where structural changes are rare and readability matters more than raw performance.
//+------------------------------------------------------------------+
//| Add a row after the specified row                                |
//+------------------------------------------------------------------+
void CTable::AddRow(int after)
  {
//--- Check that the specified row index is not negative
   if(after<0)
     {
      Print("You should enter a non-negative row index for adding a row");
      return;
     }
//--- Check that the table contains at least one row
   if(m_rows<=0)
     {
      Print("There is no row to add after");
      return;
     }
//--- Limit the row index to the last available row
   if(after>m_rows-1)
      after = m_rows-1;
//--- Define variables for the new table dimensions
   int PreviousRows  = m_rows;
   int NewRow        = after+1;
   int TotalCells    = (m_rows+1)*m_columns;
//--- Create a temporary array for the new cell data
   STRUCT_CELL NewCells[];
   ArrayResize(NewCells, TotalCells);
   int SourceIndex = 0;
//--- Copy the existing cells and initialize the new row
   for(int a=0; a<TotalCells; a++)
     {
      int NewRowStart = NewRow*m_columns;
      int NewRowEnd   = NewRowStart+m_columns-1;
      //--- Initialize the cells that belong to the new row
      if(a>=NewRowStart && a<=NewRowEnd)
        {
         //--- Apply the vertical header style to the first cell of the new row
         if(a==NewRowStart && m_has_vertical_header)
           {
            NewCells[a].s_width               = 0;
            NewCells[a].s_height              = 0;
            NewCells[a].s_border_color        = m_color_header_border;
            NewCells[a].s_back_color          = m_color_header_back;
            NewCells[a].s_text_color          = m_color_header_text;
            NewCells[a].s_custom_back_color   = false;
            NewCells[a].s_custom_border_color = false;
            NewCells[a].s_custom_text_color   = false;
            NewCells[a].s_read_only           = true;
            NewCells[a].s_alignment           = ALIGN_CENTER;
            NewCells[a].s_description         = "";
           }
         else
           {
            NewCells[a].s_width        = 0;
            NewCells[a].s_height       = 0;
            NewCells[a].s_border_color = m_color_cell_border;
            NewCells[a].s_back_color   = m_color_cell_back;
            NewCells[a].s_text_color   = m_color_cell_text;
            NewCells[a].s_custom_back_color   = false;
            NewCells[a].s_custom_border_color = false;
            NewCells[a].s_custom_text_color   = false;
            NewCells[a].s_read_only    = true;
            NewCells[a].s_alignment    = ALIGN_CENTER;
            NewCells[a].s_description  = "";
           }
        }
      else
        {
         CopyCellData(m_cells[SourceIndex], NewCells[a]);
         SourceIndex++;
        }
     }
//--- Destroy the existing table objects before resizing the arrays
   if(!Destroy(false))
     {
      Print("Failed to destroy existing table objects");
      return;
     }
   ArrayResize(m_cells, TotalCells);
   ArrayResize(m_cell_object, TotalCells);
//--- Copy the cell data back to the main array
   for(int a=0; a<TotalCells; a++)
      CopyCellData(NewCells[a], m_cells[a]);
//--- Update the number of rows
   m_rows = PreviousRows+1;
//--- Calculate the new cell dimensions
   int CellWidth  = (m_width-Table_Inner_Margin*2)/m_columns;
   int CellHeight = (m_height-Table_Inner_Margin*2)/m_rows;
//--- Update the dimensions of all cells
   for(int a=0; a<TotalCells; a++)
     {
      m_cells[a].s_height = CellHeight-m_gap;
      m_cells[a].s_width  = CellWidth-m_gap;
     }
//--- Recreate the table with the updated cell data
   Create();
  }
AddRow() Function
The AddRow() function is used to add a new row after a specified row. It first validates the requested row index and ensures that the table already contains at least one row. If the specified index is greater than the last available row, it is adjusted to the last row so that the new row is always inserted at a valid position.
The function then creates a temporary array with the new total number of cells. It copies the existing cell properties into their new positions and initializes the cells belonging to the new row with the default cell properties. If a vertical header is enabled, the first cell of the new row receives the header style.
Before updating the main cell arrays, the existing table objects are destroyed. The cell array is then resized, the copied data is restored, and the number of rows is updated. Finally, the dimensions of all cells are recalculated, and the table is recreated using the updated cell data.
//+------------------------------------------------------------------+
//| Add a column after the specified column                          |
//+------------------------------------------------------------------+
void CTable::AddColumn(int after)
  {
//--- Check that the specified column index is not negative
   if(after<0)
     {
      Print("You should enter a non-negative column index");
      return;
     }
//--- Check that the table contains at least one column
   if(m_columns<=0)
     {
      Print("There is no column to add after");
      return;
     }
//--- Limit the column index to the last available column
   if(after>m_columns-1)
      after = m_columns-1;
//--- Define variables for the new table dimensions
   int PreviousColumns = m_columns;
   int PreviousTotal   = m_rows*m_columns;
   int NewColumn       = after+1;
   int TotalCells      = m_rows*(m_columns+1);
//--- Create a temporary array for the new cell data
   STRUCT_CELL NewCells[];
   ArrayResize(NewCells, TotalCells);
//--- Initialize the indexes used to copy the existing cell data
   int skip    = after+1;
   int counter = 0;
//--- Copy the existing cells and leave space for the new column
   for(int a=0; a<ArraySize(NewCells); a++)
     {
      if(a==skip)
        {
         skip += m_columns+1;
         continue;
        }
      CopyCellData(m_cells[counter], NewCells[a]);
      counter++;
     }
//--- Destroy the existing table objects before resizing the arrays
   if(!Destroy( false ))
     {
      Print("Failed to destroy existing table objects");
      return;
     }
   ArrayResize(m_cells, TotalCells);
   ArrayResize(m_cell_object, TotalCells);
//--- Initialize the index of the new column
   skip = after+1;
//--- Copy the existing cell data and initialize the new cells
   for(int a=0; a<TotalCells; a++)
     {
      if(a==skip)
        {
         skip += m_columns+1;
         m_cells[a].s_width               = 0;
         m_cells[a].s_height              = 0;
         m_cells[a].s_border_color        = m_color_cell_border;
         m_cells[a].s_back_color          = m_color_cell_back;
         m_cells[a].s_text_color          = m_color_cell_text;
         m_cells[a].s_custom_back_color   = false;
         m_cells[a].s_custom_border_color = false;
         m_cells[a].s_custom_text_color   = false;
         m_cells[a].s_read_only           = true;
         m_cells[a].s_alignment           = ALIGN_CENTER;
         m_cells[a].s_description         = "";
         continue;
        }
      CopyCellData(NewCells[a], m_cells[a]);
     }
//--- Update the number of columns
   m_columns = PreviousColumns+1;
//--- Calculate the new cell dimensions
   int CellWidth  = (m_width-Table_Inner_Margin*2)/m_columns;
   int CellHeight = (m_height-Table_Inner_Margin*2)/m_rows;
//--- New column status
   if(m_has_horizontal_header)
      ApplyCellStyle(NewColumn);
//--- Update the dimensions of all cells
   for(int a=0; a<TotalCells; a++)
     {
      m_cells[a].s_height = CellHeight-m_gap;
      m_cells[a].s_width  = CellWidth-m_gap;
     }
//--- Recreate the table with the updated cell data
   Create();
  }
AddColumn() Function
The AddColumn() function is used to add a new column after a specified column. It first validates the specified column index and ensures that the table contains at least one column. If the specified index is greater than the last available column, it is adjusted to the last column.
The function then creates a temporary array with space for the new column and copies the existing cell data into their new positions, leaving space for the new cells. The new cells are initialized with the default cell properties.
Before updating the main cell arrays, the existing table objects are destroyed. The arrays are then resized, the existing cell data is restored, and the new column is inserted into the table. If a horizontal header is enabled, the header style is applied to the top cell of the new column. The vertical header never needs to be checked, because a column inserted after the first column can never become the vertical header. Finally, the number of columns and the dimensions of all cells are updated, and the table is recreated with the new structure.
//+------------------------------------------------------------------+
//| Delete the specified row                                         |
//+------------------------------------------------------------------+
void CTable::DeleteRow(int row)
  {
//--- Check that the specified row index is valid and is not a header row
   if(row<0 || (row==0 && m_has_horizontal_header))
     {
      Print("You should enter a positive row index");
      return;
     }
//--- Check that the table contains at least two rows
   if(m_rows<=1)
     {
      Print("There is no row to remove");
      return;
     }
//--- Limit the row index to the last available row
   if(row>m_rows-1)
      row = m_rows-1;
//--- Define variables for the new table dimensions
   int PreviousRows  = m_rows;
   int PreviousTotal = m_rows*m_columns;
   int TotalCells    = (m_rows-1)*m_columns;
//--- Create a temporary array for the remaining cell data
   STRUCT_CELL NewCells[];
   ArrayResize(NewCells, TotalCells);
   int counter = 0;
//--- Copy all cells except those in the specified row
   for(int a=0; a<PreviousTotal; a++)
     {
      //--- Skip the cells that belong to the specified row
      if(a>=row*m_columns && a<=(row+1)*m_columns-1)
         continue;
      //--- Copy the cell data to the temporary array
      CopyCellData(m_cells[a], NewCells[counter]);
      counter++;
     }
//--- Destroy the existing table objects before resizing the arrays
   if(!Destroy(false))
     {
      Print("Failed to destroy existing table objects");
      return;
     }
   ArrayResize(m_cells, TotalCells);
   ArrayResize(m_cell_object, TotalCells);
//--- Copy the remaining cell data back to the main array
//--- Restore the cell data after removing the specified row
   for(int a=0; a<TotalCells; a++)
      CopyCellData(NewCells[a], m_cells[a]);
//--- Calculate the new cell dimensions
   int CellWidth  = (m_width-Table_Inner_Margin*2)/m_columns;
   int CellHeight = (m_height-Table_Inner_Margin*2)/(m_rows-1);
//--- Update the dimensions of all cells
//--- Apply the new width and height to every cell
   for(int a=0; a<TotalCells; a++)
     {
      m_cells[a].s_height = CellHeight-m_gap;
      m_cells[a].s_width  = CellWidth-m_gap;
     }
//--- Update the number of rows and recreate the table
   m_rows = PreviousRows-1;
   Create();
  }
DeleteRow() Function
The DeleteRow() function is used to remove a specified row from the table. It first checks whether the specified row index is valid and prevents the removal of the first row when a horizontal header is enabled. It also ensures that at least one row remains in the table.
The function then creates a temporary array for the remaining cells and copies all cell data except the cells belonging to the selected row. After destroying the existing table objects, the main cell arrays are resized, and the remaining cell data is restored.
Finally, the function recalculates the dimensions of all cells, updates the number of rows, and recreates the table with the updated structure.
//+------------------------------------------------------------------+
//| Delete the specified column                                      |
//+------------------------------------------------------------------+
void CTable::DeleteColumn(int column)
  {
//--- Check that the table has at least two columns
   if(m_columns<=1)
     {
      Print("The table must have at least one column");
      return;
     }
//--- Check that the specified column index is not negative
   if(column<0)
     {
      Print("You should enter a non-negative column index");
      return;
     }
//--- Prevent deleting the vertical header column
   if(column==0 && m_has_vertical_header)
     {
      Print("The vertical header column cannot be deleted");
      return;
     }
//--- Limit the column index to the last available column
   if(column>m_columns-1)
      column = m_columns-1;
//--- Define variables for copying the existing cell data
   int PreviousColumns = m_columns;
   int PreviousTotal   = m_rows*m_columns;
   int TotalCells      = m_rows*(m_columns-1);
//--- Create a temporary array for the remaining cells
   STRUCT_CELL NewCells[];
   ArrayResize(NewCells, TotalCells);
//--- Copy all cells except those in the specified column
   int skip    = column;
   int counter = 0;
   for(int a=0; a<PreviousTotal; a++)
     {
      //--- Skip the cell that belongs to the specified column
      if(a==skip)
        {
         skip += m_columns;
         continue;
        }
      //--- Copy the cell data to the temporary array
      CopyCellData(m_cells[a], NewCells[counter]);
      counter++;
     }
//--- Destroy the existing table objects and resize the arrays
   if(!Destroy(false))
     {
      Print("Failed to destroy existing table objects");
      return;
     }
   ArrayResize(m_cells, TotalCells);
   ArrayResize(m_cell_object, TotalCells);
//--- Copy the remaining cell data back to the main array
   for(int a=0; a<TotalCells; a++)
      CopyCellData(NewCells[a], m_cells[a]);
//--- Calculate the new cell dimensions
   int CellWidth  = (m_width-Table_Inner_Margin*2)/(m_columns-1);
   int CellHeight = (m_height-Table_Inner_Margin*2)/m_rows;
//--- Update the dimensions of all cells
   for(int a=0; a<TotalCells; a++)
     {
      m_cells[a].s_height = CellHeight-m_gap;
      m_cells[a].s_width  = CellWidth-m_gap;
     }
//--- Update the number of columns and recreate the table
   m_columns = PreviousColumns-1;
   Create();
  }
DeleteColumn() Function
The DeleteColumn() function is used to remove a specified column from the table. Initially, a check is performed to determine whether the number of columns is more than one and whether the number entered in the input is valid. If a vertical header is enabled, the function also prevents the first column from being deleted.
The function then creates a temporary array for the remaining cells and copies all cell data except the cells belonging to the selected column. After destroying the existing table objects, the main cell arrays are resized, and the remaining cell data is restored.
Finally, the function recalculates the dimensions of all cells, updates the number of columns, and recreates the table with the new structure.
//+------------------------------------------------------------------+
//| Copy the properties of a cell                                    |
//+------------------------------------------------------------------+
void CTable::CopyCellData(STRUCT_CELL &src, STRUCT_CELL &dst)
  {
   dst = src;
  }
CopyCellData() Function
The CopyCellData() function is used to copy all properties of one cell to another cell. It copies the cell's alignment, background color, border color, description, height, read-only state, text color, and width. This function is mainly used when adding or removing rows and columns. By copying the complete cell data to the new positions, the class can preserve the existing cell properties while changing the structure of the table.
Cell Index Management
When a table contains multiple rows and columns, each cell is stored in a one-dimensional array. Therefore, we need a consistent way to convert between the cell's array index and its row and column positions. In this section, we will examine the functions that perform these conversions and validate the provided indexes before returning a result.
//+------------------------------------------------------------------+
//| Returns the column index of a cell based on its array index      |
//+------------------------------------------------------------------+
int CTable::IndexToColumn(int index)
  {
//--- checking index, columns and rows for a positive number
   if(index < 0 || m_columns <= 0 || m_rows <= 0)
      return(-1);
//--- index should be between 0 and (m_rows*m_columns)-1
   if(index >= m_rows * m_columns)
      return(-1);
//--- return the column
   return(index % m_columns);
  }
IndexToColumn() Function
The IndexToColumn() function converts a cell's one-dimensional array index into its corresponding column index. It first checks whether the provided index is valid and whether the table has a valid number of rows and columns. If any of these values are invalid, the function returns -1. For a valid index, the function uses the remainder of the index divided by the number of columns to determine the column in which the cell is located.
//+------------------------------------------------------------------+
//| Return the row index of a cell based on its array index          |
//+------------------------------------------------------------------+
int CTable::IndexToRow(int index)
  {
   if(index < 0 || m_columns <= 0 || m_rows <= 0)
      return(-1);
   if(index >= m_rows * m_columns)
      return(-1);
   return(index / m_columns);
  }
IndexToRow() Function
The IndexToRow() function converts a cell's one-dimensional array index into its corresponding row index. It first checks whether the provided index is valid and whether the table has a valid number of rows and columns. If any of these values are invalid, the function returns -1. For a valid index, the function divides the cell index by the number of columns. Since the cells are stored row by row in the array, the integer division result represents the row in which the cell is located.
//+------------------------------------------------------------------+
//| Return the cell index based on its column and row                |
//+------------------------------------------------------------------+
int CTable::ColumnRowToIndex(int column, int row)
  {
   if(column < 0 || row < 0)
      return(-1);
   if(column >= m_columns || row >= m_rows)
      return(-1);
   return(row * m_columns + column);
  }
ColumnRowToIndex() Function
The ColumnRowToIndex() function converts a cell's column and row indexes into its corresponding one-dimensional array index. It first checks whether the provided column and row indexes are valid and within the current table dimensions. If either index is invalid, the function returns -1. For valid indexes, the function calculates the cell index by multiplying the row index by the number of columns and then adding the column index. This allows a cell to be accessed directly by its row and column positions.
For example, suppose we have a table with 3 rows and 3 columns. By adding one column, the table can be expanded to 3 rows and 4 columns. The existing cell properties are preserved, while the newly added cells are initialized with the default properties. The two new regular cells are then given a red background.
   table.AddColumn(1);
   table.CellSetBackColor(table.ColumnRowToIndex(2,1),clrRed);
   table.CellSetBackColor(table.ColumnRowToIndex(2,2),clrRed);
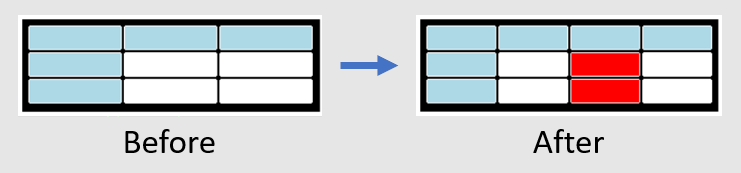
Figure 3: New cells are added after the first column and displayed with a red background.
Refreshing the Table
//+------------------------------------------------------------------+
//| Refresh all table objects                                        |
//+------------------------------------------------------------------+
void CTable::Refresh(void)
  {
//--- return if the object is not created
   if(!m_created)
      return;
//--- checking the background data array
   if(ArraySize(m_labels)<2)
      return;
//--- Check and update the background label coordinates
   if(m_labels[0].X_Distance()!=m_x_coordinate || m_labels[1].X_Distance()!=m_x_coordinate+Table_Inner_Margin/2)
     {
      m_labels[0].X_Distance(m_x_coordinate);
      m_labels[1].X_Distance(m_x_coordinate+Table_Inner_Margin/2);
     }
   if(m_labels[0].Y_Distance()!=m_y_coordinate || m_labels[1].Y_Distance()!=m_y_coordinate+Table_Inner_Margin/2)
     {
      m_labels[0].Y_Distance(m_y_coordinate);
      m_labels[1].Y_Distance(m_y_coordinate+Table_Inner_Margin/2);
     }
   if(m_labels[0].X_Size()!=m_width || m_labels[1].X_Size()!=m_width-Table_Inner_Margin)
     {
      m_labels[0].X_Size(m_width);
      m_labels[1].X_Size(m_width-Table_Inner_Margin);
     }
   if(m_labels[0].Y_Size()!=m_height || m_labels[1].Y_Size()!=m_height-Table_Inner_Margin)
     {
      m_labels[0].Y_Size(m_height);
      m_labels[1].Y_Size(m_height-Table_Inner_Margin);
     }
//--- Check and refresh all cell objects
   int total = MathMin(ArraySize(m_cells), ArraySize(m_cell_object));
   for(int a=0; a<total; a++)
     {
      //--- Check and update the cell alignment
      if(m_cells[a].s_alignment!=m_cell_object[a].TextAlign())
         m_cell_object[a].TextAlign(m_cells[a].s_alignment);
      //--- Check and update the cell background color
      if(m_cells[a].s_back_color!=m_cell_object[a].BackColor())
         m_cell_object[a].BackColor(m_cells[a].s_back_color);
      //--- Check and update the cell border color
      if(m_cells[a].s_border_color!=m_cell_object[a].BorderColor())
         m_cell_object[a].BorderColor(m_cells[a].s_border_color);
      //--- Check and update the cell description
      if(m_cells[a].s_description!=m_cell_object[a].Description())
         m_cell_object[a].Description(m_cells[a].s_description);
      //--- Check and update the cell height
      if(m_cells[a].s_height!=m_cell_object[a].Y_Size())
         m_cell_object[a].Y_Size(m_cells[a].s_height);
      //--- Check and update the cell read-only mode
      if(m_cells[a].s_read_only!=m_cell_object[a].ReadOnly())
         m_cell_object[a].ReadOnly(m_cells[a].s_read_only);
      //--- Check and update the cell text color
      if(m_cells[a].s_text_color!=m_cell_object[a].Color())
         m_cell_object[a].Color(m_cells[a].s_text_color);
      //--- Check and update the cell width
      if(m_cells[a].s_width!=m_cell_object[a].X_Size())
         m_cell_object[a].X_Size(m_cells[a].s_width);
      //--- Calculate the coordinates of the current cell
      int X      = CellXFind(a);
      int Y      = CellYFind(a);
      //--- Update the cell position when the coordinates have changed
      if(m_cell_object[a].X_Distance()!=X)
         m_cell_object[a].X_Distance(X);
      if(m_cell_object[a].Y_Distance()!=Y)
         m_cell_object[a].Y_Distance(Y);
     }
   ChartRedraw();
  }
This function is responsible for synchronizing the table's chart objects with the current data and properties stored in the class. This is especially important when the table's dimensions, position, or cell properties are changed after the table has already been created. Instead of recreating the entire table, the function checks the current state of each object and updates only the properties that differ.
The function loops through all cells and compares their stored properties with the corresponding chart objects. It checks and updates the cell alignment, background color, border color, description, height, read-only state, text color, width, and position. It also checks the positions and dimensions of the two background objects and updates them when necessary.
For each cell, the function calculates its current X and Y coordinates using the cell's row and column indexes and the CellXFind() and CellYFind() functions. If the calculated position differs from the current object position, the object is moved accordingly. Finally, the function calls ChartRedraw() to display all changes on the chart immediately.
The Refresh() function matters most after the table's width, height, or position is changed after creation. In this implementation, the function is most commonly used inside other methods.
Destroying the Table
//+------------------------------------------------------------------+
//| Delete all table objects and optionally clear the stored data    |
//+------------------------------------------------------------------+
bool CTable::Destroy(bool Empty_Data)
  {
//--- If the table has not been created, clear the stored data when requested
   if(!m_created)
     {
      if(Empty_Data)
        {
         ArrayFree(m_labels);
         ArrayFree(m_cells);
         ArrayFree(m_cell_object);
        }
      return(true);
     }
//--- Track whether all table objects are deleted successfully
   bool Deleted = true;
//--- Delete all background objects one by one
   for(int a=0; a<ArraySize(m_labels); a++)
     {
      if(!m_labels[a].Delete())
         Deleted = false;
     }
   if(Deleted && Empty_Data)
     {
      ArrayFree(m_labels);
     }
//--- Delete all cell objects one by one
   for(int a=0; a<ArraySize(m_cells); a++)
     {
      if(!m_cell_object[a].Delete())
         Deleted = false;
     }
   if(Deleted && Empty_Data)
     {
      ArrayFree(m_cells);
      ArrayFree(m_cell_object);
     }
//--- Reset the creation status when all objects are deleted successfully
   if(Deleted)
     {
      m_created = false;
      return(true);
     }
   else
     {
      return(false);
     }
  }
Destroy Function
This function is responsible for removing the table objects from the chart and, when requested, clearing the stored cell data. This function is important for managing the table's lifecycle, especially when the table needs to be recreated, resized, or removed completely.
Getting Table Properties
//+------------------------------------------------------------------+
//| Get the table x-coordinate                                       |
//+------------------------------------------------------------------+
int CTable::CoordinateXGet(void)
  {
   return(m_x_coordinate);
  }
//+------------------------------------------------------------------+
//| Get the table y-coordinate                                       |
//+------------------------------------------------------------------+
int CTable::CoordinateYGet(void)
  {
   return(m_y_coordinate);
  }
//+------------------------------------------------------------------+
//| Get the table width                                              |
//+------------------------------------------------------------------+
int CTable::WidthGet(void)
  {
   return(m_width);
  }
//+------------------------------------------------------------------+
//| Get the table height                                             |
//+------------------------------------------------------------------+
int CTable::HeightGet(void)
  {
   return(m_height);
  }
//+------------------------------------------------------------------+
//| Get the number of table rows                                     |
//+------------------------------------------------------------------+
int CTable::RowsGet(void)
  {
   return(m_rows);
  }
//+------------------------------------------------------------------+
//| Get the number of table columns                                  |
//+------------------------------------------------------------------+
int CTable::ColumnsGet(void)
  {
   return(m_columns);
  }
The CTable class also provides several getter functions for retrieving the table's current properties. These functions allow the user to access the table's position, dimensions, and structure without directly accessing the class variables. CoordinateXGet() and CoordinateYGet() return the current X and Y coordinates; WidthGet() and HeightGet() return the table dimensions; and RowsGet() and ColumnsGet() return the current number of rows and columns. These functions only return the stored values and do not modify the table.
A Real-World Example
This Expert Advisor monitors three currency pairs and displays their current market data in a table. It calculates the RSI, fast-moving average, and slow-moving average for each symbol and updates the table on every new candle. Based on the RSI and moving average conditions, it generates buy, sell, or no signal indications and highlights each signal with a different background color. For simplicity, this example is intentionally limited to three input symbols.
#property link      "https://www.mql5.com/en/users/alireza.saeedian/seller"
#property version   "1.01"
//+------------------------------------------------------------------+
//| Expert initialization function                                   |
//+------------------------------------------------------------------+
int OnInit()
  {
//--- set the event timer
   EventSetTimer(1);
//---
   return(INIT_SUCCEEDED);
  }
//+------------------------------------------------------------------+
//| Expert deinitialization function                                 |
//+------------------------------------------------------------------+
void OnDeinit(const int reason)
  {
//---
   EventKillTimer();
  }
//+------------------------------------------------------------------+
//| Expert tick function                                             |
//+------------------------------------------------------------------+
void OnTick()
  {
  }
//+------------------------------------------------------------------+
//| Expert timer event function                                      |
//+------------------------------------------------------------------+
void OnTimer(void)
  {
  }
//+------------------------------------------------------------------+
We create an Expert Advisor file named Dynamic Table EA.mq5 to build the example. The above code is an initial skeleton of the main code. We will use this file to place and demonstrate the different parts of the code step by step.
//+------------------------------------------------------------------+
//| Include the CTable class and declare a pointer to the class      |
//+------------------------------------------------------------------+
#include <Object Controls\CTable.mqh>
CTable table;
First, we include the CTable class file and then we create an instance of CTable.
//+------------------------------------------------------------------+
//| Inputs                                                           |
//+------------------------------------------------------------------+
input string Inp_Symbol_1       = "EURUSD.ecn"; //first symbol
input string Inp_Symbol_2       = "GBPUSD.ecn"; //second symbol
input string Inp_Symbol_3       = "USDJPY.ecn"; //third symbol
input int    Inp_RSI_Period     = 14;           //RSI period
input int    Inp_MA_Slow        = 50;           //slow MA period
input int    Inp_MA_Fast        = 14;           //fast MA period
input double Inp_RSI_overbought = 70;           //RSI overbought level
input double Inp_RSI_oversold   = 30;           //RSI oversold level
//+------------------------------------------------------------------+
//| Global variables                                                 |
//+------------------------------------------------------------------+
string   Symbols[];
datetime LastBarTime[3]  = {0, 0, 0};
int      HandleRSI[3]    = {0, 0, 0};
int      HandleMASlow[3] = {0, 0, 0};
int      HandleMAFast[3] = {0, 0, 0};
Next, we define the input parameters that allow the user to specify three symbols and then configure the RSI period, the fast and slow moving average periods, and the overbought and oversold RSI levels. These parameters are used later to calculate the indicators and generate trading signals.
We then define the global variables used throughout the expert advisor. The Symbols array contains the three currency pairs to be monitored, while the indicator handle arrays store the handles for the RSI, fast MA, and slow MA indicators created for each symbol. The LastBarTime array is used to ensure that the table is updated only once for each new candle.
//+------------------------------------------------------------------+
//| Expert initialization function                                   |
//+------------------------------------------------------------------+
int OnInit()
  {
//--- set the event timer
   EventSetTimer(1);
//--- adding the symbol if it's valid and exists
   bool custom = false;
   if(SymbolExist(Inp_Symbol_1, custom))
     {
      ArrayResize(Symbols, ArraySize(Symbols)+1);
      Symbols[ArraySize(Symbols)-1] = Inp_Symbol_1;
     }
   if(SymbolExist(Inp_Symbol_2, custom))
     {
      ArrayResize(Symbols, ArraySize(Symbols)+1);
      Symbols[ArraySize(Symbols)-1] = Inp_Symbol_2;
     }
   if(SymbolExist(Inp_Symbol_3, custom))
     {
      ArrayResize(Symbols, ArraySize(Symbols)+1);
      Symbols[ArraySize(Symbols)-1] = Inp_Symbol_3;
     }
//--- if the array size is zero, the expert advisor will not be initialized
   if(ArraySize(Symbols)<=0)
      return(INIT_FAILED);
//--- create indicator handles for each symbol
   for(int i=0; i<ArraySize(Symbols); i++)
     {
      HandleRSI[i]    = iRSI(Symbols[i], PERIOD_CURRENT, Inp_RSI_Period, PRICE_CLOSE);
      HandleMASlow[i] = iMA(Symbols[i], PERIOD_CURRENT, Inp_MA_Slow, 0, MODE_SMA, PRICE_CLOSE);
      HandleMAFast[i] = iMA(Symbols[i], PERIOD_CURRENT, Inp_MA_Fast, 0, MODE_SMA, PRICE_CLOSE);
      //--- check indicator handles
      if(HandleRSI[i]    == INVALID_HANDLE ||
         HandleMASlow[i] == INVALID_HANDLE ||
         HandleMAFast[i] == INVALID_HANDLE)
        {
         Print("Failed to create indicator handles for ", Symbols[i]);
         return(INIT_FAILED);
        }
     }
//--- create the table
   table.CoordinatesSet(50, 50);
   table.WidthHeightSet(500, 300);
   table.CellsInitialize(ArraySize(Symbols)+1, 5);
   table.Create();
   table.HeaderSet(true, true);
   table.CellSetDescription(table.ColumnRowToIndex(0, 0), "SYMBOLS");
   table.CellSetDescription(table.ColumnRowToIndex(1, 0), "RSI");
   table.CellSetDescription(table.ColumnRowToIndex(2, 0), "Fast MA");
   table.CellSetDescription(table.ColumnRowToIndex(3, 0), "Slow MA");
   table.CellSetDescription(table.ColumnRowToIndex(4, 0), "Signal");
   for(int i=0; i<ArraySize(Symbols); i++)
      table.CellSetDescription(table.ColumnRowToIndex(0, i+1), Symbols[i]);
//---
   return(INIT_SUCCEEDED);
  }
The OnInit() function is responsible for initializing the Expert Advisor and creating the table. First, it checks the symbol-related inputs, and if none of them are valid, the Expert Advisor is not initialized. Then it creates the RSI, fast MA, and slow MA indicator handles for each symbol in the symbols array and checks whether all handles were created successfully.
Next, the table object's position, size, and number of rows and columns are configured. The table headers are then enabled, and the symbol names and indicator names are assigned to the appropriate cells using CellSetDescription(). The first row is used for column captions, and the first column is used for symbol names.//+------------------------------------------------------------------+ //| Expert timer event function | //+------------------------------------------------------------------+ void OnTimer(void) { //--- define arrays to store indicators data double RSI_0[], RSI_1[], RSI_2[]; double MA_Fast_0[], MA_Fast_1[], MA_Fast_2[]; double MA_Slow_0[], MA_Slow_1[], MA_Slow_2[]; //--- editing the table for(int i=0; i<ArraySize(Symbols); i++) { if(i==0 && iTime(Symbols[i],PERIOD_CURRENT,0)!=LastBarTime[i]) { LastBarTime[i] = iTime(Symbols[i],PERIOD_CURRENT,0); if(CopyBuffer(HandleRSI[0], 0, 0, 2, RSI_0) != 2 || CopyBuffer(HandleMAFast[0], 0, 0, 2, MA_Fast_0) != 2 || CopyBuffer(HandleMASlow[0], 0, 0, 2, MA_Slow_0) != 2) { Print("Failed to copy indicator data."); continue; } table.CellSetDescription(table.ColumnRowToIndex(1, i+1), DoubleToString(RSI_0[0], 2)); table.CellSetDescription(table.ColumnRowToIndex(2, i+1), DoubleToString(MA_Fast_0[0], (int) SymbolInfoInteger(Symbols[i], SYMBOL_DIGITS))); table.CellSetDescription(table.ColumnRowToIndex(3, i+1), DoubleToString(MA_Slow_0[0], (int) SymbolInfoInteger(Symbols[i], SYMBOL_DIGITS))); //--- RSI is in the oversold area, and the Fast MA is above the Slow MA (Buy Signal) if(RSI_0[0]<Inp_RSI_oversold && MA_Fast_0[0]>MA_Slow_0[0]) { table.CellSetBackColor(table.ColumnRowToIndex(4, 1), clrPaleGreen, true); table.CellSetDescription(table.ColumnRowToIndex(4, 1), "Buy Signal"); } //--- RSI is in the overbought area, and the Fast MA is below the Slow MA (Sell Signal) else if(RSI_0[0]>Inp_RSI_overbought && MA_Fast_0[0]<MA_Slow_0[0]) { table.CellSetBackColor(table.ColumnRowToIndex(4, 1), clrSalmon, true); table.CellSetDescription(table.ColumnRowToIndex(4, 1), "Sell Signal"); } else { table.CellSetBackColor(table.ColumnRowToIndex(4, 1), clrGainsboro, true); table.CellSetDescription(table.ColumnRowToIndex(4, 1), "No Signal"); } } if(i==1 && iTime(Symbols[i],PERIOD_CURRENT,0)!=LastBarTime[i]) { LastBarTime[i] = iTime(Symbols[i],PERIOD_CURRENT,0); if(CopyBuffer(HandleRSI[1], 0, 0, 2, RSI_1) != 2 || CopyBuffer(HandleMAFast[1], 0, 0, 2, MA_Fast_1) != 2 || CopyBuffer(HandleMASlow[1], 0, 0, 2, MA_Slow_1) != 2) { Print("Failed to copy indicator data."); continue; } table.CellSetDescription(table.ColumnRowToIndex(1, i+1), DoubleToString(RSI_1[0], 2)); table.CellSetDescription(table.ColumnRowToIndex(2, i+1), DoubleToString(MA_Fast_1[0], (int) SymbolInfoInteger(Symbols[i], SYMBOL_DIGITS))); table.CellSetDescription(table.ColumnRowToIndex(3, i+1), DoubleToString(MA_Slow_1[0], (int) SymbolInfoInteger(Symbols[i], SYMBOL_DIGITS))); if(RSI_1[0]<Inp_RSI_oversold && MA_Fast_1[0]>MA_Slow_1[0]) { table.CellSetBackColor(table.ColumnRowToIndex(4, 2), clrPaleGreen, true); table.CellSetDescription(table.ColumnRowToIndex(4, 2), "Buy Signal"); } else if(RSI_1[0]>Inp_RSI_overbought && MA_Fast_1[0]<MA_Slow_1[0]) { table.CellSetBackColor(table.ColumnRowToIndex(4, 2), clrSalmon, true); table.CellSetDescription(table.ColumnRowToIndex(4, 2), "Sell Signal"); } else { table.CellSetBackColor(table.ColumnRowToIndex(4, 2), clrGainsboro, true); table.CellSetDescription(table.ColumnRowToIndex(4, 2), "No Signal"); } } if(i==2 && iTime(Symbols[i],PERIOD_CURRENT,0)!=LastBarTime[i]) { LastBarTime[i] = iTime(Symbols[i],PERIOD_CURRENT,0); if(CopyBuffer(HandleRSI[2], 0, 0, 2, RSI_2) != 2 || CopyBuffer(HandleMAFast[2], 0, 0, 2, MA_Fast_2) != 2 || CopyBuffer(HandleMASlow[2], 0, 0, 2, MA_Slow_2) != 2) { Print("Failed to copy indicator data."); continue; } table.CellSetDescription(table.ColumnRowToIndex(1, i+1), DoubleToString(RSI_2[0], 2)); table.CellSetDescription(table.ColumnRowToIndex(2, i+1), DoubleToString(MA_Fast_2[0], (int) SymbolInfoInteger(Symbols[i], SYMBOL_DIGITS))); table.CellSetDescription(table.ColumnRowToIndex(3, i+1), DoubleToString(MA_Slow_2[0], (int) SymbolInfoInteger(Symbols[i], SYMBOL_DIGITS))); if(RSI_2[0]<Inp_RSI_oversold && MA_Fast_2[0]>MA_Slow_2[0]) { table.CellSetBackColor(table.ColumnRowToIndex(4, 3), clrPaleGreen, true); table.CellSetDescription(table.ColumnRowToIndex(4, 3), "Buy Signal"); } else if(RSI_2[0]>Inp_RSI_overbought && MA_Fast_2[0]<MA_Slow_2[0]) { table.CellSetBackColor(table.ColumnRowToIndex(4, 3), clrSalmon, true); table.CellSetDescription(table.ColumnRowToIndex(4, 3), "Sell Signal"); } else { table.CellSetBackColor(table.ColumnRowToIndex(4, 3), clrGainsboro, true); table.CellSetDescription(table.ColumnRowToIndex(4, 3), "No Signal"); } } } ChartRedraw(); }
The OnTimer() function executes every second, as defined by EventSetTimer(). First, it checks whether a new candle has formed in the current symbol by comparing the current bar time with LastBarTime. If there is no new candle, the function continues to the next symbol without making any changes. This ensures that the table is updated only once for each new candle.
Next, arrays are declared to store the RSI, fast MA, and slow MA values for the three monitored symbols. The CopyBuffer function is then used to retrieve the latest indicator data from the corresponding indicator handles. If any of the data cannot be copied successfully, the function prints an error message and continues to the next symbol.
After successfully retrieving the indicator values, the corresponding cells are updated using CellSetDescription(). The RSI, fast MA, and slow MA values are converted to strings and displayed in the appropriate cells of the table.
The function then evaluates the trading conditions for each symbol. A buy signal is generated when the RSI is below the oversold level and the fast MA is above the slow MA. A sell signal is generated when the RSI is above the overbought level and the fast MA is below the slow MA. If neither condition is met, the table displays a no signal message.
Finally, CellSetBackColor() is used to visually distinguish the signals by assigning a different background color to each signal cell. The true value enables a custom background color mode for these cells, ensuring that their individually assigned colors are preserved. The ChartRedraw() function is called at the end to display all changes on the chart immediately.
//+------------------------------------------------------------------+
//| Expert deinitialization function                                 |
//+------------------------------------------------------------------+
void OnDeinit(const int reason)
  {
//--- release the indicator handles
   for(int i=0; i<ArraySize(Symbols); i++)
     {
      IndicatorRelease(HandleRSI[i]);
      IndicatorRelease(HandleMASlow[i]);
      IndicatorRelease(HandleMAFast[i]);
     }
//---
   table.Destroy(true);
//---
   EventKillTimer();
  }
The OnDeinit() function is responsible for releasing the resources used by the Expert Advisor when it is removed from the chart or the program is otherwise deinitialized.
The function releases the RSI, Fast MA, and Slow MA indicator handles for all three monitored symbols using IndicatorRelease(). This ensures that the resources allocated for the indicator handles are properly released. Finally, the table objects are destroyed by calling Destroy().
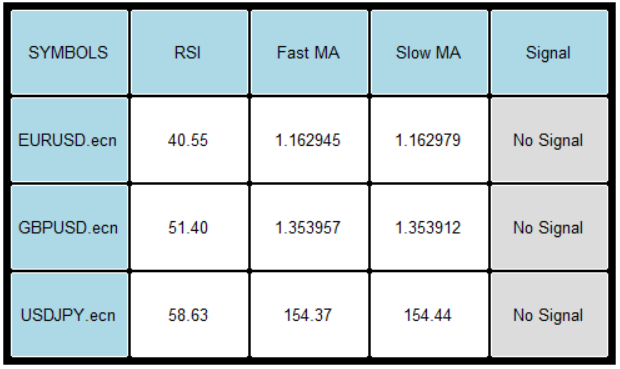
Figure 4: An example showing the table on the chart when the EA is running.
Conclusion
We built a practical table-management class for MQL5 that addresses the common developer problems: object proliferation, fragile layout calculations, and costly UI updates. The CTable design cleanly separates cell data (sizes, colors, alignment, read‑only state, descriptions) from chart objects and implements a predictable lifecycle: initialize grid → create chart objects → update via Refresh() → destroy safely. The article demonstrates header handling, default and custom cell styling, and dynamic structural changes (adding/removing rows and columns) while preserving existing cell properties.
What you get:
- A ready-to-use CTable.mqh and an example EA that shows RSI/MA signals on the chart.
- Immediate capabilities include creating a table, enabling headers, setting size and position, updating cell text and colors on events such as a new bar or timer tick, and changing the structure at runtime.
- A minimal usage recipe: set the prefix → call CoordinatesSet() → call WidthHeightSet() → call CellsInitialize() → call Create() → populate the cells → call Refresh() when needed. Refresh() is used when changes affect more than one cell or when multiple stored cell states need to be synchronized at once. For each individual cell, the setter functions handle it easily. In normal use, cell setter methods update created objects immediately, so the Refresh function is mainly needed after geometry-related changes or when synchronizing multiple cells from a stored state.
The class provides a reusable foundation: integrate it into dashboards, position or portfolio screens, or monitoring tools, and extend it with additional features (sorting, editing callbacks, and pagination) without rewriting layout logic.
Attached Files
| Number | Name | Directory |
|---|---|---|
| 1 | CTable.mqh | MQL5\Include\Object Controls\CTable.mqh |
| 2 | Dynamic Table EA.mq5 | MQL5\Experts\Dynamic Table EA\Dynamic Table EA.mq5 |
Warning: All rights to these materials are reserved by MetaQuotes Ltd. Copying or reprinting of these materials in whole or in part is prohibited.
This article was written by a user of the site and reflects their personal views. MetaQuotes Ltd is not responsible for the accuracy of the information presented, nor for any consequences resulting from the use of the solutions, strategies or recommendations described.

 Neural Networks in Trading: The Adaptive Graph Diffusion Model (Conclusion)
 Building AI-Powered Trading Systems in MQL5 (Part 11): Optimizing the UI with Frame Throttling and Partial Rendering
 Testing for Residual Autocorrelation with the Ljung-Box Portmanteau Test in MQL5
 Practical Modules from Other Languages in MQL5 (Part 07): The OS Module from Python

- Free trading apps
- Over 8,000 signals for copying
- Economic news for exploring financial markets
You agree to website policy and terms of use