

Building a Divergence System (Part III): The Adaptive SuperTrend EA
 2 196
2 196
 0
0

Table of Contents
- Introduction
- Architectural Shift From Indicator to EA
- Scope of This Article
- EA Foundation: Inputs and Setup
- The Adaptive SuperTrend Calculation Engine
- The Trade Processing Function
- Trade Execution and Position Management
- Trailing Stops: Protecting Profits
- Time and Session Filters
- Strategy Tester and Result Analysis
- Conclusion
Introduction
In the previous article (Part II), we developed the Adaptive SuperTrend indicator, a trend-following system that combines SuperTrend with divergence analysis from either MPO4 or RSI. By dynamically shrinking its ATR multiplier when opposing divergence appears, the indicator attempts to identify weakening trends earlier while still maintaining the structure that makes SuperTrend popular among traders.
In this article, we will build an automated Expert Advisor around the Adaptive SuperTrend concept. Rather than relying on a separate indicator file attached to the chart, the EA will contain the complete calculation engine internally, making it self-contained and suitable for both live trading and strategy testing. Along the way, we will add dynamic position sizing, ATR-based stop placement, risk-reward trailing stops, optional anti-repainting confirmation, and session-based trade filtering.
Architectural Shift From Indicator to EA
We need to understand what changes when moving from an indicator to an automated trading system. The shift represents a fundamental change in how the program interacts with the market and manages its own state. An indicator is a passive tool. It receives price data, performs calculations, and displays the results on the chart. Its job ends when the visual output is rendered. An Expert Advisor, by contrast, is an active program. It executes trading logic, interacts with the broker, and manages positions. It must handle failures, validate data, track its own trades, and respond to changing market conditions in real time. This difference in purpose has significant implications for code structure, error handling, and state management.
The Two Approaches: Internal Calculation vs. External Indicator
When building an EA around a custom indicator, we must decide: should the EA compute the indicator's values internally, or should it rely on the compiled indicator file using the iCustom() call?
Approach 1: External Indicator Via iCustom()
A straightforward method is to attach the compiled indicator to the chart and read its buffers using iCustom(). The EA becomes a thin wrapper that consumes signals produced elsewhere.
Advantages:
- The EA remains shorter and simpler.
- The indicator logic is maintained in a single location, which means that any update to the indicator automatically reflects in the EA.
- Visual debugging is easier because the indicator is already drawn on the chart.
Disadvantages:
- The indicator must be present in the indicators folder for the EA to function.
- Backtesting requires the indicator file to be available in the correct folder.
- Performance can suffer because the EA must repeatedly access external buffer data.
- The EA becomes dependent on the indicator's exact buffer layout and naming conventions.
Approach 2: Internal Calculation
The alternative is to embed the indicator's complete calculation engine directly into the EA. The EA computes all required values internally, without relying on an external file.
Advantages:
- The EA is self-contained; attach it to any chart, and it works immediately.
- Backtesting is simpler because no external dependencies exist.
- Performance is improved because all calculations occur in memory without cross-process communication.
- The EA can be modified and optimized as a single unit.
Disadvantages:
- The EA code is larger and more complex.
- The indicator logic must be duplicated if you want both the visual indicator and the EA.
- Any changes to the indicator logic must be manually synchronized with the EA.
Our Chosen Approach
For this article, we will use the internal calculation approach. The EA presented here computes the Adaptive SuperTrend entirely within its own code, without requiring the indicator file to be attached to the chart. We opted for internal calculation to control the data flow and eliminate external dependencies.
Scope of This Article
This introductory section has established the shift from indicator to EA and explained the decision to use internal calculation. In the following sections, we will:
- Build the EA's foundation with input parameters, global variables, and initialization.
- Implement the complete Adaptive SuperTrend calculation engine (referencing the indicator article where appropriate).
- Add signal detection with new bar management and an optional additional bar(s) for signal confirmation.
- Implement risk management with dynamic position sizing.
- Add trailing stop functionality and position tracking.
- Integrate session-based trading filters.
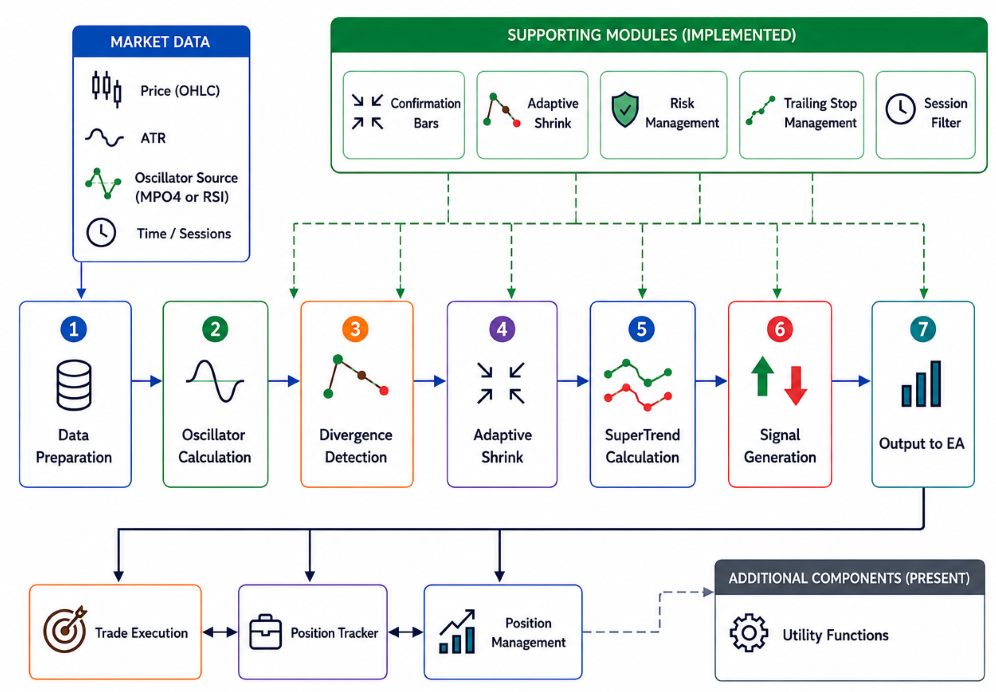
Here is an illustration demonstrating the EA architecture implemented in this article:
EA Foundation: Inputs and Setup
With the architecture decision made, we now build the EA's foundation. This section covers the input parameters, global variables, and the initialization and cleanup routines. Getting these right is important because they determine how the EA behaves, how it can be configured, and whether it runs reliably.
The first step is to prepare the MQL5 entry points by determining the name of the article, the required #property, and the raw OnInit(), OnTick(), and OnDeinit() functions. It is as follows:
//+------------------------------------------------------------------+
//|                                   The Adaptive SuperTrend EA.mq5 |
//|                                    Copyright 2026, soloharbinger |
//|                      https://www.mql5.com/en/users/soloharbinger |
//+------------------------------------------------------------------+
#property copyright "Copyright 2026, soloharbinger"
#property link      "https://www.mql5.com/en/users/soloharbinger"
#property version   "1.00"
//+------------------------------------------------------------------+
//| Expert initialization function                                   |
//+------------------------------------------------------------------+
int OnInit()
  {
//---

//---
   return(INIT_SUCCEEDED);
  }
//+------------------------------------------------------------------+
//| Expert deinitialization function                                 |
//+------------------------------------------------------------------+
void OnDeinit(const int reason)
  {
//---

  }
//+------------------------------------------------------------------+
//| Expert tick function                                             |
//+------------------------------------------------------------------+
void OnTick()
  {
//---

  }
We then include the trade library just below the EA's #property for performing trade execution functions.
#include <Trade/Trade.mqh> Input Parameters
The EA is configured through input parameters. We group them into logical sections so the user can quickly find and adjust related settings. The full set of inputs is defined right after the trade class directive.
//--- INPUTS
input group "=== Adaptive Oscillator Settings ==="
enum ENUM_DIV_SOURCE
  {
   DIV_SRC_MPO = 0,
   DIV_SRC_RSI = 1
  };
input ENUM_DIV_SOURCE InpSource = DIV_SRC_MPO;                  // Oscillator Source
input int    MPO_len = 6;                                       // MPO4 Length
input int    MPO_smooth = 7;                                    // MPO4 Smoothing
input int    DivRsiPeriod = 14;                                 // RSI Period
input int    DivPivotLen = 2;                                   // Pivot Length of Divergence

input group "=== SuperTrend Configuration ==="
input int    SuperTrendPeriod = 10;                             // SuperTrend Period
input double SuperTrendMultiplier = 3.0;                        // SuperTrend [ATR] Multiplier
input ENUM_TIMEFRAMES SuperTrendTimeframe = PERIOD_CURRENT;     // SuperTrend Timeframe

input group "=== Divergence Shrinking ==="
input bool   EnableAdaptiveShrink = false;                      // Enable Adaptive Shrinking
input double DivSensitivity = 0.3;                              // Shrink Factor [0.0 = off, 1.0 Extreme]

input group "=== Repainting Protection ==="
input bool   UseRepaintingProtection = false;                   // Anti-Repainting Protection
input int    ConfirmationBars = 1;                              // Bars for Signal Confirmation [1-3]

input group "=== Risk Management ==="
input double riskPercent = 0.5;                                // Risk Per Trade [%]
input int    ATRperiod = 14;                                    // Stop-loss ATR Period
input double ATRmultiplier = 2.0;                               // Stop-loss Multiplier
input double TP_Ratio = 2.0;                                    // Take-profit Risk-Reward-Ratio [RRR]
input bool   UseTrailingStops = false;                          // Enable Trailing Stops
input double TrailingStartRR = 1.0;                             // Start Trailing at this RRR
input double TrailingStepRR = 1.0;                              // Trailing Step RRR

input group "=== Time & Session Filters ==="
input bool EnableSessionFilter = false;                         // Enable Session Filter
input int  BrokerGMTOffset = 3;                                 // Broker GMT Offset [e.g., 3 for GMT+3]
input bool EnableAsianSession = true;                           // Enable Asian Session
input bool EnableLondonSession = true;                          // Enable London Session
input bool EnableNewYorkSession = true;                         // Enable New York Session
input bool EnableSydneySession = true;                          // Enable Sydney Session
Explanation
Most of these inputs are self-explanatory, but a few deserve attention.
Oscillator Source (InpSource) lets the user choose between the MPO4 oscillator (from the first part of this series) or a standard RSI. This is useful for traders who prefer a familiar momentum gauge. The MPO4 calculates pressure based on weighted candle bodies, while RSI is a standard overbought/oversold oscillator.
SuperTrend Timeframe (SuperTrendTimeframe) allows the SuperTrend calculation to run on a different timeframe than the chart. For example, you can attach the EA to a 1‑minute chart but compute the SuperTrend on a 15‑minute basis. This is a common technique for multi‑timeframe analysis.
Enable Adaptive Shrink (EnableAdaptiveShrink) enables the shrink mechanism. If turned off, the EA behaves like a standard SuperTrend with no divergence‑based adjustment.
Anti-Repainting Protection (UseRepaintingProtection) adds another layer of confirmation. When enabled, the EA waits for a specified number of bars (ConfirmationBars) after a potential signal before acting. This helps filter out false signals in choppy markets, though it introduces a slight delay.
Risk Management inputs control dynamic position sizing, stop placement, and trailing. The lot size is calculated from riskPercent (percentage of account balance risked per trade), the ATR stop distance, and the instrument's tick value. The trailing logic uses the TrailingStartRR and TrailingStepRR to move the stop-loss as the trade moves into profit.
Session Filters allow restricting trading to specific market sessions. This is useful to avoid low‑liquidity periods or to focus on the most active hours for a given symbol.
Global Variables and Structures
After the inputs, we declare global variables that hold handles, buffers, and state. The EA uses the CTrade class from the standard library for order execution, so we instantiate it globally.
//--- EA Globals
CTrade trade;
input int solomagic = 225;    // Set Magic Number

//--- State & Buffer Variables
double ATRBuffer[];
int ATRHandle;
int SuperTrendATRHandle;
int lastProcessedBar = -1;
int previousTrend = 0;

//--- Adaptive SuperTrend Internal Buffers
double Trend[], TrendDirection[];
double st_up[], st_dn[], st_trend_calc[];
double buf_MPO_Raw[], buf_MPO_Smooth[], buf_RSI[], buf_ATR_ST[];
double LastPivLowPriceBuffer[], LastPivLowOscBuffer[];
double LastPivHighPriceBuffer[], LastPivHighOscBuffer[];
double LastTypeBuffer[], BarsSinceBuffer[];

double st_open[], st_high[], st_low[], st_close[];
int rsiHandleDiv;
double SmoothAlpha;

//--- Position Tracking
struct PositionData
  {
   ulong             ticket;
   double            openPrice, initialRisk;
   double            originalSL;
   double            tp;
   double            trailingSL;
   bool              tpHit;
  };
PositionData positions[];
The PositionData structure is used to track each open position's key attributes. This is necessary for trailing stop management and for cleaning up closed positions from the tracking array. The internal buffers (Trend, TrendDirection, st_up, etc.) mirror the ones used in the indicator. They store the SuperTrend line values, trend direction, oscillator values, and state information for divergence detection and shrink logic.
OnInit() Initialization
The OnInit() function runs when the EA is attached to a chart or when the terminal starts. Its responsibilities include setting the magic number, creating indicator handles, and initializing any constant values.
//+------------------------------------------------------------------+
//| Expert Initialization Function                                   |
//+------------------------------------------------------------------+
int OnInit()
  {
   trade.SetExpertMagicNumber(solomagic);

//--- Risk based ATR
   ATRHandle = iATR(_Symbol, _Period, ATRperiod);
   if(ATRHandle == INVALID_HANDLE)
      return INIT_FAILED;
   ArraySetAsSeries(ATRBuffer, true);

//--- SuperTrend ATR (separate because they can use different periods)
   SuperTrendATRHandle = iATR(_Symbol, SuperTrendTimeframe, SuperTrendPeriod);
   if(SuperTrendATRHandle == INVALID_HANDLE)
      return INIT_FAILED;

   if(InpSource == DIV_SRC_RSI)
     {
      rsiHandleDiv = iRSI(_Symbol, SuperTrendTimeframe, DivRsiPeriod, PRICE_CLOSE);
      if(rsiHandleDiv == INVALID_HANDLE)
         return INIT_FAILED;
     }

   SmoothAlpha = 2.0 / (MPO_smooth + 1.0);

//--- Validate the ConfirmationBars input
   if(ConfirmationBars > 3)
     {
      Print("Too many confirmation bars");
      return INIT_PARAMETERS_INCORRECT;
     }

   Print("Adaptive SuperTrend EA initialized.");
   return INIT_SUCCEEDED;
  }
We create two separate ATR handles: one for the risk‑based stop‑loss calculation (using the chart timeframe and the ATRperiod input) and one for the SuperTrend calculation itself (using the SuperTrendTimeframe and SuperTrendPeriod). This allows the user to, for example, set stops based on a 14‑period ATR on the current timeframe while using a 10‑period ATR on a higher timeframe for the SuperTrend bands. If the source oscillator is RSI, we create an RSI handle with the specified period on the SuperTrend timeframe. If MPO4 is selected, no external handle is needed because the calculation is performed internally. The ConfirmationBars input parameter is also validated. Ideally, all parameters should be validated. Here we validate only ConfirmationBars because the strategy supports a limited confirmation range.
The SmoothAlpha is computed for the exponential smoothing of the oscillator. It follows the standard EMA smoothing formula: alpha = 2 / (period + 1). Each handle is checked for validity. If any handle is INVALID_HANDLE, the EA returns INIT_FAILED, preventing it from running without proper data sources.
OnDeinit() Cleanup
When the EA is removed from the chart or the terminal shuts down, OnDeinit() releases the indicator handles. This is a good practice to avoid memory leaks and ensure that resources are properly freed.
//+------------------------------------------------------------------+
//| Expert Deinitialization Function                                 |
//+------------------------------------------------------------------+
void OnDeinit(const int reason)
  {
   if(ATRHandle != INVALID_HANDLE)
      IndicatorRelease(ATRHandle);
   if(SuperTrendATRHandle != INVALID_HANDLE)
      IndicatorRelease(SuperTrendATRHandle);
   if(rsiHandleDiv != INVALID_HANDLE)
      IndicatorRelease(rsiHandleDiv);
  }
We check each handle before releasing it. The reason parameter indicates why the EA is being deinitialized, but we do not need it for this cleanup.
Now, the EA has a set of configurable inputs, global variables for data storage, and proper initialization/cleanup routines. This foundation is ready to support the calculation engine, signal detection, and trade execution that will be added in the following sections.
The Adaptive SuperTrend Calculation Engine
The calculation engine forms the core of the EA. It computes the Adaptive SuperTrend values, detects divergences, and applies the shrink mechanism. The logic is identical to the custom indicator from the previous article, with minor adjustments to work inside an EA context. For a detailed breakdown of the divergence detection logic, state management, and the shrink mechanism, refer to section 4 of the previous article on the Adaptive SuperTrend custom indicator. The mathematical foundation remains unchanged. Here we focus on the implementation as it appears in the EA and a brief explanation for each process.
The Calculation Function
The EA contains a single function that performs all calculations: CalculateAdaptiveSuperTrend(). It is called from OnTick() when a new bar is detected. The calculation function divides into distinct phases, they are as follows:
Phase 1: Prepare the calculation environment
//+------------------------------------------------------------------+
//| Adaptive Divergence SuperTrend Internal Math                     |
//+------------------------------------------------------------------+
void CalculateAdaptiveSuperTrend()
  {
   int lookback = 300;
   int bars_total = Bars(_Symbol, SuperTrendTimeframe);
   if(bars_total < lookback)
      lookback = bars_total - 2;
   if(lookback < SuperTrendPeriod + MPO_len + DivPivotLen + 5)
      return;

//--- Array Resizing
   ArrayResize(Trend, lookback);
   ArrayResize(TrendDirection, lookback);
   ArrayResize(st_up, lookback);
   ArrayResize(st_dn, lookback);
   ArrayResize(st_trend_calc, lookback);
   ArrayResize(buf_MPO_Raw, lookback);
   ArrayResize(buf_MPO_Smooth, lookback);
   ArrayResize(buf_ATR_ST, lookback);
   ArrayResize(buf_RSI, lookback);
   ArrayResize(LastTypeBuffer, lookback);
   ArrayResize(BarsSinceBuffer, lookback);
   ArrayResize(LastPivLowPriceBuffer, lookback);
   ArrayResize(LastPivLowOscBuffer, lookback);
   ArrayResize(LastPivHighPriceBuffer, lookback);
   ArrayResize(LastPivHighOscBuffer, lookback);

   ArrayResize(st_open, lookback);
   ArrayResize(st_high, lookback);
   ArrayResize(st_low, lookback);
   ArrayResize(st_close, lookback);

//--- Set as Series
   ArraySetAsSeries(Trend, true);
   ArraySetAsSeries(TrendDirection, true);
   ArraySetAsSeries(st_up, true);
   ArraySetAsSeries(st_dn, true);
   ArraySetAsSeries(st_trend_calc, true);
   ArraySetAsSeries(buf_MPO_Raw, true);
   ArraySetAsSeries(buf_MPO_Smooth, true);
   ArraySetAsSeries(buf_ATR_ST, true);
   ArraySetAsSeries(buf_RSI, true);
   ArraySetAsSeries(LastTypeBuffer, true);
   ArraySetAsSeries(BarsSinceBuffer, true);
   ArraySetAsSeries(LastPivLowPriceBuffer, true);
   ArraySetAsSeries(LastPivLowOscBuffer, true);
   ArraySetAsSeries(LastPivHighPriceBuffer, true);
   ArraySetAsSeries(LastPivHighOscBuffer, true);
   ArraySetAsSeries(st_open, true);
   ArraySetAsSeries(st_high, true);
   ArraySetAsSeries(st_low, true);
   ArraySetAsSeries(st_close, true);

//--- Copy Market Data
   if(CopyOpen(_Symbol, SuperTrendTimeframe, 0, lookback, st_open) < lookback ||
      CopyHigh(_Symbol, SuperTrendTimeframe, 0, lookback, st_high) < lookback ||
      CopyLow(_Symbol, SuperTrendTimeframe, 0, lookback, st_low) < lookback ||
      CopyClose(_Symbol, SuperTrendTimeframe, 0, lookback, st_close) < lookback)
      return;

   double tempATR[];
   ArraySetAsSeries(tempATR, true);
   if(CopyBuffer(SuperTrendATRHandle, 0, 0, lookback, tempATR) < lookback)
      return;
   for(int k=0; k<lookback; k++)
      buf_ATR_ST[k] = tempATR[k];

   if(InpSource == DIV_SRC_RSI)
     {
      double tempRSI[];
      ArraySetAsSeries(tempRSI, true);
      if(CopyBuffer(rsiHandleDiv, 0, 0, lookback, tempRSI) < lookback)
         return;
      for(int k=0; k<lookback; k++)
         buf_RSI[k] = tempRSI[k];
     }

   int limit = lookback - MPO_len - DivPivotLen - 3;
Explanation: Before any calculations can begin, the EA prepares the working environment. The function first determines how many historical bars should be processed, ensuring there is sufficient data for the ATR, oscillator, and divergence calculations. It then allocates all required internal arrays, configures them as time series (where index 0 always represents the most recent bar), and copies the market data, ATR values, and optional RSI values into memory. By separating data acquisition from the mathematical calculations, the remainder of the algorithm operates entirely on local arrays, reducing repeated indicator calls and making the computation both faster and easier to maintain.
Phase 2: Initialize the historical state
//--- Initial Boundaries
   st_trend_calc[limit+1] = (st_close[limit+1] > st_open[limit+1]) ? 1 : -1;
   double initMedian = (st_high[limit+1] + st_low[limit+1]) / 2.0;
   st_up[limit+1] = initMedian + SuperTrendMultiplier * buf_ATR_ST[limit+1];
   st_dn[limit+1] = initMedian - SuperTrendMultiplier * buf_ATR_ST[limit+1];
   buf_MPO_Smooth[limit+1] = 0;
   LastTypeBuffer[limit+1] = 0;
   BarsSinceBuffer[limit+1] = 9999;
   LastPivLowPriceBuffer[limit+1] = DBL_MAX;
   LastPivLowOscBuffer[limit+1] = -99999;
   LastPivHighPriceBuffer[limit+1] = 0;
   LastPivHighOscBuffer[limit+1] = 99999;
Explanation: Since the calculation proceeds backward through historical bars, the algorithm must first establish an initial reference point. This initialization seeds the oldest processed bar with a starting trend direction, initial SuperTrend bands, neutral divergence state, and default pivot values. Every subsequent bar inherits and updates this information, allowing the EA to maintain consistent historical state without recalculating previous decisions from scratch.
Phase 3: State propagation and oscillator calculation
   for(int i = limit; i >= 0; i--)
     {
      //--- Inherit State
      LastTypeBuffer[i] = LastTypeBuffer[i+1];
      BarsSinceBuffer[i] = BarsSinceBuffer[i+1] + 1;
      LastPivLowPriceBuffer[i] = LastPivLowPriceBuffer[i+1];
      LastPivLowOscBuffer[i] = LastPivLowOscBuffer[i+1];
      LastPivHighPriceBuffer[i] = LastPivHighPriceBuffer[i+1];
      LastPivHighOscBuffer[i] = LastPivHighOscBuffer[i+1];

      double finalMultiplier = SuperTrendMultiplier;

      //--- MPO / RSI Logic
      if(InpSource == DIV_SRC_MPO)
        {
         double rollingSum = 0;
         double sumBodies = 0;
         for(int k = 0; k < MPO_len; k++)
            sumBodies += MathAbs(st_close[i+k] - st_open[i+k]);
         double avgBody = (sumBodies > 0) ? sumBodies / MPO_len : Point();

         for(int k = 0; k < MPO_len; k++)
           {
            int idx = i + k;
            double body = MathAbs(st_close[idx] - st_open[idx]);
            double dir = (st_close[idx] > st_open[idx]) ? 1.0 : (st_close[idx] < st_open[idx]) ? -1.0 : 0.0;
            double weight = (avgBody > 0) ? body / avgBody : 1.0;
            rollingSum += (dir * weight);
           }
         buf_MPO_Raw[i] = (rollingSum / (MPO_len * 2.0)) * 100.0;
        }
      else
        {
         buf_MPO_Raw[i] = buf_RSI[i];
        }

      buf_MPO_Smooth[i] = (buf_MPO_Raw[i] * SmoothAlpha) + (buf_MPO_Smooth[i+1] * (1.0 - SmoothAlpha));
Explanation: Each iteration begins by inheriting the previously stored divergence state before calculating the selected momentum oscillator. If MPO4 is selected, the EA computes the weighted pressure values directly from candle bodies before applying exponential smoothing. If RSI is selected, the previously copied RSI values are used instead. This abstraction allows both oscillators to share the same divergence engine, so that every subsequent stage of the algorithm operates independently of the chosen momentum source.
Phase 4: Detect divergence
      //--- Divergence Pivot Detection
      int pIdx = i + DivPivotLen;
      if(pIdx <= limit)
        {
         bool isPivLow = true, isPivHigh = true;
         for(int k = 1; k <= DivPivotLen; k++)
           {
            if(buf_MPO_Smooth[pIdx] > buf_MPO_Smooth[pIdx+k] || buf_MPO_Smooth[pIdx] > buf_MPO_Smooth[pIdx-k])
               isPivLow = false;
            if(buf_MPO_Smooth[pIdx] < buf_MPO_Smooth[pIdx+k] || buf_MPO_Smooth[pIdx] < buf_MPO_Smooth[pIdx-k])
               isPivHigh = false;
           }

         if(isPivLow)
           {
            if(st_low[pIdx] < LastPivLowPriceBuffer[pIdx] && buf_MPO_Smooth[pIdx] > LastPivLowOscBuffer[pIdx])
              {
               LastTypeBuffer[i] = 1; // Bull Div
               BarsSinceBuffer[i] = 0;
              }
            LastPivLowPriceBuffer[i] = st_low[pIdx];
            LastPivLowOscBuffer[i] = buf_MPO_Smooth[pIdx];
           }
         if(isPivHigh)
           {
            if(st_high[pIdx] > LastPivHighPriceBuffer[pIdx] && buf_MPO_Smooth[pIdx] < LastPivHighOscBuffer[pIdx])
              {
               LastTypeBuffer[i] = -1; // Bear Div
               BarsSinceBuffer[i] = 0;
              }
            LastPivHighPriceBuffer[i] = st_high[pIdx];
            LastPivHighOscBuffer[i] = buf_MPO_Smooth[pIdx];
           }
        }
Explanation: Once the oscillator values have been calculated, the EA searches for confirmed pivot highs and lows using the configured pivot length. Each confirmed pivot is compared with the previously stored pivot to determine whether bullish or bearish divergence exists. Rather than simply generating a signal, the algorithm records the divergence type together with the number of bars elapsed since its occurrence. These state variables become the driving input for the adaptive shrinking mechanism introduced in the previous article.
Phase 5: Apply the adaptive shrink mechanism
      //--- Apply Adaptive Shrink
      if(EnableAdaptiveShrink)
        {
         int prevTrendState = (int)st_trend_calc[i+1];
         if((prevTrendState == -1 && LastTypeBuffer[i] == 1 && BarsSinceBuffer[i] < 200) ||
            (prevTrendState == 1 && LastTypeBuffer[i] == -1 && BarsSinceBuffer[i] < 200))
           {
            finalMultiplier = SuperTrendMultiplier * (1.0 - DivSensitivity);
           }
        }
Explanation: The adaptive component of the algorithm is implemented here. If a valid divergence exists in the opposite direction of the current trend and remains within its active lifetime, the EA temporarily reduces the ATR multiplier by the user-defined sensitivity factor. Otherwise, the original multiplier is preserved. This dynamic adjustment allows the SuperTrend bands to contract only when market momentum begins to weaken while remaining unchanged during healthy trends.
Phase 6: Update the supertrend
      //--- Basic SuperTrend Math
      double median = (st_high[i] + st_low[i]) / 2.0;
      double basicUp = median + finalMultiplier * buf_ATR_ST[i];
      double basicDn = median - finalMultiplier * buf_ATR_ST[i];

      double prevUp = st_up[i+1];
      double prevDn = st_dn[i+1];
      double prevClose = st_close[i+1];

      if(prevClose < prevUp && basicUp > prevUp)
         st_up[i] = prevUp;
      else
         st_up[i] = basicUp;

      if(prevClose > prevDn && basicDn < prevDn)
         st_dn[i] = prevDn;
      else
         st_dn[i] = basicDn;

      int currTrend = (int)st_trend_calc[i+1];
      if(currTrend == -1 && st_close[i] > st_up[i])
         currTrend = 1;
      else
         if(currTrend == 1 && st_close[i] < st_dn[i])
            currTrend = -1;
      st_trend_calc[i] = currTrend;

      if(EnableAdaptiveShrink && currTrend != (int)st_trend_calc[i+1])
        {
         LastTypeBuffer[i] = 0;
         BarsSinceBuffer[i] = 9999;
        }
Explanation: With the final ATR multiplier established, the EA calculates the new SuperTrend bands using the standard SuperTrend equations. The current trend state is updated whenever price crosses the appropriate band, and any completed trend reversal resets the divergence state so that outdated signals cannot influence the next trend.
Phase 7: Produce a final output
      //--- Map to Trading logic Array Format (0 = Bull, 1 = Bear)
      if(st_trend_calc[i] == 1)
        {
         Trend[i] = st_dn[i];
         TrendDirection[i] = 0.0;
        }
      else
        {
         Trend[i] = st_up[i];
         TrendDirection[i] = 1.0;
        }
     }
  }
Explanation: The final phase converts the internal trend representation into the format used by the remainder of the Expert Advisor. The appropriate SuperTrend line is selected for display, while the trend direction is encoded into a simplified signal buffer that is later used by the trading engine.
Differences Between Indicator and EA Implementation
The EA version of the calculation differs from the indicator version in a few specific ways:
- No Visual Buffers: The EA does not need to draw arrows or colored lines. It only needs the Trend and TrendDirection arrays to make trading decisions. This removes all indicator buffers that were needed before.
- Data Sources: The EA uses its own global handles (SuperTrendATRHandle, rsiHandleDiv) and copies data into local arrays. The indicator uses the open[], high[], low[], and close[] arrays passed directly to OnCalculate(). The EA must copy this data from the terminal.
- Lookback Calculation: The EA dynamically calculates lookback based on Bars(_Symbol, SuperTrendTimeframe). The indicator uses rates_total from its function parameters. Both achieve the same result.
- Return Values: The EA function has no return value. It populates the global buffers and exits. The indicator returns rates_total to signal that processing is complete.
- No Buffer Reinitialization on Every Call: The indicator resets BullArrowBuffer[i] and BearArrowBuffer[i] to EMPTY_VALUE at the start of each loop iteration. The EA does not need this because it has no visual elements.
These differences are mechanical rather than logical. The core mathematics, state propagation, and shrink logic remain identical to the indicator.
The CalculateAdaptiveSuperTrend() calculation function connects to trading by running two global arrays containing the results:
- Trend[] contains the SuperTrend line value (the lower band in an uptrend or the upper band in a downtrend).
- TrendDirection[] contains 0.0 for a bullish trend and 1.0 for a bearish trend.
The signal detection logic in the EA reads TrendDirection to determine when the trend changes. This is the bridge between the calculation engine and the trading logic.
The Trade Processing Function
New-Bar Detection in the OnTick() Function
With the calculation engine producing trend data, we now need to detect when the trend changes and act on those signals. This section covers new bar detection, reading the TrendDirection array, identifying crossovers, and the optional confirmation-bar logic for anti-repainting.
The EA processes signals once per bar. This prevents duplicate entries from the same signal, a problem common in EAs that evaluate conditions on every tick. The pattern uses a static variable to track the last bar processed.
//+------------------------------------------------------------------+
//| Main Tick Function                                               |
//+------------------------------------------------------------------+
void OnTick()
  {
//--- New Bar Detection [everything below this block processes only once per bar]
   datetime currentBarTime = iTime(_Symbol, SuperTrendTimeframe, 0);
   static datetime lastSuccessfulBarTime = 0;
   if(currentBarTime == lastSuccessfulBarTime)
      return;

//--- Execute Adaptive SuperTrend Logic
   CalculateAdaptiveSuperTrend();

//--- Anti-repainting protection
   int checkIdx = 1 + (UseRepaintingProtection ? ConfirmationBars : 0);
   if(ArraySize(TrendDirection) <= checkIdx)
      return;

   if(CopyBuffer(ATRHandle, 0, 0, 1, ATRBuffer) < 1)
      return;

   double dirValue = TrendDirection[checkIdx];
   if(dirValue == EMPTY_VALUE)
      return;

   lastSuccessfulBarTime = currentBarTime;
  }
Explanation
The currentBarTime is retrieved using iTime() with the SuperTrendTimeframe. This is because the SuperTrend calculation may run on a different timeframe than the chart. The EA processes signals based on that timeframe, not the chart timeframe.
After calling CalculateAdaptiveSuperTrend(), the TrendDirection array contains the trend state for each bar. The index checkIdx determines which bar to read. The checkIdx calculation accounts for the optional confirmation bars: if UseRepaintingProtection is false, checkIdx = 1 (the most recent completed bar), and if UseRepaintingProtection is true, checkIdx = 1 + ConfirmationBars. For example, with ConfirmationBars = 1, the EA reads the bar before the most recent completed bar. This means a signal is only valid after it has persisted through at least one additional bar.
The dirValue check ensures the value is valid. EMPTY_VALUE indicates that the calculation engine did not produce a result for that bar, which can happen if the lookback is insufficient.
The Signal Processing Function
Once the EA has a valid trend direction, it calls ProcessTradeLogic() to generate signals.
//+------------------------------------------------------------------+
//| Core Signal Detection                                            |
//+------------------------------------------------------------------+
void ProcessTradeLogic()
  {
   int signalBarIndex = 1 + (UseRepaintingProtection ? ConfirmationBars : 0);
   int previousBarIndex = 2 + (UseRepaintingProtection ? ConfirmationBars : 0);

   double confirmedDirection = TrendDirection[signalBarIndex];
   double previousDirection  = TrendDirection[previousBarIndex];

   bool superTrendBuy = (previousDirection == 1.0 && confirmedDirection == 0.0);
   bool superTrendSell = (previousDirection == 0.0 && confirmedDirection == 1.0);

   if(confirmedDirection == 0.0)
      previousTrend = 1;
   else
      if(confirmedDirection == 1.0)
         previousTrend = -1;

   int currentTrend = superTrendBuy ? 1 : (superTrendSell ? -1 : 0);

   if(superTrendBuy)
     {
      CloseExistingTrade();
      ExecuteTrade(1);
     }
   else
      if(superTrendSell)
        {
         CloseExistingTrade();
         ExecuteTrade(2);
        }
  }
Explanation
The function defines two bar indices: signalBarIndex (the bar used for the current trend state) and previousBarIndex (the bar used for the previous trend state). A crossover is detected when the direction changes: a buy signal occurs when previousDirection is bearish (1.0) and confirmedDirection is bullish (0.0), and a sell signal occurs when previousDirection is bullish (0.0) and confirmedDirection is bearish (1.0). The previousTrend variable is updated to reflect the current trend. This idea can even be used for chart comments for visual feedback.
When a signal is detected, the EA first closes any existing trade using CloseExistingTrade(), then opens a new trade in the new direction using ExecuteTrade(). Both functions will be created as this article progresses. This enforces a single position at a time, which is the default behavior for this EA.
The confirmation bar mechanism adds a delay to signal generation. This is useful for avoiding false signals in choppy markets where the SuperTrend might flip briefly before reverting. When enabled, the EA requires the new trend direction to persist for ConfirmationBars before acting. The trend state indices shift forward by the confirmation count, effectively ignoring the most recent bars. This introduces a trade-off: the EA waits longer to enter trades, potentially missing the earliest part of the move, but it also filters out false signals that would have resulted in losses.
Trade Execution and Position Management
With signals now being detected, we need to implement the actual trade execution logic. This section covers dynamic position sizing, stop-loss placement, take-profit calculation, order validation, and the position management functions that track and close trades.
The Execute Trade Function
The ExecuteTrade() function calculates the lot size, determines the stop-loss and take-profit levels, and sends the order to the broker. It also stores the position details for trailing stop management.
//+------------------------------------------------------------------+
//| Order Execution                                                  |
//+------------------------------------------------------------------+
void ExecuteTrade(int trend)
  {
   double balance = AccountInfoDouble(ACCOUNT_BALANCE);
   double riskAmount = balance * (riskPercent / 100.0);
   double ATRvalue = ATRBuffer[0];

   if(ATRvalue <= 0)
      return;

   double price = (trend == 1) ? SymbolInfoDouble(_Symbol, SYMBOL_ASK) : SymbolInfoDouble(_Symbol, SYMBOL_BID);
   double point = SymbolInfoDouble(_Symbol, SYMBOL_POINT);
   int digits = (int)SymbolInfoInteger(_Symbol, SYMBOL_DIGITS);

   double stoplossDistance = ATRvalue * ATRmultiplier;
   double sl = NormalizeDouble(price + ((trend == 1) ? -stoplossDistance : stoplossDistance), digits);
The function begins by calculating the risk amount based on account balance and the riskPercent input. The ATRvalue is read from the ATRBuffer, which was populated earlier in OnTick(). The entry price is determined by the trade direction: SYMBOL_ASK for buys and SYMBOL_BID for sells. The stop-loss distance is the ATRvalue multiplied by the ATRmultiplier. For a buy trade, the stop-loss is placed below the entry price. For a sell trade, it is placed above the entry price.
Brokers enforce a minimum stop distance. If our calculated stop-loss is too close to the entry price, the order will be rejected. We apply a simple validation and adjustment:
//--- Minimum stop validation
   double minStop = SymbolInfoInteger(_Symbol, SYMBOL_TRADE_STOPS_LEVEL) * point;
   if(MathAbs(price - sl) < minStop)
     {
      sl = (trend == 1) ? price - minStop * 1.5 : price + minStop * 1.5;
      sl = NormalizeDouble(sl, digits);
      stoplossDistance = MathAbs(price - sl);
     }

   double tp = NormalizeDouble(price + (trend == 1 ? stoplossDistance * TP_Ratio : -stoplossDistance * TP_Ratio), digits);
The SYMBOL_TRADE_STOPS_LEVEL property returns the minimum permitted stop distance in points. We multiply it by the point value to get the distance in price units. If our calculated stop distance is smaller than this minimum, we adjust the stop to minStop * 1.5. The take-profit is then calculated by multiplying the adjusted stop distance by TP_Ratio.
Dynamic Lot Size Calculation
The lot size is calculated based on the risk amount and the monetary risk per lot. This requires the tick size and tick value of the instrument.
//--- Lot size calculation
   double tickSize = SymbolInfoDouble(_Symbol, SYMBOL_TRADE_TICK_SIZE);
   double tickValue = SymbolInfoDouble(_Symbol, SYMBOL_TRADE_TICK_VALUE);

   if(tickValue <= 0 || tickSize <= 0)
     {
      PrintFormat("Invalid Tick Value or Tick Size. Cannot calculate lot size.");
      return;
     }

   double contractSize = SymbolInfoDouble(_Symbol, SYMBOL_TRADE_CONTRACT_SIZE);
   double monetaryRiskPerLot = stoplossDistance * contractSize / point * tickSize;

   double lotSize = 0;
   if(monetaryRiskPerLot > 0)
     {
      lotSize = NormalizeDouble(riskAmount / monetaryRiskPerLot, 2);
     }
   else
     {
      Print("Monetary risk per lot is zero. Cannot calculate lot size.");
      return;
     }
The tick size and tick value are retrieved from the symbol properties. The monetary risk per lot is calculated as:
stoplossDistance * contractSize / point * tickSize;
This gives the dollar amount risked for a single standard lot. Dividing the risk amount by this value gives the lot size. The result is rounded to two decimal places for standard lot step sizes.
After calculating the lot size, we validate it against the broker's minimum, maximum, and step size limits.
//--- Validate Lot Size against broker limits
   double minLot = SymbolInfoDouble(_Symbol, SYMBOL_VOLUME_MIN);
   double maxLot = SymbolInfoDouble(_Symbol, SYMBOL_VOLUME_MAX);
   double lotStep = SymbolInfoDouble(_Symbol, SYMBOL_VOLUME_STEP);

   lotSize = MathMax(minLot, MathMin(lotSize, maxLot));
   lotSize = NormalizeDouble(lotSize / lotStep, 0) * lotStep;
The lot size is clamped between the minimum and maximum allowed values, then rounded down to the nearest step size using integer division. This ensures the order meets the broker's volume requirements.
Sending the Order
With all values validated and normalized, the order is sent to the broker using the CTrade class. We check the return value and log the result.
   bool success = false;
   ResetLastError();

   if(trend == 1)
     {
      success = trade.Buy(lotSize, _Symbol, 0, sl, tp, "SuperTrend Buy 1");
     }
   else
     {
      success = trade.Sell(lotSize, _Symbol, 0, sl, tp, "SuperTrend Sell 1");
     }

   if(success)
     {
      int index = ArraySize(positions);
      ArrayResize(positions, index+1);
      positions[index].openPrice = price;
      positions[index].initialRisk = MathAbs(price - sl);
      positions[index].originalSL = sl;
      positions[index].tp = tp;

      //--- Fetch Tickets and emergency fallback
      positions[index].ticket = trade.ResultOrder();

      if(positions[index].ticket == 0)
        {
         for(int i = PositionsTotal()-1; i >= 0; i--)
           {
            ulong ticket = PositionGetTicket(i);
            if(PositionSelectByTicket(ticket) &&
               PositionGetInteger(POSITION_MAGIC) == solomagic &&
               PositionGetString(POSITION_SYMBOL) == _Symbol)
              {
               positions[index].ticket = ticket;
              }
           }
        }
     }
  }
If the order is successful, we store the position details in the positions[] array. The ticket number is retrieved from the trade.ResultOrder(). If this returns zero (which can happen with some brokers), we perform a fallback scan of all open positions matching our magic number and symbol.
The Close Existing Trade and Cleanup Function
When a new signal appears in the opposite direction, the EA closes the existing position before opening the new one.
//+------------------------------------------------------------------+
//| Close any current trade before executing another                 |
//+------------------------------------------------------------------+
void CloseExistingTrade()
  {
   for(int i = PositionsTotal()-1; i >= 0; i--)
     {
      ulong ticket = PositionGetTicket(i);
      if(PositionSelectByTicket(ticket) &&
         PositionGetInteger(POSITION_MAGIC) == solomagic &&
         PositionGetString(POSITION_SYMBOL) == _Symbol)
         trade.PositionClose(ticket);
     }
   ArrayResize(positions, 0);
   previousTrend = 0;
  }
The function loops through all open positions, identifies those belonging to our EA (by magic number and symbol), and closes them using trade.PositionClose(). The positions[] array is then cleared to prevent stale tracking data. The previousTrend variable is reset to zero.
Position Tracking and Cleanup
The positions[] array tracks all open positions for trailing stop management. The CleanupClosedPositions() function removes positions that have been closed from the tracking array.
//+------------------------------------------------------------------+
//| Prevent tracking closed positions                                |
//+------------------------------------------------------------------+
void CleanupClosedPositions()
  {
   for(int i = ArraySize(positions)-1; i >= 0; i--)
     {
      if(!PositionSelectByTicket(positions[i].ticket))
        {
         ArrayRemove(positions, i, 1);
        }
     }
  }
This function is called at the start of OnTick(). It iterates backward through the positions[] and removes any entry whose ticket is no longer valid. The backward iteration is important because ArrayRemove() shifts the remaining elements, which would cause index issues if iterating forward.
In the next section, we will implement the trailing stop logic, which uses the position data stored in the positions[] array to protect profits as the trade moves in our favor.
Trailing Stops: Protecting Profits
With trade execution in place, we now add trailing stop functionality. The trailing stop is a key component of many trend-following systems. It allows the EA to lock in profits as the trade moves in our favor, while still giving the trade room to breathe. The trailing logic in this EA is based on risk-reward ratios (RRR). The stop moves when the trade reaches a specified RRR level, then steps up incrementally as the trade continues to move.
The PositionData Structure
Before implementing the trailing logic, we need to understand the position tracking structure:
//--- Position Tracking
struct PositionData
  {
   ulong             ticket;
   double            openPrice, initialRisk;
   double            originalSL;
   double            tp;
   double            trailingSL;
   bool              tpHit;
  };
PositionData positions[];
The position data structure can be interpreted as follows:
- ticket: The position ticket number.
- openPrice: The entry price.
- initialRisk: The distance from entry to the initial stop-loss.
- originalSL: The initial stop-loss level.
- tp: The take-profit level.
- tpHit: A flag indicating whether take-profit was hit.
The Trailing Stop Function
The trailing logic is implemented in HandleTrailingStops(), which is called at the start of OnTick().
//+------------------------------------------------------------------+
//| Trailing Start and Trailing Step Function                        |
//+------------------------------------------------------------------+
void HandleTrailingStops()
  {
   if(!UseTrailingStops)
      return;

   int digits = (int)SymbolInfoInteger(_Symbol, SYMBOL_DIGITS);
   for(int i = 0; i < ArraySize(positions); i++)
     {
      ulong ticket = positions[i].ticket;

      if(ticket != 0 && PositionSelectByTicket(ticket))
        {
         ENUM_POSITION_TYPE posType = (ENUM_POSITION_TYPE)PositionGetInteger(POSITION_TYPE);
         double currentPrice = (posType == POSITION_TYPE_BUY) ?
                               SymbolInfoDouble(_Symbol, SYMBOL_BID) :
                               SymbolInfoDouble(_Symbol, SYMBOL_ASK);

         double openPrice = positions[i].openPrice;
         double initialRisk = positions[i].initialRisk;
         double currentSL = PositionGetDouble(POSITION_SL);
         double origSL = positions[i].originalSL;
         double tp = positions[i].tp;

         if(initialRisk <= 0)
            continue;

         double currentRRR = MathAbs(currentPrice - openPrice) / initialRisk;
The function begins by retrieving the position type and current price. For a buy position, we use SYMBOL_BID because that is the price at which the stop-loss would be triggered. For a sell position, we use SYMBOL_ASK. The current RRR is calculated as the absolute price movement divided by the initial risk distance.
Checking the Trailing Condition
The trailing logic is only activated when the trade has reached a minimum RRR level.
         //--- Check if the price has reached the initial trailing point
         if(currentRRR >= TrailingStartRR)
           {
            //--- Calculate NewSL based on your live market logic
            double newSL;
            if(posType == POSITION_TYPE_BUY)
               newSL = NormalizeDouble(currentPrice - (initialRisk * TrailingStepRR), digits);
            else
               newSL = NormalizeDouble(currentPrice + (initialRisk * TrailingStepRR), digits);

            //--- Validate that new SL doesn't cross current price and only moves favorably
            if((posType == POSITION_TYPE_BUY && newSL > currentSL && newSL > origSL) ||
               (posType == POSITION_TYPE_SELL && newSL < currentSL && newSL < origSL))
              {
               trade.PositionModify(ticket, newSL, tp);
              }
           }
        }
     }
  }
The TrailingStartRR input parameter determines when the trailing begins. For example, with TrailingStartRR = 1.0, the trailing activates once the trade has moved by the same distance as the initial risk. When the condition is met, a new stop-loss level is calculated:
- For a buy position:
currentPrice - (initialRisk * TrailingStepRR)
- For a sell position:
currentPrice + (initialRisk * TrailingStepRR)
The TrailingStepRR input controls how far the stop is placed behind the current price. With TrailingStepRR = 1.0, the stop is placed exactly one initial risk unit behind the current price. Before modifying the stop, the function validates that the new stop level is favorable: for a buy position, the new stop must be higher than both the current stop and the original stop, and for a sell position, the new stop must be lower than both the current stop and the original stop. This validation prevents the stop from moving backward, which would be counterproductive. It also ensures the trailing stop only tightens, never widens.
When to Call the Trailing Stops Function
The HandleTrailingStops() function is called at the beginning of OnTick(), before the new-bar detection. It is intentional.
//+------------------------------------------------------------------+
//| Main Tick Function                                               |
//+------------------------------------------------------------------+
void OnTick()
  {
//--- Trade Management [queried on every tick]
   CleanupClosedPositions();
   HandleTrailingStops();

//--- New Bar Detection [everything below this block processes only once per bar]
   datetime currentBarTime = iTime(_Symbol, SuperTrendTimeframe, 0);
   static datetime lastSuccessfulBarTime = 0;
   if(currentBarTime == lastSuccessfulBarTime)
      return;
Trailing stops need to be checked on every tick because price moves continuously between bar closes. If we only checked on new bars, the stop might not update during significant intra-bar moves, reducing the effectiveness of the trailing logic.
The trailing stop operates independently of the signal detection logic. The EA may be trailing a position while simultaneously watching for a new signal. When a crossover is detected, CloseExistingTrade() closes the position (and the trailing stops are no longer relevant), then ExecuteTrade() opens a new position. This separation of concerns makes the code easier to maintain. The trailing logic uses only the positions[] array and does not depend on the signal layer. Similarly, the signal logic does not need to know how the trailing stops work.
Time and Session Filters
We will add session-based trading control to the EA, because not all market hours are equally suitable for trading. Some sessions have higher liquidity and volatility, while others are quieter and may produce false signals. The session filters allow the user to restrict trading to specific market sessions.
We define four major sessions using a struct. Each session has a start time, end time, and name. The times are defined in UTC.
//--- Session Times (UTC)
struct SessionTime { int startH, startM; int endH, endM; string name; };
const SessionTime Asian  = {0, 0, 9, 0, "Asian"};
const SessionTime London = {8, 0, 17, 0, "London"};
const SessionTime NY     = {13, 0, 22, 0, "New York"};
const SessionTime Sydney = {22, 0, 7, 0, "Sydney"};
Next we create a function that determines whether a given time falls within a session's active hours.
//+------------------------------------------------------------------+
//| Check Session Time                                               |
//+------------------------------------------------------------------+
bool CheckSession(int currentMinutes, const SessionTime &session)
  {
   int start = session.startH * 60 + session.startM;
   int end = session.endH * 60 + session.endM;
   return (start < end) ? (currentMinutes >= start && currentMinutes < end) :
          (currentMinutes >= start || currentMinutes < end);
  }
The CheckSession() function converts hours and minutes to total minutes since midnight for easier comparison. If the session does not cross midnight (start < end), the check is straightforward: the current time must be between start and end. If the session crosses midnight (start > end), the check becomes an OR condition: the current time must be either after the start or before the end.
Lastly, we add a session filter function that coordinates the session checks and returns a boolean indicating whether trading is permitted.
//+------------------------------------------------------------------+
//| Trade & Session Switch Function                                  |
//+------------------------------------------------------------------+
bool IsTradingAllowed()
  {
   if(!EnableSessionFilter)
      return true;

//--- Convert broker server time to UTC using the offset
   datetime serverTime = TimeCurrent();
   datetime utcTime = serverTime - (BrokerGMTOffset * 3600);

   MqlDateTime ts;
   TimeToStruct(utcTime, ts);
   int now = ts.hour * 60 + ts.min;

   bool inSession = false;
   if(EnableAsianSession)
      inSession |= CheckSession(now, Asian);
   if(EnableLondonSession)
      inSession |= CheckSession(now, London);
   if(EnableNewYorkSession)
      inSession |= CheckSession(now, NY);
   if(EnableSydneySession)
      inSession |= CheckSession(now, Sydney);
   return inSession;
  }
The function first checks EnableSessionFilter. If the filter is disabled, trading is always allowed. This gives the user the option to ignore session restrictions entirely. If the filter is enabled, the function retrieves the broker's server time using TimeCurrent(). This is the time reported by the broker server, which may differ from the user's local time. The BrokerGMTOffset input parameter converts the server time to UTC. For example, if the broker is on GMT+3, a value of 3 would subtract 3 hours from the server time to get UTC. Once the UTC time is calculated, the function extracts the hour and minutes into a single integer representing minutes since midnight. It then checks each enabled session and returns true if any of them are active.
When to Call the Session Filter Function
The session filter is integrated into OnTick() through the IsTradingAllowed() call. If trading is not allowed, the EA skips the trade logic.
//+------------------------------------------------------------------+
//| Main Tick Function                                               |
//+------------------------------------------------------------------+
void OnTick()
  {
//--- Trade Management [queried on every tick]
   CleanupClosedPositions();
   HandleTrailingStops();

//--- New Bar Detection [everything below this block processes only once per bar]
   datetime currentBarTime = iTime(_Symbol, SuperTrendTimeframe, 0);
   static datetime lastSuccessfulBarTime = 0;
   if(currentBarTime == lastSuccessfulBarTime)
      return;

//--- Execute Adaptive SuperTrend Logic
   CalculateAdaptiveSuperTrend();

//--- Anti-repainting protection
   int checkIdx = 1 + (UseRepaintingProtection ? ConfirmationBars : 0);
   if(ArraySize(TrendDirection) <= checkIdx)
      return;

   if(CopyBuffer(ATRHandle, 0, 0, 1, ATRBuffer) < 1)
      return;

   double dirValue = TrendDirection[checkIdx];
   if(dirValue == EMPTY_VALUE)
      return;

   lastSuccessfulBarTime = currentBarTime;

   if(IsTradingAllowed())
      ProcessTradeLogic();
  }
The session check is placed after the new-bar detection and data validation, but before ProcessTradeLogic(). This ensures that trades are only executed when sessions are active. The session filter operates independently of the signal logic. It does not affect the indicator calculation or the chart display. It only controls whether trades are executed based on the current time.
Note: The UTC conversion using BrokerGMTOffset is important because brokers use different time zones. The user must know their broker's offset from UTC. For example, if the broker's server time is 3 hours ahead of UTC, the user would set BrokerGMTOffset = 3. Some brokers change offset during daylight saving time, so the user may need to adjust this value seasonally.
Strategy Tester and Result Analysis
Author's Note: This adaptive strategy has not yet been extensively backtested by the author. At the time of writing, only the functionality of the trading logic has been verified to ensure that every component behaves as intended. The strategy itself was developed from a profound understanding of how SuperTrend indicators operate, so the Strategy Tester results presented in this article were almost as new to me as they are to you.
Rather than evaluating the Adaptive SuperTrend Expert Advisor only as a complete system, it is equally important to examine the contribution of each supporting module. To achieve this, we will progressively enable the major components of the EA and compare their Strategy Tester results against the baseline SuperTrend implementation. This isolates the impact of each architectural addition and demonstrates the contribution of every module.
The following components will be evaluated: Baseline SuperTrend, Adaptive Shrink Mechanism, Confirmation Bars, Trailing Stop Management, and Session Filters. Each test uses identical market data, trading conditions, and risk settings so that any changes in performance can be attributed to the module being evaluated.
Test 1: Baseline SuperTrend
We will only use the default input values where all the supporting modules are false, and the default oscillator values. The strategy is tested on Gold M15 from January 1st to June 1st (six months). Here is the result of our first test:
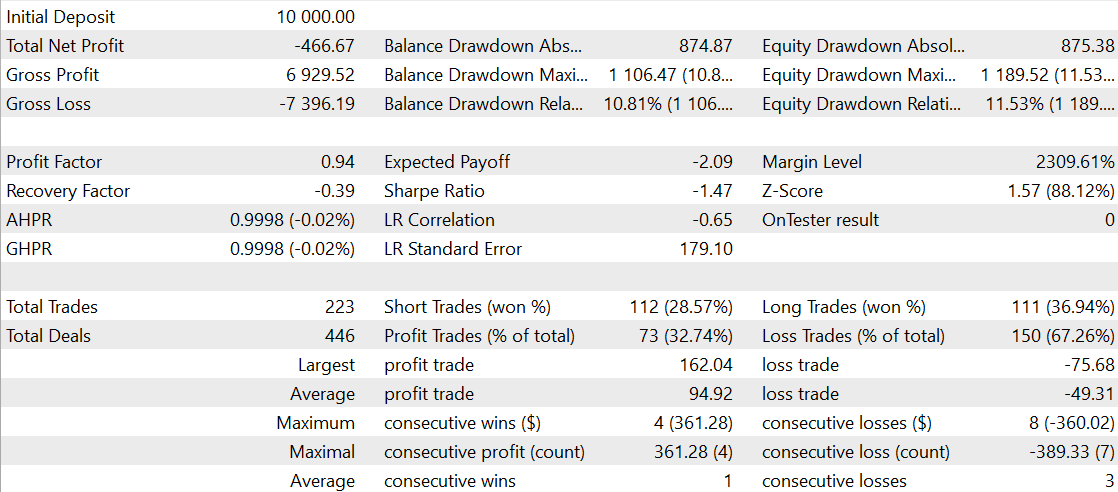
Ended in overall negative, a profit factor of less than 1.0 (0.9), took 223 trades, equity drawdown of ~11%, almost equal numbers of Buys and Sells, and a win rate of ~32%. This is the baseline supertrend strategy. This is what the equity curve looks like in this period:
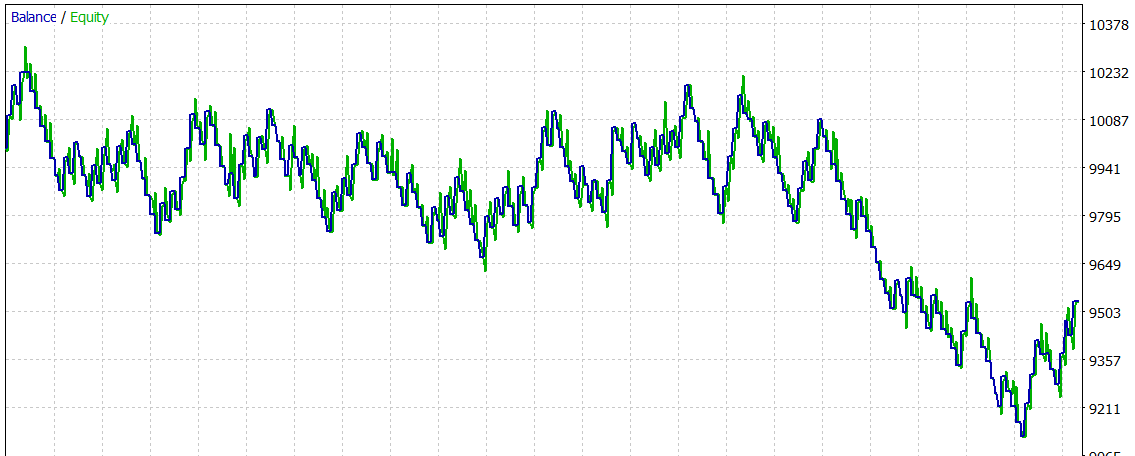
We hope to improve this graph as we add other components to the strategy.
Test 2: Adaptive Shrink Mechanism
We now enable the Adaptive Shrink Mechanism and set the shrink factor to 0.5, causing the SuperTrend band to contract by 50% whenever a valid opposing divergence is detected, allowing the strategy to react earlier to weakening momentum. 
The results and graph are as follows:
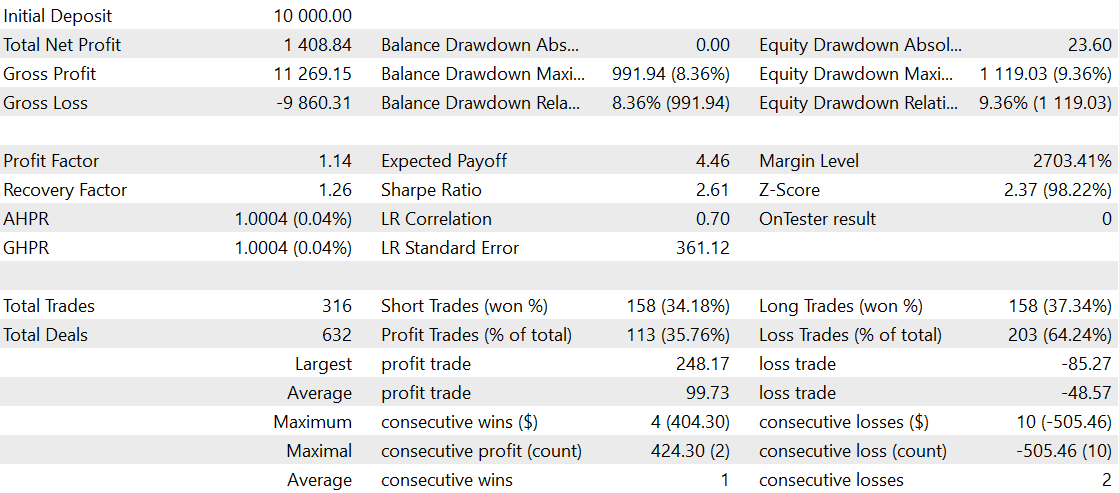
The profit and recovery factors bumped up (1.14 and 1.26, respectively), net positive, an increased number of trades, a lower equity drawdown of ~9%, a slightly higher win rate, and a better equity curve during the same six-month period.
Test 3: Confirmation Bars
Next, we will enable the anti-repainting input for extra confirmation bars before executing a trade. Then we can just choose 1 extra bar for confirmation.

We then check the effect it has on the result and the equity curve:
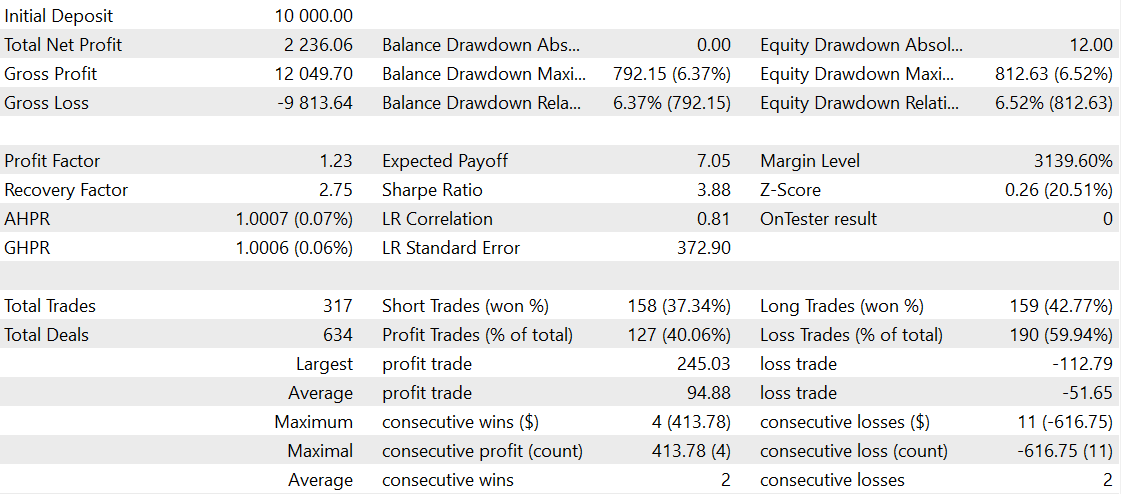
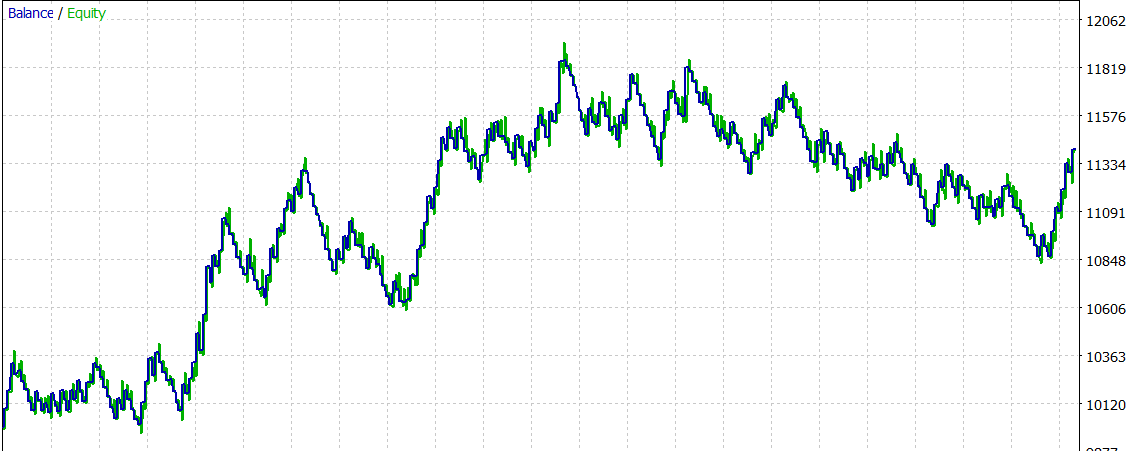
An even better profit and recovery factors (1.23 and 2.75, respectively), over 1.6x profit, about the same number of trades, a much lower equity drawdown of ~6%, a significantly higher win rate, and a smoother equity curve. These results suggest that waiting for one more bar improves signal quality by filtering out premature reversals while maintaining nearly the same trading frequency.
Test 4: Trailing Stop Management
Trend-following strategies often benefit from dynamically protecting unrealized gains. We will now evaluate whether the trailing stop module provides a similar advantage for the Adaptive SuperTrend strategy. We will enable trailing, start trailing when we are 1 RR up, and trail at every 0.5 RR up after. 
The results and graph are as follows:
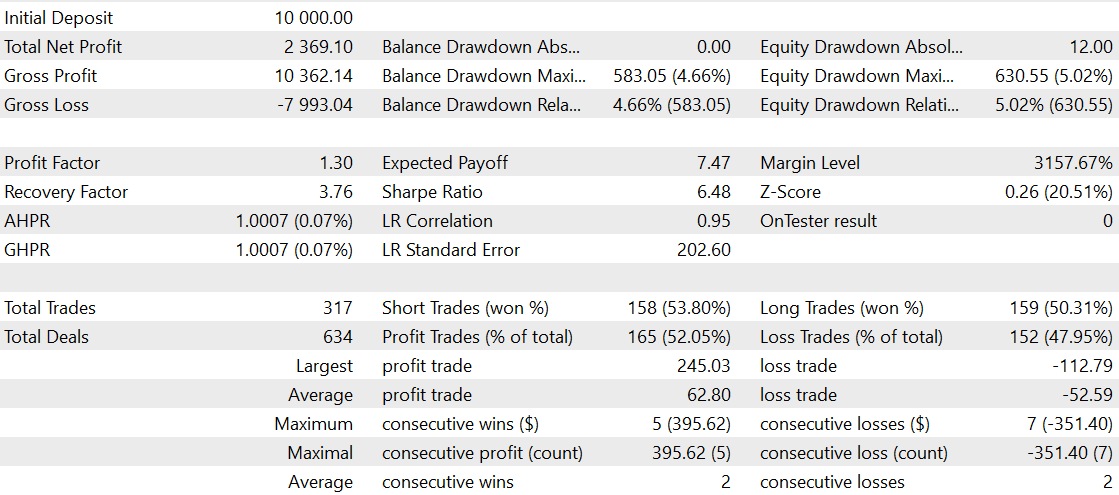
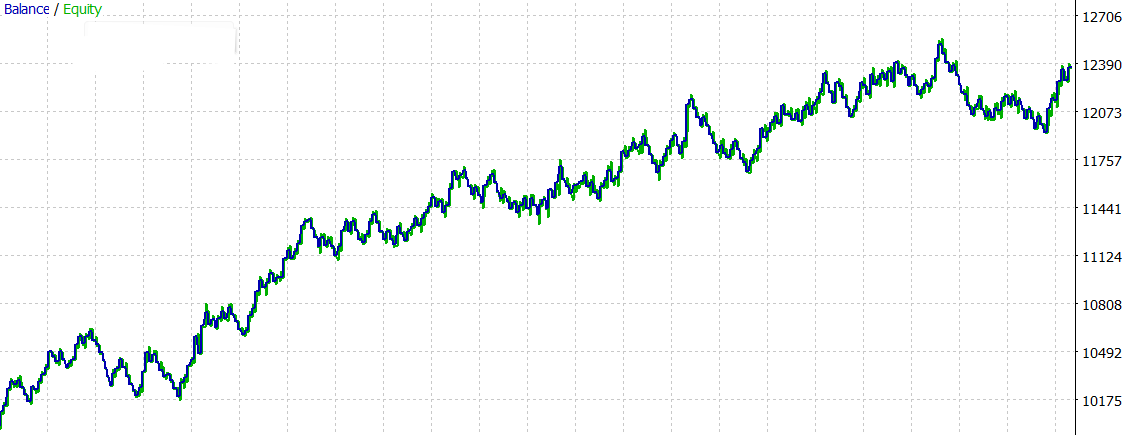
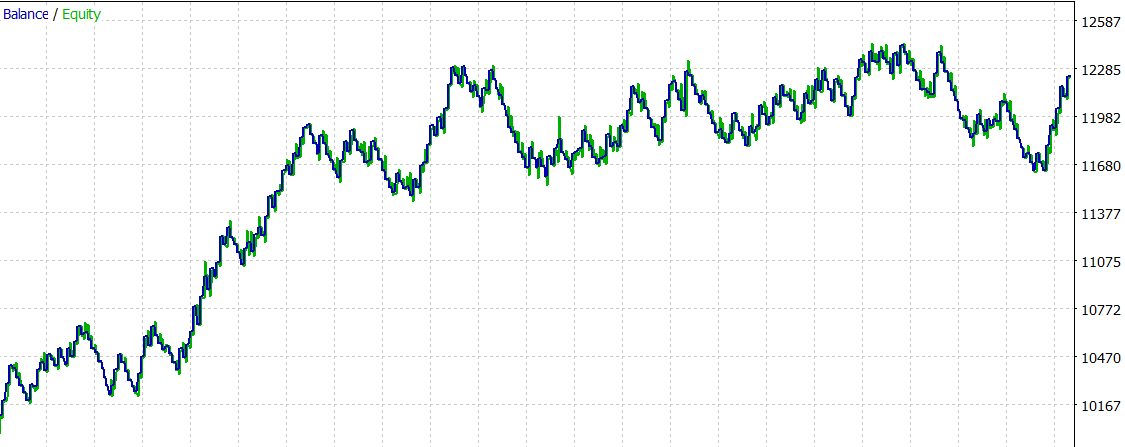
The profit and recovery factors are once more improved (1.3 and 3.76, respectively), with a slight increase in net profit, the same trade frequency, a lower equity drawdown of 5%, a significantly higher win rate than the last but a lower average profit per trade, and a better equity curve than the last test. The results demonstrate that the trailing stop module indeed improves trade management while maintaining similar overall profitability during the test period.
Testing 5: Session Filter
Session filter is purely just a feature for traders that don't feel comfortable trading in quiet or choppy sessions. As an example, we will exclude the London session, allowing us to evaluate how restricting trading hours affects overall system performance. Different assets or trading styles may favor different session configurations. The inputs, results, and graph are as follows:
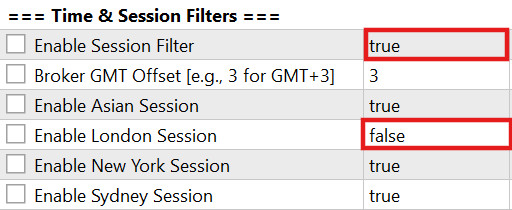
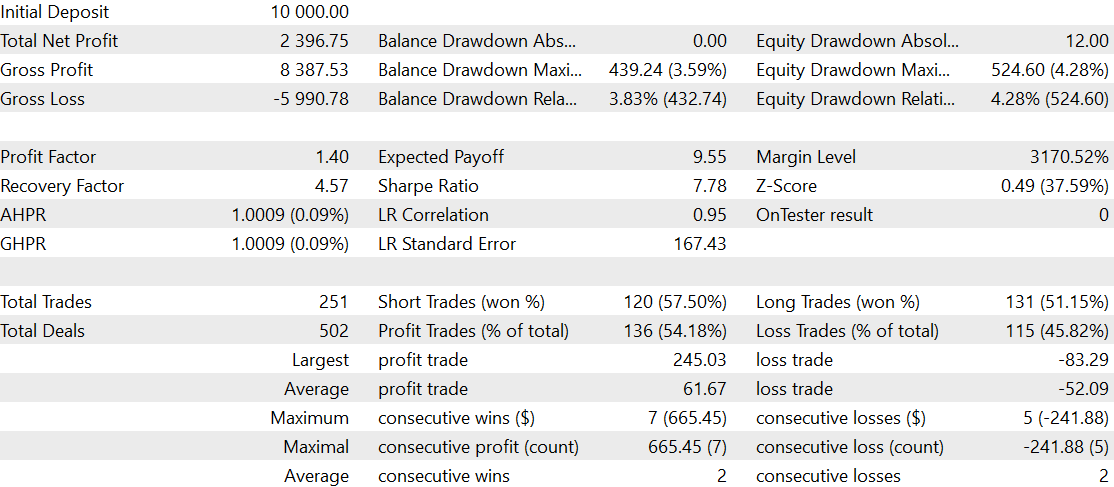
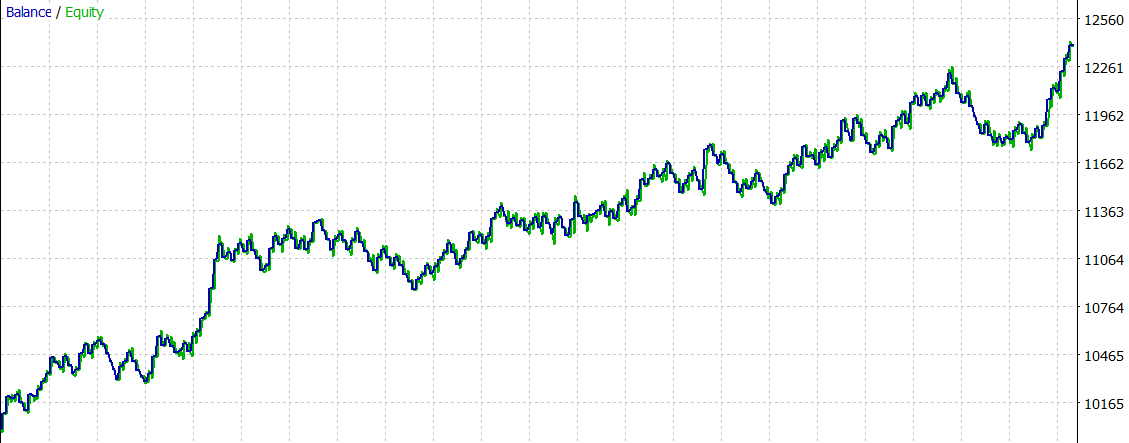
The profit and recovery factors are improved (1.4 and 4.57, respectively), about the same overall profit, an 80% drop in trade frequency from 317 to 251, a lower equity drawdown of 4.2%, a slightly higher win rate, and a steady equity curve. Avoiding the London session adds a positive impact to the strategy and reduces trade frequency.
The examples presented here evaluate only one configuration over a six-month period. Traders can repeat these tests across different symbols, timeframes, and longer historical periods. A practical workflow is to begin with several generic backtests to identify promising parameter ranges before performing a slow optimization to obtain a more robust parameter set for future trading conditions.
Result Analyses
The sequential tests indicate that each supporting module improves a different aspect of the Adaptive SuperTrend Expert Advisor. Rather than relying on a single feature, the system combines several complementary components that collectively improve robustness over the baseline SuperTrend implementation. The below table shows our observations in this six-month backtest:
| Module | Primary Contribution | Observed Impact |
|---|---|---|
| Baseline SuperTrend. | Reference implementation. | Negative expectancy, highest drawdown, lowest win rate. |
| Adaptive Shrink. | Earlier reaction to weakening trends. | Improved profit factor, lower drawdown, and increased trade opportunities. |
| Confirmation Bars. | Signal validation. | Higher win rate and recovery factor with similar trade frequency. |
| Trailing Stop Management. | Dynamic trade management. | Lower drawdown and improved recovery while protecting open profits. |
| Session Filter. | Market selection. | Reduced trade frequency while maintaining profitability and improving equity stability. |
Each addition addresses a different weakness of the baseline strategy, producing a more stable equity curve and improved risk-adjusted performance over the same testing period.
Conclusion
In this article, we transformed the Adaptive SuperTrend concept from an indicator into an Expert Advisor capable of automatically detecting signals and executing trades. The EA introduces several features including, dynamic position sizing, ATR-based stops, RR-driven trailing stop management, optional confirmation bars, and session filtering. Together, these additions aim to improve signal quality, trade management, and overall system robustness. The article structure follows a separation of concerns: the calculation engine produces trend data, the signal detection identifies crossovers, the execution layer handles orders with validation, and position management tracks and protects trades.
While the configuration presented here serves as a practical starting point, traders are encouraged to continue testing the strategy across different symbols, timeframes, and market conditions. The modular nature of the Expert Advisor also makes it easy to experiment with new filters, risk management techniques, or optimization settings to further refine the strategy for individual trading styles.
Warning: All rights to these materials are reserved by MetaQuotes Ltd. Copying or reprinting of these materials in whole or in part is prohibited.
This article was written by a user of the site and reflects their personal views. MetaQuotes Ltd is not responsible for the accuracy of the information presented, nor for any consequences resulting from the use of the solutions, strategies or recommendations described.

 Crystal Structure Algorithm (CryStAl)
 Streaming MetaTrader 5 Trade Events to a Local HTTP Server Using WinINet in MQL5
 Implementing and Benchmarking Bag-of-SFA-Symbols (BOSS) Against Dynamic Time Warping (DTW)
 Mathematical Models in Grid Strategies

- Free trading apps
- Over 8,000 signals for copying
- Economic news for exploring financial markets
You agree to website policy and terms of use