

Developing a Manual Backtesting Expert Advisor: Additional Features
 1 774
1 774
 1
1

Welcome to the future
In the previous article, I wrote about Chart Replay Pro, a manual backtesting Expert Advisor that I developed to manually test strategies in order to see if they work as well as obtain feasible parameters before automating them. Since publishing that article, more than a hundred people have downloaded the Expert Advisor and reviews have been positive, signifying that Chart Replay Pro, despite being a simple Expert Advisor, is quite a powerful and useful tool to any trader worth their salt.
As much as I liked its simplicity, the fact that it didn’t have much control in terms of precise trade adjustments like in live trading bugged me. I partially expressed this thought in the previous article as I ended it by stating, “Future improvements I plan: on-the-fly lot changes and individual-position close buttons.” Well, welcome to the future. In this article, I cover three additions: (1) a Lot Adjustment system that works without closing and restarting the EA in the Strategy Tester, (2) a Trade Manager for individual positions (instead of closing all trades), and (3) an Order System for buy/sell stop and buy/sell limit orders. This will add the control over trades and trade adjustments I yearned for. I shall also address the challenges I faced when bringing these new features to life so that you, the reader, don’t have to go through such roadblocks if you were to develop such a system.
More risk, More reward?
In the previous version, lot size was fixed once the test started. To change it, you had to close the Strategy Tester visual window, open the Inputs tab, and modify the LotSize parameter. One would then have to restart the test from scratch which was highly inefficient and truthfully, irritating.
So I got to work on recreating the Lot Size Adjuster with the aim of making it look as close as possible to the normal chart. After a bit of research and digging in the MT5 include folder, I found these:
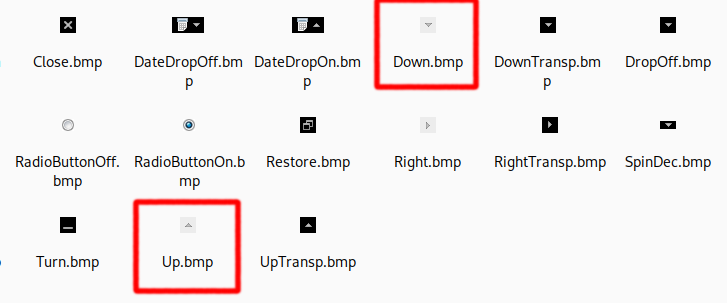
They looked very similar if not the same to the official ones, so I imported them using the following lines of code as well as the Edit class that will be used to display the lot size:
#include <Controls/BmpButton.mqh>
#include <Controls/Edit.mqh>

#resource "\\Include\\Controls\\res\\Up.bmp"
#resource "\\Include\\Controls\\res\\Down.bmp"

CBmpButton IncreaseLot;
CBmpButton DecreaseLot;
CEdit Lots;
One thing to note is that the #resource lines are necessary to load the bitmap images since it tells the compiler that the resource at the specified path (path_to_resource_file) should be included into the executable EX5 file.
Unlike the CButton class, the CbmpButton class is specifically used to create buttons using bitmap images, which was necessary in this case for proper display and handling of the IncreaseLot and DecreaseLot buttons.
I then sized the buttons as well as the Edit class instance for displaying lot size to match the original Lot Size Adjuster as closely as possible inside the OnInit() function:
Lots.Create(0, LOTS, 0, 78, 20, 123, 37);
Lots.Text(DoubleToString(SymbolInfoDouble(_Symbol, SYMBOL_VOLUME_MIN), 2));
Lots.ReadOnly(true);
Lots.TextAlign(ALIGN_CENTER);

IncreaseLot.Create(0, LOT_INC, 0, 62, 20, 78, 37);
IncreaseLot.BmpNames("::Include\\Controls\\res\\Up.bmp");

DecreaseLot.Create(0, LOT_DEC, 0, 123, 20, 139, 37);
DecreaseLot.BmpNames("::Include\\Controls\\res\\Down.bmp");
The keen-eyed may have noticed that I set Lots, which is the display for lot size, to read-only. This field in the original Lot Size Adjuster is usually write enabled but I shall address that shortly.
The two .BmpNames lines are used to point to what bitmap image one would like to use for the button, which is different from adding it as a resource. These work within the code, the #resource ones as indicated before are for the compiler to know what to include.
You can also use the .BmpNames lines to set it to a different bitmap image when clicked if you wish to do so.
With those few lines, the front end of our Lot Size Adjuster was officially done. Looks familiar?
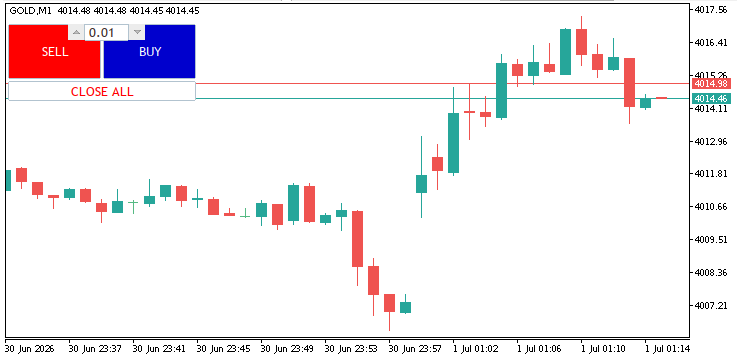
Next step was to add functionality, which began by adding a user input for increment value:
input double lotSizeInc = 0.01; //Lot Size Increment/Decrement Value
Then I wrote the functions for the up and down buttons for increasing and decreasing lot size value in the OnTick() function:
//---Lot Size Adjuster Logic
   if(IncreaseLot.Pressed())
     {
      double currLot = StringToDouble(Lots.Text());                                                        //Get current lotsize
      currLot = currLot + lotSizeInc;                                                                      //Adds user defined increment
      Lots.Text(DoubleToString(currLot, 2));                                                               //Update lotsize
      IncreaseLot.Pressed(false);
     }

   if(DecreaseLot.Pressed())
     {
      double currLot = StringToDouble(Lots.Text());
      currLot = currLot - lotSizeInc;
      if(currLot < SymbolInfoDouble(_Symbol,SYMBOL_VOLUME_MIN))
         currLot = SymbolInfoDouble(_Symbol,SYMBOL_VOLUME_MIN);                                            //Ensures lotsize doesn't go below the minimum allowable lotsize
      Lots.Text(DoubleToString(currLot, 2));
      DecreaseLot.Pressed(false);
     }
The code was pretty straightforward: read whatever was in the Lots edit field, add or subtract the increment dictated by the user input and update it as the current lot size, and for the decrease button, ensure that we don’t go below the minimum allowable lot size in the current instrument.
With these lines of code in place, the Lot Size Adjuster was up and running smoothly.
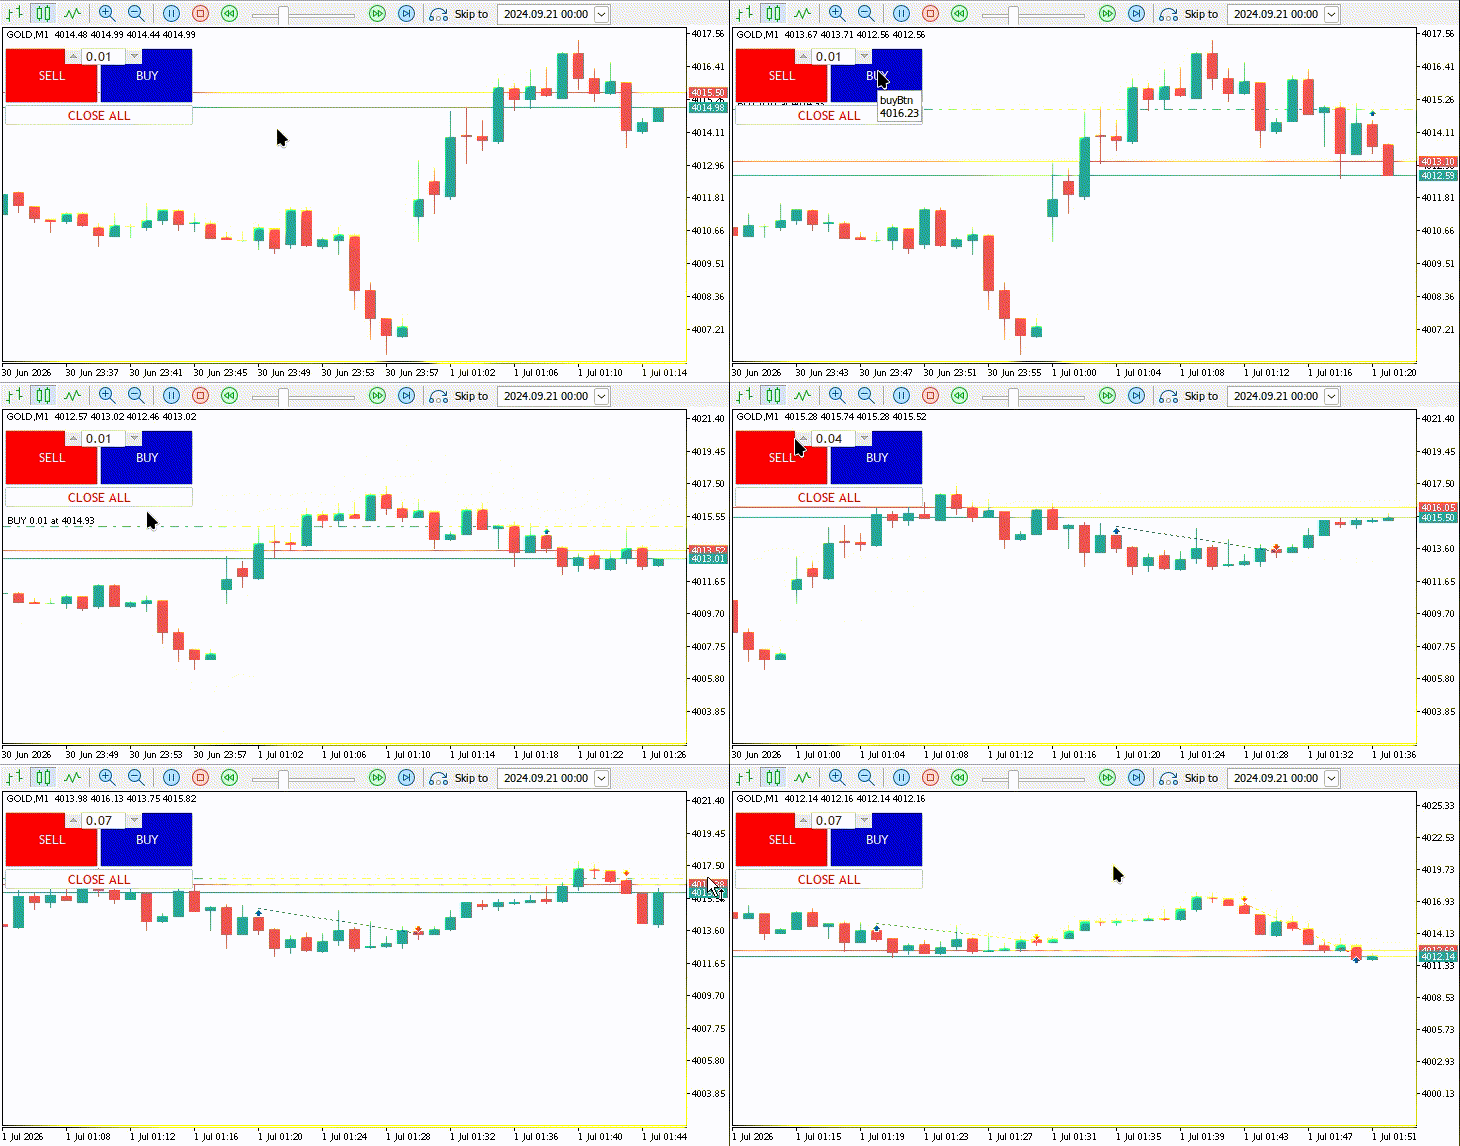
Although the Lot Size Adjuster works flawlessly as is, one cannot click on the Edit field and edit it directly as they can on a live chart. This is because when I configured it to work like that, the Edit field became blank and the lot size didn’t really change. I am still working on this so that I can get rid of the lot increment input and make it work like the original live chart field. Any information regarding how to solve this is greatly appreciated in the comments below.
Order up
After the great success of making the Lot Size Adjuster, I was motivated enough to try making Order Buttons. These were for strategies that needed stops and limits. The code was pretty straightforward since all I had to do was recreate the same buttons but change the names as well as the logic, but first, the class declarations
//---Order Setup Buttons
CButton buyOrder;
CButton sellOrder;
Then setting up the front-end
sellOrder.Create(0, SELL_ORDER_BUTTON, 0, 2, 147, 95, 202);
sellOrder.Text("SELL ORDER");
sellOrder.Color(clrBlack);
sellOrder.ColorBackground(clrYellow);

buyOrder.Create(0, BUY_ORDER_BUTTON, 0, 97, 147, 190, 202);
buyOrder.Text("BUY ORDER");
buyOrder.Color(clrBlack);
buyOrder.ColorBackground(clrAqua);
Then it hit me, setting up orders, unlike trades, needed a price at which they will be set, and the location of the order relative to price and type of order would determine whether it's a stop order, or a limit order.
This made me make a few more buttons as well as a few more user inputs, namely Entry Adjustment Buttons, an Okay button for placing the actual order (this button’s logic would also be used in determining if the order is a stop or a limit), a Cancel button for canceling an order if one doesn’t want to execute it, and a Delete All button for deleting all orders.
The code to setup these was fairly straightforward:
CButton Entry;
CButton EntryPlus;
CButton EntryMinus;
CButton orderOkay;
CButton orderCancel;
CButton orderDelete;
Their setup:
orderDelete.Create(0, ORDER_DELETE_BUTTON, 0, 2, 204, 190, 224);
orderDelete.Text("DELETE ALL");
orderDelete.Color(clrRed);
orderDelete.ColorBackground(clrWhite);

Entry.Create(0, ORDER_ENTRY_BUTTON, 0, 2, 226, 68, 246);
Entry.Text("ENTRY");
Entry.Color(clrWhite);
Entry.ColorBackground(clrGray);

EntryPlus.Create(0, ORDER_ENTRY_PLUS_BUTTON, 0, 69, 226, 129, 246);
EntryPlus.Text("+");
EntryPlus.Color(clrWhite);
EntryPlus.ColorBackground(clrGray);

EntryMinus.Create(0, ORDER_ENTRY_MINUS_BUTTON, 0, 130, 226, 190, 246);
EntryMinus.Text("-");
EntryMinus.Color(clrWhite);
EntryMinus.ColorBackground(clrGray);

orderOkay.Create(0, ORDER_OKAY_BUTTON, 0, 2, 248, 190, 268);
orderOkay.Text("OK");
orderOkay.Color(clrRed);
orderOkay.ColorBackground(clrWhite);

orderCancel.Create(0, ORDER_CANCEL_BUTTON, 0, 2, 270,190, 290);
orderCancel.Text("CANCEL");
orderCancel.Color(clrRed);
orderCancel.ColorBackground(clrWhite);
For the Entry buttons, Okay button and Cancel button, I put them under a function called orderButtons(), which gets called once the user presses on the Sell Order or Buy Order button, since they aren’t required during normal operation of the EA.
At this point, I was confident enough to define the logic for the Order system:
//---Order buttons logic
   if(sellOrder.Pressed())
     {
      ObjectDelete(0, SELL_ORDER_LINE);                                                                    //clear any previous sell order line
      sellOrderValue = bid - stopOffset;                                                                   //store the sell order price value temporarily for easier manipulation with the entry buttons

      ObjectCreate(0, SELL_ORDER_LINE, OBJ_HLINE, 0, 0, sellOrderValue);
      ObjectSetInteger(0, SELL_ORDER_LINE, OBJPROP_COLOR, clrOrange);

      orderButtons();                                                                                      //Display Entry, Okay and Cancel Buttons
      sellOrder.Pressed(false);
     }

   if(buyOrder.Pressed())
     {
      ObjectDelete(0, BUY_ORDER_LINE);                                                                     //clear any previous buy order line
      buyOrderValue = ask + stopOffset;                                                                    //store the buy order price value temporarily

      ObjectCreate(0, BUY_ORDER_LINE, OBJ_HLINE, 0, 0, buyOrderValue);
      ObjectSetInteger(0, BUY_ORDER_LINE, OBJPROP_COLOR, clrAqua);

      orderButtons();                                                                                      //Display Entry, Okay and Cancel Buttons
      buyOrder.Pressed(false);
     }

//---Entry buttons logic
   if(EntryPlus.Pressed())
     {
      //---Checks if buyOrderValue is manipulated by the buyOrder button
      if(buyOrderValue > -1)
        {
         buyOrderValue = buyOrderValue + stopIncOffset;                                                    //Adds user defined increment to the buyOrderValue
         ObjectSetDouble(0, BUY_ORDER_LINE, OBJPROP_PRICE, buyOrderValue);                                 //sets the buy order line to the new buyOrderValue price
        }

      //---Checks if sellOrderValue is manipulated by sellOrder button
      if(sellOrderValue > -1)
        {
         sellOrderValue = sellOrderValue + stopIncOffset;                                                  //Adds user defined increment to the sellOrderValue
         ObjectSetDouble(0, SELL_ORDER_LINE, OBJPROP_PRICE, sellOrderValue);                               //sets the sell order line to the new sellOrderValue price
        }
      EntryPlus.Pressed(false);
     }

   if(EntryMinus.Pressed())
     {
      //---Checks if buyOrderValue is manipulated by the buyOrder button
      if(buyOrderValue > -1)
        {
         buyOrderValue = buyOrderValue - stopIncOffset;                                                    //Subtract user defined increment to the buyOrderValue
         ObjectSetDouble(0, BUY_ORDER_LINE, OBJPROP_PRICE, buyOrderValue);                                 //sets the buy order line to the new buyOrderValue price
        }

      //---Checks if sellOrderValue is manipulated by sellOrder button
      if(sellOrderValue > -1)
        {
         sellOrderValue = sellOrderValue - stopIncOffset;                                                  //Subtract user defined increment to the sellOrderValue
         ObjectSetDouble(0, SELL_ORDER_LINE, OBJPROP_PRICE, sellOrderValue);                               //sets the sell order line to the new sellOrderValue price
        }
      EntryMinus.Pressed(false);
     }

//---Order Execution Button logic
   if(orderOkay.Pressed())
     {
      if(sellOrderValue != -1)                                                                             //Only place a sell stop/limit if it has been adjusted
        {
         if(sellOrderValue > bid)
           {
            trade.SellLimit(StringToDouble(Lots.Text()), sellOrderValue, _Symbol);                         //set a sell limit if sellOrderValue is greater than bid
           }
         else
            if(sellOrderValue < bid)
              {
               trade.SellStop(StringToDouble(Lots.Text()), sellOrderValue, _Symbol);                       //set a sell stop if sellOrderValue is less than bid
              }
         sellOrderValue = -1;                                                                              //reset sellOrderValue
         ObjectDelete(0, SELL_ORDER_LINE);                                                                 //Clean up by deleting the sell order line
        }

      if(buyOrderValue != -1)                                                                              //Only place a buy stop/limit if it has been adjusted
        {
         if(buyOrderValue < ask)
           {
            trade.BuyLimit(StringToDouble(Lots.Text()), buyOrderValue, _Symbol);                           //set a buy limit if buyOrderValue is less than ask
           }
         else
            if(buyOrderValue > ask)
              {
               trade.BuyStop(StringToDouble(Lots.Text()), buyOrderValue, _Symbol);                         //set a buy stop if buyOrderValue is greater than ask
              }
         buyOrderValue = -1;                                                                               //reset buyOrderValue
         ObjectDelete(0, BUY_ORDER_LINE);                                                                  //clean up by deleting the buy order line
        }
      deleteOrderButtons();                                                                                //clean up by getting rid of the Entry, Okay and Cancel buttons
      orderOkay.Pressed(false);
     }
//---Order Cancel button logic
   if(orderCancel.Pressed())
     {
      ObjectDelete(0, SELL_ORDER_LINE);                                                                    //Deletes sell order line
      ObjectDelete(0, BUY_ORDER_LINE);                                                                     //Deletes buy order line
      sellOrderValue = -1;                                                                                 //Reset sellOrderValue
      buyOrderValue = -1;                                                                                  //Reset buyOrderValue

      deleteOrderButtons();                                                                                //Gets rid of Entry, Okay and Cancel buttons
      orderCancel.Pressed(false);
     }
//---Order Delete button logic
   if(orderDelete.Pressed())
     {
      if(OrdersTotal() <= 0)
         return;                                                                                           //does nothing if no orders are open
      //---Loop through open orders and delete them them
      for(int i = OrdersTotal(); i >= 0; i--)
        {
         ord.SelectByIndex(i);
         trade.OrderDelete(ord.Ticket());
        }
      orderDelete.Pressed(false);
     }
This worked flawlessly and the buttons were quite intuitive which was a plus.
The sellOrderValue and buyOrderValue variables are global varables (the full source code is available before the conclusion) incase you are wondering where they came from.They are set to -1 initially since one may use this Expert Advisor on an instrument that trades at less than $1 which may cause errors if they are initially set/reset to 0.
One challenge that I faced was the fact that OnChartEvent() function doesn’t work in Strategy Tester (when I say Strategy Tester in this scenario, I mean the window that appears when one selects 'visual mode with the display of charts, indicators and trades'). I would have liked to drag the Entry Line to where I please but since the mouse input wouldn’t be processed, I used the Entry Plus and Entry Minus buttons instead.
Side note: placing the Entry/OK/Cancel button creation inside the buy/sell order logic causes a bug. The buy/sell buttons cannot be reset to an unpressed state, so the entry keeps updating as bid/ask changes, which alters the intended offset. This bug is solved by the use of the global variables sellOrderValue and buyOrderValue which can be later accessed by the Entry/OK/Cancel buttons as static values.
The end result looked quite nice.
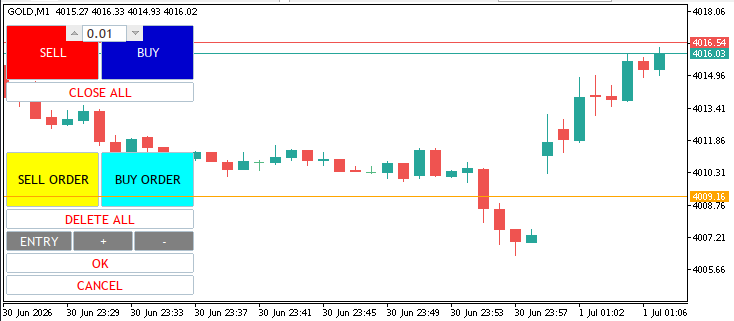
Name’s Manager, Trade Manager
The individual Trade Manager was the hardest part: I wanted it to look symmetrical and remain functional, but those goals conflicted. In all the other parts of this code, buttons were more or less in a consistent part in space and could be mapped exactly where they needed to be, but if I was to create a system that had to display buttons for every trade in order to manage it, well, function won. I considered an edit field that displays the ticket number, but updating it on OnTick() would be cumbersome. It's also faster to click a button to adjust TP/SL or close the position than to scroll through ticket numbers.
So I began by declaring the various buttons I would need for this:
//---Trade Manager Buttons
CButton tradeManager;
CButton TPAdjust;
CButton TPPlus;
CButton TPMinus;
CButton SLAdjust;
CButton SLPlus;
CButton SLMinus;
CButton adjustOkay;
CButton adjustCancel;
CButton adjustClose;
Next, I set them up like so:
tradeManager.Create(0, TRADE_MANAGER, 0, 2, 300, 190, 320);
tradeManager.Text("MANAGER");
tradeManager.Color(clrWhite);
tradeManager.ColorBackground(clrPurple);

TPAdjust.Create(0, TP_ADJUST_BUTTON, 0, 2, 344, 68, 364);
TPAdjust.Text("TP");
TPAdjust.Color(clrWhite);
TPAdjust.ColorBackground(clrGray);

TPPlus.Create(0, TP_ADJUST_PLUS_BUTTON, 0, 69, 344, 129, 364);
TPPlus.Text("+");
TPPlus.Color(clrWhite);
TPPlus.ColorBackground(clrGray);

TPMinus.Create(0, TP_ADJUST_MINUS_BUTTON, 0, 130, 344, 190, 364);
TPMinus.Text("-");
TPMinus.Color(clrWhite);
TPMinus.ColorBackground(clrGray);

SLAdjust.Create(0, SL_ADJUST_BUTTON, 0, 2, 366, 68, 386);
SLAdjust.Text("SL");
SLAdjust.Color(clrWhite);
SLAdjust.ColorBackground(clrGray);

SLPlus.Create(0, SL_ADJUST_PLUS_BUTTON, 0, 69, 366, 129, 386);
SLPlus.Text("+");
SLPlus.Color(clrWhite);
SLPlus.ColorBackground(clrGray);

SLMinus.Create(0, SL_ADJUST_MINUS_BUTTON, 0, 130, 366, 190, 386);
SLMinus.Text("-");
SLMinus.Color(clrWhite);
SLMinus.ColorBackground(clrGray);

adjustOkay.Create(0, ADJUST_OKAY_BUTTON, 0, 2, 388, 190, 408);
adjustOkay.Text("OK");
adjustOkay.Color(clrRed);
adjustOkay.ColorBackground(clrWhite);

adjustCancel.Create(0, ADJUST_CANCEL_BUTTON, 0, 2, 410,190, 430);
adjustCancel.Text("CANCEL");
adjustCancel.Color(clrRed);
adjustCancel.ColorBackground(clrWhite);
adjustClose.Create(0, ADJUST_CLOSE_BUTTON, 0, 2, 432, 190, 452);
adjustClose.Text("CLOSE TRADE");
adjustClose.Color(clrRed);
adjustClose.ColorBackground(clrWhite);
I put the buttons above in a function called tpslButtons() since they would only be needed when a trade is selected.
The next (and most dreaded) part, the logic:
//---Trade Manager Logic
   ArrayResize(tradeButtons, PositionsTotal());                                                            //resize the tradeButtons array to the number of open positions
   arr.Sort();                                                                                             //sort the ticket array

   if(PositionsTotal() > 0)
     {
      //---Loop through open positions
      for(int i = PositionsTotal() - 1; i >= 0; i--)
        {
         Pos.SelectByIndex(i);

         //---Add trade button and store ticket if a new trade is detected
         if(arr.SearchFirst(Pos.Ticket()) < 0)
           {
            //---Setup X coordinates for the button
            int topX = PositionsTotal() == 1 ? 2 : i*tradeButtonsXOffset;
            int bottomX = topX + tradeButtonsXOffset-2;

            //---Create the tradeButton and set it up
            tradeButtons[i].Create(0, (string)Pos.Ticket(), 0, topX, 322, bottomX, 342);
            tradeButtons[i].Text(IntegerToString(PositionsTotal()));

            arr.InsertSort(Pos.Ticket());                                                                  //insert the ticket to the arr array
           }

         //---tradeButtons logic
         if(tradeButtons[i].Pressed())
           {
            selectedTicket = Pos.Ticket();                                                                 //Save the ticket of the selected position
            tpslButtons();                                                                                 //Show the TP adjust, SL adjust, Okay, Cancel and Close buttons
            double TP = Pos.PositionType() == POSITION_TYPE_BUY ? ask + sltpOffset : bid - sltpOffset;     //Set the TP based on position type and user defined offset
            double SL = Pos.PositionType() == POSITION_TYPE_SELL ? ask + sltpOffset : bid - sltpOffset;    //Set the SL based on position type and user defined offset

            takeProfitValue = TP;                                                                          //Export the TP for further manipulation by TPPlus and TPMinus buttons
            stopLossValue = SL;                                                                            //Export the SL for further manipulation by SLPlus and SLMinus buttons

            //---Creation and setup of the TP Line
            ObjectCreate(0, TAKE_PROFIT_LINE, OBJ_HLINE, 0, 0, TP);
            ObjectSetInteger(0, TAKE_PROFIT_LINE, OBJPROP_COLOR, clrLimeGreen);

            //---Creation and setup of the SL Line
            ObjectCreate(0, STOP_LOSS_LINE, OBJ_HLINE, 0, 0, SL);
            ObjectSetInteger(0, STOP_LOSS_LINE, OBJPROP_COLOR, clrRed);
            tradeButtons[i].Pressed(false);
           }
        }
     }

//---TP Plus button Logic
   if(TPPlus.Pressed())
     {
      takeProfitValue = takeProfitValue + sltpOffset;                                                      //adds user defined offset to the takeProfitValue
      ObjectSetDouble(0, TAKE_PROFIT_LINE, OBJPROP_PRICE, takeProfitValue);                                //adjust the take profit line to the new takeProfitValue
      TPPlus.Pressed(false);
     }

//---SL Plus button Logic
   if(SLPlus.Pressed())
     {
      stopLossValue = stopLossValue + sltpOffset;                                                          //adds user defined offset to the stopLossValue
      ObjectSetDouble(0, STOP_LOSS_LINE, OBJPROP_PRICE, stopLossValue);                                    //adjust the stop loss to the new stopLossValue
      SLPlus.Pressed(false);
     }

//---TP Minus button Logic
   if(TPMinus.Pressed())
     {
      takeProfitValue = takeProfitValue - sltpOffset;                                                      //Subtract user defined offset to the takeProfitValue
      ObjectSetDouble(0, TAKE_PROFIT_LINE, OBJPROP_PRICE, takeProfitValue);                                //adjust the take profit line to the new takeProfitValue
      TPMinus.Pressed(false);
     }

//---SL Minus button Logic
   if(SLMinus.Pressed())
     {
      stopLossValue = stopLossValue - sltpOffset;                                                          //Subtract user defined offset to the stopLossValue
      ObjectSetDouble(0, STOP_LOSS_LINE, OBJPROP_PRICE, stopLossValue);                                    //adjust the stop loss to the new stopLossValue
      SLMinus.Pressed(false);
     }

//---Okay / Execute TP/SL adjustments button Logic
   if(adjustOkay.Pressed())
     {
      trade.PositionModify(selectedTicket, stopLossValue, takeProfitValue);                                //Modify the TP/SL of the selected position

      //---Reset
      selectedTicket = 0;
      takeProfitValue = 0;
      stopLossValue = 0;
      ObjectDelete(0, TAKE_PROFIT_LINE);
      ObjectDelete(0, STOP_LOSS_LINE);
      adjustOkay.Pressed(false);
      deleteAdjustButtons();
     }

//---Cancel TP/SL adjustments
   if(adjustCancel.Pressed())
     {
      selectedTicket = 0;
      takeProfitValue = 0;
      stopLossValue = 0;
      ObjectDelete(0, TAKE_PROFIT_LINE);
      ObjectDelete(0, STOP_LOSS_LINE);
      adjustCancel.Pressed(false);
      deleteAdjustButtons();
     }

//---Close currently selected position
   if(adjustClose.Pressed())
     {
      trade.PositionClose(selectedTicket);                                                                 //Close the position

      //---Reset
      selectedTicket = 0;
      takeProfitValue = 0;
      stopLossValue = 0;
      ObjectDelete(0, TAKE_PROFIT_LINE);
      ObjectDelete(0, STOP_LOSS_LINE);
      adjustClose.Pressed(false);
      deleteAdjustButtons();
     }
  }
If this logic looks a bit confusing, that’s because it is, but let me guide you through it. First, we have the ArrayResize line. This just resizes the array tradeButtons, which will contain the buttons for all open trades, to the number of open positions.
The arr.sort() is used to sort an array named arr, created using the CArrayLong class. The arr array is later used to store the ticket numbers for the created buttons.
The code then checks if there are any open positions and if that’s true, the code proceeds to loop through them, starting with the most recent opened position to the oldest using the for loop.
After selecting the position we are currently in using Pos.SelectByIndex(i) line, which if it's not evident, is an instance of the CPositionInfo class, we search the arr array and if the ticket for the currently selected position is not in the array, we go ahead and create the button for it and add the ticket to the arr array.
Now when creating the trade buttons, I opted for the buttons to go from left to right hence the topX and bottomX adjustment for the x1 and x2 parameters. They are necessary for spacing the buttons and they work by using the position’s position in the for loop to space it. The first one needs to be at an x1 value of 2 hence the line “int topX = PositionsTotal() == 1 ? 2 : i*tradeButtonsXOffset;”
The next section as stated by the comment was to handle what happens when one presses the actual trade buttons. Since this all runs on OnTick(), we have to export the constantly shifting variables that would be affected if a new tick is registered, ie, the TP and SL that are stored in the global variables takeProfitValue and stopLossValue respectively. The ticket number is also treated the same since the code will need it to modify the position later on. We create the visual lines to show where the TP and SL will be positioned and their values are set according to the position type (buy or sell) and the user-set offset.
We then proceed to handle TPPlus and TPMinus buttons, which were as easy as adding or subtracting the takeProfitValue value and adjusting the TP line, and the same logic was used on the SLPlus and SLMinus buttons, which perform the same actions but on the SL Line.
The adjustOkay button modifies the currently selected trade using the ticket we stored in the global variable selectedTicket, and then proceeds to reset the selectedTicket, takeProfitValue and stopLossValue variables and finally deleting the TP and SL lines.
The adjustCancel button does what the adjustOkay button logic does. The only difference is that it doesn’t adjust the trade, and the adjustClose button is on the same boat, except that it closes the trade instead but the rest is pretty much the same.
It took a few tries and a lot of head scratches, but the code finally worked and was very decent looking.
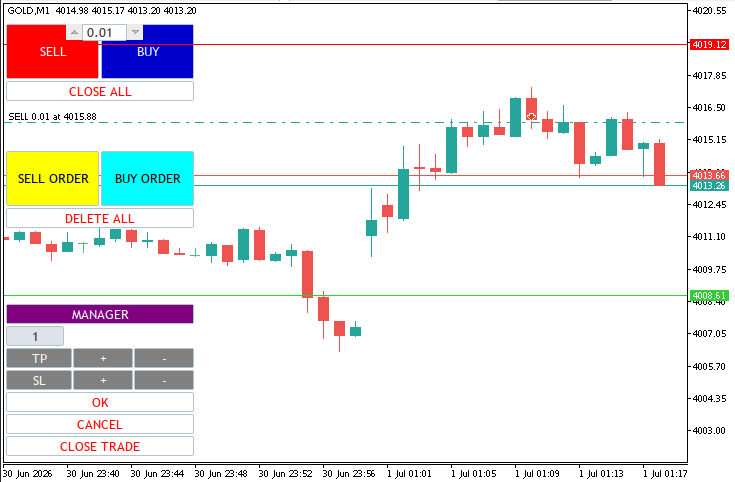
Conclusion
With the Trade Manager complete, I achieved the original goals for this EA. In my view, its usefulness for finding feasible strategies and trading edges in manual testing has more than doubled. The only part that this version still lacks is order management which I believe I can easily integrate into the Trade Management section, but that I shall do in the next and probably final version. For now, it’s quite satisfactory. This EA is available here for free and I do update it if any bugs are spotted, and the full source code is available too below if you would like to tinker with it, or understand it better. Until next time.
Warning: All rights to these materials are reserved by MetaQuotes Ltd. Copying or reprinting of these materials in whole or in part is prohibited.
This article was written by a user of the site and reflects their personal views. MetaQuotes Ltd is not responsible for the accuracy of the information presented, nor for any consequences resulting from the use of the solutions, strategies or recommendations described.

 Symbolic Aggregate Approximation (SAX) in MQL5: Historical Analog Search and Forecasting
 CSV Data Analysis (Part 7): Statistical Robustness Testing on MQL5 CSV Exports with Monte Carlo Simulation
 Forecasting a Conditional Distribution Using MLP
 Bison Algorithm (BIA)

- Free trading apps
- Over 8,000 signals for copying
- Economic news for exploring financial markets
You agree to website policy and terms of use
Adding the lot size bar that looks like the one used in live trading is certainly a good improvement on the implementation from the last article. I know that the implementation in this article is mainly for testing out or backtesting ideas, so a static lot size can be reasonably, but I personally would prefer using a lot size that is based on the account's percentage. That way, the 0.1 lot on the "increase/decrease" button would mean 0.1% of account balance instead. I just feel like this would make me see the impact of the strategy on my account, disciplinarily speaking. It can also help with calculating risk on any trade I want rather than putting lot sizes that I have little idea on how it would impact the account balance.
Anyways the code is there for me to tinker with, I am just commenting this idea for those that would also want to consider it.