
Master MQL5 from beginner to pro (Part V): Fundamental control flow operators
Introduction
In this article of our series, we will focus on teaching a program how to make decisions. To achieve this, we will develop an indicator. This indicator will display either inside or outside bars.
- An outside bar is a bar that breaks the range of the previous candlestick in both directions.
- An inside bar is a bar that remains within the range of the previous candle after closing.
- We will mark each closed candlestick. If a candlestick is still forming, we will not place any markers on it.
- Markers will be applied only to "long" candlesticks: for an outside bar, the marker will be placed on the current bar, while for an inside bar, it will be placed on the previous one. This choice is subjective, so if you find the indicator useful but disagree with this decision, feel free to adjust the corresponding parts in the code.
- Let's make our indicator universal. It will be able to display both options, and the user will determine which one to choose using input parameters.
Developing this indicator will require us to use the control flow operators discussed in this article. Since the indicator is relatively simple, we will primarily work with conditional statements and loops - everything necessary for this task. However, for additional practice, you may consider rewriting the indicator using:
- Different types of loops;
- The switch-case operator instead of some (or all) conditional statements.
Until now, our programs have been fairly limited, executing instructions in a strictly linear fashion without decision-making capabilities. After reading this article, you will be able to create more sophisticated programs.
To start, we will take a detailed look at Boolean (logical) expressions, as they form the foundation for understanding the rest of the material.
Detailed Overview of Logical Expressions
As a reminder, Boolean data types (bool) have only two possible values: true or false.
Every time a logical operator is used, the program essentially asks its current data: "Is it true that (condition)?" ("Is it true that (prev_calculated == rates_total)? If yes, then I should exit the current function! Otherwise, I need to continue calculations…".)
In MQL5, the number 0 represents false, while all other numbers in boolean expressions, whether positive or negative, are treated as true.
Strings, however, cannot be converted to bool. Any attempt to do so will result in a compiler error. However, strings can be compared.
Logical data most commonly results from comparison expressions. The simplest type of logical expression is a comparison statement. In MQL5, the following comparison operators are used (similar to standard mathematical notation): greater than (>), less than (<), equal to (==), not equal to (!=), greater than or equal to (>=), less than or equal to (<=). For example, the expression (a==b) evaluates to true only if both elements are equal. This, I think, is clear.
When comparing strings, the string with characters that have higher ASCII values in the character table will be considered greater. For instance: ("A" > "1") is true, while ("Y" < "A") is false. If a string contains multiple characters, the comparison proceeds character by character from left to right until a difference is found. An empty string ("") is considered smaller than any other string. If two strings have identical starting characters but one is shorter, the shorter one is considered smaller.
There are three more logical operations:
- Logical negation or inversion, (also referred to as Logical "NOT"), which is indicated by an exclamation mark (!);
turns a logical value into its opposite. - Logical conjunction (Logical "AND") is denoted by two ampersand symbols (&&);
an expression with this operator will only be true if both parts of the expression - both left and right - are true. - Logical disjunction (Logical "OR") is denoted by two vertical lines (||);
an expression with this operator will be true if at least one of its parts is true.
| Table 1. Logical NOT (!) | Table 2. Logical AND (&&) | Table 3. Logical OR (||) |
 | 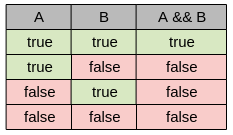 | 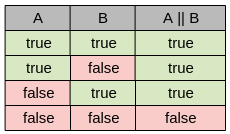 |
To reinforce your understanding, try determining the result of each logical expression below. Hints are provided in the comments, but I recommend attempting the exercises without looking at them first. Use the comments only to verify your answers.
int a = 3;
int b = 5;

bool e = ( a*b ) > ( a+b+b );          // true

Print ( (a>b) );                       // false
Print ( (a<b) || ((a/b) > (3/2)) );    // true
Print ( !a  );                         // false
Print ( ! (!e) );                      // true
Print ( (b>a) && ((a<=3) || (b<=3)) ); // true
Print ( "Trust" > "Training" );        // true
Print ( a==b );                        // false
Print ( b=a );                         // 3 (!!!) (therefore, for any logical operator this is always true)
//  In the last example, a very common and hard-to-detect mistake has been made.
//    Instead of a comparison, an assignment was used, which results in a value of type int!
//  Fortunately, the compiler will usually warn about this substitution.
Example 1. Examples of using logical operators
When an expression contains multiple operators without parentheses, they are generally evaluated from left to right (except for assignment). The execution order follows these rules:
- All arithmetic operators are executed first.
- *, /, %
- +, -
- Comparison operators (==, !=, >, <, >=, <=) come next.
- These are followed by the remaining logical operators, which are executed in the order in which they are listed:
- Inversion (!);
- Conjunction (&&);
- Disjunction (||);
- The assignment operator (=) will be executed last.
If you're unsure about execution order in your code, use parentheses as shown in Example 1. Parentheses ensure clarity by forcing operations in parentheses to be executed first. Furthermore, this improves code readability through proper indentation.
The if Statement
The if statement, also known as a conditional statement, branching statement, or decision structure, helps the program make choices.
Its syntax is straightforward:
if (condition) action_if_condition_is_true;
else action_in_all_other_cases; // The "else" branch is optional
Example 2. Conditional statement template.
Why is it called "branching"? If we visualize it, the structure looks like a tree branch, splitting the program flow:
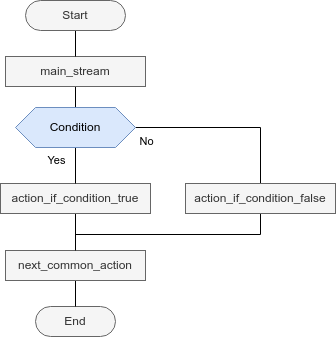
Figure 1. Branching operator
If you use your imagination, you can see how the main "trunk" of execution splits into separate branches. In older flowcharts, entire algorithms often resemble bushes. For example, suppose you want to read a book, but your desk lamp isn’t working. You might first try turning the lamp on - maybe it works? If it doesn't, check whether the bulb is in the socket - perhaps someone removed it? If the bulb is there but the lamp still won't turn on, check if it's burnt out. If it is burnt out, try replacing it. If none of these steps work, try using another lamp. This logical process can be represented as a decision tree:
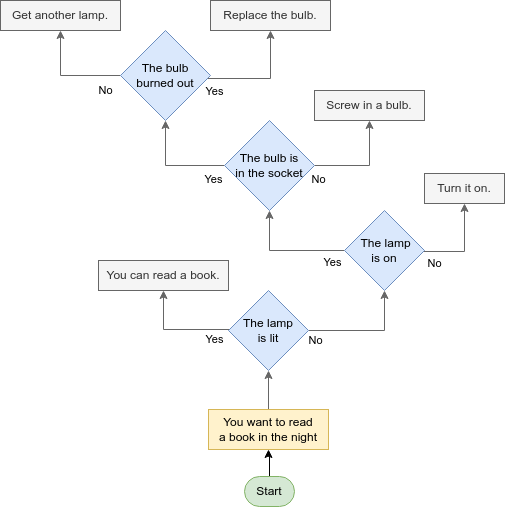
Figure 2. Illustration of branches
In this flowchart, execution starts from the green "Start" point at the bottom. In my opinion, it clearly shows how branching occurs at each choice point. Each decision point, marked in blue, represents a branching path.
Note that "action_if_condition_is_true" and "action_in_all_other_cases" in the MQL5 language can be a single statement, but this statement can be composite if necessary.
Let me explain. In MQL5, actions can be enclosed (or not) in curly braces. The curly brackets act as separate "entities" and delimit separate code blocks. Any variables declared inside a block are not accessible outside of it. In some cases, curly braces are mandatory, but often they are optional. The contents inside braces will be perceived as a single whole by the rest of the program. For example, variables declared inside a block will not be visible to any statements outside. By compound statements I mean such "blocks" in curly brackets. There can be any number of actions inside it, but if-type commands will execute them until they encounter the curly brace that closes the main block. If braces are omitted, only the first statement after if is executed, while subsequent statements run unconditionally.
Often commands that are subordinate to some statement (in our case, if or else), are referred to as the "statement body".
In the template from example 2, the body of the if statement is "action_if_condition_is_true", and the body of the else statement, respectively, is "action_in_all_other_cases".
Here is a practical example. This code checks for a new candlestick in the indicator based on example 16. The logic compares the number of previously calculated candlesticks (prev_calculated) with the total number of candlesticks (rates_total):
if (prev_calculated == rates_total) // _If_ they are equal,

  {                                 //    _then_ do nothing, wait for a new candlestick
    Comment("Nothing to do");       // Display a relevant message in a comment
    return(rates_total);            // Since nothing needs to be done, exit the function
                                    //   and inform the terminal that all bars have been calculated (return rates_total)
  }

// A new candle has arrived. Execute necessary actions
Comment("");                        // Clear comments
Print("I can start to do anything");   // Log a message


// Since the required actions will be executed
//   only if prev_calculated is not equal to rates_total,
//   else branch is not needed in this example.
// We just perform the actions.
Example 3. Waiting for a new candlestick using prev_calculated and rates_total
Here, the if statement contains two operations: Comment() and return. The else statement is omitted because all necessary actions occur in the main execution block.
Inside curly braces, we can use as many operators as we need. If you remove the curly braces, only the Comment("Nothing to do") statement would execute conditionally. In this case, the return operator would execute unconditionally, and the message about readiness for work would never appear (I recommend checking it on a minute chart).
Best practice recommendation:
Always use curly braces ({}) for if statements, even if they contain only one statement.
Stick to this recommendation until you gain enough experience, for example by reading other programmers' codes in a code base. Braces make application debugging more visual, and you will avoid spending hours trying to isolate hard-to-find errors. Also, if you use curly braces even for one statement, it will be a little easier to add additional actions later. For example, you might later want to implement the output of debugging information or alerts.
The Ternary Operator
Sometimes, we use conditional statements simply to assign one of two possible values to a variable. For example:
int a = 9;
int b = 45;
string message;

if( (b%a) == 0 ) // (1)
  {
    message = "b divides by a without remainder"; // (2)
  }
else
  {
    message = "b is NOT divisible by a"; // (3)
  }

Print (message);
Example 4. Condition for transformation into a ternary operator
In this case, you can shorten the notation slightly by using a ternary (three-part) operator:
int a = 9;
int b = 45;
string message;

message = ( (b%a) == 0 ) /* (1) */ ?
          "b divides by a without remainder" /* (2) */ :
          "b is NOT divisible by a" /* (3) */ ;

Print (message);
Example 5. Ternary operator
The operator follows the same for as the if statement: condition -> (question mark) -> value_if_condition_is_true -> (colon instead of 'else') -> value_if_condition_is_false. You can use such ternary operators if they are appropriate for our task.
The key difference between the ternary operator and the traditional IF statement is that the ternary operator must return a value that matches the type of the variable on the left side of the assignment. As a result, it can only be used within expressions. In contrast, a traditional IF statement contains expressions within its body but cannot directly return a value.
The switch — case Statement
There are scenarios where we need to choose from more than just two options. While multiple nested IF statements can be used, they can significantly reduce code readability. In such cases, the switch statement (also called a selector) is the preferred solution. Syntax template:
switch (integer_variable)
  {
    case value_1:
      operation_list_1;
    case value_2
      operation_list_2;
    // …
    default:
      default_operation_list;
  }
Example 6. Structure of switch-case statement
This is how it works. If the value of "integer_variable" matches one of the values ("value_1", "value_2" ...), execution starts at that case and continues sequentially. Most often, it is enough to complete just one block. Therefore, after each list of operations, we usually add a break statement, which immediately terminates the switch statement. If no cases match, the default section executes. The default section must always be placed at the end of the statement.
In MQL5, switch-case is widely used for handling trading errors in Expert Advisors and for processing user input, such as keyboard key presses or mouse movements. Below is a typical example of a function handling trading errors:
void PrintErrorDescription()
{

  int lastError = GetLastError();

// If (lastError == 0), there are no errors…
  if(lastError == 0)
    {
      return;  // …no need to load cpu with unnecessary computations.
    }

// If there are errors, output an explanatory message to the log.
  switch(lastError)
    {
      case ERR_INTERNAL_ERROR:
        Print("Unexpected internal error"); // You can select any appropriate action here
        break;
      case ERR_WRONG_INTERNAL_PARAMETER:
        Print("Wrong parameter in the inner call of the client terminal function");
        break;
      case ERR_INVALID_PARAMETER:
        Print("Wrong parameter when calling the system function");
        break;
      case ERR_NOT_ENOUGH_MEMORY:
        Print("Not enough memory to perform the system function");
        break;

      default:
        Print("I don't know anything about this error");
    }
}
Example 7. Standard error handling process
Loops with Precondition (while)
A loop is a control structure that allows for repeated execution of a block of code.
In programming, we often encounter situations where certain actions need to be performed multiple times, but with slightly varying data. For example, we may need to iterate through all elements of an array (e.g., an indicator buffer) to visualize an indicator's behavior over historical data. Another example is reading parameters from a file, line by line, for a complex EA. And a lot of other cases.
MQL5 provides three types of loops, each suitable for different scenarios. While all loops are interchangeable, meaning one can always replace another without loss of functionality, using the right type of loop improves code readability and efficiency.
The first type is the while loop, also known as a loop with a precondition. This name comes from the fact that the condition is checked before executing the loop body. Visually, it can be represented as follows:
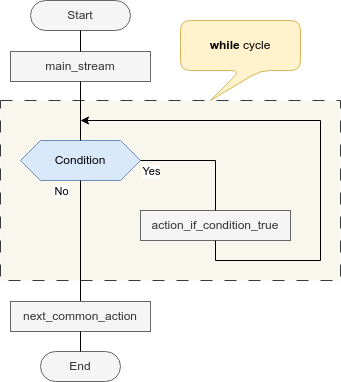
Figure 3. While loop diagram
The syntax template for this operator is very simple:
while (condition)
    action_if_condition_is_true;
Example 8. While loop template
Here "action_if_condition_is_true" is a single statement, simple or compound.
When a program encounters a while statement, it checks the condition, and if the condition is true, it performs the actions in the loop body, and then checks the condition again. This way the loop will execute again and again until the condition becomes false. Since the condition is checked before the body statements are executed, there may be situations when the loop will not execute even once.
Usually this statement is used in cases where the exact number of repetitions cannot be calculated. For example, when you need to read a text file, the program cannot know how long it is. The program will keep reading the file until it reaches the end-of-file marker. Once it is reached, reading will stopped. And such situations in programming are quite common.
In any case, at least one parameter must change inside the loop body, which affects the condition in parentheses. If there is no such parameter, the loop will become infinite, and then it can only be interrupted by closing the terminal window. In the worst-case scenario, if the processor gets locked in an infinite loop, even basic operations like keyboard input or mouse movements might be ignored. The only way to stop the program would be a forced system reboot. Therefore, you should make sure you leave the program at least one opportunity to complete it. For exampl, you can add a condition (&& ! IsStopped() ), which will stop the loop if the program is terminating.
Let’s implement a simple task of summing numbers from 1 to 5 using a while loop. Assume we do not know about arithmetic progressions.
Using the while loop, this problem is solved as follows:
//--- Variables declaration
int a  = 1;  // initialize (!) the variable parameter used in the condition
int sum = 0; // result
string message = "The sum of "+ (string) a; // show message

//--- Perform main operations
while (a <= 5)  // While a is less than 5
  {
    sum += a; // Add the value to the sum
    if ( a != 1) // The first value is already added at the time of initialization
    {
      message += " + " + string (a); // Further operations
    }

    a++; // Increase parameter (very important!)
  }

//-- After the loop is completed, output a message
message += " is " + (string) sum;  // message text
Comment (message); // show the comment
Example 9. Using the while loop
Even though the number of iterations is small, this example demonstrates the mechanics of while loops.
Loop with postcondition (do… while)
The do… while loop uses a condition check after all the actions of its body have been processed. Graphically, this loop can be represented as follows:
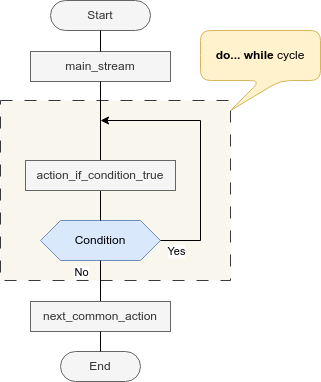
Figure 4. Do-while loop diagram
Syntax template:
do
  actions_if_condition_is_true;
while (condition);
Example 10. The do-while statement template
Unlike while, actions inside the body of the loop are executed at least once in this statement. The rest is similar: the program performs an action, checks the condition that tells it whether to return to the beginning, and if necessary, performs all the actions from the loop body again.
As for the application areas, this could be, for example, checking trading instruments in the Market watch window. The algorithm might look like this:
- take the first symbol from the list (if we are absolutely sure that it definitely exists),
- perform the required action (for example, check existing orders)
- and then check if there are other symbols in the list;
- if another symbol is found, continue actions until the list is over.
The summation with this form of the loop looks almost the same as in the previous case. Only two lines have changed: the description of the loop itself
//--- Variables declaration
int a  = 1;  // initialize (!) the variable parameter used in the condition
int sum = 0; // result
string message = "The sum of "+ (string) a; // show message

//--- Perform main operations
do // Execute
  {
    sum += a;    // Add value to the sum
    if ( a != 1) // The first value is already added at the time of initialization
    {
      message += " + " + string (a); // Further operations
    }

    a++;         // Increase parameter (very important!)
  }
while (a <= 5)  // While a is less than 5

//-- After the loop is completed, output a message
message += " is " + (string) sum;  // message text
Comment (message);                 // show the comment
Example 11. Using the do-while loop
The For loop
The for loop is the most commonly used one because it is used to iterate over all sorts of sequences, in situations where the number of elements to be iterated over can be easily calculated. Syntax template:
for (initialize_counter ; conditions ; change_counter)
  action_if_condition_is_true;
Example 12. For loop template
Unlike the previous loop forms, with the for loop you can clearly see which parameter is changing (in the template I called this parameter a counter) and how. Then, in the body of the loop, you can focus on solving the main task (for example, iterating through the elements of an array).
Essentially this loop is the same as while, that is, the check is also performed before the execution of the body operators. Here is how to use For to sum numbers:
//--- Variables declaration
int a;   // do NOT initialize the variable parameter, only describe
         //   (this is optional as you can describe it in the loop header)
int sum = 0;                    // result
string message = "The sum of "; // a shorter message for the user,
                                //   as the value is not yet known

//--- Perform main operations
for (a=1; a<=5; a++)// For (each `a` from 1 to 5) /loop header/
  {
    sum += a;    // Add `a` to the sum
    if ( a != 1) // the first value does not contain "+"
    {
      message += " + ";  // add "+" before all sequence members starting from the second
    }
   message += string (a); // Add sequence elements to the message

            // Changes to the counter are described not here, but in the loop header as the last parameter.
  }

//-- After the loop is completed, output a message
message += " is " + (string) sum;  // message text
Comment (message);                 // show the comment
Example 13. Using the for loop
In this example we see more changes compared to the previous ones (highlighted in yellow). Once again, I want to emphasize that all steps related to the loop counter (modifiable parameter) are moved to the loop header: initialization (a = 1), condition check (a <= 5) (if the condition is true, the main loop body executes), increment (a++) and condition re-evaluation — at the end of each iteration, the counter is updated, and the condition is checked again.
Break and continue statements
Sometimes, it is unnecessary to execute all steps of a loop.
For example, when searching for a value in an array, it is not always required to iterate through the entire array if the target value is found midway. In such cases, when we need to completely terminate the loop, we use the break statement, which immediately exits the loop and proceeds to the next operation after it. For example:
string message = "";

for (int i=0; i<=3; i++)
  {
    if ( i == 2 )
      {
        break;
      }

    message += " " + IntegerToString( i );
  }

Print(message); // Result: 0 1 (no further execution)
Example 14. Using the break statement
There are also cases where we don't need to execute the loop body under certain conditions, but the loop itself should not terminate - we simply want to skip specific iterations. For example, in Example 14, if we want to exclude the number 2 from being printed while keeping all other numbers, we need to modify the code slightly by replacing `break` with `continue`. The continue statement immediately skips to the next iteration:
string message = "";

for (int i=0; i<=3; i++)
  {
    if ( i == 2 )
      {
        continue;
      }

    message += " " + IntegerToString( i );
  }

Print(message); // Output: 0 1 3 (the number 2 is skipped)
Example 15. Using the continue statement
The break statement can be used either inside a loop or in case statements; the continue statement can only be used inside loops.
And that's all about statements. Now lets see how these operators can help in creating real-world programs.
A few words about the MQL5 Wizard (Indicator mode)
I hope you've already familiarized yourself with creating indicators using the wizard from the first article. However, I will briefly revisit the wizard's steps, focusing on different aspects than before.
The first window of the wizard doesn’t introduce anything new compared to the first article, so I will skip it. The second window, while not new either, now makes more sense since you are familiar with global settings managed through input parameters. Sometimes, it is more intuitive to configure these parameters directly in the wizard. Reminder: parameter names can be arbitrary. But I recommend adding the prefix inp_ to easily distinguish them in the code.
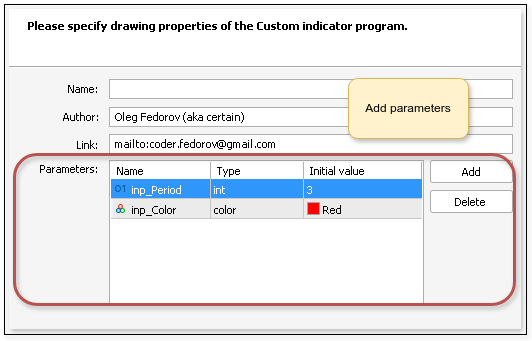
Figure 5. Adding program parameters using the wizard
The next important step is choosing the format of the OnCalculate method (Figure 6). OnCalculate is the main method of any indicator in the MQL5 language. It is called every time the terminal calculates this indicator. The function can take different sets of input parameters, depending on your selection in the wizard.
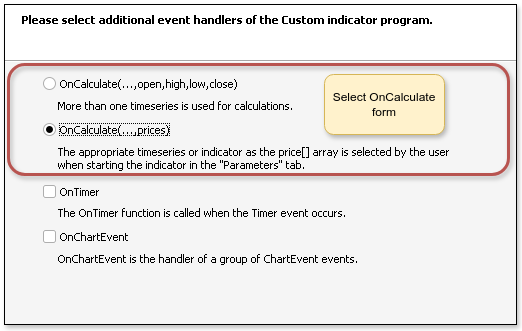
Figure 6. Selecting the OnCalculate method form
Selecting the upper option is suitable for most situations, since the function in this case accepts automatically generated arrays: open, high, low, close, volume, time. The user can process these arrays as needed.
However, there are special cases where we want to give the user the ability to choose which curve to use to calculate a given indicator. For example, a moving average can be based on the high, low, or an existing indicator's output. In this case, we should select the lower option, and then an array with curve data will be transferred to OnCalculate. Then a special tab for selecting a curve will appear in the compiled indicator, in the input parameters window. Figure 7 shows the start windows of the ready-made indicators for the Upper and Lower options.
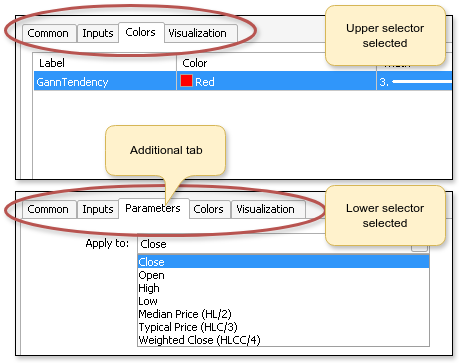
Figure 7. Comparison of indicator start windows with different OnCalculate forms
And the last point in the Wizard that I want to draw your attention to. In the last step of the dialog box, when creating an indicator, you can choose how exactly the indicator will be displayed (Figure 8). To display the indicator, you need to add a buffer, which is a special array containing data for rendering the indicator. Various display styles are available, from simple lines (e.g., moving averages) to multi-colored histograms and candlesticks. With advanced customization, you can even draw custom graphics (though this is beyond the wizard's functionality).
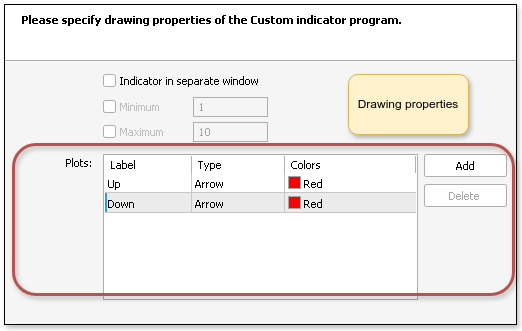
Figure 8. Indicator rendering parameters
In any case, if you want the indicator to draw something, and at the same time the results of its work are easily accessible to other programs (for example, Expert Advisors), you need to add at least one buffer.
A buffer is simply an array of numbers that stores the data calculated by our indicator for each candlestick. In general, this data is not necessarily intended for plotting. Sometimes buffers store colors or some intermediate calculation data needed for calculations in other buffers.
Manual addition is possible but requires extra (though simple) setup. For beginners, I strongly recommend using the wizard for buffer creation.
Typically, when drawing lines, you need at least one buffer for each curve being calculated. To draw arrows, you most often need at least two buffers: one for each direction. Although you can get by with just one, if the arrow is used for only one calculated value for any candlestick without showing the direction. More complex cases may require additional buffers (covered in future articles). For now, the information provided is enough.
Now, let's create an indicator
- Name: InsideOutsideBar,
- One parameter: inp_barsTypeSelector, type int, default value 0,
- Upper format of OnCalculate (with the list of arrays) on the third screen of the wizard,
- Two drawing buffers in the "Plots" section with the names Up and Down and the drawing type "Arrow".
Indicator code generated by the Wizard
If everything in the previous section was done correctly, you should get the following code:
//+------------------------------------------------------------------+
//|                                             InsideOutsideBar.mq5 |
//|                                       Oleg Fedorov (aka certain) |
//|                                   mailto:coder.fedorov@gmail.com |
//+------------------------------------------------------------------+
#property copyright "Oleg Fedorov (aka certain)"
#property link      "mailto:coder.fedorov@gmail.com"
#property version   "1.00"
#property indicator_chart_window
#property indicator_buffers 2
#property indicator_plots   2
//--- plot Up
#property indicator_label1  "Up"
#property indicator_type1   DRAW_ARROW
#property indicator_color1  clrMediumPurple
#property indicator_style1  STYLE_SOLID
#property indicator_width1  1
//--- plot Down
#property indicator_label2  "Down"
#property indicator_type2   DRAW_ARROW
#property indicator_color2  clrMediumPurple
#property indicator_style2  STYLE_SOLID
#property indicator_width2  1
//--- input parameters
input int      inp_barsTypeSelector=0;
//--- indicator buffers
double         UpBuffer[];
double         DownBuffer[];
//+------------------------------------------------------------------+
//| Custom indicator initialization function                         |
//+------------------------------------------------------------------+
int OnInit()
  {
//--- indicator buffers mapping
   SetIndexBuffer(0,UpBuffer,INDICATOR_DATA);
   SetIndexBuffer(1,DownBuffer,INDICATOR_DATA);
//--- setting a code from the Wingdings charset as the property of PLOT_ARROW
   PlotIndexSetInteger(0,PLOT_ARROW,159);
   PlotIndexSetInteger(1,PLOT_ARROW,159);

//---
   return(INIT_SUCCEEDED);
  }
//+------------------------------------------------------------------+
//| Custom indicator iteration function                              |
//+------------------------------------------------------------------+
int OnCalculate(const int rates_total,
                const int prev_calculated,
                const datetime &time[],
                const double &open[],
                const double &high[],
                const double &low[],
                const double &close[],
                const long &tick_volume[],
                const long &volume[],
                const int &spread[])
  {
//---

//--- return value of prev_calculated for the next call
   return(rates_total);
  }
//+------------------------------------------------------------------+
Example 16. Indicator code generated by MQL5 Wizard
The first block here, as usual, is the header containing the parameters. Then come standard parameters describing the author. These are followed by a line stating that the indicator will be located in the chart window. And the two lines at the end of this block represent a message to the compiler that our indicator has two buffers for calculations and two buffers for rendering (as you understand, in this case these are the same buffers, although in the general case the number of buffers may differ):
#property indicator_buffers 2
#property indicator_plots   2
Example 17. Description of indicator buffers for calculation and rendering
The next block of parameters describes how the plotting created by each buffer should look:
//--- plot Up
#property indicator_label1  "Up"             // Display name of the buffers
#property indicator_type1   DRAW_ARROW       // Drawing type - arrow
#property indicator_color1  clrMediumPurple  // Arrow color
#property indicator_style1  STYLE_SOLID      // Line style - solid
#property indicator_width1  1                // Line width (arrow size)
//--- plot Down
#property indicator_label2  "Down"
#property indicator_type2   DRAW_ARROW
#property indicator_color2  clrMediumPurple
#property indicator_style2  STYLE_SOLID
#property indicator_width2  1
Example 18. Rendering parameters
The next block of code describes the input parameters of our indicator. In our case there is only one parameter: inp_barsTypeSelector:
//--- input parameters
input int      inp_barsTypeSelector=0;
Example 19. Input parameters of the indicator
Then comes the code that creates a variable for the render buffers. Note that this buffer uses a dynamic array with elements of type double. In fact, this is an array of price levels, based on which the indicator curve will be built:
//--- indicator buffers
double         UpBuffer[];
double         DownBuffer[];
Example 20. Variable for the drawing buffer
Then comes the description of two functions: OnInit and OnCalculate.
OnInit is exactly the same function as in scripts. It is launched in exactly the same way immediately after the indicator starts - before all other functions are executed - and is executed exactly once. In this case, the wizard has written two calls to the standard SetIndexBuffer function, which is used to link our array to the indicator's drawing buffer. In addition, both arrows were assigned icons using the PlotIndexSetInteger function. The OnInit function does not take any parameters and returns the initialization success status (in this case, always "successful").
OnCalculate, as I wrote earlier, is a function that is called on every tick or every time other programs try to use our indicator. Now it is empty. In this function, we will describe the main actions of our indicator.
The function takes a number of variables as parameters:
- Total number of bars on the chart (rates_total);
- Number of bars previously calculated by the indicator (prev_calculated). At the first launch, the value of prev_calculated is zero, but the implementation of the function that the wizard created returns the total number of bars on a given tick at the end of the work, and at the beginning of the next launch, the terminal will pass this value as prev_calculated to the function. By the way, this is the basis for one of the algorithms for determining a new candlestick: if rates_total==prev_calculated, then the candlestick is the same and nothing needs to be calculated, but if they are not equal, then we start the next steps;
- Multiple arrays: prices, time, volumes, spreads... This is what is needed when you create your own indicators. Note that arrays are passed by reference (since arrays cannot be passed by value), but they have a const modifier, which tells the compiler that the data in these arrays is immutable.
Now we can start programming our indicator.
Programming the Indicator
The first thing I want to do is adjust the indicator parameters a little. We can have only two types of formations: either inside or outside bar. Let's create a global enumeration immediately after the preprocessor directives:
enum BarsTypeSelector
 {
  Inside  = 0, // Inside bar
  Outside = 1  // Outside bar
 };
Example 21. Enumeration for calculation types
Let's change the default type and value for our input parameter:
//--- input parameters
input BarsTypeSelector      inp_barsTypeSelector=Inside;
Example 22. Changing the default type and value of an input parameter
Now let's expand the possibilities for customizing our indicator. Let's add the ability to change the appearance of the icon and the visible indentation of the icon from the bar. To do this, let's manually (so you remember that adding parameters is very easy) add two more variables to the input parameters section:
//--- input parameters
input BarsTypeSelector      inp_barsTypeSelector=Inside;
input int                   inp_arrowCode=159;
input int                   inp_arrowShift=5;
Example 23. Additional variables for appearance settings
Let me remind you that the input parameters themselves do not affect the indicator operation in any way; they need to be used somewhere. To apply the change, let's modify the OnInit function:
int OnInit()
 {
//--- indicator buffers mapping
  SetIndexBuffer(0,UpBuffer,INDICATOR_DATA);
  SetIndexBuffer(1,DownBuffer,INDICATOR_DATA);
//--- setting a code from the Wingdings charset as the property of PLOT_ARROW
  PlotIndexSetInteger(0,PLOT_ARROW,inp_arrowCode);
  PlotIndexSetInteger(1,PLOT_ARROW,inp_arrowCode);

  PlotIndexSetInteger(0, PLOT_ARROW_SHIFT, inp_arrowShift);
  PlotIndexSetInteger(1, PLOT_ARROW_SHIFT, -inp_arrowShift);

//---
  return(INIT_SUCCEEDED);
 }
Example 24. Changes to the OnInit function
Now let's move on to programming the main actions in the OnCalculate function. To make the code a little more compact, I'll skip the title of this function and immediately describe the code that does the useful work.
/********************************************************************************************
 *                                                                                          *
 * Attention! All arrays in the code are NOT series, so we have larger numbers on the right. *
 *                                                                                          *
 ********************************************************************************************/

//--- Description of variables
  int i,     // Loop counter
      start; // Initial bar for historical data

  const int barsInPattern = 2; // For proper preparation we need to know,
                               //   how many bars will be involved in one check
                               //   I've added a constant to avoid the presence of
                               //   "magic numbers" that come from nowhere,
                               //   we could use the #define directive instead of the constant

//--- Check the boundary conditions and set the origin
  if(rates_total < barsInPattern)      // If there are not enough bars to work
    return(0);                         // Do nothing

  if(prev_calculated < barsInPattern+1)// If nothing has been calculated yet
   {
    start = barsInPattern;     // Set the minimum possible number of bars to start searching
   }
  else
   {
    start = rates_total — barsInPattern; // If the indicator has been running for some time,
                                         //   Just count the last two bars
   }

//--- To avoid strange artifacts on the last candlestick, initialize the last elements of the arrays
//      with EMPTY_VALUE
  UpBuffer[rates_total-1] = EMPTY_VALUE;
  DownBuffer[rates_total-1] = EMPTY_VALUE;

//---
  for(i = start; i<rates_total-1; i++) // Start counting from the starting position
                                       //   and continue until there are no more closed barsя
                                       // (If we needed to include the last - unclosed - bar,
                                       //   we would set the condition i<=rates_total-1)
   {
    // First, let's clear both indicator buffers (initialize to an empty value)
    UpBuffer[i] = EMPTY_VALUE;
    DownBuffer[i] = EMPTY_VALUE;

    if(inp_barsTypeSelector==Inside) // If the user wants to display inside bars
     {
      // Check if the current bar is inside
      if(high[i] <= high[i-1] && low[i] >= low[i-1])
       {
        // And if yes, we mark the previous (larger) candlestick
        UpBuffer[i-1] = high[i-1];
        DownBuffer[i-1] = low[i-1];
       }
     }
    else // If outside bars are needed
     {
      // Check if the current bar is outside
      if(high[i] >= high[i-1] && low[i] <= low[i-1])
       {
        // Mark the current candlestick if necessary
        UpBuffer[i] = high[i];
        DownBuffer[i] = low[i];
       }
     }
   }

//--- return value of prev_calculated for the next call
  return(rates_total);
Example 25. OnCalculate function body
It seems to me that the code is commented sufficiently, and there is no particular point in analyzing it further. If I'm wrong, please ask questions in the comments. This code should be inserted into the OnCalculate function, between the opening and closing curly brackets, erasing everything that was there before (I included the return operator in the example - in the last line). The full working code of the indicator is attached to the article.
Figure 9 shows the operation of this indicator. On the left, the bars that preceded the inside bars are marked in pink, and the outside bars are marked on the right.
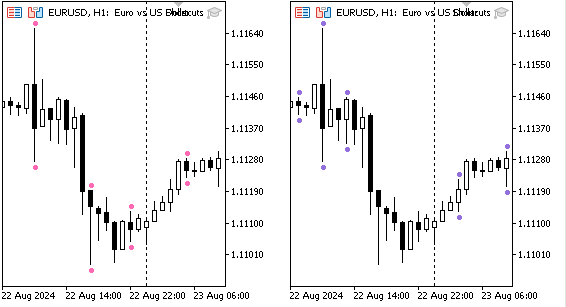
Figure 9. How the InsideOutsideBar indicator works. Inside bars are on the left, and outside bars are on the right
Conclusion
Once you have mastered the operators described in this article, you will be able to understand most programs written in MQL5 - and write your own algorithms of any complexity. In essence, all programming can be reduced to the simplest operations such as arithmetic or assignment, choosing from several options (if or switch) and repeating the desired fragment the required number of times (loops). Functions provide a way to conveniently organize operations, while objects enable convenient arrangement of functions and their external data.
Now you are definitely no longer a beginner. There is still way to go from this point to becoming an MQL5 professional. For example, you need to figure out how to re-use previously created indicators in new developments and how to create Expert Advisors that will trade for you. There are also many features of the MQL5 platform that are worth studying in order to be able to do everything you want: graphical interfaces for your Expert Advisors, unusual indicators like "heiken" or "renko", convenient services and profitable strategies for automatic trading... Therefore, this series will continue. In the next article, we will look at how to create Expert Advisors in as much detail as we can. Then I will provide my vision of OOP in the context of MQL5. This will close the "common" part, and after that we will probably delve into some of the platform features and the standard code library that comes with the terminal in the Include folder.
List of previous articles within the series:
- Master MQL5 from beginner to pro (Part I): Getting started with programming
- Master MQL5 from beginner to pro (Part II): Basic data types and use of variable
- Master MQL5 from beginner to pro (Part III): Complex data types and include files
- Master MQL5 from beginner to pro (Part IV): About Arrays, Functions and Global Terminal Variables
Translated from Russian by MetaQuotes Ltd.
Original article: https://www.mql5.com/ru/articles/15499
Warning: All rights to these materials are reserved by MetaQuotes Ltd. Copying or reprinting of these materials in whole or in part is prohibited.
This article was written by a user of the site and reflects their personal views. MetaQuotes Ltd is not responsible for the accuracy of the information presented, nor for any consequences resulting from the use of the solutions, strategies or recommendations described.
 MQL5 Wizard Techniques you should know (Part 58): Reinforcement Learning (DDPG) with Moving Average and Stochastic Oscillator Patterns
 Introduction to MQL5 (Part 14): A Beginner's Guide to Building Custom Indicators (III)
 Day Trading Larry Connors RSI2 Mean-Reversion Strategies
 Build Self Optimizing Expert Advisors in MQL5 (Part 6): Self Adapting Trading Rules (II)
- Free trading apps
- Over 8,000 signals for copying
- Economic news for exploring financial markets
You agree to website policy and terms of use
Good morning Fedorov,
I must thank you for the effort you put into your articles: I find them very useful.
Greetings,
Good morning Fedorov,
I must thank you for the effort you put into your articles: I find them very useful.
Greetings,