
Data label for time series mining (Part 5):Apply and Test in EA Using Socket

Introduction
In the previous articles, I discussed how to annotate data according to our own needs and use them to train time series prediction models, but you may not have a good idea of how to use these models better. Now it’s time to discuss how to validate our created models in the historical backtesting of MetaTrader 5 and incorporate them into our EA. But you need to know that in EA, you need to have a strategy as the key logic, and a real and usable strategy requires a specific theoretical basis and a lot of verification and adjustment to ensure its robustness.
The strategy in this article is very simple, it is just a simple demonstration example, do not move it to real trading casually! Of course, with the support of a large number of various libraries, you can also complete this work with just python, but MetaTrader 5 provides such a convenient and comprehensive backtesting tool, and can more accurately simulate our trading environment, so we still have to choose MetaTrader 5 client as our backtesting platform. But since our model creation environment is python, the historical backtesting of MetaTrader 5 has to be implemented with MQL5, which makes the implementation of the backtesting task a bit difficult, but we are not without a solution. In this article, we will discuss using three different methods to backtest our models in the MetaTrader 5 environment, to help us improve and enhance the quality of the models. I will introduce different methods in the next few articles, and this article will discuss the WebSocket method.
Table of contents:
- Introduction
- Implementation Principle
- Python Server Function Implementation
- MQL5 Client Function Implementation
- How to Backtest
- Conclusion
Implementation Principle
First, we add a web server instance to our python script and add our model inference to it. Then we use MQL5 to create a web client to request the inference service in the server.

We assume that the logic of EA is as follows:
- First, every time the OnTick() event is triggered, the latest 300 bar chart data is sent to the server through the client.
- After receiving the information, the server sends the predicted trend of the next 6 bar charts to the EA client through the model inference. Here we use the Nbeats model mentioned in the previous article, because it can decompose the prediction into trends.
- If it is a downward trend, then sell, if it is an upward trend, then buy.
Python Server Function Implementation
The socket provided by python mainly includes the following functions:
- socket.bind(): Bind the address (host, port) to the socket. In AF_INET, the address is represented as a tuple (host, port).
- socket.listen(): Start TCP listening. backlog specifies the maximum number of connections that the operating system can suspend before rejecting the connection. The value is at least 1, and most applications set it to 5.
- socket.accept(): Passively accept TCP client connection, (blocking) wait for the connection to arrive.
- socket.connect(): Actively initialize TCP server connection. Generally, the format of address is tuple (hostname,port). If the connection fails, return socket.error error.
- socket.connect_ex(): An extended version of the connect() function, which returns an error code when an error occurs, instead of throwing an exception socket.recv(): Receive TCP data, the data is returned as a string, bufsize specifies the maximum amount of data to receive. flag provides additional information about the message, which can usually be ignored.
- socket.send(): Send TCP data, send the data in string to the connected socket. The return value is the number of bytes to be sent, which may be smaller than the byte size of string.
- socket.sendall(): Fully send TCP data. Send the data in string to the connected socket, but try to send all the data before returning. Return None on success, or raise an exception on failure.
- socket.recvfrom(): Receive UDP data, similar to recv(), but the return value is (data,address). Where data is a string containing the received data, and address is the address of the socket sending the data.
- socket.sendto(): Send UDP data, send data to the socket, address is a tuple of the form (ipaddr,port), specifying the remote address. The return value is the number of bytes sent.
- socket.close(): Close the socket
- socket.getpeername(): Return the remote address of the connected socket. The return value is usually a tuple (ipaddr,port).
- socket.getsockname(): Return the socket’s own address. Usually a tuple (ipaddr,port)
- socket.setsockopt(level,optname,value): Set the value of the given socket option.
- socket.getsockopt(level,optname[.buflen]): Return the value of the socket option.
- socket.settimeout(timeout): Set the timeout period for socket operations, timeout is a floating point number, in seconds. A value of None means no timeout period. Generally, the timeout period should be set when the socket is just created, because they may be used for connection operations (such as connect())
- socket.gettimeout(): Return the current timeout period value, in seconds, or None if no timeout period is set.
- socket.fileno(): Return the file descriptor of the socket.
- socket.setblocking(flag): If flag is 0, set the socket to non-blocking mode, otherwise set the socket to blocking mode (default value). In non-blocking mode, if no data is found when calling recv(), or send() call cannot send data immediately, it will cause socket.error exception.
- socket.makefile(): Create a file associated with the socket.
1. Import the required packages
The implementation of this class does not require installing additional packages, and the socket library is usually included by default (under the conda environment). If you think some warning messages are too messy, you can add the warnings module and add the statement warnings.filterwarnings(“ignore”). At the same time, we also need to define the global variables we need:
- max_encoder_length=96
- max_prediction_length=20
- info_file=“results.json”
These global variables are defined based on the model we trained in the previous article.
The code:
import socket
import json
from time import sleep
import pandas as pd
import numpy as np
import warnings
from pytorch_forecasting import NBeats

warnings.filterwarnings("ignore")
max_encoder_length=96
max_prediction_length=20
info_file="results.json"
2. Create server class
Create a server class, in which we initialize some basic settings for the socket, including the following functions:
socket.socket(): we set the two parameters to socket.AF_INET and socket.SOCK_STREAM.
socket.socket()'s bind() method: this function sets the host parameter to “127.0.0.1” and the port parameter to “8989”, where the host is not recommended to change, and the port can be set to other values if 8989 is occupied.
The model will be introduced later, so we temporarily initialize it to None.
We need to listen to the server port: self.sk.listen(1), passively accept TCP client connections, and wait for the connections to arrive: self.sk_, self.ad_ = self.sock.accept(). We complete these tasks in the class initialization, to avoid repeated initialization when looping to receive information.
class server_:
    def __init__(self, host = '127.0.0.1', port = 8989):
        self.sk = socket.socket(socket.AF_INET, socket.SOCK_STREAM)
        self.host = host
        self.port = port
        self.sk.bind((self.host, self.port))
        self.re = ''
        self.model=None
        self.stop=None
        self.sk.listen(1)
        self.sk_, self.ad_ = self.sk.accept()
        print('server running:',self.sk_, self.ad_)
Note: If you deploy the server in a docker or docker-like container, you may need to set the host to “0.0.0.0”, otherwise your client may not be able to find the server.
3.Logic for processing the received information
We define a class method msg() to process the information received, using a while loop to process the information received. One thing to note here is that the data received needs to be decoded with decode(“utf-8”), and then the processed information is sent to the inference logic processing function self.sk_.send(bytes(eva(self.re), “utf-8”)), where the inference logic function is defined as eva(), with the parameter being the information we received, which we will implement later. Next, we have one more thing to do, which is to make sure that our server also stops when the EA backtest stops, otherwise it will occupy resources in the background. We can do this by sending a “stop” string to the server after the EA ends, and if we receive this string, we let the server stop the loop and terminate the process. We have already added this class attribute in the initialization of the server class, and we just need to set it to true when we receive this signal.
def msg(self):
        self.re = ''
        while True:
            data = self.sk_.recv(2374)
            if not data:
                break
            data=data.decode("utf-8")
            # print(len(data))
            if data=="stop":
                self.stop=True
                break
            self.re+=data
            bt=eva(self.re, self.model)
            bt=bytes(bt, "utf-8")
            self.sk_.send(bt)
        return self.re
Note: In the example, we set the parameter self.sk_.recv(2374) to 2374, which is exactly the length of 300 floating-point numbers. If you find that the data you receive is incomplete, you can adjust this value.
4. reclaim resources
After the server stops, we need to reclaim resources.
def __del__(self):
        print("server closed!")
        self.sk_.close()
        self.ad_.close()
        self.sock.close()
5. Define the inference logic
The inference logic of this example is very simple. We just load the model and use the bar chart given by the client to predict the results, and then decompose them into trends, and send the results back to the client. What we need to pay attention to here is that we can initialize the model in the initialization of the server class, instead of here, so that the model will be preloaded and ready to infer at any time.
First, we define a function to load the model, and then call this function in the initialization of the server class to get the instantiated model. In the previous article, we have introduced the processing of model saving and loading. The model will save the information in the “results.json” json file in the root directory of the folder after training. We can read and load the model. Of course, our server.py file also needs to be in the root directory of the folder.def load_model(): with open(info_file) as f: m_p=json.load(fp=f)['last_best_model'] model = NBeats.load_from_checkpoint(m_p) return modelThen add in the init() function of the class server_(): self.model=load_model() to initialize, and then pass the initialized model to the inference function.
    def __init__(self, host = '127.0.0.1', port = 8989):
        self.sk = socket.socket(socket.AF_INET, socket.SOCK_STREAM)
        self.host = host
        self.port = port
        self.sk.bind((self.host, self.port))
        self.re = ''
        self.model=load_model()
        self.stop=None
        self.sk.listen(1)
        self.sk_, self.ad_ = self.sk.accept()
        print('server running:',self.sk_, self.ad_)
Next, let’s continue to complete our inference function.
One thing we need to pay special attention to here is that the data format that the model needs to input must be DataFrame format, so we need to convert the received data to numpy array first: msg=np.fromstring(msg, dtype=float, sep= ‘,’), and then convert it to DataFrame: dt=pd.DataFrame(msg). After the inference is completed, the result is returned. We set that if the last trend value is greater than the average of the trend values, it is an upward trend, otherwise it is a downward trend. If it is an upward trend, return “buy”, if it is a downward trend, return “sell”. The specific inference process is not discussed again in this article, please refer to the inference process of the previous articles in this series. There is one more point that needs to be emphasized here. Because we set the predictor of the model as the “close” column of DataFrame, we need to add the “close” column to the data converted to DataFrame: dt[‘close’]=dt.
def eva(msg,model):
        offset=1
        msg=np.fromstring(msg, dtype=float, sep= ',')
        # print(msg)
        dt=pd.DataFrame(msg)
        dt=dt.iloc[-max_encoder_length-offset:-offset,:]
        last_=dt.iloc[-1]
        for i in range(1,max_prediction_length+1):
            dt.loc[dt.index[-1]+1]=last_
        dt['close']=dt
        dt['series']=0
        dt['time_idx']=dt.index-dt.index[0]
        print(dt)
        predictions = model.predict(dt, mode='raw',trainer_kwargs=dict(accelerator="cpu",logger=False),return_x=True)
        trend =predictions.output["trend"][0].detach().cpu()
        if (trend[-1]-trend.mean()) >= 0:
            return "buy"
        else:
            return "sell"
Next, we need to add the main loop.
First, we initialize the service class, then we add the information processing function in the while loop. We terminate the loop and exit the program when we receive the stop signal. Note that we do not want the loop to run too fast, so we add sleep(0.5) to limit the loop speed and avoid high CPU usage.
while True:
     rem=sv.msg()
     if sv.stop:
          break
    sleep(0.5)
So far, we have completed a simple server, next we need to implement the client in EA.
MQL5 Client Function Implementation
1. Socket functions in MQL5
The socket module currently includes the following functions:
- SocketCreate: Creates a socket with the specified identifier and returns its handle
- SocketClose: Closes the socket
- SocketConnect: Connects to the server with timeout control
- SocketIsConnected: Checks whether the socket is currently connected
- SocketIsReadable: Gets the number of bytes that can be read from the socket
- SocketIsWritable: Checks whether data can be written to the socket at the current time
- SocketTimeouts: Sets the data reception and transmission timeouts for the system socket object
- SocketRead: Reads data from the socket
- SocketSend: Writes data to the socket
- SocketTlsHandshake: Initiates a secure TLS (SSL) connection with the specified host using the TLS Handshake protocol
- SocketTlsCertificate: Gets the certificate data used for secure network connection
- SocketTlsRead: Reads data from the secure TLS connection
- SocketTlsReadAvailable: Reads all available data from the secure TLS connection
- SocketTlsSend: Sends data through the secure TLS connection
By referring to these methods, we can easily add additional functions in the client side.
2. EA Function Implementation
First, let’s discuss the functional logic of EA:
Initialize the socket in "int OnInit()".
Then in the "void OnTick()", implement receiving data from the client and sending the current bar chart data to the client, as well as our EA backtesting logic.
In "void OnDeinit(const int reason)", you need to send a “stop” message to the server and close the socket.3. Initialize EA
First, we need to define a global variable “int sk”, which is used to receive the handle after the socket is created.
In the OnInit() function, we use SocketCreate() to create the client: int sk=SocketCreate().
Then we define our server address: string host=“127.0.0.1”;Server port: int port= 8989;
Data length to send, we discussed sending 300 data at a time before: int data_len=300;
In the OnInit() function, we need to judge the initialization situation. If the creation fails, the initialization fails.
Then we create a connection with the server SocketConnect(sk,host, port,1000), where the port must be consistent with the server side. If the connection fails, the initialization fails.
int sk=-1;

string host="127.0.0.1";
int port= 8989;

int OnInit()
  {
//---
    sk=SocketCreate();
    Print(sk);
    Print(GetLastError());
    if (sk==INVALID_HANDLE) {
        Print("Failed to create socket");
        return INIT_FAILED;
    }

    if (!SocketConnect(sk,host, port,1000))
    {
        Print("Failed to connect to server");
        return INIT_FAILED;
    }
//---
   return(INIT_SUCCEEDED);
  }
void OnDeinit(const int reason) {
    socket.Disconnect();
}
4. Trading logic
Here we need to define the main data processing logic and trading logic in void OnTick().
Create variables “MqlTradeRequest request” and “MqlTradeResult result” for executing order tasks;
Create a char array variable “char recv_data[]” to receive server information;
Create a double array variable “double priceData[300]” to copy chart data;
Create variables “string dataToSend” and “char ds[]” to convert the double array to a char array that can be used by socket;
First we need to copy the data to be sent from the chart: int nc=CopyClose(Symbol(),0,0,data_len,priceData);
Then convert the data to string format: for(int i=0;i<ArraySize(priceData);i++) dataToSend+=(string)priceData[i]+“,”, we use “,” to separate each data;
Then use "int dsl=StringToCharArray(dataToSend,ds)" to convert the string data to a char array that can be used by socket.
After the data conversion, we need to use SocketIsWritable(sk) to determine whether our socket can send data, if yes, then use SocketSend(sk,ds,dsl) to send data.
We also need to read information from the server, use "uint len=SocketIsReadable(sk)" to check whether there is data available on the current port, if the information is not empty, then execute the trading logic: int rsp_len=SocketRead(sk,recv_data,len,500), "len" is the buffer size, "500" is the timeout setting (in milliseconds).
If “buy” is received, then open a buy order, set request as follows:
- Reset the trade request structure request: ZeroMemory(request)
- Set to execute the trade command immediately: request.action = TRADE_ACTION_DEAL
- Set the currency pair of the trade: request.symbol = Symbol()
- The volume of the order: request.volume = 0.1
- The type of the order: request.type = ORDER_TYPE_BUY
- The SymbolInfoDouble function requires 2 inputs, the first is the currency pair string, the second is the type in the ENUM_SYMBOL_INFO_DOUBLE enumeration: request.price = SymbolInfoDouble(Symbol(), SYMBOL_ASK)
- The allowed slippage of the trade: request.deviation = 5
- Then send the trade order: OrderSend(request, result)
If “sell” is received, then open a sell order, set request as follows (the settings refer to the buy order, here is not explained in detail):
- ZeroMemory(request)
- request.action = TRADE_ACTION_DEAL
- request.symbol = Symbol()
- request.volume = 0.1
- request.type = ORDER_TYPE_SELL
- request.price = SymbolInfoDouble(Symbol(), SYMBOL_BID)
- request.deviation = 5
- Then send the trade order: OrderSend(request, result)
Here, in order to avoid problems with the test code, we comment out the real order sending function and open it in the backtest.
Complete code:
void OnTick() {
    MqlTradeRequest request;
    MqlTradeResult result;
    char recv_data[];
    double priceData[300];
    string dataToSend;
    char ds[];
    int nc=CopyClose(Symbol(),0,0,300,priceData);
    for(int i=0;i<ArraySize(priceData);i++) dataToSend+=(string)priceData[i]+",";
    int dsl=StringToCharArray(dataToSend,ds);
    if (SocketIsWritable(sk))
        {
        Print("Send data:",dsl);
        int ssl=SocketSend(sk,ds,dsl);
        }
    uint len=SocketIsReadable(sk);
    if (len)
    {
      int rsp_len=SocketRead(sk,recv_data,len,500);
      if(rsp_len>0)
      {
        string result;
        result+=CharArrayToString(recv_data,0,rsp_len);
        Print("The predicted value is:",result);
        if (StringFind(result,"buy"))
        {
           ZeroMemory(request);
            request.action = TRADE_ACTION_DEAL;
            request.symbol = Symbol();
            request.volume = 0.1;
            request.type = ORDER_TYPE_BUY;
            request.price = SymbolInfoDouble(Symbol(), SYMBOL_ASK);
            request.deviation = 5;
            //OrderSend(request, result);
        }
        else{
            ZeroMemory(request);
            request.action = TRADE_ACTION_DEAL;
            request.symbol = Symbol();
            request.volume = 0.1;
            request.type = ORDER_TYPE_SELL;
            request.price = SymbolInfoDouble(Symbol(), SYMBOL_BID);
            request.deviation = 5;
            //OrderSend(request, result);
             }
        }
     }
}
Note: The buffer_maxlen parameter in the SocketSend() function must be consistent with the server setting. This value will be automatically calculated and returned when the StringToCharArray() function is executed.
Now we run server.py first and then add EA to the chart in the MetaTrader 5 client to see the following results: 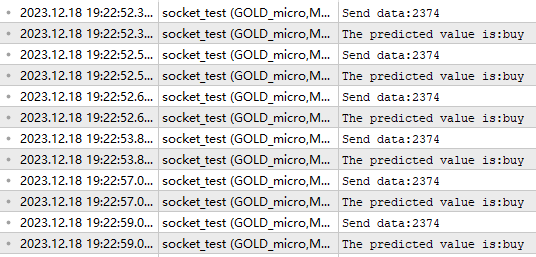
How to Backtest
We mentioned the limitations of socket in MQL5 earlier, and next we need to add websocket support in both the MQL5 file and the python file.
1. Adding websocket support to the client
In backtesting, we can use the winhttp.mqh in the windows api to achieve the functionality we want. For a detailed introduction to this api, you can see
Microsoft’s official documentation: https://docs.microsoft.com/en-us/windows/win32/winhttp/winhttp-functions, here we only list the main functions:
- WinHttpOpen(): Initializes the library and prepares it for use by the application
- WinHttpConnect(): Sets the domain name of the server that the application wants to communicate with
- WinHttpOpenRequest(): Creates an HTTP request handle
- WinHttpSetOption: Sets various configuration options for the HTTP connection
- WinHttpSendRequest: Sends a request to the server
- WinHttpReceiveResponse: Receives a response from the server after sending a request
- WinHttpWebSocketCompleteUpgrade: Confirms that the response received from the server meets the WebSocket protocol
- WinHttpCloseHandle: Used to discard any previously used resource descriptors
- WinHttpWebSocketSend: Used to send data over a WebSocket connection
- WinHttpWebSocketReceive: Receives data using a WebSocket connection
- WinHttpWebSocketClose: Closes the WebSocket connection
- WinHttpWebSocketQueryCloseStatus: Checks the close status message sent from the server
Download the "winhttp.mqh" file and copy it to the client data folder "Include\WinAPI\"path. Now let’s complete the code part.
Add the handle variables we need to use in the global variables "HINTERNET ses_h,cnt_h,re_h,ws_h", and initialize them in OnInit():
- First avoid random numbers by setting them to NULL:ses_h=cnt_h=re_h=ws_h=NULL;
- Then start the http session:ses_h=WinHttpOpen(“MT5”,WINHTTP_ACCESS_TYPE_DEFAULT_PROXY,NULL,NULL,0), if it fails then initialization fails;
- Connect to the server:cnt_h=WinHttpConnect(ses_h,host,port,0), if it fails then initialization fails;
- Execute request initialization:re_h=WinHttpOpenRequest(cnt_h,“GET”,NULL,NULL,NULL,NULL,0), if it fails then initialization fails;
- Set up websocket:WinHttpSetOption(re_h,WINHTTP_OPTION_UPGRADE_TO_WEB_SOCKET,nullpointer,0), if it fails then initialization fails;
- Execute websocket handshake request:WinHttpSendRequest( re_h,NULL, 0,nullpointer, 0, 0, 0), if it fails then initialization fails;
- Receive the server’s handshake response:WinHttpReceiveResponse(re_h,nullpointer), if it fails then initialization fails;
- Upgrade to websocket, get the handle after initialization:WinHttpWebSocketCompleteUpgrade(re_h,nv), if it fails then initialization fails;
- After the upgrade is complete, we no longer need the original request handle, we close it:WinHttpCloseHandle(re_h);
This way we have completed the entire connection process between the client and the server, these processes must be strictly executed in order, and we need to comment out the original settings of the initialization failure statement, because they will always be effective in the backtesting process and cause us to fail to initialize successfully.
int sk=-1;

string host="127.0.0.1";
int port= 8989;
int data_len=300;

HINTERNET ses_h,cnt_h,re_h,ws_h;

int OnInit()
  {
//---
   ses_h=cnt_h=re_h=ws_h=NULL;

   ses_h=WinHttpOpen("MT5",
                     WINHTTP_ACCESS_TYPE_DEFAULT_PROXY,
                     NULL,
                     NULL,
                     0);
   Print(ses_h);
   if (ses_h==NULL){
      Print("Http open failed!");
      return INIT_FAILED;
      }
   cnt_h=WinHttpConnect(ses_h,
                        host,
                        port,
                        0);
   Print(cnt_h);
   if (cnt_h==-1){
      Print("Http connect failed!");
      return INIT_FAILED;
      }
   re_h=WinHttpOpenRequest(cnt_h,
                           "GET",
                           NULL,
                           NULL,
                           NULL,
                           NULL,
                           0);
   if(re_h==NULL){
      Print("Request open failed!");
      return INIT_FAILED;
   }
   uchar nullpointer[]= {};
   if(!WinHttpSetOption(re_h,WINHTTP_OPTION_UPGRADE_TO_WEB_SOCKET,nullpointer,0))
     {
          Print("Set web socket failed!");
          return INIT_FAILED;
       }
   bool br;
   br = WinHttpSendRequest( re_h,
                             NULL,
                             0,
                             nullpointer,
                             0,
                             0,
                             0);
   if (!br)
      {
         Print("send request failed!");
         return INIT_FAILED;
         }
   br=WinHttpReceiveResponse(re_h,nullpointer);
   if (!br)
     {
       Print("receive response failed!",string(kernel32::GetLastError()));
       return INIT_FAILED;
       }
   ulong nv=0;
   ws_h=WinHttpWebSocketCompleteUpgrade(re_h,nv);
   if (!ws_h)
   {
      Print("Web socket upgrade failed!",string(kernel32::GetLastError()));
      return INIT_FAILED;
         }


   WinHttpCloseHandle(re_h);
   re_h=NULL;


    sk=SocketCreate();
    Print(sk);
    Print(GetLastError());
    if (sk==INVALID_HANDLE) {
        Print("Failed to create socket");
        //return INIT_FAILED;
    }

    if (!SocketConnect(sk,host, port,1000))
    {
        Print("Failed to connect to server");
        //return INIT_FAILED;
    }
//---
   return(INIT_SUCCEEDED);
  }
Then we add the relevant logic code in the OnTick() function.
First, we need to determine what environment we are working in, because we have defined the socket handle global variable, we can distinguish whether we are working in normal conditions or test status by judging whether the socket is initialized successfully, so the “sk!=-1” if true means socket initialization is successful, this part of the code we do not need to change. If the "sk!=-1" is not true, then we need to complete the websocket work logic:
- First send data to the server: WinHttpWebSocketSend(ws_h,WINHTTP_WEB_SOCKET_BINARY_MESSAGE_BUFFER_TYPE,ds,dsl), here we need to pay special attention to is that if this process is successful, the return value of the function is 0, otherwise it will return the relevant error code
- If successful, empty the received data variable: ZeroMemory(recv_data)
- Receive data: get=WinHttpWebSocketReceive(ws_h,recv_data,ArraySize(recv_data),rb,st), if data is successfully received, the return value is 0, otherwise it returns an error code
- If data is received, decode the data :pre+=CharArrayToString(recv_data,0)
If the server sends us “buy” then open a buy order, otherwise open a sell order. The difference is that we also added additional judgment logic, if there is already an order we will first determine whether there is an unsettled order "numt=PositionsTotal()>0", if there is then get the order type: tpt=OrderGetInteger(ORDER_TYPE), then see if the order type is ORDER_TYPE_SELL or ORDER_TYPE_BUY, if the order type is the same as the trend sent by the server, we do not need any operation. If the order type is opposite to the trend, then close the current order and open an order that matches the trend.
We use the server information as “buy” as an example to introduce this process.
If tpt==ORDER_TYPE_BUY, return directly, if tpt==ORDER_TYPE_SELL, it means that there is a sell order, then set :request.order=tik, set: request.action=TRADE_ACTION_REMOVE, when executing to OrderSend(request, result), it will close the sell order.
If there is no order, then set:
- request.action = TRADE_ACTION_DEAL;
- request.action = TRADE_ACTION_DEAL;
- request.symbol = Symbol();
- request.volume = 0.1;
- request.type = ORDER_TYPE_BUY;
- request.price = SymbolInfoDouble(Symbol(), SYMBOL_ASK);
- request.deviation = 5;
- request.type_filling=ORDER_FILLING_IOC;
When executing to OrderSend(request, result), it will open a buy order. Similarly, if the server information is “sell”, set it in the same way, this article will not discuss in detail.
void OnTick()
  {
//---
    MqlTradeRequest request;
    MqlTradeResult result;
    char recv_data[5];
    double priceData[300];
    string dataToSend;
    char ds[];
    int nc=CopyClose(Symbol(),0,0,data_len,priceData);
    for(int i=0;i<ArraySize(priceData);i++) dataToSend+=(string)priceData[i]+",";
    int dsl=StringToCharArray(dataToSend,ds);


    if (sk!=-1)
    {
       if (SocketIsWritable(sk))
           {
           Print("Send data:",dsl);
           int ssl=SocketSend(sk,ds,dsl);
            }
       uint len=SocketIsReadable(sk);
       if (len)
       {
         int rsp_len=SocketRead(sk,recv_data,len,500);
         if(rsp_len>0)
         {
           string result=NULL;
           result+=CharArrayToString(recv_data,0,rsp_len);
           Print("The predicted value is:",result);
           if (StringFind(result,"buy"))
           {
              ZeroMemory(request);
               request.action = TRADE_ACTION_DEAL;
               request.symbol = "EURUSD";
               request.volume = 0.1;
               request.type = ORDER_TYPE_BUY;
               request.price = SymbolInfoDouble("EURUSD", SYMBOL_ASK);
               request.deviation = 5;
               //OrderSend(request, result);
           }
           else{
               ZeroMemory(request);
               request.action = TRADE_ACTION_DEAL;
               request.symbol = "EURUSD";
               request.volume = 0.1;
               request.type = ORDER_TYPE_SELL;
               request.price = SymbolInfoDouble("EURUSD", SYMBOL_BID);
               request.deviation = 5;
               //OrderSend(request, result);
               }
            }
          }
     }
    else
    {
    ulong send=0;
       if (ws_h)
       {
         send=WinHttpWebSocketSend(ws_h,
                             WINHTTP_WEB_SOCKET_BINARY_MESSAGE_BUFFER_TYPE,
                             ds,
                             dsl);
          //Print("Send data failed!",string(kernel32::GetLastError()));
         if(!send)
            {
               ZeroMemory(recv_data);
               ulong rb=0;
               WINHTTP_WEB_SOCKET_BUFFER_TYPE st=-1;
               ulong get=WinHttpWebSocketReceive(ws_h,recv_data,ArraySize(recv_data),rb,st);
                if (!get)
                {
                    string pre=NULL;
                    pre+=CharArrayToString(recv_data,0);
                    Print("The predicted value is:",pre);
                    ulong numt=0;
                    ulong tik=0;
                    bool sod=false;
                    ulong tpt=-1;
                    numt=PositionsTotal();
                    if (numt>0)
                     {  tik=OrderGetTicket(numt-1);
                        sod=OrderSelect(tik);
                        tpt=OrderGetInteger(ORDER_TYPE);//ORDER_TYPE_BUY or ORDER_TYPE_SELL
                         }
                    if (pre=="buy")
                    {
                       if (tpt==ORDER_TYPE_BUY)
                           return;
                       else if(tpt==ORDER_TYPE_SELL)
                           {
                           request.order=tik;
                           request.action=TRADE_ACTION_REMOVE;
                           Print("Close sell order.");
                                }
                       else{
                        ZeroMemory(request);
                        request.action = TRADE_ACTION_DEAL;
                        request.symbol = Symbol();
                        request.volume = 1;
                        request.type = ORDER_TYPE_BUY;
                        request.price = SymbolInfoDouble(Symbol(), SYMBOL_ASK);
                        request.deviation = 5;
                        request.type_filling=ORDER_FILLING_IOC;
                        Print("Open buy order.");

                                 }
                        OrderSend(request, result);
                           }
                    else{
                       if (tpt==ORDER_TYPE_SELL)
                           return;
                       else if(tpt==ORDER_TYPE_BUY)
                           {
                           request.order=tik;
                           request.action=TRADE_ACTION_REMOVE;
                           Print("Close buy order.");
                                }
                       else{
                           ZeroMemory(request);
                           request.action = TRADE_ACTION_DEAL;
                           request.symbol = Symbol();
                           request.volume = 1;
                           request.type = ORDER_TYPE_SELL;
                           request.price = SymbolInfoDouble(Symbol(), SYMBOL_BID);
                           request.deviation = 5;
                           request.type_filling=ORDER_FILLING_IOC;
                           Print("OPen sell order.");
                                }

                        OrderSend(request, result);
                          }
                    }
            }
        }


    }

  }
At this point, we have completed the configuration of our MQL5 websocket client.
2. Server-side configuration
We need to add websocket support in server.py.
First, we need to import the required libraries.
import base64
import hashlib
import struct
The main work is done in the server class’s msg(self) function: First, add the websocker flag variable wsk=False, then judge whether the data we receive is masked or not.
If masked, the high bit of the second byte of the data is 1, and we only need to judge the value of (data[1] & 0x80) >> 7.
If not masked, just use data.decode(“utf-8”).
If masked, we need to find the masking key: mask = data[4:8] and the payload data: payload = data[8:], and then unmask: for i in range(len(payload)):message += chr(payload[i] ^ mask[i % 4]), and set the flag variable wsk to true.
After solving the masking problem, we also need to add the websocket handshake process:
First, judge whether it is a handshake process: if ‘\r\n\r\n’ in data;
If it is a handshake process, get the key value: data.split(“\r\n”)[4].split(": ")[1];
Calculate the Sec-WebSocket-Accept value: base64.b64encode(hashlib.sha1((key+GUID).encode(‘utf-8’)).digest()), where the GUID is a fixed value “258EAFA5-E914-47DA-95CA-C5AB0DC85B11”.
Then define the handshake response header:
 response_tpl="HTTP/1.1 101 Switching Protocols\r\n" \
              "Upgrade:websocket\r\n" \
              "Connection: Upgrade\r\n" \
              "Sec-WebSocket-Accept: %s\r\n" \
              "WebSocket-Location: ws://%s/\r\n\r\n"
Fill in the response header: response_str = response_tpl % (ac.decode(‘utf-8’), “127.0.0.1:8989”).
Finally, send the handshake response: self.sk_.send(bytes(response_str, encoding=‘utf-8’)).
There is one more thing to add, which is to process the information to be sent as websocket acceptable information:
if wsk:
   tk=b'\x81'
   lgt=len(bt)
   tk+=struct.pack('B',lgt)
   bt=tk+bt
Now the part that needs to be modified on the server side is basically completed.
def msg(self):
        self.re = ''
        wsk=False
        while True:
            data = self.sk_.recv(2500)
            if not data:
                break

            if (data[1] & 0x80) >> 7:
                fin = (data[0] & 0x80) >> 7 # FIN bit
                opcode = data[0] & 0x0f # opcode
                masked = (data[1] & 0x80) >> 7 # mask bit
                mask = data[4:8] # masking key
                payload = data[8:] # payload data
                print('fin is:{},opcode is:{},mask:{}'.format(fin,opcode,masked))
                message = ""
                for i in range(len(payload)):
                    message += chr(payload[i] ^ mask[i % 4])
                data=message
                wsk=True
            else:
                data=data.decode("utf-8")

            if '\r\n\r\n' in data:
                key = data.split("\r\n")[4].split(": ")[1]
                print(key)
                GUID = "258EAFA5-E914-47DA-95CA-C5AB0DC85B11"

                ac = base64.b64encode(hashlib.sha1((key+GUID).encode('utf-8')).digest())

                response_tpl="HTTP/1.1 101 Switching Protocols\r\n" \
                            "Upgrade:websocket\r\n" \
                            "Connection: Upgrade\r\n" \
                            "Sec-WebSocket-Accept: %s\r\n" \
                            "WebSocket-Location: ws://%s/\r\n\r\n"
                response_str = response_tpl % (ac.decode('utf-8'), "127.0.0.1:8989")
                self.sk_.send(bytes(response_str, encoding='utf-8'))

                data=data.split('\r\n\r\n',1)[1]
            if "stop" in data:
                self.stop=True
                break
            if len(data)<200:
                 break
            self.re+=data
            bt=eva(self.re, self.model)
            bt=bytes(bt, "utf-8")

            if wsk:
                 tk=b'\x81'
                 lgt=len(bt)
                 tk+=struct.pack('B',lgt)
                 bt=tk+bt
            self.sk_.sendall(bt)
        return self.re
3. Using
First, we need to run the server side, locate the server.py file directory in the command line, and run python server.py to start the service.

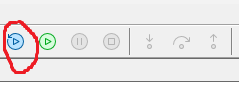
Then go back to the MetaTrader 5 client, open the source code and directly press Ctrl+F5 or click the test button to start the test:
 At this time, the toolbox column of the information test chart will display relevant information:

The results of running the backtest are as follows:

We can see that our entire system runs perfectly and can perform the relevant order operations according to the model’s prediction.
Note:
- If you want to test directly in the chart, please note: So far our code will initialize both websocket and socket at the same time, of course, if the socket initialization is successful, the execution logic will not execute the websocket logic part, but to avoid unnecessary trouble, it is recommended that in this case, please comment out the websocket initialization part in OnInit().
- In addition to using OnTick() to complete our main logic, we can also consider implementing logic in OnTimer(), so that you can set the specific time to send data, such as sending data every 15 minutes. This can avoid sending data frequently when every quote arrives. This article does not give the specific implementation code, readers can refer to the implementation method of this article to write their own implementation code.
Conclusion
This article introduces how to use the server-client method to backtest the model we trained before, and how to test our system in both backtesting and non-backtesting scenarios. It is undeniable that this article involves a lot of cross-language and cross-domain knowledge, and the most difficult part to understand should be the websocket part, which is a complex engineering project. But as long as you follow the steps in this article, you will succeed. It needs to be emphasized that this article only provides an example, which allows you to test our model with a fairly simple strategy. Please do not use it for actual trading! Real trading may require you to optimize every part of this system to run stably, so once again, do not use this example directly in your real trading! This article ends here, and in the next one we will discuss how to get rid of the socket dependency and use our model directly in the EA.
I hope you have learned something and wish you a happy life!
References:
Warning: All rights to these materials are reserved by MetaQuotes Ltd. Copying or reprinting of these materials in whole or in part is prohibited.
This article was written by a user of the site and reflects their personal views. MetaQuotes Ltd is not responsible for the accuracy of the information presented, nor for any consequences resulting from the use of the solutions, strategies or recommendations described.

- Free trading apps
- Over 8,000 signals for copying
- Economic news for exploring financial markets
You agree to website policy and terms of use
Published article Data tagging in time series analysis (Part 5): Application and testing of assessors using Socket:
Author: Yuqiang Pan