
开发交易机器人:Python与MQL5结合(第二部分):模型选择、创建与训练,以及Python自定义测试器

上篇文章简要回顾
在上篇文章中,我们简要介绍了机器学习,执行了数据增强,为未来的模型开发了特征,并从中选择了最优特征。现在,是时候创建一个能够从我们的特征中学习并进行交易(希望是成功的)的机器学习模型了。为了评估模型,我们将编写一个自定义的Python测试器,它将帮助我们评估模型的性能和测试图形的美观性。为了获得更美观的测试图形和更高的模型稳定性,我们还将开发一些经典的机器学习特征。
我们的最终目标是创建一个能够预测价格并进行交易的模型,并且这个模型要尽可能盈利。所有的代码都将使用Python编写,并包含MQL5库的相关部分。
Python版本和所需模块
我在这里使用的是Python版本3.10.10。 下面附带的代码包含了多个用于数据预处理、特征提取和训练机器学习模型的函数。具体来说,它包括:
- 使用sklearn库中的高斯混合模型(GMM)进行特征聚类的函数
- 使用sklearn库中的递归特征消除与交叉验证(RFECV)进行特征提取的函数
- 训练XGBoost分类器的函数
要运行这些代码,你需要安装以下Python模块:
- pandas
- numpy
- sklearn
- xgboost
- matplotlib
- seaborn
- MetaTrader 5
- tqdm
你可以使用'pip'——Python包安装工具来安装它们。下面是一个安装所有所需模块的示例命令:
pip install pandas numpy sklearn xgboost matplotlib seaborn tqdm MetaTrader5
让我们开始吧!
分类还是回归?
这是数据预测领域中的一个永恒问题。分类更适合于需要明确是非答案的二元问题。此外,还有多类分类问题。我们将在本系列的后续文章中讨论它,因为它可以显著增强模型的性能。
回归适合于连续序列(包括价格序列)中某个未来值的特定预测。一方面,这可能会更加方便,但另一方面,回归的数据标注与标注本身一样,是一个具有挑战性的主题,因为除了直接采用资产的未来价格外,我们几乎别无选择。
我个人更喜欢分类,因为它简化了数据标注的工作。很多事情都可以简化为是非条件,而多类分类可以应用于整个复杂的手动交易系统,如智能资金管理系统。在本系列的上一篇文章中,你已经看到了数据标注的代码,它显然适用于二元分类。因此,我们将采用这种特定的模型结构。
接下来需要确定具体的模型。
选择分类模型
我们需要为具有选定特征的数据选择一个合适的分类模型。选择取决于特征的数量、数据类型和类别数。
流行的模型包括:用于二元分类的逻辑回归、用于高维和非线性问题的随机森林、用于复杂问题的神经网络。选择范围很广。在尝试了许多方法后,我得出的结论是,在当今的条件下,最有效的是提升方法(boosting)及其相关模型。
我决定使用前沿的XGBoost模型——这是一种带有正则化、并行处理和大量设置的基于决策树的梯度提升方法。XGBoost因其高精度而经常在数据科学竞赛中获胜。这成为了我选择模型的主要标准。
生成分类模型代码
该代码使用了最先进的XGBoost模型——基于决策树的梯度提升。XGBoost的一个特点是使用二阶导数进行优化,这与其他模型相比提高了效率和准确性。
train_xgboost_classifier函数接收数据和提升轮数作为输入。它将数据拆分为X特征集和y标签集,创建带有超参数调整的XGBClassifier模型,并使用fit()方法进行训练。
数据被分为训练集和测试集,使用该函数在训练数据上训练模型。在剩余的数据上测试模型,并计算预测的准确性。
XGBoost的主要优势在于它使用梯度提升将多个模型组合成一个高精度模型,并通过优化二阶导数来提高效率。
我们还需要安装OpenMP运行时库才能使用XGBoost。对于Windows系统,你需要下载与你的Python版本相匹配的Microsoft Visual C++可再发行组件包。
接下来让我们进入代码部分。在代码开头,我们这样导入xgboost库:
import xgboost as xgb 其他代码:
import xgboost as xgb

def train_xgboost_classifier(data, num_boost_rounds=500):
    # Check if data is not empty
    if data.empty:
        raise ValueError("Data should not be empty")

    # Check if all required columns are present in the data
    required_columns = ['label', 'labels']
    if not all(column in data.columns for column in required_columns):
        raise ValueError(f"Data is missing required columns: {required_columns}")

    # Remove the 'label' column as it is not a feature
    X = data.drop(['label', 'labels'], axis=1)
    y = data['labels']

    # Check if all features have numeric data type
    if not all(pd.api.types.is_numeric_dtype(X[column]) for column in X.columns):
        raise ValueError("All features should have numeric data type")

    # Create an XGBoostClassifier model
    clf = xgb.XGBClassifier(objective='binary:logistic', max_depth=10, learning_rate=0.3, n_estimators=num_boost_rounds, random_state=1)

    # Train the model on the data
    clf.fit(X, y)

    # Return the trained model
    return clf

labeled_data_engineered = feature_engineering(labeled_data_clustered, n_features_to_select=20)

# Get all data
raw_data = labeled_data_engineered

# Test the model on all data
train_data = raw_data[raw_data.index <= FORWARD]

# Test the model on all data
test_data = raw_data[raw_data.index >= FORWARD]

# Train the XGBoost model on the filtered data
xgb_clf = train_xgboost_classifier(train_data, num_boost_rounds=100)

# Test the model on all data
test_data = raw_data[raw_data.index >= FORWARD]
X_test = test_data.drop(['label', 'labels'], axis=1)
y_test = test_data['labels']
predicted_labels = xgb_clf.predict(X_test)

# Calculate prediction accuracy
accuracy = (predicted_labels == y_test).mean()
print(f"Prediction accuracy: {accuracy:.2f}")
现在我们来训练模型,可以看到准确率是53%。
我们的分类准确率现在为53%,这意味着有53%的标签对应的交易是盈利的。请注意,这里我们讨论的是预测价格变动超过盈利点(200点)且尾部未触及止损点(100点)的情况。在实践中,我们的盈利因子大约为3,这对于盈利交易来说已经足够了。下一步是编写一个自定义的Python测试器,以美元(而非点数)为单位分析模型的盈利能力。我们需要了解模型在考虑交易成本后是否盈利,还是在消耗资金。
Implementing the function of the custom tester in Python
def test_model(model, X_test, y_test, markup, initial_balance=10000.0, point_cost=0.00001):
    balance = initial_balance
    trades = 0
    profits = []

    # Test the model on the test data
    predicted_labels = model.predict(X_test)
    for i in range(len(predicted_labels) - 48):
        if predicted_labels[i] == 1:
            # Open a long position
            entry_price = X_test.iloc[i]['close']
            exit_price = X_test.iloc[i+48]['close']
            if exit_price > entry_price + markup:
                # Close the long position with profit
                profit = (exit_price - entry_price - markup) / point_cost
                balance += profit
                trades += 1
                profits.append(profit)
            else:
                # Close the long position with loss
                loss = (entry_price - exit_price + markup) / point_cost
                balance -= loss
                trades += 1
                profits.append(-loss)
        elif predicted_labels[i] == 0:
            # Open a short position
            entry_price = X_test.iloc[i]['close']
            exit_price = X_test.iloc[i+48]['close']
            if exit_price < entry_price - markup:
                # Close the short position with profit
                profit = (entry_price - exit_price - markup) / point_cost
                balance += profit
                trades += 1
                profits.append(profit)
            else:
                # Close the short position with loss
                loss = (exit_price - entry_price + markup) / point_cost
                balance -= loss
                trades += 1
                profits.append(-loss)

    # Calculate the cumulative profit or loss
    total_profit = balance - initial_balance

    # Plot the balance change over the number of trades
    plt.plot(range(trades), [balance + sum(profits[:i]) for i in range(trades)])
    plt.title('Balance Change')
    plt.xlabel('Trades')
    plt.ylabel('Balance ($)')
    plt.xticks(range(0, len(X_test), int(len(X_test)/10)), X_test.index[::int(len(X_test)/10)].strftime('%Y-%m-%d'))  # Add dates to the x-axis
    plt.axvline(FORWARD, color='r', linestyle='--')  # Add a vertical line for the FORWARD date
    plt.show()

    # Print the results
    print(f"Cumulative profit or loss: {total_profit:.2f} $")
    print(f"Number of trades: {trades}")

# Get test data
test_data = raw_data[raw_data.index >= FORWARD]
X_test = test_data.drop(['label', 'labels'], axis=1)
y_test = test_data['labels']

# Test the model with markup and target labels
initial_balance = 10000.0
markup = 0.00001
test_model(xgb_clf, X_test, y_test, markup, initial_balance)
该代码创建了一个函数,用于在测试数据上测试机器学习模型,并分析其在考虑交易成本后的盈利能力。未考虑掉期费用,因为它们具有动态性,并取决于关键利率。不过,可以通过简单地在加价中增加几个点来考虑掉期费用的影响。
该函数接收一个模型、测试数据、加价和初始余额作为输入。使用模型的预测结果进行模拟交易:预测值为1时买入(做多),预测值为0时卖出(做空)。如果盈利超过加价,则平仓,并将盈利加到余额中。
保存每笔交易和每个头寸的盈亏情况。构建余额图表。计算累计总盈亏。
最后,我们获取测试数据并删除不必要的列。使用给定的加价和初始余额对训练好的xgb_clf模型进行测试。让我们开始测试吧!

测试器总体上运行成功,我们得到了一个如此漂亮的盈利图表。这是一个自定义测试,用于分析在考虑交易成本和标签的情况下机器学习交易模型的盈利能力。
将交叉验证纳入模型
我们需要使用交叉验证来获得对机器学习模型质量的更可靠评估。交叉验证允许在多个数据子集上评估模型,这有助于避免过拟合并提供更客观的评估。
在我们的案例中,我们将使用5折交叉验证来评估XGBoost模型。为此,我们将使用sklearn库中的cross_val_score函数。
让我们按照以下方式修改train_xgboost_classifier函数的代码:
def train_xgboost_classifier(data, num_boost_rounds=500):
    # Check that data is not empty
    if data.empty:
        raise ValueError("Data should not be empty")

    # Check that all required columns are present in the data
    required_columns = ['label', 'labels']
    if not all(column in data.columns for column in required_columns):
        raise ValueError(f"Data is missing required columns: {required_columns}")

    # Drop the 'label' column since it is not a feature
    X = data.drop(['label', 'labels'], axis=1)
    y = data['labels']

    # Check that all features have numeric data type
    if not all(pd.api.types.is_numeric_dtype(X[column]) for column in X.columns):
        raise ValueError("All features should have numeric data type")

    # Create XGBoostClassifier model
    clf = xgb.XGBClassifier(objective='binary:logistic', max_depth=10, learning_rate=0.3, n_estimators=num_boost_rounds, random_state=1)

    # Train the model on the data using cross-validation
    scores = cross_val_score(clf, X, y, cv=5)

    # Calculate the mean accuracy of the predictions
    accuracy = scores.mean()

    print(f"Mean prediction accuracy on cross-validation: {accuracy:.2f}")

    # Train the model on the data without cross-validation
    clf.fit(X, y)

    # Return the trained model
    return clf

labeled_data_engineered = feature_engineering(labeled_data_clustered, n_features_to_select=20)

# Get all data
raw_data = labeled_data_engineered

# Train data
train_data = raw_data[raw_data.index <= FORWARD]

# Train the XGBoost model on the filtered data
xgb_clf = train_xgboost_classifier(train_data, num_boost_rounds=100)

# Test data
test_data = raw_data[raw_data.index >= FORWARD]
X_test = test_data.drop(['label', 'labels'], axis=1)
y_test = test_data['labels']
predicted_labels = xgb_clf.predict(X_test)

# Calculate the accuracy of the predictions
accuracy = (predicted_labels == y_test).mean()
print(f"Accuracy: {accuracy:.2f}")
在训练模型时,train_xgboost_classifier函数将执行5-fold交叉验证,并输出平均预测准确率。训练过程仍然会包括直到FORWARD日期的样本数据。
但需要注意的是,交叉验证仅用于评估模型,而不是用于训练模型。实际的训练过程是在直到FORWARD日期的所有数据上进行的,且不使用交叉验证。
交叉验证允许对模型质量进行更可靠和客观的评估,这从理论上讲将提高模型对新价格数据的鲁棒性。真的是这样吗?让我们检查并看看测试器的工作效果如何。
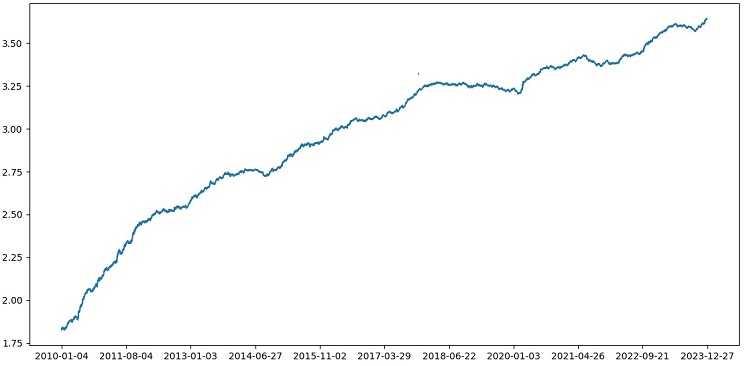
使用1990年至2024年的数据对XGBoost进行交叉验证测试,结果显示2010年后的测试准确率为56%。模型在初次尝试时就对新数据表现出了良好的鲁棒性。准确率也有了相当大的提升,这是个好消息。
网格上的模型超参数优化
超参数优化是创建机器学习模型以最大化其准确性和性能的重要步骤。这与优化MQL5交易策略(EAs)相似,只是想象一下,你有一个机器学习模型而不是交易策略。通过使用网格搜索,你可以找到表现最佳的参数。
让我们来看看使用Scikit-learn进行基于网格的XGBoost超参数优化。
我们将使用Scikit-learn中的GridSearchCV来对网格中所有超参数集的模型进行交叉验证。选择交叉验证中平均准确率最高的参数集。
优化代码:
from sklearn.model_selection import GridSearchCV

# Define the grid of hyperparameters
param_grid = {
    'max_depth': [3, 5, 7, 10],
    'learning_rate': [0.1, 0.3, 0.5],
    'n_estimators': [100, 500, 1000]
}

# Create XGBoost model
clf = xgb.XGBClassifier(objective='binary:logistic', random_state=1)

# Perform grid search to find the best hyperparameters
grid_search = GridSearchCV(clf, param_grid, cv=5, scoring='accuracy')
grid_search.fit(X_train, y_train)

# Print the best hyperparameters
print("Best hyperparameters:", grid_search.best_params_)

# Print the mean accuracy of the predictions on cross-validation for the best hyperparameters
print("Mean prediction accuracy on cross-validation:", grid_search.best_score_)
在这里,我们定义了一个超参数网格param_grid,创建了XGBoost分类器模型clf,并使用GridSearchCV方法在网格上搜索最优超参数。然后,我们输出了最佳超参数grid_search.best_params_和平均交叉验证预测准确率grid_search.best_score_。
请注意,在这段代码中,我们使用交叉验证来优化超参数。这使我们能够获得更可靠和客观的模型质量评估。
运行这段代码后,我们得到了XGBoost模型的最佳超参数和交叉验证上的平均预测准确率。然后,我们可以使用最佳超参数在所有数据上训练模型,并在新数据上进行测试。
因此,在创建机器学习模型时,在网格上优化模型超参数是一项重要任务。使用Scikit-learn库中的GridSearchCV方法,我们可以自动化这个过程,并为给定的模型和数据找到最佳超参数。
def train_xgboost_classifier(data, num_boost_rounds=1000):
    # Check that data is not empty
    if data.empty:
        raise ValueError("Data should not be empty")

    # Check that all required columns are present in the data
    required_columns = ['label', 'labels']
    if not all(column in data.columns for column in required_columns):
        raise ValueError(f"Data is missing required columns: {required_columns}")

    # Drop the 'label' column since it is not a feature
    X = data.drop(['label', 'labels'], axis=1)
    y = data['labels']

    # Check that all features have numeric data type
    if not all(pd.api.types.is_numeric_dtype(X[column]) for column in X.columns):
        raise ValueError("All features should have numeric data type")

    # Create XGBoostClassifier model
    clf = xgb.XGBClassifier(objective='binary:logistic', random_state=1)

    # Define hyperparameters for grid search
    param_grid = {
        'max_depth': [3, 5, 7, 10],
        'learning_rate': [0.05, 0.1, 0.2, 0.3, 0.5],
        'n_estimators': [50, 100, 600, 1200, 2000]
    }

    # Train the model on the data using cross-validation and grid search
    grid_search = GridSearchCV(clf, param_grid, cv=5, scoring='accuracy')
    grid_search.fit(X, y)

    # Calculate the mean accuracy of the predictions
    accuracy = grid_search.best_score_

    print(f"Mean prediction accuracy on cross-validation: {accuracy:.2f}")

    # Return the trained model with the best hyperparameters
    return grid_search.best_estimator_
模型集成
是时候让我们的模型变得更酷、更棒了!模型集成是机器学习中的一种强大方法,它通过组合多个模型来提高预测准确性。流行的方法包括装袋(bagging,即在不同数据子集上创建模型)和提升(boosting,即顺序训练模型以纠正前一个模型的错误)。
在我们的任务中,我们使用结合了装袋和提升的XGBoost集成。我们创建多个在不同数据子集上训练的XGBoost模型,并组合它们的预测结果。我们还使用GridSearchCV来优化每个模型的超参数。
模型集成的好处包括:提高准确性、降低方差、改善整体模型质量。
最终的模型训练函数使用了交叉验证、集成和网格装袋超参数选择。
def train_xgboost_classifier(data, num_boost_rounds=1000):
    # Check that data is not empty
    if data.empty:
        raise ValueError("Data should not be empty")

    # Check that all required columns are present in the data
    required_columns = ['label', 'labels']
    if not all(column in data.columns for column in required_columns):
        raise ValueError(f"Missing required columns in data: {required_columns}")

    # Remove the 'label' column as it is not a feature
    X = data.drop(['label', 'labels'], axis=1)
    y = data['labels']

    # Check that all features have numeric data type
    if not all(pd.api.types.is_numeric_dtype(X[column]) for column in X.columns):
        raise ValueError("All features should have numeric data type")

    # Create XGBoostClassifier model
    clf = xgb.XGBClassifier(objective='binary:logistic', random_state=1)

    # Define hyperparameters for grid search
    param_grid = {
        'max_depth': [3, 7, 12],
        'learning_rate': [0.1, 0.3, 0.5],
        'n_estimators': [100, 600, 1200]
    }

    # Train the model on the data using cross-validation and hyperparameter tuning
    grid_search = GridSearchCV(clf, param_grid, cv=5, scoring='accuracy')
    grid_search.fit(X, y)

    # Calculate the mean accuracy of the predictions
    accuracy = grid_search.best_score_

    print(f"Mean accuracy on cross-validation: {accuracy:.2f}")

    # Return the trained model
    return grid_search.best_estimator_

labeled_data_engineered = feature_engineering(labeled_data_clustered, n_features_to_select=20)

# Get all data
raw_data = labeled_data_engineered

# Train data
train_data = raw_data[raw_data.index <= FORWARD]

# Test data
test_data = raw_data[raw_data.index <= EXAMWARD]

# Train the XGBoost model on the filtered data
xgb_clf = train_xgboost_classifier(train_data, num_boost_rounds=100)

# Test the model on all data
test_data = raw_data[raw_data.index >= FORWARD]
X_test = test_data.drop(['label', 'labels'], axis=1)
y_test = test_data['labels']
predicted_labels = xgb_clf.predict(X_test)

# Calculate the accuracy of the predictions
accuracy = (predicted_labels == y_test).mean()
print(f"Prediction accuracy: {accuracy:.2f}")
通过装袋方法实现模型集成,进行测试后获得了以下测试结果:
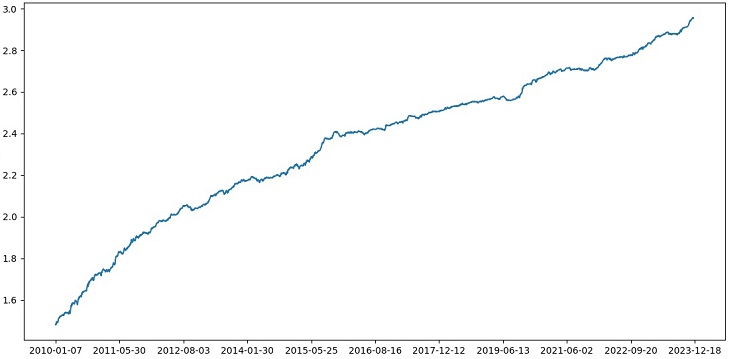
对于风险收益比为1:8的交易分类准确率提升至73%。换句话说,与之前的代码版本相比,模型集成和网格搜索在分类准确率上给了我们巨大的提升。我认为这是一个非常出色的结果,从模型在向前测试部分的前期性能图表中可以清楚地看到,随着代码的不断优化,模型的性能得到了显著增强。
实施验证样本并测试模型稳健性
现在,我使用EXAMWARD日期之后的数据进行测试。这允许我测试模型在完全新的数据上的性能,这些数据之前没有被用于模型的训练和测试。通过这种方式,我可以客观地评估模型在实际条件下的表现。
在观察样本上进行测试是验证机器学习模型的重要步骤。这确保了模型在新的数据上表现良好,并给出了其在实际应用中性能的初步了解。在这里,我们需要正确确定样本大小,并确保其具有代表性。
在我的例子中,我使用EXAMWARD之后的数据来测试模型在训练和测试集之外,完全未知的数据上的表现。这样,我就可以获得对模型效率和实际应用准备情况的客观评估。
我在2000-2010年的数据上进行训练,2010-2019年的数据上进行测试,而验正数据则从2019年开始。这个验证模拟了在未知未来的交易情况。
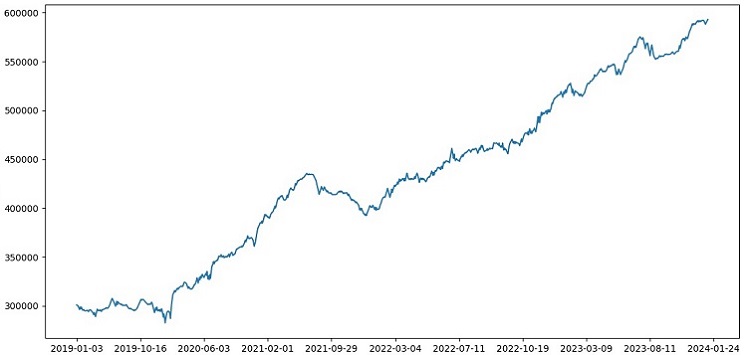
总体来说,情况看起来不错。验证准确率下降到60%,但最重要的是,模型是盈利的,相当稳健,同时没有出现大的回撤。令人高兴的是,模型学会了风险/收益的概念——它预测了低风险和高潜在收益的情况(我们使用1:8的风险收益比)。
结论
本系列关于使用Python创建交易机器人的第二篇文章到此为止。到目前为止,我们已经解决了数据处理、特征处理、特征选择和生成问题,以及模型选择和训练问题。我们还实现了一个自定义测试器来测试模型,并且似乎一切都进行得很顺利。顺便说一下,我尝试了其他特征,包括最简单的特征,试图简化数据,但都没有成功。具有这些特征的模型在测试器中导致账户资金耗尽。这再次证明了特征和数据与模型本身一样重要。我们可以创建一个好的模型并应用各种改进和方法,但如果特征无用,那么它也会毫不留情地在未知数据上耗尽我们的资金。相反,有了好的特征,即使模型一般,也能得到稳定的结果。
进一步发展
在未来,我计划在MetaTrader 5终端中创建一个自定义版本的在线交易,以便直接通过Python进行交易,以提高便利性。毕竟,我最初决定为Python制作一个版本的原因就是将在特征转移到MQL5时遇到的问题。对我来说,在Python中处理特征、选择特征、数据标注和数据增强仍然要快得多,也方便得多。
我认为Python的MQL5库被低估了。显然,很少有人使用它。这是一个强大的解决方案,可以用来创建既美观又盈利的模型!
我还想实现一个版本,这个版本将从真实交易所(如CME或MOEX)的市场深度历史数据中学习。这也是一个很有前途的努力方向。
本文由MetaQuotes Ltd译自俄文
原文地址: https://www.mql5.com/ru/articles/14910
注意: MetaQuotes Ltd.将保留所有关于这些材料的权利。全部或部分复制或者转载这些材料将被禁止。
本文由网站的一位用户撰写,反映了他们的个人观点。MetaQuotes Ltd 不对所提供信息的准确性负责,也不对因使用所述解决方案、策略或建议而产生的任何后果负责。

尤金,从你的文章中我开始研究与交易有关的 ML,非常感谢你。
您能解释一下以下几点吗?
在label_data 函数处理数据后,数据量会大幅减少(我们会随机得到 一组满足函数条件的条形图)。然后,数据会经过几个函数的处理,我们将其分为训练样本和测试样本。模型在训练样本上进行训练。然后,从测试样本中移除['标签'] 列,并尝试预测它们的值来估计模型。测试数据中没有概念替换吗?毕竟,在测试中,我们使用的是通过了label_data 函数的数据(即由一个考虑到未来数据的函数提前选择的一组非连续条)。然后在测试器中有一个参数 10,据我所知,这个参数应该是负责关闭交易的条数,但由于我们使用的是一组非连续的条形图,所以并不清楚我们得到了什么。
这就产生了以下问题:我错在哪里?为什么不使用所有 >= FORWARD 的条形图进行测试?如果我们不使用所有 >= 向前的柱状图,那么在不知道未来的情况下,我们如何选择预测所需的柱状图?
谢谢。
干得好,非常有趣、实用、朴实。很难看到一篇这么好的文章,里面有实际的例子,而不是只有理论而没有结果。非常感谢你的工作和分享,我会继续关注并期待这一系列文章。
非常感谢!是的,前面还有很多想法要实现,包括将这篇文章扩展翻译成 ONNX)。
重大缺陷:
改进建议: