构建K线趋势约束模型(第5部分):通知系统(第一部分)
内容
- 概述
- 终端通知
- 推送通知
- 电子邮件通知
- 调试趋势约束V1.04
- 整合社交网络渠道(例如Telegram和WhatsApp)
- Telegram整合
- WhatsApp整合
- 虚拟专用网络(VPS)在我们的通知系统上的强大功能
- 结论
概述
MetaTrader 5为用户提供了多种通知选项,用于告知用户交易事件,如终端通知、电子邮件通知和推送通知。将其与Telegram和WhatsApp等社交平台集成,用于信号分享,可以带来极大的便利。在MetaTrader 5中配置通知后,无论您身在何处,都能随时了解您的交易情况。通过利用上述通知访问方式,您可以选择最适合您需求的选项。本指南将引导您完成MetaTrader 5通知的设置和自定义,包括与Telegram和其他社交媒体平台的集成。本指南将重点介绍配置细节和集成的初步步骤,为本系列第二部分更深入的探索奠定基础。
终端通知
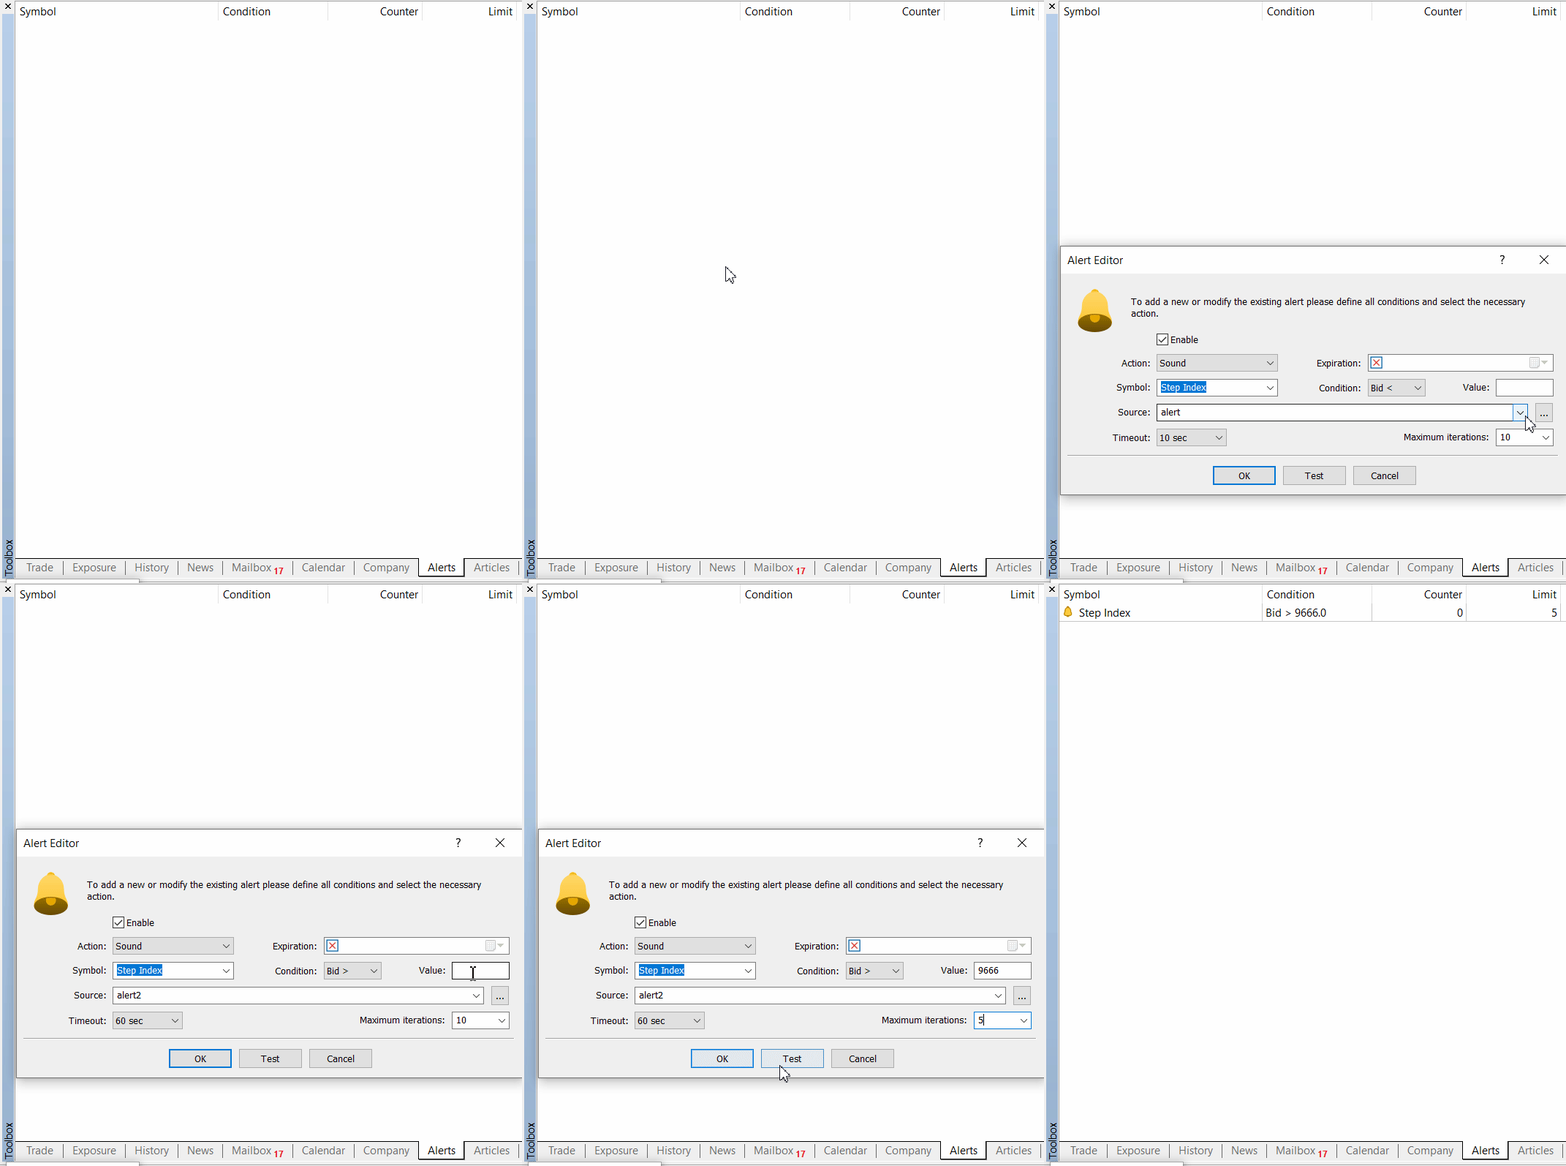
终端通知是MetaTrader 5平台中的内部警报。它们涵盖了MetaTrader 5中触发的所有警报事件。您可以在MetaTrader 5中手动设置警报,以便在满足特定条件时触发。警报设置通常默认位于MetaTrader 5窗口底部的“工具”选项卡中。
- 品种:选择您希望设置警报的交易品种。
- 条件:选择将触发警报的条件(例如,出价(Bid)>,询价(Ask)<,时间(Time)=等)。
- 值:指定与条件进行比较的值(例如,特定的价格水平)。
- 来源:选择触发的警报类型(例如,声音、文件、邮件等)。对于终端通知,您可以选择声音。
- 动作:选择当警报触发时要执行的动作(例如,播放声音、发送通知等)。
- 声音:选择当警报触发时要播放的声音文件。
- 超时:设置再次检查警报的时间间隔。
- 最大迭代次数:指定警报应触发的次数。
以下是一个使用Step Index合成品设置警报的示例。表格中显示的值可以根据您的需求进行调整。配置完设置后,点击OK创建警报,可以随时被激活。请查看表格下方的动画演示图片,以便快速了解流程。准备开始时,请在工具窗口中的警报选项卡上右键单击,从出现的菜单中选择“新建”,然后会打开一个包含表格中主要的设置对话框。
| 设置 | 值 |
|---|---|
| 品种 | 步骤索引 |
| 条件 | 出价> |
| 值 | 9666 |
| 来源 | 声音 |
| 动作 | 选择一个声音文件(alert2.wav) |
| 超时 | 设定为60秒 |
| 最大迭代次数 | 设定为5 |

推送通知
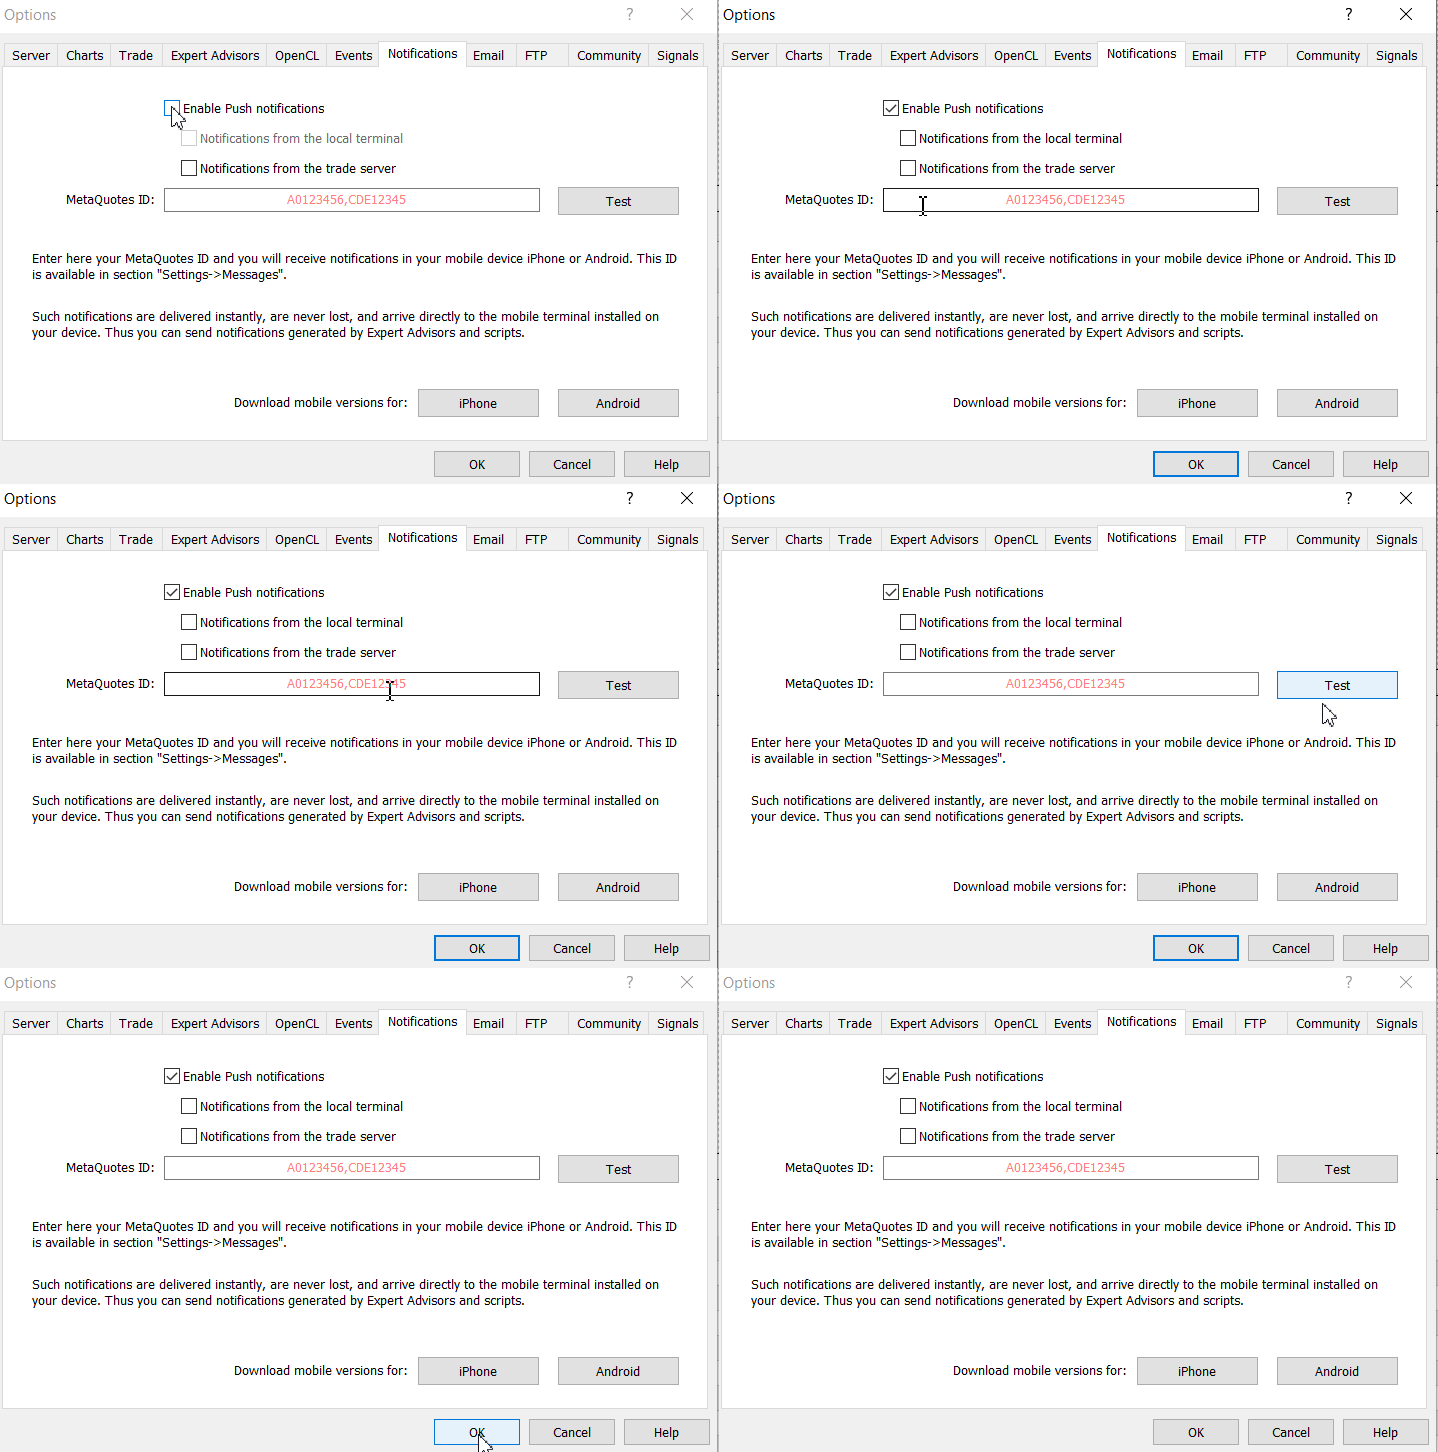
这是MetaTrader 5中的一个功能,它允许将平台上生成的通知(无论是由平台内部、指标还是EA生成)通过移动设备的MetaQuotes ID发送到移动端的MetaTrader 5平台。为了让移动设备接收推送通知,安卓用户必须从playstore、iOS用户必须从apple store安装MetaTrader 5。在桌面端的MetaTrader 5上,必须启用推送通知功能,才能在移动设备上接收到警报。在移动设备上安装MetaTrader 5后,会立即生成一个唯一的MetaQuotes ID。
左侧有一张图片,展示了如何找到MetaQuotes ID。右侧有一张图片,演示了如何在桌面端的MetaTrader 5平台上激活推送通知,以及输入MetaQuotes ID的字段。通过勾选该框并输入您移动平台上的ID,您可以立即开始在MetaTrader 5移动平台的消息部分接收通知。您可以添加来自多个移动设备的多个MetaQuotes ID,用分隔符将它们分开。


电子邮件通知
电子邮件因其便捷性、高效性和功能广泛性,在沟通和交流方面依然是一个强大且多用途的工具。无论是用于个人用途、商务信函还是专业人际网络的构建,电子邮件都提供了一种可靠且有效的联系方式和信息交换手段。在MetaTrader 5中设置电子邮件通知,可以让您通过电子邮件接收各种交易活动警报,如价格波动、订单执行情况和自定义事件等。
电子邮件的优势在于其几乎即时的传递速度,这使得信息能够快速交换并有效传播给大量群体。电子邮件服务通常提供加密功能以确保内容安全,保护敏感信息。与其他沟通形式相比,直接将信息投递到收件人的收件箱减少了被拦截的风险。
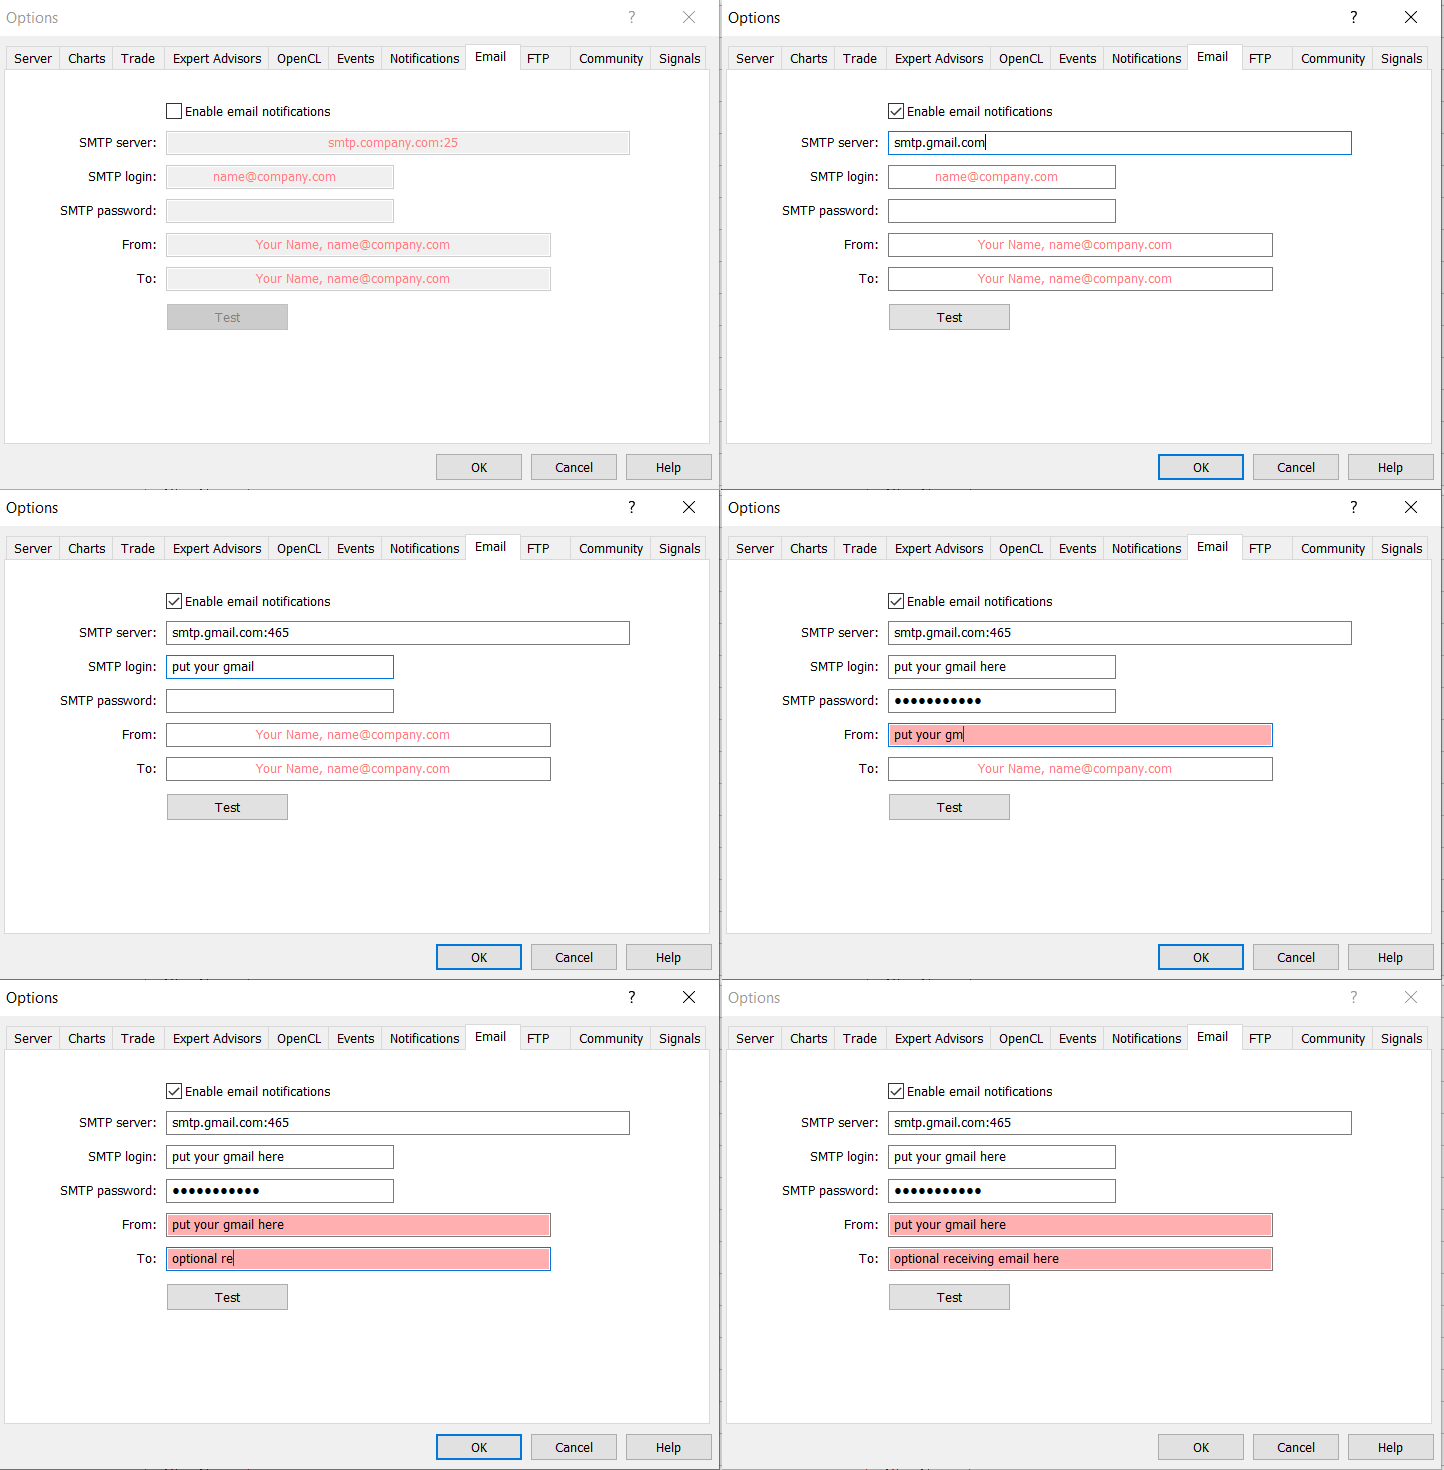
以下是设置电子邮件通知的分步指南:
- 在您的电脑上启动MetaTrader 5平台。
- 找到工具>选项>电子邮件
- 选中启用框。
- 填写SMTP服务器详细信息:
设置 填写详细信息 SMTP服务器 您的电子邮件提供商的SMTP服务器地址(例如,gmail的SMTP是.gmail.com)。 SMTP登录 您的email地址(例如,your-email@gmail.com)。 SMTP密码 您的电子邮件密码或应用程序特定密码(如果使用Gmail)。 从 您的email地址(例如,your-email@gmail.com)。 到 您要通知的接收方的电子邮件地址(可以与发件人地址相同或不同)。
什么是SMPT服务器。
基于我的研究,简单邮件传输协议(SMTP)服务器是一种邮件服务器,它使用SMTP协议来发送、接收和中转外发电子邮件。它与邮件传输代理(MTA)协同工作,将发件人的电子邮件客户端中的邮件发送到收件人的邮件服务器。以下是一些提供SMTP服务器的邮件服务提供商列表:
- gmail
- yahoo mail
- hotmail
- zohomail
- icloud mail
调试趋势约束V1.04
我们已经成功将Draw_Line样式整合到系统的趋势中。然而,我发现由于这个新功能,每根K线后都会触发大量警报。例如,当图表设置为分钟时间框架时,每分钟K线结束时都会生成警报,这非常令人困扰。
我们的目标是获取最佳信号,只关注少数几个重要的。为了解决这个问题,我考虑通过从第五个和第六个缓冲区中移除myalert()函数来处理。正如本文所述,对于Telegram和WhatsApp的无缝集成,修正这段代码至关重要。以下是代码的修订版本:
缓冲区5已修改:
// --- Buffer5 (Buy Trend)
      if(MA5[i] > MA6[i])
        {
         Buffer5[i] = Low[i] - 15 * myPoint;
         // Disabled myAlert from Buffer 5
         // myAlert("indicator", "BUY TREND | MA Fast: " + DoubleToString(MA5[i], 2) + " | MA Slow: " + DoubleToString(MA6[i], 2));
        }
缓冲区6已修改:
// --- Buffer6 (Sell Trend)
      if(MA5[i] < MA6[i])
        {
         Buffer6[i] = High[i] + 15 * myPoint;
         // Disabled myAlert from Buffer 6
         // myAlert("indicator", "SELL TREND | MA Fast: " + DoubleToString(MA5[i], 2) + " | MA Slow: " + DoubleToString(MA6[i], 2));
        }
Trend Constraint V1.04修改后:
///Indicator Name: Trend Constraint
#property copyright "Clemence Benjamin"
#property link      "https://mql5.com"
#property version   "1.04"
#property description "A model that seek to produce sell signal when D1 candle is Bearish only and  buy signal when it is Bullish"
//--- indicator settings
#property indicator_chart_window
#property indicator_buffers 6
#property indicator_plots 6

#property indicator_type1 DRAW_ARROW
#property indicator_width1 5
#property indicator_color1 0xFF3C00
#property indicator_label1 "Buy"

#property indicator_type2 DRAW_ARROW
#property indicator_width2 5
#property indicator_color2 0x0000FF
#property indicator_label2 "Sell"

#property indicator_type3 DRAW_ARROW
#property indicator_width3 2
#property indicator_color3 0xE8351A
#property indicator_label3 "Buy Reversal"

#property indicator_type4 DRAW_ARROW
#property indicator_width4 2
#property indicator_color4 0x1A1AE8
#property indicator_label4 "Sell Reversal"

#property indicator_type5 DRAW_LINE
#property indicator_style5 STYLE_SOLID
#property indicator_width5 2
#property indicator_color5 0xFFAA00
#property indicator_label5 "Buy Trend"

#property indicator_type6 DRAW_LINE
#property indicator_style6 STYLE_SOLID
#property indicator_width6 2
#property indicator_color6 0x0000FF
#property indicator_label6 "Sell Trend"

#define PLOT_MAXIMUM_BARS_BACK 5000
#define OMIT_OLDEST_BARS 50

//--- indicator buffers
double Buffer1[];
double Buffer2[];
double Buffer3[];
double Buffer4[];
double Buffer5[];
double Buffer6[];

input double Oversold = 30;
input double Overbought = 70;
input int Slow_MA_period = 200;
input int Fast_MA_period = 100;
datetime time_alert; //used when sending alert
input bool Audible_Alerts = true;
input bool Push_Notifications = true;
double myPoint; //initialized in OnInit
int RSI_handle;
double RSI[];
double Open[];
double Close[];
int MA_handle;
double MA[];
int MA_handle2;
double MA2[];
int MA_handle3;
double MA3[];
int MA_handle4;
double MA4[];
double Low[];
double High[];
int MA_handle5;
double MA5[];
int MA_handle6;
double MA6[];

void myAlert(string type, string message)
  {
   if(type == "print")
      Print(message);
   else if(type == "error")
     {
      Print(type+" | Trend Constraint V1.04 @ "+Symbol()+","+IntegerToString(Period())+" | "+message);
     }
   else if(type == "order")
     {
     }
   else if(type == "modify")
     {
     }
   else if(type == "indicator")
     {
      if(Audible_Alerts) Alert(type+" | Trend Constraint V1.04 @ "+Symbol()+","+IntegerToString(Period())+" | "+message);
      if(Push_Notifications) SendNotification(type+" | Trend Constraint V1.04 @ "+Symbol()+","+IntegerToString(Period())+" | "+message);
     }
  }

//+------------------------------------------------------------------+
//| Custom indicator initialization function                         |
//+------------------------------------------------------------------+
int OnInit()
  {
   SetIndexBuffer(0, Buffer1);
   PlotIndexSetDouble(0, PLOT_EMPTY_VALUE, EMPTY_VALUE);
   PlotIndexSetInteger(0, PLOT_DRAW_BEGIN, MathMax(Bars(Symbol(), PERIOD_CURRENT)-PLOT_MAXIMUM_BARS_BACK+1, OMIT_OLDEST_BARS+1));
   PlotIndexSetInteger(0, PLOT_ARROW, 241);
   SetIndexBuffer(1, Buffer2);
   PlotIndexSetDouble(1, PLOT_EMPTY_VALUE, EMPTY_VALUE);
   PlotIndexSetInteger(1, PLOT_DRAW_BEGIN, MathMax(Bars(Symbol(), PERIOD_CURRENT)-PLOT_MAXIMUM_BARS_BACK+1, OMIT_OLDEST_BARS+1));
   PlotIndexSetInteger(1, PLOT_ARROW, 242);
   SetIndexBuffer(2, Buffer3);
   PlotIndexSetDouble(2, PLOT_EMPTY_VALUE, EMPTY_VALUE);
   PlotIndexSetInteger(2, PLOT_DRAW_BEGIN, MathMax(Bars(Symbol(), PERIOD_CURRENT)-PLOT_MAXIMUM_BARS_BACK+1, OMIT_OLDEST_BARS+1));
   PlotIndexSetInteger(2, PLOT_ARROW, 236);
   SetIndexBuffer(3, Buffer4);
   PlotIndexSetDouble(3, PLOT_EMPTY_VALUE, EMPTY_VALUE);
   PlotIndexSetInteger(3, PLOT_DRAW_BEGIN, MathMax(Bars(Symbol(), PERIOD_CURRENT)-PLOT_MAXIMUM_BARS_BACK+1, OMIT_OLDEST_BARS+1));
   PlotIndexSetInteger(3, PLOT_ARROW, 238);
   SetIndexBuffer(4, Buffer5);
   PlotIndexSetDouble(4, PLOT_EMPTY_VALUE, EMPTY_VALUE);
   PlotIndexSetInteger(4, PLOT_DRAW_BEGIN, MathMax(Bars(Symbol(), PERIOD_CURRENT)-PLOT_MAXIMUM_BARS_BACK+1, OMIT_OLDEST_BARS+1));
   SetIndexBuffer(5, Buffer6);
   PlotIndexSetDouble(5, PLOT_EMPTY_VALUE, EMPTY_VALUE);
   PlotIndexSetInteger(5, PLOT_DRAW_BEGIN, MathMax(Bars(Symbol(), PERIOD_CURRENT)-PLOT_MAXIMUM_BARS_BACK+1, OMIT_OLDEST_BARS+1));
   //initialize myPoint
   myPoint = Point();
   if(Digits() == 5 || Digits() == 3)
     {
      myPoint *= 10;
     }
   RSI_handle = iRSI(NULL, PERIOD_CURRENT, 14, PRICE_CLOSE);
   if(RSI_handle < 0)
     {
      Print("The creation of iRSI has failed: RSI_handle=", INVALID_HANDLE);
      Print("Runtime error = ", GetLastError());
      return(INIT_FAILED);
     }

   MA_handle = iMA(NULL, PERIOD_CURRENT, 7, 0, MODE_SMMA, PRICE_CLOSE);
   if(MA_handle < 0)
     {
      Print("The creation of iMA has failed: MA_handle=", INVALID_HANDLE);
      Print("Runtime error = ", GetLastError());
      return(INIT_FAILED);
     }

   MA_handle2 = iMA(NULL, PERIOD_CURRENT, 400, 0, MODE_SMA, PRICE_CLOSE);
   if(MA_handle2 < 0)
     {
      Print("The creation of iMA has failed: MA_handle2=", INVALID_HANDLE);
      Print("Runtime error = ", GetLastError());
      return(INIT_FAILED);
     }

   MA_handle3 = iMA(NULL, PERIOD_CURRENT, 100, 0, MODE_EMA, PRICE_CLOSE);
   if(MA_handle3 < 0)
     {
      Print("The creation of iMA has failed: MA_handle3=", INVALID_HANDLE);
      Print("Runtime error = ", GetLastError());
      return(INIT_FAILED);
     }

   MA_handle4 = iMA(NULL, PERIOD_CURRENT, 200, 0, MODE_SMA, PRICE_CLOSE);
   if(MA_handle4 < 0)
     {
      Print("The creation of iMA has failed: MA_handle4=", INVALID_HANDLE);
      Print("Runtime error = ", GetLastError());
      return(INIT_FAILED);
     }

   MA_handle5 = iMA(NULL, PERIOD_CURRENT, Fast_MA_period, 0, MODE_SMA, PRICE_CLOSE);
   if(MA_handle5 < 0)
     {
      Print("The creation of iMA has failed: MA_handle5=", INVALID_HANDLE);
      Print("Runtime error = ", GetLastError());
      return(INIT_FAILED);
     }

   MA_handle6 = iMA(NULL, PERIOD_CURRENT, Slow_MA_period, 0, MODE_SMA, PRICE_CLOSE);
   if(MA_handle6 < 0)
     {
      Print("The creation of iMA has failed: MA_handle6=", INVALID_HANDLE);
      Print("Runtime error = ", GetLastError());
      return(INIT_FAILED);
     }

   return(INIT_SUCCEEDED);
  }

//+------------------------------------------------------------------+
//| Custom indicator iteration function                              |
//+------------------------------------------------------------------+
int OnCalculate(const int rates_total,
                const int prev_calculated,
                const datetime& time[],
                const double& open[],
                const double& high[],
                const double& low[],
                const double& close[],
                const long& tick_volume[],
                const long& volume[],
                const int& spread[])
  {
   int limit = rates_total - prev_calculated;
   //--- counting from 0 to rates_total
   ArraySetAsSeries(Buffer1, true);
   ArraySetAsSeries(Buffer2, true);
   ArraySetAsSeries(Buffer3, true);
   ArraySetAsSeries(Buffer4, true);
   ArraySetAsSeries(Buffer5, true);
   ArraySetAsSeries(Buffer6, true);
   //--- initial zero
   if(prev_calculated < 1)
     {
      ArrayInitialize(Buffer1, EMPTY_VALUE);
      ArrayInitialize(Buffer2, EMPTY_VALUE);
      ArrayInitialize(Buffer3, EMPTY_VALUE);
      ArrayInitialize(Buffer4, EMPTY_VALUE);
      ArrayInitialize(Buffer5, EMPTY_VALUE);
      ArrayInitialize(Buffer6, EMPTY_VALUE);
     }
   else
      limit++;
   datetime Time[];

   int RSIBuffer;
   int MABuffer;
   int RSIPeriod = 14;
   ArrayResize(RSI, rates_total);
   ArrayResize(Open, rates_total);
   ArrayResize(Close, rates_total);
   CopyOpen(NULL, 0, 0, rates_total, Open);
   CopyClose(NULL, 0, 0, rates_total, Close);
   if(CopyBuffer(RSI_handle, 0, 0, rates_total, RSI) < 0)
     {
      Print("Getting RSI values failed, not enough bars!");
     }
   ArrayResize(MA, rates_total);
   if(CopyBuffer(MA_handle, 0, 0, rates_total, MA) < 0)
     {
      Print("Getting MA values failed, not enough bars!");
     }
   ArrayResize(MA2, rates_total);
   if(CopyBuffer(MA_handle2, 0, 0, rates_total, MA2) < 0)
     {
      Print("Getting MA values failed, not enough bars!");
     }
   ArrayResize(MA3, rates_total);
   if(CopyBuffer(MA_handle3, 0, 0, rates_total, MA3) < 0)
     {
      Print("Getting MA values failed, not enough bars!");
     }
   ArrayResize(MA4, rates_total);
   if(CopyBuffer(MA_handle4, 0, 0, rates_total, MA4) < 0)
     {
      Print("Getting MA values failed, not enough bars!");
     }
   ArrayResize(Low, rates_total);
   if(CopyLow(NULL, 0, 0, rates_total, Low) < 0)
     {
      Print("Getting LOW values failed, not enough bars!");
     }
   ArrayResize(High, rates_total);
   if(CopyHigh(NULL, 0, 0, rates_total, High) < 0)
     {
      Print("Getting HIGH values failed, not enough bars!");
     }
   ArrayResize(MA5, rates_total);
   if(CopyBuffer(MA_handle5, 0, 0, rates_total, MA5) < 0)
     {
      Print("Getting MA values failed, not enough bars!");
     }
   ArrayResize(MA6, rates_total);
   if(CopyBuffer(MA_handle6, 0, 0, rates_total, MA6) < 0)
     {
      Print("Getting MA values failed, not enough bars!");
     }

   for(int i=limit-1; i>=0; i--)
     {
      if(i < rates_total-1 && time[i] != time[i+1]+PeriodSeconds())
        {
         continue;
        }
      Buffer1[i] = EMPTY_VALUE;
      Buffer2[i] = EMPTY_VALUE;
      Buffer3[i] = EMPTY_VALUE;
      Buffer4[i] = EMPTY_VALUE;
      Buffer5[i] = EMPTY_VALUE;
      Buffer6[i] = EMPTY_VALUE;

      // --- Indicator calculations
      // --- Buffer1 (Buy)
      if((Close[i] > MA[i] && MA[i] > MA2[i] && RSI[i] < Oversold) || (RSI[i] < Oversold && Close[i] > MA3[i]))
        {
         Buffer1[i] = Low[i] - 5 * myPoint;
         myAlert("indicator", "BUY OPPORTUNITY | RSI: " + DoubleToString(RSI[i], 2) + " | MA: " + DoubleToString(MA[i], 2));
        }

      // --- Buffer2 (Sell)
      if((Close[i] < MA[i] && MA[i] < MA2[i] && RSI[i] > Overbought) || (RSI[i] > Overbought && Close[i] < MA3[i]))
        {
         Buffer2[i] = High[i] + 5 * myPoint;
         myAlert("indicator", "SELL OPPORTUNITY | RSI: " + DoubleToString(RSI[i], 2) + " | MA: " + DoubleToString(MA[i], 2));
        }

      // --- Buffer3 (Buy Reversal)
      if(RSI[i] < Oversold && Close[i] > MA[i])
        {
         Buffer3[i] = Low[i] - 10 * myPoint;
         myAlert("indicator", "BUY REVERSAL | RSI: " + DoubleToString(RSI[i], 2) + " | MA: " + DoubleToString(MA[i], 2));
        }

      // --- Buffer4 (Sell Reversal)
      if(RSI[i] > Overbought && Close[i] < MA[i])
        {
         Buffer4[i] = High[i] + 10 * myPoint;
         myAlert("indicator", "SELL REVERSAL | RSI: " + DoubleToString(RSI[i], 2) + " | MA: " + DoubleToString(MA[i], 2));
        }

      // --- Buffer5 (Buy Trend)
      if(MA5[i] > MA6[i])
        {
         Buffer5[i] = Low[i] - 15 * myPoint;
         //Disabled myAlert from Buffer 5
         // myAlert("indicator", "BUY TREND | MA Fast: " + DoubleToString(MA5[i], 2) + " | MA Slow: " + DoubleToString(MA6[i], 2));
        }

      // --- Buffer6 (Sell Trend)
      if(MA5[i] < MA6[i])
        {
         Buffer6[i] = High[i] + 15 * myPoint;
         // Disabled myAlert from Buffer 6
         // myAlert("indicator", "SELL TREND | MA Fast: " + DoubleToString(MA5[i], 2) + " | MA Slow: " + DoubleToString(MA6[i], 2));
        }
     }
   return(rates_total);
  }
社交媒体(如Telegram和WhatsApp)的集成
本文章节将展示如何在MetaTrader 5平台上为我们的Trend Constraint指标特别集成Telegram和WhatsApp。这一过程通过提供实时、安全且便捷的通知服务,显著增强了MetaTrader 5的功能。这些集成提高了交易活动的效率、响应速度和有效性,成为当今交易者宝贵的工具。鉴于这些平台拥有庞大的用户基础,与这些社区分享信号将带来诸多益处。让我们深入探讨如何将我们的指标生成的信号传输到社交媒体平台。我已经对此进行了研究和测试,以确认其功能的有效性。
要求:
- 最新版本的MetaTrader5平台。
- 已验证的WhatsApp和Telegram账号(可从Android的Play Store和iOS的App Store下载)。
- web浏览器如Google Chrome。
- 用于托管中间件脚本的服务器。
Telegram整合
步骤 1:创建Telegram机器人
创建机器人:
- 打开Telegram并搜索“BotFather”机器人。
- 与BotFather开始聊天,并使用/newbot命令创建一个新机器人。
- 按照提示为您的机器人设置名称和用户名。
- BotFather将提供一个令牌,您将使用该令牌与Telegram API进行交互。
获取聊天ID:
- 将您的机器人添加到Telegram群组中或与其开始聊天。
- 在浏览器中使用以下URL来获取更新并找到您的聊天ID:https://api.telegram.org/bot<YourBotToken>/getUpdates
- 在聊天中发送一条消息,并再次检查URL以找到聊天ID。
为了获取Chat ID的更全面指南,请访问Github。
步骤 2:创建中间件脚本
您需要一个脚本来通过Telegram的API发送消息。
为了创建一个中间件脚本,根据我所做的研究,我们将使用Python语言。这个Python脚本使用requests库通过机器人向Telegram聊天发送消息。以下是脚本每一行的说明:
import requests
导入requests库,该库用于在Python中发出HTTP请求。在此脚本中,它将用于向Telegram Bot API发送POST请求。
def send_telegram_message(chat_id, message, bot_token):
定义一个名为send_telegram_message的函数:此函数接受三个参数:
- chat_id:目标聊天的唯一标识符或目标频道的用户名。
- message:要发送的文本消息。
- bot_token:Telegram机器人的令牌,创建机器人时由@BotFather提供。
url = f"https://api.telegram.org/bot{bot_token}/sendMessage"
此行代码使用提供的bot_token.构造了Telegram Bot API方法sendMessage的URL。
    payload = {
        'chat_id': chat_id,
        'text': message
    }
创建POST请求的数据体。这个字典包含了sendMessage方法所需的参数:
- chat_id:消息将被发送到的聊天的ID。
- text:消息的内容。
response = requests.post(url, data=payload)
这行代码使用requests.post方法将带有数据体的HTTP POST请求发送到构造的URL。API的响应被存储在response变量中。
return response.json()
这行代码将响应转换为JSON格式并返回它。这个JSON响应通常包含有关已发送消息的信息,包括消息ID、发送者、聊天详细信息等。
将所有代码段组合在一起,可以得到以下结果:
import requests

def send_telegram_message(chat_id, message, bot_token):
    url = f"https://api.telegram.org/bot{bot_token}/sendMessage"
    payload = {
        'chat_id': chat_id,
        'text': message
    }
    response = requests.post(url, data=payload)
    return response.json()
步骤3:配置MetaTrader 5以便使用中间件
编写一个MQL5脚本,通过HTTP请求向中间件脚本发送警报
让我们逐行分析代码,理解每一行的含义:
void SendTelegramMessage(string chat_id, string message, string bot_token)
定义了一个名为SendTelegramMessage的函数。
函数参数如下:
- chat_id:一个字符串,表示消息将被发送到的Telegram的chat ID。
- message:一个字符串,包含要发送的消息内容。
- bot_token:一个字符串,表示与Telegram API进行授权所需的机器人令牌。
{
    string url = "http://your-server-url/send_telegram_message";
将服务器端点URL赋值给变量url。该URL是处理将消息转发到Telegram服务器的地址。
    char postData[];
    StringToCharArray("chat_id=" + chat_id + "&message=" + message + "&bot_token=" + bot_token, postData);
postData数组:
- 声明:声明了一个类型为char的数组postData,用于存储POST请求的数据。
- 字符串到字符数组转换:将一个由chat_id、message和bot_token参数拼接而成的字符串转换为字符数组,并存储在postData中。拼接后的字符串形成了服务器所需的POST请求体的格式。
char result[];
声明了一个类型为char 的数组result ,用于存储来自网络请求的响应。
int res = WebRequest("POST", url, "", NULL, 0, postData, 0, result, NULL);
网络请求:
- HTTP方法:“POST”表示请求类型。
- URL:url 是发送请求的端点。
- Headers:空字符串 "" 表示没有额外的头部信息。
- Cookies:NULL表示没有使用Cookies。
- Timeout:0表示没有设置超时时间。
- POST数据:postData是要在POST请求中发送的数据。
- 结果:存储响应的地方。
- 该函数返回一个整数res,表示响应的HTTP状态码。
if (res != 200)
检查响应码:将响应码 res 与 200(HTTP 成功时)进行比较。如果响应码不是 200,则表示出现了错误。
错误处理程序:
    {
        Print("Error sending message: ", GetLastError());
    }
打印错误消息:如果响应代码不是200,此块使用GetLastError()打印错误消息以及最后一个错误代码。
成功处理程序:
    else
    {
        Print("Message sent successfully.");
    }
打印成功消息:如果响应代码是200,此代码块会打印一条成功消息,表明消息已成功发送。
该行代码以闭合大括号结束SendTelegramMessage函数。
用MQL5代码发送Telegram消息:
void SendTelegramMessage(string chat_id, string message, string bot_token)
{
    string url = "http://your-server-url/send_telegram_message";
    char postData[];
    StringToCharArray("chat_id=" + chat_id + "&message=" + message + "&bot_token=" + bot_token, postData);

    char result[];
    int res = WebRequest("POST", url, "", NULL, 0, postData, 0, result, NULL);
    if (res != 200)
    {
        Print("Error sending message: ", GetLastError());
    }
    else
    {
        Print("Message sent successfully.");
    }
}
上述MQL5脚本旨在通过向服务器端点发送Web请求,从而与Telegram聊天发送消息。示例用法展示了如何在脚本启动时运行的OnStart事件中使用SendTelegramMessage函数。在下一节中,我们将探讨WhatsApp的集成,但即便现在讨论的是另一个社交平台,我们之前解释的Telegram集成原理仍然适用。请始终记得用您自己的实际凭证替换代码中的某些部分,以确保能够正常运行。
WhatsApp整合
步骤1:注册消息API供应商
- 选择提供商:Twilio是WhatsApp集成的热门选择。
- 创建账户:在Twilio注册并完成所有必要的验证。
- 获取API凭证:从Twilio获取您的API凭证(账户SID,认证令牌)。
步骤 2:创建中间件脚本。
用于WhatsApp集成的中间件Python脚本:
import requests

def send_whatsapp_message(to, message, account_sid, auth_token):
    url = f"https://api.twilio.com/2010-04-01/Accounts/{account_sid}/Messages.json"
    payload = {
        'From': 'whatsapp:+14155238886',  # Twilio sandbox number
        'To': f'whatsapp:{to}',
        'Body': message
    }
    headers = {
        'Authorization': f'Basic {account_sid}:{auth_token}'
    }
    response = requests.post(url, data=payload, headers=headers)
    return response.json()
步骤3:配置MetaTrader 5以便使用中间件
用MQL5代码发送WhatsApp通知:
void SendWhatsAppMessage(string to, string message, string account_sid, string auth_token)
{
    string url = "http://your-server-url/send_whatsapp_message";
    char postData[];
    StringToCharArray("to=" + to + "&message=" + message + "&account_sid=" + account_sid + "&auth_token=" + auth_token, postData);

    char result[];
    int res = WebRequest("POST", url, "", NULL, 0, postData, 0, result, NULL);
    if (res != 200)
    {
        Print("Error sending message: ", GetLastError());
    }
    else
    {
        Print("Message sent successfully.");
    }
}
虚拟私人服务(VPS)对我们通知系统的强大作用
虚拟私人服务(VPS)能够持续不间断地运行,确保您的MetaTrader 5平台和通知系统始终保持活跃状态。这对于接收无中断的实时通知至关重要。VPS供应商提供强大且稳定的网络连接,降低了家庭或办公网络可能发生的断线风险。VPS服务器通常放置于数据中心,这些数据中心与主要金融交易所之间拥有高速连接,从而减少了延迟,并提高了接收和处理交易警报和通知的速度。与共享托管不同,VPS提供专用的CPU、RAM和存储资源,确保运行MetaTrader 5和处理通知时具有一致性。您可以从任何与互联网连接的设备远程访问VPS,从而能够在任何地方管理您的MetaTrader 5平台并接收通知。
结论
我们已成功为指标配置了强大的通知系统,为WhatsApp和Telegram的集成奠定了坚实的基础。这一改进对于吸引庞大的用户群体至关重要,因为这些信息可以即时共享。开发者可以通过这些热门平台向感兴趣的交易者做营销,从而获利,提供了一种从平台直接传输到社交媒体渠道的快速且高效的方式。
这种方法确保了信息可以在任何有互联网接入的地方随时进行访问,只需一键即可轻松共享。交易者可以方便地选择使用Telegram或WhatsApp来访问信息。关于进一步集成的详细信息,将在第二部分中探讨。请参考下方附带的参考文件。欢迎在评论区自由地参与讨论。
本文由MetaQuotes Ltd译自英文
原文地址: https://www.mql5.com/en/articles/14963
注意: MetaQuotes Ltd.将保留所有关于这些材料的权利。全部或部分复制或者转载这些材料将被禁止。
本文由网站的一位用户撰写,反映了他们的个人观点。MetaQuotes Ltd 不对所提供信息的准确性负责,也不对因使用所述解决方案、策略或建议而产生的任何后果负责。
 掌握市场动态:创建有关支撑与阻力位策略的EA
 开发交易机器人:Python与MQL5结合(第二部分):模型选择、创建与训练,以及Python自定义测试器
 您应当知道的 MQL5 向导技术(第 14 部分):以 STF 进行多意向时间序列预测

