
MetaTrader 5의 연속 선물 계약

소개
MetaTrader 5에서는 브로커의 기호로만 구성할 수 있으므로 Trader는 자신의 차트를 만들 수 없습니다. 거래자는 합성 상품, 즉 연속 선물 계약이 필요합니다. 문제는 중개자만이 계약을 접합할 수 있고 중개자만이 주어진 기호에 대한 선물을 연결할지 여부를 결정한다는 것입니다.
다행스럽게도 닫힌 선물의 역사는 항상 터미널에서 볼 수 있습니다. 이 기록을 사용하여 터미널에서 선물 계약을 연결합니다.
규칙:
- 글의 모든 데이터, 그림 및 스크린샷은 실제 우크라이나 주가 지수 선물을 기반으로 합니다.
- 글에 대체되거나 추가된 코드 섹션은 색상으로 표시됩니다. 예:
//+------------------------------------------------------------------+
//|                                               This is an example |
//|                                               of the edited code |
//+------------------------------------------------------------------+
-->
첫 번째 문제: 날짜가 겹칩니다.
가까운 선물은 날짜가 겹치면서 거래됩니다.
이는 다른 선물이 마감되기까지 아직 2개월이 남아 있는 동안 선물이 거래되고 있음을 의미합니다.

그림 1. 선물 계약에서 날짜가 겹칩니다.
그림은 UX-12.13 선물이 아직 열려 있지만 2013.09.16이 UX-3.14 선물 거래의 시작 날짜임을 보여줍니다.
두 번째 문제: 접합 방법 선택
접합에는 두 가지 방법이 있습니다.
- 간단한 추가 – 현재 상품의 유통 날짜가 만료되고 다음 상품이 다른 바에서 열리는 경우. 단순 추가 동안 차트의 가격은 기록 값과 일치하지만 동시에 연결된 위치에는 항상 가격 차이가 있습니다. 즉, 차트가 매끄럽지 않을 것입니다.

그림 2. 스플라이싱. 간단한 추가.
- 시프트 추가: 현재 악기가 5-10일 후에 종료되며 이 5-10개의 바를 다음 악기 바로 교체하기 시작합니다. 5-10바 간격을 전환 기간이라고 합니다. 시프트 가격을 추가하는 동안 잘못된 값이 표시되지만(현재 상품에 해당하지 않음) 간단한 추가 방법과 비교하여 차트가 더 매끄럽습니다.

그림 3. 스플라이싱. 시프트가 있는 덧셈
터미널의 설정
"시장 감시" 창에서 선물은 내림차순으로 배치되어야 합니다.

그림 4. 시장감시
지표 작성
기본 표시기는 terminal_data_folder\MQL5\Indicators 폴더에 있어야 합니다. MyIndicators(\Indicators에서 열림)에 Synthetics 폴더를 만듭니다. 이를 통해 표준 라이브러리의 \Indicators 폴더에 공간을 절약하고 표시기의 MQL5 Storage 시작 동기화를 용이하게 할 수 있습니다. 폴더의 최종 경로는 terminal_data_folder\MQL5\Indicators\MyIndicators\Synthetics와 같습니다.
Synthetics 폴더에서 새 파일을 만듭니다.

그림 5. 표시기 새 파일 생성
새 파일 유형 설정 - "사용자 지정 표시기":

그림 6. 새 파일 형식 - "사용자 지정 표시기"
"다음"을 누르고 "사용자 지정 표시기의 일반 속성" 창을 엽니다. 표시기의 이름 - "SYNT"를 입력하고 두 가지 옵션을 추가합니다. 첫 번째 옵션인 "연결을 위한 선물 수"는 연결할 기기의 수를 결정합니다. 2는 "접합을 위한 선물 수"의 가능한 최소값입니다. 두 번째 옵션 "접착 유형"은 기본 표시기("간단한 추가")에서 접합 유형을 결정합니다.

그림 7. 사용자 지정 지표 매개변수
"접착 유형" 옵션에 주의하십시오. 접합은 "단순 추가" 또는 "시프트 추가"가 될 수 있습니다. 이 단계에서는 이 두 접합 유형의 목록을 추가할 수 없습니다. 그렇기 때문에 기본 "단순 추가"를 그대로 두십시오. "SYNT" 표시기 코드 작성 중에 나중에 옵션으로 전환하여 접합 유형이 있는 드롭다운 목록을 봅니다.
다음 창에서 표시기 이벤트 처리기를 선택합니다.

그림 8. 표시기 이벤트 핸들러
OnTimer() 함수는 "SYNT" 표시기에 사용됩니다. 표시기의 주요 기능은 OnTimer() 에서 설정됩니다. 지표는 거래가 완료된 기호 차트(이 기호에는 OnCalculate 이벤트가 포함되지 않음)와 거래가 활성화된 기호 차트에 모두 첨부할 수 있습니다.
"다음"을 누르고 "사용자 지정 표시기 프로그램의 일반 속성"에서 "별도 창의 표시기"를 선택합니다.

그림 9. "별도 창의 표시기" 옵션
"완료" 버튼을 누르면 "SYNT" 표시기 템플릿이 표시됩니다.
드롭다운 목록 구성
스플라이싱 유형 목록을 드롭다운 목록으로 보려면 표시기 옵션에서 ENUM_GLUING_TYPE 열거를 선언해야 합니다.
입력 매개변수 블록의 시작 부분에서 전역 영역에 열거형을 선언합니다.
#property indicator_separate_window
//+------------------------------------------------------------------+
//|  Splicing types enumeration                                      |
//+------------------------------------------------------------------+
enum ENUM_GLUING_TYPE
  {
   simple_addition,        // simple addition||simple addition
   addition_with_shift     // addition with shift||addition with shift
  };
//--- input parameters || input parameters
input ENUM_GLUING_TYPE  gluing_type=simple_addition;
//+------------------------------------------------------------------+
//| Custom indicator initialization function                         |
//+------------------------------------------------------------------+
-->
이제 드롭다운 목록이 어떻게 표시되는지 확인할 수 있습니다.
지표(F7) 파일을 컴파일해야 합니다. 이제 표시기를 연결한 후 드롭다운 목록이 실행되는 옵션을 볼 수 있습니다.

그림. 10. 이제
매개변수의 드롭다운 목록
차트에 처음 첨부되거나 속성이 변경될 때 "일반" 탭에 표시될 지표에 대한 설명을 추가합니다.
#property version   "1.00"
//+------------------------------------------------------------------+
//| version   "1.00": The timer history swapping                     |
//+------------------------------------------------------------------+
#property description "Indicator for several futures splicing."
#property description "Is drawn in the latest futures window"
#property description "Uses N first symbols for drawing"
#property description "which were taken from the \"Market review\"."

#property indicator_separate_window
-->
표시기 구성 방법 - DRAW_COLOR_CANDLES - 색깔의 초.
색상 인덱스 저장소에는 4개의 표시기 버퍼와 1개의 버퍼가 필요합니다. 선의 스타일, 표시기 - STYLE_SOLID - 연속 선. 표시기 코드의 모든 항목 표시:
#property description "taken from the \"Market review\"."

//--- indicator settings || indicator settings
#property indicator_separate_window
#property indicator_buffers 5
#property indicator_plots   1
//--- plot Bars || bars plotting
#property indicator_label1    "SYNT"
#property indicator_type1     DRAW_COLOR_CANDLES
#property indicator_style1    STYLE_SOLID
#property indicator_width1    1
//+------------------------------------------------------------------+
//|  enumeration of splicing methods                                 |
//+------------------------------------------------------------------+
-->
"number_futures_gluing" 입력 매개변수(건설에 필요한 기기 수)를 입력합니다. 기본 "number_futures_gluing" 값은 2입니다.
//--- input parameters || input parameters
input int               numder_futures_gluing=2;
input ENUM_GLUING_TYPE  gluing_type=simple_addition;
-->
4개의 표시기 버퍼, 색상 인덱스 저장을 위한 1개의 버퍼 및 LoadHistory[] 보조 배열을 선언합니다.
#property indicator_style1    STYLE_SOLID
#property indicator_width1    1
//--- indicator buffers || indicator buffers
double            OpenBuffer[];
double            HighBuffer[];
double            LowBuffer[];
double            CloseBuffer[];
double            ColorCandlesColors[];
double            LoadHistory[];
//+------------------------------------------------------------------+
//|  enumeration of splicing methods                                 |
//+------------------------------------------------------------------+
-->
표시기 버퍼를 1차원 동적 배열에 연결하고 버퍼 색인 을 시계열과 같이 설정합니다.
//--- indicator buffers mapping
//--- indicator buffers mapping
   SetIndexBuffer(0,OpenBuffer,INDICATOR_DATA);
   SetIndexBuffer(1,HighBuffer,INDICATOR_DATA);
   SetIndexBuffer(2,LowBuffer,INDICATOR_DATA);
   SetIndexBuffer(3,CloseBuffer,INDICATOR_DATA);
   SetIndexBuffer(4,ColorCandlesColors,INDICATOR_COLOR_INDEX);
   SetIndexBuffer(5,LoadHistory,INDICATOR_CALCULATIONS);
//--- set buffer indexing as timeseries
//--- set buffer indexing as in timeseries
   ArraySetAsSeries(OpenBuffer,true);
   ArraySetAsSeries(HighBuffer,true);
   ArraySetAsSeries(LowBuffer,true);
   ArraySetAsSeries(CloseBuffer,true);
   ArraySetAsSeries(ColorCandlesColors,true);
//---
   return(INIT_SUCCEEDED);
-->
"데이터 창"에 표시기 시리즈의 이름("열기", "높음", "낮음" 및 "닫기")을 표시하려면 s_symbol 변수가 필요합니다.
input int               numder_futures_gluing=2;
input ENUM_GLUING_TYPE  gluing_type=simple_addition;
//--- symbol name
string s_symbol;
//+------------------------------------------------------------------+
//| Custom indicator initialization function                         |
//+------------------------------------------------------------------+
-->
표시기를 활성화하려면 shft_array 변수와 두 개의 good_history 및 indicator_rendered 플래그가 필요합니다.
input ENUM_GLUING_TYPE  gluing_type=simple_addition;
//--- symbol name
string   s_symbol;
int      shift_array=0;
bool     good_history=false;        //history is not prepared||history not prepared
bool     indicator_rendered=false;  // indicator is not drawn
//+------------------------------------------------------------------+
//| Custom indicator initialization function                         |
//+------------------------------------------------------------------+
-->
그런 다음 표시기를 설정하고 버퍼 색상 인덱스를 선택한 색상에 연결합니다.
   ArraySetAsSeries(CloseBuffer,true);
   ArraySetAsSeries(ColorCandlesColors,true);
//--- set accuracy || accuracy of the indicator values
   IndicatorSetInteger(INDICATOR_DIGITS,0);
//--- set drawing line empty value || empty value of the drawing line
   PlotIndexSetDouble(0,PLOT_EMPTY_VALUE,0.0);
//--- set labels for the line || displayed name in the DataWindow
   PlotIndexSetString(0,PLOT_LABEL,s_symbol+" Open;"+s_symbol+" High;"+s_symbol+" Low;"+s_symbol+" Close");
   IndicatorSetString(INDICATOR_SHORTNAME,"SYNT");
//--- set number of colors in color buffer || number of colors in the buffer
   PlotIndexSetInteger(0,PLOT_COLOR_INDEXES,9);
//--- set line color || set the line color
   PlotIndexSetInteger(0,PLOT_LINE_COLOR,0,clrBlue);
   PlotIndexSetInteger(0,PLOT_LINE_COLOR,1,clrOrange);
   PlotIndexSetInteger(0,PLOT_LINE_COLOR,2,clrRed);
   PlotIndexSetInteger(0,PLOT_LINE_COLOR,3,clrGreen);
   PlotIndexSetInteger(0,PLOT_LINE_COLOR,4,clrPink);
   PlotIndexSetInteger(0,PLOT_LINE_COLOR,5,clrIndigo);
   PlotIndexSetInteger(0,PLOT_LINE_COLOR,6,clrPaleVioletRed);
   PlotIndexSetInteger(0,PLOT_LINE_COLOR,7,clrDarkViolet);
   PlotIndexSetInteger(0,PLOT_LINE_COLOR,8,clrDimGray);
//---
   return(INIT_SUCCEEDED);
-->
3초 간격의 타이머 초기화와 난수 생성기를 OnInit() 함수에 추가합니다.
   PlotIndexSetInteger(0,PLOT_LINE_COLOR,7,clrDarkViolet);
   PlotIndexSetInteger(0,PLOT_LINE_COLOR,8,clrDimGray);
//---
   EventSetTimer(3);
//--- random number generator initializor
   MathSrand(GetTickCount());
//---
   return(INIT_SUCCEEDED);
-->
접합을 처리하려면 최소한 두 개의 기호가 필요합니다.
OnCalculate() 함수에서 스플라이싱을 위한 기기 수를 확인합니다.
                const long &tick_volume[],
                const long &volume[],
                const int &spread[])
  {
//--- checking the number of instruments || checking the number of instruments
   if(numder_futures_gluing<=1)
     {
      //--- create the message line
      string comm=StringFormat("For the indicator choose not less than %d symbols",numder_futures_gluing);
      //--- display the message in comment in the chart main window
      Comment(comm);
      return(0);
     }
//--- return value of prev_calculated for next call
   return(rates_total);
-->
접합을 위한 기호의 수를 확인한 후 표시기가 이미 그려졌는지 확인합니다. 표시기가 그려지면 OnCalculate() 를 종료할 수 있습니다.
      Comment(comm);
      return(0);
     }
   if(indicator_rendered==true) return(rates_total);
//--- return value of prev_calculated for next call
   return(rates_total);
-->
"SYNT" 지표는 주로 요일봉 발달 경향을 분석하는 데 사용되기 때문에 각 틱에서 재계산을 진행할 필요가 없다고 생각합니다. 각 눈금에 "SYNT" 표시기는 계산되지 않습니다.
또한 다음과 같은 경우에만 지표를 계산해야 합니다.
- 표시기가 처음 시작된 경우;
- 기록이 변경된 경우(예: 추가 사항이 있음).
   if(indicator_rendered==true) return(rates_total);
//--- if calculations were started the first time
//--- or if we need to calculate the indicator for two or more bars (changes in history)
//--- remember, that the "0" bar - is the left-most
   if(prev_calculated==0 || rates_total>prev_calculated+1)
     {
     }
//--- return value of prev_calculated for next call
   return(rates_total);
-->
강제 표시기 버퍼 초기화
표시기 "SYNT" 버퍼는 연결된 동적 배열입니다.
표시기가 처음 실행되면 버퍼가 강제로 초기화됩니다. OnCalculate()에서 초기화를 진행합니다. OnInit가 아닌 OnCalculate() 에서 수행해야 하는 이유는 무엇입니까? 설명은 아래 그림과 같습니다.
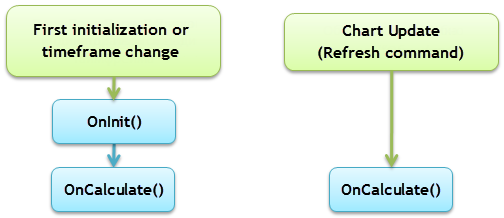
그림 11. OnCalculate()의 배열 초기화
그림 11에서 볼 수 있듯이 OnCalculate() 이벤트는 어떤 경우에도 발생하지만 OnInit() 이벤트는 "업데이트" 명령. 따라서 배열 초기화는 OnCalculate()에서 수행됩니다.
//--- remember, that the "0" bar - is the left-most
   if(prev_calculated==0 || rates_total>prev_calculated+1)
     {
      //--- arrays initialization
      ArrayInitialize(OpenBuffer,0);
      ArrayInitialize(HighBuffer,0);
      ArrayInitialize(LowBuffer,0);
      ArrayInitialize(CloseBuffer,0);
     }
//--- return value of prev_calculated for next call
   return(rates_total);
-->
ArrayInitialize() 함수는 표시기 버퍼를 초기화합니다. 이 경우 초기화는 0을 표시합니다.
버퍼 표시기를 EMPTY_VALUE 로 초기화하려고 하면 "SYNT"에서 표시기를 연결할 수 없습니다.
단순 덧셈 알고리즘

그림 12. 단순 덧셈 알고리즘
사진의 날짜는 UX-9.13, UX-12.13 및 UX-3.14 선물 유통의 시작 및 종료 날짜입니다. 이러한 데이터는 표에 나와 있습니다.
| 상징 | 유통 시작 | 순환 종료 |
|---|---|---|
| UX-9.13 | 2013.03.15 | 2013.09.16 |
| UX-12.13 | 2013.06.17 | 2013.12.16 |
| UX-3.14 | 2013.09.16 | 2014.03.17 |
그림 10에서 2013.12.25 날짜 - 실제 달력 날짜입니다. UX-3.14 기호는 여전히 유효합니다.
"단순 추가" 접합 방법은 SimpleAddition 기능에서 구현됩니다.
//+------------------------------------------------------------------+
//| Timer function                                                   |
//+------------------------------------------------------------------+
void OnTimer()
  {
//---
  }
//+------------------------------------------------------------------+
//| Simple addition                                                  |
//| Simple addition. Add in the indicator array                      |
//| sibmUP symbol                                                    |
//+------------------------------------------------------------------+
bool SimpleAddition(string simbUP,string simbDOWN,ENUM_TIMEFRAMES period,int Color)
  {
  }
//+------------------------------------------------------------------+
-->
simbUP 은 상승 선물이고 simbDOWN 은 하락 선물이며 둘 다 "시장 검토" 창에 있습니다. 색상 - 선물을 그리는 데 사용되는 색상.
SimpleAddition() 함수의 전체 코드는 다음과 같습니다.
//+------------------------------------------------------------------+
//| Simple addition                                                  |
//| Simple addition. Add in the indicator array                      |
//| sibmUP symbol                                                    |
//+------------------------------------------------------------------+
bool SimpleAddition(string simbUP,string simbDOWN,ENUM_TIMEFRAMES period,int Color)//////
  {
   datetime expiration_time_UP;     // simbUP symbol expiration date
   datetime expiration_time_DOWN;   // simbDOWN expiration date

   expiration_time_UP=int(SymbolInfoInteger(simbUP,SYMBOL_EXPIRATION_TIME));
   if(expiration_time_UP>TimeLocal())
     {
      expiration_time_UP=TimeLocal();
     }
   if(simbDOWN!="")
     {
      expiration_time_DOWN=int(SymbolInfoInteger(simbDOWN,SYMBOL_EXPIRATION_TIME));
     }
   else
     {
      expiration_time_DOWN=int(SymbolInfoInteger(simbUP,SYMBOL_START_TIME));
     }
//--- Open, High, Low and Close prices will be copied in the rates[] array
   MqlRates rates[];
   ArraySetAsSeries(rates,true);
   int copied=0;           //--- copied number
   copied=CopyRates(simbUP,period,expiration_time_DOWN,expiration_time_UP,rates);
   if(copied>0)
     {
      for(int j=shift_array;j<shift_array+copied;j++)
        {
         //--- write prices in buffers
         OpenBuffer[j]=rates[j-shift_array].open;
         HighBuffer[j]=rates[j-shift_array].high;
         LowBuffer[j]=rates[j-shift_array].low;
         CloseBuffer[j]=rates[j-shift_array].close;
         ColorCandlesColors[j]=Color;
        }
      shift_array=shift_array+copied;
      indicator_rendered=true;
      ChartRedraw();
     }
   else
     {
      Print("Unable to get the symbol history data",simbUP);
      indicator_rendered=false;
      return(false);
     }
//---  Simple addition end
   return(true);
  }
//+------------------------------------------------------------------+
-->
시프트 알고리즘을 사용한 덧셈

그림 13. 시프트 접합 알고리즘을 사용한 추가
단순 덧셈에 비해 이 알고리즘의 접합은 기호가 닫히기 10일 전에 시작됩니다. "Shift를 사용한 추가" 접합 방법은 AdditionWithShift() 함수에서 처리됩니다.
//--- Simple addition end
   return(true);
  }
//+------------------------------------------------------------------+
//| Addition With Shift                                              |
//| Addition with Shift. Add in the indicator array only             |
//| sibmUP symbol                                                    |
//+------------------------------------------------------------------+
bool AdditionWithShift(string simbUP,string simbDOWN,ENUM_TIMEFRAMES period,int Color)
  {
//---
   return(true);
  }
//+------------------------------------------------------------------+
-->
AdditionWithShift()와 SimpleAddition() 함수의 차이점은 두 줄에 있습니다. 날짜에서 10일을 뺍니다.
   .
   .
   .
   expiration_time_UP=int(SymbolInfoInteger(simbUP,SYMBOL_EXPIRATION_TIME))-86400*10;
   .
   .
   .
   expiration_time_DOWN=int(SymbolInfoInteger(simbDOWN,SYMBOL_EXPIRATION_TIME))-86400*10;
   .
   .
   .
-->
코드의 작은 차이로 인해 AdditionWithShift() 함수의 전체 코드는 표시하지 않겠습니다. 코드는 글의 표시기 파일에서 찾을 수 있습니다.
AdditionWithShift() 함수와 SimpleAddition() 함수의 이러한 작은 차이에도 불구하고, 하나의 범용 함수로 만들기 위해 두 함수를 연결하지 않는 것이 좋습니다(추가 변경의 경우 알고리즘 또는 예를 들어 테스트 시작).
기호 히스토리 사전 로드
CheckLoadHistory() 함수는 모든 기호 기록을 보조 버퍼 tmp_rates로 복사합니다.
복사 프로세스가 성공하면 true 값이 good_history 플래그에 할당됩니다. 즉, 표시기 그리기를 시작할 수 있습니다.
//--- Addition With Shift end
   return(true);
  }
//+------------------------------------------------------------------+
//| Request to receive all history from a trade server               |
//| Request to recieve all history from a trade server               |
//+------------------------------------------------------------------+
bool CheckLoadHistory(string symbol,ENUM_TIMEFRAMES period)
  {
   MqlRates tmp_rates[];      // the Open, High, Low and Close prices will be copied in the rates[]array
   datetime start_time;       // start time of the instrument trades
   datetime expiration_time;  // expiration time of the instrument trade
   start_time=int(SymbolInfoInteger(symbol,SYMBOL_START_TIME));
   expiration_time=int(SymbolInfoInteger(symbol,SYMBOL_EXPIRATION_TIME));
   if(CopyRates(symbol,period,start_time,expiration_time,tmp_rates)>0)
     {
      good_history=true;
     }
   else
     {
      good_history=false;
     }
//---
   return(true);
  }
//+------------------------------------------------------------------+
-->
미래의 수명은 매우 짧고 모든 기록 복사는 공간을 많이 차지하지 않으므로 모든 기호 기록을 복사할 수 있습니다.
OnTimer - 표시기의 주요 기능
이제 두 가지 접합 방법에 대한 코드와 기록 로드에 대한 코드가 있으므로 OnTimer() 함수를 변경할 수 있습니다.
//+------------------------------------------------------------------+
//| Timer function                                                   |
//+------------------------------------------------------------------+
void OnTimer()
  {
   if(indicator_rendered==true) return;
   if(good_history==true)
     {
      int t=0;       // color || color
      int number;
      switch(gluing_type)
        {
         case simple_addition:
            for(int n=0;n<numder_futures_gluing;n++)
              {
               //--- get the random number
               number=MathRand();
               //--- get the color index as the modulo
               t=number%(PlotIndexGetInteger(0,PLOT_COLOR_INDEXES)-1);
               SimpleAddition(SymbolName(n,true),SymbolName(n+1,true),PERIOD_D1,t);
              }
            break;
         case addition_with_shift:
            for(int n=0;n<numder_futures_gluing;n++)
              {
               //--- get random number
               number=MathRand();
               //--- get the color index as the modulo
               t=number%(PlotIndexGetInteger(0,PLOT_COLOR_INDEXES)-1);
               AdditionWithShift(SymbolName(n,true),SymbolName(n+1,true),PERIOD_D1,t);
              }
            break;
        }
     }
   else
     {
      for(int n=0;n<numder_futures_gluing;n++)
        {
         CheckLoadHistory(SymbolName(n,true),PERIOD_D1);
        }
     }
  }
//+------------------------------------------------------------------+
-->
표시기가 구성됩니다. 컴파일하여 차트에 첨부할 수 있습니다. 닫힌 거래 기호를 선택하고 H1 기간을 설정하는 것이 좋습니다.
"SYNT" 표시기의 초기 출력
서로 다른 접합 방법의 두 "SYNT" 표시기 템플릿을 차트에 첨부한 후 다음 방법을 비교할 수 있습니다.
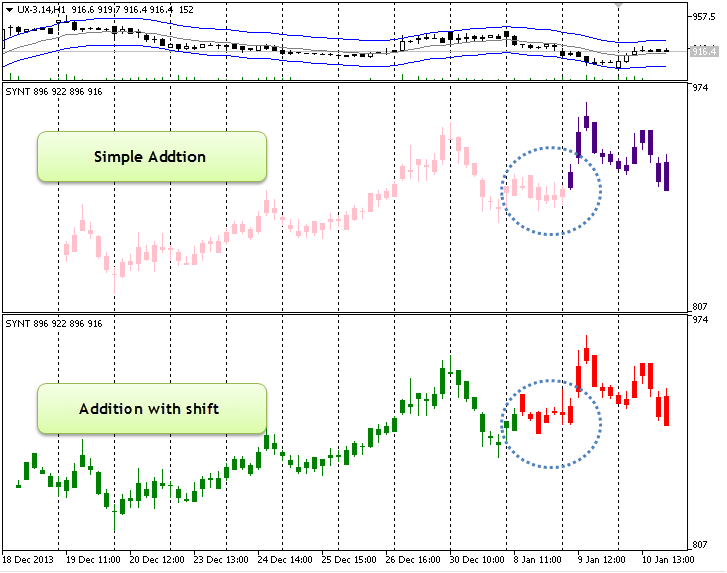
그림 14. 퓨처 스플라이싱 비교의 두 가지 방법
표시기 연결 가능성(표준 및 사용자 지정)
사용자 지정 표시기는 OnCalculate 첫 번째 호출 및 "SYNT" 표시기와 연결될 수 있습니다.
int OnCalculate (const int rates_total,      // size of the array price[]
                 const int prev_calculated,  // calculated bars during the previous call
                 const int begin,            // tangible data starting point
                 const double& price[]       // calculation array
   );
-->
"내비게이터" 창에서 "사용자 지정 표시기" 목록을 엽니다. 그런 다음 "예" 목록을 열고 표시기를 선택하여 "SYNT"에 배치합니다. "매개변수" 탭의 드롭다운 목록에서 "이전 지표 데이터"를 선택합니다.
다음은 "SYNT" 표시기에 연결할 수 있는 표시기가 있는 목록이며 실수 없이 "SYNT"에서 시작됩니다.
3개의 선물을 첨부된 맞춤 이동 평균 표시기와 결합한 표시기 "SYNT":

Fig. 15. 세 개의 접합된 기호의 예
결론
하루 시간대에 열려 있는 이전 차트 기호의 동작을 분석하는 것이 더 쉽습니다. 기술적 지표의 수는 제한되어 있지만 이 방법은 연속 선물의 가격 행동을 추적하는 데 도움이 됩니다.
MetaQuotes 소프트웨어 사를 통해 러시아어가 번역됨.
원본 기고글: https://www.mql5.com/ru/articles/802
경고: 이 자료들에 대한 모든 권한은 MetaQuotes(MetaQuotes Ltd.)에 있습니다. 이 자료들의 전부 또는 일부에 대한 복제 및 재출력은 금지됩니다.
이 글은 사이트 사용자가 작성했으며 개인의 견해를 반영합니다. Metaquotes Ltd는 제시된 정보의 정확성 또는 설명 된 솔루션, 전략 또는 권장 사항의 사용으로 인한 결과에 대해 책임을 지지 않습니다.

 MQL5 Expert Advisor의 GSM 모뎀 작업
 비디오 튜토리얼: MetaTrader 신호 서비스
좋은 기사입니다. 저는 독창적인 척하지 않습니다. 그러나 제 생각은 다음과 같습니다. 선물의 시작과 순환은 항상 변동성이 있으며 기본 거래량이 발생하는 실제 상황을 반영하지 않습니다.
그것이 얼마나 가능한지는 모르겠습니다. 하지만 이렇게 말씀드리겠습니다. (정상적인 거래가 이루어지는) 날짜에 각 선물에 대해 간격을 설정하고 이 구간을 전체적으로 최적화하면 어떨까요?
즉, 한 테스트에서 한 차트를 테스트한 다음 다른 차트로 전환하는 등의 작업이 가능할까요?
"전략 테스터에서 접착력을 테스트할 수 있나요?"라고 묻는다면. - 대답은 '아니오'입니다. 즉, 글루잉은 사용자 지정 지표이기 때문에 간단한 방법으로 작동하지 않습니다.
접착 된 선물에서는 작동하지 않을 것임이 분명합니다. 제 말은 책과 포럼에서 어떤 접착 방식이 실제 움직임을 더 잘 반영하는지 쓴다는 뜻입니다. 로버트 파도의 책에서 이 주제는 잘 논의되었습니다.
아이디어는 각 선물에 대해 날짜 간격을 설정하고 전체적으로 몇 년 동안 모든 것을 테스트 할 수 있다는 것입니다.
접착 된 선물로 작동하지 않을 것임이 분명합니다. 저는 책과 포럼에서 어떤 접착 방식이 실제 움직임을 더 잘 반영하는지에 대한 글을 쓴다는 의미였습니다. 로버트 파도의 책에서 이 주제는 잘 논의되었습니다.
아이디어는 각 선물에 대해 날짜 간격을 설정하고 전체적으로 몇 년 동안 모든 것을 테스트 할 수 있다는 것입니다.
이를 "글루잉 타입"이라고 합니다. 특히 이 글에서는 "단순 더하기"와 "오프셋을 사용한 더하기"라는 두 가지 유형의 접착을 고려합니다.
한동안 캐스텀 도구를 사용할 수 있었습니다.
글루를 생성하고 업데이트하는 제품도 있을까요? 아무도 그런 제품을 만난 적이 없나요?
이러한 도구는 전문가 어드바이저를 테스트하고 실행하는 데 사용할 수 있습니다(물론 거래에 적합한 심볼을 할당하는 데 사용).