
Graphical Interfaces IX: The Color Picker Control (Chapter 1)

Contents
Introduction
Please read the first article called Graphical interfaces I: Preparation of the library structure (Chapter 1) to gain a better understanding of the purpose of this library. At the end of articles of each part there is a list of chapters with links, and you can also download a complete version of the library at the current stage of its development. Files must be placed under the same directories as they are located in the archive.
Part IX of these series will describe the following elements of control and interface:
1. First chapter:
- Color picker control (CColorPicker class).
- Color button control (CColorButton class).
2. Second chapter:
- Progress bar control (CProgressBar class).
- Line graph control (CLineGraph class).
There will be comprehensive examples provided for all the above mentioned controls showing how they can be applied in custom applications.
Color picker control
A color palette can be found in various applications that have an option to indicate color of object. In MetaTrader trading terminals a color palette can be used for quick change of colors of controls in your MQL application. For example, when creating a visual studio for graphical interfaces and colors need to be set up for each control, it would be very inconvenient to do so without a color palette.
Color palette is a complex compound element of control that apart from actual palette that displays a selected color model also has other objects and groups of controls. Compound parts of this control are listed below.
- Background
- Color palette that displays a specified color model
- Marker of set color
- Marker of selected color
- Marker of color when hovering over with the mouse
- Group of radio buttons with Edit boxes for manual configuration of color model's components
- Button to cancel a selected color
- Button to configure (fix) color specified in second marker
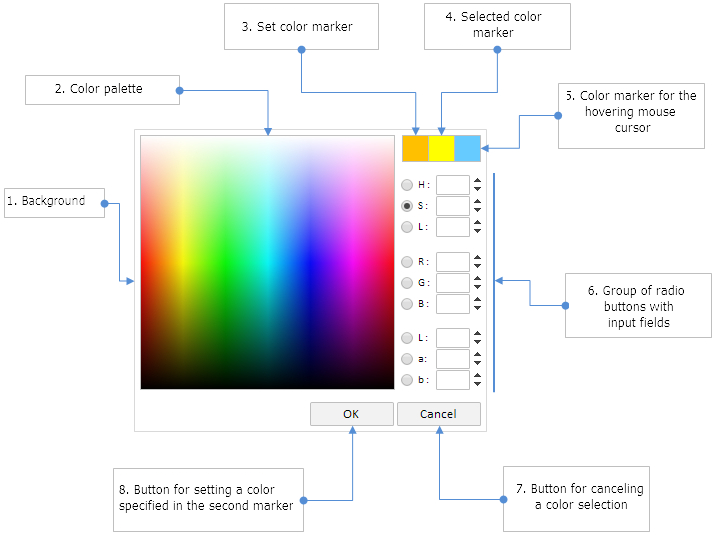
Fig. 1. Compound parts of color picker.
The screenshot above shows that a group of radio buttons is divided into three sub-groups that have three radio buttons each. Every sub-group is a color model, and every radio button is a component of this model (coordinate of color area). The list below provides deciphering of abbreviations of all color models that will be used when creating a color palette for a developed library.
1. HSL color model:
- H - hue. Range of values from 0 to 360.
- S - saturation. Range of values from 0 to 100.
- L - lightness. Range of values from 0 to 100.
2. RGB color model:
- R - red color. Range of values from 0 to 255.
- G - green color. Range of values from 0 to 255.
- B - blue color. Range of values from 0 to 255.
3. Lab color model:
- L - luminance. Range of values from 0 to 100.
- a – first chromatic coordinate that defines the color tone from green to purple. Range of values from 128 to 127.
- b – second chromatic coordinate that defines the color tone from blue to yellow. Range of values from 128 to 127.
Further, we will look into the CColorPicker class to create a color palette.
Development of the CColorPicker class
We create the ColorPicker.mqh file in the same directory where files of the remaining controls are currently held (<data folder>\MQLX\Include\EasyAndFastGUI\Controls). In this file we should create the CColorPicker class with standard members as shown in the code listing below:
//+------------------------------------------------------------------+
//|                                                  ColorPicker.mqh |
//|                        Copyright 2015, MetaQuotes Software Corp. |
//|                                              http://www.mql5.com |
//+------------------------------------------------------------------+
#include "Element.mqh"
#include "Window.mqh"
//+------------------------------------------------------------------+
//| Class for creating color picker                                  |
//+------------------------------------------------------------------+
class CColorPicker : public CElement
  {
private:
   //--- Pointer to the form that the control is attached to.
   CWindow          *m_wnd;
   //---
public:
                     CColorPicker(void);
                    ~CColorPicker(void);
   //---
public:
   //--- Store form pointer
   void              WindowPointer(CWindow &object)           { m_wnd=::GetPointer(object);            }
   //---
public:
   //--- Handler of chart events
   virtual void      OnEvent(const int id,const long &lparam,const double &dparam,const string &sparam);
   //--- Timer
   virtual void      OnEventTimer(void);
   //--- Moving the control
   virtual void      Moving(const int x,const int y);
   //--- (1) Show, (2) hide, (3) reset, (4) delete
   virtual void      Show(void);
   virtual void      Hide(void);
   virtual void      Reset(void);
   virtual void      Delete(void);
   //--- (1) Set, (2) reset priorities for clicking the left button of the mouse
   virtual void      SetZorders(void);
   virtual void      ResetZorders(void);
   //--- Reset color
   virtual void      ResetColors(void) {}
  };
The following properties will be available for setting graphical objects of control:
- Control area color
- Border color of control area
- Border color of color palette and markers
Properties of graphical objects of other controls can be changed after receiving their pointer.
class CColorPicker : public CElement
  {
private:
   //--- Color of (1) area and (2) area border
   color             m_area_color;
   color             m_area_border_color;
   //--- Color of palette border
   color             m_palette_border_color;
   //---
public:
   //--- Setting color (1) of area and (2) area border, (3) palette border
   void              AreaBackColor(const color clr)           { m_area_color=clr;                      }
   void              AreaBorderColor(const color clr)         { m_area_border_color=clr;               }
   void              PaletteBorderColor(const color clr)      { m_palette_border_color=clr;            }
  };
Since other controls will be used as compound parts of the color palette, it is required to connect files with classes of these controls to the ColorPicker.mqh file. Seventeen private methods and one public method will be required to create the color palette.
//+------------------------------------------------------------------+
//|                                                  ColorPicker.mqh |
//|                        Copyright 2015, MetaQuotes Software Corp. |
//|                                              http://www.mql5.com |
//+------------------------------------------------------------------+
#include "Element.mqh"
#include "Window.mqh"
#include "SpinEdit.mqh"
#include "SimpleButton.mqh"
#include "RadioButtons.mqh"
//+------------------------------------------------------------------+
//| Class for creating color palette                |
//+------------------------------------------------------------------+
class CColorPicker : public CElement
  {
private:
   //--- Objects for creating control
   CRectLabel        m_area;
   CRectCanvas       m_canvas;
   CRectLabel        m_current;
   CRectLabel        m_picked;
   CRectLabel        m_hover;
   //---
   CRadioButtons     m_radio_buttons;
   CSpinEdit         m_hsl_h_edit;
   CSpinEdit         m_hsl_s_edit;
   CSpinEdit         m_hsl_l_edit;
   //---
   CSpinEdit         m_rgb_r_edit;
   CSpinEdit         m_rgb_g_edit;
   CSpinEdit         m_rgb_b_edit;
   //---
   CSpinEdit         m_lab_l_edit;
   CSpinEdit         m_lab_a_edit;
   CSpinEdit         m_lab_b_edit;
   //---
   CSimpleButton     m_button_ok;
   CSimpleButton     m_button_cancel;
   //---
public:
   //--- Methods for creating control
   bool              CreateColorPicker(const long chart_id,const int subwin,const int x,const int y);
   //---
private:
   bool              CreateArea(void);
   bool              CreatePalette(void);
   bool              CreateCurrentSample(void);
   bool              CreatePickedSample(void);
   bool              CreateHoverSample(void);
   bool              CreateRadioButtons(void);
   bool              CreateHslHEdit(void);
   bool              CreateHslSEdit(void);
   bool              CreateHslLEdit(void);
   bool              CreateRgbREdit(void);
   bool              CreateRgbGEdit(void);
   bool              CreateRgbBEdit(void);
   bool              CreateLabLEdit(void);
   bool              CreateLabAEdit(void);
   bool              CreateLabBEdit(void);
   bool              CreateButtonOK(const string text);
   bool              CreateButtonCancel(const string text);
  };
When switching the radio button next to the color palette, two dimensional cuts of color areas will be displayed in accordance with the indicated value of a selected component. In other words, for drawing each cut first you need to make calculation relative to current value of its component. Therefore, we will write three separate methods for every color model. Index of selected radio button will be sent to all these methods (selected index).
For changing color we use methods of the instance of the CColors class that is declared in the basic class of control (CElement). There is no suitable method in the CColors class for converting from the RGB format to Lab. Therefore, where the conversion RGB->Lab is required, double correction through color master model XYZ will need to be applied: RGB->XYZ->Lab. For calculating and storing values of components of all color models in the CColorPicker class, relevant fields need to be declared.
class CColorPicker : public CElement
  {
private:
   //--- Values of components in different color models:
   //    HSL
   double            m_hsl_h;
   double            m_hsl_s;
   double            m_hsl_l;
   //--- RGB
   double            m_rgb_r;
   double            m_rgb_g;
   double            m_rgb_b;
   //--- Lab
   double            m_lab_l;
   double            m_lab_a;
   double            m_lab_b;
   //--- XYZ
   double            m_xyz_x;
   double            m_xyz_y;
   double            m_xyz_z;
   //---
private:
   //--- Draw palette based on the HSL color model (0: H, 1: S, 2: L)
   void              DrawHSL(const int index);
   //--- Draw palette based on the RGB color model (3: R, 4: G, 5: B)
   void              DrawRGB(const int index);
   //--- Draw palette based on the LAB color model (6: L, 7: a, 8: b)
   void              DrawLab(const int index);
  };
As an example we provide here a code of just one of these methods - CColorPicker::DrawHSL(), as the only difference between them is in a preliminary calculation of component value before the change. The code of other methods is available from the files attached to this article.
Calculations and drawings are performed for every pixel of display. Please note that calculations are performed relative to sizes of color palette. I.e. by using this code you can create a similar control where color palette can have a different size or shape (not necessarily a square).

Fig. 2. Example of color palette sized 500x255 pixels.
//+------------------------------------------------------------------+
//| Draw HSL palette                                                |
//+------------------------------------------------------------------+
void CColorPicker::DrawHSL(const int index)
  {
   switch(index)
     {
      //--- Hue (H) - color tone that ranges from 0 to 360
      case 0 :
        {
         //--- Calculate H component
         m_hsl_h=m_hsl_h_edit.GetValue()/360.0;
         //---
         for(int ly=0; ly<m_canvas.YSize(); ly++)
           {
            //--- Calculate L component
            m_hsl_l=ly/(double)m_canvas.YSize();
            //---
            for(int lx=0; lx<m_canvas.XSize(); lx++)
              {
               //--- Calculate S component
               m_hsl_s=lx/(double)m_canvas.XSize();
               //--- Conversion of HSL component to RGB
               m_clr.HSLtoRGB(m_hsl_h,m_hsl_s,m_hsl_l,m_rgb_r,m_rgb_g,m_rgb_b);
               //--- Connect channels
               uint rgb_color=XRGB(m_rgb_r,m_rgb_g,m_rgb_b);
               m_canvas.PixelSet(lx,m_canvas.YSize()-ly,rgb_color);
              }
           }
         break;
        }
      //--- Saturation (S) - saturation in range from 0 to 100
      case 1 :
        {
         //--- Calculate S component
         m_hsl_s=m_hsl_s_edit.GetValue()/100.0;
         //---
         for(int ly=0; ly<m_canvas.YSize(); ly++)
           {
            //--- Calculate L component
            m_hsl_l=ly/(double)m_canvas.YSize();
            //---
            for(int lx=0; lx<m_canvas.XSize(); lx++)
              {
               //--- Calculate H component
               m_hsl_h=lx/(double)m_canvas.XSize();
               //--- Conversion of HSL component to RGB
               m_clr.HSLtoRGB(m_hsl_h,m_hsl_s,m_hsl_l,m_rgb_r,m_rgb_g,m_rgb_b);
               //--- Connect channels
               uint rgb_color=XRGB(m_rgb_r,m_rgb_g,m_rgb_b);
               m_canvas.PixelSet(lx,m_canvas.YSize()-ly,rgb_color);
              }
           }
         break;
        }
      //--- Lightness (L) - lightness in the range from 0 to 100
      case 2 :
        {
         //--- Calculate L component
         m_hsl_l=m_hsl_l_edit.GetValue()/100.0;
         //---
         for(int ly=0; ly<m_canvas.YSize(); ly++)
           {
            //--- Calculate S component
            m_hsl_s=ly/(double)m_canvas.YSize();
            //---
            for(int lx=0; lx<m_canvas.XSize(); lx++)
              {
               //--- Calculate H component
               m_hsl_h=lx/(double)m_canvas.XSize();
               //--- Conversion of HSL component to RGB
               m_clr.HSLtoRGB(m_hsl_h,m_hsl_s,m_hsl_l,m_rgb_r,m_rgb_g,m_rgb_b);
               //--- Connect channels
               uint rgb_color=XRGB(m_rgb_r,m_rgb_g,m_rgb_b);
               m_canvas.PixelSet(lx,m_canvas.YSize()-ly,rgb_color);
              }
           }
         break;
        }
     }
  }
We will write the CColorPicker::DrawPaletteBorder() method to draw a border on canvas of the color palette:
class CColorPicker : public CElement
  {
private:
   //--- Draw palette border
   void              DrawPaletteBorder(void);
  };
//+------------------------------------------------------------------+
//| Draw palette border                                              |
//+------------------------------------------------------------------+
void CColorPicker::DrawPaletteBorder(void)
  {
//--- Palette size
   int x_size=m_canvas.XSize()-1;
   int y_size=m_canvas.YSize()-1;
//--- Draw border
   m_canvas.Line(0,0,x_size,0,m_palette_border_color);
   m_canvas.Line(0,y_size,x_size,y_size,m_palette_border_color);
   m_canvas.Line(0,0,0,y_size,m_palette_border_color);
   m_canvas.Line(x_size,0,x_size,y_size,m_palette_border_color);
  }
All the above mentioned methods for drawing will be eventually called in the main method for drawing the CColorPicker::DrawPalette(): color palette
class CColorPicker : public CElement
  {
private:
   //--- Draw palette
   void              DrawPalette(const int index);
  };
//+------------------------------------------------------------------+
//| Draw palette                                                     |
//+------------------------------------------------------------------+
void CColorPicker::DrawPalette(const int index)
  {
   switch(index)
     {
      //--- HSL (0: H, 1: S, 2: L)
      case 0 : case 1 : case 2 :
        {
         DrawHSL(index);
         break;
        }
      //--- RGB (3: R, 4: G, 5: B)
      case 3 : case 4 : case 5 :
        {
         DrawRGB(index);
         break;
        }
      //--- LAB (6: L, 7: a, 8: b)
      case 6 : case 7 : case 8 :
        {
         DrawLab(index);
         break;
        }
     }
//--- Draw border of palette
   DrawPaletteBorder();
//--- Update palette
   m_canvas.Update();
  }
When selecting a color from the palette or configuring a component of any color model presented in a control, values in all Edit boxes will be automatically re-calculated. We require methods that can be used to calculate components of all color models of control with regard to the one whose cut (selected radio button) is displayed on the palette at the current moment.
First of all, methods for correcting the RGB components and HSL models, that will be called in many other methods of the class, will be required:
class CColorPicker : public CElement
  {
private:
   //--- Correcting RGB components
   void              AdjustmentComponentRGB(void);
   //--- Correcting HSL components
   void              AdjustmentComponentHSL(void);
  };
//+------------------------------------------------------------------+
//| Correcting RGB components                                        |
//+------------------------------------------------------------------+
void CColorPicker::AdjustmentComponentRGB(void)
  {
   m_rgb_r=::fmin(::fmax(m_rgb_r,0),255);
   m_rgb_g=::fmin(::fmax(m_rgb_g,0),255);
   m_rgb_b=::fmin(::fmax(m_rgb_b,0),255);
  }
//+------------------------------------------------------------------+
//| Correcting HSL components                                        |
//+------------------------------------------------------------------+
void CColorPicker::AdjustmentComponentHSL(void)
  {
   m_hsl_h*=360;
   m_hsl_s*=100;
   m_hsl_l*=100;
  }
After calculating all components we need to set new values in the Edit box. In some cases it may be required to (1) set values of all components, and occasionally - (2) for all apart from currently selected one. For such situations we are going to write the CColorPicker::SetControls() method that can work in two modes.
class CColorPicker : public CElement
  {
private:
   //--- Setting current parameters in Edit boxes
   void              SetControls(const int index,const bool fix_selected);
  };
//+------------------------------------------------------------------+
//| Setting current parameters in Edit boxes                         |
//+------------------------------------------------------------------+
void CColorPicker::SetControls(const int index,const bool fix_selected)
  {
//--- If value needs to be fixed in the Edit box of the selected radio button
   if(fix_selected)
     {
      //--- HSL components
      if(index!=0)
         m_hsl_h_edit.ChangeValue(m_hsl_h);
      if(index!=1)
         m_hsl_s_edit.ChangeValue(m_hsl_s);
      if(index!=2)
         m_hsl_l_edit.ChangeValue(m_hsl_l);
      //--- RGB components
      if(index!=3)
         m_rgb_r_edit.ChangeValue(m_rgb_r);
      if(index!=4)
         m_rgb_g_edit.ChangeValue(m_rgb_g);
      if(index!=5)
         m_rgb_b_edit.ChangeValue(m_rgb_b);
      //--- Lab components
      if(index!=6)
         m_lab_l_edit.ChangeValue(m_lab_l);
      if(index!=7)
         m_lab_a_edit.ChangeValue(m_lab_a);
      if(index!=8)
         m_lab_b_edit.ChangeValue(m_lab_b);
      return;
     }
//--- If it is required to correct values in the Edit boxes of all color models
   m_hsl_h_edit.ChangeValue(m_hsl_h);
   m_hsl_s_edit.ChangeValue(m_hsl_s);
   m_hsl_l_edit.ChangeValue(m_hsl_l);
//---
   m_rgb_r_edit.ChangeValue(m_rgb_r);
   m_rgb_g_edit.ChangeValue(m_rgb_g);
   m_rgb_b_edit.ChangeValue(m_rgb_b);
//---
   m_lab_l_edit.ChangeValue(m_lab_l);
   m_lab_a_edit.ChangeValue(m_lab_a);
   m_lab_b_edit.ChangeValue(m_lab_b);
  }
To calculate components of all color models of control regarding the one whose cut (selected radio button) is displayed on the palette at the current moment, we will write three separate methods: CColorPicker::SetHSL(), CColorPicker::SetRGB() and CColorPicker::SetLab(). Since these methods have a very similar content, just one code will be provided here — CColorPicker::SetRGB(). In the beginning of this method we obtain values from Edit boxes of the RGB model in the value class fields. Obtained values are converted to HSLand Lab format. At the end we call the CColorPicker::SetControls() method in the mode of setting values for all color models of the control (false).
class CColorPicker : public CElement
  {
private:
   //--- Setting parameters of color models relative to (1) HSL, (2) RGB, (3) Lab
   void              SetHSL(void);
   void              SetRGB(void);
   void              SetLab(void);
  };
//+------------------------------------------------------------------+
//| Setting parameters of color models relative to RGB               |
//+------------------------------------------------------------------+
void CColorPicker::SetRGB(void)
  {
//--- Obtain current values of RGB components
   m_rgb_r=m_rgb_r_edit.GetValue();
   m_rgb_g=m_rgb_g_edit.GetValue();
   m_rgb_b=m_rgb_b_edit.GetValue();
//--- Conversion of RGB component to HSL components
   m_clr.RGBtoHSL(m_rgb_r,m_rgb_g,m_rgb_b,m_hsl_h,m_hsl_s,m_hsl_l);
//--- Correcting HSL components
   AdjustmentComponentHSL();
//--- Conversion of RGB component to Lab components
   m_clr.RGBtoXYZ(m_rgb_r,m_rgb_g,m_rgb_b,m_xyz_x,m_xyz_y,m_xyz_z);
   m_clr.XYZtoCIELab(m_xyz_x,m_xyz_y,m_xyz_z,m_lab_l,m_lab_a,m_lab_b);
//--- Setting current parameters in Edit boxes
   SetControls(0,false);
  }
And, finally, the main method is required where all the above mentioned methods for calculations, drawing and setting values of components are called in the Edit box of control. Here, it is the CColorPicker::SetComponents() method. It also operates in two modes. In case if the fix_selected argument equals true then components will be calculated relative to the selected color, and setting values in Edit box will be relative to the selected radio button of component. If the fix_selected argument equals false, then calculation is done relative to the indicated color model. The color palette is redrawn after all calculations.
class CColorPicker : public CElement
  {
private:
   //--- Calculation and setting color components
   void              SetComponents(const int index,const bool fix_selected);
  };
//+------------------------------------------------------------------+
//| Calculation and setting color components                         |
//+------------------------------------------------------------------+
void CColorPicker::SetComponents(const int index=0,const bool fix_selected=true)
  {
//--- If it is required to correct colors relative to selected radio button of component
   if(fix_selected)
     {
      //--- Decompose picked color to RGB components
      m_rgb_r=m_clr.GetR(m_picked_color);
      m_rgb_g=m_clr.GetG(m_picked_color);
      m_rgb_b=m_clr.GetB(m_picked_color);
      //--- Convert RGB components to HSL components
      m_clr.RGBtoHSL(m_rgb_r,m_rgb_g,m_rgb_b,m_hsl_h,m_hsl_s,m_hsl_l);
      //--- Correcting HSL components
      AdjustmentComponentHSL();
      //--- Convert RGB components to LAB components
      m_clr.RGBtoXYZ(m_rgb_r,m_rgb_g,m_rgb_b,m_xyz_x,m_xyz_y,m_xyz_z);
      m_clr.XYZtoCIELab(m_xyz_x,m_xyz_y,m_xyz_z,m_lab_l,m_lab_a,m_lab_b);
      //--- Set colors in Edit boxes
      SetControls(m_radio_buttons.SelectedButtonIndex(),true);
      return;
     }
//--- Setting parameters of color models
   switch(index)
     {
      case 0 : case 1 : case 2 :
         SetHSL();
         break;
      case 3 : case 4 : case 5 :
         SetRGB();
         break;
      case 6 : case 7 : case 8 :
         SetLab();
         break;
     }
//--- Draw palette relative to selected radio button
   DrawPalette(m_radio_buttons.SelectedButtonIndex());
  }
To set a current color of the palette that will be assigned to all marker objects, we write the CColorPicker::CurrentColor() method. The article further reveals where it will be used.
class CColorPicker : public CElement
  {
public:
   //--- Setting color selected by a user from the palette
   void              CurrentColor(const color clr);
  };
//+------------------------------------------------------------------+
//| Setting current color                                            |
//+------------------------------------------------------------------+
void CColorPicker::CurrentColor(const color clr)
  {
   m_hover_color=clr;
   m_hover.Color(clr);
   m_hover.BackColor(clr);
   m_hover.Tooltip(::ColorToString(clr));
//---
   m_picked_color=clr;
   m_picked.Color(clr);
   m_picked.BackColor(clr);
   m_picked.Tooltip(::ColorToString(clr));
//---
   m_current_color=clr;
   m_current.BackColor(clr);
   m_current.Tooltip(::ColorToString(clr));
  }
All methods for calculations are ready. Proceed to methods of handling events of control.
Methods for handling events of control
The following methods will be required for handling events and managing color palettes:
- The CColorPicker::OnHoverColor() method — obtaining color (over palette) of the mouse cursor. The program exits from the method if the mouse cursor is beyond the palette area. If the cursor is in its area, then we define its coordinates over it and obtain color of the mouse cursor. Immediately after this a new color is set for the specifically designed marker, and with the ColorToString() method, graphical objects of marker and color palette have a tooltip set – color string in the RGB format.
//+------------------------------------------------------------------+
//| Get color of the mouse cursor                                    |
//+------------------------------------------------------------------+
bool CColorPicker::OnHoverColor(const int x,const int y)
  {
//--- Exit if a focus is not on the palette
   if(!m_canvas.MouseFocus())
      return(false);
//--- Define color on the palette of the mouse cursor
   int lx =x-m_canvas.X();
   int ly =y-m_canvas.Y();
   m_hover_color=(color)::ColorToARGB(m_canvas.PixelGet(lx,ly),0);
//--- Set color and tooltip in relevant sample (marker)
   m_hover.Color(m_hover_color);
   m_hover.BackColor(m_hover_color);
   m_hover.Tooltip(::ColorToString(m_hover_color));
//--- Set tooltip for palette
   m_canvas.Tooltip(::ColorToString(m_hover_color));
   return(true);
  }
- The CColorPicker::OnClickPalette() method — handle clicking on the color palette. In the beginning of the method the object's name is checked. If clicking occurred on the palette, then color of the mouse cursor and tooltip for relevant marker are saved and set. At the very end the CColorPicker::SetComponents() method is called for calculating and setting components of color models relative to selected radio button of the component.
//+------------------------------------------------------------------+
//| Handle clicking on color palette                                 |
//+------------------------------------------------------------------+
bool CColorPicker::OnClickPalette(const string clicked_object)
  {
//--- Exit if the object name doesn't match
   if(clicked_object!=m_canvas.Name())
      return(false);
//--- Set color and tooltip in relevant sample (marker)
   m_picked_color=m_hover_color;
   m_picked.Color(m_picked_color);
   m_picked.BackColor(m_picked_color);
   m_picked.Tooltip(::ColorToString(m_picked_color));
//--- Calculate and set color components relative to selected radio button
   SetComponents();
   return(true);
  }
- The CColorPicker::OnClickRadioButton() method — handle clicking on the radio button. First, two checks have to be completed: (1) by the element identifier and (2) by displayed text of radio button. If checks are passed, then color palette is redrawn relative to selected component of color model that it belongs to
//+------------------------------------------------------------------+
//| Handle clicking on the radio button                              |
//+------------------------------------------------------------------+
bool CColorPicker::OnClickRadioButton(const long id,const int button_index,const string button_text)
  {
//--- Exit, if identifiers do not match
   if(id!=CElement::Id())
      return(false);
//--- Exit if radio button text doesn't match
   if(button_text!=m_radio_buttons.SelectedButtonText())
      return(false);
//--- Update palette with consideration of last changes
   DrawPalette(button_index);
   return(true);
  }
- The CColorPicker::OnEndEdit() method — handle entry of new value in the Edit box. It is sufficient to have a single check by element identifier, and after it is complete, components of all color models are calculated relative to the one that has a component radio button currently selected.
//+------------------------------------------------------------------+
//| Handle entry of new value in Edit box                            |
//+------------------------------------------------------------------+
bool CColorPicker::OnEndEdit(const long id,const int button_index)
  {
//--- Exit, if identifiers do not match
   if(id!=CElement::Id())
      return(false);
//--- Calculate and set color components for all color models
   SetComponents(button_index,false);
   return(true);
  }
- The CColorPicker::OnClickButtonOK() method — handle clicking on the 'OK' button. This is not a final version of the method, and it will be amended further in the article. The only thing we need to know of at the moment, is that when clicking the button, the selected color is saved as current.
//+------------------------------------------------------------------+
//| Handle clicking on the 'OK' button                               |
//+------------------------------------------------------------------+
bool CColorPicker::OnClickButtonOK(const string clicked_object)
  {
//--- Exit if the object name doesn't match
   if(clicked_object!=m_button_ok.Text())
      return(false);
//--- Save selected color
   m_current_color=m_picked_color;
   m_current.BackColor(m_current_color);
   m_current.Tooltip(::ColorToString(m_current_color));
   return(true);
  }
- The CColorPicker::OnClickButtonCancel() method — handle clicking on the 'Cancel' button. There is a single check by the object's name in this method. Then, if the form that the control is connected to has a dialog window type, then it is closed.
//+------------------------------------------------------------------+
//| Handle clicking on the 'Cancel' button                           |
//+------------------------------------------------------------------+
bool CColorPicker::OnClickButtonCancel(const string clicked_object)
  {
//--- Exit if the object name doesn't match
   if(clicked_object!=m_button_cancel.Text())
      return(false);
//--- Close window if it is a dialog window
   if(m_wnd.WindowType()==W_DIALOG)
      m_wnd.CloseDialogBox();
//---
   return(true);
  }
There are a total of six blocks in the handler of events of the CColorPicker::OnEvent() color palette. Every method from the above list will be called upon the arrival of the event identifier intended for it. The entire code of the event handler is available from the code listing below:
//+------------------------------------------------------------------+
//| Handler of chart event                                           |
//+------------------------------------------------------------------+
void CColorPicker::OnEvent(const int id,const long &lparam,const double &dparam,const string &sparam)
  {
//--- Handle the event of moving the mouse
   if(id==CHARTEVENT_MOUSE_MOVE)
     {
      //--- Exit if control is hidden
      if(!CElement::IsVisible())
         return;
      //--- Coordinates and state of the left button of the mouse
      int x=(int)lparam;
      int y=(int)dparam;
      m_mouse_state=(bool)int(sparam);
      CElement::MouseFocus(x>X() && x<X2() && y>Y() && y<Y2());
      m_canvas.MouseFocus(x>m_canvas.X() && x<m_canvas.X2()-1 && y>m_canvas.Y() && y<m_canvas.Y2()-1);
      //--- Get color of the mouse cursor
      if(OnHoverColor(x,y))
         return;
      //---
      return;
     }
//--- Handle the event of clicking the left button of the mouse on the object
   if(id==CHARTEVENT_OBJECT_CLICK)
     {
      //--- If the palette is clicked
      if(OnClickPalette(sparam))
         return;
      //---
      return;
     }
//--- Handle entering values in the Edit box
   if(id==CHARTEVENT_CUSTOM+ON_END_EDIT)
     {
      //--- Check entering new value
      if(OnEndEdit(lparam,(int)dparam))
         return;
      //---
      return;
     }
//--- Handle clicking on control
   if(id==CHARTEVENT_CUSTOM+ON_CLICK_LABEL)
     {
      //--- If radio button is clicked
      if(OnClickRadioButton(lparam,(int)dparam,sparam))
         return;
      //---
      return;
     }
//--- Handle clicking on switches of Edit boxes
   if(id==CHARTEVENT_CUSTOM+ON_CLICK_INC || id==CHARTEVENT_CUSTOM+ON_CLICK_DEC)
     {
      //--- Check entering new value
      if(OnEndEdit(lparam,(int)dparam))
         return;
      //---
      return;
     }
//--- Handle clicking on the control button
   if(id==CHARTEVENT_CUSTOM+ON_CLICK_BUTTON)
     {
      //--- Exit, if identifiers do not match
      if(lparam!=CElement::Id())
         return;
      //--- If clicked on "OK" button
      if(OnClickButtonOK(sparam))
         return;
      //--- If clicked on "CANCEL" button
      if(OnClickButtonCancel(sparam))
         return;
      //---
      return;
     }
  }
Many controls of developed library have the FastSwitching() method. It is normally used for fast switch of values in Edit boxes, scrollbars of lists or tables. However, here it is needed to re-draw the color palette when fast switching of a counter of the component's Edit box is activated. The code of the CColorPicker::FastSwitching() method is available from the files attached to the article.
Color button
Class for creating a color palette is ready, but one element for its full-fledged use is still missing. We need a button that will be used to call the window with color palette. The button should have an option to see color set at the current moment. We will write the class for creating such button. The list below shows its compound parts.
- Control area
- Text label with description
- Indicator of selected color
- Button area
- Description of selected color in the RGB format
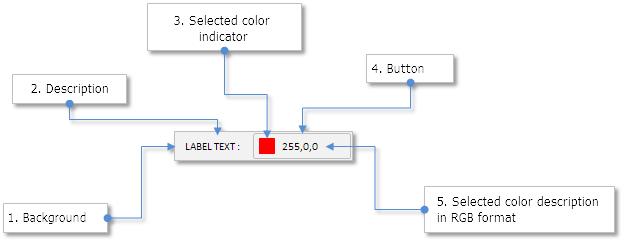
Fig. 3. Compound parts of the button to call a color palette.
In the previous articles we have already considered similar controls, therefore we will not provide here a description of this code class. Instead of that we will proceed to the interaction part between the button and the color palette. Please find the ColorButton.mqh file with the CColorButton class in the archive attached to the article to learn more.
We need to connect the color palette with the button for calling it. We will do it through the button pointer that will be stored in the CColorPicker class. For this purpose we connect the ColorButton.mqh file to the ColorPicker.mqh file and declare the instance of the CColorButton class where the pointer to the button for calling the color palette is stored.
//+------------------------------------------------------------------+
//|                                                  ColorPicker.mqh |
//|                        Copyright 2015, MetaQuotes Software Corp. |
//|                                              http://www.mql5.com |
//+------------------------------------------------------------------+
#include "Element.mqh"
#include "Window.mqh"
#include "SpinEdit.mqh"
#include "SimpleButton.mqh"
#include "RadioButtons.mqh"
#include "ColorButton.mqh"
//+------------------------------------------------------------------+
//| Class for creating color picker                                  |
//+------------------------------------------------------------------+
class CColorPicker : public CElement
  {
private:
   //--- Pointer to the button that calls control for color picking
   CColorButton     *m_color_button;
  };
A public method for storing pointer to the button will also be required. In order to simplify the interaction between the call button and the palette, all palette markers will be assigned a current color of the button when sending button's object for storing its pointer. A window that has a color palette connected will be opened then (see the code listing below).
class CColorPicker : public CElement
  {
public:
   //--- Store pointer to the button that calls color palette
   void              ColorButtonPointer(CColorButton &object);
  };
//+------------------------------------------------------------------+
//| Store pointer to the button that calls color palette and          |
//| open window that the palette is connected to                     |
//+------------------------------------------------------------------+
void CColorPicker::ColorButtonPointer(CColorButton &object)
  {
//--- Store pointer to the button
   m_color_button=::GetPointer(object);
//--- Set color of sent button to all markers of the palette
   CurrentColor(object.CurrentColor());
//--- Open window that the palette is connected to
   m_wnd.Show();
  }
Furthermore, we will require methods to set and obtain color of the button. Set color will appear on the marker (indicator) of the button, and for additional information in the button text, a string presentation of color in the RGB format is displayed.
class CColorButton : public CElement
  {
public:
   //--- Return/set current color of parameter
   color             CurrentColor(void)                 const { return(m_current_color);       }
   void              CurrentColor(const color clr);
  };
//+------------------------------------------------------------------+
//| Change current color of parameter                                |
//+------------------------------------------------------------------+
void CColorButton::CurrentColor(const color clr)
  {
   m_current_color=clr;
   m_button_icon.BackColor(clr);
   m_button_label.Description(::ColorToString(clr));
  }
And one small addition to the CColorPicker::OnClickButtonOK() method. If a pointer to the button is set then:
- a color selected on the palette is set for the button;
- window that the color palette is connected to can be closed;
- message that a new color is selected in the palette is generated. A new identifier of the ON_CHANGE_COLOR event contained in the Defines.mqh file is required here. This message will also contain (1) control identifier (2) element index and (3) button text that called color palette. This way, you will be able to understand which button this message refers to in the event handler, and that will help us handle the event correctly;
- pointer to the button is zeroed out.
If there is no pointer to the button, then there will be a message with a tooltip displayed for a developer of the MQL application in the terminal's log.
//+------------------------------------------------------------------+
//| Handle clicking on the 'OK' button                               |
//+------------------------------------------------------------------+
bool CColorPicker::OnClickButtonOK(const string clicked_object)
  {
//--- Exit if the object name doesn't match
   if(clicked_object!=m_button_ok.Text())
      return(false);
//--- Save selected color
   m_current_color=m_picked_color;
   m_current.BackColor(m_current_color);
   m_current.Tooltip(::ColorToString(m_current_color));
//--- If there is a pointer to the button of calling window for color selection
   if(::CheckPointer(m_color_button)!=POINTER_INVALID)
     {
      //--- Set a selected color for the button
      m_color_button.CurrentColor(m_current_color);
      //--- Close window
      m_wnd.CloseDialogBox();
      //--- Send a message about it
      ::EventChartCustom(m_chart_id,ON_CHANGE_COLOR,CElement::Id(),CElement::Index(),m_color_button.LabelText());
      //--- Reset pointer
      m_color_button=NULL;
     }
   else
     {
      //--- If there is no pointer and it is a dialog window,
      //    display message that there is not pointer to the button for calling the control
      if(m_wnd.WindowType()==W_DIALOG)
         ::Print(__FUNCTION__," > Non-valid pointer of calling control (CColorButton).");
     }
//---
   return(true);
  }
Now we have everything in order to proceed with testing the color palette.
Test of controls
Any Expert Advisor from the previous article can be used for testing. Let's make a copy and keep there only a main menu and a status string. In the main window (W_MAIN) of graphical interface we create five buttons for calling a dialog window (W_DIALOG) with color palette. In other words, it is sufficient to create one color palette for the entire MQL application. Every time when clicking on the button for calling the dialog window with a color palette, the same window will be called. But button pointer at the point of calling must be sent to the CColorPicker class independently. It will be further shown how this should be implemented in the custom class of application.
In the custom class named CProgram we need to declare instances of classes for creating an additional window (CWindow), five buttons for calling the color palettes CColorButton and CColorPicker, and also methods for their creation with offsets from the extreme point of the form.
class CProgram : public CWndEvents
  {
private:
   //--- Form 2 - window with color palette for color selection
   CWindow           m_window2;
   //--- Buttons for calling window with color palette
   CColorButton      m_color_button1;
   CColorButton      m_color_button2;
   CColorButton      m_color_button3;
   CColorButton      m_color_button4;
   CColorButton      m_color_button5;
   //--- Color palette
   CColorPicker      m_color_picker;
   //---
private:
   //--- Form 2
   bool              CreateWindow2(const string text);
   //--- Buttons for calling color palette
#define COLORBUTTON1_GAP_X    (7)
#define COLORBUTTON1_GAP_Y    (50)
   bool              CreateColorButton1(const string text);
#define COLORBUTTON2_GAP_X    (7)
#define COLORBUTTON2_GAP_Y    (75)
   bool              CreateColorButton2(const string text);
#define COLORBUTTON3_GAP_X    (7)
#define COLORBUTTON3_GAP_Y    (100)
   bool              CreateColorButton3(const string text);
#define COLORBUTTON4_GAP_X    (7)
#define COLORBUTTON4_GAP_Y    (125)
   bool              CreateColorButton4(const string text);
#define COLORBUTTON5_GAP_X    (7)
#define COLORBUTTON5_GAP_Y    (150)
   bool              CreateColorButton5(const string text);
   //--- Color palette
#define COLORPICKER_GAP_X     (1)
#define COLORPICKER_GAP_Y     (20)
   bool              CreateColorPicker(void);
  };
Codes of methods of creating buttons for calling color palette are practically identical, therefore we will provide here an example of just one of them. Difference may only be in setting the initial color that will be displayed in the button indicator after the setting, and also the text in description.
//+------------------------------------------------------------------+
//| Create button to call color palette 1                            |
//+------------------------------------------------------------------+
bool CProgram::CreateColorButton1(const string text)
  {
//--- Store pointer to the window
   m_color_button1.WindowPointer(m_window1);
//--- Coordinates
   int x=m_window1.X()+COLORBUTTON1_GAP_X;
   int y=m_window1.Y()+COLORBUTTON1_GAP_Y;
//--- Set properties before creation
   m_color_button1.XSize(195);
   m_color_button1.YSize(18);
   m_color_button1.ButtonXSize(100);
   m_color_button1.ButtonYSize(18);
   m_color_button1.AreaColor(clrWhiteSmoke);
   m_color_button1.LabelColor(clrBlack);
   m_color_button1.BackColor(C'220,220,220');
   m_color_button1.BorderColor(clrSilver);
   m_color_button1.CurrentColor(clrRed);
//--- Create element
   if(!m_color_button1.CreateColorButton(m_chart_id,m_subwin,text,x,y))
      return(false);
//--- Add pointer to control in the base
   CWndContainer::AddToElementsArray(0,m_color_button1);
   return(true);
  }
Code of the method for creating the form of the dialog window for a color palette differs from the main window only by having the window type (W_DIALOG) be indicated. In addition to this, we set a unique image for this window that indicates its purpose. All images are attached in the archive at the end of the article.
//+------------------------------------------------------------------+
//| Create form 2 for color palette                                  |
//+------------------------------------------------------------------+
#resource "\\Images\\EasyAndFastGUI\\Icons\\bmp16\\color_picker.bmp"
//---
bool CProgram::CreateWindow2(const string caption_text)
  {
//--- Store pointer to the window
   CWndContainer::AddWindow(m_window2);
//--- Coordinates
   int x=(m_window2.X()>0) ? m_window2.X() : 30;
   int y=(m_window2.Y()>0) ? m_window2.Y() : 30;
//--- Properties
   m_window2.Movable(true);
   m_window2.XSize(350);
   m_window2.YSize(286);
   m_window2.WindowType(W_DIALOG);
   m_window2.WindowBgColor(clrWhiteSmoke);
   m_window2.WindowBorderColor(clrLightSteelBlue);
   m_window2.CaptionBgColor(clrLightSteelBlue);
   m_window2.CaptionBgColorHover(clrLightSteelBlue);
   m_window2.IconFile("Images\\EasyAndFastGUI\\Icons\\bmp16\\color_picker.bmp");
//--- Creating a form
   if(!m_window2.CreateWindow(m_chart_id,m_subwin,caption_text,x,y))
      return(false);
//---
   return(true);
  }
The listing below has the code of the CProgram::CreateColorPicker() method for creating a color palette. It is important to save a pointer to the dialog window that a control will be connected to. When adding a control pointer in the base of controls, window index that the element is connected to needs to be sent. In this case it is a dialog window index [1].
//+------------------------------------------------------------------+
//| Create color palette for color selection                         |
//+------------------------------------------------------------------+
bool CProgram::CreateColorPicker(void)
  {
//--- Store pointer to the window
   m_color_picker.WindowPointer(m_window2);
//--- Coordinates
   int x=m_window2.X()+COLORPICKER_GAP_X;
   int y=m_window2.Y()+COLORPICKER_GAP_Y;
//--- Create control
   if(!m_color_picker.CreateColorPicker(m_chart_id,m_subwin,x,y))
      return(false);
//--- Add pointer to control in the base
   CWndContainer::AddToElementsArray(1,m_color_picker);
   return(true);
  }
We need to ensure that when clicking the button, its pointer is sent to the color palette. It may be done in the handler of events of the custom class CProgram::OnEvent(). When clicking the button, a message with the ON_CLICK_BUTTON event identifier is generated. The message also contains the text of the button description used to define which object of the CColorButton type needs to be sent to the color palette. Right after sending the object of the button, a window with the color palette will open, and the color of the button whose object was just sent will be displayed in all its markers. It is demonstrated in the code listing below:
//+------------------------------------------------------------------+
//| Event handler                                                    |
//+------------------------------------------------------------------+
void CProgram::OnEvent(const int id,const long &lparam,const double &dparam,const string &sparam)
  {
//--- Button click event
   if(id==CHARTEVENT_CUSTOM+ON_CLICK_BUTTON)
     {
      //--- If button 1 is clicked
      if(sparam==m_color_button1.LabelText())
        {
         m_color_picker.ColorButtonPointer(m_color_button1);
         return;
        }
      //--- If button 2 is clicked
      if(sparam==m_color_button2.LabelText())
        {
         m_color_picker.ColorButtonPointer(m_color_button2);
         return;
        }
      //--- If button 3 is clicked
      if(sparam==m_color_button3.LabelText())
        {
         m_color_picker.ColorButtonPointer(m_color_button3);
         return;
        }
      //--- If button 4 is clicked
      if(sparam==m_color_button4.LabelText())
        {
         m_color_picker.ColorButtonPointer(m_color_button4);
         return;
        }
      //--- If button 5 is clicked
      if(sparam==m_color_button5.LabelText())
        {
         m_color_picker.ColorButtonPointer(m_color_button5);
         return;
        }
     }
  }
After the color selection is confirmed by clicking "ОК" button on the color palette, a message with the ON_CHANGE_COLOR identifier will be handled as shown in the following listing of the code.
void CProgram::OnEvent(const int id,const long &lparam,const double &dparam,const string &sparam)
  {
//--- Event of changing color using the color palette
   if(id==CHARTEVENT_CUSTOM+ON_CHANGE_COLOR)
     {
      //---If identifiers of controls match
      if(lparam==m_color_picker.Id())
        {
         //--- If the response is from button 1
         if(sparam==m_color_button1.LabelText())
           {
            //--- Change object color that refers to button 1...
            return;
           }
         //--- If the response is from button 2
         if(sparam==m_color_button2.LabelText())
           {
            //--- Change object color that refers to button 2...
            return;
           }
         //--- If the response is from button 3
         if(sparam==m_color_button3.LabelText())
           {
            //--- Change color of the object that refers to button 3...
            return;
           }
         //--- If the response is from button 4
         if(sparam==m_color_button4.LabelText())
           {
            //--- Change color of the object that refers to button 4...
            return;
           }
         //--- If the response is from button 5
         if(sparam==m_color_button5.LabelText())
           {
            //--- Change color of the object that refers to button 5...
            return;
           }
        }
      return;
     }
  }
Compile the program and upload it on the chart in the terminal. The result appears on the screenshot below:

Fig. 4. Test of buttons for calling a color palette.
By clicking the button for calling a color palette from five color buttons presented on the main window, the color picker window will open as shown on the following screenshot:

Fig. 5. Test of the color picker element.
Now everything operates as it was expected.
Conclusion
A complex compound control of the graphical interface called color picker was presented in this article (first chapter of part 9 of series of articles). A special button for calling a color palette has been created as an additional control. Now users of the developed library have an opportunity to manage colors of objects by using a graphical interface of its MQL application.
The following article will contain a description of code classes of controls, like progress bar and line chart.
Below are the materials from part nine of series of articles that you can download on your PC in order to test how everything operates. For any questions related to the use of material provided in these files, you can refer to a detailed description of the process of developing library in one of articles in the list provided below, or ask questions in comments to this article.
List of articles (chapters) of the part nine:
- Graphical interfaces IX: the color picker control (Chapter 1)
- Graphical interfaces IX: the progress bar and line chart controls (Chapter 2)
Translated from Russian by MetaQuotes Ltd.
Original article: https://www.mql5.com/ru/articles/2579
Warning: All rights to these materials are reserved by MetaQuotes Ltd. Copying or reprinting of these materials in whole or in part is prohibited.
This article was written by a user of the site and reflects their personal views. MetaQuotes Ltd is not responsible for the accuracy of the information presented, nor for any consequences resulting from the use of the solutions, strategies or recommendations described.

 Graphical Interfaces IX: The Progress Bar and Line Chart Controls (Chapter 2)
 Cross-Platform Expert Advisor: Reuse of Components from the MQL5 Standard Library
 LifeHack for trader: four backtests are better than one
- Free trading apps
- Over 8,000 signals for copying
- Economic news for exploring financial markets
You agree to website policy and terms of use
It is you, a loner trying to create a visual studio, who do not understand the aspects and applications of colour palettes, while we, mere mortals, have already had to develop colour pickers for ourselves and apply them in our own developments. Now it will be in one library.
Of course, you can try and find a use for this tool in mql applications, but its real use makes sense only in the visual studio.
I propose to take the author's library as a basis, and all developers using it will jointly create a visual studio for creating interface mql applications.
If all developers will coordinate their work, then perhaps, by joint efforts something can work out.
Of course, to coordinate joint work needs a leader, - the main developer, seeing the plan for further development of the idea and its embodiment, but such a person is already there. In my opinion, it is the author of this series of articles.
It seems that the idea is constructive and promising).
P.S. If the project of joint creation of visual studio by developers will be started, coordinated and led, I will definitely join the common work.
Well, if you understand the necessity of using colour picker in an application and it is not difficult to give an example, I will be grateful.
Elementary: to select the colour of icons or lines created by the application during operation. Why restart the program just to change the colour of created objects?
Andrei, why would you do that? :)))
You could have given a person the freedom for the flight of thought
Situation:
Normal window (Main) -> open a Dialog window (Config) -> that open a new Dialog window that has the Color Picker.
When you click OK or Cancel button in Color Picker window, the focus go to the Main window (grandparent) instead of Config window (parent).