
How to create bots for Telegram in MQL5

Introduction
During the F8 conference held in San Francisco on 12th of April in 2016, Facebook announced the integration of API for bots into the Messenger. The same day a major update for the Telegram Bot Platform was released. Version 2.0 has pleasantly surprised with its functionality. It seems that bots that used to be popular in the ICQ era are now experiencing a comeback. At the new stage of development bots were given a thoughtful functionality, open interface for programing, and multimedia support. Basically, they have all the conditions to become irreplaceable when you want to find, see or purchase something.
This article is a step-by-step manual for creating bots for Telegram in MQL5. So what is a "bot"? A bot (shortened from "robot") is a special account in Telegram for exchanging messages. Bots operate on your (client) side, and interact with the Telegram server using a special set of commands that are part of Bot API. Before we proceed with creating a bot, please download Telegram and login to it. The registration is linked to the telephone number, but you can also search by @username. It is time now to get acquainted with a folder of all bots.
Registration of a new bot
A special bot @BotFather is in charge of registering and setting up bots. We will find it through the search engine. After adding it to the list of contacts, we will start communicating with it using the /start command. As a response it will send you a list of all available commands, as shown in Fig. 1.
 .
.
Fig.1. List of @BotFather commands.
With the /newbot command we begin the registration of a new bot. We need to come up with two names. The first one is a name of a bot that can be set in your native language. The second one is a username of a bot in Latin that ends with a “bot” prefix. As a result, we obtain a token – the access key for operating with a bot through API. The example of registration is shown in Fig. 2.

Fig.2. Registration of a new bot.
If you wish, few parameters can be amended. I suggest keeping the settings for the inline mode. Otherwise, our bots won't be able to work with it. I would recommend setting only the cosmetic qualities:- /setcommands – setting the list of supported commands. This list will appear to users as a tooltip when entering the symbol "/" in the chat window.
- /setuserpic – setting the profile picture. Without one, a bot just isn't presentable enough.
- /setdescription – a text displayed as a greeting when a bot is added to the Messenger. Normally, there are few sentences to describe the purpose of a bot.
So, a new bot is registered. Let's discuss now the modes it can be used in.
Operation mode for bots
Telegram has three schemes of interaction between bots and users. First - private chats. Every user communicates with a bot independently from each other, as shown if Fig 3, by making requests and receiving replies.

Fig.3. Bot and private chats.
Users send messages to a bot. They are stored on the server for no longer than 24 hours, and are removed afterwards. A bot has time to request these messages and to respond to them. This is the main mode that our bots will be operating in.
The second mode involves group chats. In this case, the message sent by any member of a group is seen by the entire group (Fig. 4).

Fig.4. Bot in a group chat.
With regard to bots, you can let them join groups by using the /setjoingroups command. If a bot is added to a group, then by using the /setprivacy command you can set the option to either receive all messages, or only those that start with a sign of the symbol team “/”. To be honest, I only managed to think of one bot appointment in this mode – statistics of messages for a subsequent analysis.
The third mode focuses on operation on a channel. Telegram channels are accounts for transmitting messages for a wide audience that support an unlimited number of subscribers. The important feature of channels is that users can't leave comments and likes on the news feed (one-way connection). Only channel administrators can create messages there (Fig. 5).

Fig.5. Bot as a channel administrator.
Bots can be also added to the list of administrators. This makes a channel an ideal tool for providing trading signals. A bit later we will write a simple bot that publishes signals from the standard MACD indicator. A new public channel can be created through the messenger's “New Channel” menu. Don't forget to add your bot to the list of channel's admins. It is achieved through the property window of the channel. All preparations have been concluded to let us proceed with programming.
Handling a stream of messages
While writing this article, I had a goal to create a class that would undertake the routine of handling messages and allow to focus on the bot's logic. As a result, the CCustomBot class that implements a minimum functionality for work was written.
Communication with a server occurs through POST requests using the WebRequst function. Every command has its own URL:
https://api.telegram.org/bot< TOKEN >/ METHOD_NAME
where TOKEN is a token of a registered bot; METHOD_NAME — a list of supported methods.
Responses from the server arrive in the JSON format, therefore a good JSON parser was required. I have applied a native parser JSON Serialization and Deserialization. I would like to thank Alexey (sergeev) for the work he accomplished. Also, the panel for displaying some parameters is also applied. The CComment class taken from the Codebase was suitable for this task. Names of class public methods were borrowed from the documentation for Bot API to achieve universality. The methods that we have managed to implement in the class are listed below:
In order to understand how to use these functions, we are going to get deeper into programming.
GetMe
Since during every request a token is sent, then, above all, the GetMe function that checks for its credibility is implemented. It is advisable to perform this check at the start of EA, and notify a user in case of failure.
int GetMe() | |
| Returned value | error code |
If successful, GetMe returns 0, and you can find out the bot username through the Name() method. This name is not used for operation. However, it will be displayed on the panel for information purposes. The address like telegram.me/<botname> allows to use a Web-version of Messenger and will serve as a link to advertise your bot. The EA that checks the token in OnInit would look as follows:
//+------------------------------------------------------------------+
//|                                               Telegram_GetMe.mq5 |
//|                        Copyright 2014, MetaQuotes Software Corp. |
//|                                              https://www.mql5.com |
//+------------------------------------------------------------------+
#property copyright "Copyright 2014, MetaQuotes Software Corp."
#property link      "https://www.mql5.com"
#property version   "1.00"
#property strict

#include <Telegram.mqh>

input string InpToken="177791741:AAH0yB3YV7ywm80af_-AGqb7hzTR_Ud9DhQ";//Token

CCustomBot bot;
int getme_result;
//+------------------------------------------------------------------+
//|   OnInit                                                         |
//+------------------------------------------------------------------+
int OnInit()
  {
//--- set token
   bot.Token(InpToken);
//--- check token
   getme_result=bot.GetMe();
//--- run timer
   EventSetTimer(3);
   OnTimer();
//--- done
   return(INIT_SUCCEEDED);
  }
//+------------------------------------------------------------------+
//|   OnDeinit                                                       |
//+------------------------------------------------------------------+
void OnDeinit(const int reason)
  {
   Comment("");
  }
//+------------------------------------------------------------------+
//|   OnTimer                                                        |
//+------------------------------------------------------------------+
void OnTimer()
  {
//--- show error message end exit
   if(getme_result!=0)
     {
      Comment("Error: ",GetErrorDescription(getme_result));
      return;
     }
//--- show bot name
   Comment("Bot name: ",bot.Name());

//---{ insert your code here }
  }
//+------------------------------------------------------------------+
GetUpdates
The main function GetUpdates reads an array of messages stored on the server. It needs to be called by the timer. A period of updating the timer shouldn't be set below 1 second in order to avoid server overload.
int GetUpdate() | |
| Returned value | error code |
Let's have a look inside this function. When it is called, reading and parsing of all unread messages received from users is performed. The example of one of those messages is provided below:
{
   "ok":true,
   "result":[
      {
         "update_id":349778698,
         "message":{
            "message_id":2,
            "from":{
               "id":198289825,
               "first_name":"Andriy",
               "last_name":"Voitenko",
               "username":"avaticks"
            },
            "chat":{
               "id":198289825,
               "first_name":"Andriy",
               "last_name":"Voitenko",
               "username":"avaticks",
               "type":"private"
            },
            "date":1459775817,
            "text":"\/start"
         }
      }
   ]
}
A user with avaticks username has sent the /start command to the bot. The point is to save such messages and to respond to them in the future. The chat number chat[id] is a unique identifier. The same user communicating with a bot through various devices has different chat identifiers. This parameter is suitable as a unique key for building a chat list. While operating, bots will accumulate the chat array and update the last received message in each of them. If we have responded to it, then this message has been handled and we can set the done flag to it. The chat type is also known. It can be either private, or group.
In order to write your own bot, it is simply required to inherit from CCustomBot and re-determine the ProcessMessage virtual function in the class, that is provided for implementing the operation logic. A full-fledged bot, as per Telegram documentation, needs to know how to respond to two commands: "/start" and "/help". Let's write the first bot that will respond to them.
//+------------------------------------------------------------------+
//|                                          Telegram_GetUpdates.mq5 |
//|                        Copyright 2014, MetaQuotes Software Corp. |
//|                                              https://www.mql5.com |
//+------------------------------------------------------------------+
#property copyright "Copyright 2014, MetaQuotes Software Corp."
#property link      "https://www.mql5.com"
#property version   "1.00"
#property strict

#include <Telegram.mqh>
//+------------------------------------------------------------------+
//|   CMyBot                                                         |
//+------------------------------------------------------------------+
class CMyBot: public CCustomBot
  {
public:
   void ProcessMessages(void)
     {
      for(int i=0; i<m_chats.Total(); i++)
        {
         CCustomChat *chat=m_chats.GetNodeAtIndex(i);
         //--- if the message is not processed
         if(!chat.m_new_one.done)
           {
            chat.m_new_one.done=true;
            string text=chat.m_new_one.message_text;

            //--- start
            if(text=="/start")
               SendMessage(chat.m_id,"Hello, world! I am bot. \xF680");

            //--- help
            if(text=="/help")
               SendMessage(chat.m_id,"My commands list: \n/start-start chatting with me \n/help-get help");
           }
        }
     }
  };

//---
input string InpToken="177791741:AAH0yB3YV7ywm80af_-AGqb7hzTR_Ud9DhQ";//Token
//---
CMyBot bot;
int getme_result;
//+------------------------------------------------------------------+
//|   OnInit                                                         |
//+------------------------------------------------------------------+
int OnInit()
  {
//--- set token
   bot.Token(InpToken);
//--- check token
   getme_result=bot.GetMe();
//--- run timer
   EventSetTimer(3);
   OnTimer();
//--- done
   return(INIT_SUCCEEDED);
  }
//+------------------------------------------------------------------+
//|   OnDeinit                                                       |
//+------------------------------------------------------------------+
void OnDeinit(const int reason)
  {
   Comment("");
  }
//+------------------------------------------------------------------+
//|   OnTimer                                                        |
//+------------------------------------------------------------------+
void OnTimer()
  {
//--- show error message end exit
   if(getme_result!=0)
     {
      Comment("Error: ",GetErrorDescription(getme_result));
      return;
     }
//--- show bot name
   Comment("Bot name: ",bot.Name());
//--- reading messages
   bot.GetUpdates();
//--- processing messages
   bot.ProcessMessages();
  }
//+------------------------------------------------------------------+
The result achieved is shown in figure 6.

Fig.6. Bot with a minimal set of commands.
Working with a keyboard
For interactive communication with users for bots, developers have come up with an idea of a “keyboard”. When sending messages for every chat, a "keyboard" with a pre-selected set of keys can be displayed. When pressing a key, a user sends a message with a text indicated on it. This way, the interaction between a bot and a user is significantly simplified.
The class has three functions for working with the keyboard. The first function creates the keyboard's object.
string ReplyKeyboardMarkup(const string keyboard, const bool resize, const bool one_time) | |
| keyboard | string that sets the location of keys |
| resize | permission to resize the keyboard size |
| one_time | to show keyboard just one time. The keyboard disappears after pressing the key. |
| Returned value | The string (JSON object) that needs to be transmitted as the reply_markup parameter when sending a message with SendMessage |
The second function hides the keyboard.
string ReplyKeyboardHide() | |
| Returned value | The string (JSON object) that needs to be transmitted as the reply_markup parameter when sending a message with SendMessage |
The third function allows to send a small panel whose type indicates that a bot expects an answer from you in the form of a text (the keyboard is not displayed).
string ForceReply() | |
| Returned value | The string (JSON object) that needs to be transmitted as the reply_markup parameter when sending a message with SendMessage |
Now we proceed to analyzing how these functions are used.
SendMessage
The keyboard can't be displayed or hidden by itself. The action is sent with a message. The SendMessage function for sending messages to the chat looks as follows:
int SendMessage(const long chat_id, const string text, const string reply_markup=NULL) | |
| chat_id | chat number |
| text | message text |
| reply markup | keyboard (JSON object) |
| Returned value | error code |
The keyboard is optional in this case. We can send simple text messages from our MQL-programs. In my opinion, this function is more interesting that the native SendNotification. Firstly, we can send messages more often (approximately once per second). Secondly, the HTML format is supported. In addition to that, the ability to send Emoji is a serious bonus.
Тelegram supports a number of Emoji characters from the table that can be viewed here. As you can see, the majority of Emoji codes are in the range of 1F300 – 1F700. Their bitness goes beyond two-byte code of strings acceptable in MQL5. If you remove higher digits so only a two-bite number remains, then the obtained range (F300 – F700) falls in the area (E000— F8FF) that in the Unicode table is reserved for a certain use. This way, nothing stops us from using 2 lower bites for sending Emoji. The string message with a classic Emoji with a code U+1F642 looks as follows:
string text="Have a nice day.\xF642";//message text with Emoji U+1F642
This is also fair for keys that are a text, in fact. Nothing stops us from using Emoji on keys. Let's write a sample for displaying three keys with the event handler.
//+------------------------------------------------------------------+
//|                                         Telegram_SendMessage.mq5 |
//|                        Copyright 2014, MetaQuotes Software Corp. |
//|                                              https://www.mql5.com |
//+------------------------------------------------------------------+
#property copyright "Copyright 2014, MetaQuotes Software Corp."
#property link      "https://www.mql5.com"
#property version   "1.00"
#property strict

#include <Telegram.mqh>
//+------------------------------------------------------------------+
//|   CMyBot                                                         |
//+------------------------------------------------------------------+
class CMyBot: public CCustomBot
  {
private:
   string            m_button[3];
public:
   //+------------------------------------------------------------------+
   void CMyBot::CMyBot(void)
     {
      m_button[0]="Button #1";
      m_button[1]="Button #2";
      m_button[2]="Button #3";
     }

   //+------------------------------------------------------------------+
   string GetKeyboard()
     {
      return("[[\""+m_button[0]+"\"],[\""+m_button[1]+"\"],[\""+m_button[2]+"\"]]");
     }

   //+------------------------------------------------------------------+
   void ProcessMessages(void)
     {
      for(int i=0;i<m_chats.Total();i++)
        {
         CCustomChat *chat=m_chats.GetNodeAtIndex(i);
         if(!chat.m_new_one.done)
           {
            chat.m_new_one.done=true;
            string text=chat.m_new_one.message_text;

            //--- start or help commands
            if(text=="/start" || text=="/help")
               bot.SendMessage(chat.m_id,"Click on the buttons",bot.ReplyKeyboardMarkup(GetKeyboard(),false,false));

            //--- on click event
            int total=ArraySize(m_button);
            for(int k=0;k<total;k++)
              {
               if(text==m_button[k])
                  bot.SendMessage(chat.m_id,m_button[k],bot.ReplyKeyboardMarkup(GetKeyboard(),false,false));
              }
           }
        }
     }
  };

input string InpToken="177791741:AAH0yB3YV7ywm80af_-AGqb7hzTR_Ud9DhQ";//Token

CMyBot bot;
int getme_result;
//+------------------------------------------------------------------+
//|   OnInit                                                         |
//+------------------------------------------------------------------+
int OnInit()
  {
//--- set token
   bot.Token(InpToken);
//--- check token
   getme_result=bot.GetMe();
//--- run timer
   EventSetTimer(1);
   OnTimer();
//--- done
   return(INIT_SUCCEEDED);
  }
//+------------------------------------------------------------------+
//|   OnDeinit                                                       |
//+------------------------------------------------------------------+
void OnDeinit(const int reason)
  {
   Comment("");
  }
//+------------------------------------------------------------------+
//|   OnTimer                                                        |
//+------------------------------------------------------------------+
void OnTimer()
  {
//--- show error message end exit
   if(getme_result!=0)
     {
      Comment("Error: ",GetErrorDescription(getme_result));
      return;
     }
//--- show bot name
   Comment("Bot name: ",bot.Name());
//--- reading messages
   bot.GetUpdates();
//--- processing messages
   bot.ProcessMessages();
  }
//+------------------------------------------------------------------+
As a result we will get a message with the keyboard as displayed in Fig. 7.

Fig.7. Message with keyboard.
//+------------------------------------------------------------------+
//|                                         Telegram_SendMessage.mq5 |
//|                        Copyright 2014, MetaQuotes Software Corp. |
//|                                              https://www.mql5.com |
//+------------------------------------------------------------------+
#property copyright "Copyright 2014, MetaQuotes Software Corp."
#property link      "https://www.mql5.com"
#property version   "1.00"
#property strict

#include <Telegram.mqh>

#define MUTE_TEXT       "Mute"
#define UNMUTE_TEXT     "Unmute"

#define LOCK_TEXT       "Lock"
#define UNLOCK_TEXT     "Unlock"

#define RADIO_SELECT    "\xF518"
#define RADIO_EMPTY     "\x26AA"

#define MUTE_CODE       "\xF515"
#define UNMUTE_CODE     "\xF514"

#define LOCK_CODE       "\xF512"
#define UNLOCK_CODE     "\xF513"
//+------------------------------------------------------------------+
//|   CMyBot                                                         |
//+------------------------------------------------------------------+
class CMyBot: public CCustomBot
  {
private:
   string            m_radio_button[3];
   int               m_radio_index;
   bool              m_lock_state;
   bool              m_mute_state;

public:
   //+------------------------------------------------------------------+
   void CMyBot::CMyBot(void)
     {
      m_radio_button[0]="Radio Button #1";
      m_radio_button[1]="Radio Button #2";
      m_radio_button[2]="Radio Button #3";
      m_radio_index=0;
      m_lock_state=false;
      m_mute_state=true;
     }

   //+------------------------------------------------------------------+
   string GetKeyboard()
     {
      //---
      string radio_code[3]={RADIO_EMPTY,RADIO_EMPTY,RADIO_EMPTY};
      if(m_radio_index>=0 && m_radio_index<=2)
         radio_code[m_radio_index]=RADIO_SELECT;
      //---
      string mute_text=UNMUTE_TEXT;
      string mute_code=UNMUTE_CODE;
      if(m_mute_state)
        {
         mute_text=MUTE_TEXT;
         mute_code=MUTE_CODE;
        }
      //---
      string lock_text=UNLOCK_TEXT;
      string lock_code=UNLOCK_CODE;
      if(m_lock_state)
        {
         lock_text=LOCK_TEXT;
         lock_code=LOCK_CODE;
        }
      //---
      //Print(m_lock.GetKey());
      return(StringFormat("[[\"%s %s\"],[\"%s %s\"],[\"%s %s\"],[\"%s %s\",\"%s %s\"]]",
             radio_code[0],m_radio_button[0],
             radio_code[1],m_radio_button[1],
             radio_code[2],m_radio_button[2],
             lock_code,lock_text,
             mute_code,mute_text));
     }

   //+------------------------------------------------------------------+
   void ProcessMessages(void)
     {
      for(int i=0;i<m_chats.Total();i++)
        {
         CCustomChat *chat=m_chats.GetNodeAtIndex(i);
         if(!chat.m_new_one.done)
           {
            chat.m_new_one.done=true;
            string text=chat.m_new_one.message_text;

            //--- start
            if(text=="/start" || text=="/help")
              {
               bot.SendMessage(chat.m_id,"Click on the buttons",bot.ReplyKeyboardMarkup(GetKeyboard(),false,false));
              }

            //--- Click on a RadioButton
            int total=ArraySize(m_radio_button);
            for(int k=0;k<total;k++)
              {
               if(text==RADIO_EMPTY+" "+m_radio_button[k])
                 {
                  m_radio_index=k;
                  bot.SendMessage(chat.m_id,m_radio_button[k],bot.ReplyKeyboardMarkup(GetKeyboard(),false,false));
                 }
              }

            //--- Unlock
            if(text==LOCK_CODE+" "+LOCK_TEXT)
              {
               m_lock_state=false;
               bot.SendMessage(chat.m_id,UNLOCK_TEXT,bot.ReplyKeyboardMarkup(GetKeyboard(),false,false));
              }

            //--- Lock
            if(text==UNLOCK_CODE+" "+UNLOCK_TEXT)
              {
               m_lock_state=true;
               bot.SendMessage(chat.m_id,LOCK_TEXT,bot.ReplyKeyboardMarkup(GetKeyboard(),false,false));
              }

            //--- Unmute
            if(text==MUTE_CODE+" "+MUTE_TEXT)
              {
               m_mute_state=false;
               bot.SendMessage(chat.m_id,UNMUTE_TEXT,bot.ReplyKeyboardMarkup(GetKeyboard(),false,false));
              }

            //--- Mute
            if(text==UNMUTE_CODE+" "+UNMUTE_TEXT)
              {
               m_mute_state=true;
               bot.SendMessage(chat.m_id,MUTE_TEXT,bot.ReplyKeyboardMarkup(GetKeyboard(),false,false));
              }
           }
        }
     }
  };
As a result we get the following window (figure 8).
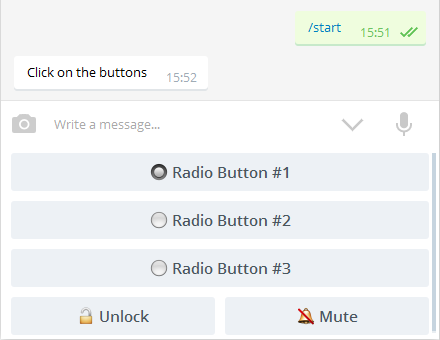
Fig.8. RadioButton and CheckBox controls
We can see here that Emoji used here provide settings with a better visibility. Apart from these controls, we will be able to easily implement hierarchical menu with navigation in every sub-menu. Everything will depend on functionality that you will come up with and decide to implement.
In case we decide to publish messages on the channel, there is a second option - SendMessage.
int SendMessage(const string channel_name, const string text) | |
| channel_name | channel name as @name |
| text | message text. HTML tags are supported. |
| Returned value | error code |
The result of this function is displayed in figure 9 below.
Working with multimedia
Bots can exchange photos, audio and video files and also voice messages, stickers and location coordinates. At the point of writing this article, Bot API 2.0 with a function of exchanging contact data and invitations to meet up was released. From the whole list provided, only the option to exchange photos holds relevance for us.
SendPhoto
The class has implemented the opportunity to send photos with two ways of application.
int SendPhoto(const long chat_id, const string local_path, string &photo_id, const string caption=NULL, const bool common_flag=false, const int timeout=10000) | |
| chat_id | chat number |
| local_path | local path to the folder in <data folder>\MQL5\Files |
| photo_id | identifier of the photo uploaded to the server |
| caption | signature text below photo |
| common_flag | file location flag in the common folder of all client terminals \Terminal\Common\Files |
| timeout | operation time out in milliseconds |
Example of the code that sends photo:
CCustomBot bot;

string token = "208375865:AAFnuOjlZ3Wsdan6PAjeqqUtBybe0Di1or8";

bot.Token(token);

string photo_id;
int result=bot.SendPhoto(198289825,"EURUSD1.gif",photo_id,"screenshot");
if(result==0)
   Print("Photo ID: ",photo_id);
else
   Print("Error: ",GetErrorDescription(result));
I believe you will have cases when it will be required to send a photo to several users or send the same photo several times. In this case it is more rational to upload a photo once, and to apply the photo_id identifier along with the second option of the SendPhoto function when re-sending a photo:
int SendPhoto(const long chat_id, const string photo_id, const string caption=NULL) | |
| chat_id | chat number |
| photo_id | identifier of the photo uploaded to the server |
| caption | signature text below photo |
SendChartAction
Imagine that you handle a user's response and are almost ready to provide him with a result. Since it may take few seconds to create a response, it would be polite to notify a user that you are in the process already. And this is what events are used for. For example, while the chart screenshot is formed to be sent to a user, you can send the "send photo" event in the meantime. This is achieved via SendChatAction.
int SendChatAction(const long chat_id, const ENUM_CHAT_ACTION actiona) | |
| chat_id | chat number |
| action | event identifier |
Examples of bots
The first bot Telegram_Bot_EA allows to obtain information about the account balance, quotes and chart screenshots. How it operates is shown in this video.
The second bot Telegram_Search_EA sends search results to MQL5.com. You may be curious to watch the following video to see how it actually works.
The third bot Telegram_Signal_EA publishes signals from the MACD standard indicator on the channel. I think it will be easy to change MACD to your favorite indicator and use this code for your purposes.
//+------------------------------------------------------------------+
//|                                        Telegram_Signal_EA_v1.mq4 |
//|                        Copyright 2014, MetaQuotes Software Corp. |
//|                                              https://www.mql5.com |
//+------------------------------------------------------------------+
#property copyright "Copyright 2014, MetaQuotes Software Corp."
#property link      "https://www.mql5.com"
#property version   "1.00"

//+------------------------------------------------------------------+
//|   Includes                                                       |
//+------------------------------------------------------------------+
#include <Telegram.mqh>

//--- Input parameters
input string InpChannelName="@forexsignalchannel";//Channel Name
input string InpToken="177791741:AAH0yB3YV7ywm80af_-AGqb7hzTR_Ud9DhQ";//Token

//--- Global variables
CCustomBot bot;
int macd_handle;
datetime time_signal=0;
//+------------------------------------------------------------------+
//| Expert initialization function                                   |
//+------------------------------------------------------------------+
int OnInit()
  {
   time_signal=0;

//--- set token
   bot.Token(InpToken);

//--- get an indicator handle
   macd_handle=iMACD(NULL,0,12,26,9,PRICE_CLOSE);
   if(macd_handle==INVALID_HANDLE)
      return(INIT_FAILED);

//--- done
   return(INIT_SUCCEEDED);
  }
//+------------------------------------------------------------------+
//| Expert tick function                                             |
//+------------------------------------------------------------------+
void OnTick()
  {

//--- get time
   datetime time[1];
   if(CopyTime(NULL,0,0,1,time)!=1)
      return;

//--- check the signal on each bar
   if(time_signal!=time[0])
     {
      //--- first calc
      if(time_signal==0)
        {
         time_signal=time[0];
         return;
        }

      double macd[2]={0.0};
      double signal[2]={0.0};

      if(CopyBuffer(macd_handle,0,0,2,macd)!=2)
         return;
      if(CopyBuffer(macd_handle,1,0,2,signal)!=2)
         return;

      time_signal=time[0];

      //--- Send signal BUY
      if(macd[1]>signal[1] &&
         macd[0]<=signal[0])
        {
         string msg=StringFormat("Name: MACD Signal\nSymbol: %s\nTimeframe: %s\nType: Buy\nPrice: %s\nTime: %s",
                                 _Symbol,
                                 StringSubstr(EnumToString(_Period),7),
                                 DoubleToString(SymbolInfoDouble(_Symbol,SYMBOL_ASK),_Digits),
                                 TimeToString(time[0]));
         int res=bot.SendMessage(InpChannelName,msg);
         if(res!=0)
            Print("Error: ",GetErrorDescription(res));
        }

      //--- Send signal SELL
      if(macd[1]<signal[1] &&
         macd[0]>=signal[0])
        {
         string msg=StringFormat("Name: MACD Signal\nSymbol: %s\nTimeframe: %s\nType: Sell\nPrice: %s\nTime: %s",
                                 _Symbol,
                                 StringSubstr(EnumToString(_Period),7),
                                 DoubleToString(SymbolInfoDouble(_Symbol,SYMBOL_BID),_Digits),
                                 TimeToString(time[0]));
         int res=bot.SendMessage(InpChannelName,msg);
         if(res!=0)
            Print("Error: ",GetErrorDescription(res));
        }
     }
  }
//+------------------------------------------------------------------+
As a result you will receive messages shown in Fig. 9.

Fig.9. MACD indicator signals.
Conclusion
Those who wish to connect analytics to the Yandex.AppMetrika base for their bot, may use the Botan source. The idea of the service is to send them messages received from users, and to request indicators like segmentation, tracking, cohort analysis etc. There is no need to exit Messenger, because statistics will be sent by the special bot in the form of charts, and a more detailed report will be available on the website.
I hope that this articles has inspired you to apply Telegram in trading. It wasn't my goal to cover all details, because they have been already provided in documentation for Bot API. The codes attached to this article are adapted to trading on both platforms — MetaTrader 4 and MetaTrader 5.
Translated from Russian by MetaQuotes Ltd.
Original article: https://www.mql5.com/ru/articles/2355
Warning: All rights to these materials are reserved by MetaQuotes Ltd. Copying or reprinting of these materials in whole or in part is prohibited.
This article was written by a user of the site and reflects their personal views. MetaQuotes Ltd is not responsible for the accuracy of the information presented, nor for any consequences resulting from the use of the solutions, strategies or recommendations described.

 Creating an assistant in manual trading
 Regular expressions for traders
 Universal Expert Advisor: A Custom Trailing Stop (Part 6)
- Free trading apps
- Over 8,000 signals for copying
- Economic news for exploring financial markets
You agree to website policy and terms of use
I have just got the same error" Error Code 400 Description "Bad request: chat not found" but everything worked perfectly before. I also did some research & havent found any solution.
Could anyone shed me some light how to fix this problem? Thanks
in my case, I just read old posts & know that im trying to send msg to a private channel. So I have just replaced the channel name with chat id & its working perfectly!
Thanks Andriy & other pro coders <3
Start of this week the file Telegram.mqh is giving some issues with the functions "ArrayAdd" and "WebRequest".
Is someone also facing this problems? I tried adding back the original files, but they seem to have the same issue as well.
try with this file
try with this file
I was getting some Errors hence I did 4 edits