Advanced Order Blocks (v1.88) — User Manual & Playbook (Part 2)
Developed by - Algo Theory Studio
This is Part 2 of the official manual. If you have not read the core theory covering Zone Types, Breaker Blocks, and Liquidity Pools, [read Part 1 here first].
📺 [Watch the Full Advanced OB Video Tutorial on YouTube]
🛒 [Get the FREE Advanced Order Blocks Indicator for MT5]
🛒 [Get the FREE Advanced Order Blocks Indicator for MT4]
__________________________________________________________________________________________________________________________________________________________________________________
Table of Contents (Part)
9. Settings Reference
10. Alerts
11. How to Use / Trading Application
12. Known Limitation / Notes
__________________________________________________________________________________________________________________________________________________________________________________
9. Settings Reference
Every setting below matches the exact label, default value, and group exactly as it appears in the indicator's own Inputs tab, in the same order. Where a setting is covered in depth elsewhere in the manual, the relevant section is noted. Bold defaults flag settings whose default is easy to assume wrong.
9.1 General
| Setting | Default | Notes |
|---|---|---|
| Color Mode: Light | Dark | Light | Remaps 4 specific default colors only, not a full theme — Part8.2 |
| Style: Colored | Monochrome | Colored | Two fixed gray shades replace all custom colors when Monochrome — Part8.3 |
| Zone Opacity % | 50 | General opacity used by most zones — Part8.1 |
9.2 Structure Detection
| Setting | Default | Notes |
|---|---|---|
| Internal Structure Lookback | 5 (min 2) | Pivot lookback for Internal structure — Part2.1 & Part2.2 |
| Confluence Filter | On | Internal-only breakout wick-shape filter — Part2.4 |
| Confluence Wick Ratio | 1.0 | 0 = disabled, higher = stricter — Part2.4 |
| Internal CHoCH Min Body-Close Ratio | 0.0 (disabled) | Extra conviction filter, Internal CHoCH breaks only — Part2.4 |
| Swing Lookback Length | 50 (min 10) | Pivot lookback for Swing structure — Part2.1 & Part2.2 |
| Break Confirmation: Close | High/Low | Close | Close mode's single-candle transition window — Part2.4 |
| Min Break Distance (ATR multiples) | 0.0 (disabled) | Applies to both BOS and CHoCH — Part2.4 |
| Min Bars Before Pivot Can Be Broken | 1 | — Part2.4 |
| Swing CHoCH Min Body-Close Ratio | 0.0 (disabled) | Swing equivalent of the Internal CHoCH filter above |
9.3 Order Blocks
| Setting | Default | Notes |
|---|---|---|
| Internal Order Blocks | On | Master toggle for the Internal OB lens |
| Internal OB Max Count | 5 (1-20) | Oldest drops off once exceeded |
| Internal Bullish OB Color | Pale Green | |
| Internal Bearish OB Color | Light Salmon | |
| Swing Order Blocks | On | Master toggle for the Swing OB lens |
| Swing OB Max Count | 5 (1-20) | |
| Swing Bullish OB Color | Pale Green | |
| Swing Bearish OB Color | Light Salmon | |
| OB Volatility Filter | ATR | ATR = fixed 200-period ATR; Range = expanding all-history average — Part4.4 |
| High-Vol Bar ATR Multiplier | 2.0 | Threshold for excluding spike candles from OB selection — Part4.4 |
| OB Mitigation Source | High/Low | Shared by OB, Breaker re-break, and Rejection break checks — Part4.3 |
| Show Order Block Labels | On | |
| Label text color | NONE (auto) | Auto-picks black or white by chart background brightness when left NONE |
| Label Text Size | 6 (6-24) | |
| Label Offset From Latest Bar | 50 bars | Shared by every zone type's labels — Part8.4 |
| Use Midline Label While Zone Age <= This | 60 bars | — Part8.4 |
9.4 Mitigated Order Blocks
| Setting | Default | Notes |
|---|---|---|
| Show Mitigated OBs | Off | Off = touched OBs keep their normal active color, no visual cue — Part4.2 |
| Mitigated Bullish OB Color | Silver | Only visible if the above is on |
| Mitigated Bearish OB Color | Silver | |
| Mitigated Zone Opacity % | 15 | Overrides the general Zone Opacity for this state |
9.5 Breaker Blocks
| Setting | Default | Notes |
|---|---|---|
| Show Breaker Blocks | On | Master toggle — Part5.1 |
| Internal Breaker Max Count | 5 (1-20) | |
| Swing Breaker Max Count | 5 (1-20) | |
| Bullish Breaker Color | Pale Green | |
| Bearish Breaker Color | Light Salmon | |
| Remove Breaker When Re-Broken | On | — Part5.2 |
| Max Breaker Width (bars) | 500 (0=disabled) | An age limit despite the name — Part5.3 |
| Show Breaker Labels | On |
9.6 Rejection Blocks (Swing)
| Setting | Default | Notes |
|---|---|---|
| Show Rejection Blocks | On | Swing structure only, no Internal equivalent — Part6.1 |
| Min Wick-to-Opposite-Wick Ratio | 2.0 | — Part6.1 |
| Min Wick Size (ATR multiples) | 0.5 | — Part6.1 |
| Require Alignment With Swing Trend Bias | On | — Part6.2 |
| Rejection Block Max Count | 5 (1-20) | |
| Bullish Rejection Color | Teal | |
| Bearish Rejection Color | Crimson | |
| Show Rejection Labels | On |
9.7 Liquidity Pools
| Setting | Default | Notes |
|---|---|---|
| Internal Liquidity Pools (BSL/SSL) | Off | The only Internal-lens toggle in the whole indicator that defaults off — likely because every Internal pivot would otherwise spawn a band |
| Internal LP Max Count | 5 (1-20) | |
| Internal Buyside Liquidity (BSL) Color | Light Salmon | |
| Internal Sellside Liquidity (SSL) Color | Pale Green | |
| Swing Liquidity Pools (BSL/SSL) | On | |
| Swing LP Max Count | 5 (1-20) | |
| Swing Buyside Liquidity (BSL) Color | Light Salmon | |
| Swing Sellside Liquidity (SSL) Color | Pale Green | |
| LP Sweep Source: Close | High/Low | High/Low | Active→Swept only; Swept→Flipped is always Close regardless — Part7.4 |
| Equal High/Low Merge Tolerance (ATR) | 0.1 (0=disabled) | — Part7.2 |
| Zone Thickness (ATR multiples) | 1.00 | — Part7.1 |
| Show Liquidity Pool Labels | On | |
| Append Equal-Pivot Count To Label | On | The "(x2)" suffix — Part7.2 |
9.8 Liquidity Pools: Swept
| Setting | Default | Notes |
|---|---|---|
| Show Swept/Flipped Liquidity Pools | On | Off deletes a pool the instant it leaves Active — Part7.5 |
| Swept Zone Opacity % | 35 | |
| Swept Pool Max Age Before Flip (bars) | 500 (0=disabled) |
9.9 Liquidity Pools: Flipped
| Setting | Default | Notes |
|---|---|---|
| Flipped Bullish Color (BSL → Support) | Pale Green | |
| Flipped Bearish Color (SSL → Resistance) | Light Salmon | |
| Flipped Zone Max Age (bars) | 500 (0=disabled) |
9.10 Alerts
Notification Methods
| Setting | Default | Notes |
|---|---|---|
| Popup Alert (Terminal Window) | On | |
| Push Notification (Mobile) | Off | Requires a MetaQuotes ID configured in the Terminal |
| Email Alert | Off | Requires SMTP set in Terminal Options |
Order Blocks
| Setting | Default | Notes |
|---|---|---|
| Price Enters Internal OB | Off | |
| Price Enters Swing OB | Off |
Liquidity Pools
| Setting | Default | Notes |
|---|---|---|
| Liquidity Pool Swept (BSL/SSL) | Off |
__________________________________________________________________________________________________________________________________________________________________________________
10. Alerts
10.1 Notification Methods
Three independent delivery channels — any combination can be on at once, and every enabled channel fires for the same event:
- Popup Alert — the standard MT5 terminal Alert() popup and sound.
- Push Notification — sent to the MetaTrader mobile app; requires a MetaQuotes ID linked under Terminal settings.
- Email Alert — requires SMTP configured under Terminal → Options first.
10.2 Order Block Entry Alerts
Price Enters Internal OB / Price Enters Swing OB fires once price first trades into an Order Block — specifically, the candle's wick reaches the zone and its close is still within/beyond it in the expected direction.
Worth knowing: this check is fixed and does not follow the "OB Mitigation Source" setting from see4.3 — it always uses this same wick-plus-close combination, regardless of what that setting is.
10.3 Liquidity Sweep Alerts
Liquidity Pool Swept (BSL/SSL) fires the moment a pool transitions Active → Swept (see Part7.3) — separately for Internal BSL, Internal SSL, Swing BSL, and Swing SSL.
10.4 Startup Alert Behavior
The moment the indicator is first attached (or the chart/history reloads), it runs one immediate check: is price currently sitting inside an existing Internal/Swing OB right now? If so, it fires that alert immediately, once, per matching zone.
- This does not replay every historical OB-entry event across your loaded chart history — only the current bar/price is checked, once, at that single startup moment.
- This startup check applies to all types of blocks' entry alerts
- After that, alerts only fire going forward, only on confirmed closed candles — never on live, still-forming price, and never replayed for the initial history load.
__________________________________________________________________________________________________________________________________________________________________________________
11. How to Use / Trading Application
The reads below reflect common Smart Money Concepts practice, combined with specifics unique to how this indicator builds and manages its zones. Treat this as context for interpreting what you're seeing, not a guarantee of what price does next.
11.1 Internal vs. Swing — Matching the Lens to Your Style
Internal's shorter lookback means more frequent, less selective zones — more signals, more noise, generally suited to shorter holding periods and tighter entries.
Swing's longer lookback means fewer, higher-conviction zones — generally suited to swing/position holding periods.
Tip: these aren't mutually exclusive. A common approach is using Swing zones as the map — the handful of price areas worth watching — and Internal zones for a tighter, more precise entry once price actually arrives at one.
*Common misunderstanding: neither lens is a different timeframe under the hood (see Part1.2 & Part2.1) — both read the exact same chart candles.
11.2 Reading Order Blocks
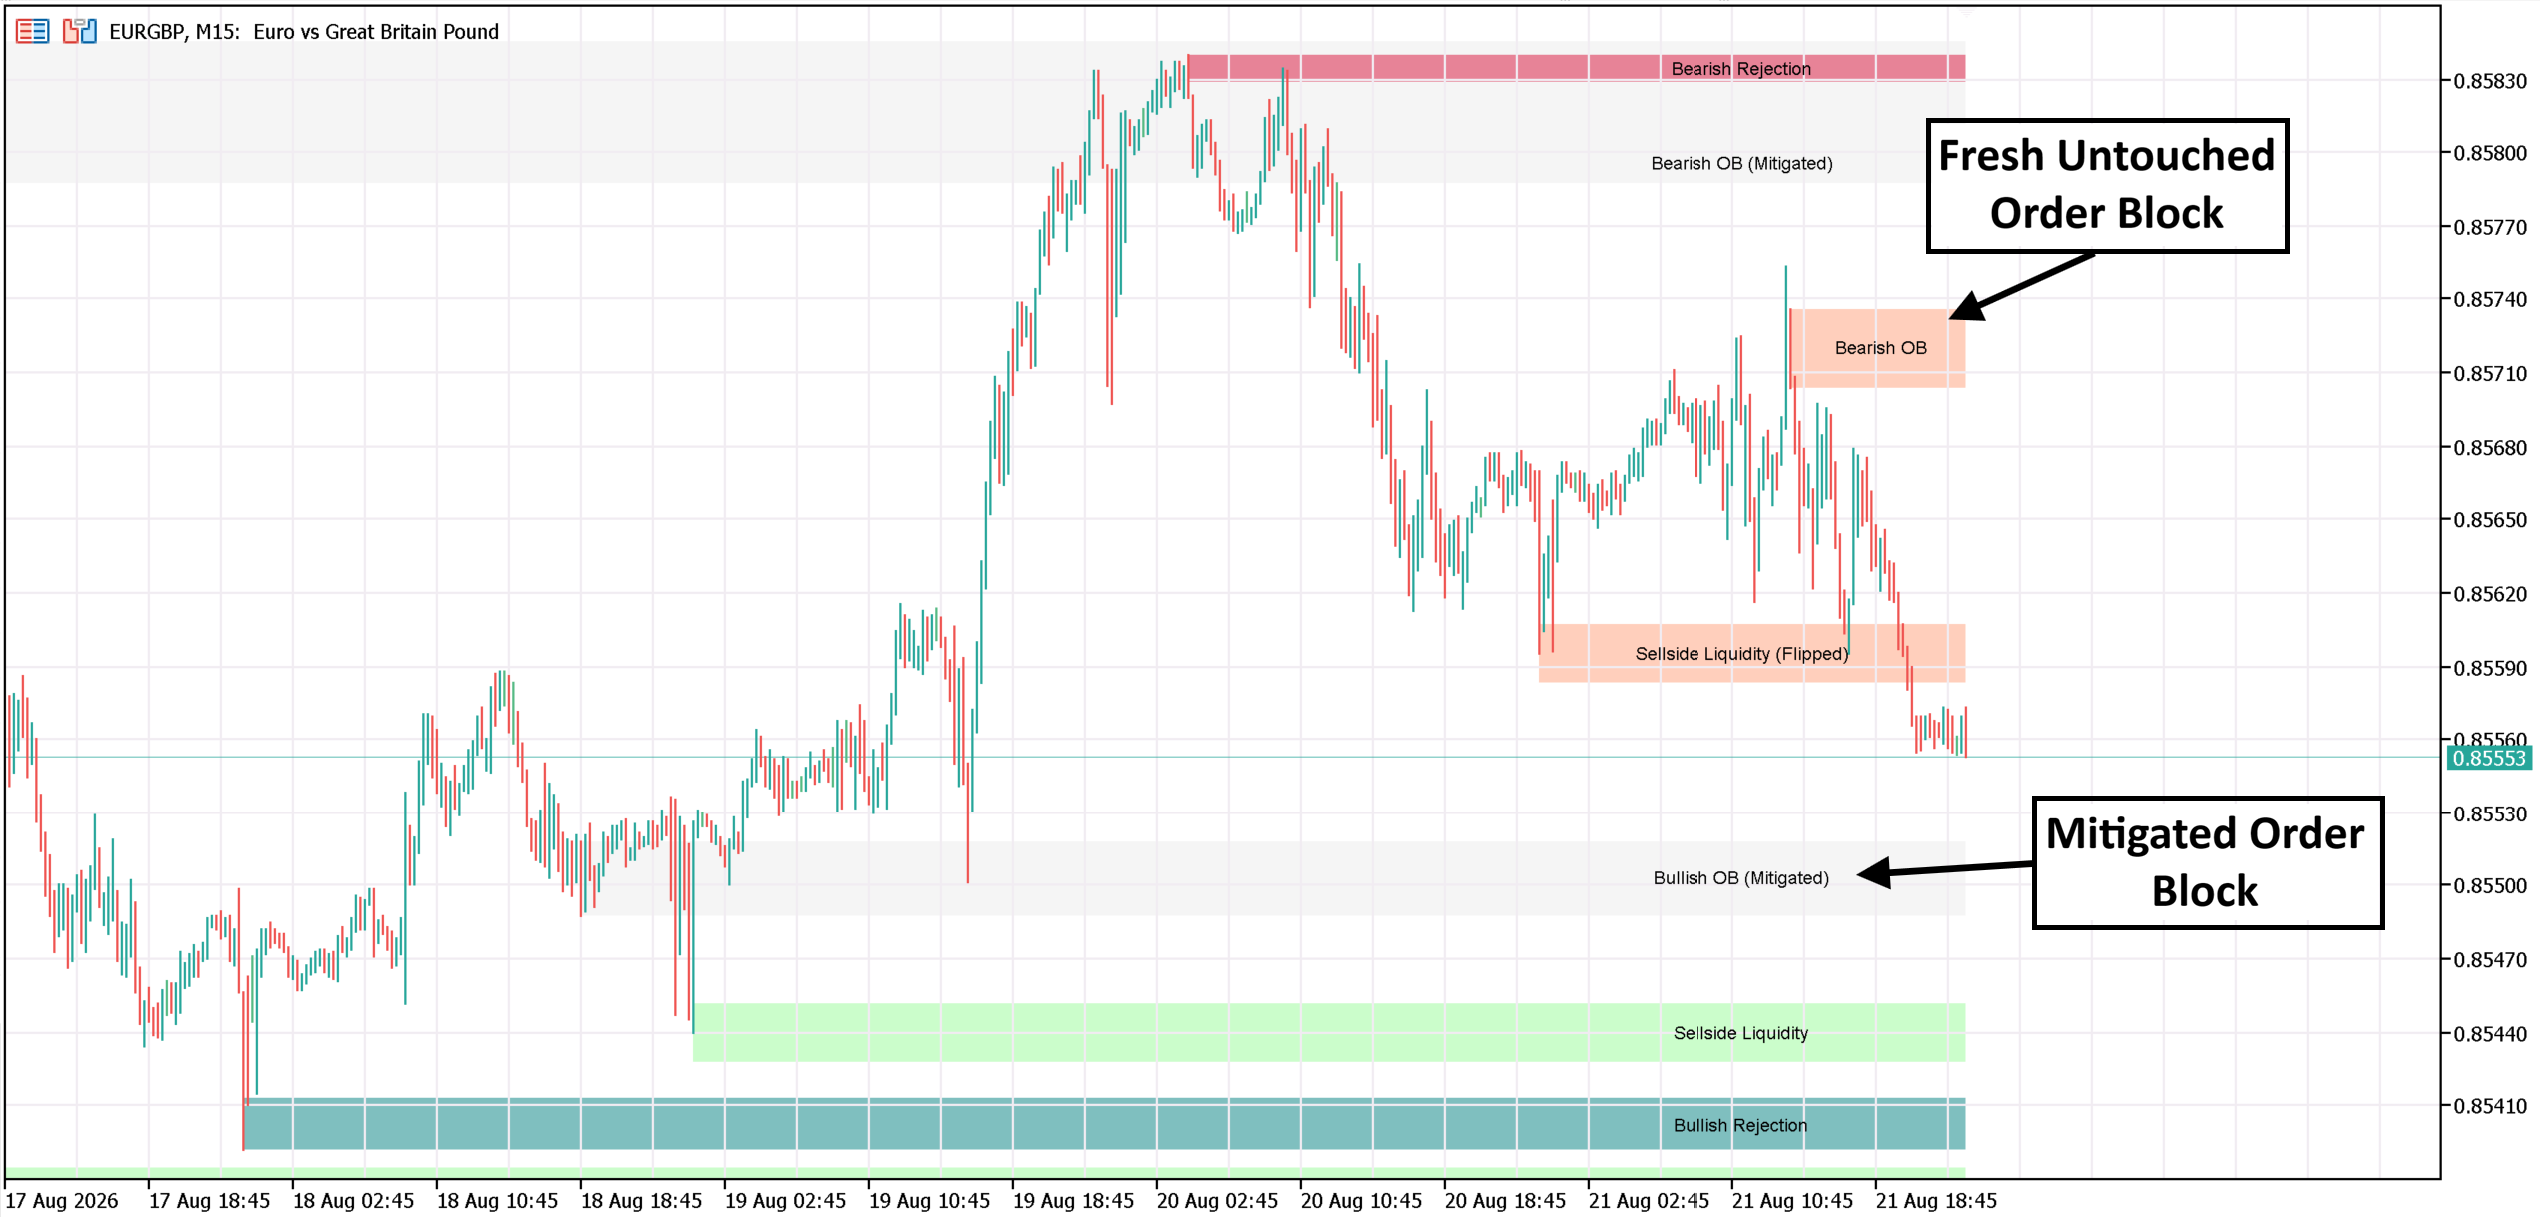
A fresh, untouched OB is generally weighted more heavily than one price has already tapped — a Mitigated OB has already had part of its imbalance absorbed.
Indicator-specific nuance: the OB candle chosen here isn't always simply "the last opposite candle" the way some simpler tools define it — the volatility filter (see Part4.4) can skip an oversized spike candle and anchor to the next one instead. If you're cross-checking this against a different OB tool and the zone doesn't line up, check for a high-volatility candle in that range before assuming a bug.
11.3 Reading Order Block + Breaker Together
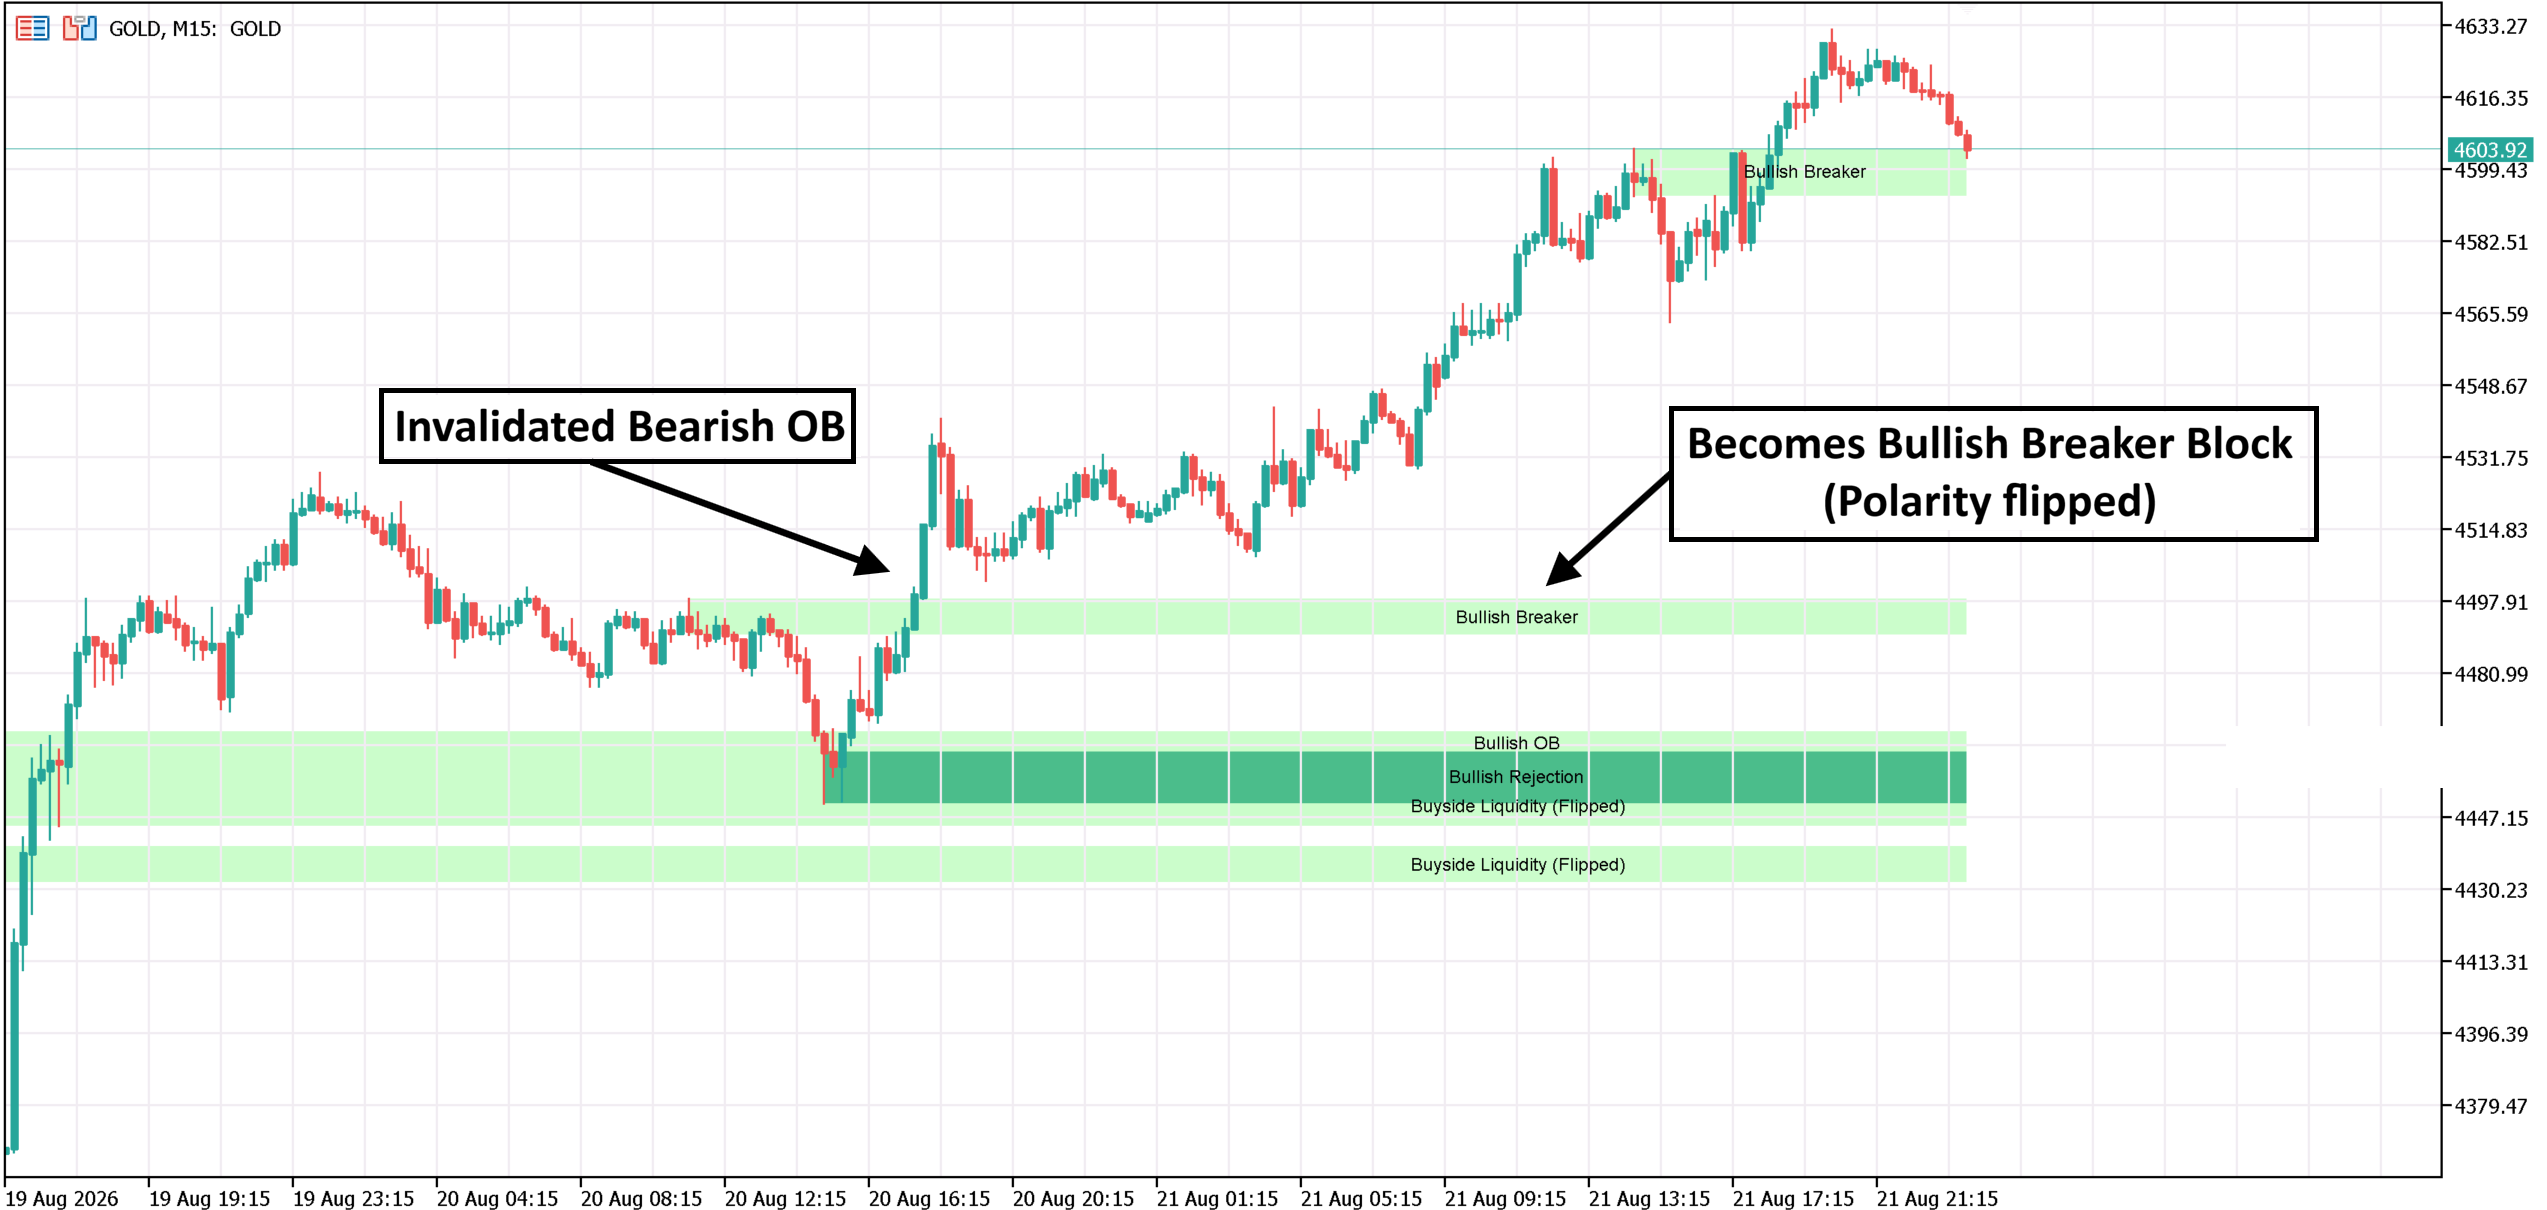
A Breaker forming is commonly read as the point an OB's premise is fully over, not just weakened — the level's role has reversed. Some traders watch a retest of a fresh Breaker as an opportunity in the new, flipped direction.
Common misunderstanding: a Breaker is a new, separate object, not a continuation of the same box (see Part5.1). Once it's gone — re-broken (see Part5.2) or aged out (see Part5.3) — there's no reverting to the original OB. That level's history is simply closed at that point.
11.4 Reading Rejection Blocks
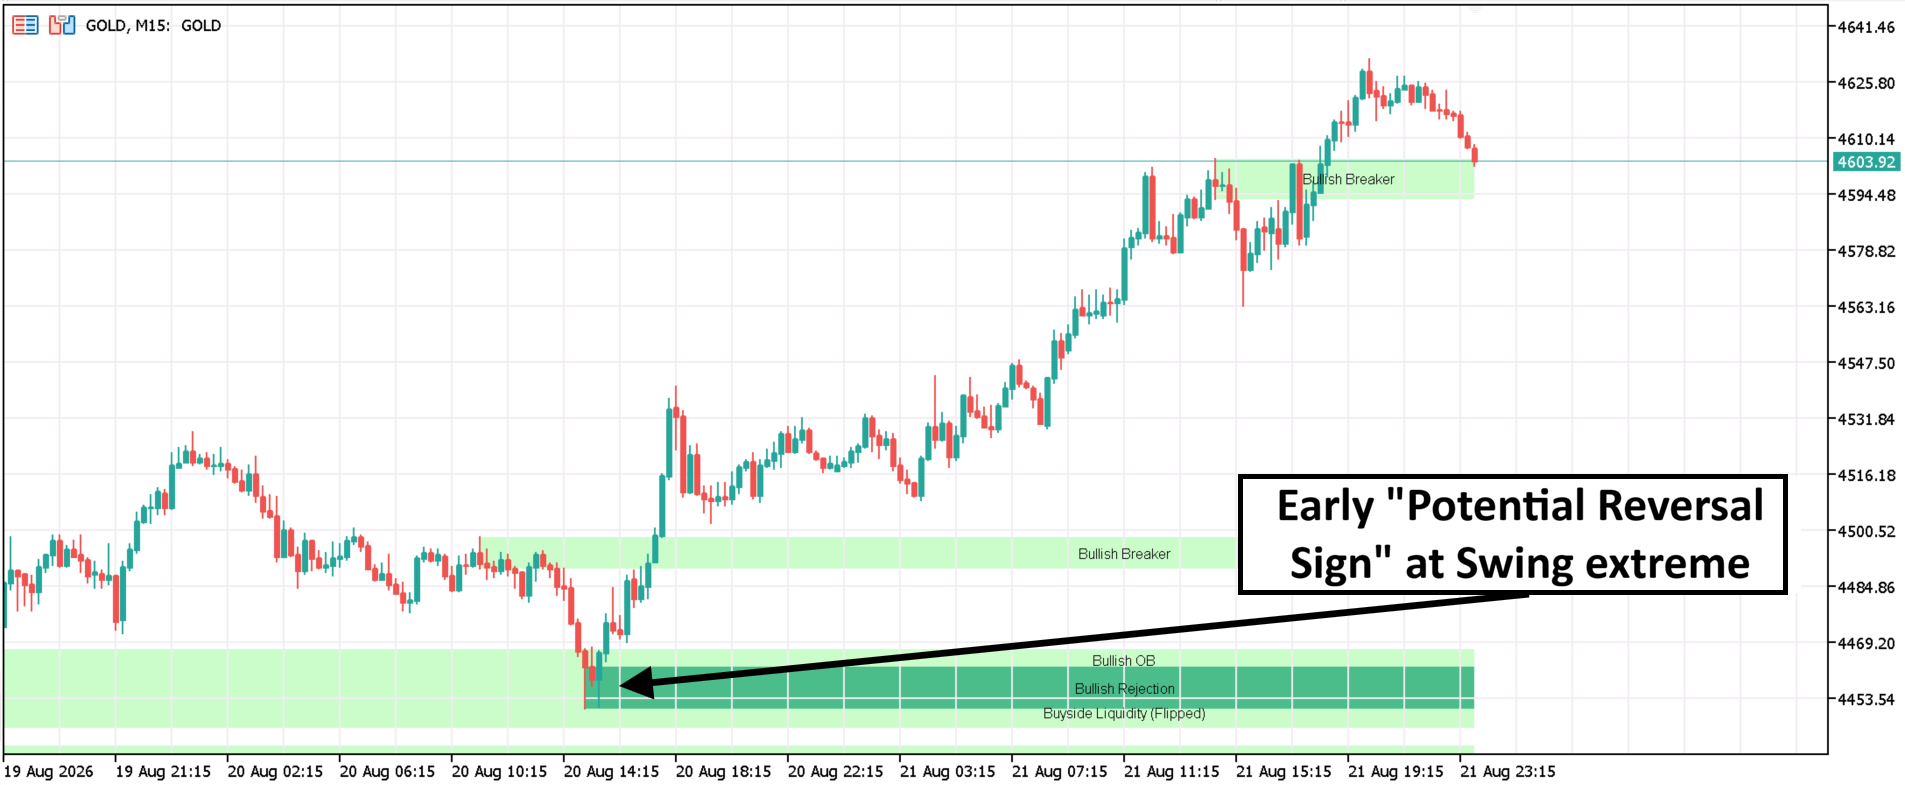
Because a Rejection Block doesn't require a structure break (see Part6.1), it can appear even when nothing else on the chart is signaling a change — often watched as an early, single-candle reversal cue at a swing extreme, especially where it lines up with an approaching Liquidity Pool.
11.5 Reading Liquidity Pools
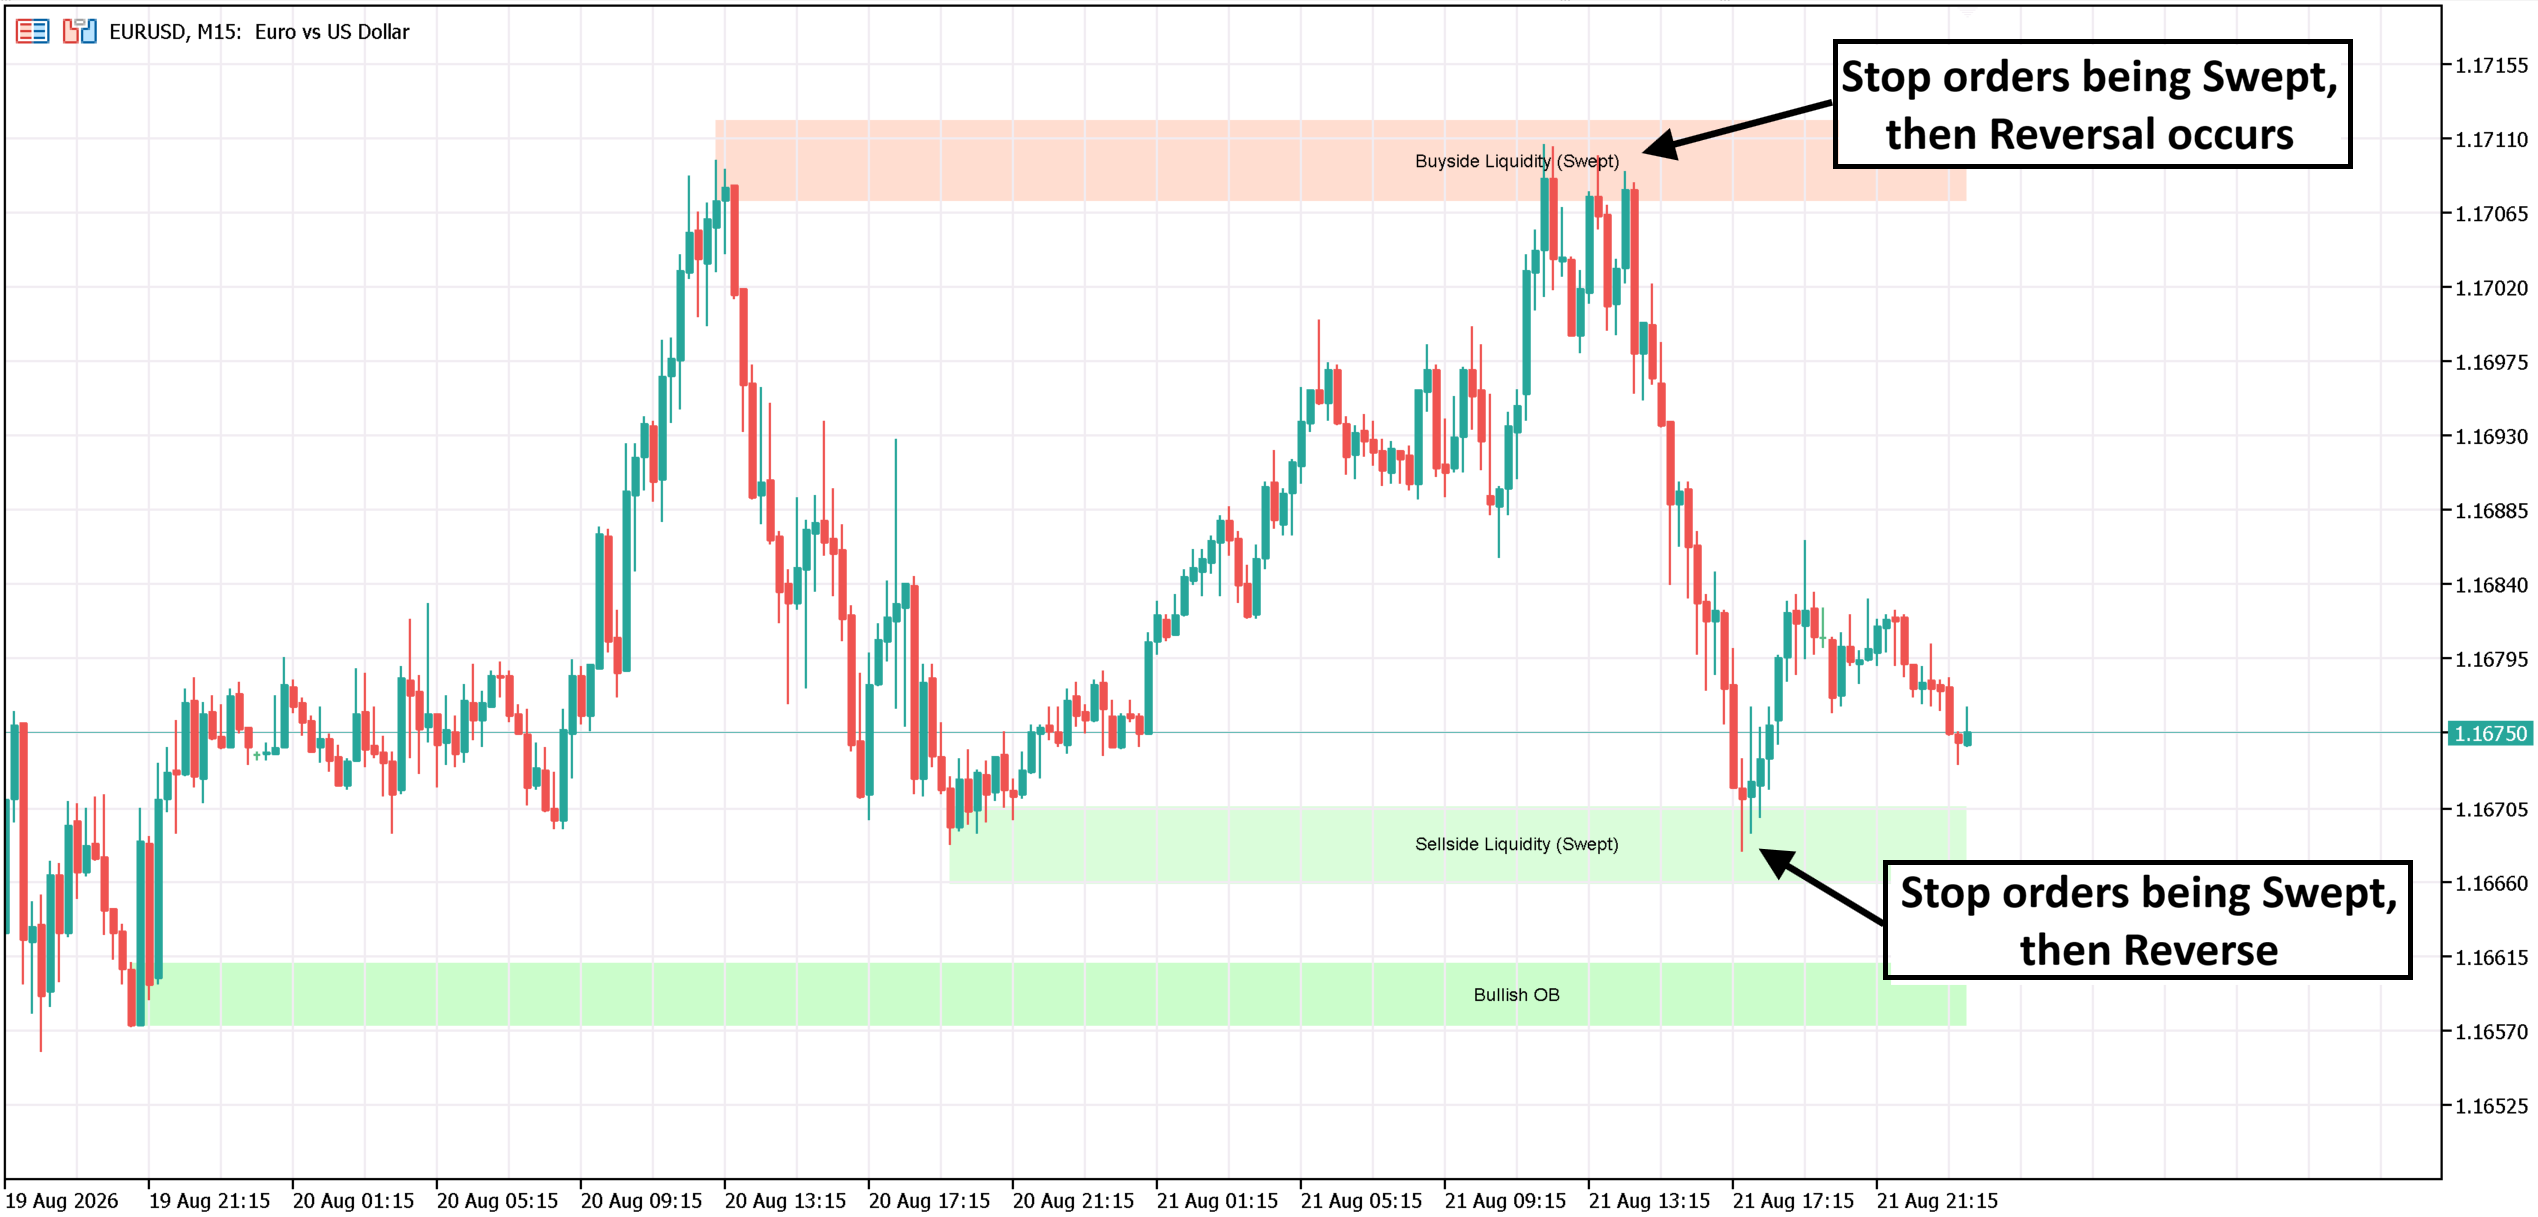
BuySide Liquidity/SellSide Liquidity (BSL/SSL) mark where resting stop and breakout orders are assumed to cluster. The common read: price is often drawn toward these levels to run those orders before reversing — so a level that Sweeps and then Flips is typically watched as a possible reversal/support-resistance zone, not as confirmation of a breakout continuing.
Only a Flipped pool is exempt from being hidden behind an overlapping OB/Breaker/Rejection zone (see Part7.6) — a reasonable sign that the indicator itself treats a Flipped level as the more chart-worthy state.
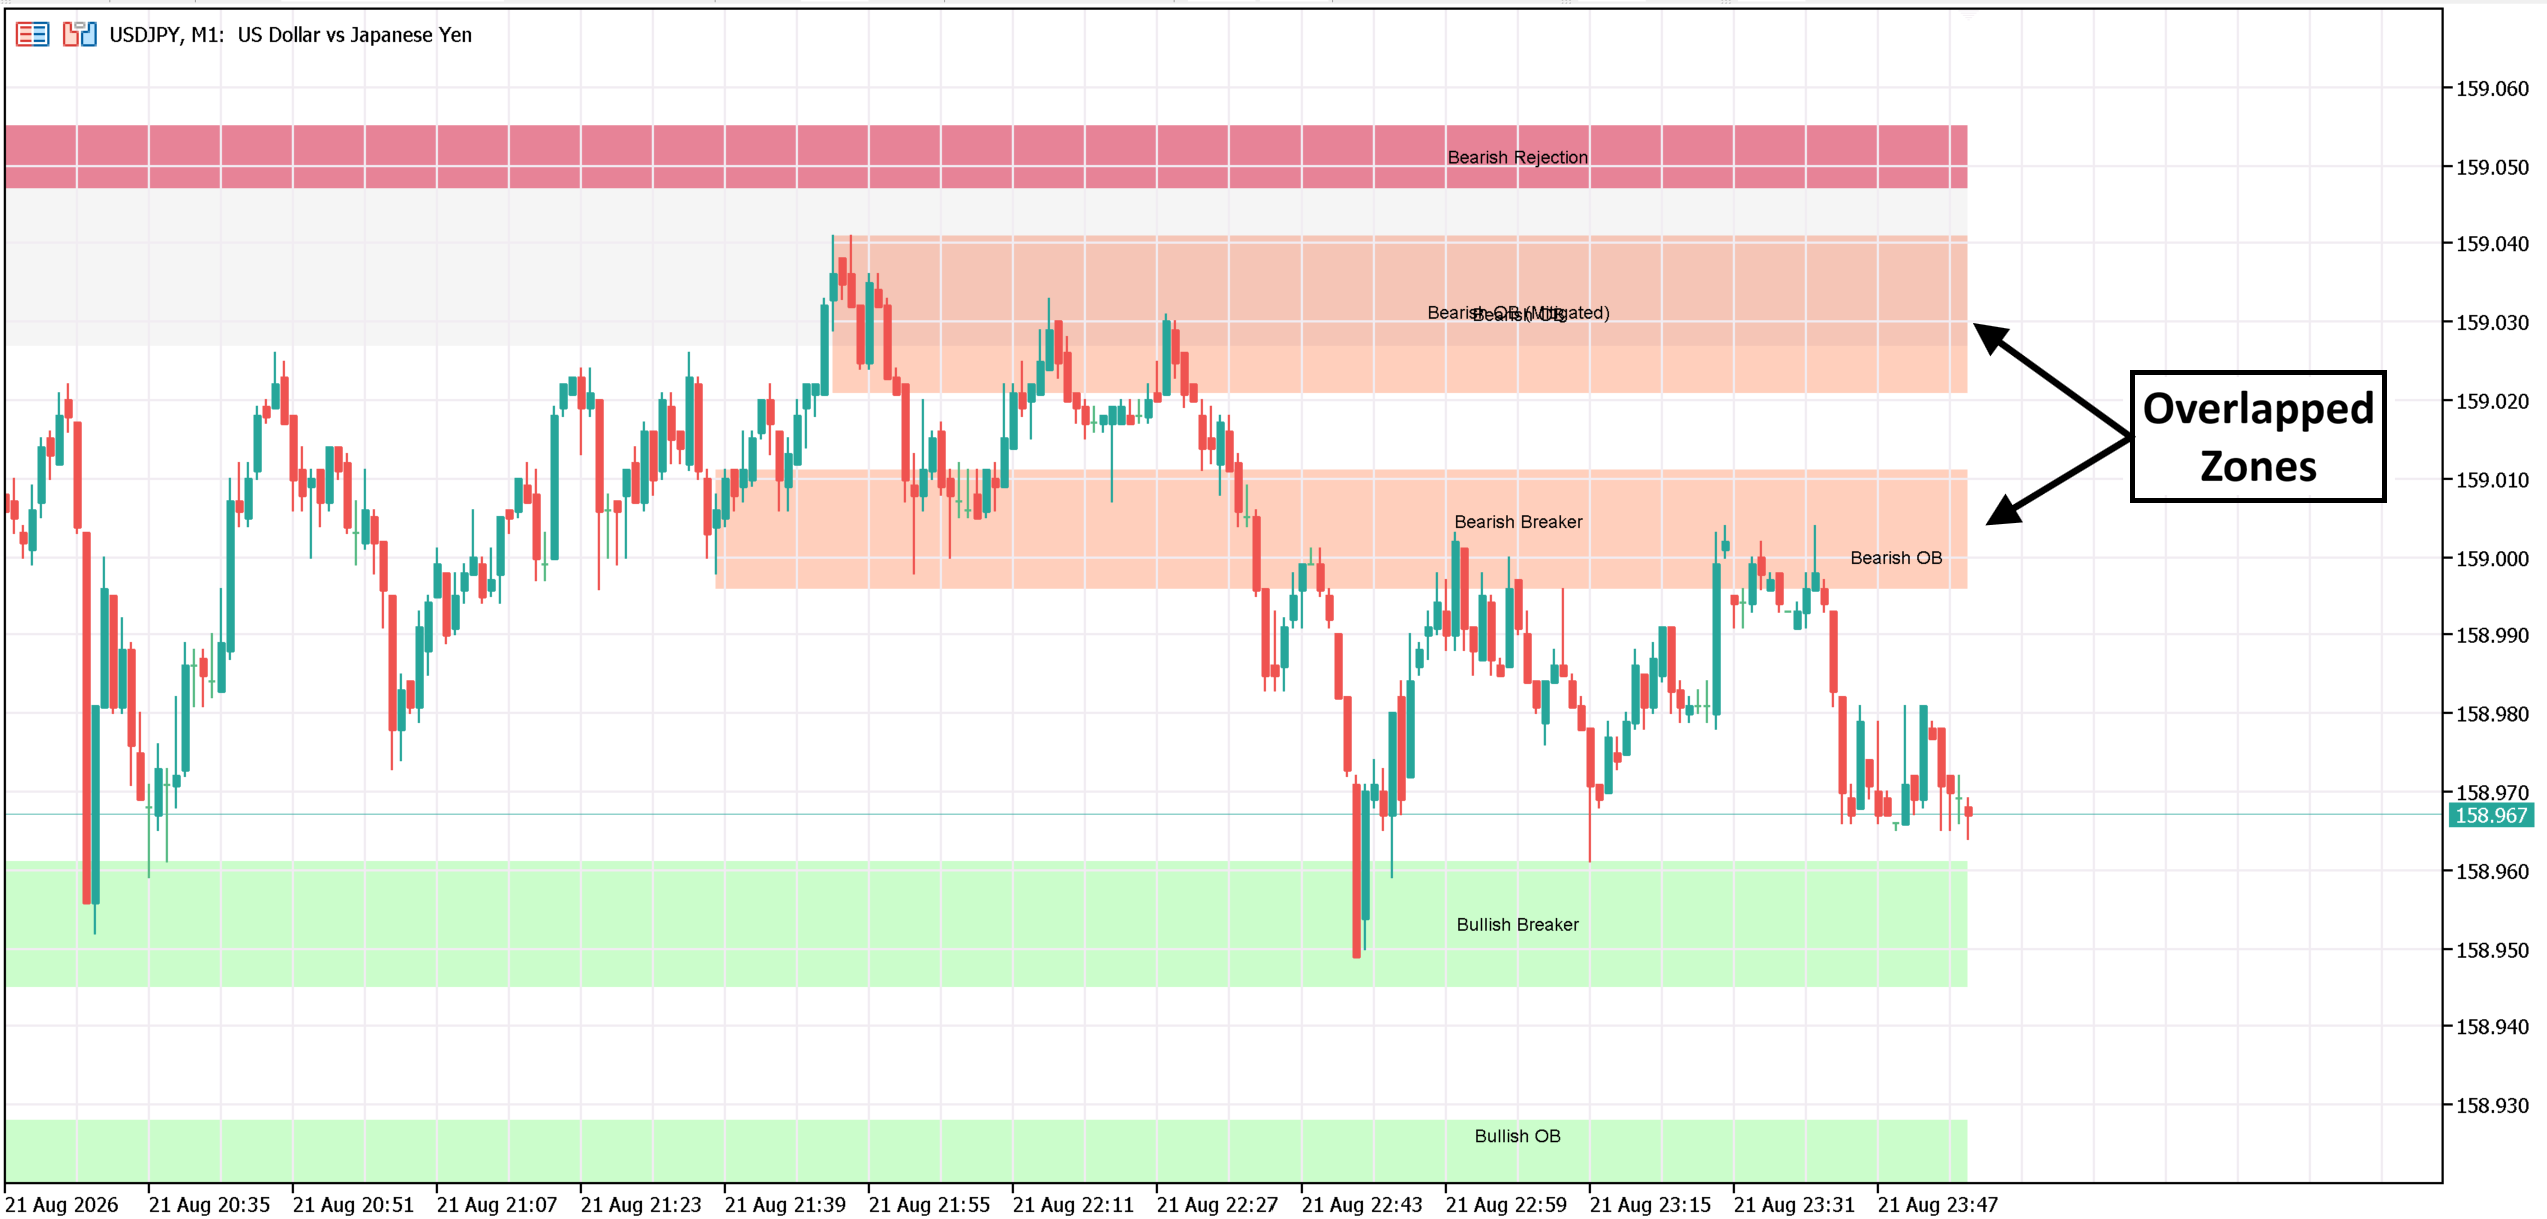
11.6 Combining Zones for Confluence
An area where an Internal OB, a Swing OB, and/or a Liquidity Pool all overlap is generally read as stronger than any single zone alone — independent structural readings agreeing on the same price.
11.7 A Few More Worth Knowing
- Nothing acts on live price. Every zone, state change, and alert waits for a candle to fully close (see Part1.3). Don't expect a zone or alert mid-candle.
- One shared ATR underlies every "ATR multiples" setting — Min Break Distance, Rejection wick size, the High-Vol Bar filter, LP tolerance and thickness (Part4.4) all reference the same fixed 200-period ATR. Tightening one doesn't change the yardstick the others use; they're independent multipliers of one shared, non-adjustable base.
- Zone counts are capped. Max Count settings (Part 9) mean older zones quietly drop off once a newer one pushes past the limit. If zones seem to be "missing" further back on the chart, check the relevant Max Count before assuming something's broken.
- Internal Liquidity Pools default off (see Part9.7) while every other Internal toggle defaults on. If you're expecting Internal BSL/SSL bands and don't see any, this is very likely why.
__________________________________________________________________________________________________________________________________________________________________________________
12. Known Limitations / Notes
12.1 Object Count Limits
Every zone category — Internal/Swing OB, Internal/Swing Breaker, Rejection, Internal/Swing LP — has its own Max Count setting (Part 9), and that's the only cap; there's no separate hidden internal limit behind it. Once a new zone pushes a category past its count, the oldest zone in that specific category is dropped silently, with no warning or alert. Each category counts independently — hitting the Internal OB cap has no effect on how many Swing OBs, Breakers, or LPs can exist at the same time.
12.2 Performance & Chart Clutter
With every zone type enabled across both lenses, a single chart is maintaining up to seven independent sets of zones (Internal OB, Swing OB, Internal Breaker, Swing Breaker, Rejection, Internal LP, Swing LP) plus their labels, all re-evaluated on every new closed bar. On a fast-moving symbol or a lower timeframe, that's a genuinely large number of chart objects being created, merged, or deleted continuously.
If you notice clutter or any chart lag: lower the Max Count settings first (Part 9), or disable zone types you're not actively using. Internal Liquidity Pools default off for exactly this reason (see Part9.7) — Rejection Blocks or Breaker Blocks are reasonable candidates to turn off too if your approach doesn't rely on them.
12.3 SMC Concepts Not included in this indicator
- No BOS/CHoCH lines or labels — calculated internally, never drawn (see Part 1.2, 2.3).
- No premium/discount (equilibrium) zones, no Fibonacci tools, no Fair Value Gaps/imbalances (see Part 1.2).
- No Fair Value Gaps (FVG) / Inverted Fair Value Gaps (iFVG). - To be considered in future version update.
- No Equal Highs/Lows lines or label — calculated internally, never drawn.
- No Previous Day/Week/Month High/Low
If you need any of these features above, they're covered in [SMC Analytics MT5] & [SMC Analytics MT4].
12.4 General Capabilities Not Included
- No multi-timeframe overlay — everything runs on the single timeframe the chart is set to (see Part1.2 & Part2.1).
- No trade execution of any kind — this is a visual analysis tool only. It never places, modifies, or closes an order.
- No built-in statistics — no win-rate, hit-rate, or historical performance reporting on its own zones. What's on the chart is the full output; there's no summary panel behind it.
__________________________________________________________________________________________________________________________________________________________________________________
🎯 Next Steps & Resources
If you landed on Part 2 directly through search, make sure to read the foundational theoretical mechanics, zone types, and liquidity rules in the first half of this guide.
⬅️ [Read Part 1: Core Concepts & Order Block Lifecycle]
Download the Free Indicator: Get the Advanced Order Blocks indicator directly for your platform:
📥 [Advanced Order Blocks for MetaTrader 5]
📥 [Advanced Order Blocks for MetaTrader 4]
This is a 100% free, advanced tool developed to give back to the trading community. If this indicator and manual add value to your analysis, two quick actions make a massive difference:
⭐️ [Leave an Honest Review on MQL5] — High ratings keep this project visible and free for everyone.
📺 [Subscribe to Algo Theory Studio on YouTube] — For full video breakdowns, strategy guides, and visual walkthroughs.
💬 Support & Feedback
-
Bug Reports & Technical Issues: Send a Direct / Private Message (PM) on MQL5 with a description of the issue and relevant chart screenshots — messaging directly ensures issues are diagnosed and fixed quickly in official updates.
-
Feature Ideas? Drop your suggestions in the comment section or send a private message. Community input actively drives future indicator enhancements.
Trade with precision and strictly manage your risk.