
Flintridge Trader Pro — Multi-MA Crossover Signals with Built-In Risk Management

Introduction
Most crossover indicators fail traders in the same two ways. First, they repaint: the signal that looks perfect on the historical chart was never actually printed at that bar in real time — it shifted into place after the fact, and the live trader who acted on it got something completely different. Second, they stop at the arrow. They tell you "buy here" and then abandon you. Where is the stop? What is the target? When does the trade end? You are left to improvise risk on the fly, which is exactly when discipline breaks down.
Flintridge Trader Pro is built to fix both problems at once. At its core is a fast, mathematically rigorous multi-moving-average crossover engine — the crossover of a close-based MA against an open-based MA — with three selectable smoothing algorithms (ALMA, HullMA, TEMA), a delay-offset construction that guarantees non-repainting behavior, and an alternate higher-timeframe confirmation channel that suppresses low-quality intraday noise. On top of that signal engine it stacks swing-based supply and demand zones with automatic Break-of-Structure conversion, a complete automatic risk state machine with one stop loss and three take-profit targets, three MetaTrader-only accuracy filters, a multi-section dashboard, and a full alert package. Everything is non-repainting and built for production deployment on the MQL5.com Market. This article walks through every component.
Download the indicator:
- MetaTrader 5: Flintridge Trader Pro MT5
- MetaTrader 4: Flintridge Trader Pro MT4
TIP: Flintridge Trader Pro works on every symbol and every timeframe. The alternate higher-timeframe confirmation (×8 multiplier) is the single most powerful noise filter — leave it on for intraday charts and you will see far fewer but far cleaner signals. The full user manual is here: Flintridge Trader Pro — User Manual.
The Multi-MA Crossover Engine
The signal core is deceptively simple in concept and carefully engineered in execution. Two moving averages are computed every bar:
- closeMA — a moving average applied to the bar's close price
- openMA — the same moving average algorithm and period applied to the bar's open price
When closeMA crosses above openMA , the bar is asserting that closing pressure has overtaken opening pressure — a bullish momentum shift. A BUY is registered. When closeMA crosses below openMA , closing pressure has fallen below opening pressure — a bearish shift, and a SELL is registered.
Why close-MA versus open-MA rather than the more common fast-MA versus slow-MA? Because the close-versus-open relationship encodes the intrabar directional bias of a smoothed window of candles, not just the trailing trend. A fast/slow crossover lags by construction — both averages are derived from the same price series, so one is always a delayed copy of the other. The close/open crossover instead measures the persistent gap between where bars close and where they open across the smoothing window. When that gap flips sign in a smoothed sense, the market's character has genuinely changed. The result is a signal that turns earlier than a comparable dual-MA system while remaining smooth enough to avoid single-bar whipsaw.
The MA period default is deliberately short — 2 — because the smoothing algorithms used here (ALMA, HullMA, TEMA) are themselves low-lag constructions. A period of 2 on an ALMA is not the same as a period of 2 on a simple moving average; the windowing and weighting do most of the smoothing work, so a tight period keeps the engine responsive without becoming noisy. Traders who want slower, higher-conviction signals can raise the period; the manual documents preset blocks for exactly this.
An optional Heikin Ashi source mode replaces raw open/close with Heikin Ashi open/close before the MAs are computed. Heikin Ashi candles filter price noise by construction, so this mode produces fewer signals that align tightly with the dominant swing — useful on choppy instruments where raw-price crossovers fire too often.
ALMA vs HullMA vs TEMA — The Math, Briefly
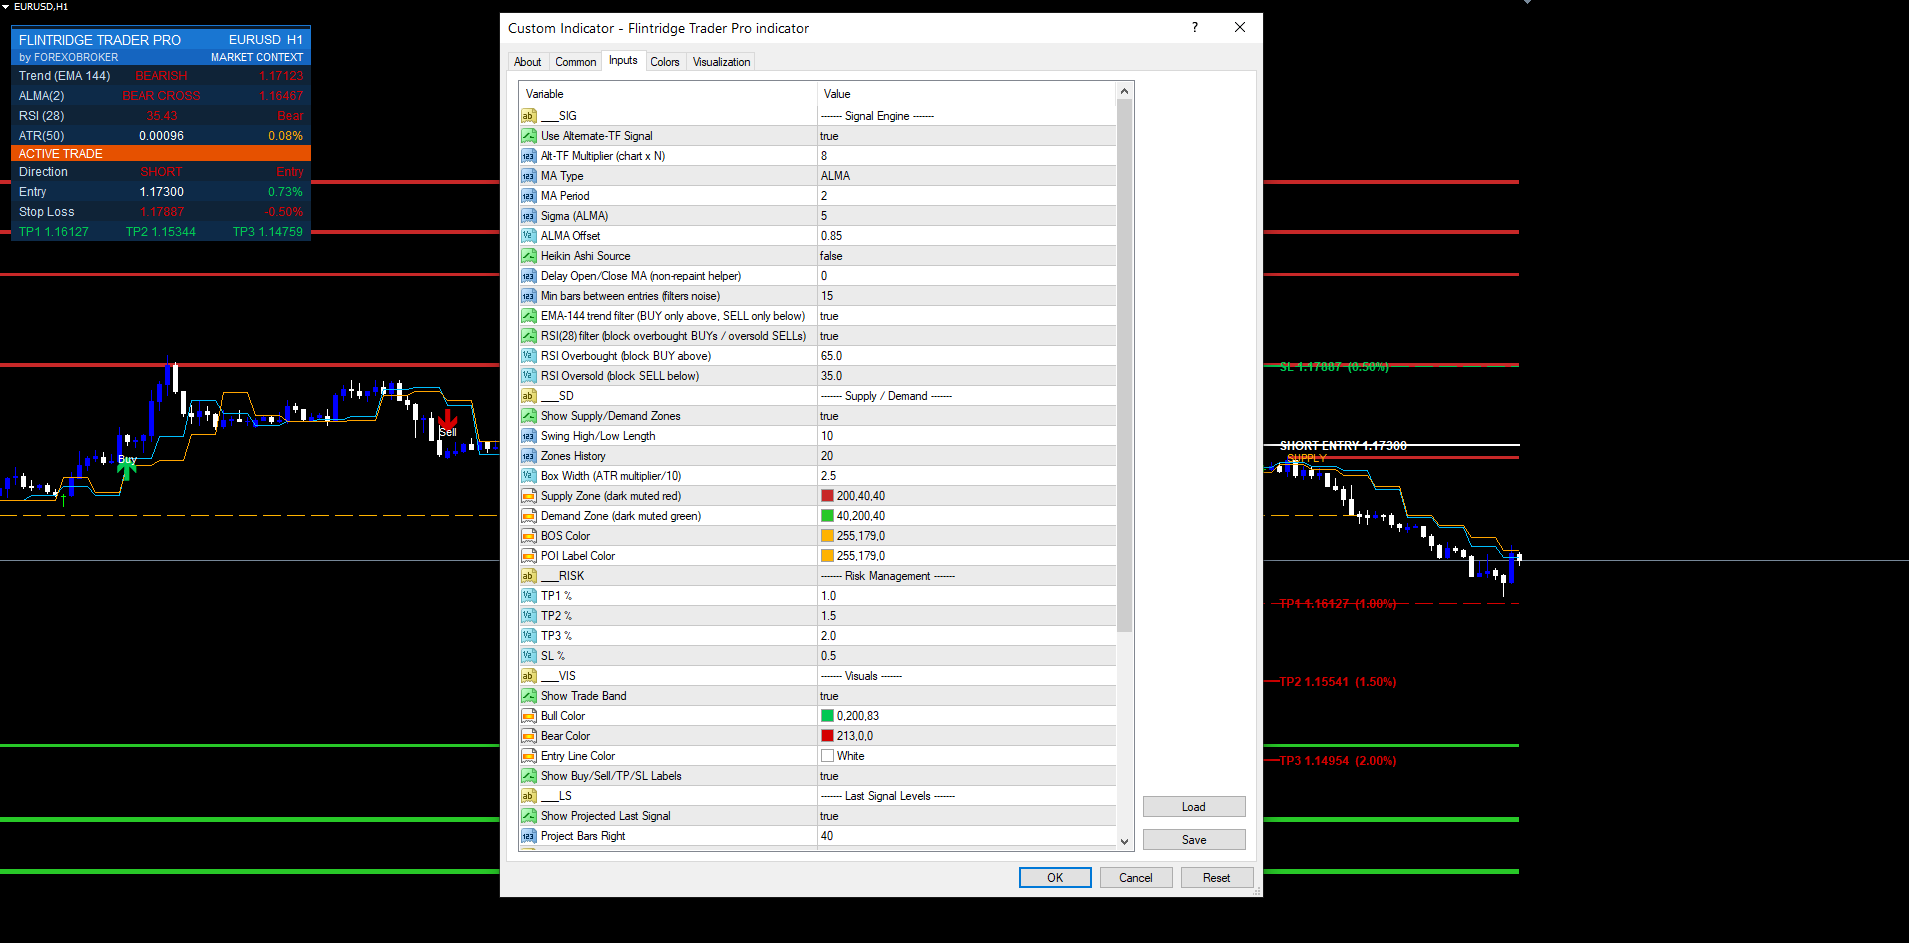
Flintridge Trader Pro lets you select the smoothing algorithm from a dropdown. Each has a distinct character; understanding the math helps you choose.
ALMA (Arnaud Legoux Moving Average) — default. ALMA applies a Gaussian-shaped weighting window over the lookback period. Two parameters shape it: sigma (default 5) controls how sharp the Gaussian is — higher sigma means a tighter, more selective window — and offset (default 0.85) controls where the peak of the Gaussian sits inside the window. An offset of 0.85 pushes the weight peak toward the most recent bars, which dramatically reduces lag while the Gaussian shape still suppresses noise. ALMA is the default precisely because this combination delivers the best lag/smoothness trade-off for a crossover engine: it reacts fast at turning points but does not chatter mid-trend. The weighted sum is:
ALMA = Σ ( w[k] · price[k] ) / Σ w[k] w[k] = exp( -( k - m )² / ( 2 · s² ) ) m = offset · ( period - 1 ) s = period / sigma
HullMA (Hull Moving Average). The Hull MA is a lag-elimination construction built from three weighted moving averages: HMA = WMA( 2·WMA(price, n/2) − WMA(price, n), √n ) . The inner term 2·WMA(n/2) − WMA(n) is an aggressively de-lagged signal; the final WMA over √n re-smooths it. HullMA turns extremely fast and is the best choice when you want the crossover to fire at the earliest possible moment and you are willing to accept slightly more frequent signals in exchange for responsiveness. It pairs well with the alternate-TF confirmation, which absorbs the extra sensitivity.
TEMA (Triple Exponential Moving Average). TEMA is defined as 3·EMA1 − 3·EMA2 + EMA3 , where EMA1 is an EMA of price, EMA2 an EMA of EMA1 , and EMA3 an EMA of EMA2 . The triple-cascade subtraction cancels most of the EMA lag while preserving the EMA's smooth, continuous response (no window edge effects). TEMA is the middle ground: smoother than HullMA, faster than a plain EMA, and the most stable choice on noisy, low-liquidity symbols.
In practice: keep ALMA for the broad majority of instruments and timeframes. Switch to HullMA when you want the earliest possible turn and run a higher-timeframe confirmation to filter the extra signals. Switch to TEMA on noisy exotics or thin crypto pairs where ALMA's window edges occasionally produce a premature flip.
Non-Repaint Design
There is no point discussing the rest of the system until the non-repaint guarantee is clear, because every downstream component (zones, BOS, risk state machine, alerts) inherits it.
A crossover indicator repaints when it evaluates the crossover on the still-forming bar (shift 0). On that bar the close is changing on every tick, so the MA value — and therefore the crossover state — flickers and only settles when the bar finally closes. A trader watching shift 0 sees arrows appear and vanish.
Flintridge Trader Pro avoids this with a delay-offset construction. The crossover is never evaluated on shift 0. The MA series are read at a confirmed offset (shift ≥ 1), so the comparison is always between two fully closed, immutable bars. The signal that exists on bar N at chart load is byte-for-byte the signal that fired during bar N's close in real time. There is no after-the-fact shifting, no recalculation, no "it looked different live."
Three architectural choices enforce this:
- Closed-bar-only evaluation. All crossover detection happens at shift ≥ 1. The forming bar is never used for signal logic.
- Immutable inputs. Once a bar closes, its open and close are fixed, so the ALMA/HullMA/TEMA values for that bar are fixed, so the crossover state for that bar is fixed forever.
- Per-bar object dedup. Signal arrows and labels are keyed by the bar timestamp. If the indicator recomputes a bar (which happens on the first tick of a new bar), the dedup check sees the existing object and does not redraw — preventing duplicate signals.
The practical consequence: forward-test results match historical-replay results, which is what makes the indicator safe to deploy alongside an Expert Advisor or to use for systematic, rules-based discretionary trading.
Alternate Higher-Timeframe Confirmation
Intraday crossover signals are noisy because intraday price is noisy. The most reliable way to clean them is to demand that a higher timeframe agrees with the entry direction before the signal is allowed to print. Flintridge Trader Pro builds this in directly.
When alternate-TF confirmation is enabled, the indicator computes a second copy of the entire crossover engine on a higher timeframe derived from the chart timeframe via an ×8 multiplier. On an M5 chart the confirmation timeframe is effectively M40-equivalent (the nearest higher standard timeframe to 5 × 8); on M15 it is roughly H2; on H1 it is roughly H8/D1-equivalent. The multiplier scales with the chart so the confirmation is always meaningfully "higher" without the trader having to hand-pick a second timeframe.
A BUY on the chart timeframe is only allowed to print when the higher-timeframe engine is also in a bullish crossover state. A SELL requires the higher-timeframe engine to be bearish. Crossovers that fight the higher-timeframe bias are discarded silently — no arrow, no alert. This single filter removes the large majority of the losing counter-trend setups that plague raw crossover systems on M1–M15 charts.
The higher-timeframe series are themselves read at a confirmed offset, so the confirmation is non-repainting too: a higher-timeframe bar that has not yet closed never participates in the gate. The cost is a small, deterministic delay — the chart-timeframe signal waits for the higher-timeframe bar to confirm — which is a price worth paying for the dramatic reduction in false signals.
For traders who deliberately want to fade strength (counter-trend mean-reversion styles), the confirmation can be turned off; the engine then prints every chart-timeframe crossover and the trader takes responsibility for trend filtering.
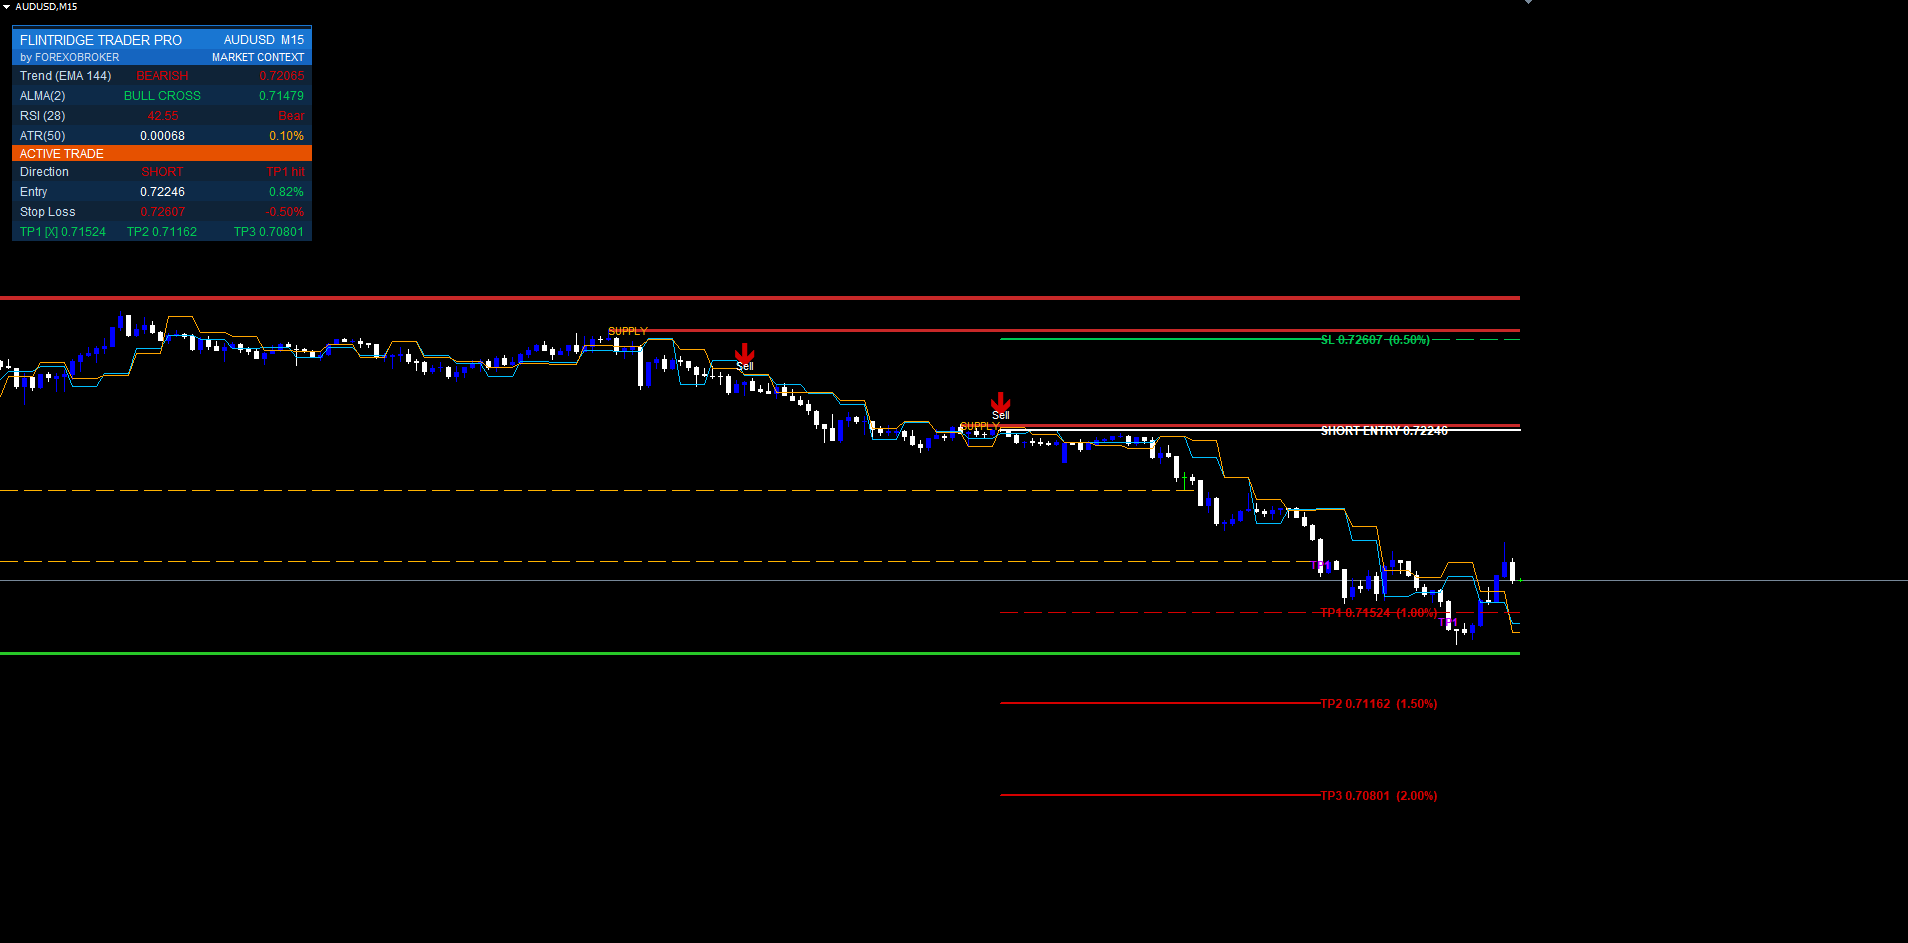
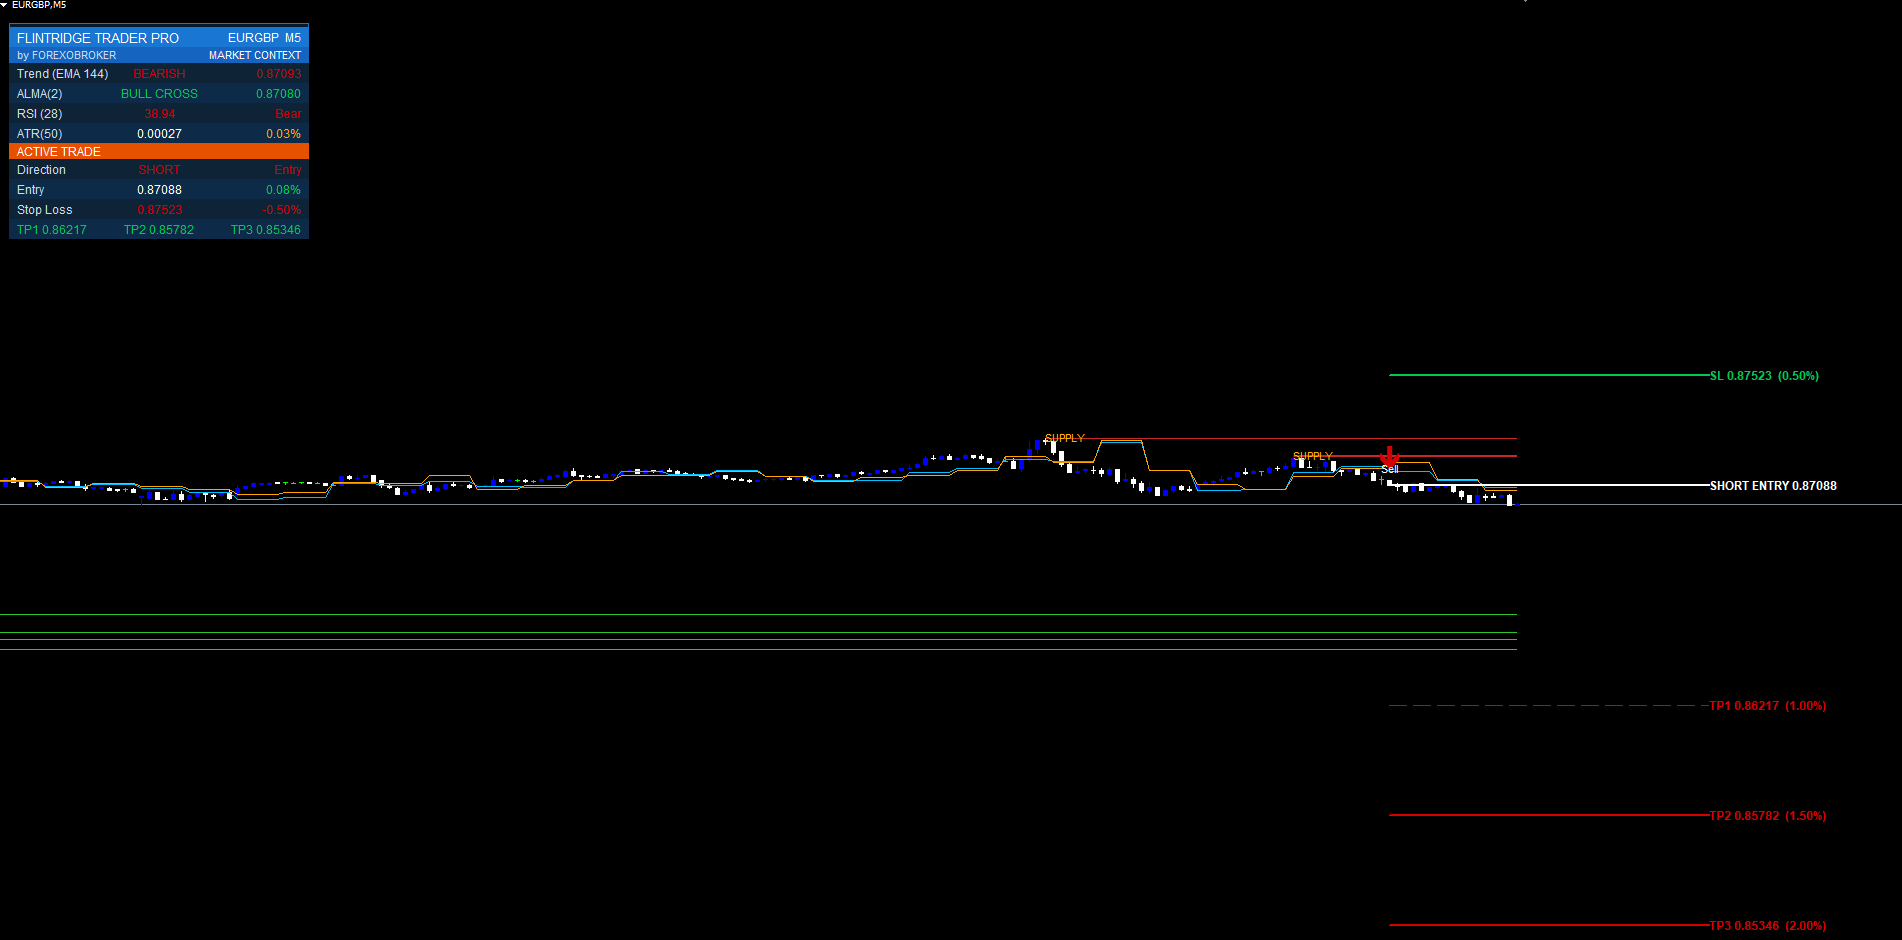
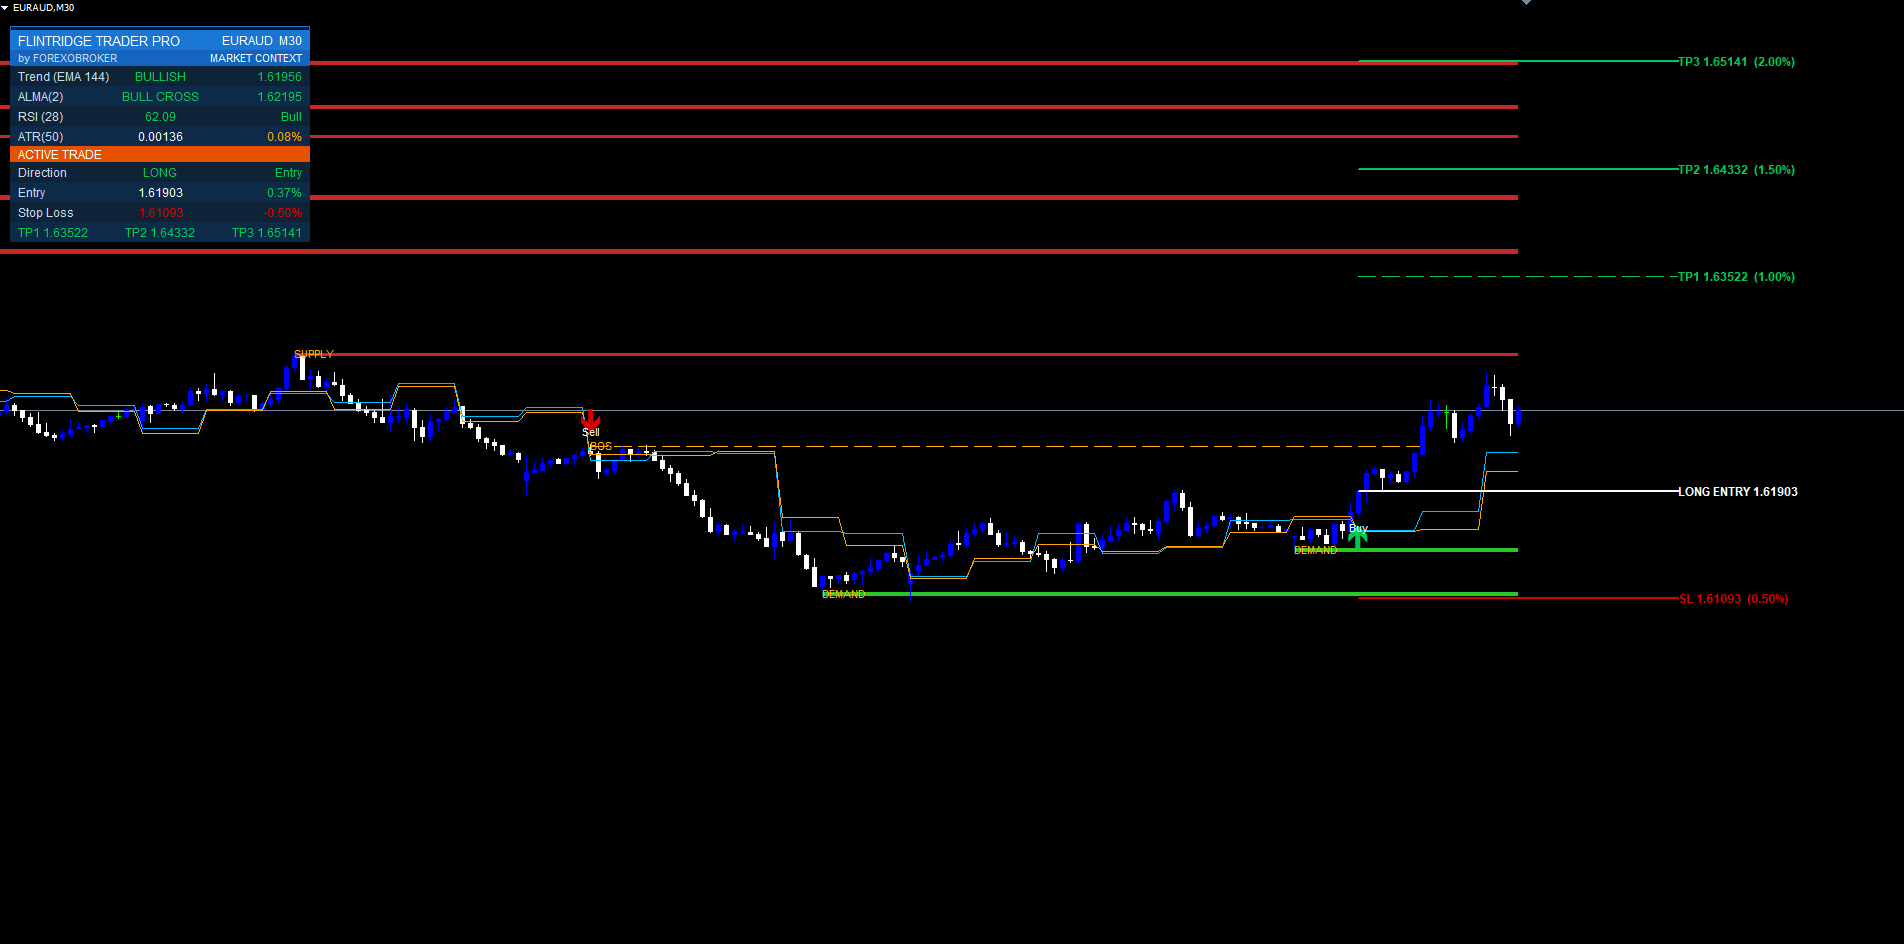
Supply & Demand Zones + POI

Signals are stronger when they fire into or out of a meaningful structural level. Flintridge Trader Pro draws swing-based supply and demand zones automatically.
The zone detector uses a swing-length lookback of 10 bars. A confirmed swing high — a bar whose high is the highest across the lookback window on both sides — anchors a supply zone (a resistance band above price). A confirmed swing low anchors a demand zone (a support band below price). The vertical thickness of each zone is not arbitrary: it is scaled by the current ATR using a box-width factor of 2.5, so zones are wide on volatile instruments and tight on calm ones — a zone is always proportional to the instrument's real movement, not a fixed pip count that would be meaningless across symbols.
The indicator keeps the most recent 20 zones on the chart and recycles the oldest as new swings form, so the chart never accumulates hundreds of stale boxes. Each zone carries a POI (Point of Interest) midline — a horizontal line through the exact center of the zone. The POI is the practical action level: price reacting at the POI rather than the far edge of the zone is the higher-probability behavior, and the POI gives you a precise line to anchor entries and stops against.
Zones are computed only from confirmed swings (the swing must be fully formed on both sides of the pivot), so they are non-repainting like everything else: a zone drawn at a historical swing was drawn at exactly that price at the time the swing confirmed.
Automatic BOS (Break of Structure) Conversion
A supply or demand zone is only valid until price decisively breaks it. When that happens, the level has not disappeared — its meaning has inverted. Broken supply becomes demand (old resistance becomes support); broken demand becomes supply. Flintridge Trader Pro automates this transition with automatic BOS conversion.
When price closes through an active zone (a confirmed close beyond the far edge, not a single-wick poke), the indicator marks that zone as a Break of Structure. The box is relabeled and recolored to show it is now a flipped level, and the POI midline is retained because a flipped level's midline is one of the most respected re-test targets in price-action trading. Subsequent price returns to a BOS level frequently produce strong continuation moves in the breakout direction — entering on a crossover signal that coincides with a BOS re-test is one of the highest-quality contexts the indicator can show you.
Because the break is detected on a confirmed close (shift ≥ 1) rather than an intrabar spike, the BOS conversion is non-repainting: a level that flipped at a historical bar flipped exactly there and stays flipped. There is no scenario where a BOS retroactively un-breaks.
The combination is the point: a crossover BUY that fires as price re-tests a freshly converted BOS demand level, with the higher timeframe confirming bullish, is a far higher-conviction setup than a bare crossover arrow in empty space. The zones and BOS give the signal context.
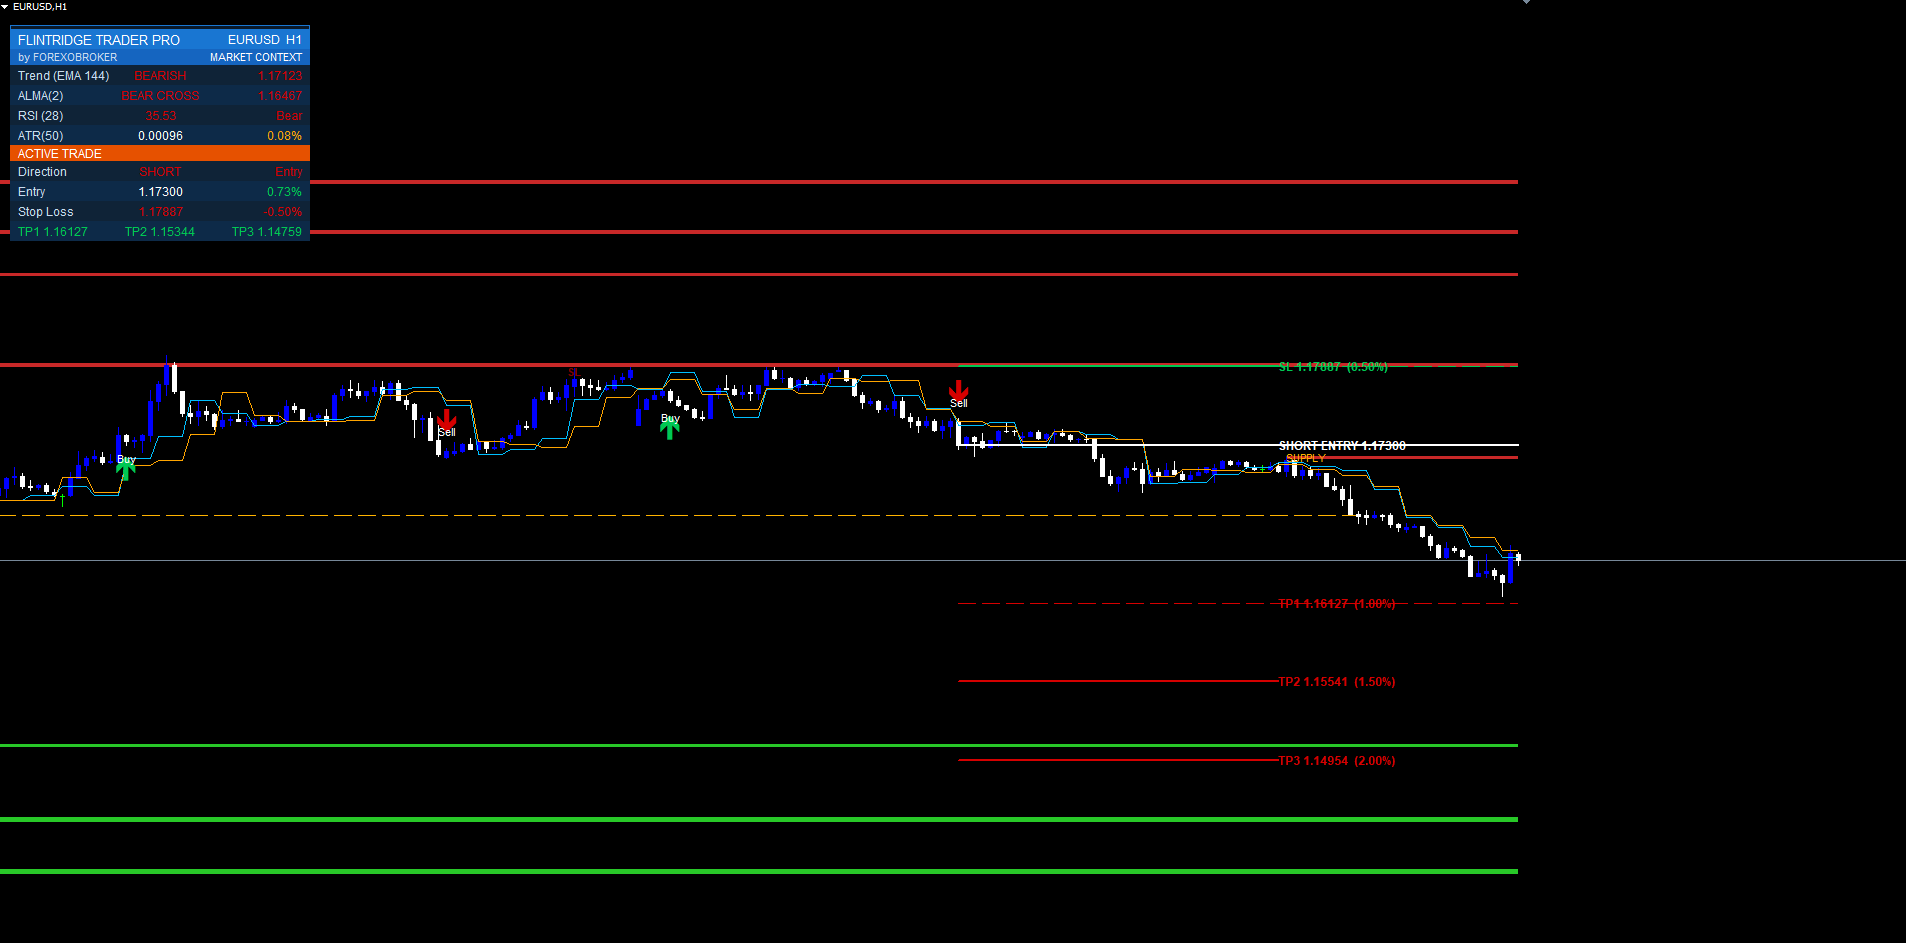
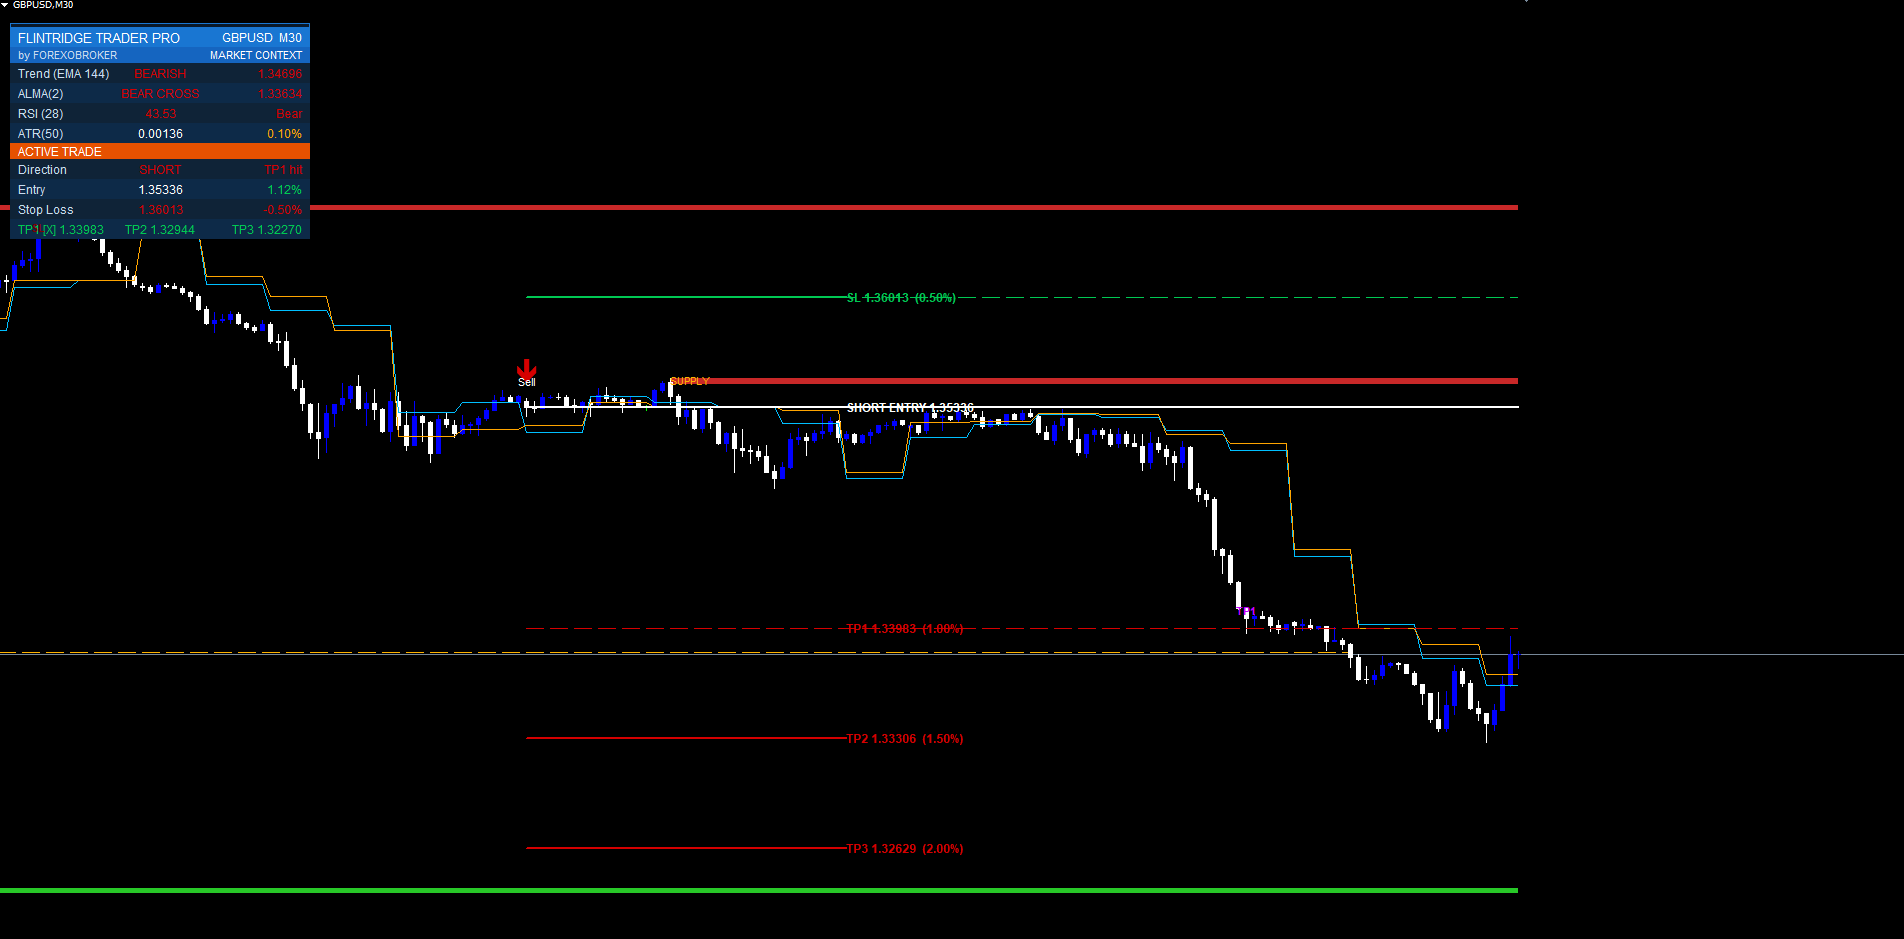
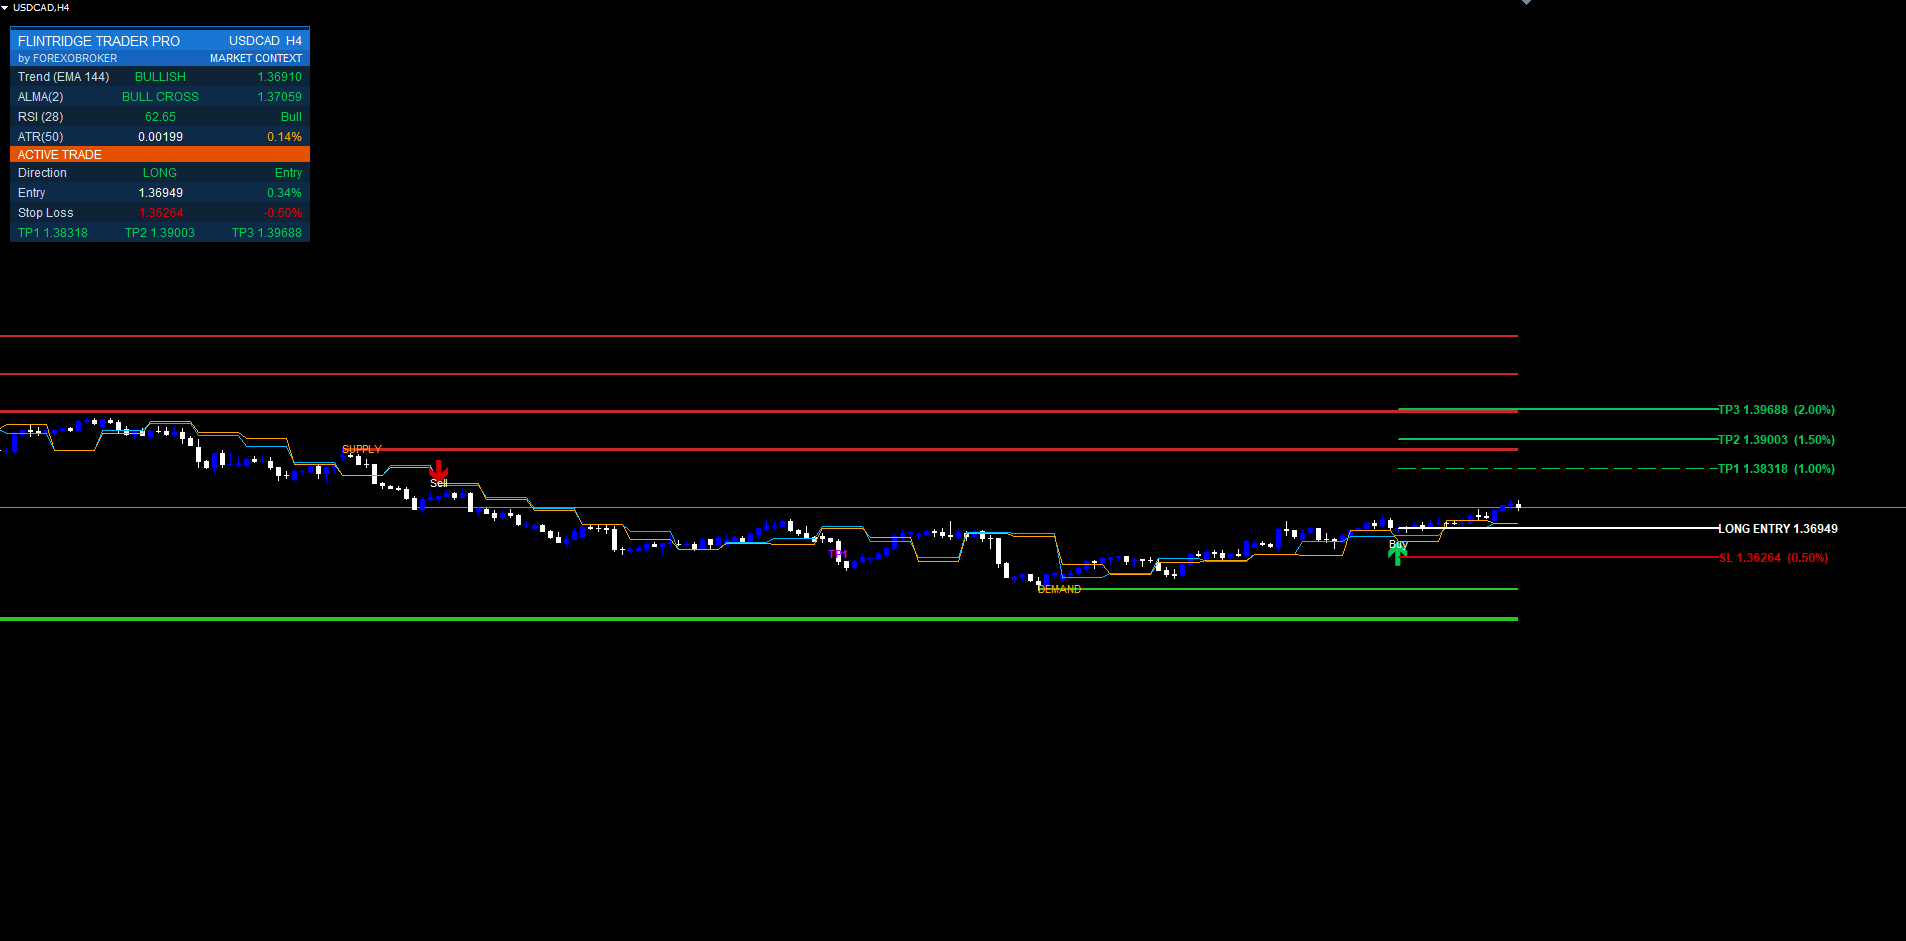
The Risk State Machine & Three Take-Profits
Every confirmed signal immediately becomes a fully specified trade. There is no "now figure out your own risk" gap. Flintridge Trader Pro runs an internal trade state machine with these states:
FLAT → ENTRY → TP1 → TP2 → TP3
                  ↘ SL → FLAT
When a signal fires from the FLAT state, the machine transitions to ENTRY and computes the full level set from the entry price using fixed percentage distances:
- Stop Loss at 0.5% from entry (below for BUY, above for SELL)
- Take-Profit 1 at 1.0% from entry
- Take-Profit 2 at 1.5% from entry
- Take-Profit 3 at 2.0% from entry
Percentage-based distances are used rather than fixed pips so the trade plan is automatically correct on every instrument — 0.5% means the same risk whether the symbol is EURUSD at 1.08, XAUUSD at 2400, or BTCUSD at 65000, with no per-symbol retuning. The 0.5% SL paired with a 1.0% first target gives a clean 1:2 risk-reward on TP1 alone; TP2 (1:3) and TP3 (1:4) are the runners.
As subsequent bars print, the state machine advances. When price trades through TP1, the machine moves to the TP1 state and a TP1 HIT marker is dropped on the bar; TP2 and TP3 work the same way. If price hits the stop first, the machine transitions SL → FLAT, drops an SL HIT marker, and the trade is closed in the indicator's internal accounting. A trade is fully closed when either SL is hit or TP3 is reached, whichever comes first; the SL/TP level lines are then removed to keep the chart clean while the original signal arrow stays permanently visible for review.
For the most recent signal the indicator also projects the level set 40 bars forward with right-edge price tags (for example TP2 1.07845 ), so the live trade plan is readable at a glance without measuring anything by hand.
MetaTrader-Only Accuracy Filters
This is where the MetaTrader build adds real edge over a bare crossover. Three additional quality filters run inside the MT4/MT5 indicator. They exist specifically to suppress the lower-quality signals that any crossover engine produces, raising the average quality of what actually prints on the chart.
EMA-Trend Filter (EMA-144). A 144-period EMA is computed on the chart timeframe. A BUY is only permitted when price is above the EMA-144; a SELL is only permitted when price is below it. The logic is blunt and effective: do not buy in a structurally falling market and do not sell in a structurally rising one. The 144 length (a Fibonacci-adjacent value) is long enough to define the dominant trend without being so slow that it lags behind genuine regime changes. Crossover signals that fight the EMA-144 are discarded before they ever draw.
RSI(28) Filter. A 28-period RSI runs as an exhaustion guard. The filter blocks BUY signals when RSI is overbought and blocks SELL signals when RSI is oversold. The reasoning: a crossover BUY that fires while the market is already stretched to an overbought extreme is statistically the worst kind of entry — you would be buying the top of an exhausted move. The 28 period (longer than the conventional 14) is intentional; a longer RSI reaches its extremes less often and only on genuinely stretched conditions, so the filter blocks the truly bad entries without strangling the normal signal flow.
Signal Cooldown. A minimum number of bars must elapse between consecutive entries (default 15 bars). Crossover engines, especially on fast smoothing like HullMA, can fire a cluster of near-identical signals in a tight range as the MAs hug each other. The cooldown enforces one decision per meaningful move: after a signal prints, the engine ignores further crossovers until the cooldown expires. This single setting is the most effective defense against over-trading a chop.
These three filters compound. A signal that survives the alternate-TF confirmation, the EMA-144 trend filter, the RSI(28) exhaustion guard, and the cooldown is, by construction, a signal that agrees with the higher timeframe, agrees with the dominant trend, is not entering into an exhausted extreme, and is spaced cleanly from the previous trade. That is a meaningfully higher-quality population of signals than a raw crossover produces — fewer arrows, better arrows.
On-Chart Visuals — Entry & Exit Labels
When a signal passes every filter, two on-chart elements are drawn at the signal bar: a directional arrow and a text label.
The arrow is a Wingdings glyph (up-arrow code 233 for BUY, down-arrow code 234 for SELL) placed below the bar low for buys and above the bar high for sells, offset by a fraction of ATR so it never overlaps the candle regardless of timeframe. The arrow color follows the trade direction. The text label sits further from the candle and reads BUY or SELL in bold, ASCII characters only — no Unicode glyphs that render as question marks on some MetaTrader font/locale combinations.
As the trade progresses, additional small markers are dropped: TP1 HIT , TP2 HIT , TP3 HIT , and SL HIT on the exact bar where each event occurred. These exit labels make post-hoc trade journaling trivial — the entire lifecycle of every trade the system would have taken is permanently on the chart. Signal arrows and exit markers are never deleted; only the forward-projected SL/TP lines are removed when a trade closes, to keep the live view uncluttered. Scroll back at any time and every historical decision is still there to review.
The Multi-Section Dashboard
The dashboard is a pixel-anchored widget built from rectangle-label backgrounds and label text. It uses the chart's pixel coordinate system, so it stays locked to its chosen corner regardless of scroll, zoom, symbol change, or terminal resize (it re-anchors on every chart-change event).
It is organized into three sections:
Header. Brand title, by FOREXOBROKER , and the current symbol with its timeframe.
MARKET CONTEXT. Four live readouts that tell you whether conditions favor a trade before one fires:
- EMA-144 Trend — price above the EMA-144 (bullish, colored) or below it (bearish), so you instantly know which direction the trend filter is currently allowing
- MA-Cross — the live crossover state of the engine (close-MA above or below open-MA) so you can see a signal building before it confirms
- RSI-28 — the current RSI(28) value with its state (overbought / oversold / neutral), so you know whether the exhaustion filter is currently blocking a direction
- ATR-50 — a 50-period ATR value, the volatility context that scales the supply/demand zone widths
ACTIVE TRADE. When a trade is live, this section reports the full plan and live progress:
- Direction — LONG / SHORT / WAITING
- Entry — the entry price
- Live P&L % — the current open profit or loss as a percentage of entry, updated every tick
- SL — the stop-loss price
- TP1 / TP2 / TP3 — the three target prices, each showing a hit tick (a * marker) once that level has been reached
The dashboard position is configurable (six corner anchors plus X/Y pixel nudges), as is the column width and font size, so it fits cleanly on any chart layout. It redraws on a timer in the MT5 build and on every calculation pass in the MT4 build for a consistently live readout on both platforms.
Alerts & Notifications
Flintridge Trader Pro ships a complete alert package delivered through three MetaTrader channels — pop-up dialog, email, and push notification to the MetaTrader mobile app — each independently switchable.
The alert event categories are:
- BUY signal fired
- SELL signal fired
- Any entry (combined BUY or SELL — one toggle for "tell me when anything triggers")
- TP1 hit, TP2 hit, TP3 hit
- SL hit
- Any exit (combined — TP or SL, one toggle for "tell me when a trade ends")
Each event has both a master switch and a per-event toggle, so you can configure exactly the noise level you want: a scalper might enable only BUY/SELL plus SL; an analytical observer might enable everything on the email channel only and leave pop-ups off.
Every alert message carries the indicator name, the symbol, the timeframe, and the relevant price level. Messages are ASCII-only so they never render as question marks on any platform. Two safeguards keep the alert stream sane:
- No historical flood on load. A non-repaint silence flag suppresses alerts during the initial historical replay when the indicator attaches to a chart. Only fresh events on new bars after attachment alert. Without this, attaching to a chart with months of history would fire hundreds of alerts instantly.
- Per-bar deduplication. The same bar cannot fire the same alert twice, even when the indicator recomputes the bar on the first tick of the next bar.
The result is an alert system you can leave running on multiple charts without it becoming unusable.
Best Markets & Timeframes
Flintridge Trader Pro is symbol- and timeframe-agnostic by design — the percentage-based risk model and ATR-scaled zones mean it adapts to any instrument without retuning. That said, some contexts suit it better than others.
Forex majors (EURUSD, GBPUSD, USDJPY, etc.) on M15–H4 are the sweet spot: liquid, well-behaved, and the alternate-TF confirmation works cleanly because higher-timeframe structure is meaningful on majors. Gold and indices (XAUUSD, US30, NAS100) work well on M30–H4 with ATR-scaled zones automatically widening to match their larger ranges. Crypto (BTCUSD, ETHUSD) is best on H1+ with the TEMA smoothing selected, because crypto's noise punishes faster constructions on low timeframes.
General guidance: higher timeframes produce fewer, higher-conviction signals; lower timeframes produce more frequent setups that lean harder on the accuracy filters. On M1–M5 keep the alternate-TF confirmation, the EMA-144 filter, and a generous cooldown all enabled — that combination is what makes scalping the engine viable rather than noisy. On H1 and above the engine is clean enough that you can relax the filters if you want more setups. The user manual ships three tuned preset blocks (Scalping, Swing, Conservative) as starting points.
Conclusion
Flintridge Trader Pro is a complete signal-and-management system built on two non-negotiable principles: signals must not repaint, and a signal without a stop and targets is not a trade. The multi-MA crossover engine — ALMA, HullMA, or TEMA, confirmed against a higher timeframe — produces the entry. Swing-based supply/demand zones with automatic BOS conversion supply the structural context. The risk state machine attaches a 0.5% stop and a 1.0% / 1.5% / 2.0% take-profit ladder automatically. The three MetaTrader-only filters (EMA-144 trend, RSI-28 exhaustion, signal cooldown) strip out the low-quality population. The dashboard and the full alert package keep you informed without flooding you.
The MT4 and MT5 builds are functionally and visually identical and produce the same signals at the same bar timestamps given the same price data. The indicator is MQL5.com Market compliant: every input is range-validated in OnInit, every handle and chart object is released in OnDeinit, and there is no DLL, file, internet, or expiry dependency anywhere in the code.
To get the indicator, visit the MQL5 Market product page below. For support, use the comments section on the product page or contact support@forexobroker.com. Updates ship automatically for the lifetime of the product. For installation, every input group, preset strategies, and troubleshooting, read the companion user manual: Flintridge Trader Pro — User Manual.
Download the indicator:
- MetaTrader 5: Flintridge Trader Pro MT5
- MetaTrader 4: Flintridge Trader Pro MT4
CONTACT & SUPPORT
- Email: info@forexobroker.com
- Questions: Use the Comments section on the product page or send a private message
- Bug Reports: Please include your broker name, account type, and a screenshot
-
✅ All MQL Tools: https://www.mql5.com/en/users/forexobroker/ ✅
--------------------------------------------------------------------------------------------------------------
🏦 **Broker I use**: https://icmarkets.com/?camp=55869
🏦 **Broker For EU Traders I use 1**: https://www.ictrading.com?camp=91414
🏦 **Broker I use 2**: https://one.exnessonelink.com/boarding/sign-up/a/c_thuv62ocfq
💻 **VPS**: https://chocoping.com/processing/aff.php?aff=738
💼 **Companies I use for getting funded**:
Fundednext: https://fundednext.com/?fpr=kestutis39
The5ers: https://www.the5ers.com/?afmc=16kl
FTMO: https://trader.ftmo.com/?affiliates=nRAyOhmFRnEnFdOpdLeh
Risk Disclaimer
Trading foreign exchange and CFDs on margin carries a high level of risk and may not be suitable for all investors. You may sustain a loss exceeding your initial investment. Trend Quorum is a technical analysis tool and does not guarantee profitable trades. Past performance is not indicative of future results. The authors accept no liability for any loss arising from use of the indicator. By using Trend Quorum you acknowledge sole responsibility for your trading decisions.


![[iVISTscalp5]: TSI — Timing Strength Index](https://c.mql5.com/6/1015/splash-preview-772243.png "[iVISTscalp5]: TSI — Timing Strength Index")
![[XAUUSD]: Weekly Liquidity Activation Points (LAP), July 6 - July 10, 2026](https://c.mql5.com/6/1015/splash-preview-772241.png "[XAUUSD]: Weekly Liquidity Activation Points (LAP), July 6 - July 10, 2026")
