

Introduction
The Sniper Ashfield Pro indicator is a non-repainting EMA-crossover trading system for MetaTrader 4 and MetaTrader 5 that takes the classic EMA9/EMA21 crossover and gates every trigger behind a six-factor confluence engine. Only crossovers that clear a configurable minimum confluence score become BUY or SELL signals on your chart. On top of that gate it adds a session-anchored daily VWAP, an ATR-based stop loss, three take-profit targets at configurable risk-reward multiples, a nineteen-row multi-section dashboard, and a thirteen-event alert package across four delivery channels.
This manual walks you through installation, attachment, every input group, reading the chart and dashboard, configuring alerts, three preset strategy templates, and troubleshooting.
Download the indicator:
- MetaTrader 5: Sniper Ashfield Pro MT5
- MetaTrader 4: Sniper Ashfield Pro MT4
TIP: This indicator is designed for traders who want a structured, rules-based crossover system with built-in risk management. It works on any symbol and any timeframe available in MetaTrader.
Installation Guide
Sniper Ashfield Pro is distributed through the MQL5.com Market. Installation is automatic.
Step 1 — Purchase and Auto-Install
- Purchase the indicator from the MQL5 Market product page
- The indicator installs automatically into your MetaTrader terminal
- Open MetaTrader and press Ctrl+N to open the Navigator panel
- Expand Indicators > Market
- Find Sniper Ashfield Pro in the list
Step 2 — Attach to a Chart
- Drag the indicator from the Navigator onto any chart
- The input dialog opens
- Review or adjust the inputs (defaults are tuned for H1 swing trading on majors)
- Click OK to attach
IMPORTANT: Do not manually copy files to the data folder. The MQL5 Market handles all file placement and updates automatically.
If you do not see the indicator in your Navigator after purchase, restart MetaTrader. If it still does not appear, check View > Toolbox > Journal for any error messages and verify your MQL5.com account is logged in via Tools > Options > Community.
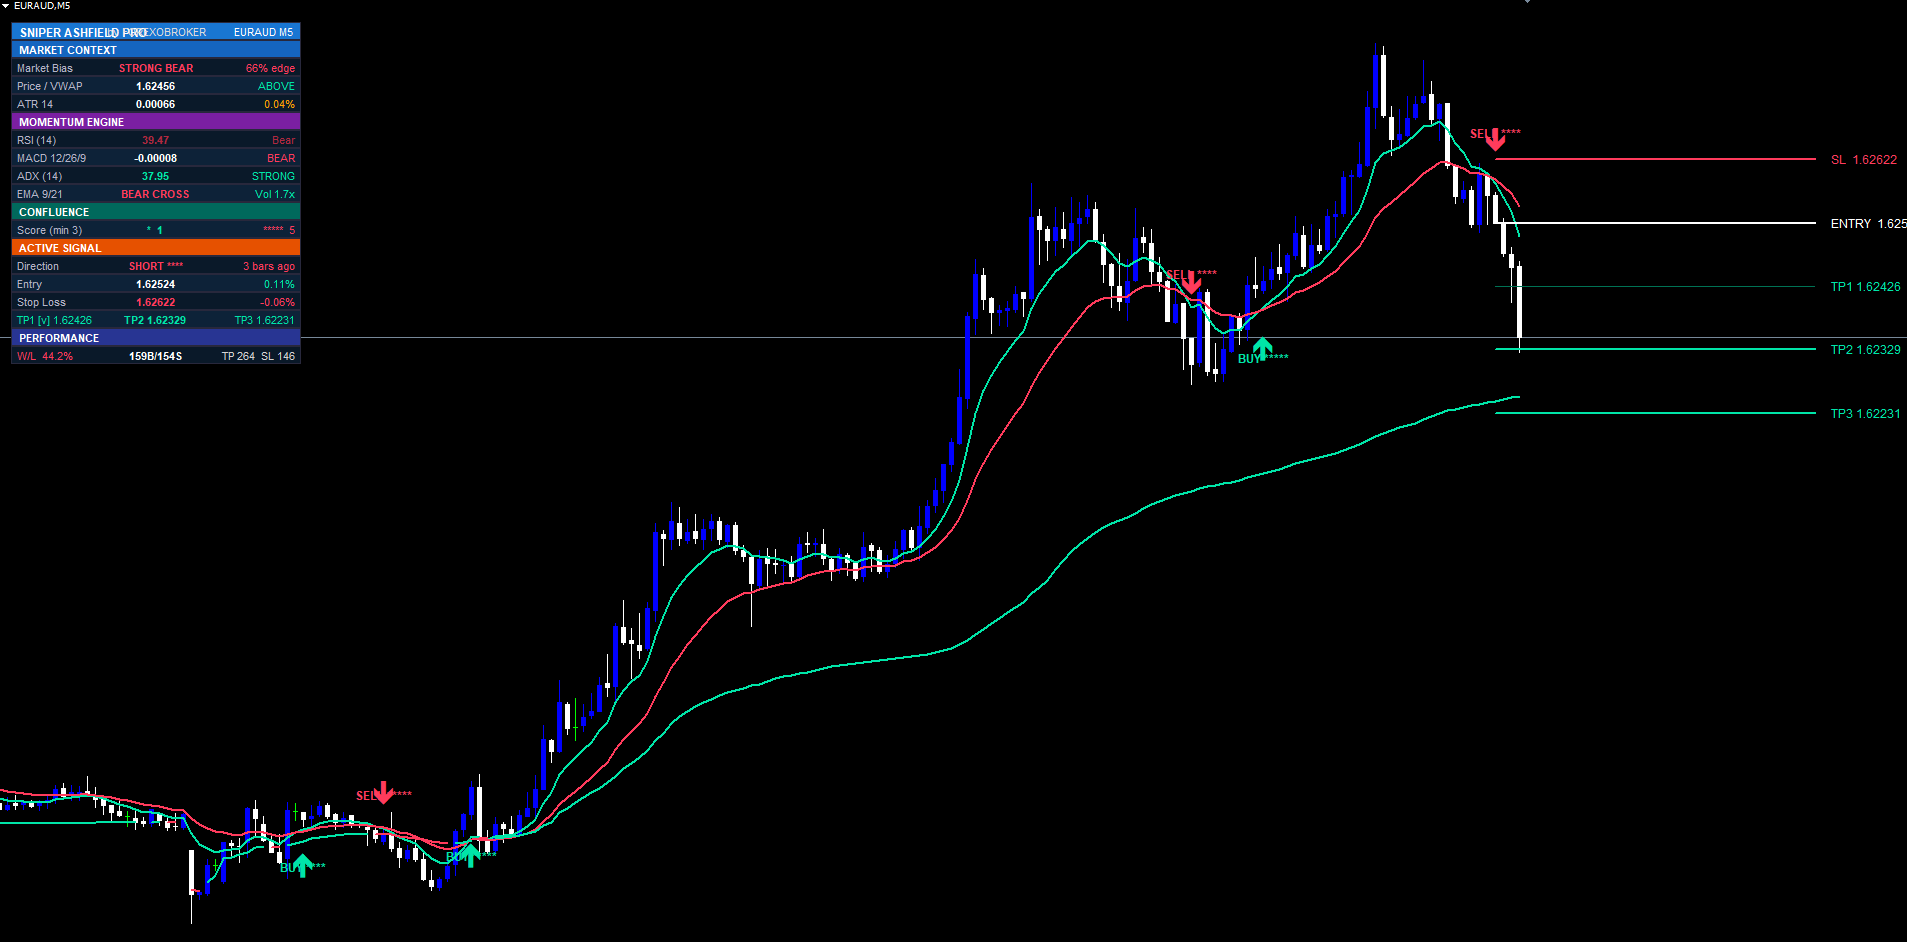
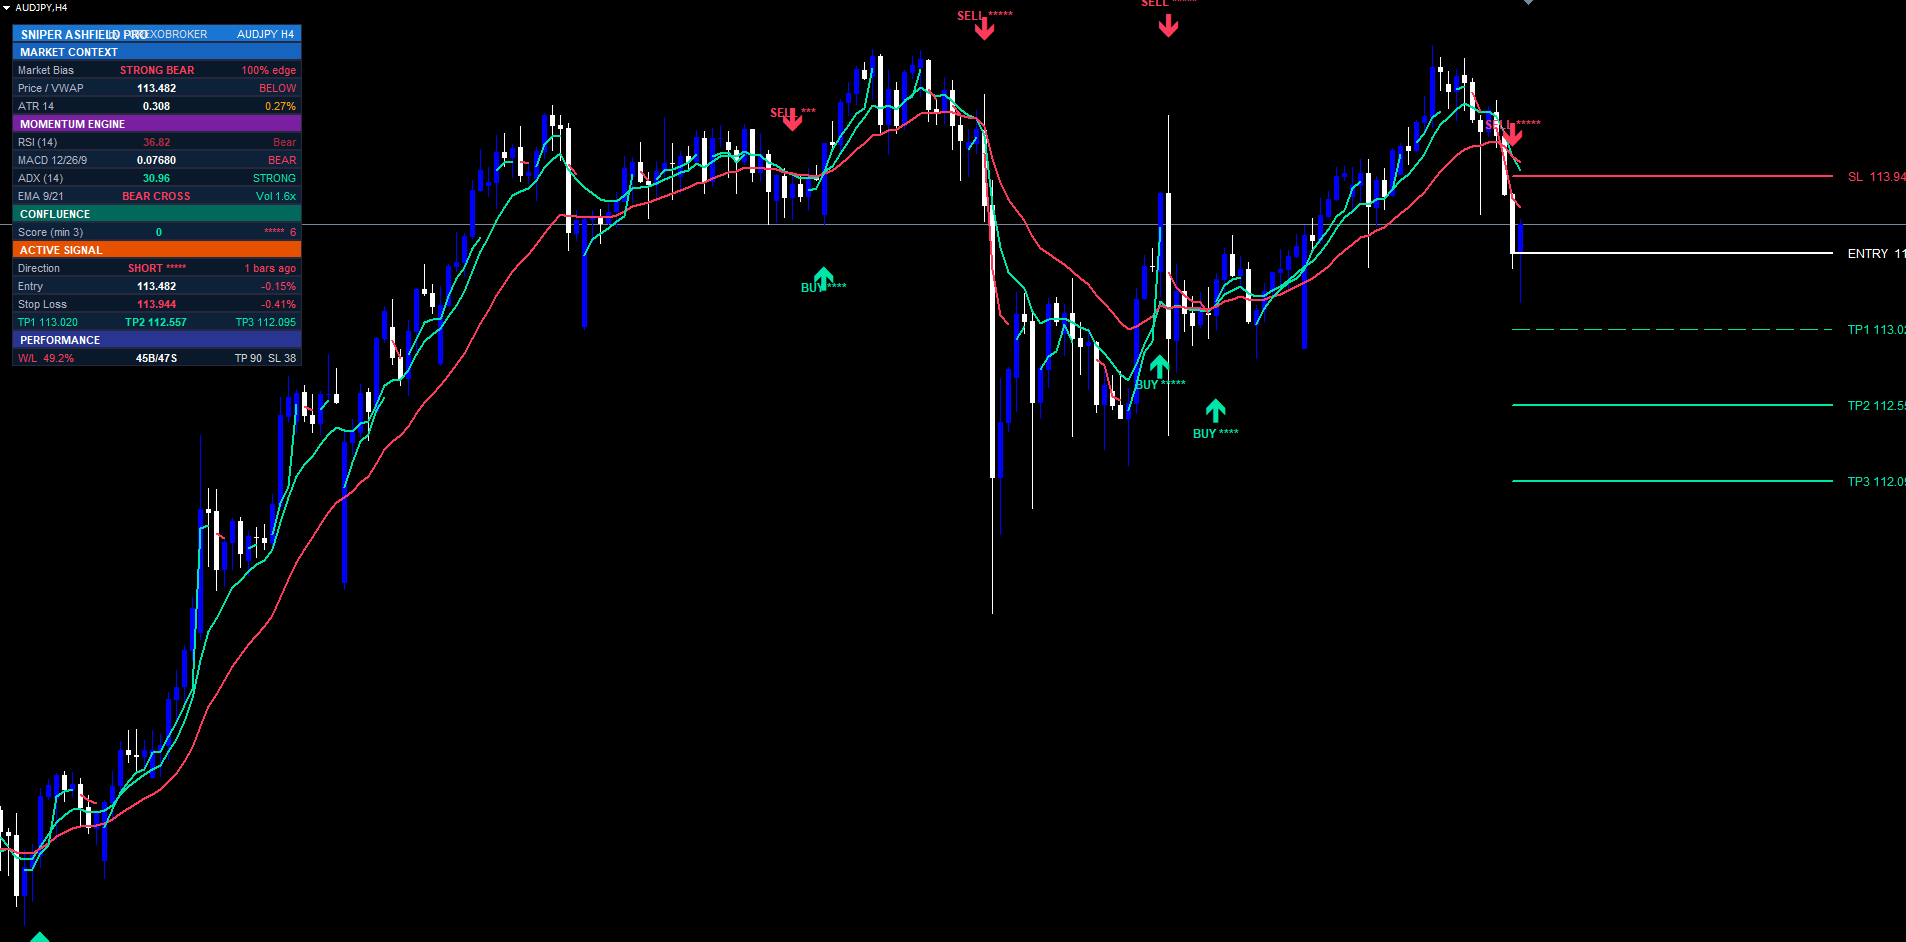
First Impression — What You See on the Chart
Once attached with default inputs, the indicator immediately draws several elements:
- The fast EMA line (default EMA9, mint colored)
- The slow EMA line (default EMA21, red colored)
- A two-color session VWAP line — mint-tinted where price closed above it, red-tinted where price closed below
- Historical BUY/SELL arrows at every confluence-cleared signal in the visible history, each with an ASCII star rating showing the confluence score
- Dashboard in the top-right corner showing live state across six sections
If a trade is currently active (the last signal has not yet hit SL or TP3), four to five horizontal lines will also be drawn from the signal bar: entry (solid white), SL (dashed red), and TP1/TP2/TP3, each with a price label on the right edge.
If the chart looks too cluttered, scroll the inputs to the Visuals group and toggle off the VWAP line ( ShowVwapLine ) or the dashboard ( ShowDashboard ).
Reading the Signal Labels
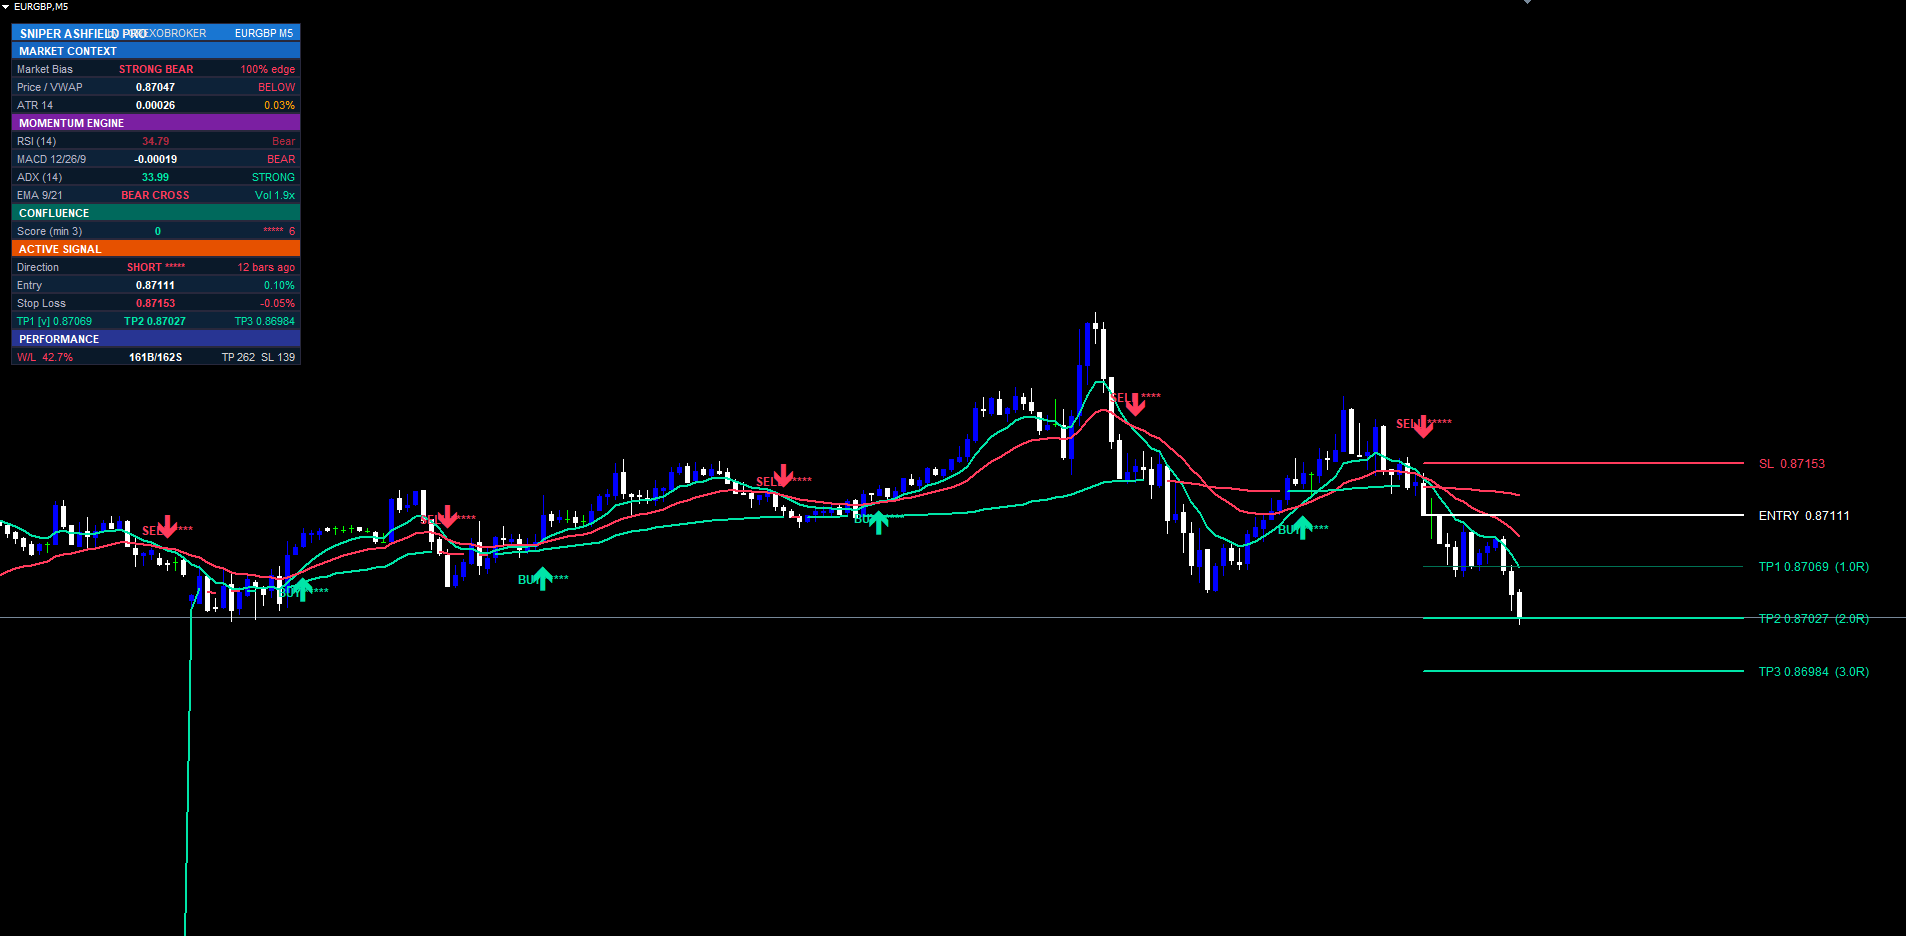
A signal on the chart combines two elements:
- A Wingdings arrow placed below the bar low (for BUY) or above the bar high (for SELL), colored mint for buys and red for sells
- A bold text label further from the candle reading BUY or SELL followed by an ASCII star string whose length equals the confluence score (1 to 6 stars)
Star count interpretation:
- * — 1 of 6 factors agreed
- ** — 2 of 6
- *** — 3 of 6 (the default minimum threshold)
- **** — 4 of 6 (a strong setup)
- ***** — 5 of 6 (very strong)
- ****** — 6 of 6 (every factor aligned — the purest sniper entry, rare)
Higher star counts indicate higher-conviction setups but fire less frequently. Historical arrows are never deleted, so you can scroll back and review every signal the system would have taken and how strong each one was. The optimal star count for your trading style is something you find through walk-forward testing.
Input Parameter Groups
The input panel is organized into six sections.
Signal Engine
The crossover trigger and gate:
- FastLen (default 9) — fast EMA period
- SlowLen (21) — slow EMA period (must be greater than FastLen)
- MinConfluence (3) — minimum confluence score required to draw a signal (range 1–6)
- SignalCooldown (5) — minimum bars between same-direction signals
- NonRepaintMode (true) — evaluate signals only on confirmed closed bars
Confluence Filters
Toggle and tune the six scoring factors:
- UseVwap (true) — require price on the correct side of session VWAP
- UseRsi (true) — require RSI momentum bias (>50 buys, <50 sells)
- RsiLen (14) — RSI period
- UseMacd (true) — require MACD line on the correct side of its signal line
- UseAdx (true) — require ADX strength plus EMA alignment
- AdxThresh (20) — ADX threshold below which the market is treated as ranging (range 10–50)
- UseVol (true) — require a volume burst with directional candle
Disabling any filter awards a free point so the maximum score stays at 6 and MinConfluence keeps its meaning.
Risk Management
SL/TP configuration:
- ShowSLTP (true) — draw entry, SL and TP lines on the chart
- AtrLen (14) — ATR period used for the stop distance
- AtrMult (1.5) — ATR multiplier defining the stop distance (risk unit)
- RrTP1 , RrTP2 , RrTP3 (1.0, 2.0, 3.0) — risk-reward multiples for the three TP targets
- ExtendBars (40) — how many bars forward to draw the level lines (range 5–500)
Visuals
- BullColor / BearColor — colors for bullish and bearish elements
- EmaFastColor / EmaSlowColor — EMA line colors
- EmaWidth (2) — EMA line width (range 1–5)
- ShowVwapLine (true) — draw the two-color VWAP line
- VwapWidth (2) — VWAP line width (range 1–5)
Dashboard
- ShowDashboard (true) — show the dashboard widget
- DashCorner (Right Upper) — chart corner anchor (any of the four corners)
- DashFontSize (8) — base font size (range 6–14)
- DashHeaderColor — brand header bar color
Alerts
Four channels and six event categories:
- AlertBuySell (true) — fire on BUY/SELL signals
- AlertTPHit (true) — fire on TP1/TP2/TP3 hits
- AlertSLHit (true) — fire on SL hits
- AlertEmaCross (false) — fire on raw (pre-confluence) EMA crosses
- AlertVwapCross (false) — fire when price crosses the session VWAP
- AlertRsi50 (false) — fire when RSI crosses the 50 line
- AlertPopup (true) — show MetaTrader popup dialog
- AlertPush (false) — send push notification to the mobile app
- AlertEmailOn (false) — send email
- AlertSoundOn (true) — play a sound on signal
- AlertSoundFile ("alert.wav") — the sound file to play
Understanding SL and TP Levels
When a signal fires, up to five horizontal lines are drawn from the signal bar extending forward by ExtendBars bars:
- Entry line — solid white, 2px width
- SL line — dashed red, 2px width
- TP1 line — dashed, 1px width (thin)
- TP2 line — dashed, 2px width (full)
- TP3 line — dotted, 2px width
Each line has a right-side text label showing the exact price; the TP labels also show the R-multiple in parentheses, like TP2 1.07845 (2.0R) .
The stop is computed from ATR: risk = ATR(AtrLen) × AtrMult , with a minimum floor so the stop never collapses onto the entry. The three TPs are then entry ± risk × RrTP1/2/3 . Because ATR adapts to volatility, the stop is automatically wider on volatile instruments and tighter on quiet ones — no manual pip tuning per symbol.
When price reaches TP1 or TP2, that line recolors to a faded solid style so you can see at a glance which targets are already banked while the trade runs. When TP3 is reached the trade closes as a win and all level lines are wiped. If the stop is hit first, the lines are also wiped. There is only ever one active trade-line set on the chart — a fresh signal wipes the old set and draws a new one. The signal arrow itself stays permanently visible.
The internal performance counter applies one refinement: if TP1 was reached before the stop, the closed trade counts as a win (a disciplined trader would have moved the stop to breakeven after TP1). If the stop hits before any TP, the trade counts as a loss.
Reading the Dashboard
The dashboard has nineteen rows organized into six sections.
Header (row 0) — SNIPER ASHFIELD PRO brand title, by FOREXOBROKER , current symbol and timeframe.
Market Context (rows 1–4) — Section header "MARKET CONTEXT", then:
- Market Bias — STRONG/MILD BULL or BEAR, or NEUTRAL, with the percentage edge
- Price / VWAP — current close with ABOVE or BELOW session VWAP (color-coded)
- ATR — value plus ATR as a percentage of price
Momentum Engine (rows 5–8) — Section header "MOMENTUM ENGINE", then:
- RSI value with state (OB / OS / Bull / Bear)
- MACD main value with BULL/BEAR signal-cross state
- ADX value with STRONG/WEAK trend classification
- EMA-cross state (BULL/BEAR CROSS) with the current volume ratio
Confluence (rows 9–10) — Section header "CONFLUENCE", then a row with the live buy score (stars) and live sell score (stars), with the minimum-required threshold in the row label. This updates every tick — watch the score build before a crossover fires.
Active Signal (rows 11–15) — Section header "ACTIVE SIGNAL", then:
- Direction — LONG / SHORT / WAITING with stars and bars-ago
- Entry — entry price with live percentage P&L
- Stop Loss — SL price with percentage distance from entry
- TP1 / TP2 / TP3 prices on a single row, each prefixed [v] once reached
Performance (rows 16–18) — Section header "PERFORMANCE", then a summary: running win-rate percentage (color-coded), total BUY/SELL count, aggregate TP-hit and SL-hit totals.
To reposition the dashboard, change DashCorner to any of the four chart corners. The dashboard re-anchors automatically when you resize the terminal window.
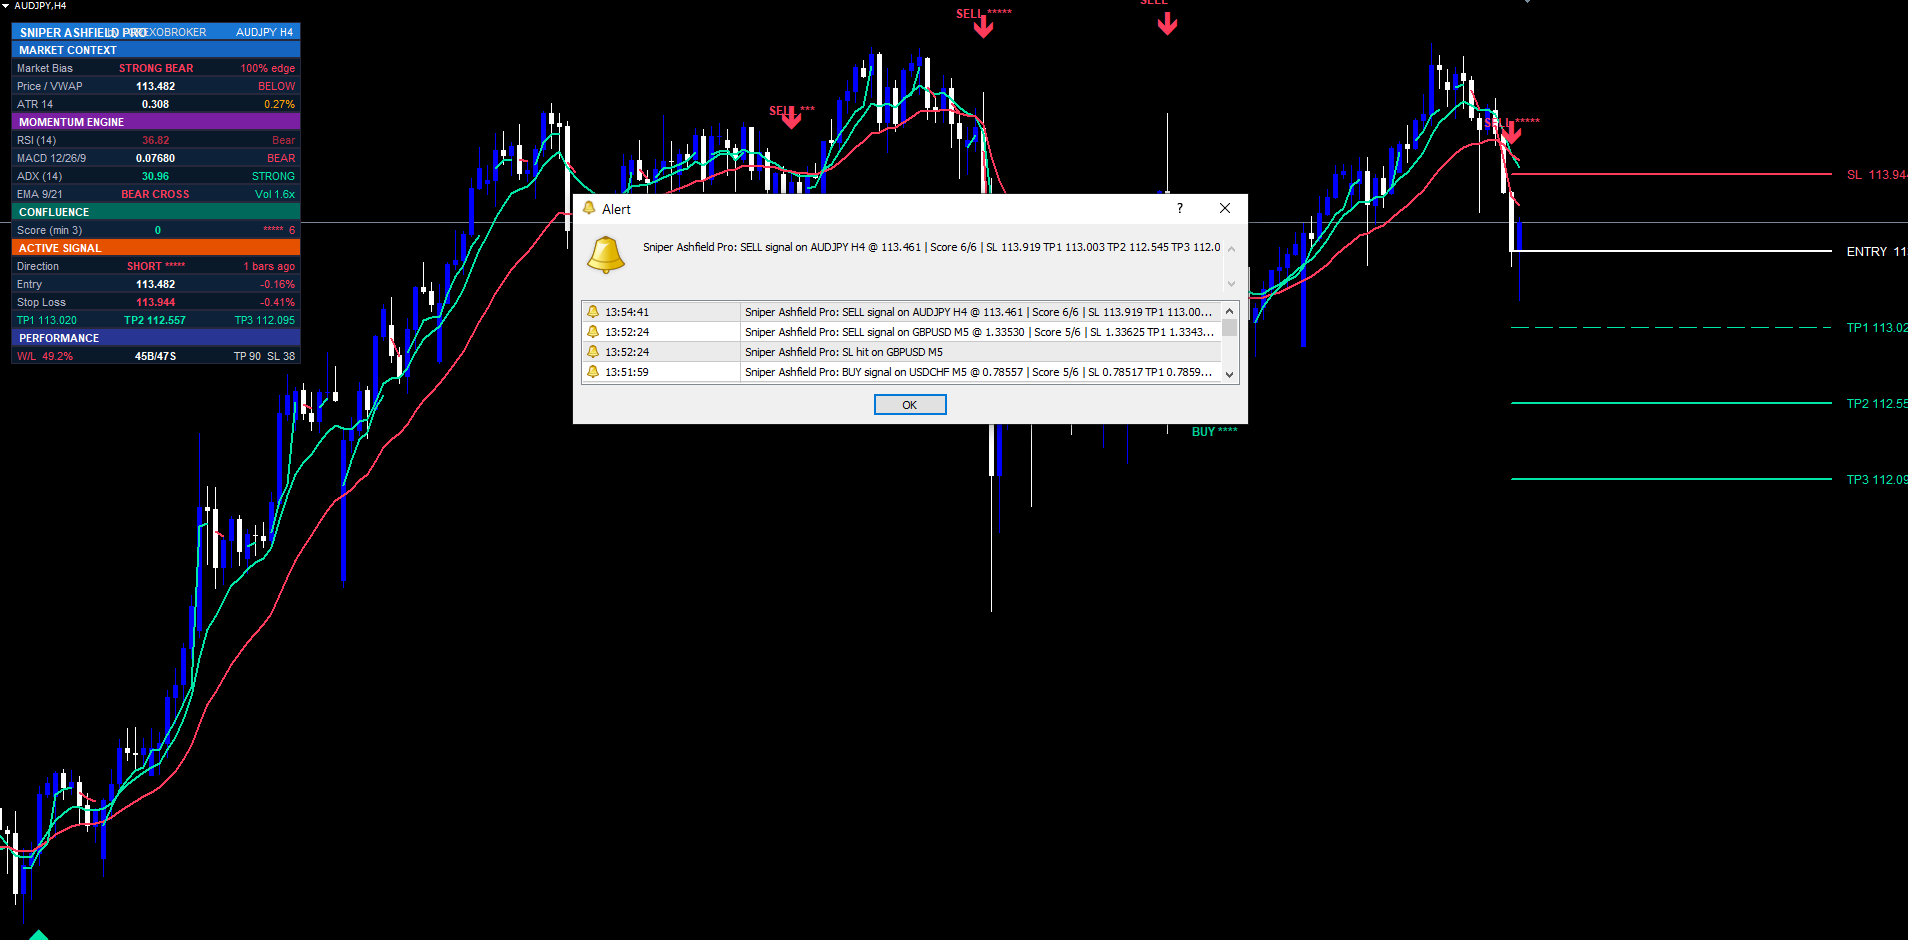
Configuring Alerts
Sniper Ashfield Pro can deliver alerts via four independent channels.
Popup Alerts
The simplest channel. When enabled ( AlertPopup = true ), every triggered event produces a MetaTrader popup dialog with the full alert message. Best for active sessions when you are at your computer.
Push Notifications to the MetaTrader Mobile App
- Install the MetaTrader mobile app on your phone (iOS or Android)
- Open the app and go to Settings > Chat and Messages
- Note your MetaQuotes ID (a number like 12345678 )
- In the desktop MetaTrader, go to Tools > Options > Notifications
- Tick Enable Push Notifications and paste your MetaQuotes ID
- In the indicator inputs, set AlertPush = true
The push channel delivers the same message text directly to your phone's lock screen.
Email Alerts
- In MetaTrader, go to Tools > Options > Email
- Tick Enable and configure your SMTP server, sender, recipient, and login
- Click Test to confirm delivery
- In the indicator inputs, set AlertEmailOn = true
Email is slower than popup and push (typically 5–30 seconds of SMTP latency) but useful for archival and downstream automation.
Sound Alerts
When AlertSoundOn = true , the configured AlertSoundFile (default alert.wav ) plays on each new BUY/SELL signal. Place a custom .wav in your terminal's Sounds folder and set its filename in the input to use your own alert tone.
Event Categories
Within those channels, six event categories can be toggled individually: AlertBuySell (the main signal event), AlertTPHit , AlertSLHit , AlertEmaCross (raw pre-confluence crosses), AlertVwapCross , and AlertRsi50 .
A typical active-trader setup: BuySell + TPHit + SLHit enabled, popup + push channels. A typical analytical setup: everything enabled, email channel only. Alerts are silenced during the initial historical replay when the indicator attaches — only fresh signals from new bars after attachment will alert.
Preset Strategies
These three configurations are starting points. Tune from there based on your symbol and timeframe.
Scalping (M1 / M5 majors)
FastLen = 9 SlowLen = 21 MinConfluence = 5 SignalCooldown = 3 AtrLen = 14 AtrMult = 1.2 RrTP1/TP2/TP3 = 0.8 / 1.5 / 2.5
A strict confluence floor (5 of 6) keeps only the highest-conviction crossovers on fast, noisy markets. Tighter ATR multiplier and a shorter TP ladder match the smaller intraday ranges. Short cooldown allows more setups while still preventing same-bar duplicates.
Swing Trading (H1 / H4 majors — default)
(All defaults work well — H1 majors are the design target.)
MinConfluence   = 3
The default configuration is calibrated for H1 majors. Increase MinConfluence to 4 if you prefer fewer, stronger signals.
Conservative (H4 / D1 — fewer, stronger setups)
FastLen = 12 SlowLen = 26 MinConfluence = 5 SignalCooldown = 10 AtrLen = 14 AtrMult = 2.0 RrTP1/TP2/TP3 = 1.0 / 2.5 / 4.0
Slightly slower EMAs, a strict 5-of-6 confluence requirement, wider stops to absorb H4/D1 volatility, and a runner TP at 4.0R for the rare extended trends.
Troubleshooting
Indicator shows in Navigator but does not attach to chart. Check the Journal tab in the Toolbox (Ctrl+T) for error messages. The most common cause is invalid input values — every numeric input is range-validated. Confirm FastLen is less than SlowLen , MinConfluence is 1–6, AdxThresh is 10–50, and DashFontSize is 6–14.
EMA lines or VWAP do not appear. The indicator needs roughly SlowLen + AtrLen + 35 bars of history before lines render. On a fresh chart, scroll back to load more bars or switch to a higher timeframe to confirm it is working.
Dashboard is in the wrong position. Change DashCorner to one of the four corner options. The dashboard re-anchors itself on terminal resize automatically.
Too many signals on chart. Increase MinConfluence from 3 toward 5 or 6. Each step up significantly thins the signal stream because it requires more factors to align simultaneously.
Too few signals on chart. Decrease MinConfluence toward 1, or disable some confluence filters ( UseVwap , UseRsi , UseMacd , UseAdx , UseVol ). Note: each disabled filter awards a free point in scoring, so make sure your MinConfluence value still reflects your real strictness.
Alerts fire during initial attachment. This should never happen on the current version. If it does, verify the indicator version under its properties dialog; if older than the Market release, remove and re-add it from the Navigator.
SL/TP lines disappear unexpectedly. The lines are intentionally wiped when the trade closes (SL hit or TP3 hit) or when a new signal fires. The signal arrow stays. To check whether a trade closed, look at the dashboard's Active Signal section — if it shows "WAITING", the trade has closed.
Different signals on MT4 vs MT5. The two builds produce identical signals at identical bar timestamps. If you see a discrepancy, verify both are on the same symbol with identical inputs and have synced history (right-click chart > Refresh).
Download the indicator:
- MetaTrader 5: Sniper Ashfield Pro MT5
- MetaTrader 4: Sniper Ashfield Pro MT4
CONTACT & SUPPORT
- Email: info@forexobroker.com
- Questions: Use the Comments section on the product page or send a private message
- Bug Reports: Please include your broker name, account type, and a screenshot
-
✅ All MQL Tools: https://www.mql5.com/en/users/forexobroker/ ✅
--------------------------------------------------------------------------------------------------------------
🏦 **Broker I use**: https://icmarkets.com/?camp=55869
🏦 **Broker For EU Traders I use 1**: https://www.ictrading.com?camp=91414
🏦 **Broker I use 2**: https://one.exnessonelink.com/boarding/sign-up/a/c_thuv62ocfq
💻 **VPS**: https://chocoping.com/processing/aff.php?aff=738
💼 **Companies I use for getting funded**:
Fundednext: https://fundednext.com/?fpr=kestutis39
The5ers: https://www.the5ers.com/?afmc=16kl
FTMO: https://trader.ftmo.com/?affiliates=nRAyOhmFRnEnFdOpdLeh
Risk Disclaimer
Trading foreign exchange and CFDs on margin carries a high level of risk and may not be suitable for all investors. You may sustain a loss exceeding your initial investment. Trend Quorum is a technical analysis tool and does not guarantee profitable trades. Past performance is not indicative of future results. The authors accept no liability for any loss arising from use of the indicator. By using Trend Quorum you acknowledge sole responsibility for your trading decisions.


