

Introduction
The Voidbreak Buy Sell Pro indicator is a non-repainting range-filter regime system for MetaTrader 4 and MetaTrader 5. A volatility-adaptive band — the "void" — absorbs ordinary chop and ignores it. The indicator only changes its mind when price genuinely breaks out of that void, and it converts each breakout into a sticky bull/bear regime. The single signal it produces is the regime flip: bear-to-bull is a BUY, bull-to-bear is a SELL. One trade at a time, one entry logic, no signal spam.
Around that engine sits a complete trade plan: a hybrid ATR/swing stop-loss with three modes, three R-multiple take-profit targets, automatic timeframe scaling, a five-layer display-only confluence score, an EMA trend cloud, a six-section dashboard, and an eight-event alert package delivered through MetaTrader's native popup, mobile push, and email channels.
This manual covers installation, first impression, reading the signals and dashboard, every input group, SL/TP behaviour, alerts, three preset strategies, and troubleshooting.
Download the indicator:
- MetaTrader 5: Voidbreak Buy Sell Pro MT5
- MetaTrader 4: Voidbreak Buy Sell Pro MT4
TIP: Voidbreak works on forex, crypto, metals, oil, indices, and stocks, on every timeframe M1 through MN1. Auto-scale keeps the stop and target geometry sensible on every one.
Installation Guide
Voidbreak Buy Sell Pro is distributed through the MQL5.com Market. Installation is automatic — there are no files to copy.
Step 1 — Purchase and Auto-Install
- Purchase the indicator from the MQL5.com Market product page
- It installs automatically into your MetaTrader terminal
- Open MetaTrader, press Ctrl+N for the Navigator, and expand Indicators > Market
- Find Voidbreak Buy Sell Pro in the list
Step 2 — Attach to a Chart
- Drag the indicator from the Navigator onto any chart
- Review or adjust the inputs (defaults are tuned for H1 swing trading)
- Click OK to attach
IMPORTANT: Do not manually copy files to the Data Folder. The MQL5 Market handles all placement and updates automatically.
If the indicator does not appear in the Navigator after purchase, restart MetaTrader. If it still does not show, check View > Toolbox > Journal for messages and verify your MQL5.com account is logged in via Tools > Options > Community.
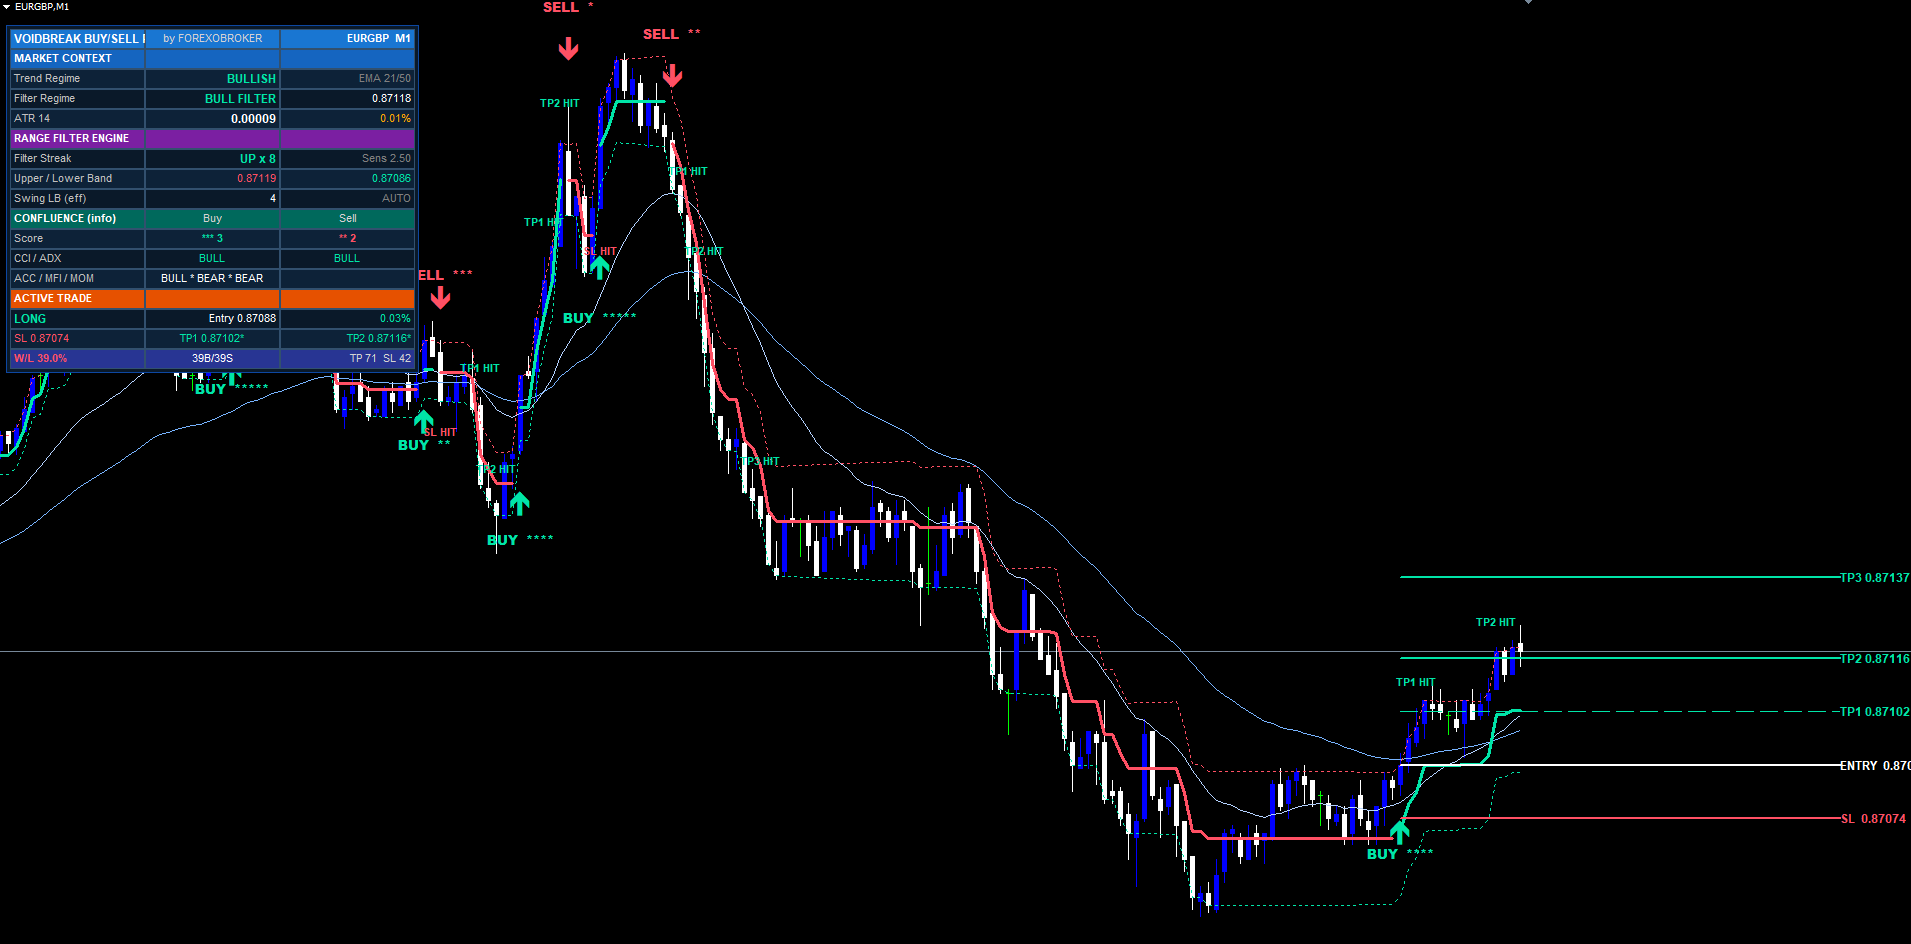
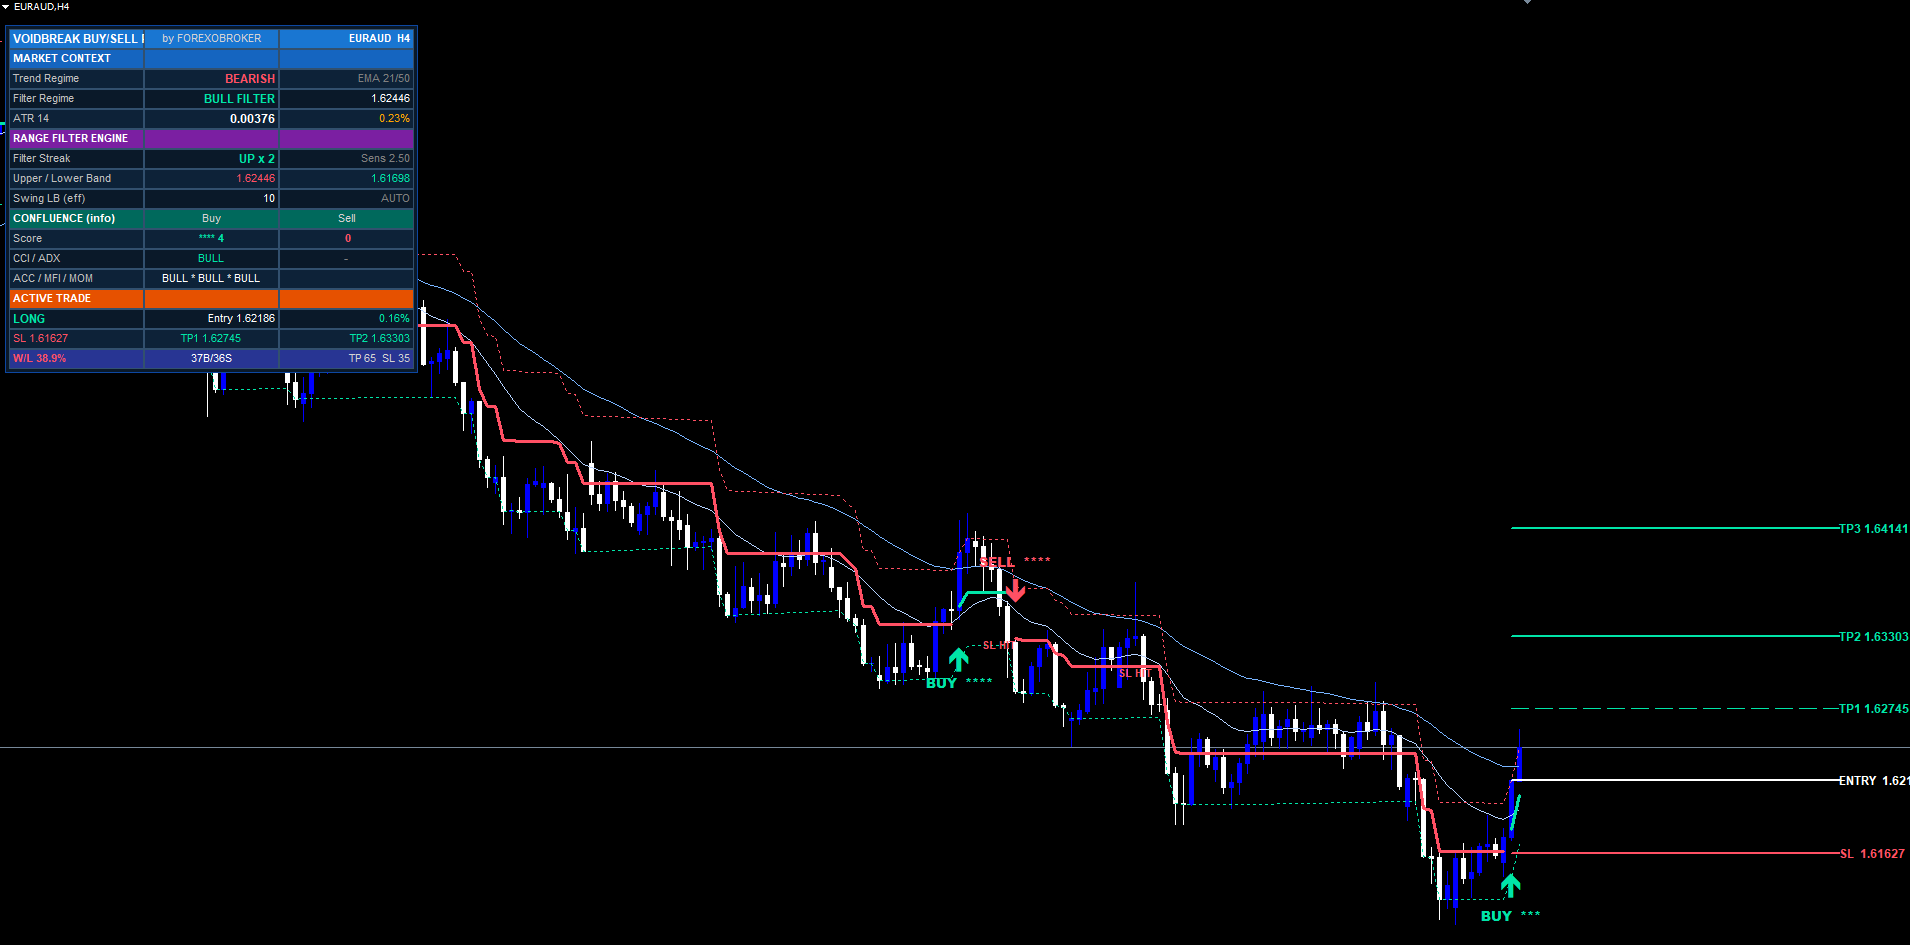
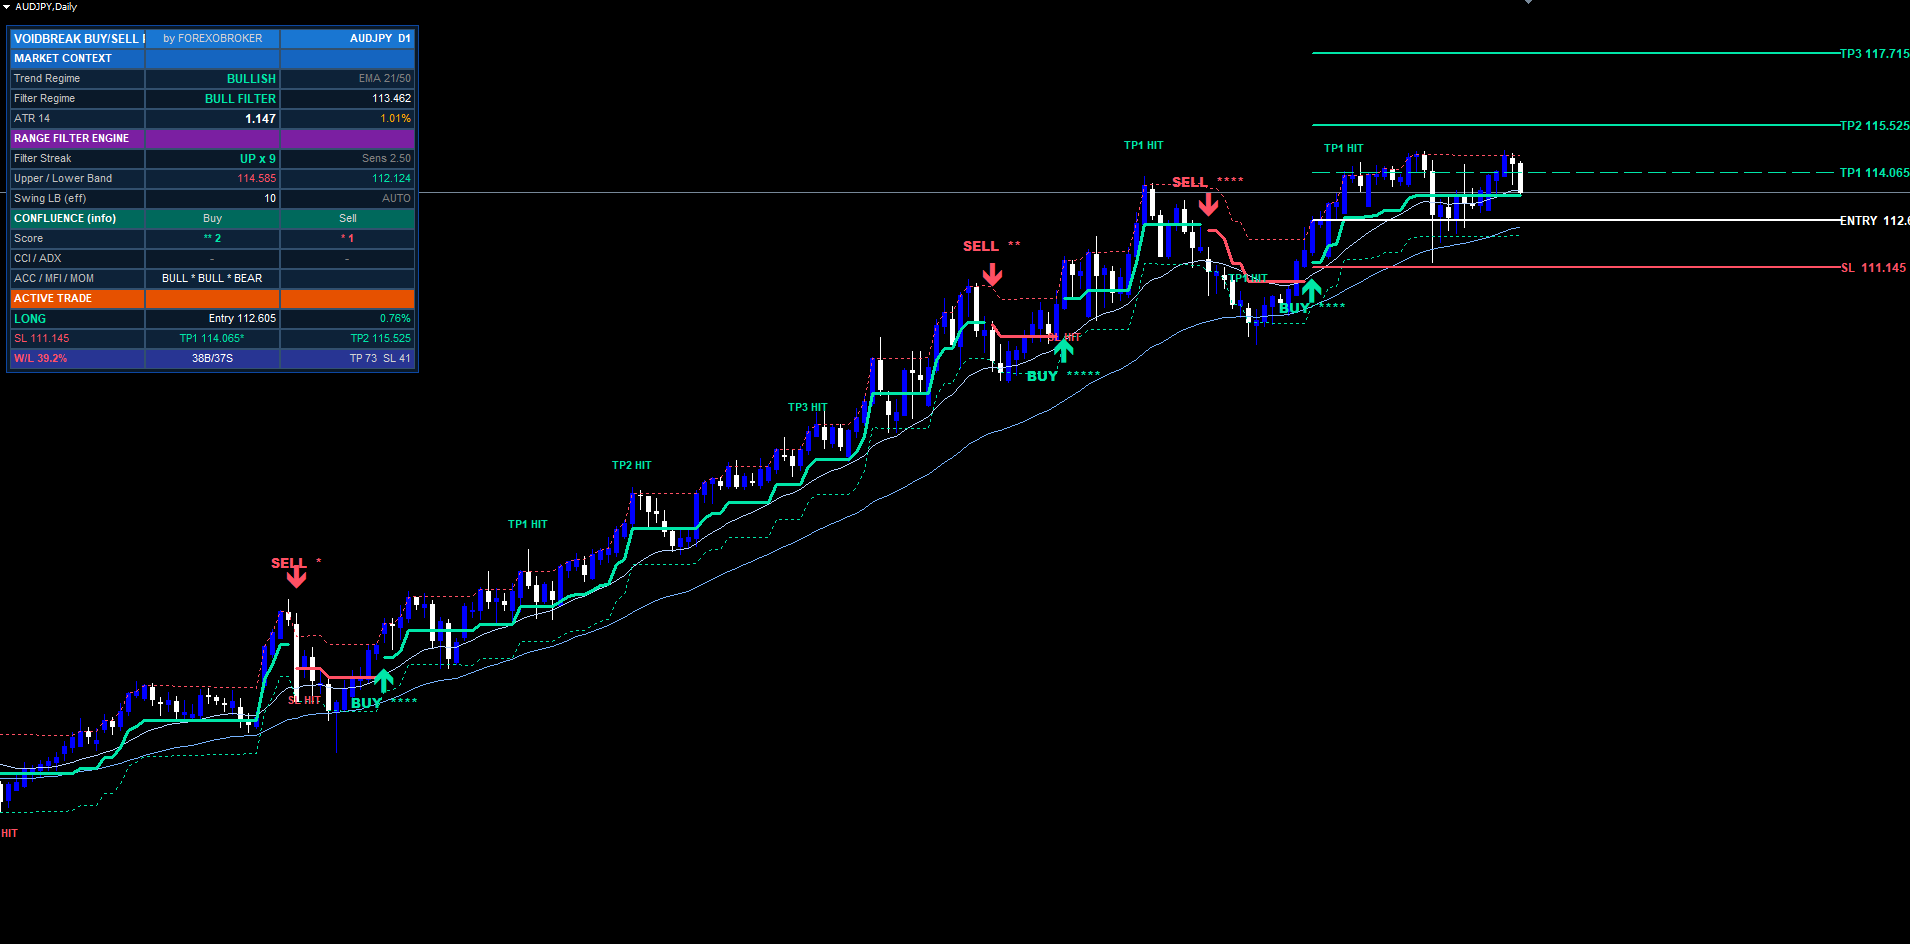
First Impression — What You See on the Chart
Attached with default inputs, Voidbreak immediately draws:
- The range filter line and its upper/lower band (the void boundary, rngfilt ± smoothrng )
- An EMA trend cloud (fast 21 / slow 50) shaded behind price
- Historical BUY/SELL labels at every confirmed regime flip in the visible history, each with confluence stars
- If a trade is currently open: entry, SL, TP1, TP2, TP3 lines with right-edge price tags
- The dashboard in the top-right corner showing all six sections
Bull elements are mint ( #00E5A8 ), bear elements are red ( #FF3B5C ). If the chart feels busy, open the Visuals or Trend Cloud groups and toggle off the bands, the cloud, or the dashboard individually.
Reading the Signal Labels & Confluence Stars
A signal label has two parts:
- A directional arrow below the bar low (BUY) or above the bar high (SELL), in the regime colour
- A bold text label showing the configured BUY/SELL text plus stars matching the confluence score, e.g. BUY ****
The stars are a conviction read only. They never gate or delay a signal — a BUY fires the instant the regime flips regardless of score. They tell you how much independent context agreed:
- * — 1 of 5 layers agreed
- ** — 2 of 5
- *** — 3 of 5 (decent context)
- **** — 4 of 5 (strong context)
- ***** — 5 of 5 (every layer aligned — uncommon)
The five layers are CCI(20), ADX(21)+DI, Accumulation/Distribution, MFI(14), and Momentum(21) slope. A zero-star flip is the range filter acting alone — still a valid signal, just with no supporting evidence. The dashboard shows the per-layer breakdown so you can see exactly which layers agree.
Input Parameter Groups
The input panel is organised into eight sections.
Range Filter Engine
| Input | Default | Notes |
|---|---|---|
| Source | close | Price the filter samples |
| Sampling Period | 50 | EMA length for the volatility measure (10–200) |
| Range Sensitivity | 2.5 | Band-width multiplier; higher = wider void, fewer flips (0.5–10) |
Risk Management
| Input | Default | Notes |
|---|---|---|
| Show SL/TP | true | Draw level lines |
| SL Mode | Hybrid Swing+ATR | Or Pure ATR / Recent Swing |
| Swing Lookback | 10 | Bars scanned for the swing stop (3–100) |
| Auto-Scale | true | Scale lookback by timeframe |
| SL ATR Length | 14 | ATR period for the stop (2–100) |
| SL ATR Mult | 1.5 | ATR multiple for the pure-ATR stop (0.2–10) |
| SL Padding | 0.25 | ATR cushion on the swing stop (0–2) |
| TP1 / TP2 / TP3 | 1.0 / 2.0 / 3.5 | R-multiples (0.1–20 each) |
| Level Line Extension | 40 | Bars the level lines extend forward |
Visuals
Bull colour ( #00E5A8 ), Bear colour ( #FF3B5C ), Show Filter, Show Bands, Color Bars, and the BUY/SELL label text strings.
Trend Cloud
Show EMA (true), Fast EMA (21), Slow EMA (50) — display-only context, does not feed the signal.
Confluence Display
Five toggles — CCI, ADX, ACC, MFI, MOM (all true). Turning one off removes that layer from the star count. Display-only; never affects whether a signal fires.
Dashboard
Show (true), Position (Top Right, offset +5), Size (Small, offset +3), background colour, header colour.
Alerts
Master enable (true), plus Alert Popup / Alert Push / Alert Email channel toggles and per-event toggles for each of the eight events.
Understanding SL and TP Levels
When a signal fires, lines for entry, SL, TP1, TP2, and TP3 are drawn from the signal bar forward by the Level Line Extension input, each with a right-edge price tag (TP tags also show the R-multiple, e.g. TP2 1.10200 (2.0R) ).
SL modes. Hybrid Swing+ATR (default) computes both an ATR stop ( entry ∓ ATR × mult ) and a swing stop (recent swing extreme ∓ ATR × padding ) and uses the tighter of the two. Pure ATR uses only the ATR stop. Recent Swing uses only the swing stop. Risk is the absolute entry-to-SL distance, and all three TPs are entry ± risk × multiple .
Auto-scale. With Auto-Scale on, the swing lookback is scaled by sqrt(tfMinutes / 60) clamped to 0.4–1.0: roughly 0.4× on M1, 0.5× on M15, 0.7× on M30, and full 1.0× on H1 and above. The same Swing Lookback input therefore produces a sensible stop on every timeframe with no manual retuning.
Exits. A trade closes on (1) TP3 hit → win; (2) SL hit → win if TP1 was already reached, otherwise loss; or (3) opposite regime flip → closed at market. TP1 and TP2 do not close the trade — they are informational and update the dashboard / fire alerts only. While a trade is open no new signal can fire. Level lines are removed at close; the signal label stays permanently.
Reading the Dashboard
The dashboard has six sections:
- Header — brand title, "by FOREXOBROKER", current symbol and timeframe.
- Market Context — EMA trend regime (from the cloud), filter regime (+1/-1), ATR value and ATR as a percent of price.
- Range Filter Engine — filter streak (bars in the current regime), active sensitivity, live upper and lower band prices, and the effective swing lookback after auto-scale.
- Confluence — buy stars, sell stars, and the per-layer bias for CCI / ADX / A-D / MFI / MOM, updated every tick.
- Active Trade — direction (LONG / SHORT / WAITING), entry with live percent P&L, SL with percent distance, and TP1 / TP2 / TP3 each with a checkmark when reached.
- Performance — win/loss percentage, BUY and SELL counts, total TP and SL hit counts over the loaded history.
Watch the Confluence section when flat — you can see context build before a flip confirms. The Performance section gives a feel for how current settings behaved over loaded history (not a forecast). Reposition with the dashboard Position and Size inputs.
Configuring Alerts
Voidbreak fires eight events: BUY, SELL, Any (combined), TP1 hit, TP2 hit, TP3 hit (trade closed, win), SL hit, and opposite-flip exit. A master switch enables or disables the whole package; each event can be toggled individually.
Channels. Terminal popup, mobile push (via the MetaTrader mobile app), and email — each independently switchable in the indicator inputs.
- Popup — best for active sessions at the computer.
- Push — install the MetaTrader mobile app, note your MetaQuotes ID under app Settings > Chat and Messages, paste it into desktop Tools > Options > Notifications, and enable push.
- Email — configure SMTP under Tools > Options > Email, test delivery, then enable the email channel in the inputs.
Every alert message — popup, push, or email — carries the same compact payload: signal direction, symbol, timeframe, confluence score, entry, stop-loss, TP1, TP2 and TP3. Alerts are silenced during the initial historical replay on attach, and per-bar deduplication prevents the same bar firing the same event twice. The per-event toggles let you route only the events you care about — for example signals plus SL, but mute the informational TP1/TP2.
Preset Strategies
Starting points — tune from here for your symbol and timeframe.
Scalping (M1 / M5)
Sampling Period = 30 Range Sensitivity = 2.0 SL Mode = Pure ATR SL ATR Length = 10 SL ATR Mult = 1.2 TP1 / TP2 / TP3 = 0.8 / 1.5 / 2.5 Auto-Scale = true
A tighter, faster void for quick markets. Pure ATR keeps the stop predictable when micro-swings are noisy. Auto-Scale shrinks the swing lookback automatically on fast charts.
Swing Trading (H1 / H4 — default)
(All defaults are the design target for H1/H4.)
Sampling Period    = 50
Range Sensitivity  = 2.5
SL Mode            = Hybrid Swing+ATR
TP1 / TP2 / TP3     = 1.0 / 2.0 / 3.5
The out-of-the-box configuration. Raise Range Sensitivity toward 3.0–3.5 for fewer, larger swings.
Conservative (H4 / D1 — fewer, stronger setups)
Sampling Period = 80 Range Sensitivity = 3.5 SL Mode = Hybrid Swing+ATR SL ATR Length = 21 SL ATR Mult = 2.0 TP1 / TP2 / TP3 = 1.0 / 2.5 / 4.5 Auto-Scale = true
A wider void and longer sampling produce rare, high-conviction regime flips, with wider stops to absorb higher-timeframe volatility and a 4.5R runner for extended trends.
Troubleshooting
Indicator shows in Navigator but does not attach. Check the Journal (Ctrl+T → Journal). The usual cause is an out-of-range input — every input is range-validated. Confirm values like Sampling Period, SL ATR Length, and Swing Lookback are within their permitted ranges.
No filter line or bands appear. Voidbreak needs a minimum history (roughly Sampling Period × 3 + ATR length). On a fresh chart with little history, scroll back to load more bars or use a higher timeframe.
No signals on the chart. This is normal in a quiet range — the void is doing its job and absorbing chop. Lower Range Sensitivity for more frequent flips, or check a more volatile symbol/timeframe.
Too many signals. Raise Range Sensitivity (e.g. 2.5 → 3.5) to widen the void so price must travel further to flip the regime.
Confluence stars seem to "block" signals. They cannot. The stars are display-only and never gate a signal. If a flip is not appearing it is the range filter, not the stars — adjust Range Sensitivity.
SL/TP lines disappeared. Lines are intentionally removed when the trade closes (TP3, SL, or opposite flip). The signal label stays. Check the dashboard Active Trade section — "WAITING" means the trade has closed.
Different signals on MT4 vs MT5. The builds produce identical signals at identical bar timestamps. If they differ, confirm the same symbol and inputs on both, and refresh history on both charts (right-click chart > Refresh).
Download the indicator:
- MetaTrader 5: Voidbreak Buy Sell Pro MT5
- MetaTrader 4: Voidbreak Buy Sell Pro MT4
CONTACT & SUPPORT
- Email: info@forexobroker.com
- Questions: Use the Comments section on the product page or send a private message
- Bug Reports: Please include your broker name, account type, and a screenshot
-
✅ All MQL Tools: https://www.mql5.com/en/users/forexobroker/ ✅
--------------------------------------------------------------------------------------------------------------
🏦 **Broker I use**: https://icmarkets.com/?camp=55869
🏦 **Broker For EU Traders I use 1**: https://www.ictrading.com?camp=91414
🏦 **Broker I use 2**: https://one.exnessonelink.com/boarding/sign-up/a/c_thuv62ocfq
💻 **VPS**: https://chocoping.com/processing/aff.php?aff=738
💼 **Companies I use for getting funded**:
Fundednext: https://fundednext.com/?fpr=kestutis39
The5ers: https://www.the5ers.com/?afmc=16kl
FTMO: https://trader.ftmo.com/?affiliates=nRAyOhmFRnEnFdOpdLeh
Risk Disclaimer
Trading foreign exchange and CFDs on margin carries a high level of risk and may not be suitable for all investors. You may sustain a loss exceeding your initial investment. Trend Quorum is a technical analysis tool and does not guarantee profitable trades. Past performance is not indicative of future results. The authors accept no liability for any loss arising from use of the indicator. By using Trend Quorum you acknowledge sole responsibility for your trading decisions.


