
Wolf Blackout Trader — Range Filter Signals With 5-Tier Confluence

Wolf Blackout Trader — Range Filter Signals With 5-Tier Confluence
Introduction
Most retail trading indicators fire signals on a single condition. A moving-average crossover. An RSI overbought print. A Supertrend regime flip. Each of those triggers is fine on its own day — and catastrophic on every other day. A single-indicator system has no way to distinguish a high-quality setup from a low-quality one, so it commits the trader to taking every signal with the same conviction, win or lose.
The professional alternative is confluence: require multiple independent inputs to agree before drawing a signal, and rank each signal by how many of them did. Confluence does two things at once. It thins the signal stream so the trader only sees setups worth taking, and it produces a per-signal quality score so the trader can size and manage trades differently depending on whether two filters agreed or all five did.
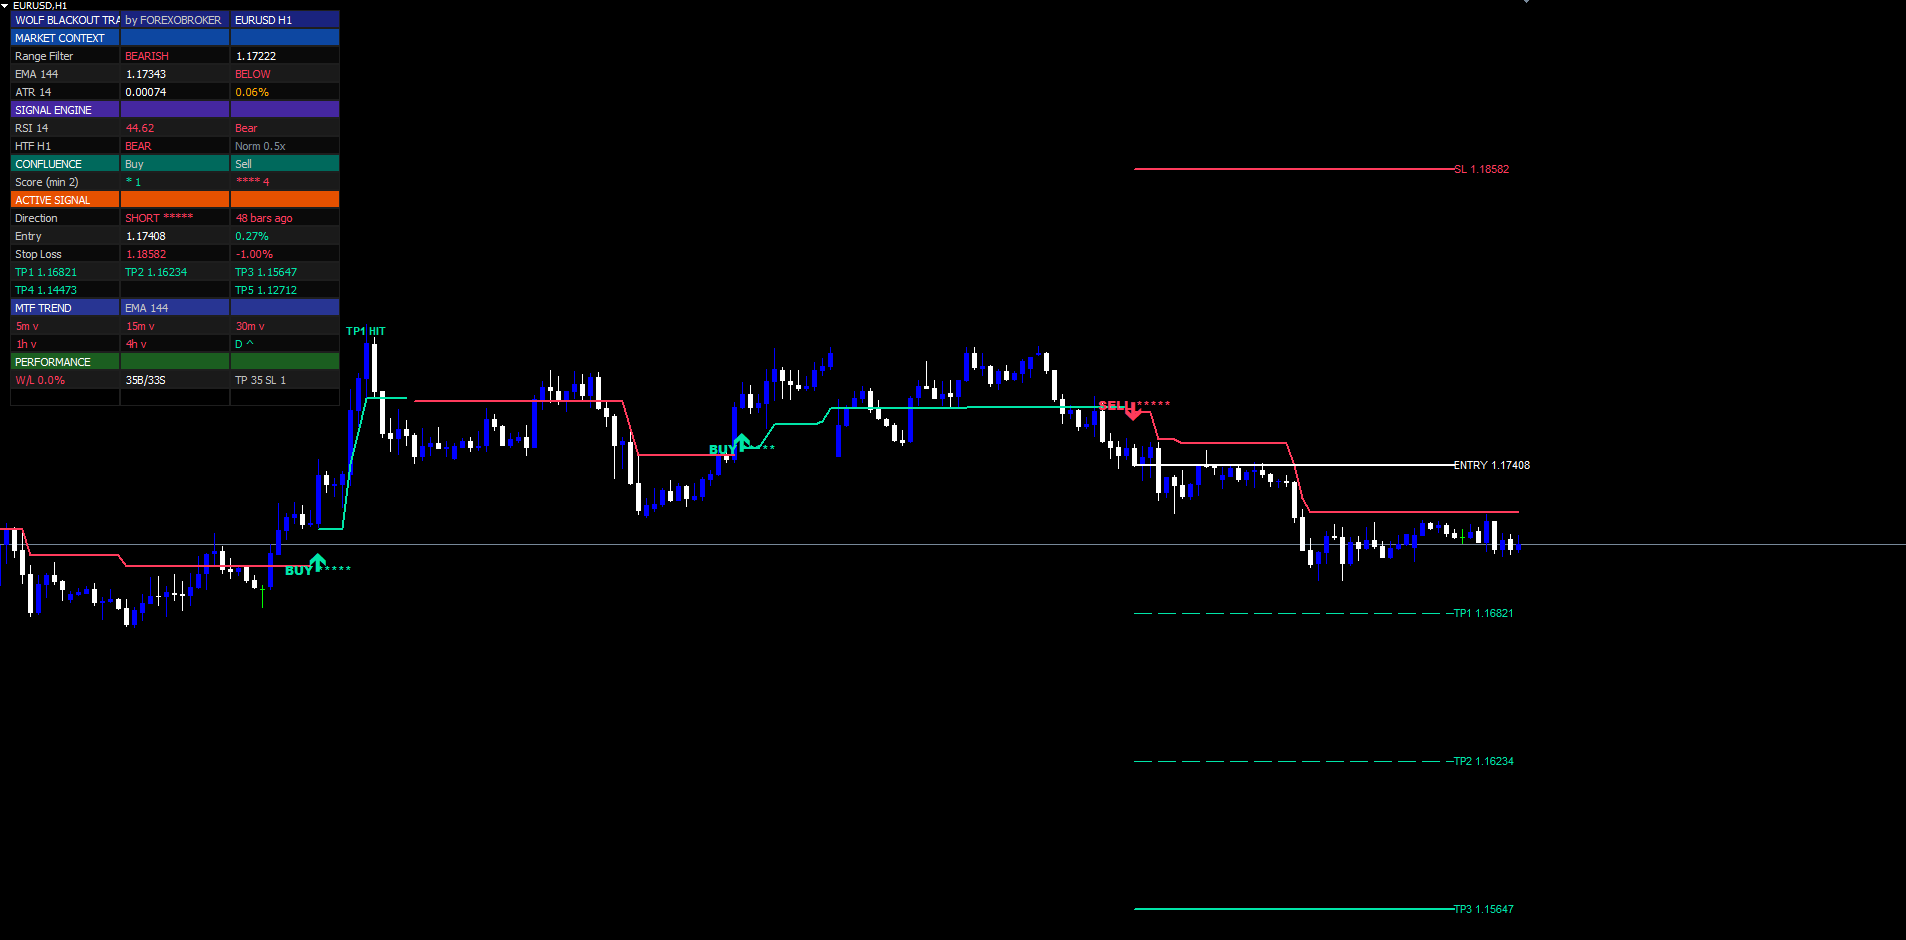
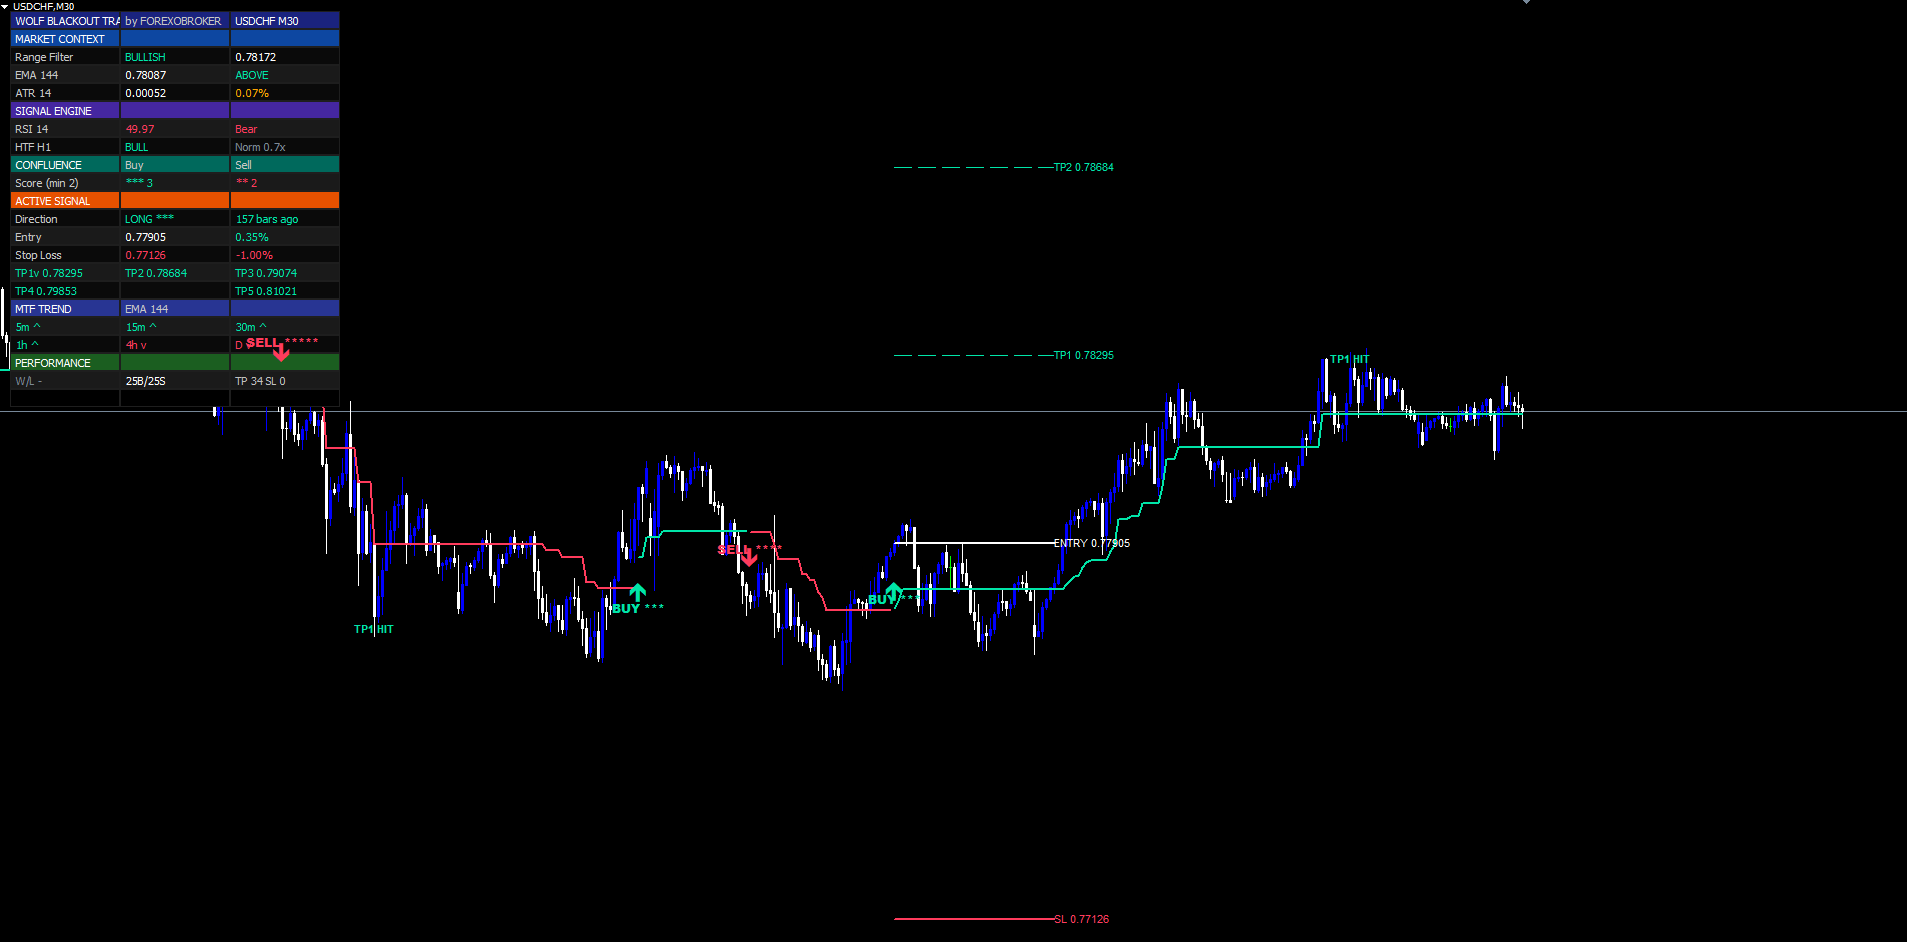
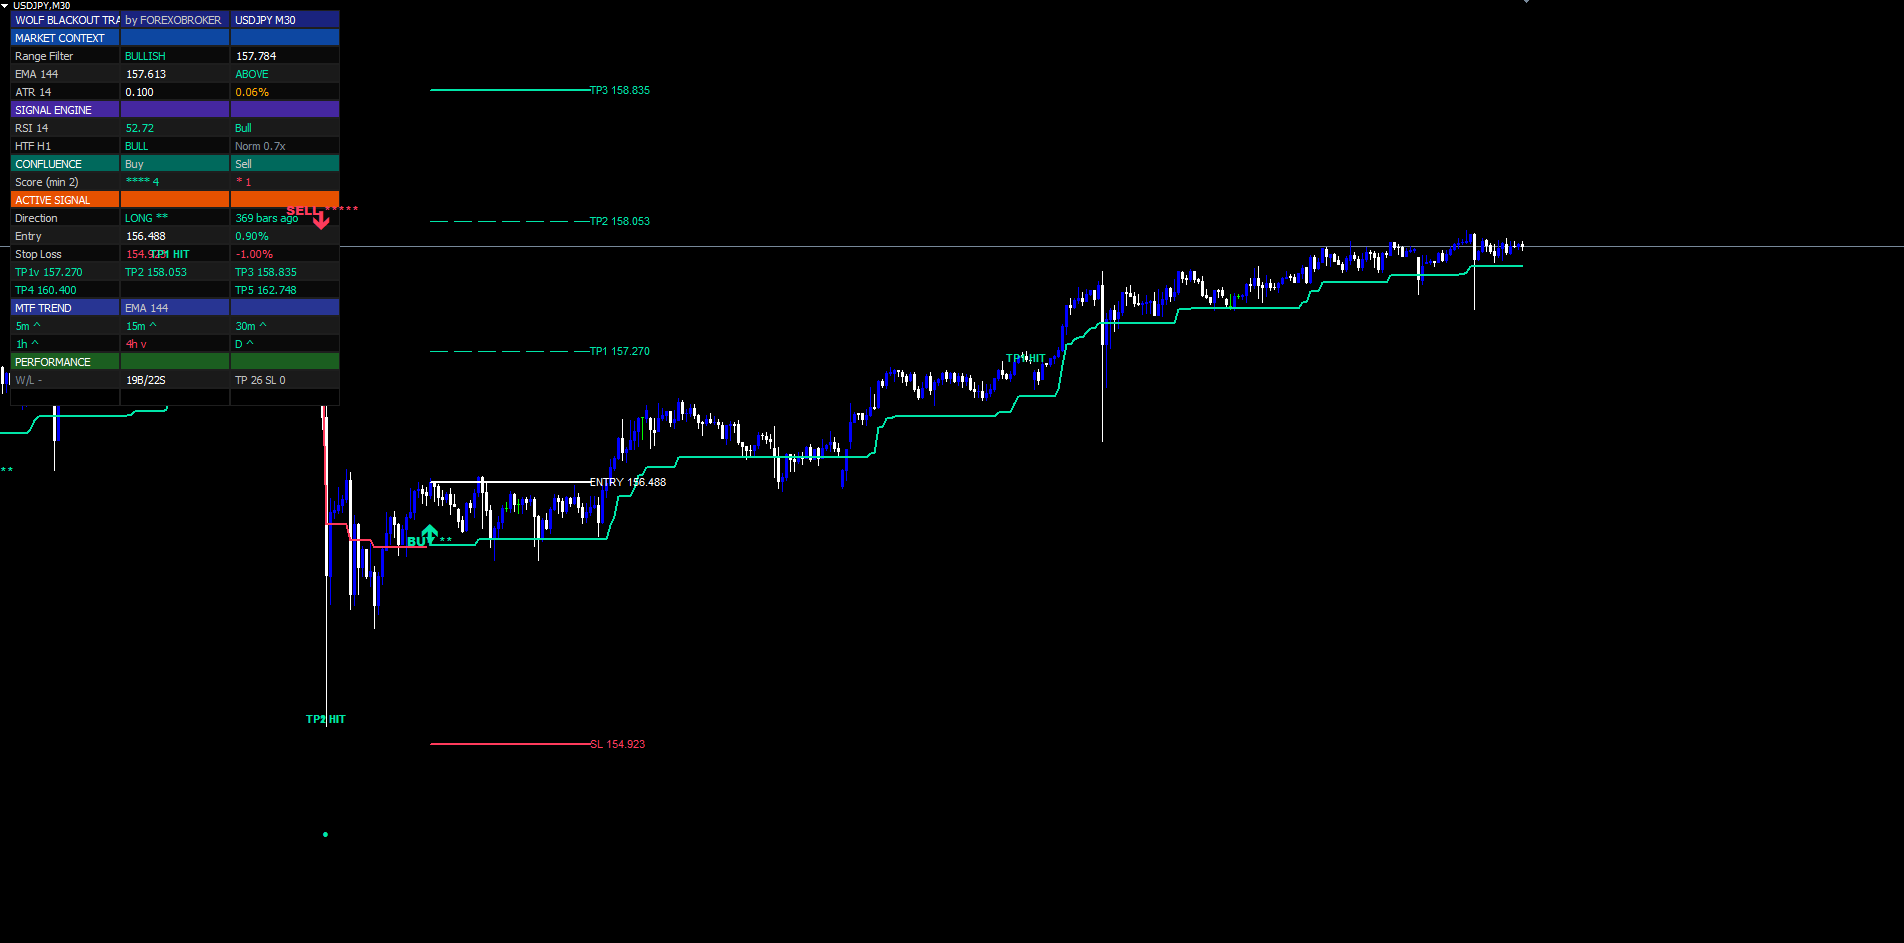
Wolf Blackout Trader is built on that principle. At its core sits a Dual Range Filter engine — a fast filter (length 32, smoothing 1.67) for early trend detection and a slow filter (length 89, smoothing 6.0) for the dominant regime — blended into a single smoothed-ATR price line that drives the primary buy/sell triggers. Around that engine wrap five independent confluence layers: range-filter trend direction, RSI side, EMA-144 trend, higher-timeframe EMA agreement, and volume burst. Each signal is scored 1 to 5 and rendered with a matching star count on the chart.
The system also includes an independent Reversal Detector that watches RSI extremes (length 28, OB 78 / OS 27) with an EMA-of-RSI confirmation gate, a 5-tier TP ladder (0.5% / 1.0% / 1.5% / 2.5% / 4.0%) with partial-hit tracking, an 8-bar signal cooldown, "blackout" bar coloring driven by the trend regime, a multi-timeframe trend row spanning M5 through Daily, a 22-row pixel-anchored dashboard, and a native MetaTrader alert package covering all 8 trade-lifecycle events (BUY, SELL, TP1–TP5, SL) across four delivery channels (popup, sound, mobile push, email).
Everything is non-repainting in close-confirmed mode, ships as identical MQL4 and MQL5 builds, and is engineered for production use on the MQL5.com Market.
Download the indicator:
- MetaTrader 5: Wolf Blackout Trader MT5
- MetaTrader 4: Wolf Blackout Trader MT4
TIP: Wolf Blackout Trader works on every symbol and every timeframe. H1 and above produce fewer, higher-quality signals; M5–M15 are well-suited for scalping. Tune the minimum-confluence input to control signal frequency.
The Wolf Blackout Trader Philosophy
Three design choices set the indicator apart from generic Range Filter forks.
Dual Range Filter, not single. Most Range Filter indicators run a single filter with one length and one smoothing factor. A short filter catches early entries but flips on noise. A long filter avoids noise but enters late. Wolf Blackout Trader runs both and blends their smoothed-ranges so the resulting filter line tracks the slow trend while reacting to the fast trend. This is similar in spirit to a Hull MA or a TEMA, but uses Range Filter's ATR-based smoothing kernel instead of weighted-MA crossovers.
5-layer confluence scoring, not boolean filters. Most "filtered" indicators chain conditions with logical AND — meaning a signal needs all filters to pass or none. That all-or-nothing rule discards information. Confluence scoring keeps the information: every signal that fires gets a 1-to-5 quality grade, and the trader sets a minimum threshold (1 to 5) below which signals are suppressed. A 5-star signal in an established trend with volume agreement and HTF confirmation is qualitatively different from a 2-star signal in a sideways range, and the dashboard + label stars make the difference visible at a glance.
5-tier TP ladder, not single-target exits. Most signal indicators draw one TP (or three at most). A 5-tier ladder at 0.5% / 1.0% / 1.5% / 2.5% / 4.0% reflects how discretionary traders actually exit: a tight first take at TP1 to recover risk, a midpoint take at TP2 / TP3 for the bulk of profit, and runners at TP4 / TP5 for the rare extended moves. Each tier independently tracks "hit" state, and the indicator's internal win/loss accounting counts a trade as a winner if TP1 was hit before SL — modeling the universal "move stop to breakeven after first take" rule.
These three choices — dual engine, scored confluence, multi-tier ladder — together produce a signal stream that is structurally different from single-indicator systems. The remainder of this article walks through each component in detail.
The Dual Range Filter Engine — Math & Code
The Range Filter concept, originally popularized by Donovan Wall, is a price-smoothing line that only moves when price travels beyond a smoothed-ATR distance from the previous filter value. It is mathematically a one-sided trailing filter — the line moves up when price punches above the upper band, holds still when price oscillates inside the band, and moves down when price punches below the lower band.
The MQL4 implementation is built around two helper steps: a smoothed-range calculator (cascaded EMA of absolute price change) and a trailing-filter walker that locks the filter value unless price punches outside a smoothed-ATR band. Both run in a single series-indexed loop. Because MQL4 buffers are accessed with buffer[0] for the current bar (opposite of MQL5's chronological indexing), the loop walks from high shift to low shift, and the calculator state is held in g_* global series arrays sized to rates_total .
The smoothed-range step computes, per bar, an inner EMA over length t of |close - close[1]| , then an outer EMA over 2*t - 1 of that inner value, multiplied by the sensitivity factor:
double CalcEmaStep(double price, double prevEma, int period, bool seed) { if(seed) return price; double alpha = 2.0 / (period + 1.0); return price * alpha + prevEma * (1.0 - alpha); } // Inside the OnCalculate loop, for one bar at index `shift`: double absDiff = MathAbs(Src(shift) - Src(shift+1)); bool seed = (g_emaInF[shift+1] == EMPTY_VALUE); double emaInF = CalcEmaStep(absDiff, seed ? 0.0 : g_emaInF[shift+1], InpFastLen, seed); double emaOuF = CalcEmaStep(emaInF, seed ? 0.0 : g_emaOuF[shift+1], InpFastLen*2 - 1, seed); double smrngFast = emaOuF * InpFastSens;
The output is a dynamic "band width" that adapts to recent volatility. The same two-step EMA is then repeated with the slow pair (length 89, sensitivity 6.0), and the two band widths are averaged into a single value passed to the trailing filter:
// Slow pair (length 89, sensitivity 6.0) computed identically...
double smrngSlow = emaOuS * InpSlowSens;

double smrng    = (smrngFast + smrngSlow) / 2.0;

// Trailing filter — only moves when price punches outside the band
double prevFilt = (g_filt[shift+1] == EMPTY_VALUE) ? Src(shift) : g_filt[shift+1];
double rf;
if(Src(shift) > prevFilt)
   rf = (Src(shift) - smrng < prevFilt) ? prevFilt : Src(shift) - smrng;
else
   rf = (Src(shift) + smrng > prevFilt) ? prevFilt : Src(shift) + smrng;

g_filt[shift] = rf;
If the previous filter value is prevFilt and the current source s is above prevFilt + smrng , the filter moves up to s - smrng (price minus band width). If the source is below prevFilt - smrng , the filter moves down to s + smrng . Otherwise the filter holds its previous value. The result is a stair-step line that tracks trends and ignores noise.
The filter line is plotted directly on the chart through two DRAW_LINE buffers — BufFiltBull (mint, length 2) when up-streak exceeds down-streak (bullish regime) and BufFiltBear (red, length 2) when down-streak exceeds up-streak (bearish regime). Up-streak and down-streak counters increment by one each bar the filter moves up/down and reset on the opposite move. They are the primary buy/sell trigger source — when up-streak transitions from zero to one and down-streak resets, a fresh bullish trigger fires. The symmetric pattern fires bearish triggers.
The filter never repaints. Once a bar closes, its filter value is immutable. This is enforced in the MetaTrader builds by computing the loop from confirmed historical bars only — every cached g_filt[shift] is final once shift is no longer the current (live) bar, and the indicator processes only bars at shift >= 1 for signal firing when InpNonRepaint = true .
The 5-Layer Confluence Scoring
A raw trigger from the Dual Range Filter engine is not yet a signal. Every trigger is scored against five independent layers, and only triggers that pass the minimum-confluence threshold (default 2) become BUY or SELL labels on the chart.
The five layers, with default scoring:
-
Range Filter Trend (primary) — Bullish signals automatically get +1 because the trigger itself comes from the filter's up-streak. This counts as the foundation point; the other four layers stack on top.
-
RSI Side Confirmation — Bullish signals get +1 when RSI(14) > 50. Bearish signals get +1 when RSI(14) < 50. The RSI side check is the cheapest possible "momentum agreement" filter — it confirms that recent momentum aligns with the trigger direction.
-
EMA Trend Filter — Bullish signals get +1 when close > EMA(144). Bearish signals get +1 when close < EMA(144). The EMA-144 captures the medium-term trend; signals trading with it tend to have larger follow-through.
-
HTF EMA Agreement — Bullish signals get +1 when the higher-timeframe (default H1) close is above its own EMA-144. Bearish signals get +1 when HTF close is below HTF EMA. To prevent repainting, the value is sampled from the most recent closed bar on the higher timeframe (shift + 1) rather than the live forming bar:
bool HtfBull(int shift) { datetime barT = Time[shift]; int hShift= iBarShift(NULL, InpHtf, barT, false); if(hShift < 0) return false; double ema = iMA(NULL, InpHtf, InpEmaLen, 0, MODE_EMA, PRICE_CLOSE, hShift + 1); double cl = iClose(NULL, InpHtf, hShift + 1); return (ema > 0.0 && cl > 0.0 && cl > ema); }
-
Volume Burst — Both directions get +1 when current bar volume is at least 1.0× the SMA-20 of volume. This catches setups where the market is actively transacting (not drifting in low-volume chop).
The scoring function reads naturally — start at 1 (the Range Filter trigger itself), then add one point for every confirmation layer that agrees with the trigger direction. The MQL4 implementation samples each indicator at the trigger bar and returns the total:
int ScoreBuy(int shift)
{
   int s = 1; // range filter trigger

   double rsi    = iRSI(NULL, 0, InpRsiLen, InpSrc, shift);
   double emaVal = iMA (NULL, 0, InpEmaLen, 0, MODE_EMA, PRICE_CLOSE, shift);
   bool   rsiBull= (rsi > 50.0);
   bool   emaBull= (Close[shift] > emaVal);
   bool   htfBull_= HtfBull(shift);
   double vol    = (double)Volume[shift];
   double volSma = VolumeSma(shift, 20);
   bool   volBurst= (volSma > 0.0 && vol >= volSma);

   if(InpUseRsi){ if(rsiBull)  s++; } else s++;
   if(InpUseEma){ if(emaBull)  s++; } else s++;
   if(InpUseHtf){ if(htfBull_) s++; } else s++;
   if(InpUseVol){ if(volBurst) s++; } else s++;
   return s;
}
ScoreSell is the symmetric mirror — rsi < 50.0 , Close[shift] < emaVal , !HtfBull(shift) . The "disabled layer awards a free point" rule ( else s++ ) ensures that turning a confluence layer off via input does not penalize signal frequency — it simply skips the agreement check.
The minConfluence input gates whether the signal fires. A score below the threshold is silently discarded. A score at or above is rendered as a label with that many stars suffixed:
| Star Count | Meaning |
|---|---|
| ★ | 1 layer only — Range Filter trigger, all other filters off or failed |
| ★★ | 2 layers — default threshold; balanced for swing trading |
| ★★★ | 3 layers — strong setup, well-aligned momentum and trend |
| ★★★★ | 4 layers — very strong, only one filter missed |
| ★★★★★ | 5 layers — extremely rare; everything aligned |
The 22-row dashboard renders the live buy-score and sell-score on every tick, so the trader can watch confluence build as bars print. Often a score climbs from 2 to 3 to 4 in the final seconds of a bar, then triggers the signal at close.
The Reversal Detector — RSI Extremes
Range Filter triggers catch trend continuations and pullback resolutions. They do not catch outright reversals at extreme overbought/oversold levels. For traders who want to fade exhaustion, Wolf Blackout Trader includes a dedicated Reversal Detector that runs in parallel to the main confluence engine.
The detector uses a longer-period RSI (length 28 by default, not 14) and tighter extremes (OB 78, OS 27). The longer period dampens noise so the RSI only reaches the extreme zones when momentum is truly stretched. The tighter OB level (78 instead of 70) and looser OS level (27 instead of 30) are calibrated for the asymmetric distribution of RSI on most FX pairs — RSI spends more time above 50 than below in trending markets, so the bullish-reversal zone needs to be slightly deeper than the bearish-reversal zone.
A second layer of confirmation comes from an EMA-of-RSI gate. The detector requires that the RSI value is not just at the extreme level, but that an EMA of the RSI line confirms the extreme — meaning recent RSI values have also been in the zone, not just a single spike print. In MQL4 the detector samples both values per bar and gates the marker on agreement:
if(InpShowReversal) { double rsiR = iRSI(NULL, 0, InpRevRsiLen, PRICE_CLOSE, shift); double rsiRema = EmaOfRsi(InpRevRsiLen, 10, shift); if(rsiR > InpRevOb && rsiR > rsiRema) DrawReversal(Time[shift], High[shift] + (High[shift]-Low[shift])*0.3, false); // red diamond above bar else if(rsiR < InpRevOs && rsiR < rsiRema) DrawReversal(Time[shift], Low[shift] - (High[shift]-Low[shift])*0.3, true); // mint diamond below bar }
DrawReversal creates a small OBJ_ARROW with OBJPROP_ARROWCODE = 159 (Wingdings filled dot) colored mint for bullish exhaustion (oversold) or red for bearish exhaustion (overbought).
Reversal markers are independent of the main signal pipeline. They do not contribute to the confluence score, they do not draw SL/TP lines, and they do not increment the win/loss counters. They are pure visual cues — "this is where RSI says exhaustion has hit". A trader can use them in two ways: as a standalone reversal-fade entry (e.g., short on red diamond, take profit at recent swing low), or as a "be careful" warning when a same-direction Range Filter signal also fires (a 5-star BUY signal printed at RSI = 80 has a high probability of stopping into mean reversion).
The reversal detector is a pure visual layer in the MT4 / MT5 builds — it draws the diamond markers and updates the dashboard's Reversal Detector cell, but it does not fire alerts. Trade-lifecycle alerts (BUY, SELL, TP1–TP5, SL) cover everything that needs operator attention.
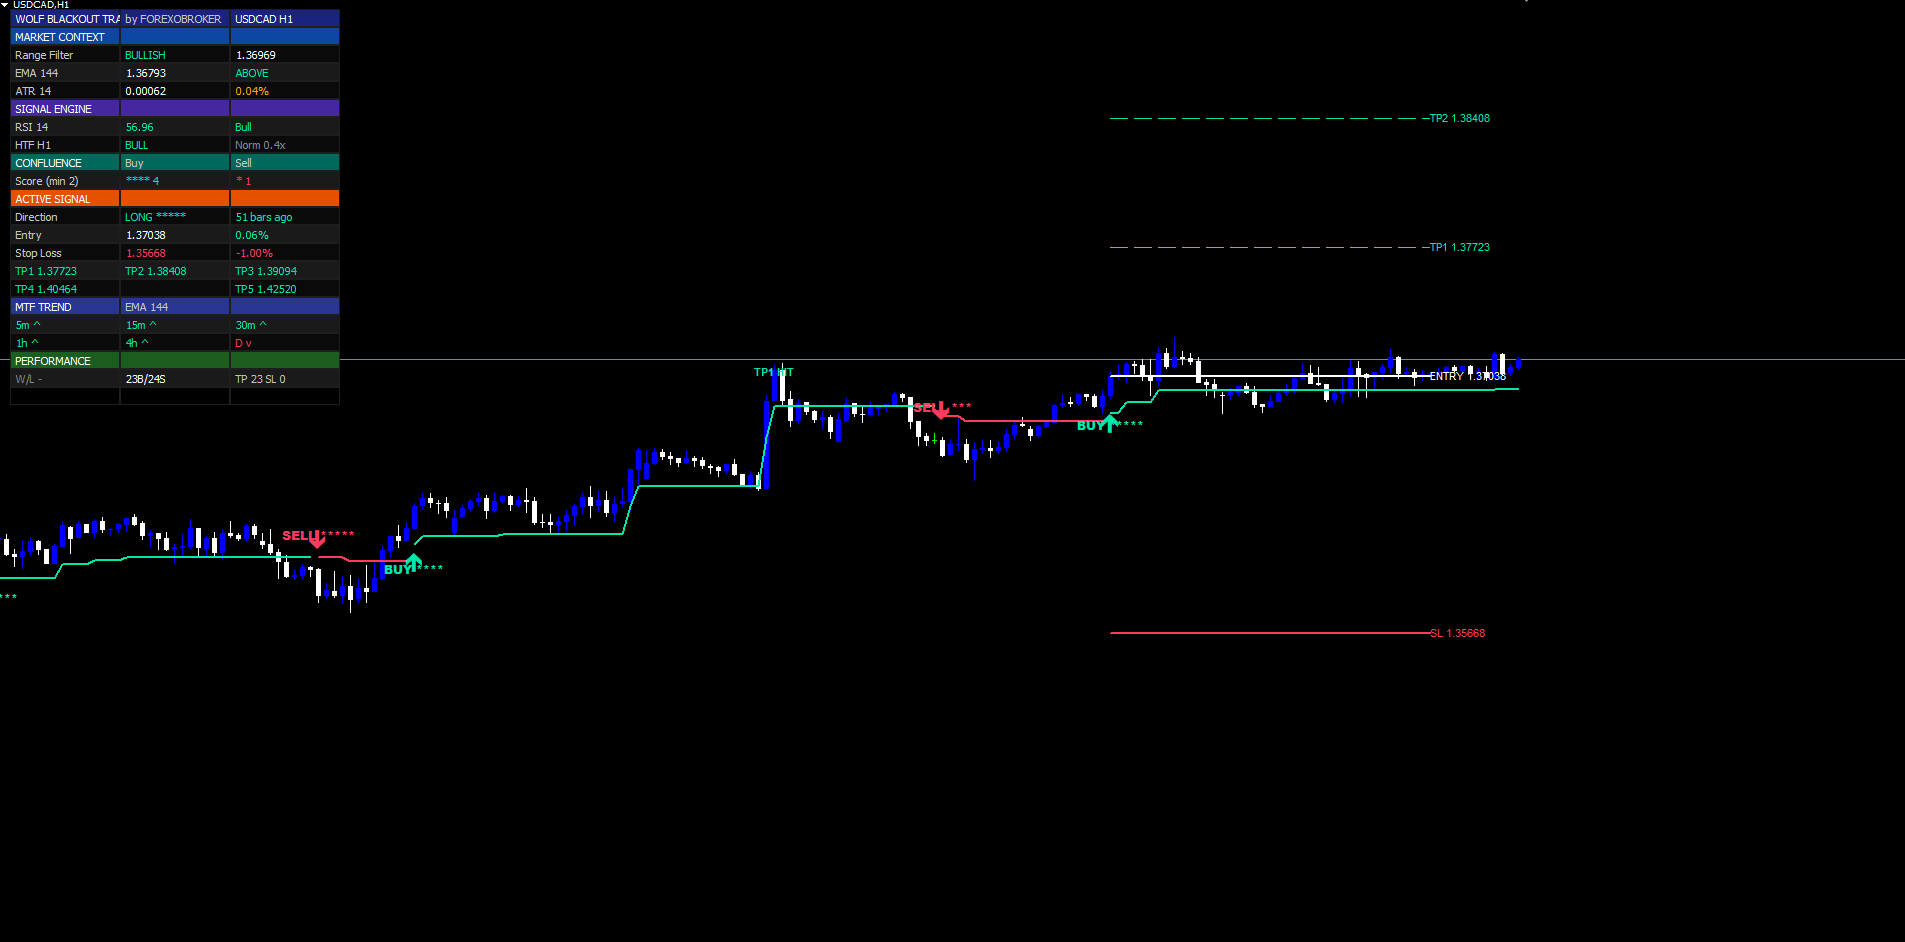
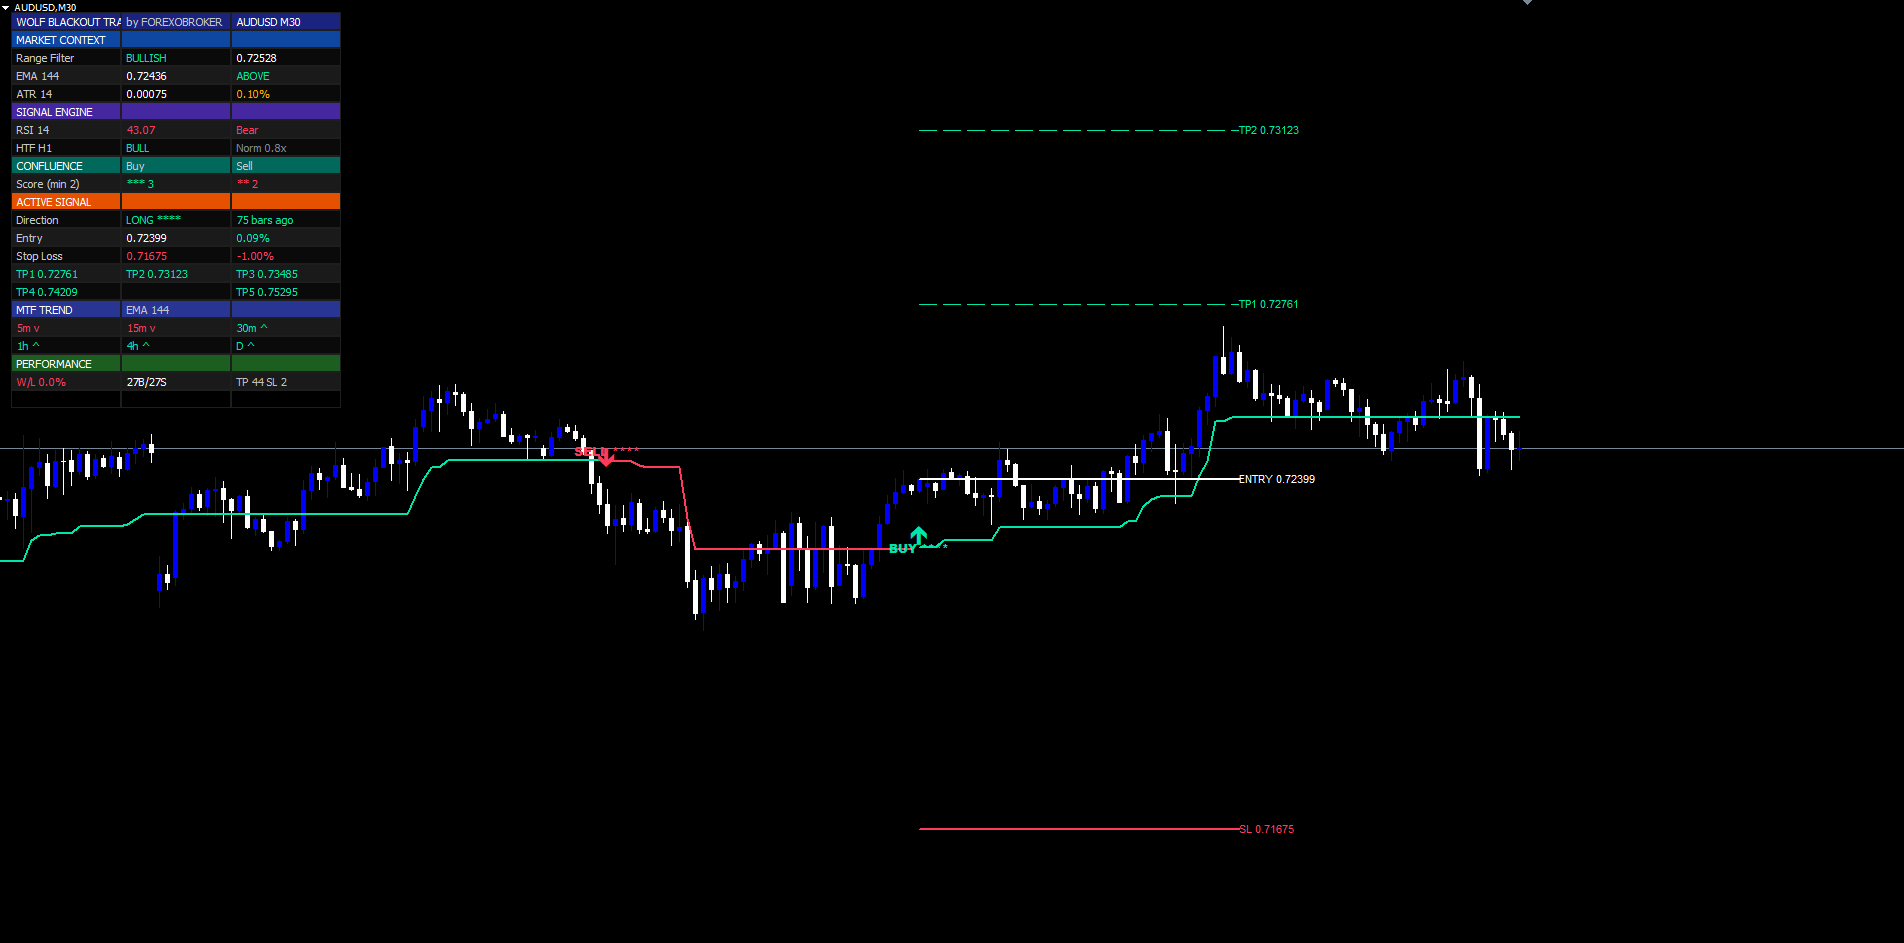
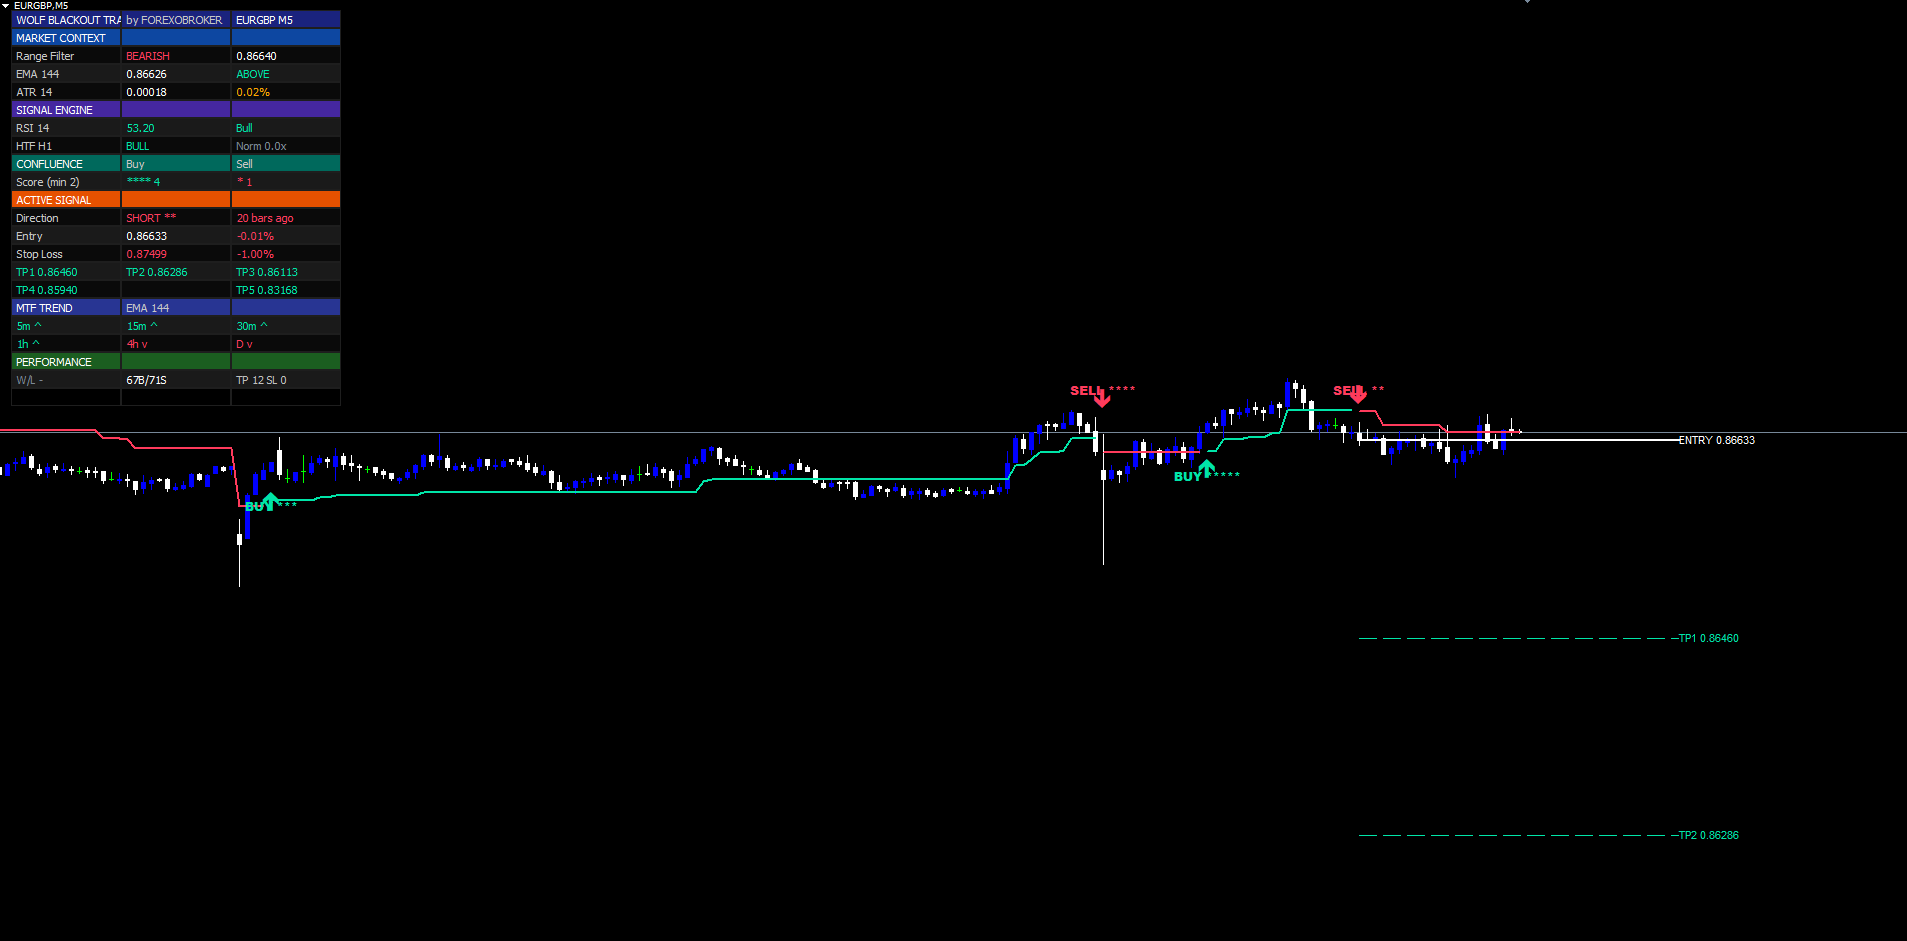
Stop Loss and the 5-TP Ladder

When a signal fires, six horizontal lines are drawn on the chart from the signal bar extending forward by extendBars bars (default 40):
- SL line (red, dashed) — stop loss at entry × (1 ± slPct / 100)
- TP1 line (mint, thin) — 0.5% from entry
- TP2 line (mint, thin) — 1.0% from entry
- TP3 line (mint, medium) — 1.5% from entry
- TP4 line (mint, medium) — 2.5% from entry
- TP5 line (mint, thick) — 4.0% from entry
The widths get progressively heavier so the chart reads cleanly even when multiple historical trades overlap. Each line has a right-side price label showing the exact price and the percentage in parentheses, like TP3 1.07845 (1.5%) .
In MQL4 the lines are drawn as OBJ_TREND segments anchored to the signal-bar time and extended forward by InpExtendBars bars. The active trade's reference prices are held in g_active* globals and updated each time a new signal fires:
void FireBuySignal(int shift, int score)
{
   datetime barT  = Time[shift];
   double   entry = Close[shift];
   double   sl    = entry * (1.0 - InpSlPct  / 100.0);
   double   tp1   = entry * (1.0 + InpTp1Pct / 100.0);
   double   tp2   = entry * (1.0 + InpTp2Pct / 100.0);
   double   tp3   = entry * (1.0 + InpTp3Pct / 100.0);
   double   tp4   = entry * (1.0 + InpTp4Pct / 100.0);
   double   tp5   = entry * (1.0 + InpTp5Pct / 100.0);

   g_activeDir       = 1;
   g_lastEntryPrice  = entry;
   g_activeSL        = sl;
   g_activeTP1 = tp1; g_activeTP2 = tp2; g_activeTP3 = tp3;
   g_activeTP4 = tp4; g_activeTP5 = tp5;
   g_tp1Reached = g_tp2Reached = g_tp3Reached = false;
   g_tp4Reached = g_tp5Reached = false;

   DrawSignalArrow(barT, Low[shift] - off,     true, score);
   DrawHeroLabel  (barT, Low[shift] - off*1.6, true, score);
   if(InpShowSLTP)
      DrawAllLevels(barT, entry, sl, tp1, tp2, tp3, tp4, tp5);
   // ... alert routing
}
DrawAllLevels creates one OBJ_TREND per price level (Entry, SL, TP1–TP5) with progressively heavier widths and styles ( STYLE_DASH for TP1/TP2/TP3, STYLE_DOT for TP4/TP5), plus a right-side OBJ_TEXT label per line showing the exact price.
The hit-tracking loop runs on every bar of the active trade. For a long trade, the loop checks if(!g_tp1Reached && hi >= g_activeTP1) — marks TP1 as hit, increments g_tp1Hits , drops a TP1 HIT chart label, and fires the optional alert. Same pattern for TP2 through TP5, with if(lo <= g_activeSL) checking the SL leg.
The win/loss accounting follows the discretionary-trader rule: if TP1 was hit before SL, the trade counts as a win. This reflects the universal "move stop to breakeven after first take" practice. So three outcomes are possible:
- Pure win — TP1+ hit, SL never hit. Trade is closed when SL OR TP5 fires, increments signalWins .
- Breakeven-protected win — TP1 hit, then SL hits. Counts as signalWins because the trader would have moved stop to BE.
- Loss — SL hit before TP1. Counts as signalLoss .
The dashboard's Performance section shows total buys, total sells, wins, losses, and the cumulative TP hit counts (TP1: 47, TP2: 31, TP3: 22, TP4: 11, TP5: 4 — illustrative). The hit ratios are useful for fine-tuning the SL/TP percentage inputs: if TP5 is rarely hit on your chosen market, lower it to 3.0% or 3.5%; if TP1 is hit too often before SL has a chance, tighten it to 0.4%.
When the trade fully closes (SL hit or TP5 hit), the SL and TP lines are removed from the chart to keep the view uncluttered. The signal arrow and label stay permanently visible for historical reference.
Regime-Colored Filter Line + Blackout Visual System
The "Blackout" in Wolf Blackout Trader refers to the indicator's signature visual system: a thick regime-colored Range Filter line riding through price action, paired with mint BUY arrows below bars and red SELL arrows above bars, all set against MetaTrader's native chart background. The line itself encodes regime state with no need for a separate color legend:
- Mint (#00E5A8) line segment — up-streak active (filter rising, bullish regime)
- Red (#FF3B5C) line segment — down-streak active (filter falling, bearish regime)
The effect is that the trend regime is identifiable from a single glance at the filter line's color, while the underlying MetaTrader candles remain unmodified — keeping every trader's preferred chart theme (dark, light, custom skin) intact. The MQL4 build implements this with two DRAW_LINE buffers, each holding EMPTY_VALUE on bars where the opposite regime is active:
// In OnInit — two plots, same width, opposing colors SetIndexBuffer(0, BufFiltBull); SetIndexBuffer(1, BufFiltBear); SetIndexStyle (0, DRAW_LINE, STYLE_SOLID, 2, InpBullCol); // mint SetIndexStyle (1, DRAW_LINE, STYLE_SOLID, 2, InpBearCol); // red SetIndexEmptyValue(0, EMPTY_VALUE); SetIndexEmptyValue(1, EMPTY_VALUE); ArrayInitialize(BufFiltBull, EMPTY_VALUE); ArrayInitialize(BufFiltBear, EMPTY_VALUE); // Per-bar in the OnCalculate loop: bool isBullRegime = (upStreak > dnStreak); if(isBullRegime) { BufFiltBull[shift] = rf; BufFiltBear[shift] = EMPTY_VALUE; } else { BufFiltBull[shift] = EMPTY_VALUE; BufFiltBear[shift] = rf; }
MT4's render engine joins consecutive non-empty bars of the same buffer into a connected segment, so the line cleanly transitions from mint to red as regime flips. The EMPTY_VALUE sentinel must be assigned via ArrayInitialize at attach (not just declared via SetIndexEmptyValue ) — otherwise warmup cells default to 0.0 and the engine draws a line down to price zero.
The MT5 build mirrors this with two DRAW_LINE plots of identical color and width, so the two builds render the filter line identically. Signal arrows ( OBJ_ARROW with Wingdings codes 233/234), hero labels ( OBJ_TEXT ), Reversal diamonds ( OBJ_ARROW code 159), and SL/TP trend lines ( OBJ_TREND ) all overlay on top of the regime-colored line, giving the chart its "blackout" identity — a single colored spine with surgical decision markers.
When InpShowFilter is set to false the line is hidden and only the colored regime arrows + signal markers remain. Some traders prefer this cleaner look on lower timeframes where the constant filter-line repaint can become visually overwhelming.
Multi-Timeframe Trend Row
The Multi-Timeframe row in the dashboard shows the EMA-144 trend direction across six fixed timeframes: M5, M15, M30, H1, H4, Daily. Each timeframe shows an arrow:
- ▲ in mint — current close on that TF is above its EMA-144 (bullish)
- ▼ in red — current close is below its EMA-144 (bearish)
The MTF row is a "trend agreement scoreboard" — when all six arrows point up, every timeframe from M5 to Daily is bullish, and any BUY signal fired on the working timeframe is operating with the wind at its back. When the arrows disagree (e.g., M5 ▲ M15 ▲ but H4 ▼ Daily ▼) the working-timeframe signal is fighting higher-timeframe trend and should be discounted or skipped.
Each timeframe is sampled using iMA and iClose with the cross-symbol/cross-timeframe overload, anchored to the most recent closed bar via iBarShift(...) + 1 so the value never repaints intra-bar:
bool MtfBull(ENUM_TIMEFRAMES tf, int shift)
{
   datetime barT  = Time[shift];
   int      hShift= iBarShift(NULL, tf, barT, false);
   if(hShift < 0) return false;
   double ema = iMA   (NULL, tf, InpMtfEmaLen, 0, MODE_EMA, PRICE_CLOSE, hShift + 1);
   double cl  = iClose(NULL, tf, hShift + 1);
   return (ema > 0.0 && cl > 0.0 && cl > ema);
}

// Sample all six timeframes for the dashboard row:
bool m5Bull  = MtfBull(PERIOD_M5,  0);
bool m15Bull = MtfBull(PERIOD_M15, 0);
bool m30Bull = MtfBull(PERIOD_M30, 0);
bool h1Bull  = MtfBull(PERIOD_H1,  0);
bool h4Bull  = MtfBull(PERIOD_H4,  0);
bool d1Bull  = MtfBull(PERIOD_D1,  0);
The hShift + 1 access ensures the value comes from the most recent closed bar on each timeframe, eliminating intra-bar repaint. The dashboard cell is then rendered as ^ in mint or v in red — note the ASCII substitution because of the no-Unicode-in-chart-objects constraint (Unicode glyphs render as ???? in MT4/MT5 OBJ_TEXT and OBJ_LABEL ).
The MTF row is one of the most actionable parts of the dashboard. A working-timeframe BUY signal with all six MTF arrows pointing up is a top-quality setup; the same signal with three up and three down arrows is mediocre at best.
The 22-Row Dashboard
The dashboard is a pixel-anchored widget rendered using OBJ_RECTANGLE_LABEL for cell backgrounds and OBJ_LABEL for cell text. It anchors to one of six chart corners and stays in position regardless of scroll, zoom, or symbol switch.
The 22 rows are organized into six sections:
Header (rows 0–1)
- Row 0 — Brand title WOLF BLACKOUT TRADER in indigo (#1A237E) background, mint text
- Row 1 — Symbol and timeframe, plus current date/time
Market Context (rows 2–6)
- Trend Regime — BULL / BEAR / FLAT (colored)
- Range Filter value with delta from previous bar
- RSI(14) value with state label (OB / OS / Bull / Bear)
- EMA(144) value and price-vs-EMA flag (^ or v)
- Volume ratio (current / SMA20) with HIGH / Norm tag
Signal Engine (rows 7–9)
- Last signal direction (LONG / SHORT / WAITING) with bars-ago counter
- Last signal star rating (★ to ★★★★★)
- Cooldown remaining bars (0 if free to signal, N otherwise)
Confluence (rows 10–12)
- Live BUY score with star rendering and minimum-required threshold in parentheses
- Live SELL score with star rendering and threshold
- Score-by-layer breakdown — Range / RSI / EMA / HTF / Vol — Pass/Fail per layer
Active Signal (rows 13–18)
- Direction with stars and bars-ago
- Entry price with live percent P&L
- Stop Loss price with percent distance from entry
- TP1 / TP2 / TP3 prices on a single row, each with * suffix if hit
- TP4 / TP5 prices on a single row, each with * suffix if hit
- Reversal detector status (BUY zone / SELL zone / -)
MTF Trend (row 19)
- Six cells showing M5 / M15 / M30 / H1 / H4 / D1 arrows
Performance (rows 20–21)
- Total buys / sells fired since attachment
- Wins / Losses / Win Rate %, plus cumulative TP1/2/3/4/5 hit counts
The dashboard supports six corner positions (Top Right / Top Left / Middle Right / Middle Left / Bottom Right / Bottom Left) and four font sizes (Tiny / Small / Normal / Large). Layout is responsive — cell widths scale with font size so the dashboard reads cleanly at every scale.
In the MetaTrader builds the dashboard is redrawn from OnTimer at 500-millisecond intervals (the MQL5 indicator-objects rule) plus on every CHARTEVENT_CHART_CHANGE so it re-anchors after terminal-window resizes. A guard flag ( g_calcReady ) prevents the dashboard from reading the g_* series arrays before OnCalculate has filled them on first attachment — without this guard, the first OnTimer tick can hit an empty array and crash the dashboard rendering for the first few seconds.
Full Alert Package — 8 Events Across 4 Native MetaTrader Channels
Wolf Blackout Trader fires 8 distinct trade-lifecycle alert events. Each is delivered through any combination of four native MetaTrader channels: terminal popup ( Alert() ), sound file ( PlaySound() ), mobile push to the MetaTrader app ( SendNotification() ), and email ( SendMail() ). All four channels are built into the MetaTrader 4 and MetaTrader 5 terminals — no external bridges, scripts, or third-party services required.
The 8 alert events:
- BUY Signal — main bullish signal fired. When the confluence score equals 5, the message text is prefixed with STRONG (it is the same alert event, just with a different word in the body).
- SELL Signal — main bearish signal fired. Same STRONG prefix at score 5.
- TP1 HIT — first take-profit reached on the active trade
- TP2 HIT — second take-profit reached
- TP3 HIT — third take-profit reached
- TP4 HIT — fourth take-profit reached
- TP5 HIT — fifth take-profit reached (trade closes)
- SL HIT — stop loss hit on the active trade (trade closes)
Each BUY / SELL alert message carries the symbol, timeframe, entry price, stop loss, all five take-profit prices, and the confluence score. Example default message text:
WBT BUY EURUSD H1 Entry 1.07842 SL 1.06764 TP1 1.08382 TP2 1.08920 TP3 1.09459 TP4 1.10539 TP5 1.12156 Score 4
Each TP / SL HIT alert is a compact one-line confirmation: WBT TP3 HIT EURUSD H1 . Short messages are intentional — they read cleanly in the popup, on the lock-screen push notification, and in the email subject line without truncation.
The alert input group controls the master switch plus per-channel toggles:
| Input | Default | Effect |
|---|---|---|
| InpEnableAlerts | true | Master on/off — disables every channel when off |
| InpAlertPopup | true | MetaTrader popup dialog (terminal must be running and visible) |
| InpAlertSound | true | Play InpAlertSound1 (default alert2.wav ) on every event |
| InpAlertPush | false | Send mobile push (requires MetaQuotes ID under Tools > Options > Notifications) |
| InpAlertEmail | false | Send email (requires SMTP under Tools > Options > Email) |
| InpAlertSound1 | "alert2.wav" | Sound file path (any .wav in Terminal/Sounds) |
The alert system silences during the initial historical replay when the indicator attaches to the chart. Only signals fired on new bars after attachment trigger alerts — without this guard, attaching the indicator to a chart with months of history would flood the terminal with hundreds of stale popups. The silencing is controlled by a g_silenceAlerts flag set to true at the top of OnCalculate when prev_calculated == 0 and cleared back to false at the end of the calculation. Per-bar deduplication prevents the same event from firing twice on the same bar.
The MetaTrader implementation is straightforward — a single helper routes one message to every enabled channel:
void SendAlerts(string subject, string body)
{
   if(InpAlertPopup) Alert(subject);
   if(InpAlertSound) PlaySound(InpAlertSound1);
   if(InpAlertPush)  SendNotification(subject);
   if(InpAlertEmail) SendMail(subject, body);
}
Mobile push is the recommended channel for traders who step away from the terminal — typical end-to-end latency from bar close to lock-screen notification is under 5 seconds via MetaQuotes' push infrastructure. Email is slower (5–30 seconds of SMTP latency) but useful for archival and downstream parsing into a trade journal.
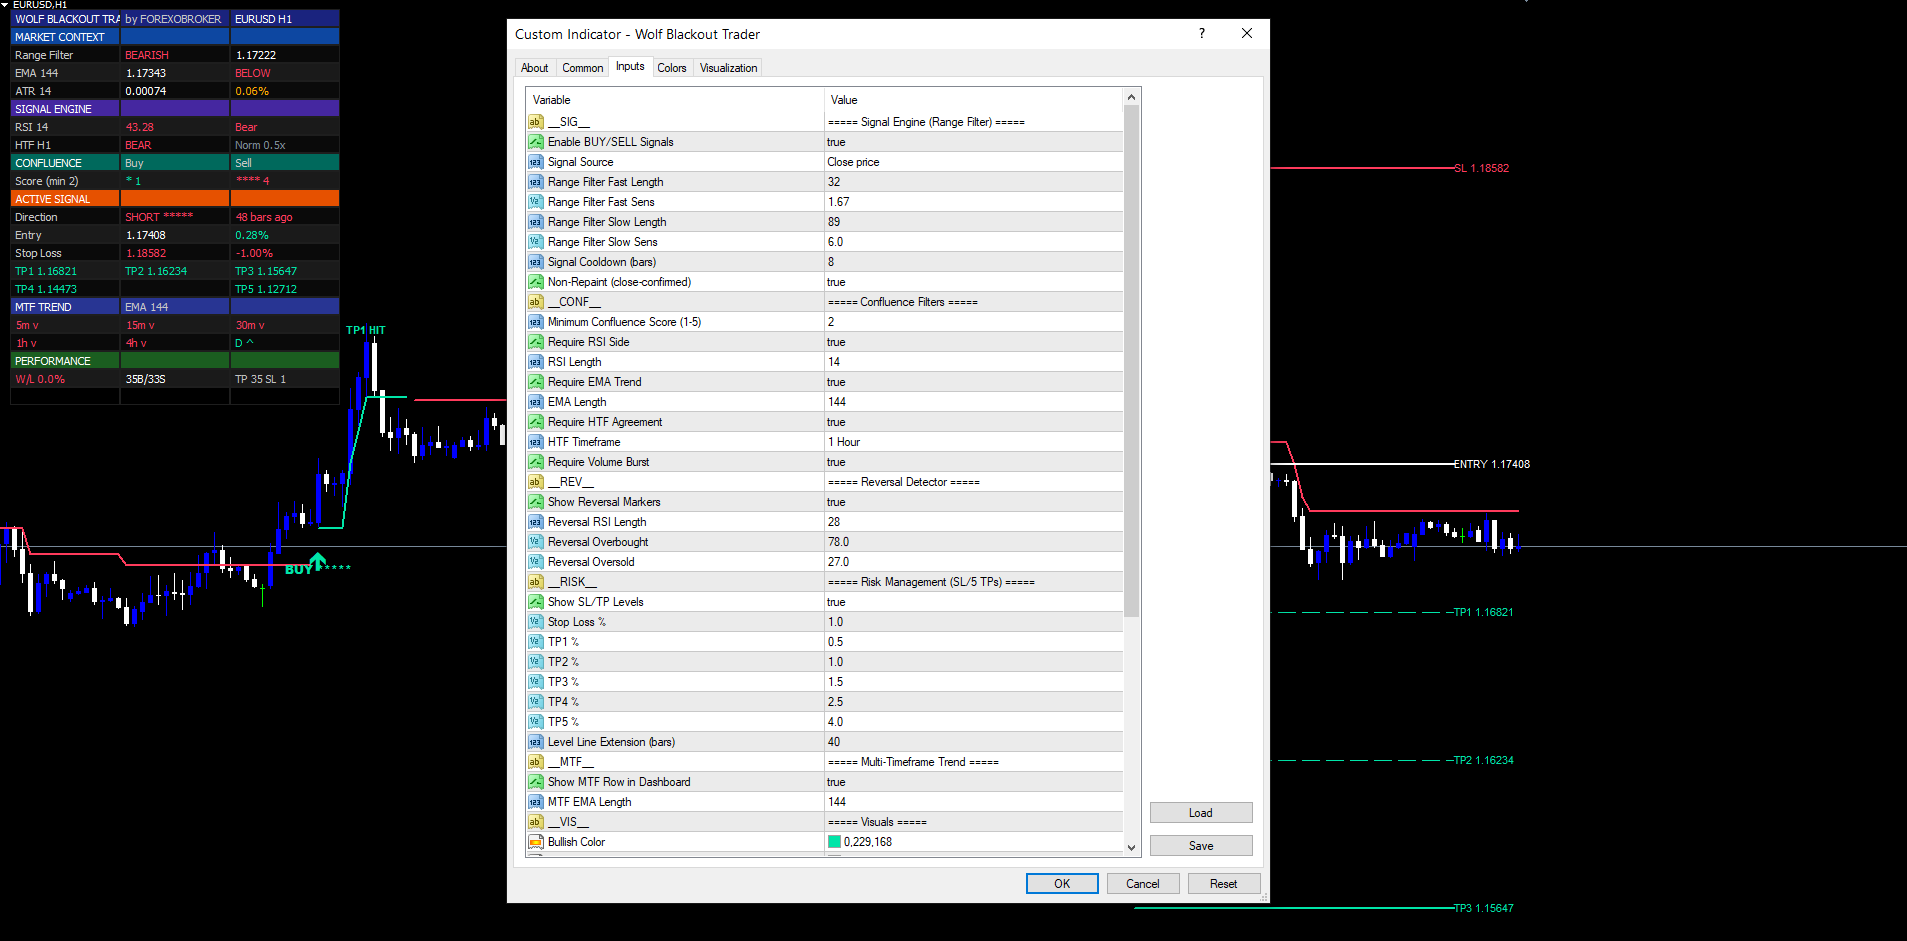
Configurable Parameters
The indicator exposes roughly 45 inputs grouped into eight sections. Defaults are tuned for H1 swing trading on FX majors; every value is adjustable in real time without re-attaching the indicator.
| Group | Key Inputs (defaults) |
|---|---|
| Signal Engine | enableSignals (true), src (close), fastLen (32), fastSens (1.67), slowLen (89), slowSens (6.0), signalCooldown (8), nonRepaintMode (true) |
| Confluence | minConfluence (2), useRsiConfirm (true), rsiLen (14), useEmaConfirm (true), emaLen (144), useHtfConfirm (true), htfRes (60), useVolConfirm (true) |
| Reversal Detector | showReversal (true), revRsiLen (28), revOb (78.0), revOs (27.0) |
| Risk (SL / 5 TPs) | showSLTP (true), slPct (1.0), tp1Pct (0.5), tp2Pct (1.0), tp3Pct (1.5), tp4Pct (2.5), tp5Pct (4.0), extendBars (40) |
| MTF Trend | showMtf (true), mtfEmaLen (144) |
| Visuals | bullCol (#00E5A8), bearCol (#FF3B5C), neutralCol (#7C8895), colorBars (true), showFilter (true), buyLblStyle ( BUY ▲ ), sellLblStyle ( SELL ▼ ) |
| Dashboard | showDash (true), dashPos (Top Right), dashSize (Tiny), dashAcc (#1A237E) |
| Alerts | InpEnableAlerts (true), InpAlertPopup (true), InpAlertSound (true), InpAlertPush (false), InpAlertEmail (false), InpAlertSound1 ("alert2.wav") |
Every input has range validation in OnInit. Out-of-range values cause the indicator to return INIT_PARAMETERS_INCORRECT , preventing accidental misuse on the MQL5.com Market.
Markets, Timeframes & Best Practices
Markets. Wolf Blackout Trader is symbol-agnostic. It works on FX majors and crosses, precious metals (XAU/USD, XAG/USD), commodity CFDs, equity indices (NAS100, US500, GER40), and crypto (BTC/USD, ETH/USD). The Range Filter math is universal; the only adjustment between asset classes is the SL/TP percentage tuning — crypto needs wider TPs (e.g., 1% / 2% / 3% / 5% / 8%) than FX majors.
Timeframes. Two regimes work well:
- H1 and above — fewer signals, higher quality, larger TP targets. Best for traders who can hold a position for hours to days. Use minConfluence = 2 for normal stream or 3 for selective.
- M5–M15 — more signals, faster turns, smaller TP targets. Best for active intraday scalping. Tighten slPct to 0.5–0.7 and tp1Pct to 0.2–0.3 to match the smaller pip-distance budgets.
Avoid M1 unless your broker's spread is unusually tight — Range Filter signals on M1 fire too frequently to be useful, and the 8-bar cooldown is too short to prevent over-trading.
Best practices.
- Combine MTF agreement with the on-chart signal. When the MTF row shows 4+ green arrows, working-timeframe BUYs are higher quality. When MTF is mixed, raise minConfluence to 3 or 4 to compensate.
- Pay attention to reversal markers near signals. A 5-star BUY signal that prints at the same bar as a red Reversal-SELL diamond is a textbook "buying into exhaustion" warning — skip or fade.
- Watch the dashboard confluence section in real time. A 1-of-5 score that builds to 4-of-5 in the last seconds of a bar is more interesting than a 4-of-5 score that has been stable for 10 bars.
- Use the Pure ATR + 5-TP ladder for trailing exits. Don't take TP1 mechanically — when momentum is strong, let the trade run to TP3 or TP4 and use TP1 only as the breakeven trigger.
- Backtest on demo for 2+ weeks before live. The MQL5.com Strategy Tester is not directly applicable to indicators, but attaching the indicator to a demo chart and tracking signals in a journal for two weeks builds intuition for which star counts and which markets work best for your style.
Download the indicator:
- MetaTrader 5: Wolf Blackout Trader MT5
- MetaTrader 4: Wolf Blackout Trader MT4
CONTACT & SUPPORT
- Email: info@forexobroker.com
- Questions: Use the Comments section on the product page or send a private message
- Bug Reports: Please include your broker name, account type, and a screenshot
-
✅ All MQL Tools: https://www.mql5.com/en/users/forexobroker/ ✅
--------------------------------------------------------------------------------------------------------------
🏦 **Broker I use**: https://icmarkets.com/?camp=55869
🏦 **Broker For EU Traders I use 1**: https://www.ictrading.com?camp=91414
🏦 **Broker I use 2**: https://one.exnessonelink.com/boarding/sign-up/a/c_thuv62ocfq
💻 **VPS**: https://chocoping.com/processing/aff.php?aff=738
💼 **Companies I use for getting funded**:
Fundednext: https://fundednext.com/?fpr=kestutis39
The5ers: https://www.the5ers.com/?afmc=16kl
FTMO: https://trader.ftmo.com/?affiliates=nRAyOhmFRnEnFdOpdLeh
Risk Disclaimer
Trading foreign exchange and CFDs on margin carries a high level of risk and may not be suitable for all investors. You may sustain a loss exceeding your initial investment. Trend Quorum is a technical analysis tool and does not guarantee profitable trades. Past performance is not indicative of future results. The authors accept no liability for any loss arising from use of the indicator. By using Trend Quorum you acknowledge sole responsibility for your trading decisions.


