
Voidbreak Buy Sell Pro — The Range Filter That Trades Regimes, Not Noise

Introduction
Open any retail trading forum and you will find the same complaint about signal indicators: they fire too often. A cross here, a colour change there, an arrow on every other bar. The trader who tries to take all of them ends up over-trading, paying spread on dozens of marginal setups, and watching a hundred conflicting "BUY" and "SELL" tags pile up on the same chart. The problem is not that the math is wrong. The problem is that most signal indicators have no concept of state. They re-evaluate from scratch on every bar and emit a fresh opinion every time, regardless of whether anything meaningful actually changed.
Voidbreak Buy Sell Pro is built on the opposite premise. At its core sits a range filter — a volatility-adaptive band that ignores price entirely until price breaks through it. Inside that band, nothing happens. The band is a "void" where ordinary chop is absorbed and discarded. Only when price escapes the void does the indicator change its mind. That escape is converted into a sticky regime — bull (+1) or bear (-1) — and the single, only signal the indicator ever produces is the flip of that regime: bear-to-bull is a BUY, bull-to-bear is a SELL. There is exactly one entry logic. No multi-signal stacking, no second opinions, no arrow spam.
On top of that one clean engine, Voidbreak layers a complete trade-management framework: a hybrid stop-loss that takes the tighter of an ATR stop and a swing stop, three R-multiple take-profit targets, an auto-scale system that keeps risk proportional across every timeframe, a five-layer confluence "conviction" score that is purely informational, an EMA trend cloud, a six-section dashboard, and an eight-event alert package delivered through the MetaTrader popup / push / email channels. Everything is non-repainting. This article walks through every component.
Download the indicator:
- MetaTrader 5: Voidbreak Buy Sell Pro MT5
- MetaTrader 4: Voidbreak Buy Sell Pro MT4
TIP: Voidbreak works on forex, crypto, metals, oil, indices, and stocks, on every timeframe from M1 to MN1. Higher timeframes (H1+) give fewer, larger regime swings; lower timeframes flip more often. The auto-scale system keeps the SL/TP geometry sensible at every one.
The Range-Filter Math
The range filter is a two-stage smoother followed by a stateful clamp. Stage one measures how far price moves bar to bar, then double-smooths that distance into a single volatility number called the smooth range:
delta = abs(src - src_prev) avgRng = EMA(delta, rfPeriod) smoothrng = EMA(avgRng, rfPeriod * 2 - 1) * sensitivity
src is the source price (close by default). rfPeriod is the sampling period (default 50). sensitivity is the range-sensitivity multiplier (default 2.5). The first EMA produces the average move size. The second EMA, over a longer window, removes the jitter from the first. Multiplying by sensitivity scales the band width: a larger value produces a wider void that filters more aggressively and flips less often; a smaller value produces a tighter void that reacts faster.
Stage two is the part that makes this a filter and not just a band. The filtered value rngfilt is a clamp that refuses to move unless price has travelled more than one full smoothrng away from it:
if   src > rngfilt_prev + smoothrng
        rngfilt = src - smoothrng
elif src < rngfilt_prev - smoothrng
        rngfilt = src + smoothrng
else
        rngfilt = rngfilt_prev          // frozen — inside the void
Read that carefully. As long as price stays within smoothrng of the last filtered value, rngfilt is frozen — it holds its previous value exactly. It only steps when price punches a full band-width past it, and even then it steps to the trailing edge of the band, not to price itself. The result is a line that walks up in trends, walks down in trends, and sits perfectly still in chop. The band around it ( rngfilt ± smoothrng ) is the "void": the region where the market is just breathing, not trending.
This is why Voidbreak does not over-trade. The void mechanically eats noise. Sideways markets that would generate dozens of crossovers on a moving-average system produce zero state changes here, because price never escapes the band.
The Regime State Machine
The filtered line rngfilt is converted into a binary regime. The rule is deliberately simple and stateful:
if rngfilt > rngfilt_prev regime = +1 (bull) elif rngfilt < rngfilt_prev regime = -1 (bear) else regime = regime_prev (unchanged — sticky)
When the filter is frozen inside the void, rngfilt == rngfilt_prev , so the regime simply persists. It does not flicker to neutral, it does not reset. It is sticky: once the market establishes a bull regime, it stays bull until the filter actually steps the other way. This is the entire reason the signal count is low and meaningful.
The signal is defined as the moment the regime changes value:
- regime was -1 , becomes +1 → BUY
- regime was +1 , becomes -1 → SELL
That is the complete entry logic of the indicator. There is no second signal type, no divergence trigger, no oscillator cross adding extra entries. One range filter, one regime, one flip. Everything else in the product is risk management and presentation built around this single decision. This is a key design choice for a non-repainting breakout system: with one trigger source there is nothing to disagree, nothing to stack, and nothing to second-guess.
One Trade At A Time — and the Three Exits
A regime flip opens a conceptual trade. Voidbreak then enforces a strict single-position rule: while a trade is open, no new signal can fire. A bull regime that gets stronger does not generate a second BUY. The indicator is either flat and waiting for a flip, or in one trade and waiting for it to close. This mirrors how a disciplined discretionary trader actually behaves and keeps the chart legible.
A trade closes in exactly one of three ways:
- TP3 is hit. The third and furthest take-profit target is reached. The trade closes and is recorded as a win. This is the best-case exit.
- SL is hit. The stop-loss price is reached. The trade closes. The outcome depends on whether TP1 had already been reached: if TP1 was hit before SL, the trade is recorded as a win (a disciplined trader would have moved the stop to breakeven after banking TP1). If SL is hit before TP1, it is a loss.
- Opposite regime flip. The regime flips against the open trade before either TP3 or SL is reached. The trade closes at market — the engine never holds a position against its own freshly-flipped regime. The very next bar's flip is, of course, the new signal in the opposite direction.
TP1 and TP2 are informational only. Reaching them updates the dashboard and can fire an alert, but neither one closes the trade. They exist so a discretionary trader can scale out and manage the stop manually while the indicator keeps tracking the full position to TP3, SL, or an opposite flip.
The Hybrid Stop-Loss
When a signal fires, the stop-loss must be placed before any take-profit can be computed. Voidbreak offers three SL modes selectable from the inputs.
Hybrid Swing+ATR (default). Two candidate stops are computed and the tighter one wins:
slPure  = entry - ATR * slAtrMult            (for a BUY; + for a SELL)
slSwing = recentSwingLow - ATR * slPadding   (for a BUY; symmetric for SELL)
SL      = the candidate CLOSER to entry      (tighter risk)
The pure-ATR stop is a clean volatility distance. The swing stop anchors to the most recent structural low (for buys) or high (for sells), cushioned by a small ATR padding. Taking the tighter of the two gives the best achievable risk-reward while still respecting structure — if the swing is close, you get a tight structural stop; if structure is far, the ATR stop caps the risk so a single setup never bleeds an outsized loss.
Pure ATR. Simply entry ∓ ATR × slAtrMult . The most predictable mode — risk is always exactly the ATR multiple. Good for systematic position sizing.
Recent Swing. Anchors purely to the recent swing extreme plus the ATR padding cushion. Hugs market structure most tightly. Stops are wider on volatile bars and tighter in quiet ranges.
Once the SL price is fixed, the trade's risk is the absolute entry-to-SL distance:
risk = abs(entry - SL)
This single risk value is the unit that drives all three take-profit targets.
Three R-Multiple Take-Profits
The three targets are pure risk-reward multiples of the SL distance:
TP1 = entry + risk * tp1Mult     (default 1.R)
TP2 = entry + risk * tp2Mult     (default 2.R)
TP3 = entry + risk * tp3Mult     (default 3.R)
For sells the formula is symmetric and the targets sit below entry. Every multiple is configurable. The defaults form a classic partial-exit ladder. TP1 at 1.0R is the breakeven anchor — once reached, the trade can no longer be a loss in Voidbreak's accounting. TP2 at 2.0R is the workhorse where most of the realised reward lives. TP3 at 3.5R is the runner that catches the rare extended trend and is the only TP that actually closes the trade.
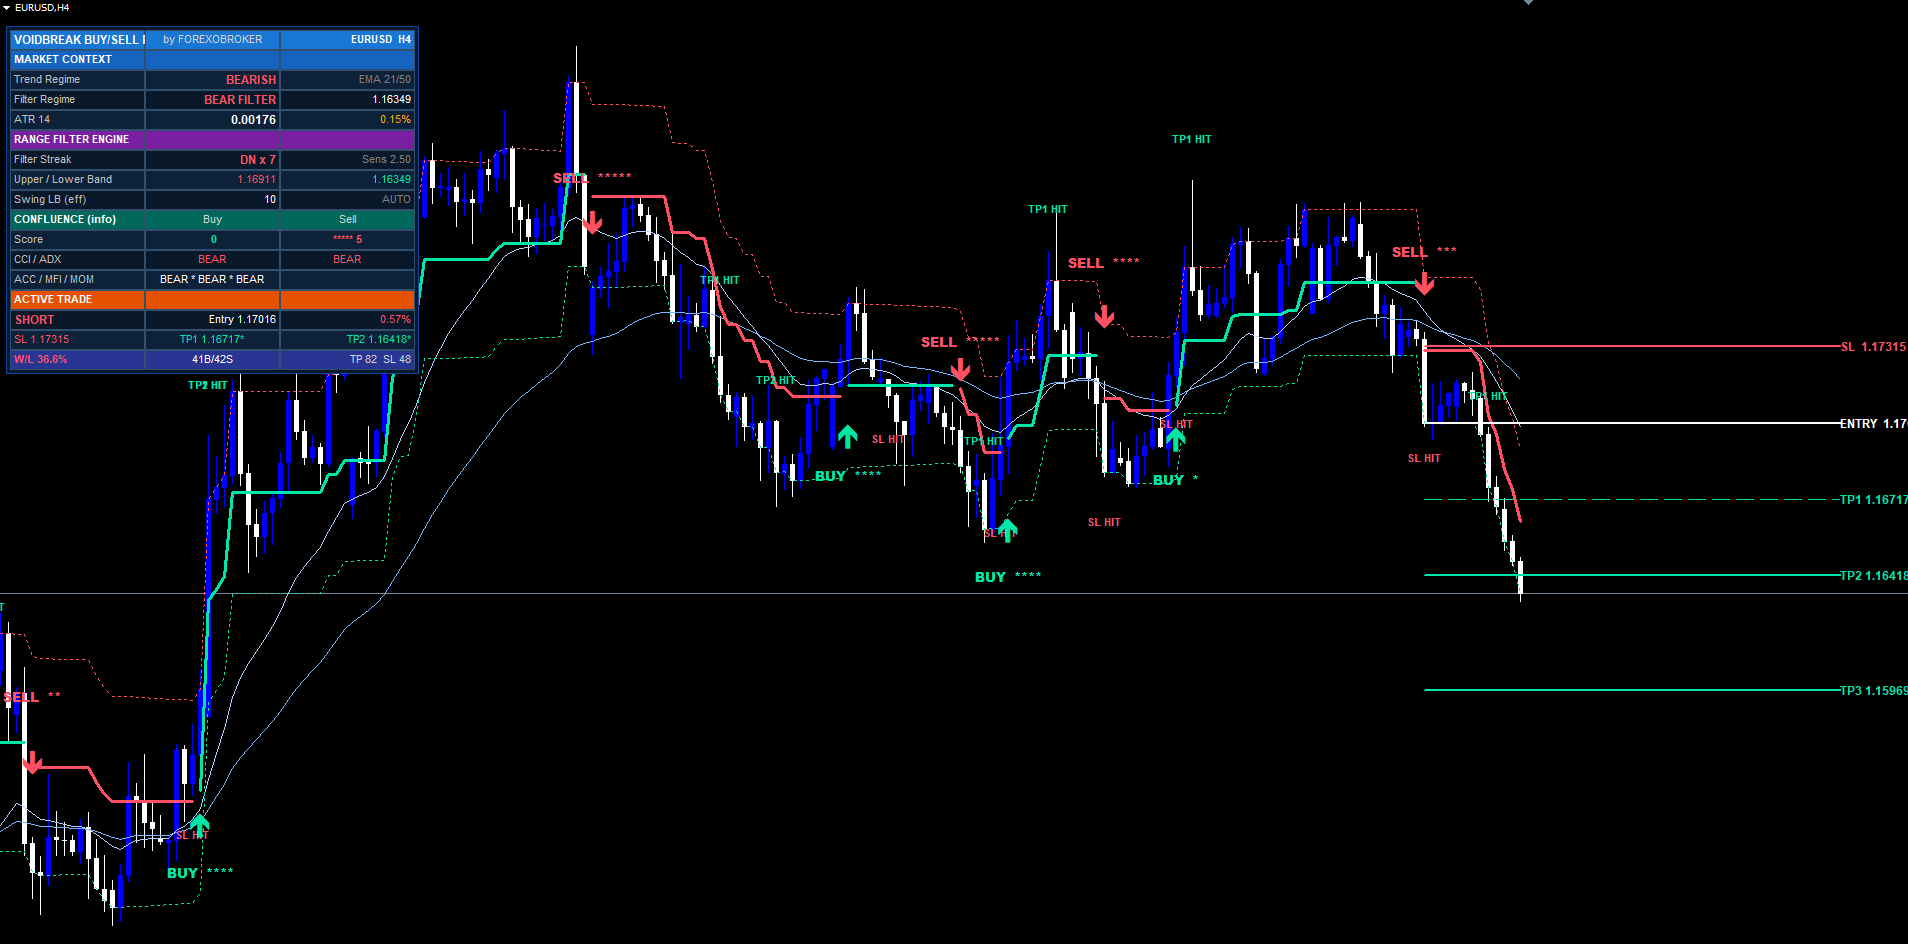
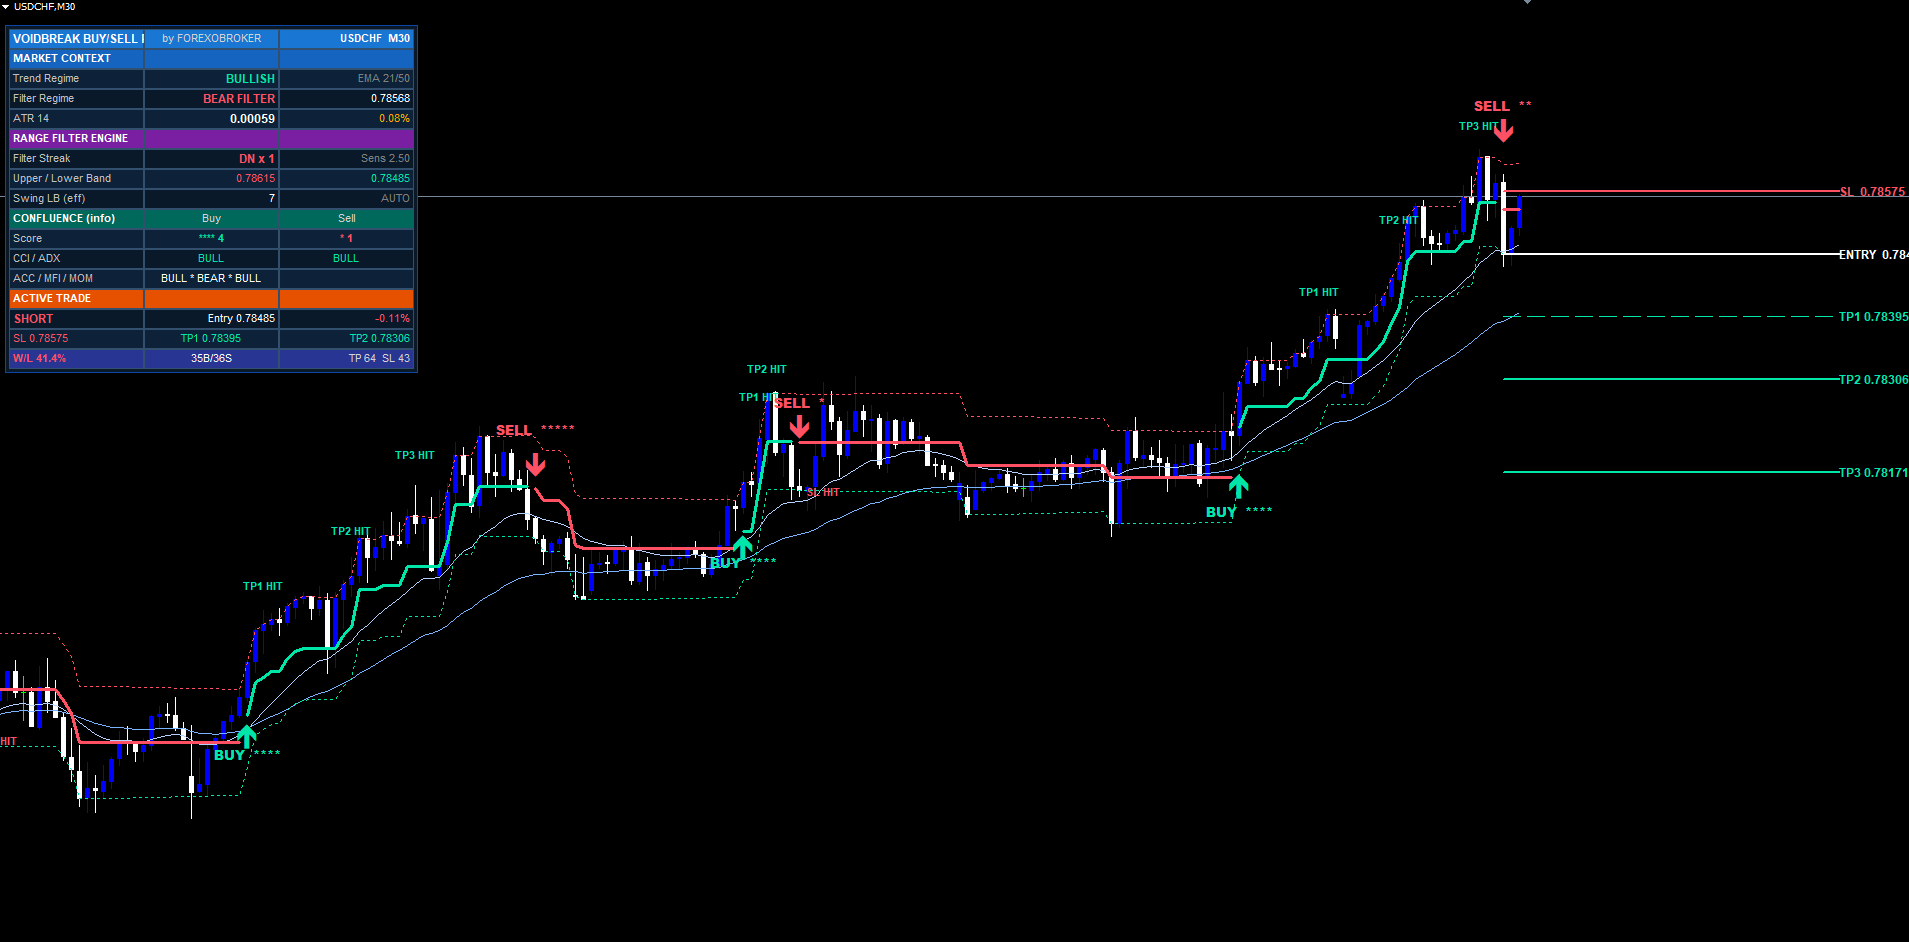
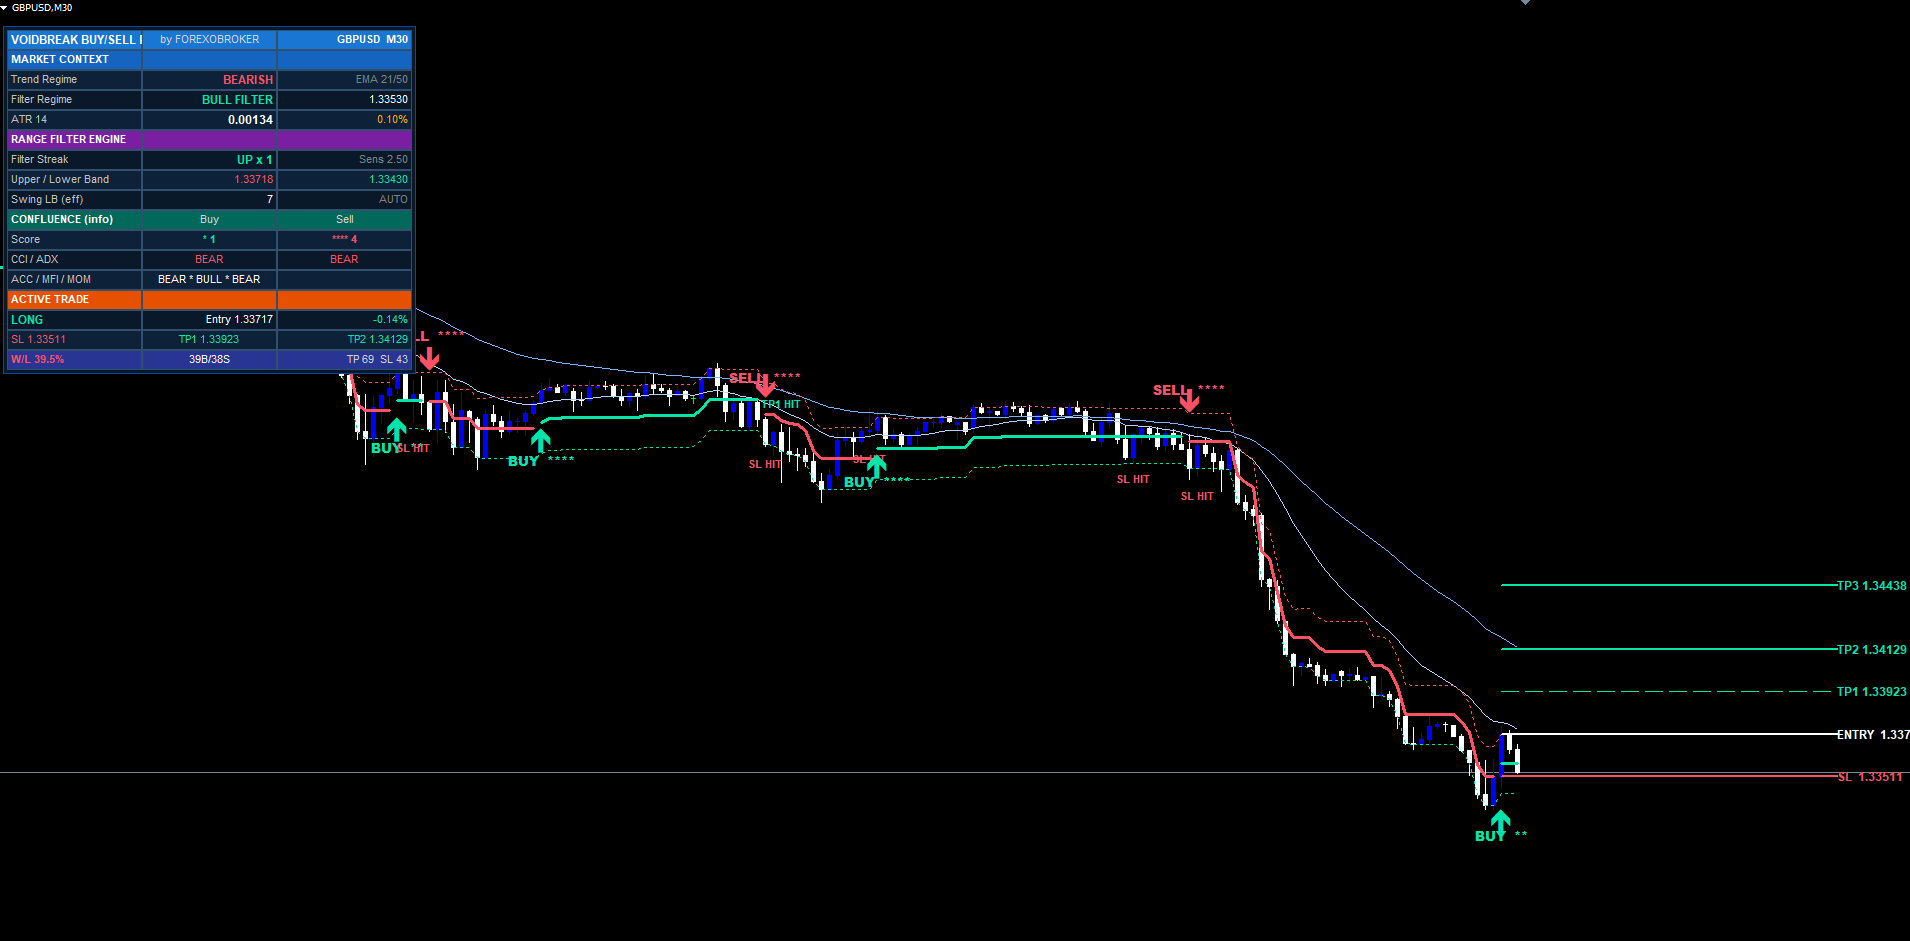
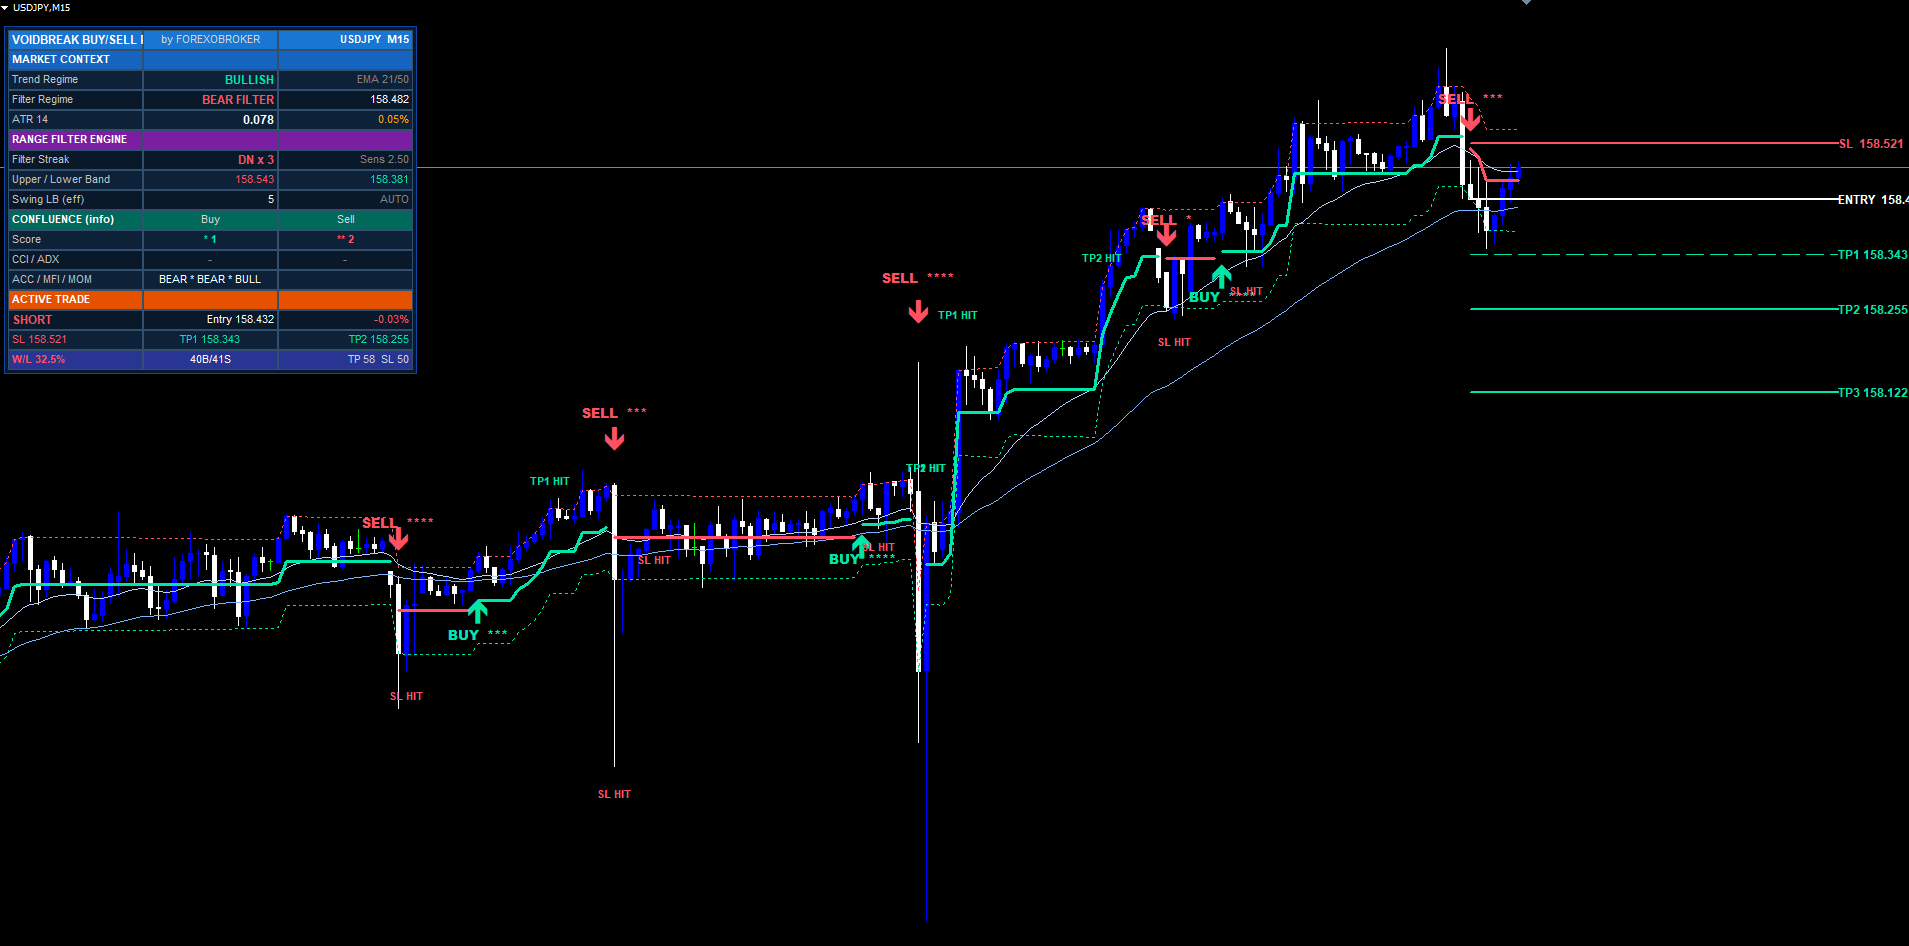
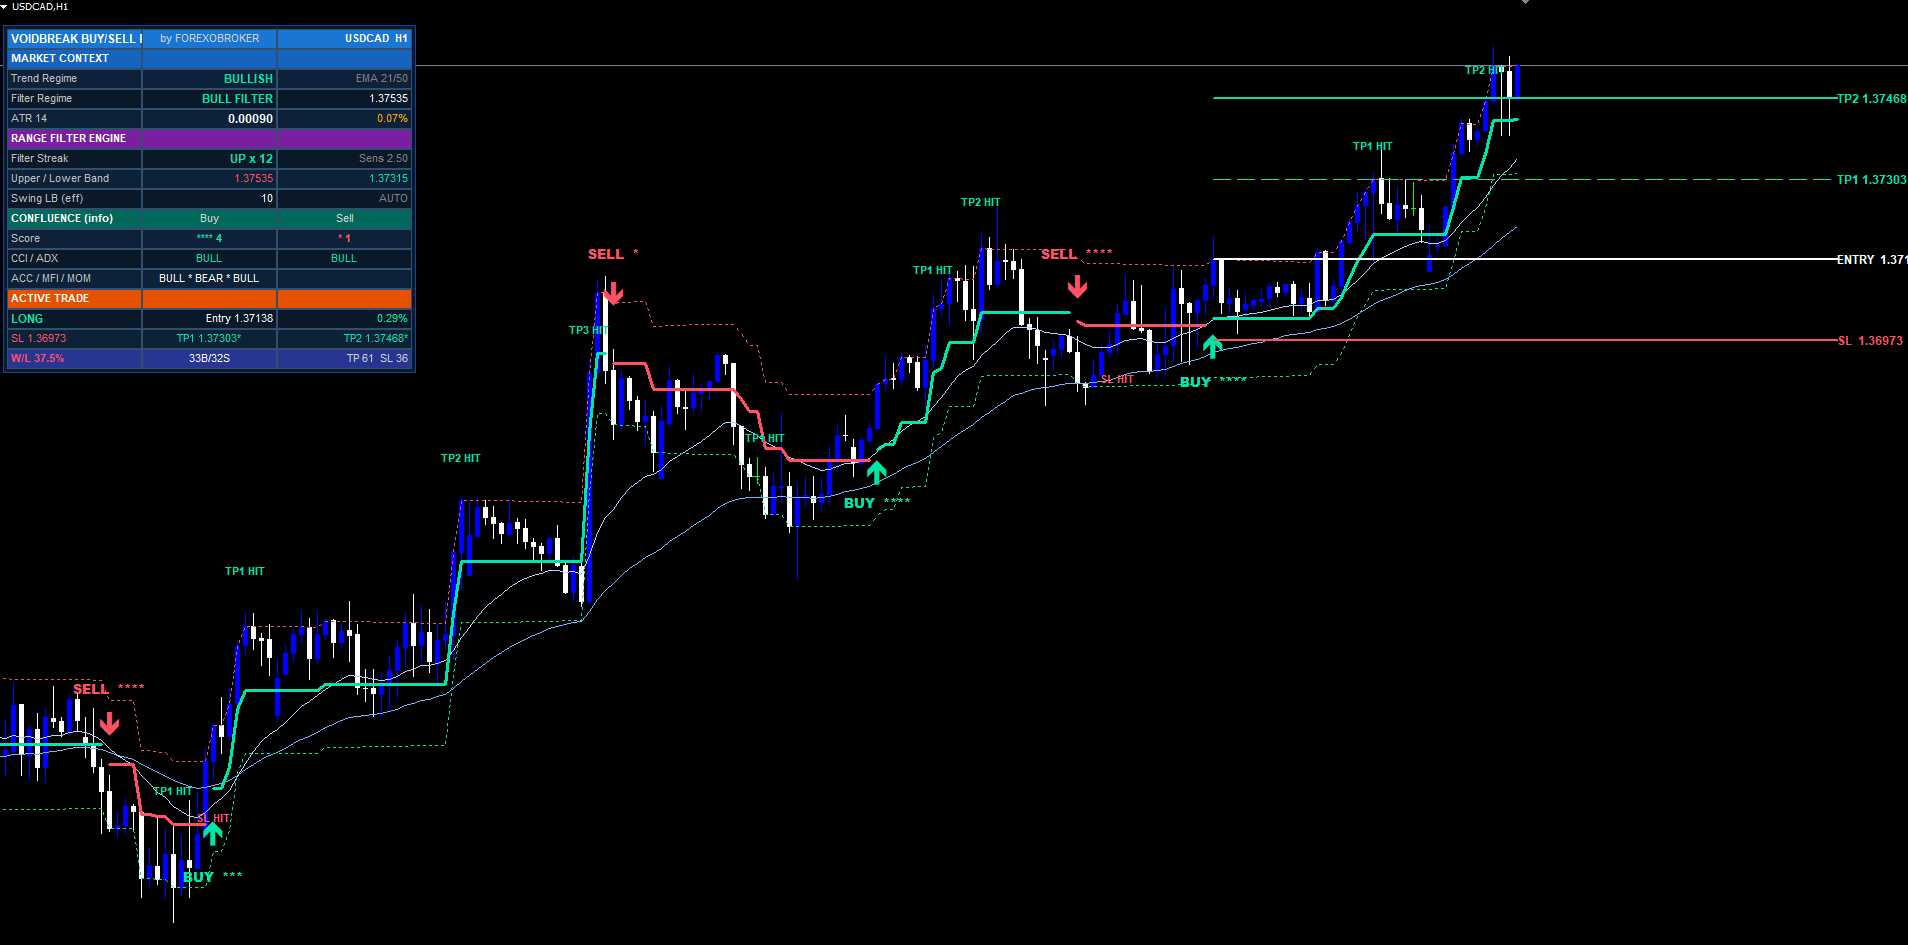
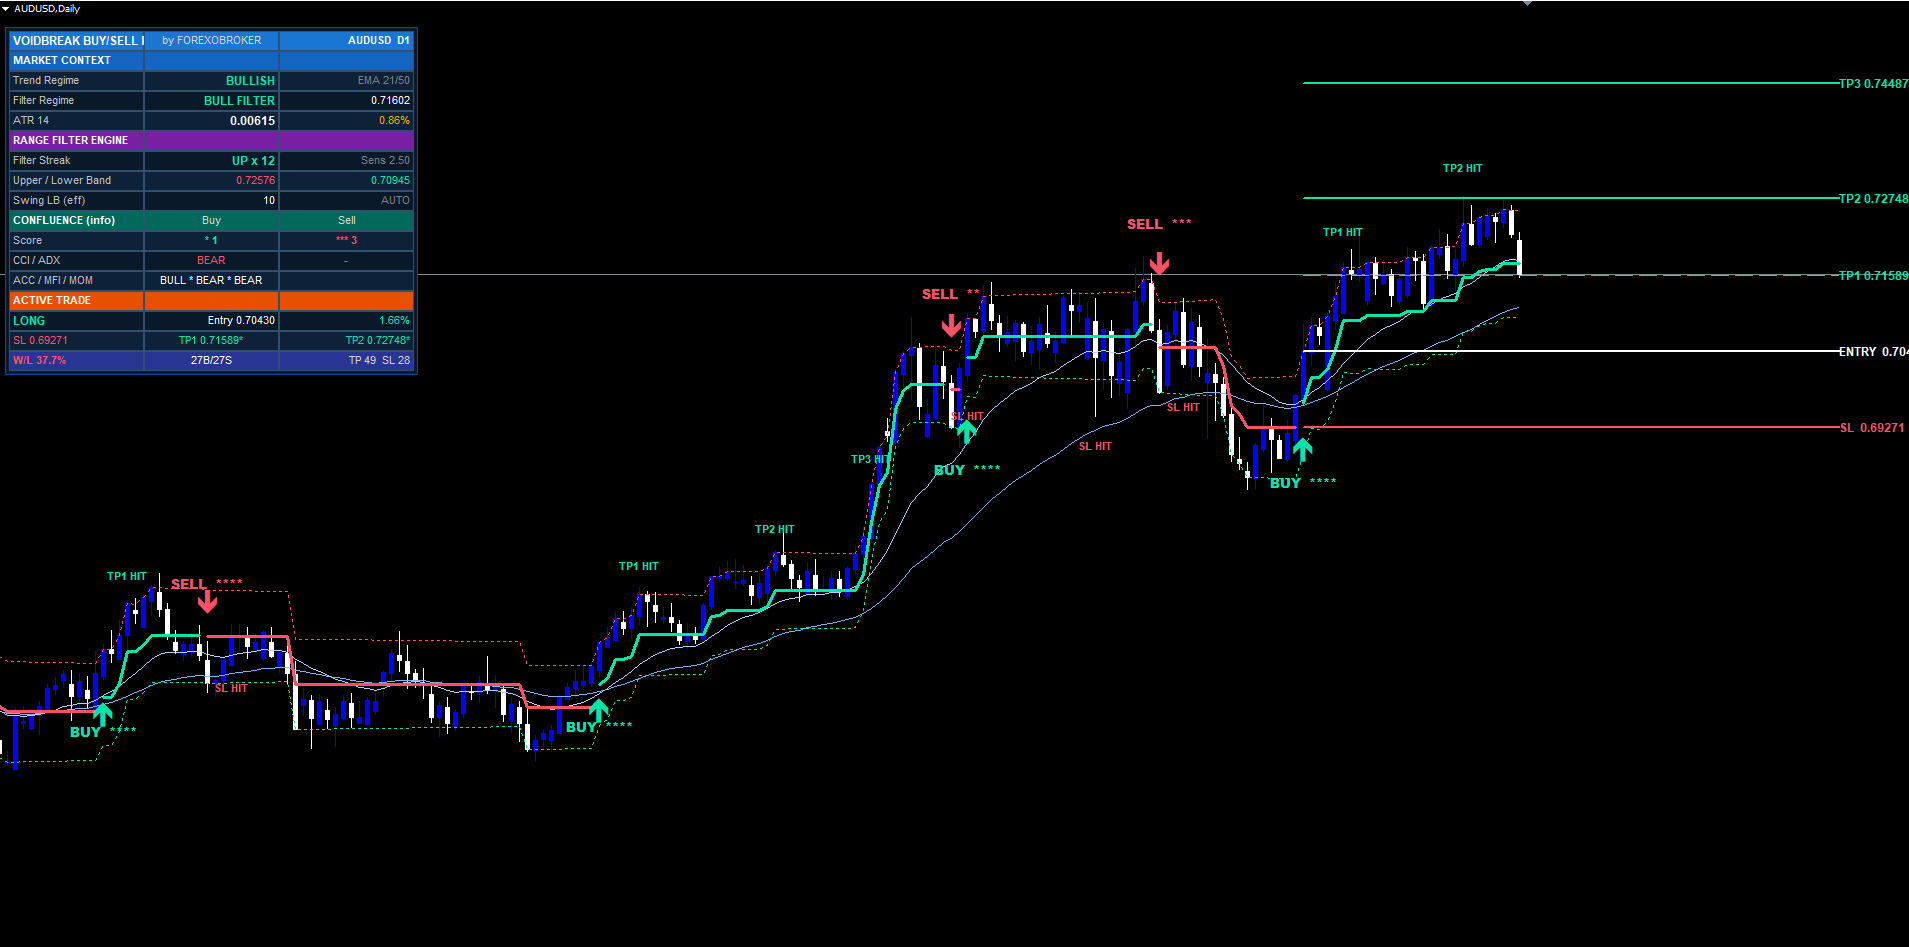
Each level is drawn as a horizontal line extending forward from the signal bar by the Level Line Extension input (default 40 bars). Each line carries a right-edge price tag showing the exact price and its R-multiple, e.g. TP2 1.10200 (2.0R) . Entry is a solid line, SL is a dashed line in the bear colour, the TP lines step from thin to bold so you can read the ladder at a glance.
On every bar after the signal, Voidbreak checks whether the bar's high (for buys) or low (for sells) reached each target, drops a small TP1 HIT / TP2 HIT / TP3 HIT marker, updates the dashboard, and optionally alerts. Lines are removed when the trade closes to keep the chart clean; the signal label itself stays permanently.
Auto-Scale-To-Timeframe
A stop-loss tuned for H1 is nonsense on M1 and far too tight on D1. Most indicators ignore this; Voidbreak handles it automatically. The swing lookback used by the SL engine is scaled by the chart's timeframe:
tfFactor = clamp(0.4, 1.0, sqrt(tfMinutes / 60)) effSwingLB = max(3, round(swingLB * tfFactor))
The square-root relationship compresses the scaling so it tapers smoothly rather than collapsing to nothing on fast charts. With the default swingLB = 10 :
- M1 (1 min): sqrt(1/60) ≈ 0.13 → clamped to the 0.4 floor → effSwingLB ≈ round(10 × 0.4) = 4
- M15: sqrt(15/60) = 0.5 → effSwingLB ≈ 5
- M30: sqrt(30/60) ≈ 0.71 → effSwingLB ≈ 7
- H1 and above: sqrt(60/60) = 1.0 , clamped to the 1.0 ceiling → effSwingLB = 10 (full lookback)
Worked example. On M1, the swing lookback shrinks to four bars, so the structural stop tracks the very recent micro-swing — appropriate for scalping where a ten-bar swing would be minutes of unrelated price action. On H4, the full ten-bar lookback is used, anchoring the stop to a genuine structural pivot. The same input ( swingLB = 10 ) produces a sensible stop on both, with no manual retuning. Auto-scale is on by default and can be disabled if you want a fixed lookback across all charts.
The Five-Layer Confluence Star Score
Voidbreak computes a 0–5 "conviction" score for every signal. This score is display-only. It never gates, delays, blocks, or modifies a signal. A BUY fires the instant the regime flips, whether the score is 0 or 5. The stars are a read on how much independent context happens to agree with the flip — not a filter. This is a deliberate separation: the entry logic stays clean and singular; the conviction read sits beside it for the trader to weigh.
The five independent layers, each worth one star:
- CCI(20). +1 for a buy when CCI > 50; +1 for a sell when CCI < -50. A momentum-thrust confirmation.
- ADX(21) + DI. +1 when ADX > 25 (a trending market, not a range) and the directional index agrees with the signal side.
- Accumulation/Distribution. +1 when the A/D line is on the correct side of its own 21-period SMA — capital flow agreeing with direction.
- MFI(14). +1 when Money Flow Index is on the correct side of its 9-period SMA — volume-weighted momentum agreeing.
- Momentum(21) slope. +1 when the linear-regression slope of the Momentum oscillator points the signal's way.
The score is rendered as stars on the signal label ( BUY ***** for a five-of-five) and broken out per-layer on the dashboard so you can see which layers agree. A five-star flip is a high-context breakout; a zero-star flip is the range filter acting alone with no supporting evidence. Both are equally valid signals — Voidbreak draws them identically — but the score tells the discretionary trader how heavily to lean in. Each layer can be toggled off in the inputs if you do not want it counted.
EMA Cloud & Range Bands
Two purely visual overlays provide context around the regime engine.
EMA trend cloud. A fast EMA (default 21) and a slow EMA (default 50) are plotted and the space between them shaded. When the fast EMA is above the slow, the cloud reads bullish; below, bearish. This is a slow-moving backdrop that tells you the broader trend the regime flips are occurring inside. It is display-only and does not feed the signal.
Range bands. The filter band itself is drawn as rngfilt + smoothrng (upper) and rngfilt - smoothrng (lower). These two lines are the void — the visible boundary that price must escape to flip the regime. Watching price approach the upper band in a bear regime is watching a potential BUY set up in real time, before the flip confirms. The bands make the otherwise-abstract filter math directly observable on the chart.
Both overlays can be toggled off independently if you prefer a minimal chart. Bull elements use #00E5A8 and bear elements use #FF3B5C by default; both colours are configurable, as is optional bar colouring that tints candles by the active regime.
On-Chart Visuals
When a regime flip confirms, Voidbreak draws a compact set of objects at the signal bar:
- A directional arrow below the bar low (BUY) or above the bar high (SELL), in the regime colour.
- A text label reading the configurable BUY/SELL text plus the confluence stars, e.g. BUY **** .
- Level lines for entry, SL, TP1, TP2, TP3, each extending forward by the Level Line Extension input.
- Right-edge price tags on each level line showing the exact price and, for the TPs, the R-multiple in parentheses.
All text uses ASCII characters only — no Unicode glyphs that could render as question marks on some MetaTrader fonts or locales. Signal arrows and labels are drawn once and never modified, so historical signals stay permanently visible for review. The level lines are removed when the trade closes (TP3, SL, or opposite flip) so the chart never accumulates stale ladders, but the signal marker itself remains so you can scroll back through every regime the system identified.
The labels are the fastest way to read a chart at a glance: arrow for direction, stars for conviction, lines for the exact trade plan — no need to open the dashboard or do any mental arithmetic.
The Six-Section Dashboard
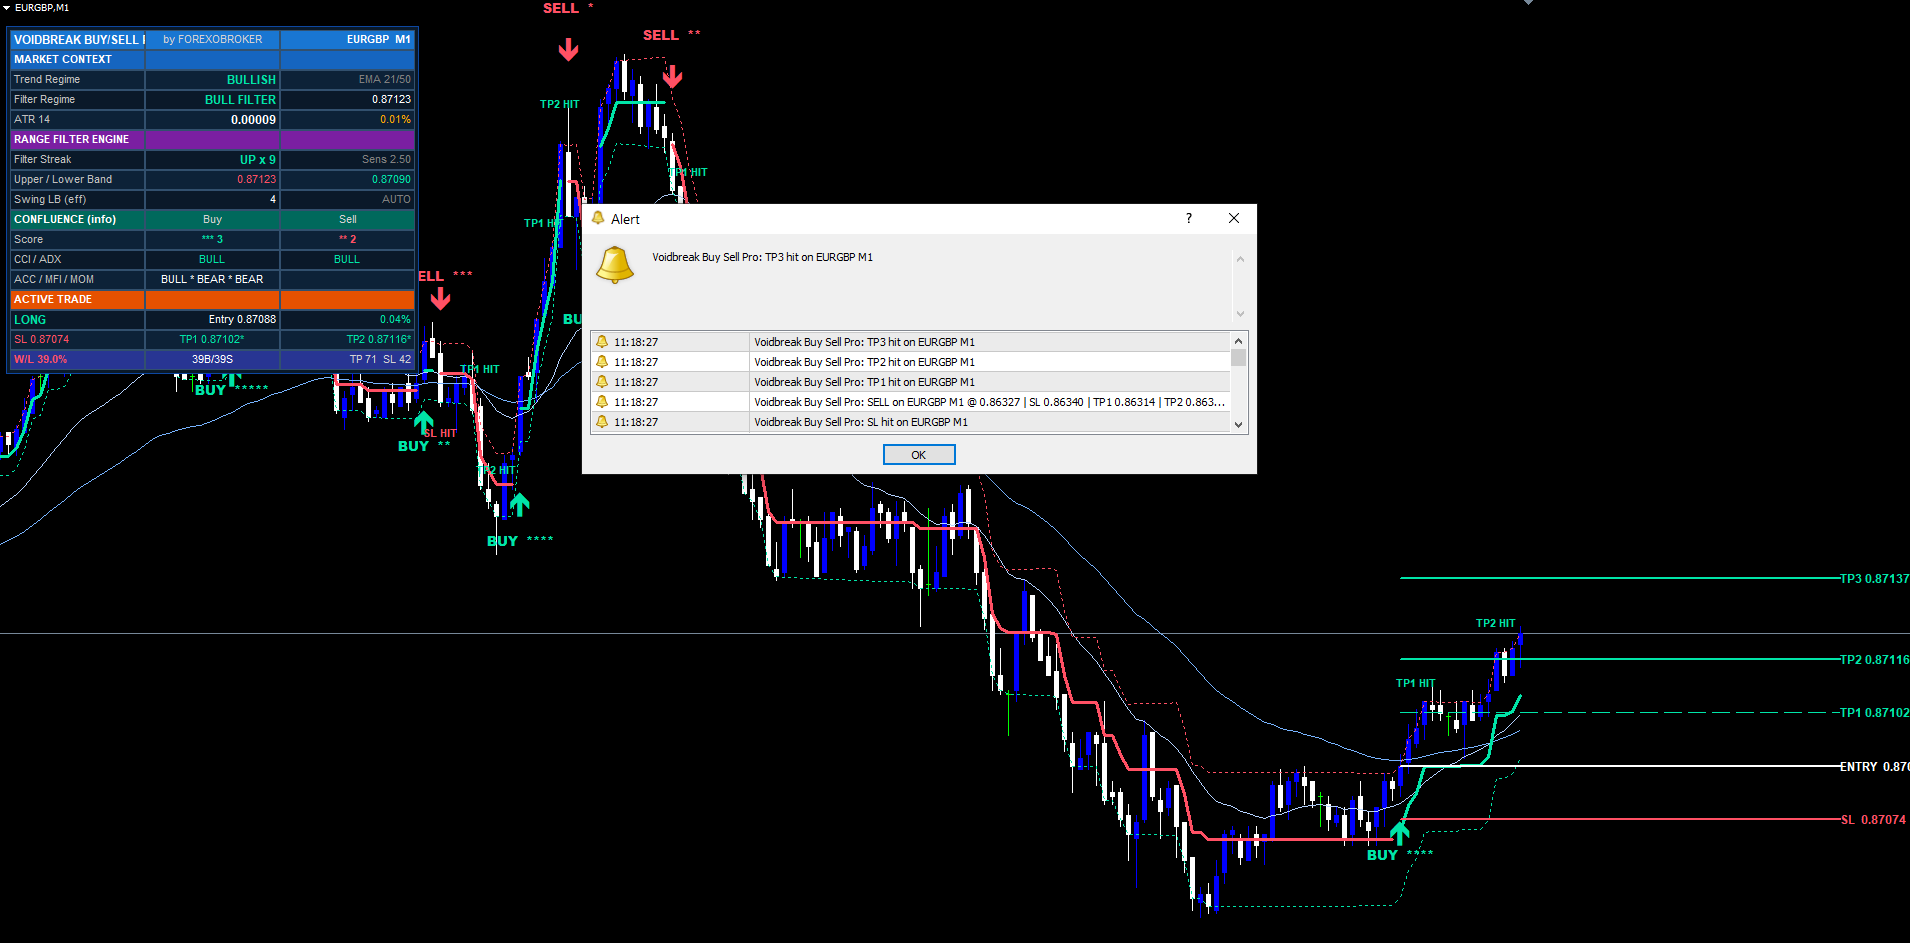
The dashboard is a pixel-anchored widget rendered with rectangle-label backgrounds and label text. It anchors to a fixed chart corner and survives scroll, zoom, and symbol changes. It is organised into six sections:
1. Header. Brand title, "by FOREXOBROKER", and the current symbol plus timeframe.
2. Market Context. The EMA trend regime (bullish/bearish from the cloud), the filter regime (+1/-1 from the range filter), and the current ATR value with ATR as a percentage of price for cross-symbol volatility comparison.
3. Range Filter Engine. The filter streak (how many bars the current regime has persisted), the active sensitivity setting, the live upper and lower band prices, and the effective swing lookback after auto-scale.
4. Confluence. The buy star count and sell star count, plus the per-layer bias for CCI, ADX, A/D, MFI, and Momentum so you can see exactly which layers agree right now — updated live every tick.
5. Active Trade. Direction (LONG / SHORT / WAITING), entry price with live percentage P&L, SL price with percentage distance from entry, and TP1 / TP2 / TP3 with a checkmark on each target that has been reached.
6. Performance. Win/loss percentage, BUY and SELL signal counts, and total TP and SL hit counts accumulated over the visible history.
The dashboard supports a configurable corner position (default Top Right) with pixel offsets, and a size setting (default Small). The Confluence section is the one to watch when no trade is active — you can see context build before a flip confirms. The Performance section gives an at-a-glance feel for how the current settings have behaved over the loaded history (not a guarantee of future results).
The Eight-Event Alert Package
Voidbreak ships eight distinct alert events, each independently toggleable:
- BUY — a bull regime flip fired
- SELL — a bear regime flip fired
- Any — combined BUY or SELL in one alert
- TP1 hit — first target reached (informational)
- TP2 hit — second target reached (informational)
- TP3 hit — third target reached, trade closed (win)
- SL hit — stop reached, trade closed
- Opposite-flip exit — trade closed by a reverse regime flip
Channels are MetaTrader-native: terminal popup, mobile push (via the MetaTrader mobile app and a MetaQuotes ID), and email (via the terminal's SMTP settings). Each channel is independently switchable in the indicator inputs, and a master alert switch enables or disables the whole package in one click. A per-event toggle lets you route only the events you care about — for example, signals plus SL, but mute the informational TP1/TP2.
Every alert message contains the same compact payload — signal direction, ticker, timeframe, confluence score, entry price, stop-loss, TP1, TP2, TP3 — so the popup at your desk, the push on your phone, and the email in your inbox carry identical information. Alerts are silenced during the initial historical replay when the indicator attaches, and per-bar deduplication prevents the same bar from firing the same event twice.
The Non-Repaint Architecture
Every signal, level line, and dashboard value is computed from confirmed, closed-bar data. This matters more for a regime system than for most indicators, because a sticky state machine that repainted would rewrite its own history every tick.
Three architectural choices guarantee non-repainting:
- Signals confirm on closed bars only. The regime flip is evaluated against completed bars. The forming bar is never used to decide whether a signal fires.
- The forming bar only updates hit checks. On the live, in-progress bar Voidbreak does exactly one thing: it checks whether the open trade's TP/SL levels were touched. It never creates, moves, or deletes a signal there.
- Sticky state is immutable once a bar closes. Because the regime persists from confirmed previous-bar values, a closed bar's regime can never change. The historical replay drawn at indicator load is byte-for-byte the live behaviour.
The practical consequence: backtests match forward tests, and the chart you see on attachment is the chart that existed in real time. This is what makes Voidbreak safe to deploy alongside expert advisors or use as a systematic signal source. Historical equals live, always.
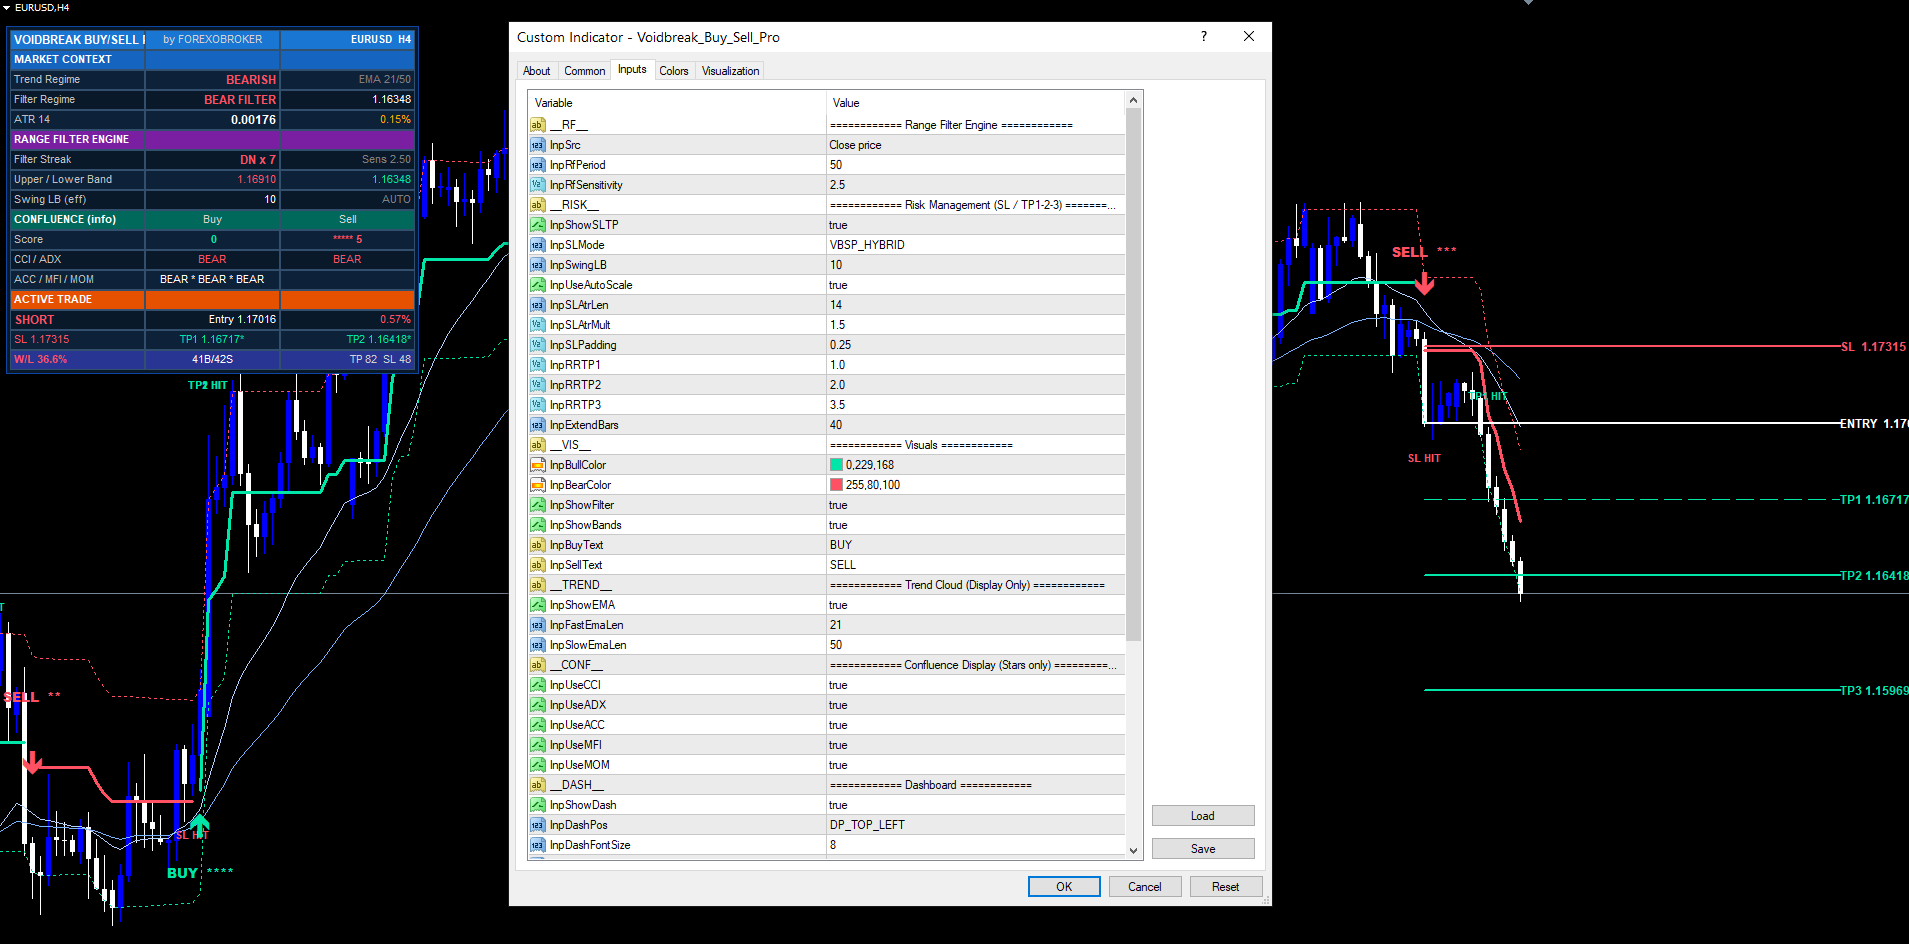
Input Parameter Reference
Inputs are grouped into eight sections. Defaults are tuned for H1 swing trading; every value is adjustable and range-validated at initialisation.
| Group | Key Inputs (defaults) |
|---|---|
| Range Filter Engine | Source (close), Sampling Period (50), Range Sensitivity (2.5) |
| Risk Management | Show SL/TP (true), SL Mode (Hybrid Swing+ATR), Swing Lookback (10), Auto-Scale (true), SL ATR Length (14), SL ATR Mult (1.5), SL Padding (0.25), TP1/TP2/TP3 (1.0 / 2.0 / 3.5), Level Line Extension (40) |
| Visuals | Bull #00E5A8 , Bear #FF3B5C , Show Filter / Bands / ColorBars, BUY/SELL label text |
| Trend Cloud | Show EMA (true), Fast EMA (21), Slow EMA (50) |
| Confluence Display | CCI / ADX / ACC / MFI / MOM toggles (all true) |
| Dashboard | Show (true), Position (Top Right +5), Size (Small +3), background & header colours |
| Alerts | Master enable (true), Alert Popup / Alert Push / Alert Email channel toggles, per-event toggles for all eight events |
Out-of-range values cause initialisation to fail cleanly with a parameters-incorrect status, preventing accidental misuse. The companion user manual documents every input with recommended values per market and timeframe.
Installation & Closing
Voidbreak Buy Sell Pro is distributed through the MQL5.com Market and installs automatically. Purchase from the MQL5.com Market → it auto-installs into your terminal → find it in the MetaTrader Navigator under Indicators > Market → drag it onto any chart. There are no files to copy, no Data Folder to open, and updates ship automatically for the lifetime of the product.
Voidbreak Buy Sell Pro is a complete regime-trading system built on one disciplined idea: a volatility-adaptive range filter that ignores noise inside its void and only changes its mind when price genuinely breaks out. That single, sticky regime flip is the only signal — no stacking, no spam, no repainting. Around it sits a full trade plan: a hybrid stop, a three-target R-multiple ladder, timeframe auto-scaling, a display-only confluence read, and a six-section dashboard. The MT4 and MT5 builds are functionally and visually identical, sharing the same decision logic and producing the same signals at the same bar timestamps on the same data.
Download the indicator:
- MetaTrader 5: Voidbreak Buy Sell Pro MT5
- MetaTrader 4: Voidbreak Buy Sell Pro MT4
CONTACT & SUPPORT
- Email: info@forexobroker.com
- Questions: Use the Comments section on the product page or send a private message
- Bug Reports: Please include your broker name, account type, and a screenshot
-
✅ All MQL Tools: https://www.mql5.com/en/users/forexobroker/ ✅
--------------------------------------------------------------------------------------------------------------
🏦 **Broker I use**: https://icmarkets.com/?camp=55869
🏦 **Broker For EU Traders I use 1**: https://www.ictrading.com?camp=91414
🏦 **Broker I use 2**: https://one.exnessonelink.com/boarding/sign-up/a/c_thuv62ocfq
💻 **VPS**: https://chocoping.com/processing/aff.php?aff=738
💼 **Companies I use for getting funded**:
Fundednext: https://fundednext.com/?fpr=kestutis39
The5ers: https://www.the5ers.com/?afmc=16kl
FTMO: https://trader.ftmo.com/?affiliates=nRAyOhmFRnEnFdOpdLeh
Risk Disclaimer
Trading foreign exchange and CFDs on margin carries a high level of risk and may not be suitable for all investors. You may sustain a loss exceeding your initial investment. Trend Quorum is a technical analysis tool and does not guarantee profitable trades. Past performance is not indicative of future results. The authors accept no liability for any loss arising from use of the indicator. By using Trend Quorum you acknowledge sole responsibility for your trading decisions.


