
Automated Trend Re-Entry Detection: How the Corex Smart Bear Bull Indicator Combines Fusion Smoothing with WPR

Introduction
Trend traders face a familiar paradox. The signals that arrive early enough to capture most of a move are also the signals that fire at every minor wiggle of price. Tighten the filters and you arrive late; loosen them and you take the whipsaws. Add the third headache — tools that "discover" yesterday's signal today by repainting once the bar closes — and the result is a workflow that consumes attention without producing edge.
The Corex Smart Bear Bull Indicator is built around a different idea. Instead of one moving average racing one threshold, it uses a five-component Fusion engine to identify the regime, a triple-stack of Williams %R oscillators to time the re-entry, and a confidence layer that grades every signal on a 0-100 scale before it appears on the chart. Every label, triangle, and exit mark is locked at confirmed bar close, so the chart you see is the chart that will be there tomorrow.
This article walks through the engine end-to-end. We cover what the Fusion smoothing actually does, how the cloud color tracks regime strength, what each of the six WPR sub-triggers detects, how the confidence score is built, and how the trend alignment gate keeps counter-trend entries from leaking through. By the end you will know what every line, label, and number on the chart means.
Download the indicator:
- MetaTrader 5: Corex Smart Bear Bull Indicator MT5
- MetaTrader 4: Corex Smart Bear Bull Indicator MT4
The Trend-Follower's Three Problems
Before describing the engine, it is worth stating what the engine is solving. Three problems show up in every honest trend-following workflow.
Late entries. Single-MA trend systems trigger after the move has already established. By the time price has crossed the 200 EMA, the Fast WPR is overbought, the next pullback is about to print, and the trader is sitting in drawdown before the position even matures. The lag is structural — it is the cost of using a single average.
Whipsaw exits. Filters help, but every additional filter adds latency. Wait for ADX to rise, for volume to spike, for two MAs to cross, and the move is half done. Without those filters, the system flips long-short-long-short on every consolidation.
Repainting tools. Many indicators look fantastic on a backtest because they redraw their own past. A signal that "appeared" three bars ago wasn't there in real time — it appeared because the most recent two bars revised history. Repainting tools cannot be traded forward.
Corex Smart Bear Bull addresses all three at once: a smoothing layer that tames lag without becoming noisy, a confidence pipeline that filters signals at the source instead of stacking filters serially, and a strict closed-bar-only state machine that rules out repainting by construction. The remainder of this article describes how those three layers fit together.
The Fusion Engine: Five MAs and a VWAP
The Fusion line is the indicator's core. It is a single price track, but it is calculated as the average of five separate smoothing methods over the same length:
- EMA — exponential moving average; weights recent bars heavier. Reactive to the latest price.
- SMA — simple moving average; treats every bar in the window equally. Stable but slow.
- LWMA — linearly weighted moving average; bridges EMA and SMA with a linear weight schedule.
- ALMA — Arnaud Legoux moving average with offset 0.85 and sigma 6. Gaussian-weighted with the peak shifted toward the most recent bar; reduces phase lag without amplifying noise the way an EMA does.
- VWAP — session-anchored volume-weighted average price computed across the current UTC trading day. Pulls the blend toward the consensus price of the day rather than purely time-weighted price action.
Each of those five methods alone will whipsaw or lag depending on market conditions. Averaged together, the contribution of any one method is bounded. When ALMA jerks early into a move, SMA and VWAP hold the blend back. When SMA lags through a turn, EMA and ALMA pull the blend forward. The five-way blend is the smoothing equivalent of a weighted vote.
The blend is computed at a configurable length (default 122 bars). Shorter lengths make the Fusion engine more reactive and produce more BULL / BEAR trend changes; longer lengths produce a smoother, more stable line that flips less often. 122 is chosen as a balance that captures intraday swings on H1-H4 charts and daily swings on D1.
Fast and Slow Smoothing and the Trend Cloud
The raw Fusion blend is then smoothed twice more by two independent EMAs. The first EMA ( InpSens1 , default 12) produces the Fusion Slow line. The second EMA ( InpSens2 , default 5) produces the Fusion Fast line. Both are drawn on the chart, and both are colored in the bull yellow-green palette.
The space between Fusion Fast and Fusion Slow is filled with the trend cloud. When the Fast line sits above the Slow line, the cloud renders in bright yellow-green; when the Fast line crosses below the Slow line, the cloud flips crimson. This is implemented through MetaTrader's DRAW_FILLING style, which natively supports a two-color "above" / "below" rendering — no per-bar object creation, no chart-object limit pressure, no repaint risk.
The cloud is the at-a-glance regime indicator. Two reading rules:
- Cloud color matches the bar's direction → trend is intact, hold the position.
- Cloud color flips against the bar's direction → regime is rolling over, look for the BULL or BEAR label that will print on the next confirmed close.
The Fast / Slow smoothing pair gives the cloud a meaningful width: when the trend is strong, the two lines diverge and the cloud is visibly thick; when momentum is fading, they compress and the cloud pinches. A pinched cloud at a horizontal turn is one of the cleanest visual cues for an upcoming flip.
The Williams %R Triple Stack
The Fusion engine identifies the regime. The re-entry layer uses three Williams %R oscillators to time entries within that regime. Williams %R is a momentum oscillator scaled from 0 (equal to the recent high) to -100 (equal to the recent low). Values above -20 are considered overbought; values below -80 are considered oversold.
Three WPR oscillators run simultaneously:
- Fast WPR (default period 21) — the entry-timing oscillator. Tracks short-term overbought / oversold conditions; this is the line whose crosses generate triangles.
- Slow WPR (period 55) — confirms intermediate momentum. A buy that is consistent with a Slow WPR turning up is more reliable than one that fights the Slow WPR.
- Turtle WPR (period 120) — the macro context oscillator. Combined with the Slow WPR, it defines whether the larger trend supports or opposes the buy.
All three are read on every confirmed bar close. The combination of values is what produces the signal differentiation in the next section: a Fast WPR cross alone is a weak signal; the same cross with the Slow and Turtle WPRs already trending in the same direction is a high-confidence continuation; the same cross with the Turtle WPR sitting in the opposing extreme is a counter-trend setup that the trend gate will block.
Introducing the Corex Smart Bear Bull Indicator
The Corex Smart Bear Bull Indicator implements the Fusion engine, the WPR triple stack, and a six-trigger re-entry layer with a 0-100 confidence score on every signal. It runs on MetaTrader 4 and MetaTrader 5 with bit-identical calculation logic between the two builds.
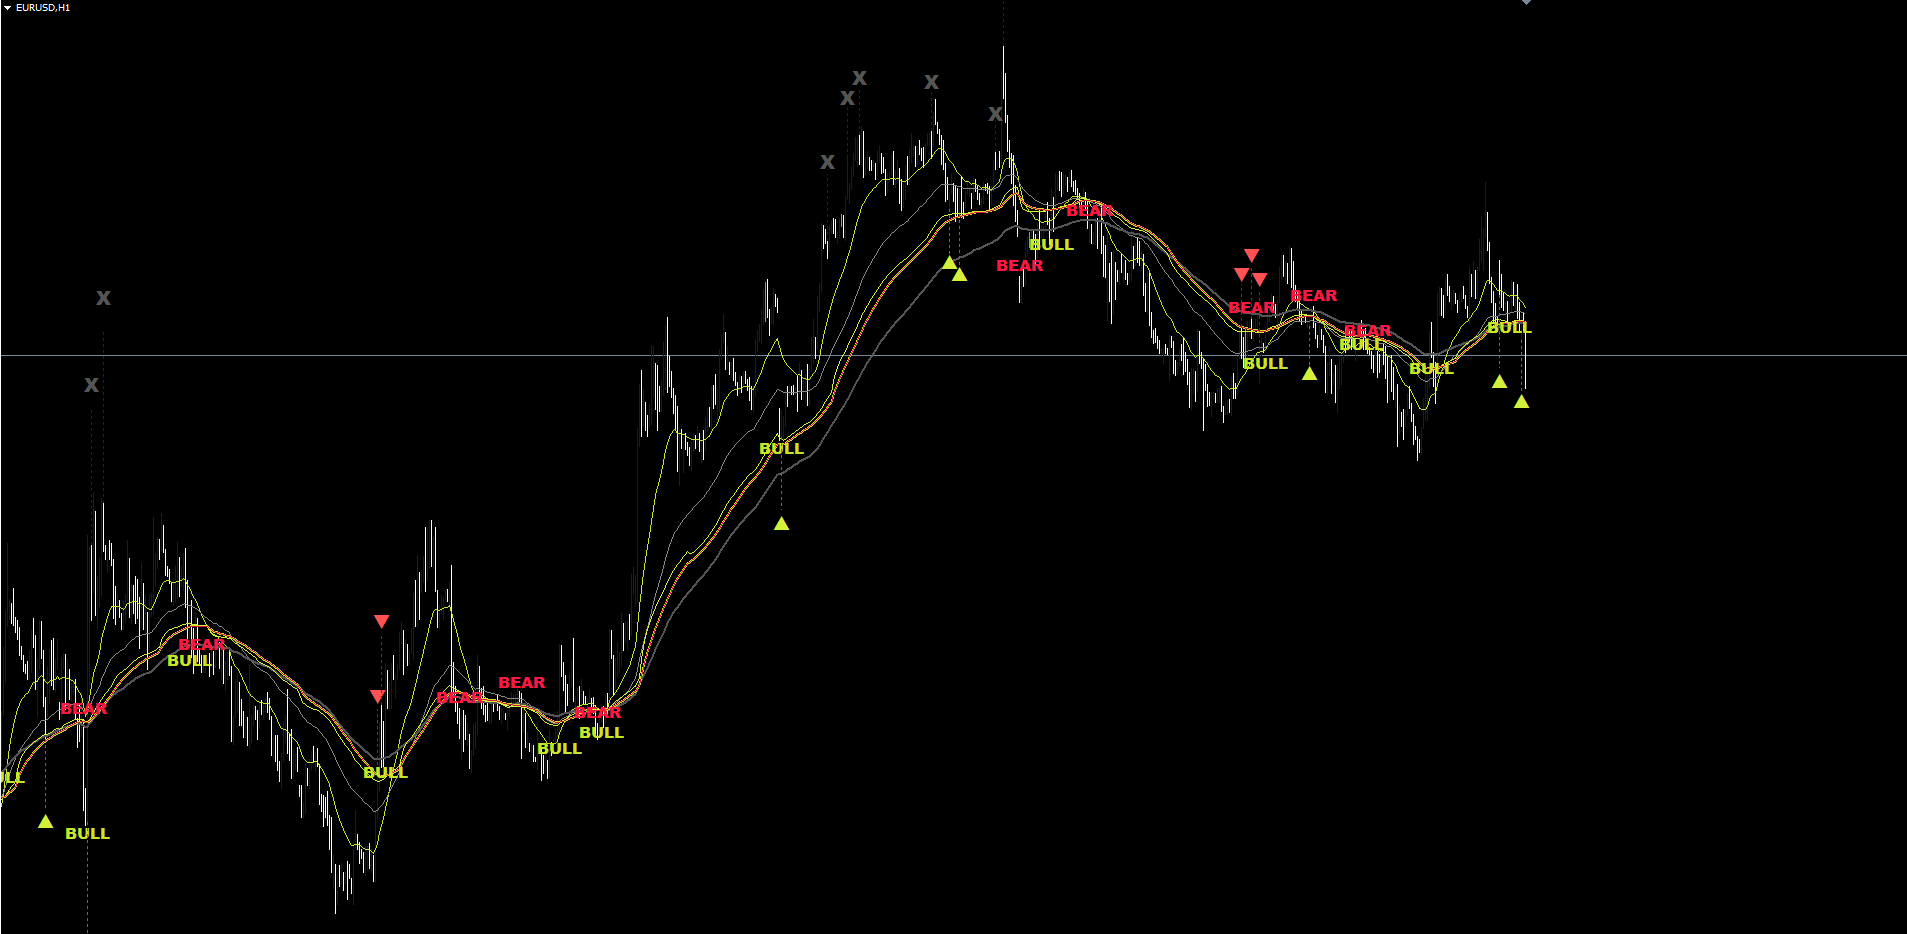
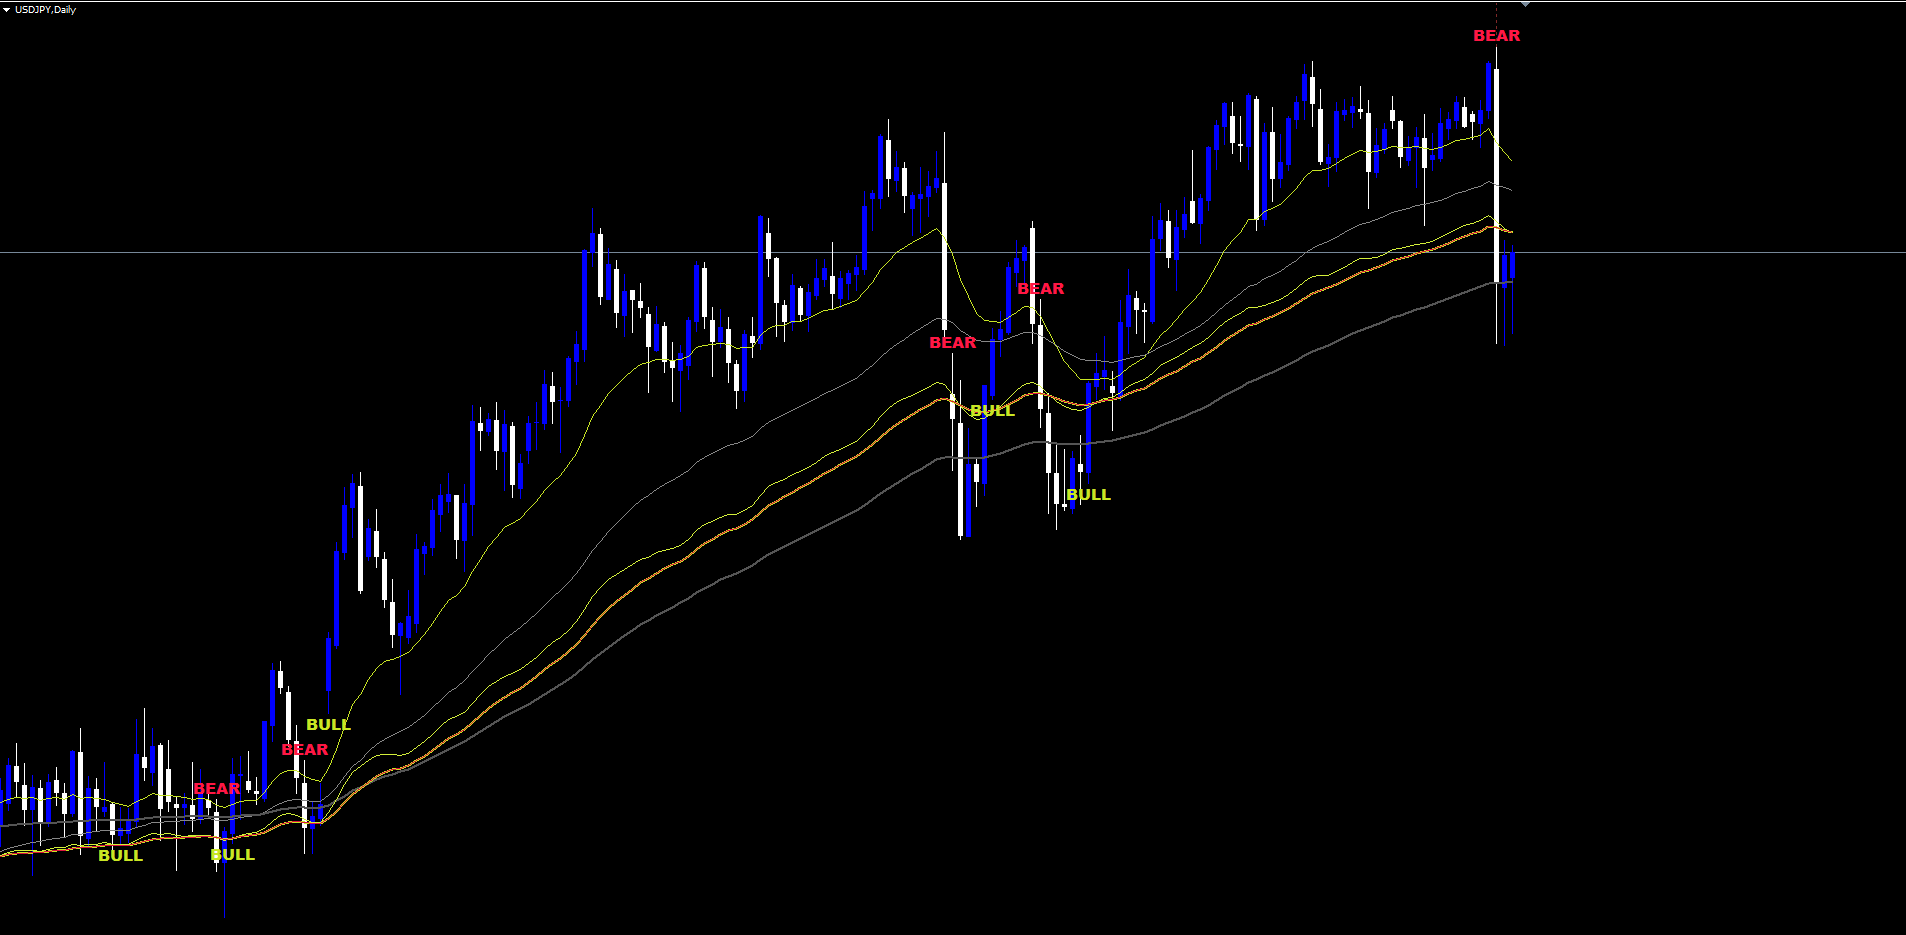
The chart visuals are intentionally compact:
- Three EMA lines at the user-configurable Fast (21) / Medium (55) / Slow (120) periods
- Two Fusion lines (Slow at width 2, Fast at width 1)
- One trend cloud filling the space between Fusion Fast and Fusion Slow
- BULL / BEAR text labels at trend-flip bars (cooldown-protected to avoid label spam)
- Re-entry triangles (▲ for long, ▼ for short) placed at ATR-offset distance from the bar's high or low
- Exit X marks (when the active trend gives up after an entry has been taken)
- Dotted connector lines from the bar's high or low to its corresponding triangle or X
That is the entire on-chart vocabulary. Six visual elements, all keyed to confirmed bar close, all idempotent across re-evaluations.
How Signals Fire
The signal layer is a small state machine that lives on top of the Fusion regime detection. The states and transitions are:
State Trigger Drawing ----- ------- ------- Neutral n/a (none) Bull BULL trend label fires "BULL" text below the bar → Re-entry Long Confidence-passing buy signal Up triangle below bar → Exit Long Confidence-passing sell signal X mark above bar Bear BEAR trend label fires "BEAR" text above the bar → Re-entry Short Confidence-passing sell signal Down triangle above bar → Exit Short Confidence-passing buy signal X mark below bar
A BULL label fires the bar after Close > Fusion Slow becomes true, the Fusion Slow slope is up, the previous bar was bearish or neutral, and the cooldown window (default 25 bars) has elapsed since the last BULL label. The BEAR label is the symmetric mirror.
Once a BULL label has been printed, the indicator is "in bull" and any confidence-passing buy signal produces a re-entry triangle. Once an entry triangle has been drawn, the indicator's "has-entry" flag is set; from that moment any confidence-passing sell signal produces an exit X mark — but only the X mark, not a re-entry. The bear-side state machine is symmetric.
The non-repainting guarantee is built into this state machine. Three rules together produce the guarantee:
- Closed-bar evaluation only. All sub-triggers, all confidence calculations, and all state mutations run only on bars with shift ≥ 1. The forming bar (shift 0) writes its line buffers but never fires a label.
- One-shot state mutations. State variables (current trend, has-entry flag, cooldown counter) update only when the bar's timestamp is strictly newer than the last processed timestamp. Re-evaluations of the same bar across ticks do not double-fire.
- Idempotent drawings. Every chart object name is keyed by the bar's timestamp. Re-drawing the same signal name on the same bar overwrites in place rather than producing a duplicate.
A signal that printed yesterday will be in the same place tomorrow. A signal printed three minutes ago on a closed M15 bar will be in the same place when you reopen the chart in three days. There is no "look-ahead", no two-bars-back revision, no repaint.
The Six Sub-Triggers
A re-entry triangle is drawn only when at least one of the six AlphaX Pro sub-triggers fires. Each sub-trigger encodes a different reading of the WPR triple stack.
Divergence Trigger. The indicator tracks the most recent two pivot lows (and pivot highs) detected with a 5-bar left / 5-bar right confirmation. A bullish divergence fires when the current pivot low is lower in price but higher in Fast WPR than the previous pivot low — a classic "lower low in price, higher low in momentum" pattern — and Fast WPR velocity is positive. The bearish divergence is the mirror.
Extreme Snap. The previous bar's Fast WPR was below -88 (deeply oversold) for a buy, or above -12 (deeply overbought) for a sell. The current bar crosses back through the threshold with positive Fast WPR velocity and at least one of Turtle WPR or Slow WPR not in the extreme bear position. The Snap is built for sharp reversal entries from over-extension.
Exhaustion. A milder version of the Snap. Previous bar's Fast WPR below -78 (or above -22), the macro stack reasonably balanced, velocity positive, and a fresh Fast WPR cross. Exhaustion catches the entries where the move has been "tired" for a few bars rather than violently snapped.
Continuation. Macro stack already aligned (Very-Strong or Strong uptrend / downtrend regime, with Slow or Turtle WPR slope confirmed) and a fresh Fast WPR cross. The Continuation trigger is for adding to a clearly established trend on the next pullback.
Pullback. Moderate uptrend (Slow WPR > -60) or moderate downtrend (Slow WPR < -40) with a Fast WPR cross and confirmed velocity. The Pullback is between Continuation (which requires a fully-aligned macro stack) and Snap (which requires extreme Fast WPR readings). It is the most common single trigger in a normal trending environment.
Triple. All three WPRs simultaneously oversold (or overbought) with a Fast WPR cross. The Triple is the rarest but most decisive signal — when it fires, it almost always coincides with a major reversal.
A signal can fire multiple sub-triggers at once. When two or more fire on the same bar, the confidence stacking bonus adds extra points (described in the next section).
Confidence Scoring 0-100
Every potential signal — buy or sell — is scored on a 0-100 scale. The score is the sum of additive factors minus the sum of subtractive factors, clamped to the [0, 100] range. Only signals that meet or exceed InpMinProConfidence (default 14.0) are accepted.
Additive factors (buy side; sell side is the mirror)
| Factor | Maximum | When it adds |
|---|---|---|
| Turtle WPR level | +25 | Turtle WPR > -35 (deep bull macro) |
| Fast WPR extreme | +20 | Fast WPR < -94 (deep oversold timing) |
| Best sub-trigger | +20 | Triple buy fired |
| Velocity quality | +15 | Fast WPR velocity in IDEAL range |
| Session quality | +10 | London-NY overlap session |
| Price / EMA alignment | +5 | Close above 200 EMA AND 50 EMA above 200 EMA |
| Stacking bonus | +15 | Three or more sub-triggers fire on the same bar |
Subtractive factors
| Factor | Maximum | When it subtracts |
|---|---|---|
| Velocity overshoot | -10 | Fast WPR velocity exceeds the EXTREME threshold |
| RSI overheat | -8 | 14-period RSI > 72 (buy) or < 28 (sell) |
| Off-hours session | -10 | Asian session for buys (or NY-close for both) |
| Low volume | -5 | Current bar volume below 70% of 20-bar average |
The full additive table includes graded levels — Turtle WPR adds +20 / +12 / +5 at progressively less extreme thresholds, Fast WPR adds +16 / +12 / +6 similarly — so the score smoothly rewards signals where multiple factors coincide and penalizes signals that are technically valid but arrive in low-quality conditions.
The default acceptance floor of 14.0 is intentionally permissive on the high-frequency end. Conservative traders should raise it to 30 or higher to filter out the marginal entries; aggressive setups can lower it to 8 or 10. The floor interacts with the trend gate and recovery mode (next section), so adjusting all three together gives the most useful flexibility.

Trend Alignment Gate and Recovery Mode
Even with the confidence floor in place, signals can still appear during strong opposing macro trends. A buy signal during a clean downtrend is mathematically valid but practically risky. The trend alignment gate is the indicator's protection layer for exactly this case.
Strong-Trend Detection. The gate checks whether both the Turtle WPR and the Slow WPR sit on the same side of two configurable thresholds. By default, a strong uptrend is detected when Turtle WPR > -35 and Slow WPR > -40; a strong downtrend when Turtle WPR < -65 and Slow WPR < -60.
Counter-Trend Block. When a strong opposing trend is detected, the gate blocks the signal. A buy signal during a strong downtrend produces no triangle; a sell during a strong uptrend produces no triangle. This is the primary counter-trend protection.
Recovery Mode. The gate is not infinitely strict. The user can enable Recovery Mode ( InpEnableProRecoveryReq = true , default) which adds a bypass: if the Fast WPR has bounced at least InpProRecoveryMinMove (default 6 points) within the last InpProRecoveryBars (default 3) bars and the bounce came from a deep enough extreme (-80 oversold for buy bounce, -20 overbought for sell bounce), the gate allows the signal through. The intuition is that real reversals show up as sharp WPR moves before they show up as price moves; if the WPR is already reversing, the buy can be allowed even though the macro trend is still down on paper.
Strict Mode. A separate toggle ( InpProTrendGateStrict = true , default) tightens the strong-trend thresholds by 5 points on each side. With strict mode on, the gate triggers earlier and blocks more signals. With strict mode off, the gate triggers only at deeper extremes.
The interaction between the confidence floor, the trend gate, and the recovery requirement is the main tuning surface for the indicator. Three useful presets:
- Conservative. InpMinProConfidence = 35 , gate ON, strict ON, recovery OFF. Few but very high-quality signals.
- Standard. Defaults as shipped ( 14 , gate ON, strict ON, recovery ON). Balanced.
- Aggressive. InpMinProConfidence = 8 , gate ON, strict OFF, recovery ON. More signals, more noise.
The Six-Channel Alert Package
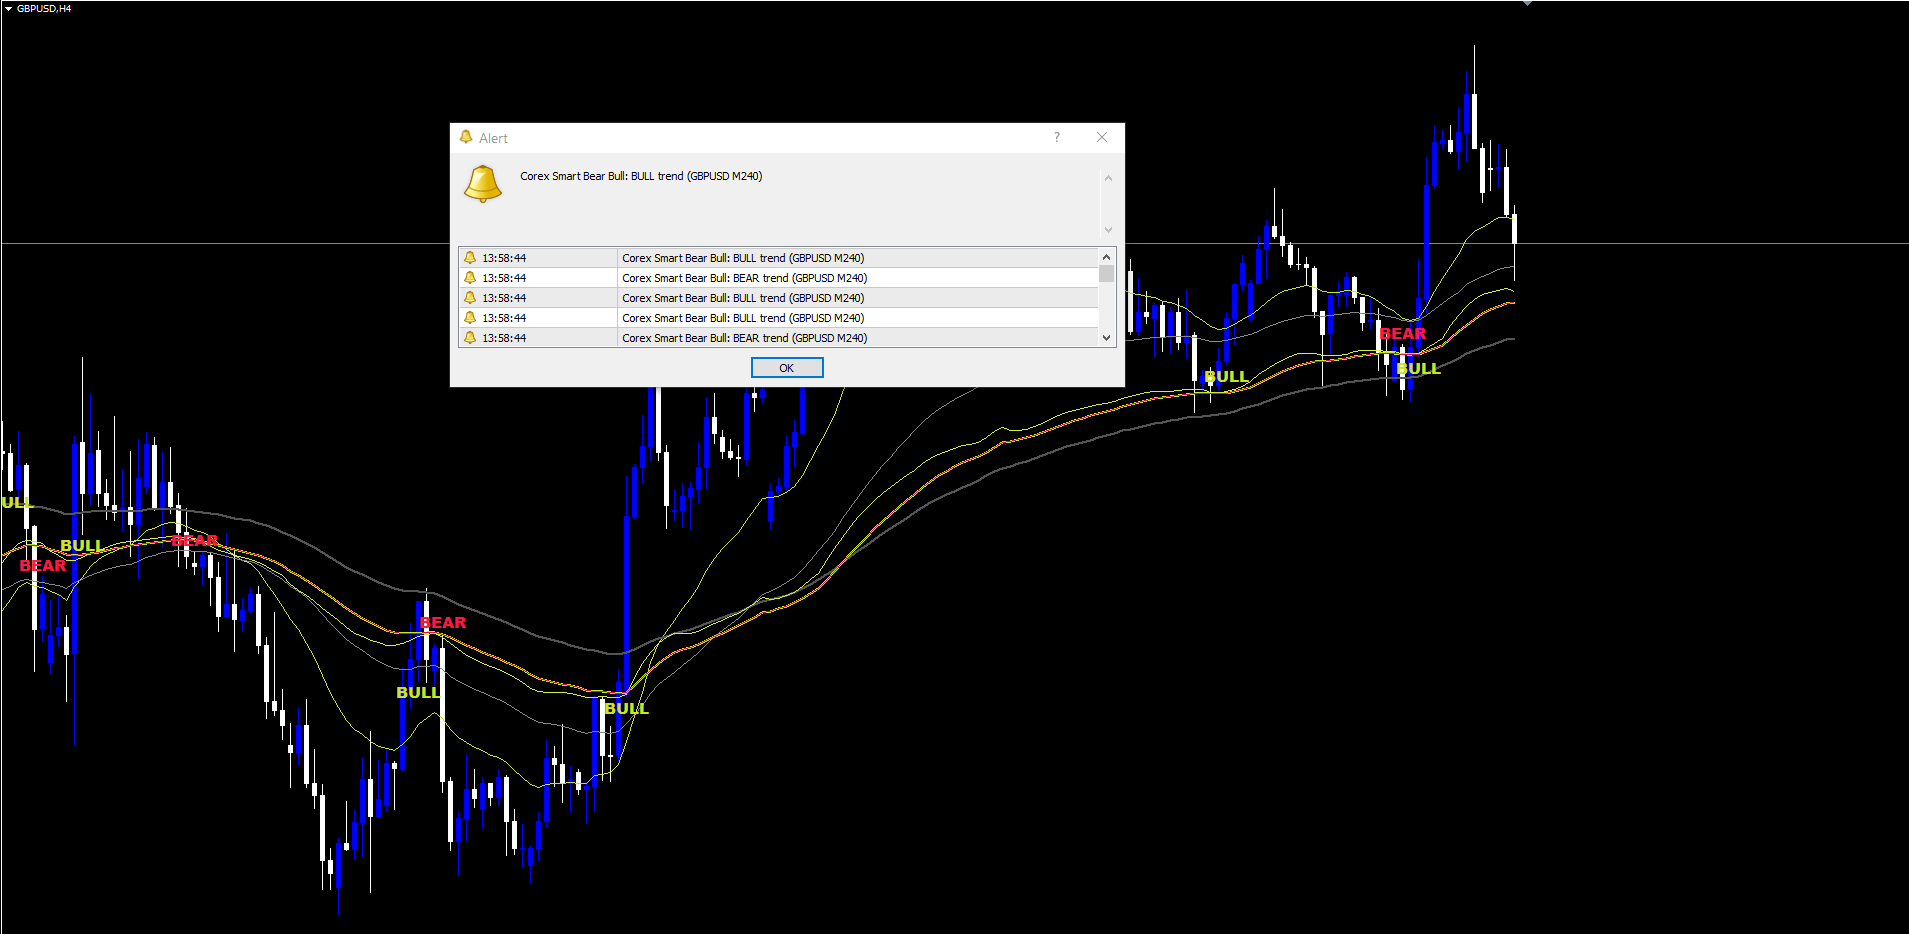
Three event types and four delivery channels combine into a 12-channel alert matrix. The events are:
- InpAlertOnTrendChange — fires on each BULL or BEAR trend label
- InpAlertOnEntry — fires on each re-entry triangle
- InpAlertOnExit — fires on each exit X mark
The delivery channels are:
- InpAlertPopup — popup dialog inside MetaTrader (default ON)
- InpAlertPush — mobile push to the MT4 / MT5 app via your MetaQuotes ID
- InpAlertEmail — email delivery via the platform's SMTP configuration
- InpAlertSound — local sound file (default alert.wav )
Every alert is fired exactly once, on the bar's first confirmed close. The message format is:
Corex Smart Bear Bull: {EVENT} ({SYMBOL} M{PERIOD})
Examples:
- Corex Smart Bear Bull: BULL trend (EURUSD M30)
- Corex Smart Bear Bull: Re-entry LONG (XAUUSD M15)
- Corex Smart Bear Bull: EXIT short (GBPUSD M60)
The format is identical on MT4 and MT5, which makes filtering / parsing on the receiving side straightforward.
Practical Trading Workflow
The intended day-to-day workflow with the indicator is short.
- Drop the indicator on the chart. Defaults are tuned for H1-H4 forex, but they work on any timeframe. The first BULL or BEAR label appears as soon as enough history is loaded (at least 250 bars).
- Wait for a trend label. The chart is in a "no opinion" state until BULL or BEAR fires. Until then, no triangles can appear by construction — the state machine has not entered a trend.
- Wait for a triangle. When the first re-entry triangle fires inside the active trend, the engine is signaling that one or more sub-triggers have aligned and the confidence is above your floor. The triangle marks the entry bar.
- Manage with the cloud. As long as the cloud color matches the trend label's direction, the trend is intact. A pinching or flipping cloud is the early warning that the regime is rolling over.
- Close on X or trend flip. Either the indicator prints an exit X (a confidence-passing opposite signal arrived inside the same trend) or it prints the opposite trend label (BULL → BEAR or BEAR → BULL). Either is a valid exit; X is "the move appears to be over within the trend"; opposite label is "the trend itself has reversed".
Across timeframes, only InpMinProConfidence typically needs adjustment. Lower timeframes (M5, M15) benefit from a higher floor (25-40) to filter the noise; higher timeframes (H4, D1) work well at the default 14 because the underlying signal-to-noise is already higher.
Parameter Reference
Defaults below match the source .mq5 declarations exactly; the validator will check them.
Fusion System
| Input | Default | Range | Description |
|---|---|---|---|
| InpFusionLength | 122 | 7-200 | Fusion blend length |
| InpSens1 | 12 | 3-20 | Fusion Slow sensitivity |
| InpSens2 | 5 | 2-15 | Fusion Fast sensitivity |
| InpShowCloud | true | bool | Show the trend cloud |
EMA Settings
| Input | Default | Range | Description |
|---|---|---|---|
| InpShowEmaFast | true | bool | Toggle Fast EMA |
| InpShowEmaMedium | true | bool | Toggle Medium EMA |
| InpShowEmaSlow | true | bool | Toggle Slow EMA |
| InpEmaFastLength | 21 | 1-500 | Fast EMA length |
| InpEmaMediumLength | 55 | 1-500 | Medium EMA length |
| InpEmaSlowLength | 120 | 1-500 | Slow EMA length |
AlphaX Pro Settings
| Input | Default | Range | Description |
|---|---|---|---|
| InpFastWPRPeriod | 21 | 3-24 | Fast Williams %R period |
| InpSlowWPRPeriod | 55 | 15-60 | Slow Williams %R period |
| InpTurtleWPRPeriod | 120 | 100-500 | Turtle Williams %R period |
| InpOversoldLevel | -90 | -99 to -70 | Fast WPR oversold cross threshold |
| InpOverboughtLevel | -10 | -30 to -1 | Fast WPR overbought cross threshold |
| InpProTrendLookback | 20 | 10-50 | WPR slope window |
| InpMinProConfidence | 14.0 | 0-100 | Acceptance floor |
| InpEnableProTrendGate | true | bool | Counter-trend gate |
| InpProTrendGateStrict | true | bool | Tighten gate by 5 points |
| InpProUptrendTurtleLvl | -35.0 | — | Uptrend Turtle WPR floor |
| InpProUptrendSlowLvl | -40.0 | — | Uptrend Slow WPR floor |
| InpProDowntrendTurtleLvl | -65.0 | — | Downtrend Turtle WPR ceiling |
| InpProDowntrendSlowLvl | -60.0 | — | Downtrend Slow WPR ceiling |
| InpEnableProRecoveryReq | true | bool | Require WPR recovery |
| InpProRecoveryBars | 3 | 2-10 | Recovery lookback |
| InpProRecoveryMinMove | 6.0 | 2-20 | Minimum recovery move |
Filters, Date Window, and Display
| Input | Default | Range | Description |
|---|---|---|---|
| InpTrendCooldown | 25 | 1-200 | Bars between BULL / BEAR labels |
| InpSignalAtrOffset | 2.4 | 0-10 | Triangle / X ATR offset |
| InpSignalLabelSize | SMALL | enum | TINY / SMALL / NORMAL |
| InpEnableDateFilter | false | bool | Restrict signals to a date range |
| InpStartDate | 2026-03-20 00:00 | datetime | Date window start (UTC) |
| InpEndDate | 2026-03-21 23:59 | datetime | Date window end (UTC) |
Theme and Alerts
| Input | Default | Description |
|---|---|---|
| InpBullPrimary / InpBullBright / InpBullDim | C'200,230,36' / C'212,240,58' / C'154,184,28' | Bull palette |
| InpBearPrimary / InpBearBright / InpBearDim | C'255,23,68' / C'255,82,82' / C'213,0,50' | Bear palette |
| InpNeutralColor | C'85,85,85' | Exit X color |
| InpEmaFastColor / InpEmaMedColor / InpEmaSlowColor | C'200,230,36' / C'136,136,136' / C'85,85,85' | EMA line colors |
| InpAlertOnTrendChange / InpAlertOnEntry / InpAlertOnExit | true / true / true | Event toggles |
| InpAlertPopup / InpAlertPush / InpAlertEmail / InpAlertSound | true / false / false / false | Delivery channels |
| InpAlertSoundFile | "alert.wav" | Sound file |
Conclusion
Most trend-following indicators are tuned around one decision: where the moving average sits relative to price. That single decision works in clean trends and breaks in everything else. Corex Smart Bear Bull replaces the single decision with a layered pipeline — a five-component Fusion blend that tames lag, a triple Williams %R stack that times re-entries, a six-trigger sub-system that captures different setup types, a 0-100 confidence score that filters at the source, and a counter-trend gate that protects against the structural failure mode of trend-following.
The non-repainting guarantee is what ties the layers together. Without it, even a perfect signal pipeline produces a chart that lies. With it, every label, triangle, and X mark on the chart was true at the moment the bar closed, and remains true forever after. The indicator is therefore directly tradable from the chart: there is no "wait for the signal to confirm" because the signal is the confirmation.
The MT4 and MT5 builds are bit-identical in calculation logic and visually identical in output. Both compile clean under their respective MetaEditor versions, both pass the mql5.com Market input-validation check, and both are non-repainting by construction. The full live demo, parameter reference, and the 12-channel alert package are accessible from the Market listing:
Download the indicator:
- MetaTrader 5: Corex Smart Bear Bull Indicator MT5
- MetaTrader 4: Corex Smart Bear Bull Indicator MT4
CONTACT & SUPPORT
- Email: info@forexobroker.com
- Questions: Use the Comments section on the product page or send a private message
- Bug Reports: Please include your broker name, account type, and a screenshot
-
✅ All MQL Tools: https://www.mql5.com/en/users/forexobroker/ ✅
--------------------------------------------------------------------------------------------------------------
🏦 **Broker I use**: https://icmarkets.com/?camp=55869
🏦 **Broker For EU Traders I use 1**: https://www.ictrading.com?camp=91414
🏦 **Broker I use 2**: https://one.exnessonelink.com/boarding/sign-up/a/c_thuv62ocfq
💻 **VPS**: https://chocoping.com/processing/aff.php?aff=738
💼 **Companies I use for getting funded**:
Fundednext: https://fundednext.com/?fpr=kestutis39
The5ers: https://www.the5ers.com/?afmc=16kl
FTMO: https://trader.ftmo.com/?affiliates=nRAyOhmFRnEnFdOpdLeh
Risk Disclaimer
Trading foreign exchange and CFDs on margin carries a high level of risk and may not be suitable for all investors. You may sustain a loss exceeding your initial investment. Trend Quorum is a technical analysis tool and does not guarantee profitable trades. Past performance is not indicative of future results. The authors accept no liability for any loss arising from use of the indicator. By using Trend Quorum you acknowledge sole responsibility for your trading decisions.


