

Purchase MT4 Version
Purchase MT5 Version
Download Demo Version
How to install or update the product
All Instructional Videos of the product
Trade Dashboard: Introduction
Trade dashboard is a manual trade manager to ease things for manual traders, it automates some of trading aspects, such as lot size calculation, partial closing of a trade, breakeven, trail stop loss and pending orders, you can set timer for different trade tasks such as close all, or open a specific trade at a certain time, you can place your orders visually with the help of trade line tool on the chart,Also you can manage your basket of orders, check economic calendar on the chart, check forex trade sessions and lots of other features.
Some of key Features:
Trade Tab >>
- Auto lot size calculation based on Risk % or Risk $.
- Fixed lot size.
- Buy line and Sell line button to show trade tool on the chart and take trades visually.
- Set risk to reward ratio.
- Keep risk to reward ratio feature.
- Showing entry price and entry distance from market price.
- Setting SL/TP based on “Point” or “Price”
- Showing actual Risk, Reward and RR based on trade lot size.
- Showing trade commission and required margin.
- Closing tab, Pending Order tab and Hedge tab.
Options tab >>
- Setting multiple partial close levels.
- Partial close price based on Point, RR and TP%.
- Partial close lot based on Initial lot size, current lot size or fixed lot size.
- Automatic breakeven option.
- Option to cover commission fee at automatic breakeven.
- 8 trail stop options. (Regular, RR-Based, Candle HH/LL, Profit, Moving Average, Parabolic SAR, ATR, Fractals)
- Trail pending order price.
Basket Tab>>
- Showing Basket of active positions under control of EA with the ability to modify each one.
- Showing Basket of pending orders under control of EA with the ability to modify each one.
- Showing breakeven of buy trades on the chart.
- Showing breakeven of sell trades on the chart.
- Visually set a unified SL/TP for all buy trades based on Point or monetary amount.
- Visually set a unified SL/TP for all sell trades based on Point or monetary amount.
- Set a monetary take profit amount for the whole basket.
- Set a monetary stop loss amount for the whole basket.
- Set a max limit for equity to close all trades.
- Set a min limit for equity to close all trade.
- Categorize all open positions and orders.
- Ability to close or delete positions and orders based on their category.
Info Tab>>
- Show the report of trades based on symbol and magic number.
- Ability to take Excel output.
- Show current chart symbol properties.
- Show account properties.
Alarm Tab>>
- Set alarm for different price action like breaking a line on the chart or reaching to a certain time.
- Set iteration and interval for the alarm.
Market Session>>
- Show different market sessions (Tokyo, Sydney, London, New York)
- Ability to choose time zone.
- Ability to see start and end of each session on the chart.
Task Scheduler>>
- Set timer to perform trading tasks like “Close All”, “Close Profit”, “Buy”, “Sell Limit”, “Screenshot” etc.,
- Ability to set daily repeat for the task.
- Ability to change properties of schedule task such as time, SL/TP, Entry etc., after setting the task.
- Ability to save the schedule list.
- Showing Economic news of the current week.
- Ability to set time zone.
- Ability to set filter news based on Impact and currency.
- Ability to view the candle corresponding to the timing of incoming news.
- Ability to set “Close All” task before or after news.
- Ability to get notification before or after news.
Settings Tab>> General
- Ability to set measure mode as “Point”, “Pip”, “Point*100”,” Point*1000”,” Point*10000”.
- Ability to take multiple orders with one click.
- Ability to Split lot size of an order.
- Ability to take multiple trades if trade lot size is bigger than broker max lot size.
- Set different dashboard theme colors.
Settings Tab>> Trade
- Ability to set max allowed risk.
- Ability to set max spread and slippage.
- Ability to add a multiplier of spread to the trade.
- Ability to add commission and spread fee to the trade lot size calculation,
- Virtual SL and TP.
- Virtual Pending order.
- OCO option.
Settings Tab>> Auto SL/TP
- Ability to set automatic SL based on ATR or Candles higher high and lower low.
- Ability to set automatic TP based on ATR or Candles higher high and lower low.
Settings Tab>> Basket
- Ability to manage manual orders or other EA trades.
- Ability to set virtual SL/TP for whole basket.
- Ability to manage whole symbols from one chart.
Settings Tab>> Over Trade
- Ability to stop trades after a defined number of trades within a month/week/day/hour and minute.
- Ability to stop trades after an amount of daily loss.
- Ability to stop trades after an amount of daily profit.
- Ability to stop trades after a number of active trades.
Settings Tab>> Notification
- Give notification for different trading tasks such as open, close, hit SL, hit TP etc.
- Set different notification method such as play sound, screen notify, phone message or email.
- Take screenshot for different trading tasks.
Settings Tab>> Hotkey
- Set hotkeys for different actions.
- Combine Shift key to hotkey.
Also user can save settings as default or normal save or can save settings as a template.
Header Part:
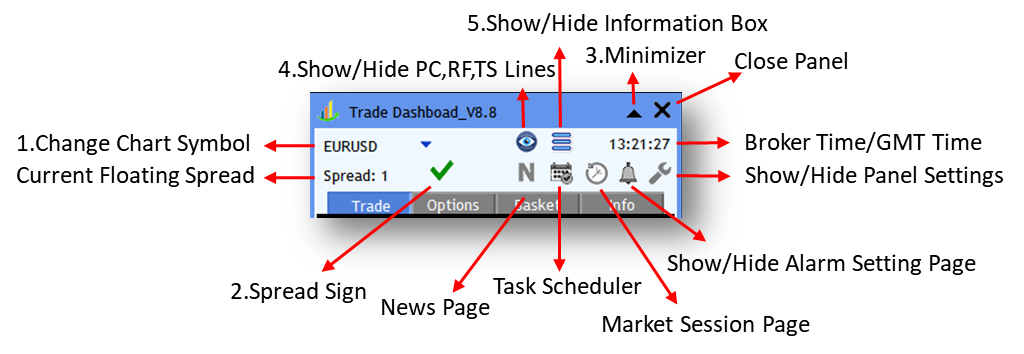
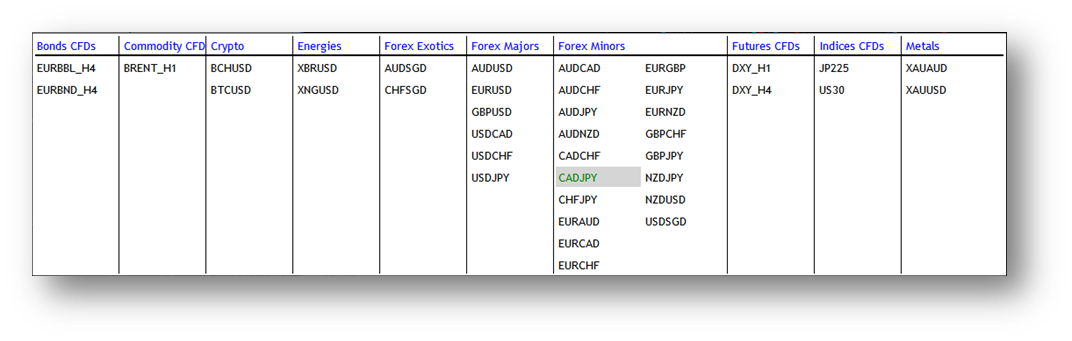
1. When you press on it you can see a table showing all symbols of your market watch categorized based on their section. By clicking any of the symbols your current chart has been changed to it.
2. Spread sign, if symbol spread is bigger than what is specified in Settings>Trade “Max Allowed spread”, then it shows a red cross sign, and if the spread is below that, it shows a green tick sign indicating that the spread of the symbol is not too high.
3. It minimizes the panel giving you more space on the chart.

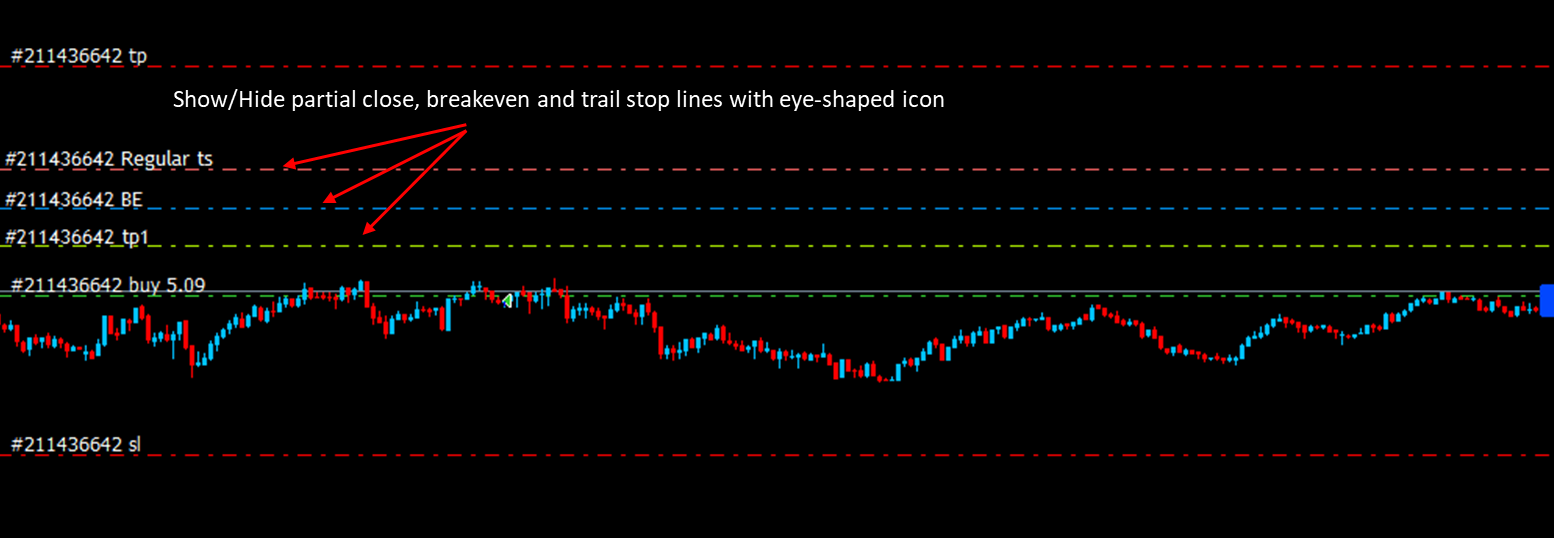
4. If you use partial close, breakeven or trail stop options, some dotted lines corresponding to each option are shown on the chart, by this eye-shaped icon you can hide or show those lines.
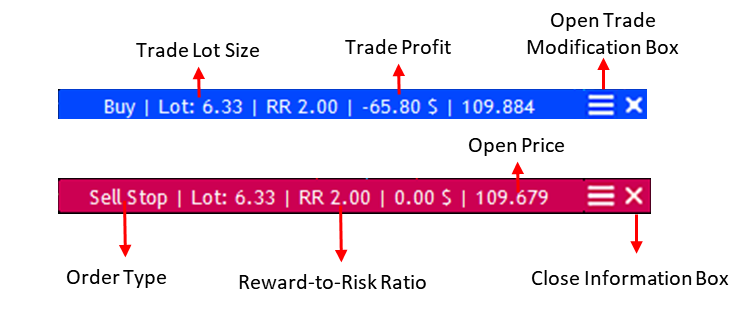
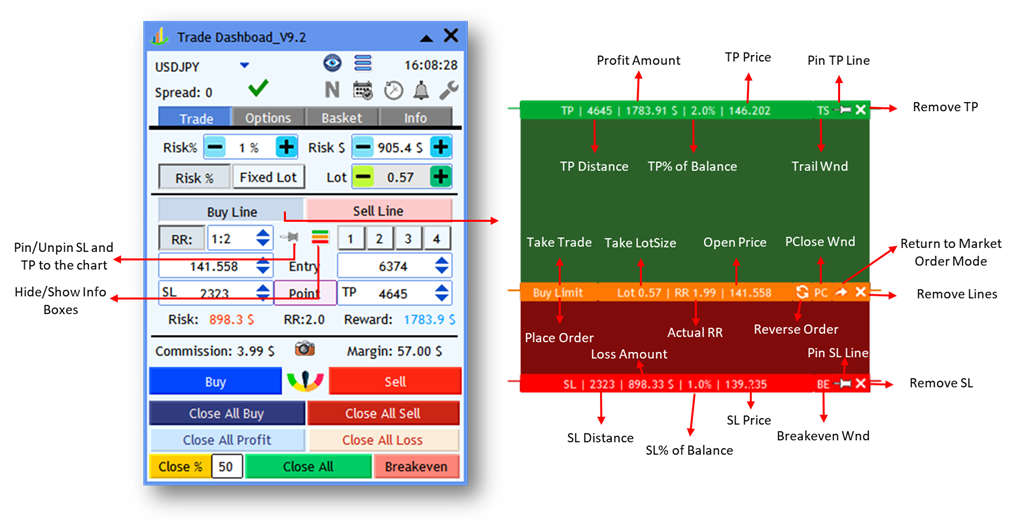
Small Modification Panel>SL/TP Tab
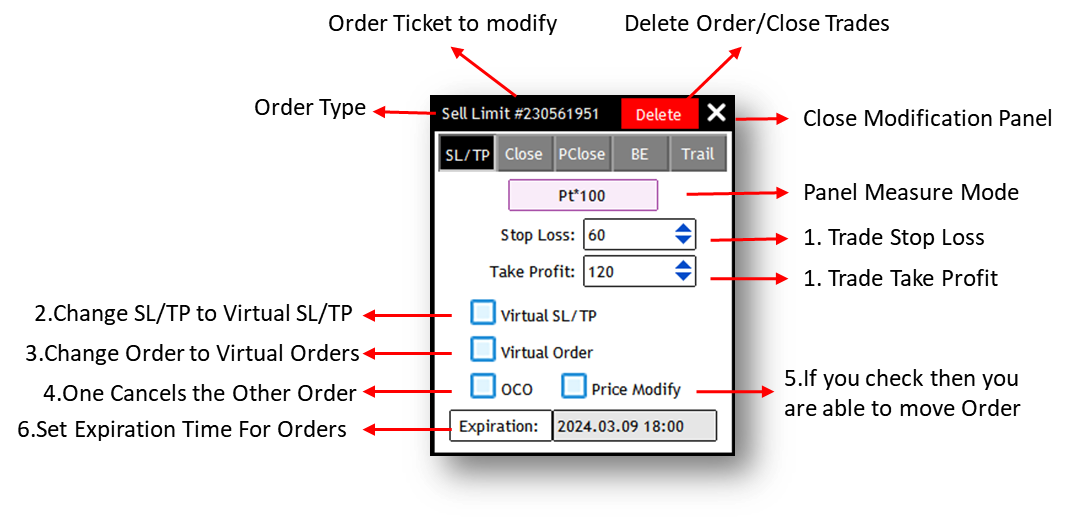
- You can change the SL and TP of the specific trade, the trade ticket number is written on the header, alternatively you can move the SL or TP information bar to change the SL or TP.
- If you press the Virtual SL/TP, then SL/TP will be hidden from you broker.
- If you press on Virtual Order, then your order will be hidden from you broker and EA is responsible to activate it if market price hits order open price.
- If you press OCO for this order, then when it gets activated, other orders will be deleted.
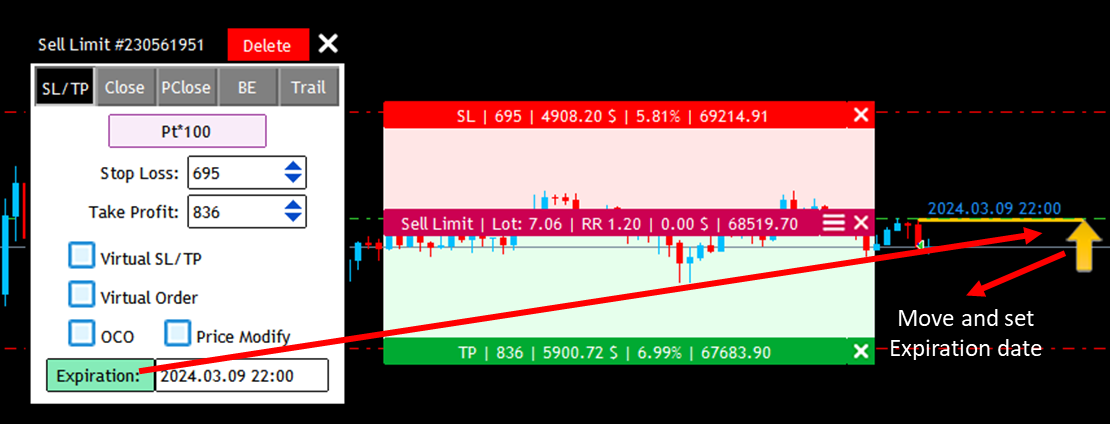
- By pressing “Price Modify” you can move order on the chart visually and set it on another price.
- If you press on Expiration button, then a yellow arrow will present on the chart and you can visually move it to set the expiration time of the order.
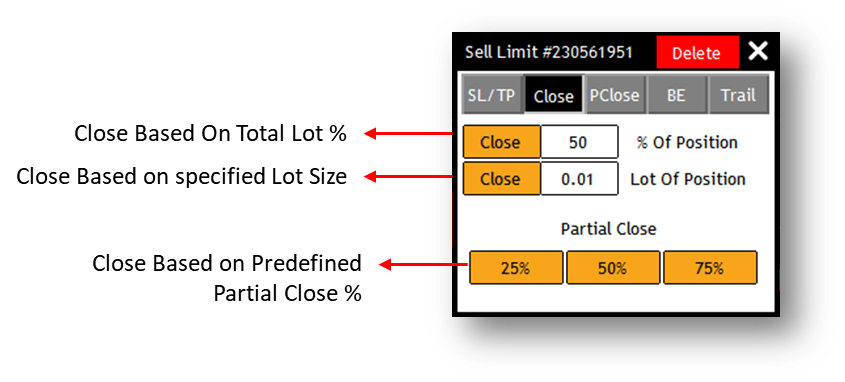
Small Modification Panel>Close Tab
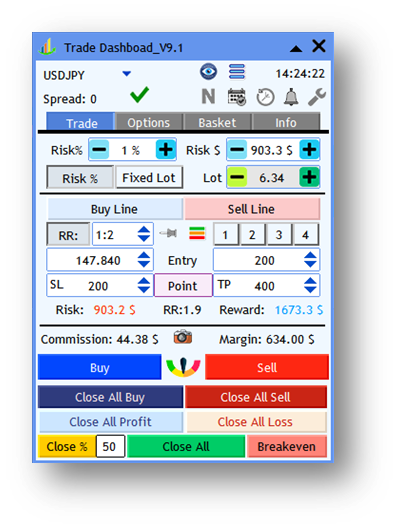
Trade Tab:
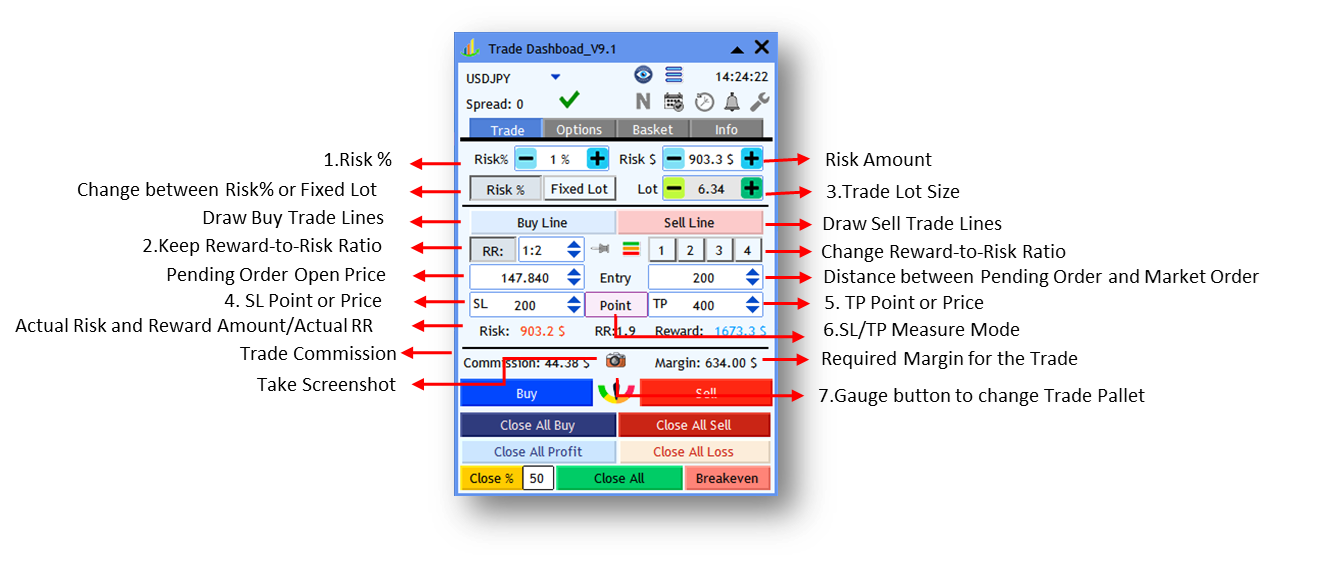
- Risk%: when you set Risk%, Risk $ and Lot size will be adjusted automatically. Also, if you change Risk$, Risk% and Lot size will be adjusted and if you change Lot then Risk% and Risk$ are adjusted automatically.
- Keep Reward-to-Risk Ratio: if you press it, TP size will be adjusted as you change SL size.
- Trade Lot Size: it can be automatically obtained based on Risk% and stop loss if “Risk %” button is pressed, however if “Fixed Lot” is pressed then use needs to manually set lot size.
- SL Point or Price: It shows SL Point if purple button is set to “Point” and shows SL actual price if purple button is set to “Price”.
- TP Point or Price: It shows TP Point if purple button is set to “Point” and shows TP actual price if purple button is set to “Price”.
- SL/TP Measure Mode: It change the mode of SL/TP boxes from showing points distance to price and vice versa.
-
Gauge button to change Trade Pallet: it changes trade pallet to Hedge and Pending order pallets. If you click on the left side of the gauge, it changes between Hedge and Close pallet. If you click on the right side of the gauge then it changes between close and pending order pallet
Close Pallet:

Pending Order Pallet:

Hedge Pallet:

- Hedge All Trades: It takes an opposite trade of all existing trades without SL and TP to hedge existing net positions.
- Close By All Trades: it Closes buy trades with the sell trades, when uses this button, it takes only commission from one side of the trade and cut off commission fee.
- Take a Reverse Trade: it takes a double opposite position of net existing positions.
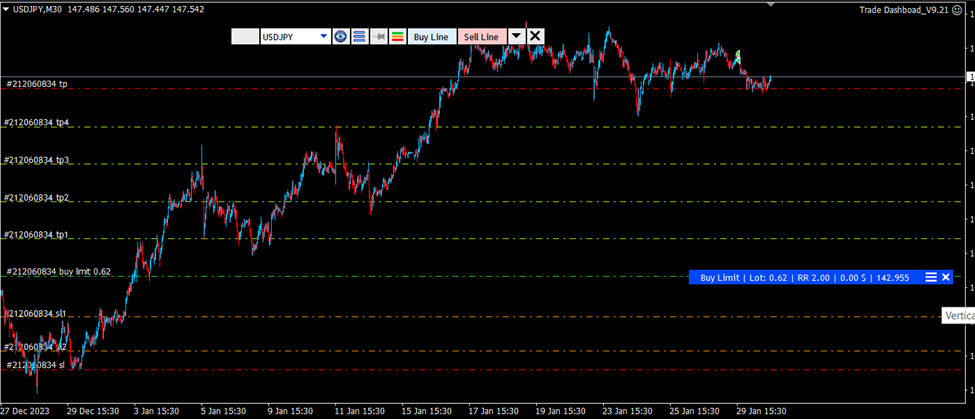
Trade Lines
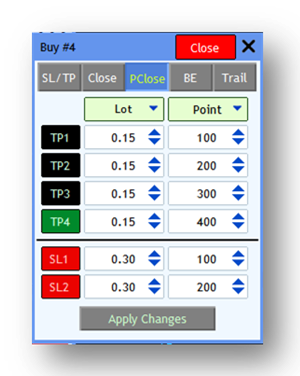
Options tab> Partial Close

1. Partial Close Lot Measure: Suppose the initial lot is 1 lot.
- %Initial Lot: if user chooses this method, it assigns each partial close lot based on initial trade lot size, give the above example, it sets 20% of 1 lot which is 0.2 lot for each level.
- %Current lot: if user chooses this method, it assigns each partial close lot based on current trade lot size, give the above example, it sets 20% of 1 lot which is 0.2 lot for first level. For the second level it sets 20% of 0.8 lot which is 0.16 lot for the second level and the same way for the rest.
- Lot: if this mode, user needs to give fixed lot size of closure for each level.
2. Partial Close Distance Measure:
- Point: User needs to set the point distance of partial close levels from open price.
- RR: In this mode, the distance is calculated based on SL size, if SL is 200 points as an example, and user sets 0.5 for the first partial close level, then the partial close distance is 200*0.5=100 points. If user changes SL size, then partial close distance will be automatically adjusted.
- TP%: In this mode, the distance is calculated based on TP size, if TP is 400 points as an example, and user sets 50% for the first partial close level, then the partial close distance is 400*50%=200 points. If user changes TP size, then partial close distance will be automatically adjusted.
- Price: You can directly set partial close price.
3. Apply to All: pressing this button, applies partial close settings to all trades under control of Trade Dashboard.
4. Apply to Chart Symbol Trades: pressing this button, applies partial close settings only to trades of underlying chart symbol.
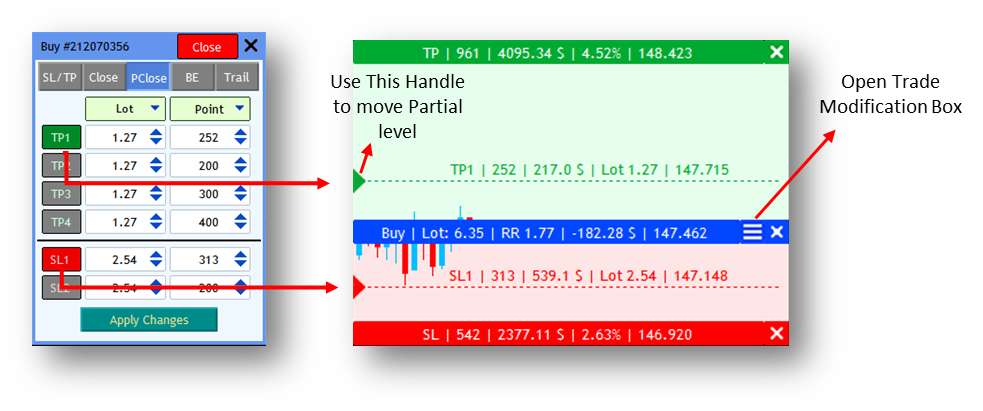
If user, turn on any partial levels and he opens trade lines, a line corresponding to that partial close level is shown on the chart allowing user to move and set partial close levels visually.
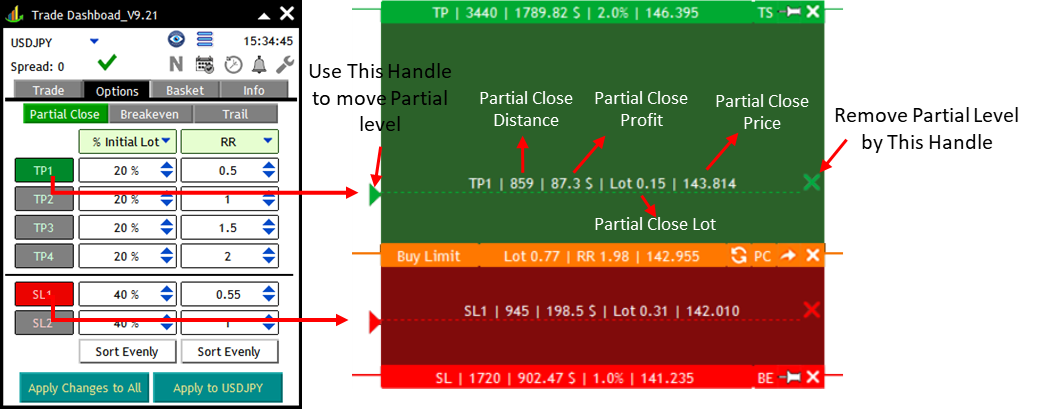
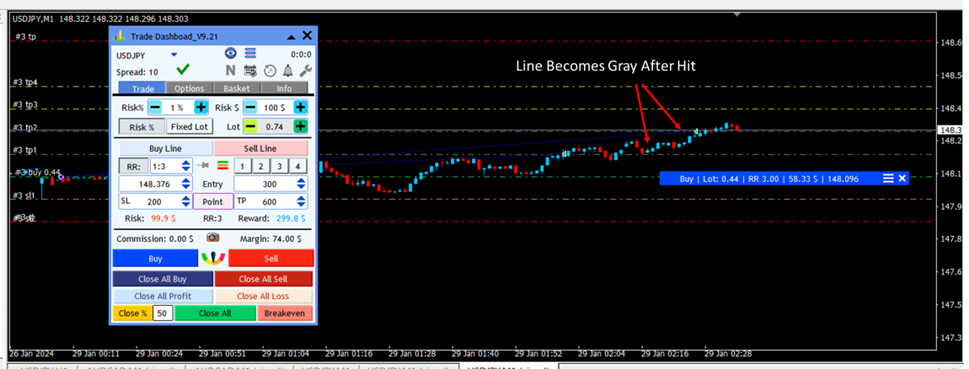
When a trade is taken, partial close levels are shown on the chart with green dotted line. User can hide these lines with eye-shaped button on the top part of Trade Dashboard.
When a level of partial close is hit, the green dotted line corresponding to that level becomes gray indicating that this level is hit already.
If you want to modify your partial close setting after taking a trade, you can press on the menu button of the information box related to that trade, a small modification box is open allowing you to modify your partial close settings.
If a level of partial is already hit, its corresponding button in the modification panel will be shown in Black color.
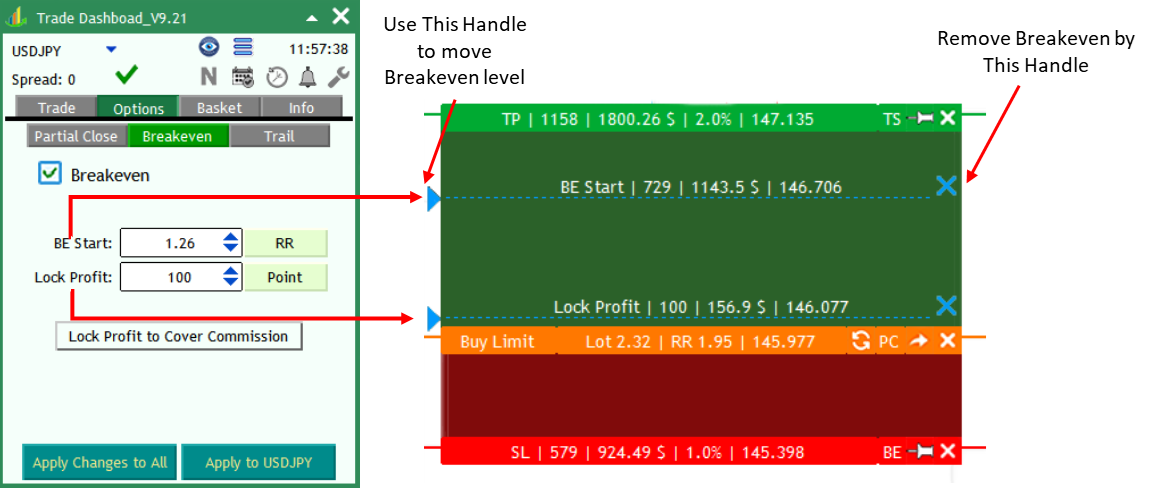
Options Tab> Breakeven
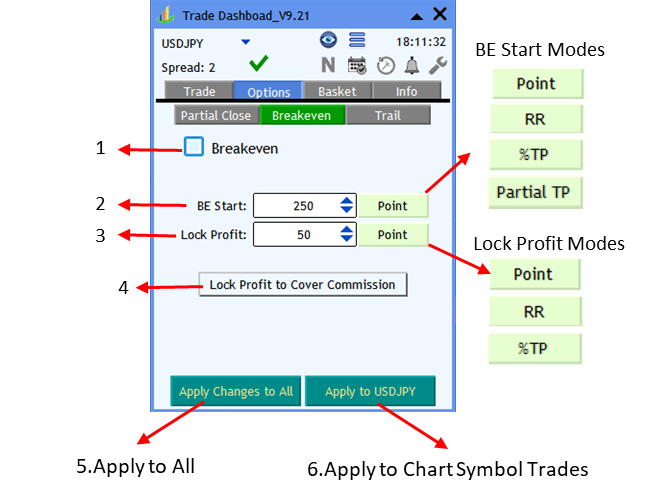
Breakeven option, moves your stop loss and put it somewhere after your entry price, ensuring your trade will be closed in profit if market price goes against your trade.
1. Activate Breakeven option.
2. BE Start: Is shows how much a trade needs to go to profit for the breakeven option to move the stop loss.
- Point: You can set BE Start distance based on Point size.
- RR: You can set BE Start distance based on SL Size, make sure your SL is not zero for this option to work correctly, if you set RR and you change SL, the BE Start will automatically change based on your SL size.
- TP%: You can set BE Start distance based on TP Size, make sure your TP is not zero for this option to work correctly, if you set TP% and you change TP, the BE Start will automatically change based on your TP size.
- Partial TP: Using this option you can set BE start equal to your Partial TP levels. If you set it, when you change corresponding partial level, BE Start will automatically change.
3. Lock Profit: It shows where to set new stop loss after BE start hits. Another word, it shows how much profit should be secured. Take notice that Lock Profit is logically less than BE Start level.
- Point: You can set Lock Profit distance based on Point size.
- RR: You can set Lock Profit distance based on SL Size, make sure your SL is not zero for this option to work correctly, if you set RR and you change SL, the Lock Profit will automatically change based on your SL size.
- TP%: You can set Lock Profit distance based on TP Size, make sure your TP is not zero for this option to work correctly, if you set TP% and you change TP, the Lock Profit will automatically change based on your TP size.
4. Lock Profit to Cover Commission: if you press this button, then Lock Profit size is automatically obtained based in a way to cover commission fee, that means if price turn back and hit your new stop loss, the result profit will only cancel commission fee.
5. Apply to All: pressing this button, applies breakeven settings to all trades under control of Trade Dashboard.
6. Apply to Chart Symbol Trades: pressing this button, applies breakeven settings only to trades of underlying chart symbol.
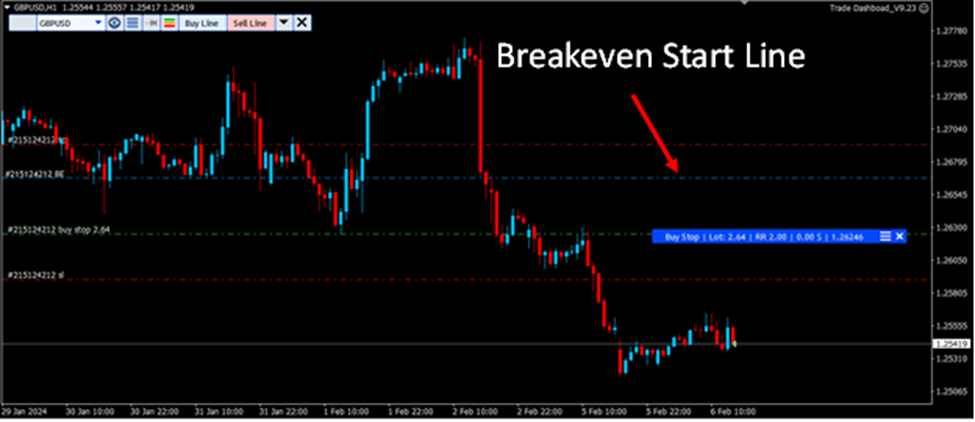
If user, turn on breakeven option while trade lines are open, a line corresponding to BE Start level is shown on the chart allowing user to move and set BE Start levels visually.
When user takes a trade, BE Start level is shown by a blue dotted line, user can show and hide this line with the help of eye-shaped button on top of Trade Dashboard panel.
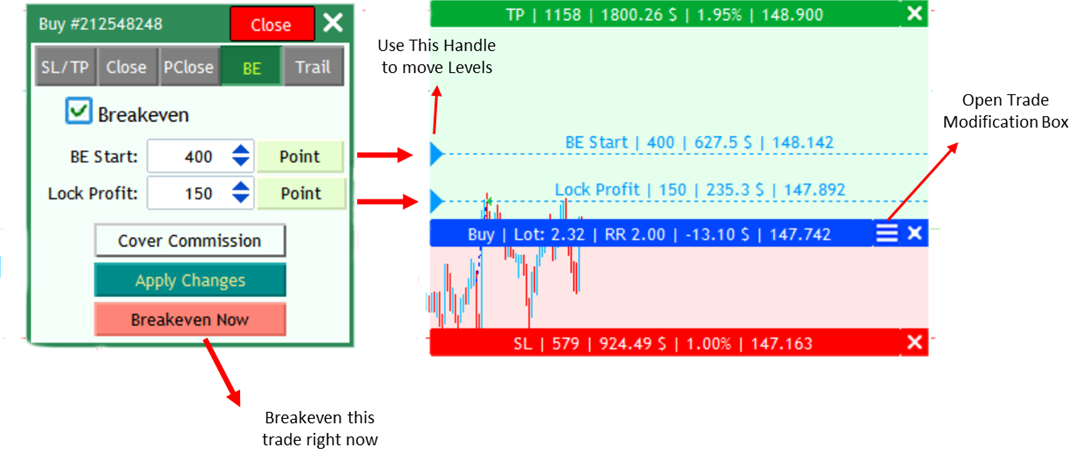
If you want to modify your Breakeven setting after taking a trade, you can press on the menu button of the information box related to that trade, a small modification box is open allowing you to modify your breakeven settings.
Options tab > Trail Stop Loss
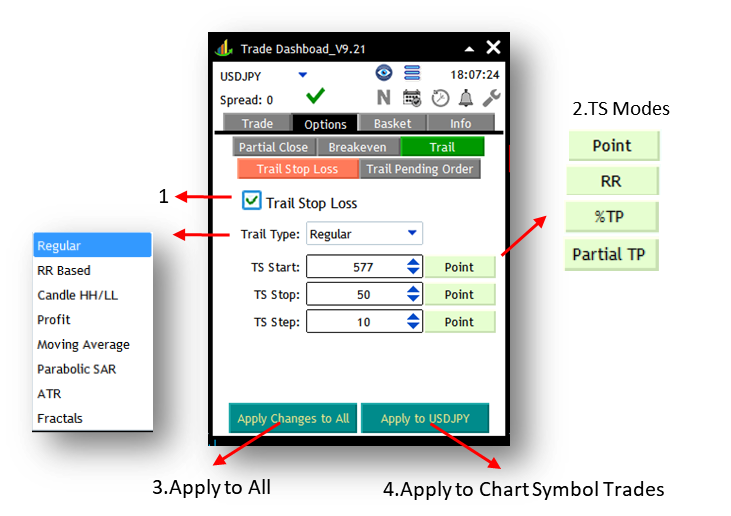
Trailing stop loss means, the EA moves your stop loss as market price goes align with your trade and make more profit, So that if price goes back against the profit and hit SL, it generates less loss and more profit. Trade Dashboard has 8 trail stop options.
1. Activate Trail Stop Option.
2. TS Mode: You can set trail stop values based on different modes:
- Point: You can set TS distance based on Point size.
- RR: You can set TS distance based on SL Size, make sure your SL is not zero for this option to work correctly, if you set RR and you change SL, the TS will automatically change based on your SL size.
- TP%: You can set TS distance based on TP Size, make sure your TP is not zero for this option to work correctly, if you set TP% and you change TP, the TS will automatically change based on your TP size.
- Partial TP: Using this option, you can set TS equal to your Partial TP levels. If you set it, when you change corresponding partial level, TS will automatically change.
3. Apply to All: pressing this button, applies trail stop settings to all trades under control of Trade Dashboard.
4. Apply to Chart Symbol Trades: pressing this button, applies trail stop settings only to trades of underlying chart symbol.
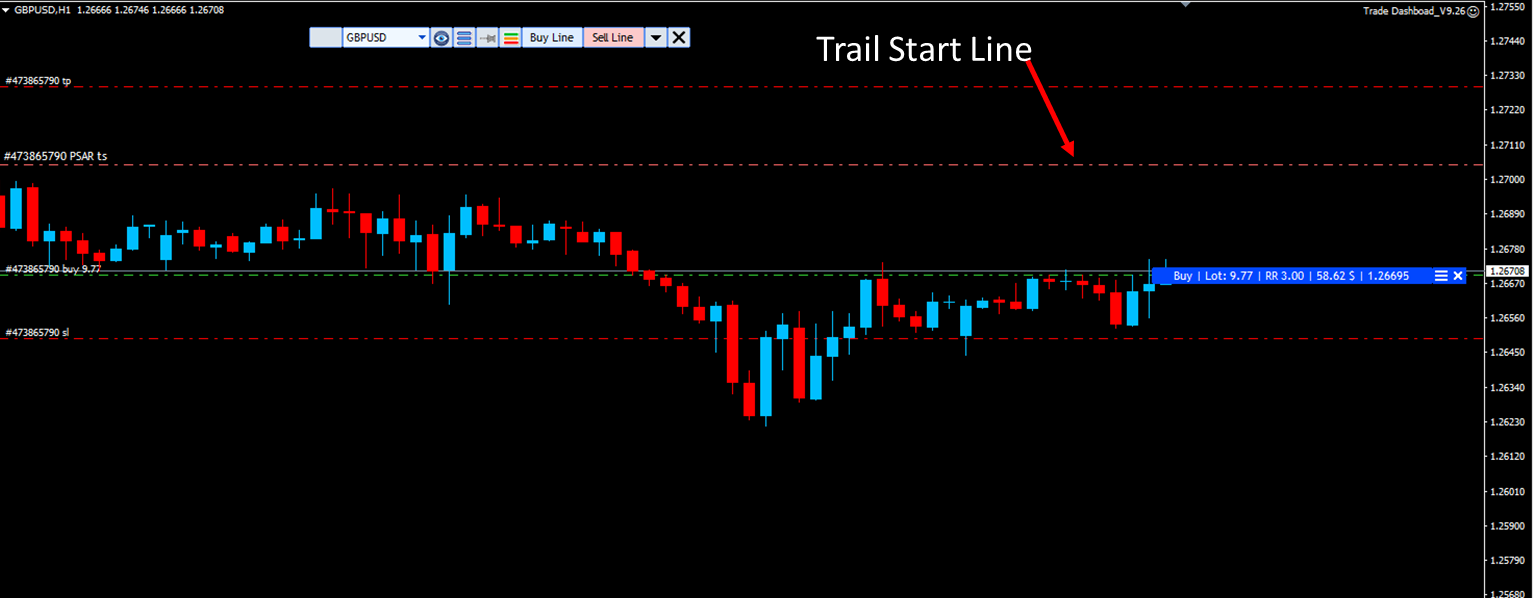
When any trail stop option is active and user opens trade lines, a line corresponding to trail start level is shown on the chart.
Regular Trail Stop:
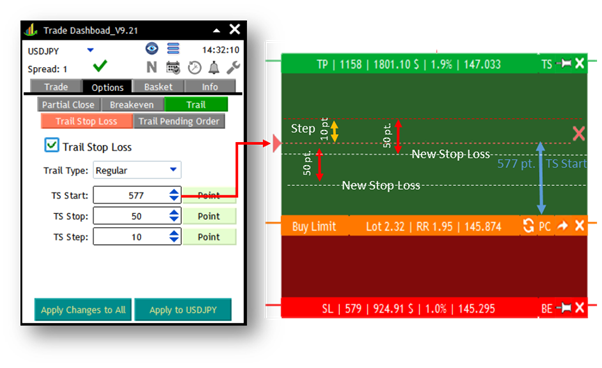
Regular Trail stop is the most common way of trailing stop loss.
TS Start: given the above example, Regular trade stop starts when trade reaches to 577 points of profit.
- TS Stop: At this point, it moves stop loss and set it to 50 points away from current market price.
- TS Step: If price goes to another 10 points of profit, it again updates stop loss and set it to 50 points away from current market price.
RR-Based Trail Stop:
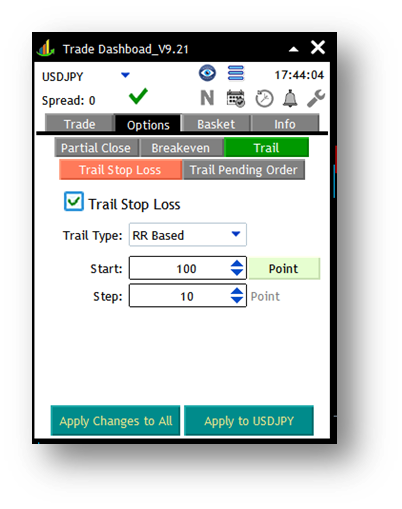
RR Based trail stop loss, works based on your trade initial RR (TP size/SL Size), you can see your trade RR in the Trade tab, take notice that if your RR is zero, then using RR Based trail stop makes no sense.
Let’s say your RR is 3 and you want to use RR Based trail stop.

- Start: Defines the distance from the entry price at which a trade should begin implementing RR Based trail stop loss. When it begins, it calculates the distance from start to the TP price, given the above example, RR Based trail starts at 100 points of profit, let’s say the distance to TP price is 500 points at this time, then the EA, finds new stop loss price by dividing 500 to Initial RR value which is 3. So the EA set stop loss to 166 points away.
- Step: If price goes to another 10 points of profit, it again calculate new stop loss price and updates it.
New Stop Loss Size=|(TP Price – Current Price)|/Initial RR
Candle HH/LL Trail Stop:
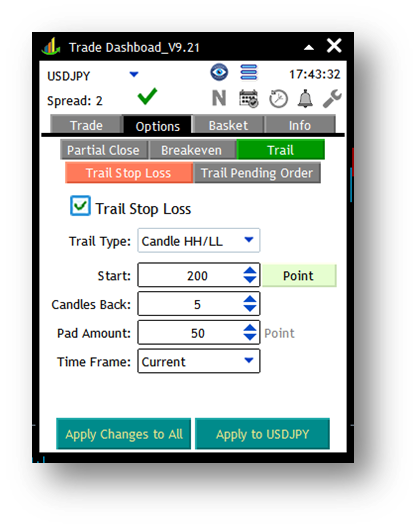
Candle trail stop loss works based on candles higher high and lower low levels. It updates stop loss at every new candle.
- Start: Defines the distance from the entry price at which EA begin implementing Candle trail stop.
- Candles Bask: Number of previous candles to find higher high for sell trades and lower low for buy trades.
- Pad Amount: Additional distance to add to new stop loss price.
- Time Frame: The time frame of candles it uses to find higher high or lower low levels.
New Stop Loss= Higher High/Lower Low of previous 5 candles in current time frame plus 50 points of Pad amount.
Profit Trail Stop:
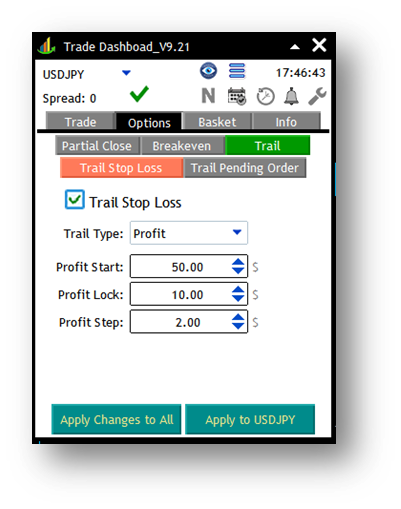
Profit trail stop loss works based on trade profit amount rather than distances.
- Profit Starts: Given the above example, Profit trail stop loss, begins its work when trades goes to 50 $ of profit.
- Profit Lock: At this time, it set new stop loss in a way to secure 10$ of profit.
- Profit Step: If trades go to another 2$ of profit, it again updates stop loss and secure another 2$ of profit
Moving Average Trail Stop:
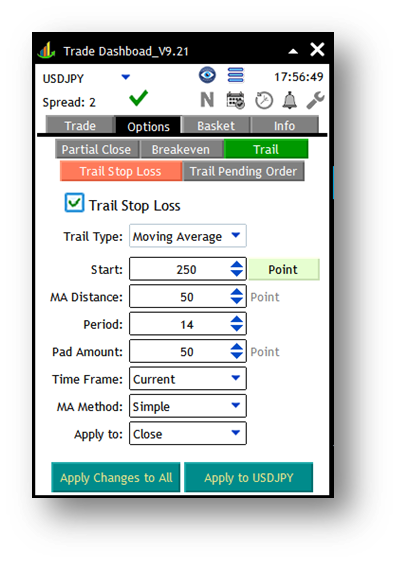
Moving Average trail stop works based on MA indicator. It updates stop loss every new candle and set it to the MA value plus pad amount.
- Start: It is where EA should start trailing stop loss.
- MA Distance: Current market price must have at least this amount of distance from MA price.
- Period: MA period.
- Pad Amount: Additional distance to add to new stop loss price.
- Time Frame: Time Frame of MA.
- MA Method: MA method includes Simple, Exponential, Smoothed and Linear Weighted.
- Apply to: MA apply to mode.
New Stop Loss= MA value + Pad Amount.
Parabolic SAR Trail Stop:

Parabolic SAR trail stop loss works based on PSAR indicator. It updates stop loss every new candle and set it to the PSAR value plus pad amount.
- TS Start: It is where EA should start trailing stop loss.
- PSAR Step: The step for parabolic SAR indicator.
- Maximum: Maximum for parabolic SAR indicator.
- Pad Amount: Additional distance to add to new stop loss price.
- Time Frame: Time Frame of PSAR.
New Stop Loss= PSAR value + Pad Amount.
ATR Trail Stop:
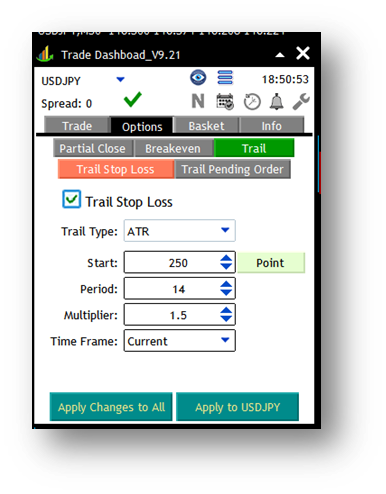
ATR trail stop loss works based on ATR indicator. It updates stop loss every new candle and set it to the ATR value plus pad amount.
- Start: It is where EA should start trailing stop loss.
- Period: Period for ATR indicator.
- Multiplier: Multiplier of ATR to add to stop loss.
- Time Frame: Time Frame for ATR indicator.
New Stop Loss= Multiplier*ATR value.
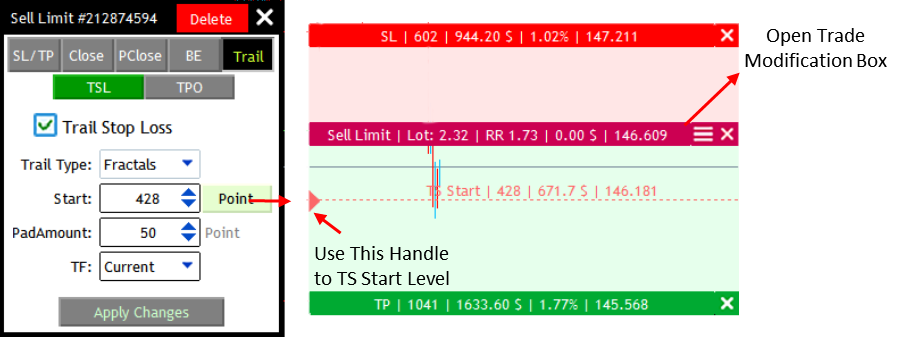
Fractals Trail Stop:

Fractals trail stop loss works based on Fractals indicator. It updates stop loss every new candle and set it to the Fractals value plus pad amount.
- Start: It is where EA should start trailing stop loss.
- Pad Amount: Additional distance to add to new stop loss price.
- Time Frame: Time Frame for Fractals indicator.
New Stop Loss= Fractals value + Pad Amount.
Options tab > Trail Pending Order
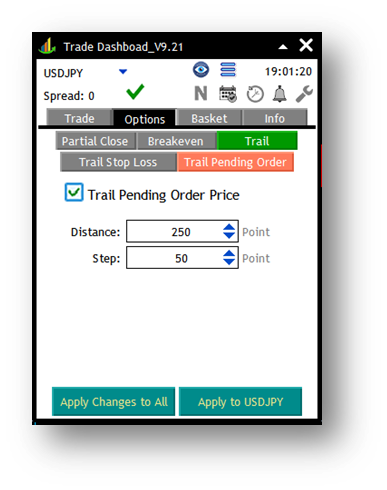
This function trail pending order price to keep a minimum distance between current price and pending order price.
- Distance: Given the above example when market price takes 250 points distance from pending order price it start working and set pending order price to 250 points away.
- Step: If market price moves another 50 points away, again it updates pending order price and set it to 250 points away.
If user, turn on trial stop option while trade lines are open, a line corresponding to trail Start level is shown on the chart allowing user to move and set trail start levels visually.
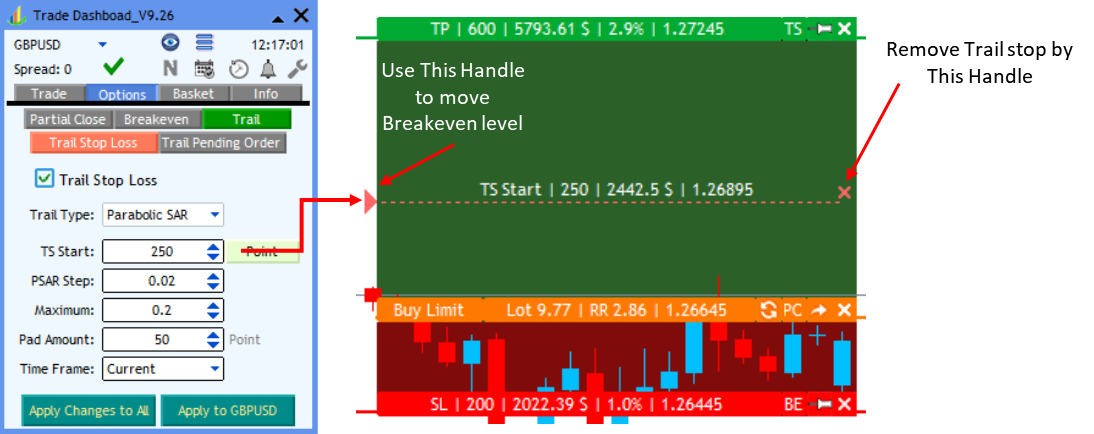
When user takes a trade, Trail Start level is shown by a red dotted line, user can show and hide this line with the help of eye-shaped button on top of Trade Dashboard panel.
If you want to modify your trail setting after taking a trade, you can press on the menu button of the information box related to that trade, a small modification box is open allowing you to modify your trail settings.
Basket tab > Positions
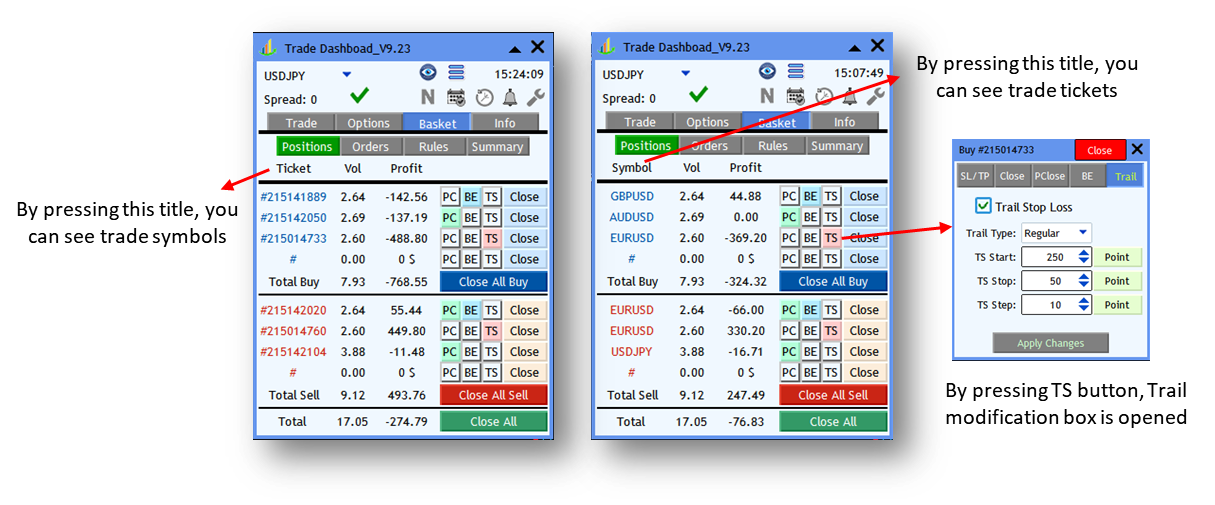
Basket tab > Orders

Order tab, is just like Positions tab but it shows pending orders under the control of Trade Dashboard, you can modify partial close, breakeven and trail stop option for each order.
Basket Tab > Rules 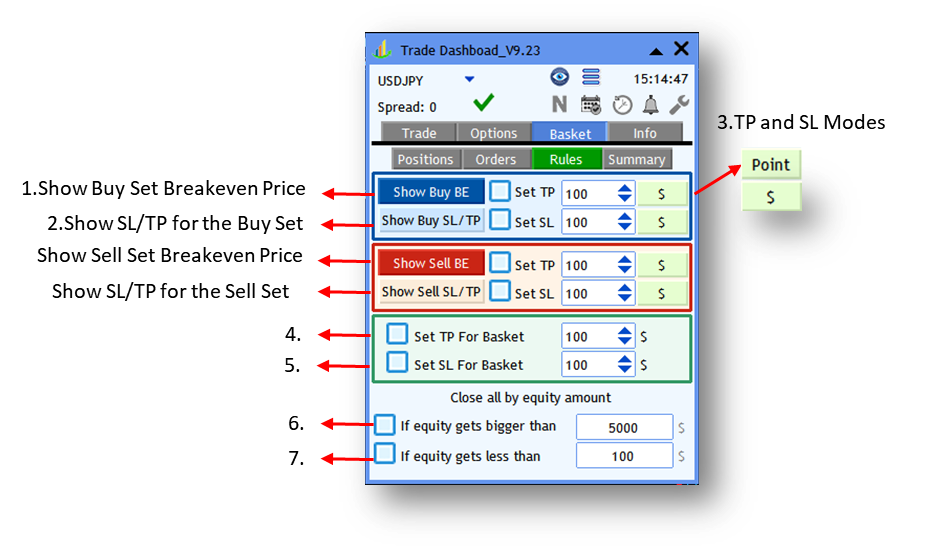
In Rules tab, you have multiple options to manage your basket of trades.
- Show Buy Set Breakeven price: it calculates breakeven price for entire buy positions and shows it on the chart.

-
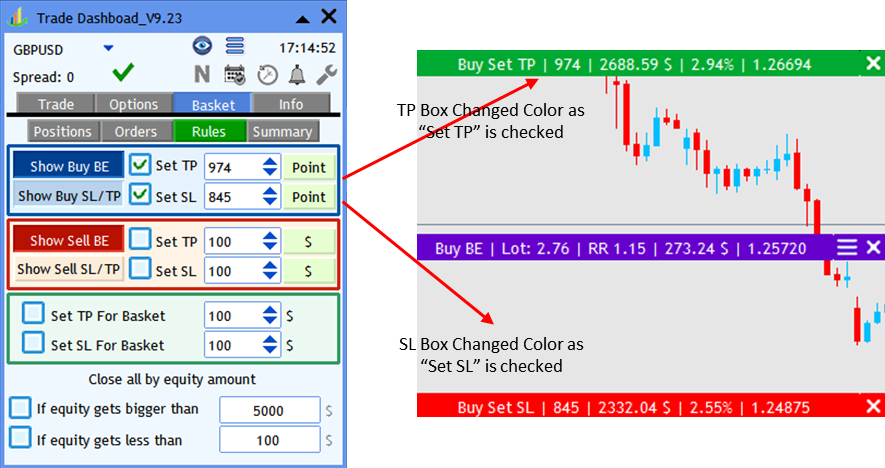
Show SL/TP for the Buy Set: it shows two handles for visually setting TP and SL for the entire buy basket.
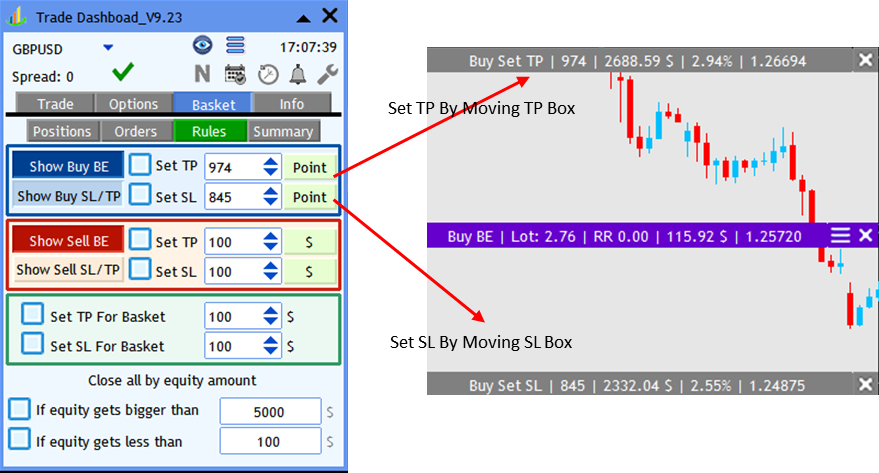
if you check “Set TP” or “Set SL”, the corresponding label changes its color from gray to green or red indicating your level is set.
-
TP and SL Mode: TP and SL for the buy or sell basket could be specified in “Point” or currency amount.
-
Set TP for basket: if you check this option, it closes all trades when total profit of the whole basket reaches to TP amount.
-
Set SL for basket: if you check this option, it closes all trades when total profit of the whole basket reaches to SL amount.
-
If equity gets bigger than this amount, it closes the whole basket.
-
If equity gets less than this amount, it closes the whole basket.
Basket Tab>Summery
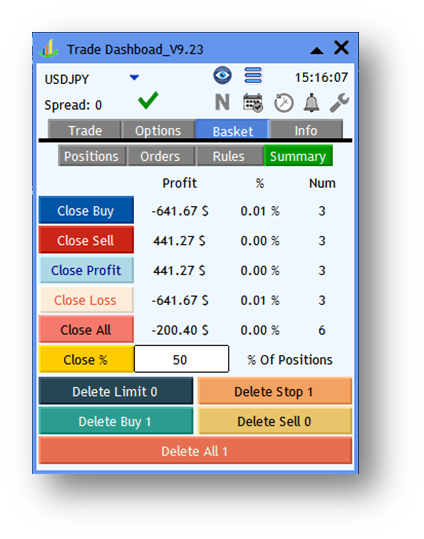
It shows summery of orders and trades categorized based on Buy, Sell, Profit and Loss. You can see the total profit of each category as well as Balance% and Number of trades in each category.
Also number of each order category is specified in its corresponding delete button.
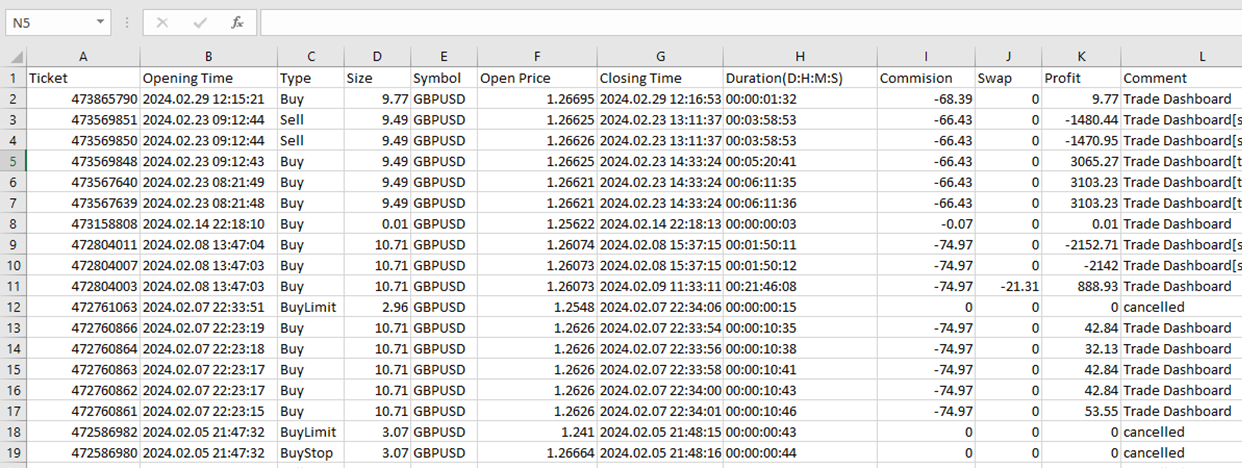
Info Tab>Report
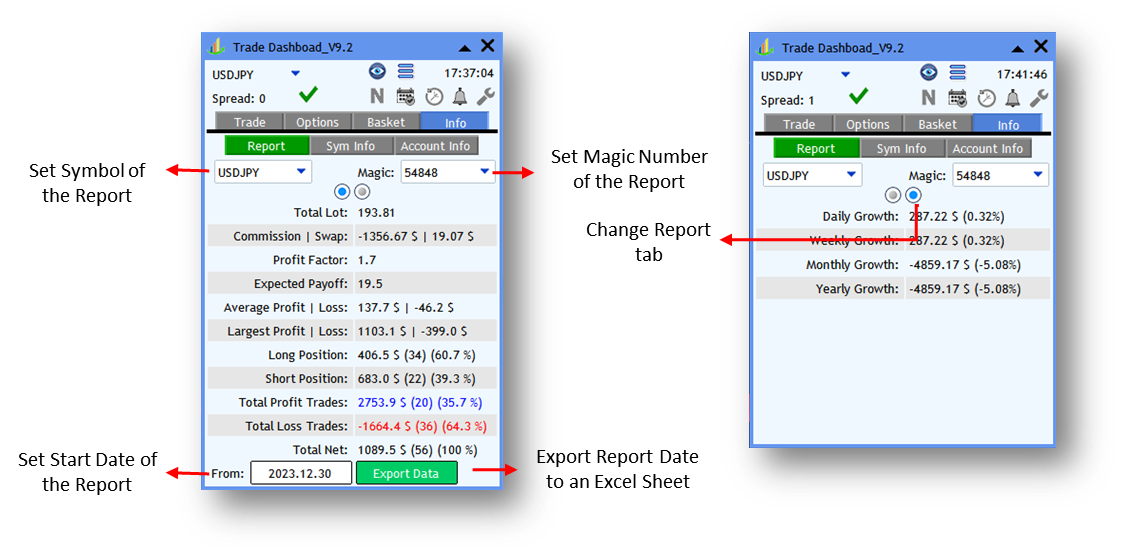
In the report tab, you can check a full report of your trades based on symbol and magic number. You can set symbol to “All” and set magic to “All” to check the report of all trades with all magic numbers.
If you export data, it generates an excel file in MQL4 or MQL5>Files>Trade Dashboard>Account History Data folder.
Info Tab>Sym Info
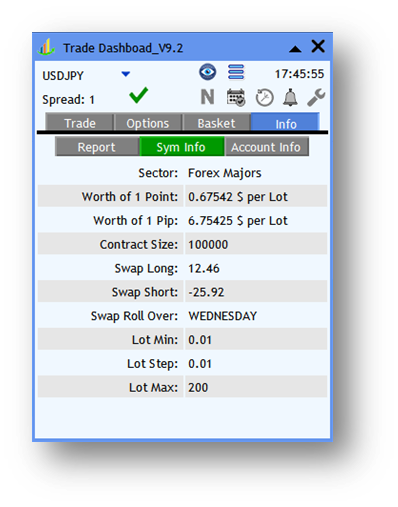
Sym Info tab shows general information about underlying chart symbol.
Info Tab>Account Info
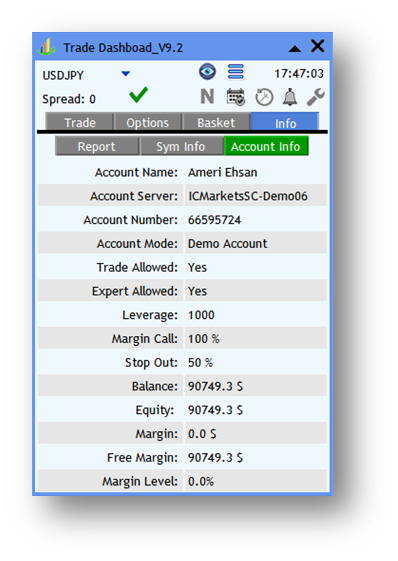
Account Info tab shows general information about your trading account.
Alert Tab
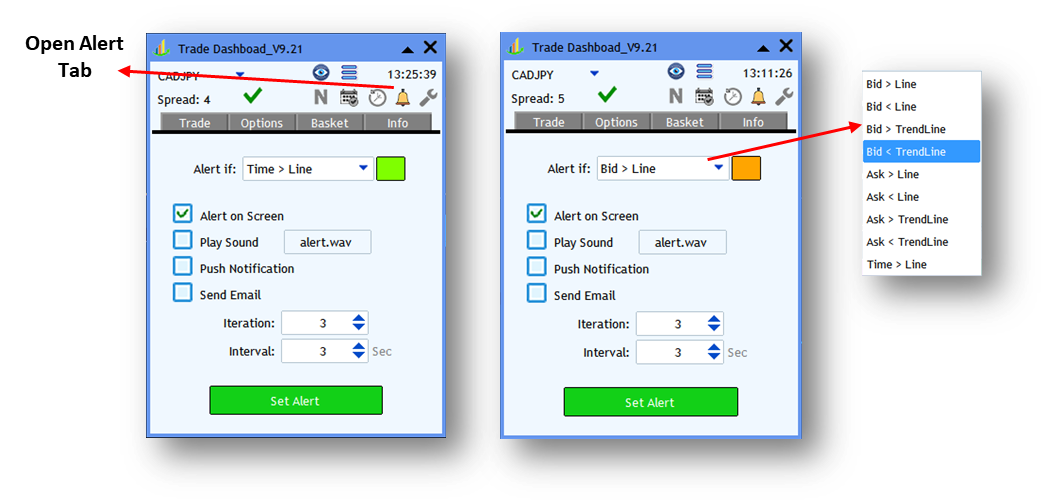
In Alert tab, you can set to receive alert if a specific price actions happens, for example if bid price goes higher than a line on the chart, it informs you with a screen alert or play a sound or push notification to your mobile phone, or sending an email.
Whatever “Alert If” option that you choose, when press on “Set Alert” a line corresponding to that alert type is shows on the chart, the color of the line is the same as color of the box next to “Alert If” box. You can move that line and set it the way you desire, when market price hits that line, you will get notified.
- Iteration: It defines number of alarms.
- Interval: It defines the time in seconds between multiple alarms.
Take notice, that if you set an alarm, you should not change chart symbol, you should keep the current symbol until you get notified.
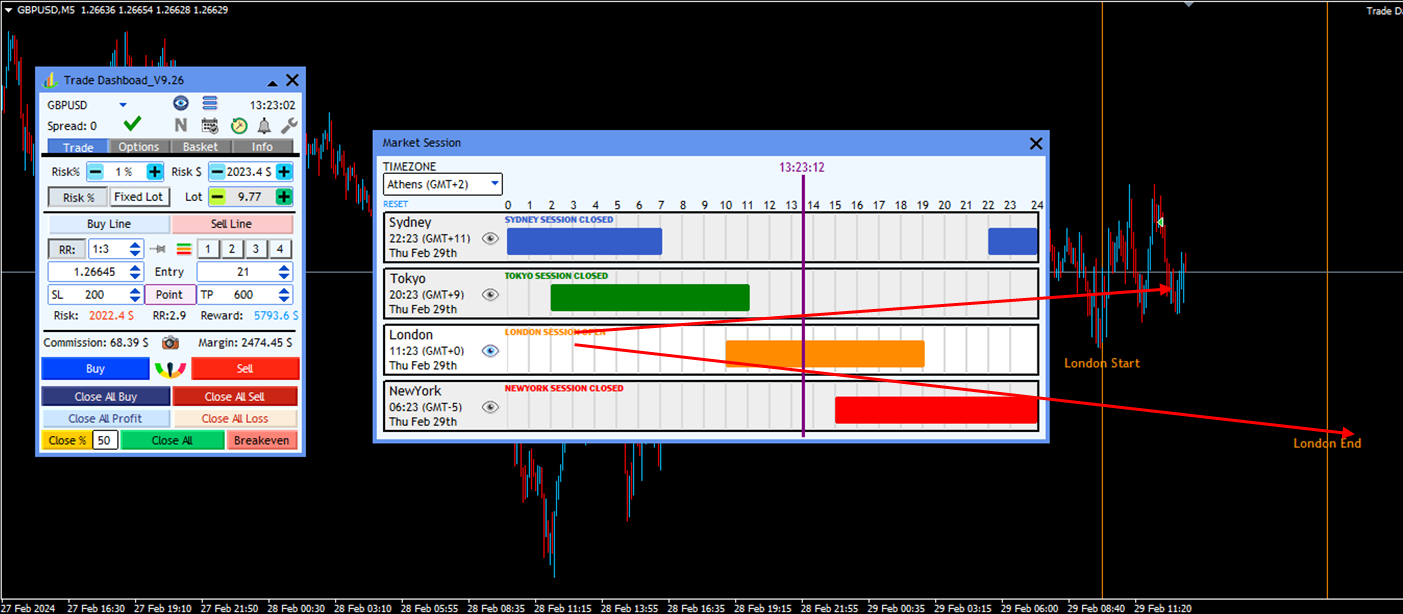
Market Session Indicator
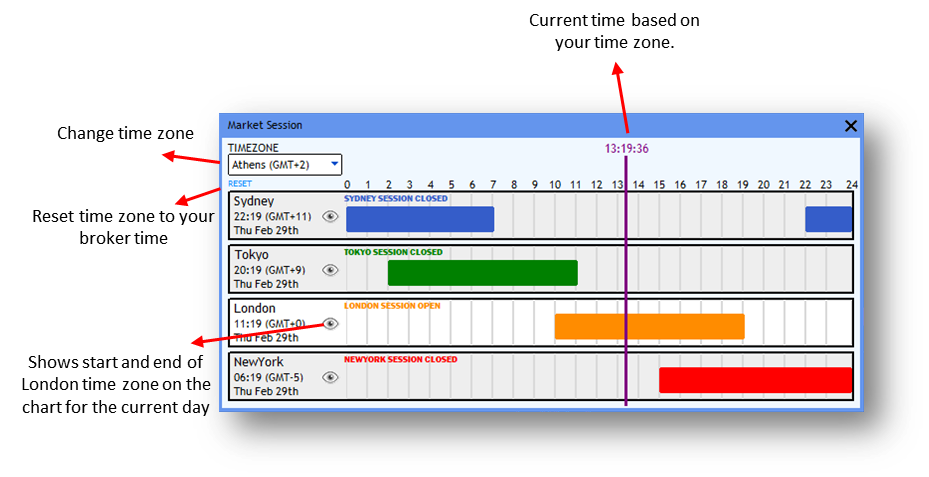
Market session indicator shows four major sessions including Sydney, Tokyo, London and New York. It shows each session and current time related to the specified time zone, user can change time zone and check sessions in different time zones.
By pressing the eye-shaped icon, it shows the start and end of each time zone for the current day on the chart.
Trade Task Schedular
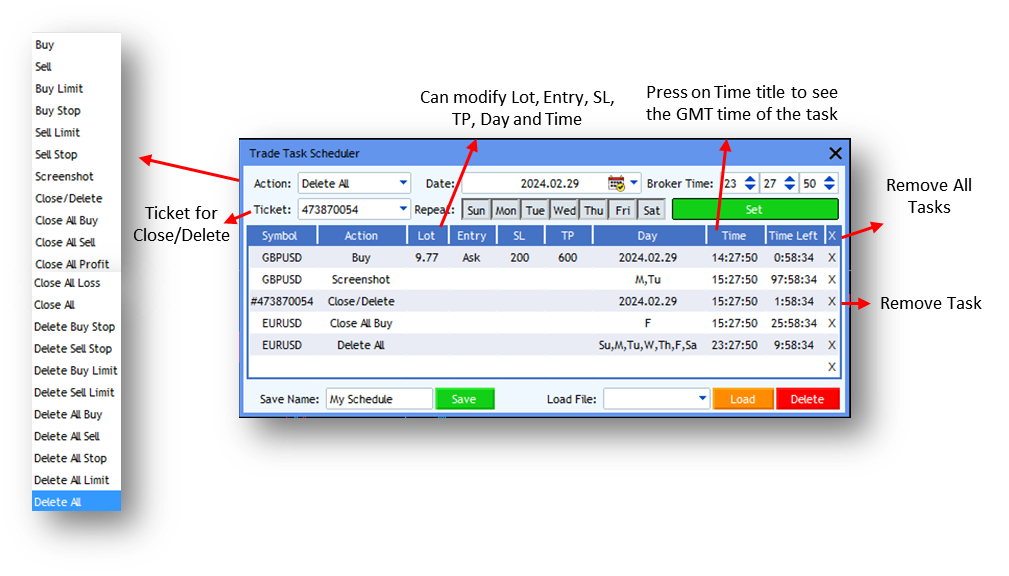
With the help of trade task schedular you can set schedule for 18 trade tasks. If your action is “Close/Delete” then you need to set the Ticket of the trade you want to “Close/Delete”.
After you set a trade task, you can modify Lot size, SL, TP, Entry price and Time, you can also modify Date of the Day column only if the actions is not required to repeat. You can see time left to the next action of each row.
Take notice that the times are always set based on your broker server time, however, if you click on Time title, you can see the times based on GMT.
If you remove the EA from chart, the actions will be removed as well, but you can save your actions if you would like and then you can load it again. It is useful especially when you have some repeated actions like “Close All” at Friday night.
Settings>General

- Default Trade Console: It sets the default trade console which locates at the bottom for the main panel.

- Auto Measure Mode: your current measure mode is written in the Trade tab between SL and TP box in a purple button. When you select a measure mode, you SL, TP, Partial close distance, breakeven distance and trail stop distance are measured by that measure mode. Choosing right Measure Mode helps you work more conveniently for that symbol, If you check “Auto Measure Mode”, then Trade Dashboard set “Point*100” for Crypto and Index symbols, and for the rest it choose “Point” mode.
- Take Multiple Trades with One Click: you might be interested in taking multiple trades only by clicking of trade button rather than pressing a button multiple times. You can set how many trades you need to open with each click.
- Offset for BE button: When user presses Breakeven button, the dashboard moves stop loss to a new price to breakeven the trade, you can set the new position of stop loss using this setting, new position of stop loss can be determined based on Point, RR, %TP or monetary amount, if you choose Commission type, then it moves stop loss in a way to cover commission fee.
- Save: It saves all of you setting, you can load your settings on any other charts or any other times.
- Save as Default: if you save as default, then you setting will be automatically loaded as soon as you put Trade Dashboard on the chart.
- Save as Template: If you save as Template, not only your settings is saved, but also your template of the chart is saved as well. For loading this type of save, you should right click on the chart and in the opened Manu, under Template, select “Load Template”, you should find you saved template there and click on it.
- Reset: It reset all you setting to the original Trade Dashboard settings.
- Load Default: it loads your default settings
Settings>Trade>Risk & LotSize
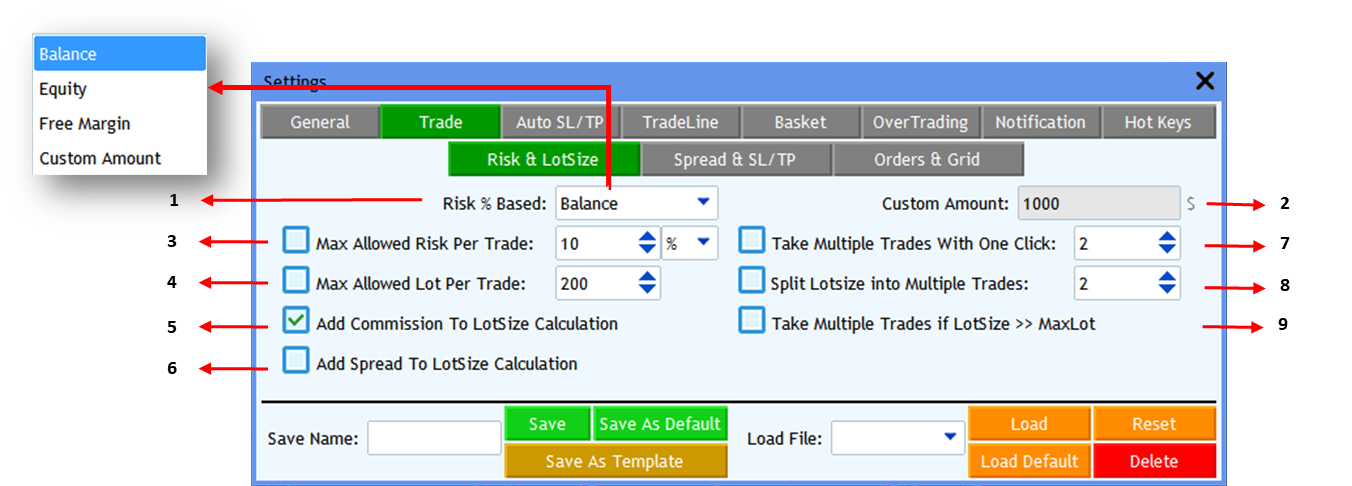
- Risk % Based: When you choose “Risk %” mode in the “Trade Tab”, it can calculate risk based on “Balance” or “Equity” or “Free Margin” or “Custom Amount”.
- Custom Amount: if you choose “Custom Amount” in the “Risk % Based” option, you must specify how much monetary amount should be used as the basis to calculated risk.
- Max Allowed Risk Per Trade: You can specify it based on “Balance %” or monetary amount, if you take an amount of risk more that this setting, it will automatically change it to the “Max Allowed Risk”, preventing you from taking unwanted risk.
- Max Allowed Lot Per Trade: You can specify max allowed lot size. It is useful specially for prop firms accounts. You cannot set a lot size more than this amount.
- Add Commission to Risk Calculation: If you check this option, then the EA, considers commission fee at lot size calculation. For example, if commission fee is 10$ and your Risk $ is 100$, then it calculates lot size in a way to lose 90$ when it hits SL. If you don’t check it, it calculates lot size in a way to lose 100$ when SL is hit.
- Add Spread to Risk Calculation: If you check it, it adds spread size to the SL size and then calculates lot size. It results in lower lot size to cover spread fee.
- Take Multiple Trades with One Click: you might be interested in taking multiple trades only by clicking of trade button rather than pressing a button multiple times. You can set how many trades you need to open with each click.
- Split Lot Size into Multiple Trades: You might want to take 5 trades of 0.2 lot rather than one trade of 1 lot. If you set it to 5, it split 1 lot order into 5 trades of 0.2 lot.
- Take Multiple Trades if LotSize>> Max Lot: Any trade symbol is limited to a max lot amount by your broker, if you can see your max lot number in “Info tab” under “Sym Info”. For example, ADAUSD max lot is 100 lot for each trade in most of brokers. Now if you need to take 150 lot of ADAUSD then you should check this setting, when you take a 150 lot trade, it automatically takes two trades, one 100 lot and the other 50 lot to satisfy 150 lot.
Setting>Trade>Spread & SL/TP

- Max Allowed Spread: If you check this setting, when you click on trade buttons, it checks the symbol spread, if it is bigger than this amount of spread, then it won’t take the trade.
- Add Spread Multiplier: If you check this option, the EA automatically, add a multiplier of symbol spread to your SL and TP size, for example if you set it to 2, then EA add 2*spread size to your SL and TP, it also adjusts the lot size based on new SL size before taking the trade.
- Set SL/TP by modification: if you press this option, the Trade Dashboard, at first take your trade without any SL and TP, then it modifies your trade and set SL and TP. By using this option, you SL and TP will be more precisely set, for example, if you set 200 point of SL, then the SL will be exactly 200 points, because it is not affected by price slippage and things like that.
- Virtual SL/TP: if you check this option, then Trade Dashboard is responsible to close your trades when market price hits SL or TP price, another word, your trade’s SL and TP are hidden from your broker. If you choose “Ask/Bid” mode, then Buy traders are closed when Bid price hits SL or TP and Sell trades are closed when Ask price hits SL or TP (just like the normal way of closing trades when they are set in the broker server side). If you choose “Bid” mode, then Bid price is the index for closing both Buy and Sell trades. Similarly, if you choose “Ask” then Ask price must hit SL or TP to close the trades. If you choose “Middle” then the middle price of Ask and Bid is the index price to close trades.
Setting>Trade>Orders & Grid
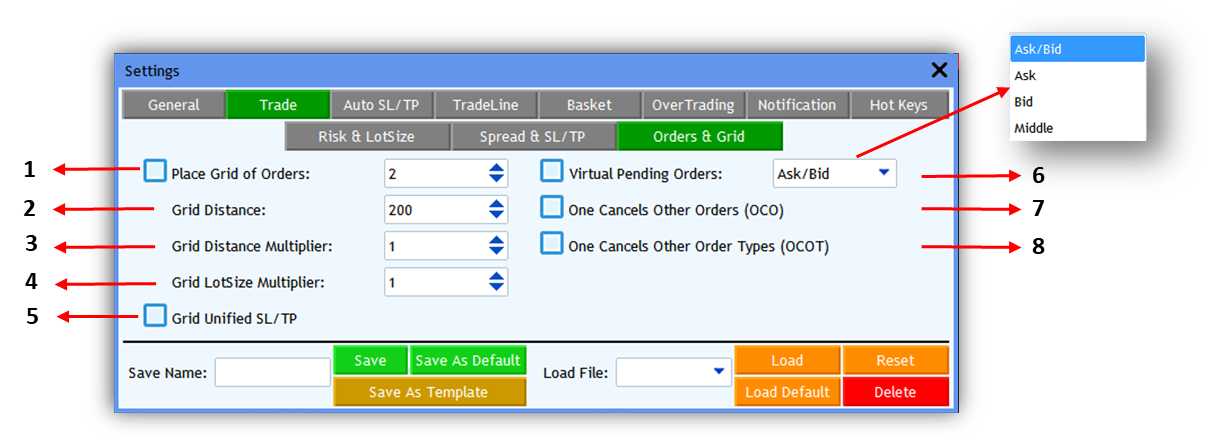
- Place Grid of Orders: If user check this setting, when he presses on pending orders button, the Dashboard will place a set of orders instead of just one order. On the pending orders button, number of levels are shown.
- Grid Distance: It sets the distance between each levels of orders.
- Grid Distance Multiplier: it multiplies the distance between levels. Each level distance is a multiplier of previous level distance.
- Grid LotSize Multiplier: it multiplies the lotsize of each level. Each level lotsize is a multiplier of previous level lotsize.
- Grid Unified SL/TP: if user checks this setting, all of orders will have the same price of SL and TP. The SL price for buy/sell is calculated based on last/first level minus/plus amount of stop loss which is set in the main panel. The TP price is calculate based on first/last level plus/minus amount of take profit which is set in the main panel. If user does not check this setting, then each order will have its own stop loss and take profit based on main panel settings.
- Virtual Pending Order: if you check it, then Trade Dashboard is responsible to turn pending order to active order when market price hits your pending order price rather than your broker. Another word, your pending order is hidden from your broker.
- One Cancels Other Order (OCO): If you check it, when a pending order turns to active, it deletes other orders. You can specifically check this option for any single order using small modification panel.
-
One Cancels Other Order Types (OCOT): If you check it, when a pending order turns to active, it deletes orders with different type from the activated order. For example, if a buy stop gets activated while this option is active for it, then the Dashboard will delete all of orders which are not buy stop. You can specifically check this option for any single order using small modification panel.
Settings>Auto SL/TP

- Auto SL: Active automatic stop loss.
- Auto SL Type: In “Candle HH/LL”, it sets SL based on candles higher highs or lower lows.
- Candles Num: It defines number of previous candles to find higher his and lower lows.
- Pad Amount: Add this amount to the higher highs and lower lows prices.
- Time Frame: Time frame of candles to find higher highs and lower lows.
- Update SL of all existing positions based on auto SL settings.
- Auto TP: Active automatic take profit.
- Auto TP Type: In “ATR” type, it calculates TP based on ATR indicator.
- Period: Defines period of ATR.
- Multiplier: If multiply this number to ATR values.
- Time Frame: Time frames of ATR.
- Update TP of all existing trades based on auto TP settings.
- Update SL and TP of all exisnting trades based on auto SL/TP settings.
Settings>TradeLine

- Trade Line Width: Trade width of trade lines. You can also, change trade width of trade lines by moving the right or left part.
- Trade Lines Distance from Right: Distance of trade line from right of the chart.
- Trade Line Magnetization Factor: It defines how much trade line magnetize to the market price. If you increase it, the trade line changes from market price to order price harder. If you make it zero, it easily moves from market price to order price.
- Trade Information Bar Width: when user takes a trade, it shows an information box, this setting shows the width of this box.
- Active Trade Button on Trade Line: if you uncheck it, then the button on the trade lines won’t take a trade.
- Show TP/SL Zone: If user uncheck it, TP and SL zones won’t be appeared.
- Trade Line Box Mode: It shows position of trade line boxes relative to trade lines.
- Lock SL Line to the Price: It ducks SL line to the chart.
- Lock TP Line to the Price: It ducks TP line to the chart.
Settings>Basket
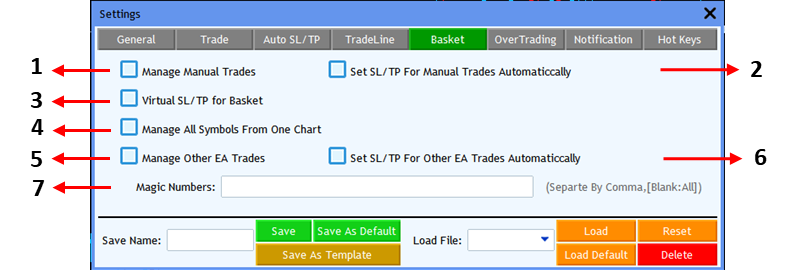
- Manage Manual Trade: if you check it, it detects all your manual trades and can control it.
- Set SL/TP for Manual Trades Automatically: if you check it, when it detects manual trades, it set SL and TP based on Trade tab settings.
- Virtual SL/TP for Basket: If you check it, when you set SL or TP in Basket>Rules tab, it sets a virtual SL/TP instead of actual SL/TP.
- Manage All Symbols from One Chart: If you check it, you can control all trades with different symbols in one chart.
- Manage Other EA Trades: If you check it, it detects all trades from other EAs.
- Set SL/TP for Other EA Trades Automatically: if you check it, when it detects other EA trades, it set SL and TP based on Trade tab settings.
- Magic Numbers: if you leave it blank, it detects all of other EA trades, however, you can give it other EA’s magic number separated by comma.
Settings>OverTrading
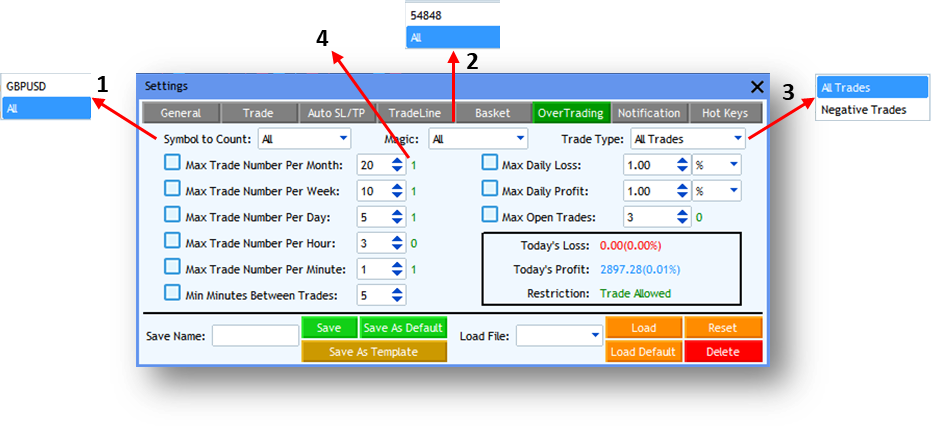
Using this tab, you can let Trade Dashboard stop you when you pass over trading rules.
- You can choose if to calculate over trading rules based on underlying chart symbol or All symbols.
- You can choose if to calculate over trading rules based on certain magic numbers or all magic number.
- You can choose if to calculate over trading rules based on Negative trades or All trades.
- It shows report of over trading items.
Setting>Notification
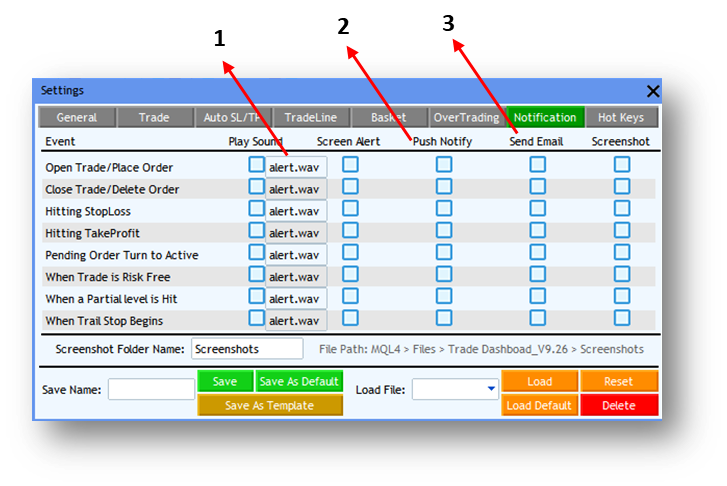
Using this tab, you can get notified or take a screenshot at important trading evets. You can change screenshot folder name.
- You can change the sound name of playing sound. You should put the new sound file into MQL root directory>Sounds folder. The sound format must be wav.
- Push Notify: It sends notification to your phone; your phone must be connected to MT4/MT5 through MT4/MT5 application. To connect application to your MT software, go to Tools>Options>Notifications. You need to check “Enable Push Notifications”, you should set MetaQuotes ID as well.
- Send Email: It sends Email to the preset Email address, to setup Email address you should go to Tools>Options>Emails
Setting>Hotkeys
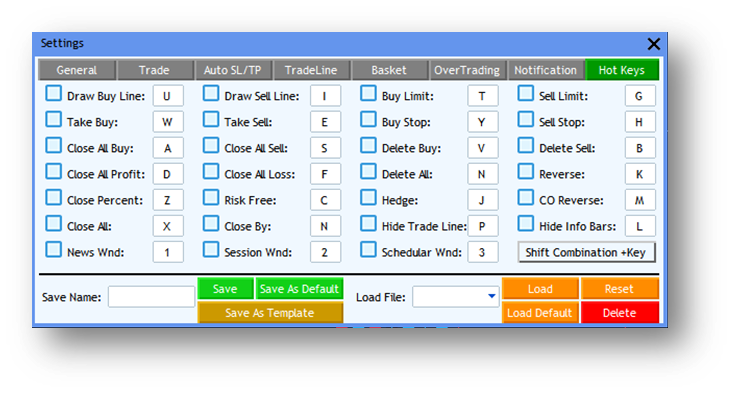
In this tab, you can separately set hotkeys for each trading action. If you press “Shift Combination +Key” you should press Shift key before pressing the hotkeys.
Purchase MT4 Product: https://www.mql5.com/en/market/product/74392
Purchase MT5 Product: https://www.mql5.com/en/market/product/80097
Download Demo Version: https://www.mql5.com/en/blogs/post/756310
How to install or update the product: https://www.mql5.com/en/blogs/post/757291
Economic Calendar Description: https://www.mql5.com/en/blogs/post/756449
YouTube Channel: https://youtube.com/@AmeriFinSolution?si=v2ZT5DB1OdNazQfz
Telegram Channel: https://t.me/AmeriFinChannel


 & AMD Framework")
")