
Visual strategy builder. Creating trading robots without programming
Contents
- Introduction
- Features
- Overview
- Example #1: "Moving Averages Crossover" Expert Advisor
- Example #2: "Reversing Martingale" Expert Advisor
- Example #3: "Closing a Trades Group on Total Profit" Utility
- Conclusion
Introduction
Algotrading and the ability to check trading ideas on historical data in the strategy tester are the most important functions of the MetaTrader5 trading platform.
But in order to use the trading strategy in automatic trading mode on a real time chart or in a strategy tester, it needs to be programmed and turned into an executable file (Expert Advisor file - EA). Not every trader has programming skills or resources to master them.
This article presents a solution to this problem — the visual strategy builder Mission Automate. With its help, anyone can automate their trading and check the strategy on historical data without writing a single line of code. Links to the free versions of the program can be found below. There are 5 ready-made free Expert Advisors based on popular strategies included. They are designed in the form of templates and can be used as a basis for other strategies.
For MetaTrader4: Mission Automate Demo MT4
For MetaTrader5: Mission Automate Demo MT5
Even though there is the word Demo in the name of the free version, it has all the functionality of the full version and does not contain any significant restrictions. It only has a few "inconveniences". Links to full paid versions of the program can be found in the descriptions of free versions on their pages in the Market.
This visual strategy builder is designed for "non-programmers" and can be useful to a wide range of users. Any trader can create fully functional trading robots after having spent a little time to get to know it and master the principles of its work.
This article provides functionality overview of presented strategy builder on the examples of creating real life trading advisors.
Features
Mission Automate application allows anyone to turn ideas into ready-made trading robots. An intuitive graphical interface with "drag and drop" technology makes the process easy and enjoyable. Creating an Expert Advisor looks like assembling a scheme from the existing blocks (elements) and connecting them with logical links. When the scheme is created, it can be immediately executed live or automatically converted to MQL5 code for further use in the strategy tester or real-time charts.
A part of available elements is listed below.
- All standard indicators present in the MetaTrader platform.
- Custom Indicators.
- Trade (trades group) Open / Close / Modify.
- Setting / canceling / modifying a pending order (orders group).
- Trades Management: lots calculator, break-even, trailing stop.
- Access to the trading history (information on closed positions).
- Elements for obtaining various information about the price history.
- Data of the last ticks for various instruments.
- Various arithmetic operations and price transformations.
- Logical operations.
- Variables / Switches.
- Operations with time.
- Various information about trading instruments.
- Information about the account (balance, equity, free margin, etc.).
- Notifications: Alert, Log, Push and Comment on the chart.
- Elements for creating input parameters of the Expert Advisor which are visible in its settings and can be optimized in the strategy tester.
A large set of elements forms a huge number of possible combinations enabling anyone to create a variety of types of trading robots and utilities. Below is an incomplete list of what can be created using Mission Automate strategy building tool.
- Expert advisors based on technical indicators.
- Price action strategies.
- Candle patterns EAs.
- Strategies based on Support and Resistance levels.
- Different types of grid systems.
- Systems using Martingale methods.
- Trades management utilities.
- Alerts and notifications systems.
- Money management tools.
In the strategy builder and in this article, the words "trade" and "position" are used as synonyms. A trade / position can be the current one, yet not closed, or history, i.e. already closed in the past. The word "order" in the text should be read as "pending order". An order may later become a position or it may be canceled and moved to history.
Overview
In general, the process of converting an idea into a trading robot consists of several stages.
- Forming a trading strategy in the head of a trader - creative work.
- Reframing the strategy as a set of rules "on paper" - the formalization of the strategy, or the preparation of EA specification.
- Transforming these rules into machine code and the executable file of the trading robot - programming of the Expert Advisor.
Most traders can successfully accomplish steps # 1 and # 2 on their own. The product described in this article allows accomplishing step # 3, which makes algorithmic trading available for any trader.
Mission Automate strategy builder allows you to create your own strategies from scratch or from one of the ready-made templates / examples, which is much simpler.
- Assembling a scheme from elements.
- Connecting elements with logical links.
- Adjusting the parameters of elements and links.
- Automatic generation of .mq5 EA file.
- Compiling the code and getting the executable .ex5 file.
- Running and testing the Expert Advisor in the strategy tester.
Strategies are assembled from blocks / modules. These blocks are called elements.
All available elements are located on the elements bar.
Elements can be connected with logical links.
Frequently used combinations of elements and links can be saved as snippets.
All created snippets are located on the snippets bar.
Elements are moved with "drag and drop".
A group of elements and links form a scheme.
A new scheme can be created using a template.
All available templates are located on the templates bar.
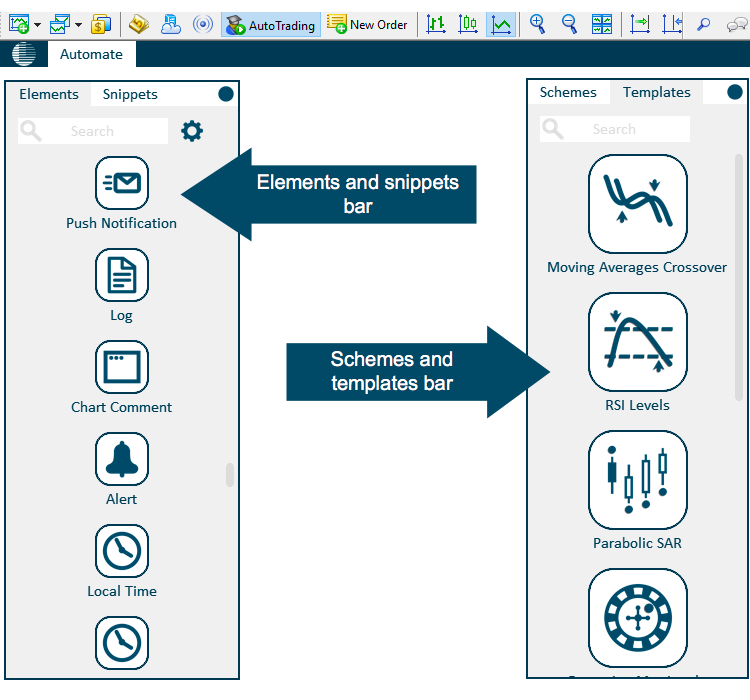
A new scheme can be created from one of the available templates or completely from scratch.
To create a scheme from a template, select the appropriate template in the panel and drag it to the workspace. A brief description of the template appears after clicking on its icon.
When the scheme is created, its icon appears in the schemes bar. Schemes icons are used to quickly access possible actions with scheme. The control panel of the scheme appears after a single click on the icon. If you double-click on the icon, the selected scheme will be moved to the center of the screen. Each scheme can be assigned a name. You can freely move the scheme around the workspace.
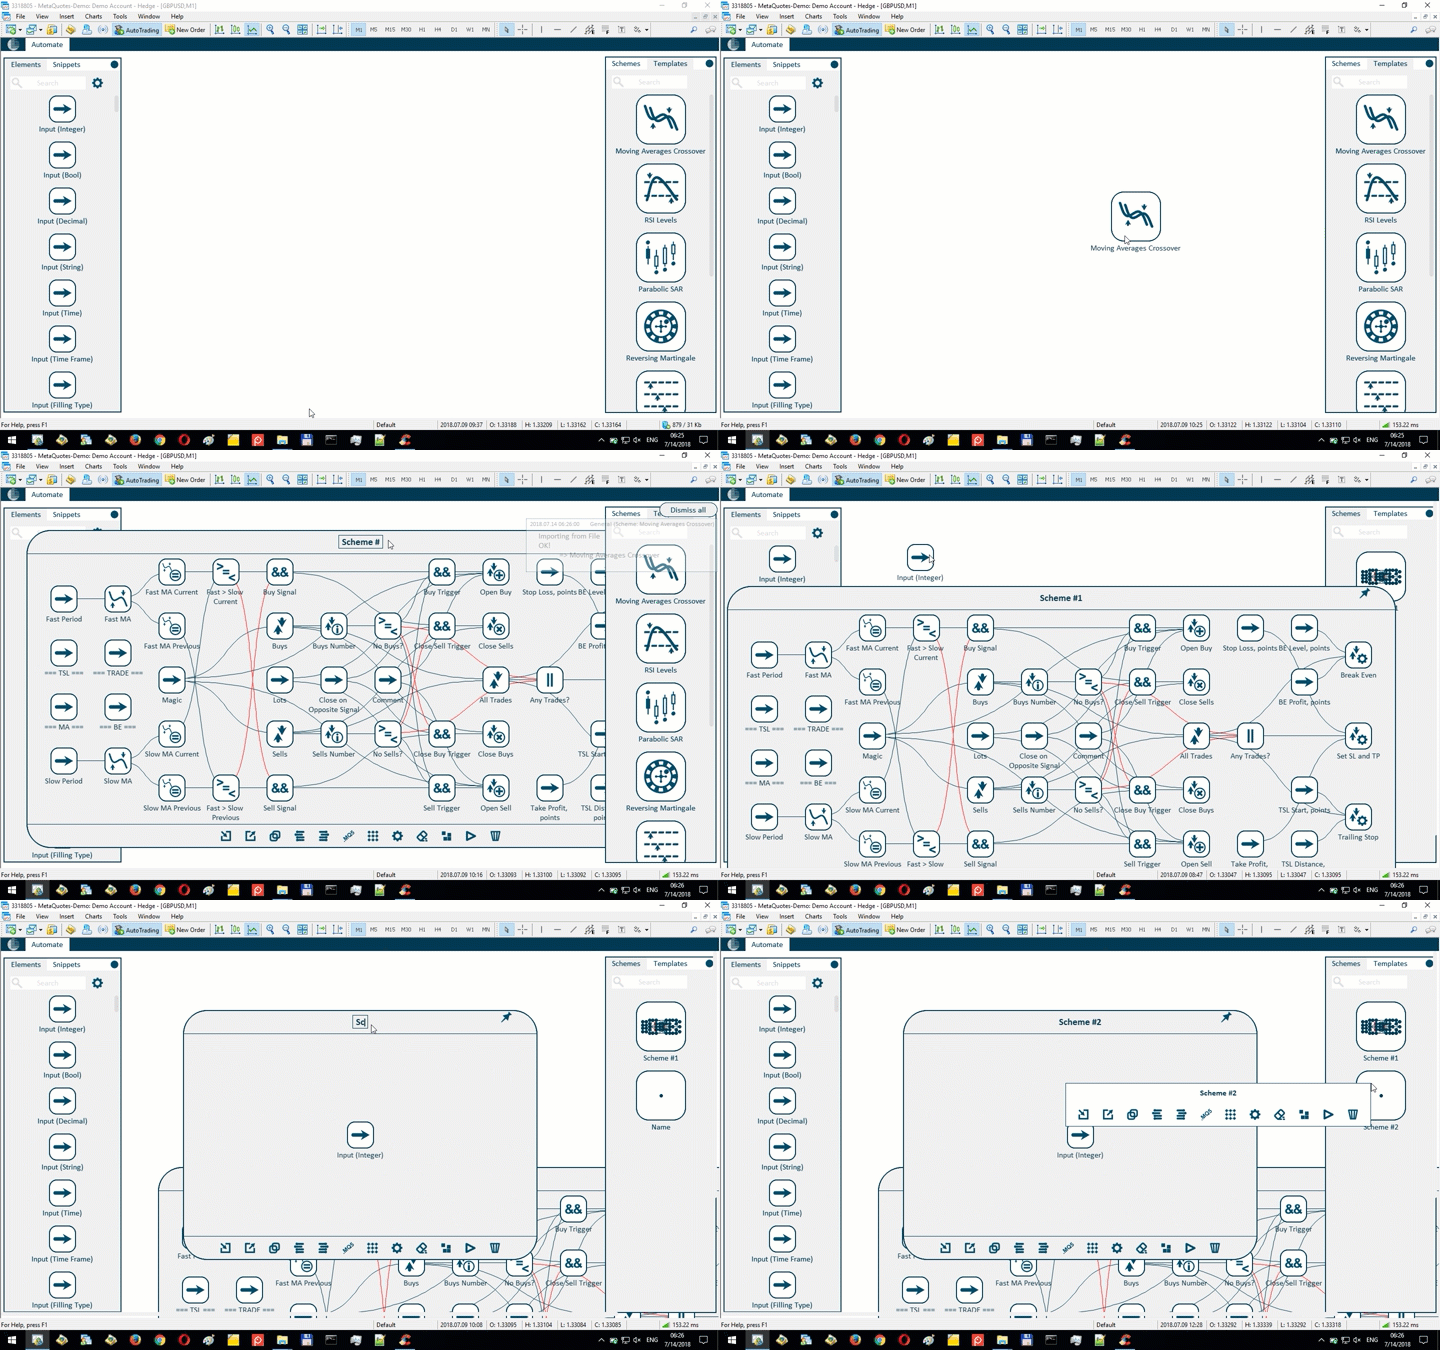
To add new elements to the scheme, they should be dragged onto it from the elements bar.
If an element from the elements bar is dragged to a clean space, a new scheme containing only this element will be created. Each element can be assigned a name.
After clicking an element, its settings panel appears. You can change the parameters values of the element or set them as default values. Apart from setting parameters, options for cloning an element, deleting it, resetting settings and accessing a short description of an element and its parameters are also available.
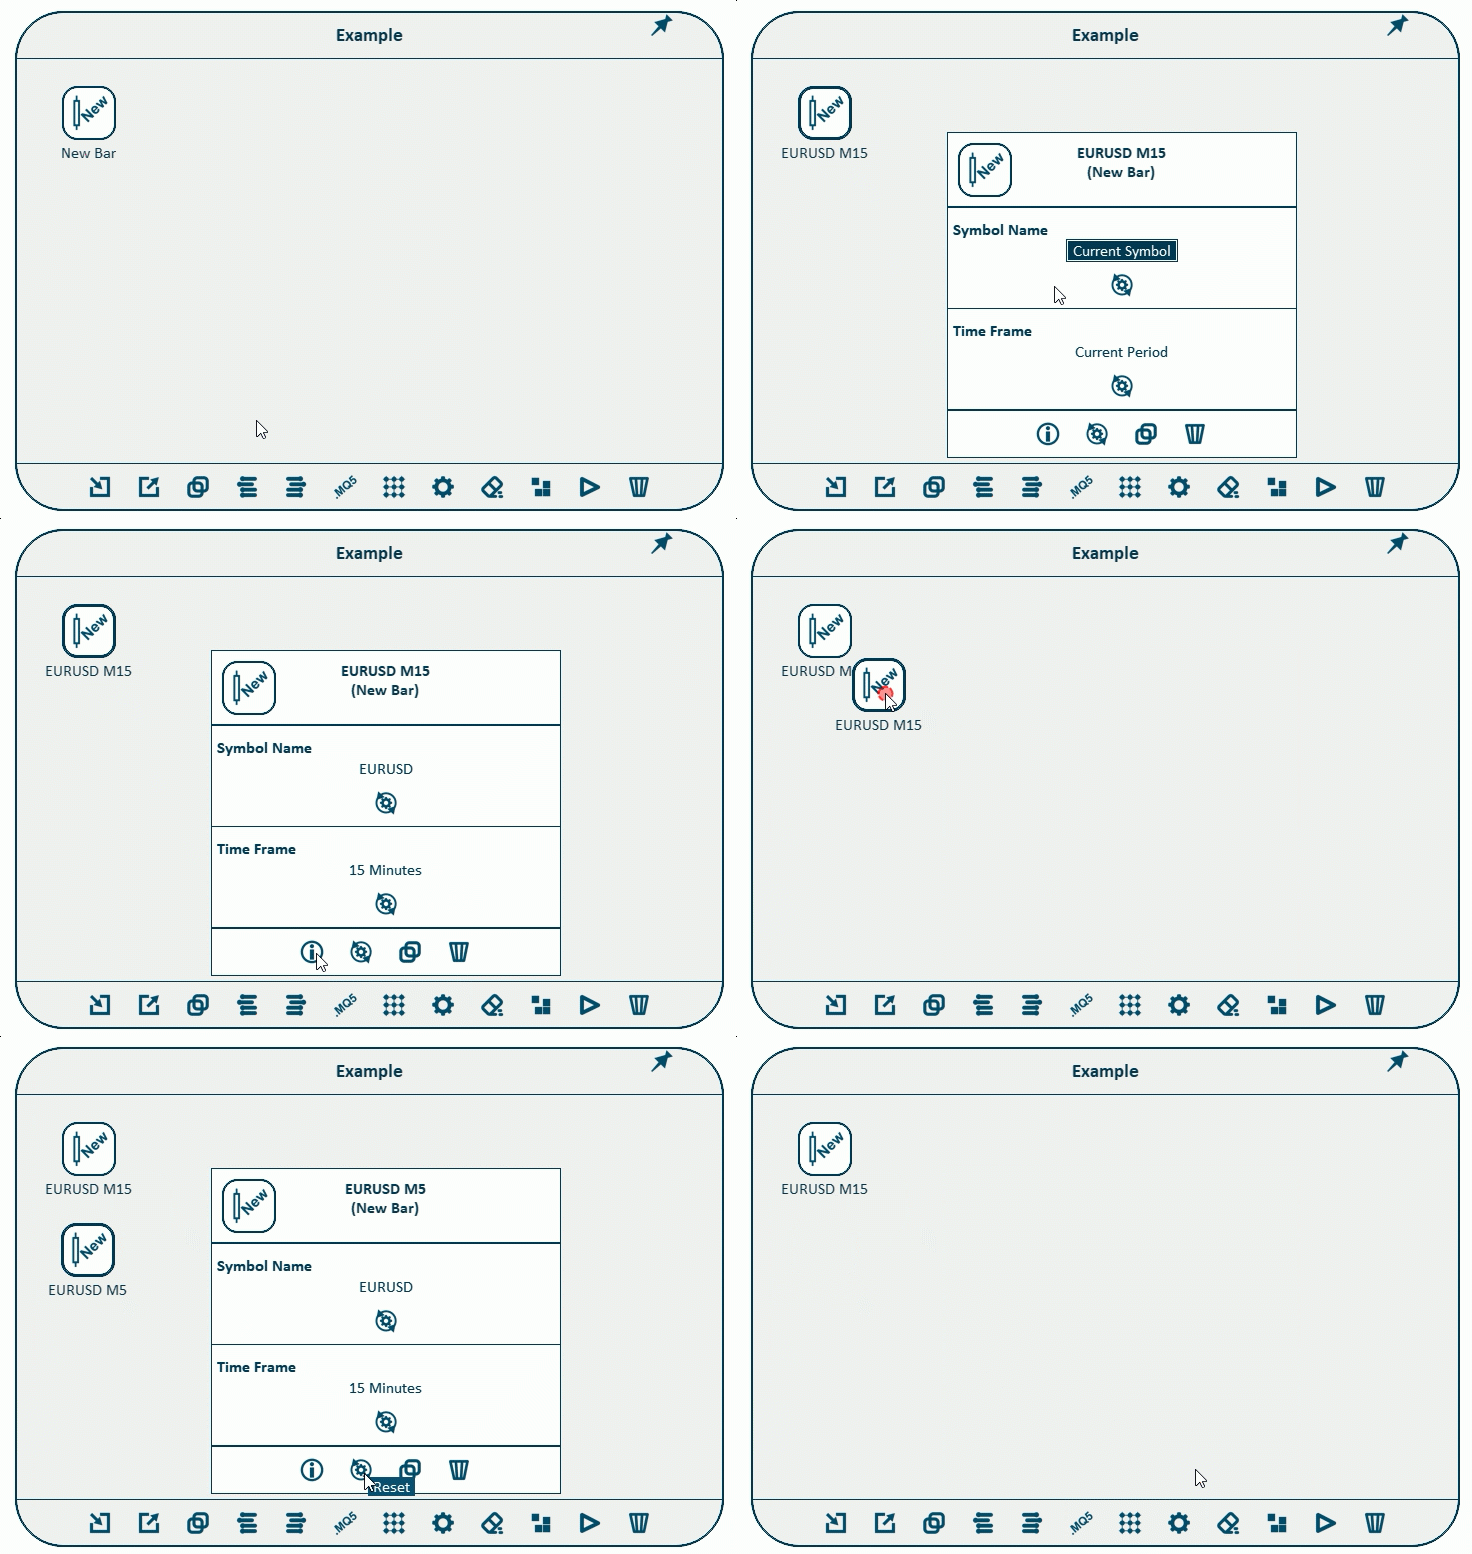
After clicking an element in the elements bar, its settings window pop ups. In this case, if you change the parameters for an element from the panel, then they will be used later for all new copies of this element.
Elements can be divided into three groups.
- Elements for performing certain actions (opening new positions, notifications, modification of existing positions, etc.) when certain conditions occur. The condition which is necessary in order to perform an action is called a trigger.
- Object elements (tick, bar, symbol, position, pending order, indicator). First, you need to create an object and configure its parameters, and only then you can get information about it.
- Elements for obtaining information about the object (current prices, information about the account status, trading history, etc.).
Elements can be connected with logical links. A Link transfers data from one element to another.
Only elements and parameters of the same types or types, which turn into each other without data loss can be connected with links.
To create a new link, "drag" the edge of the element. After a click on the link, a window with its settings appears.
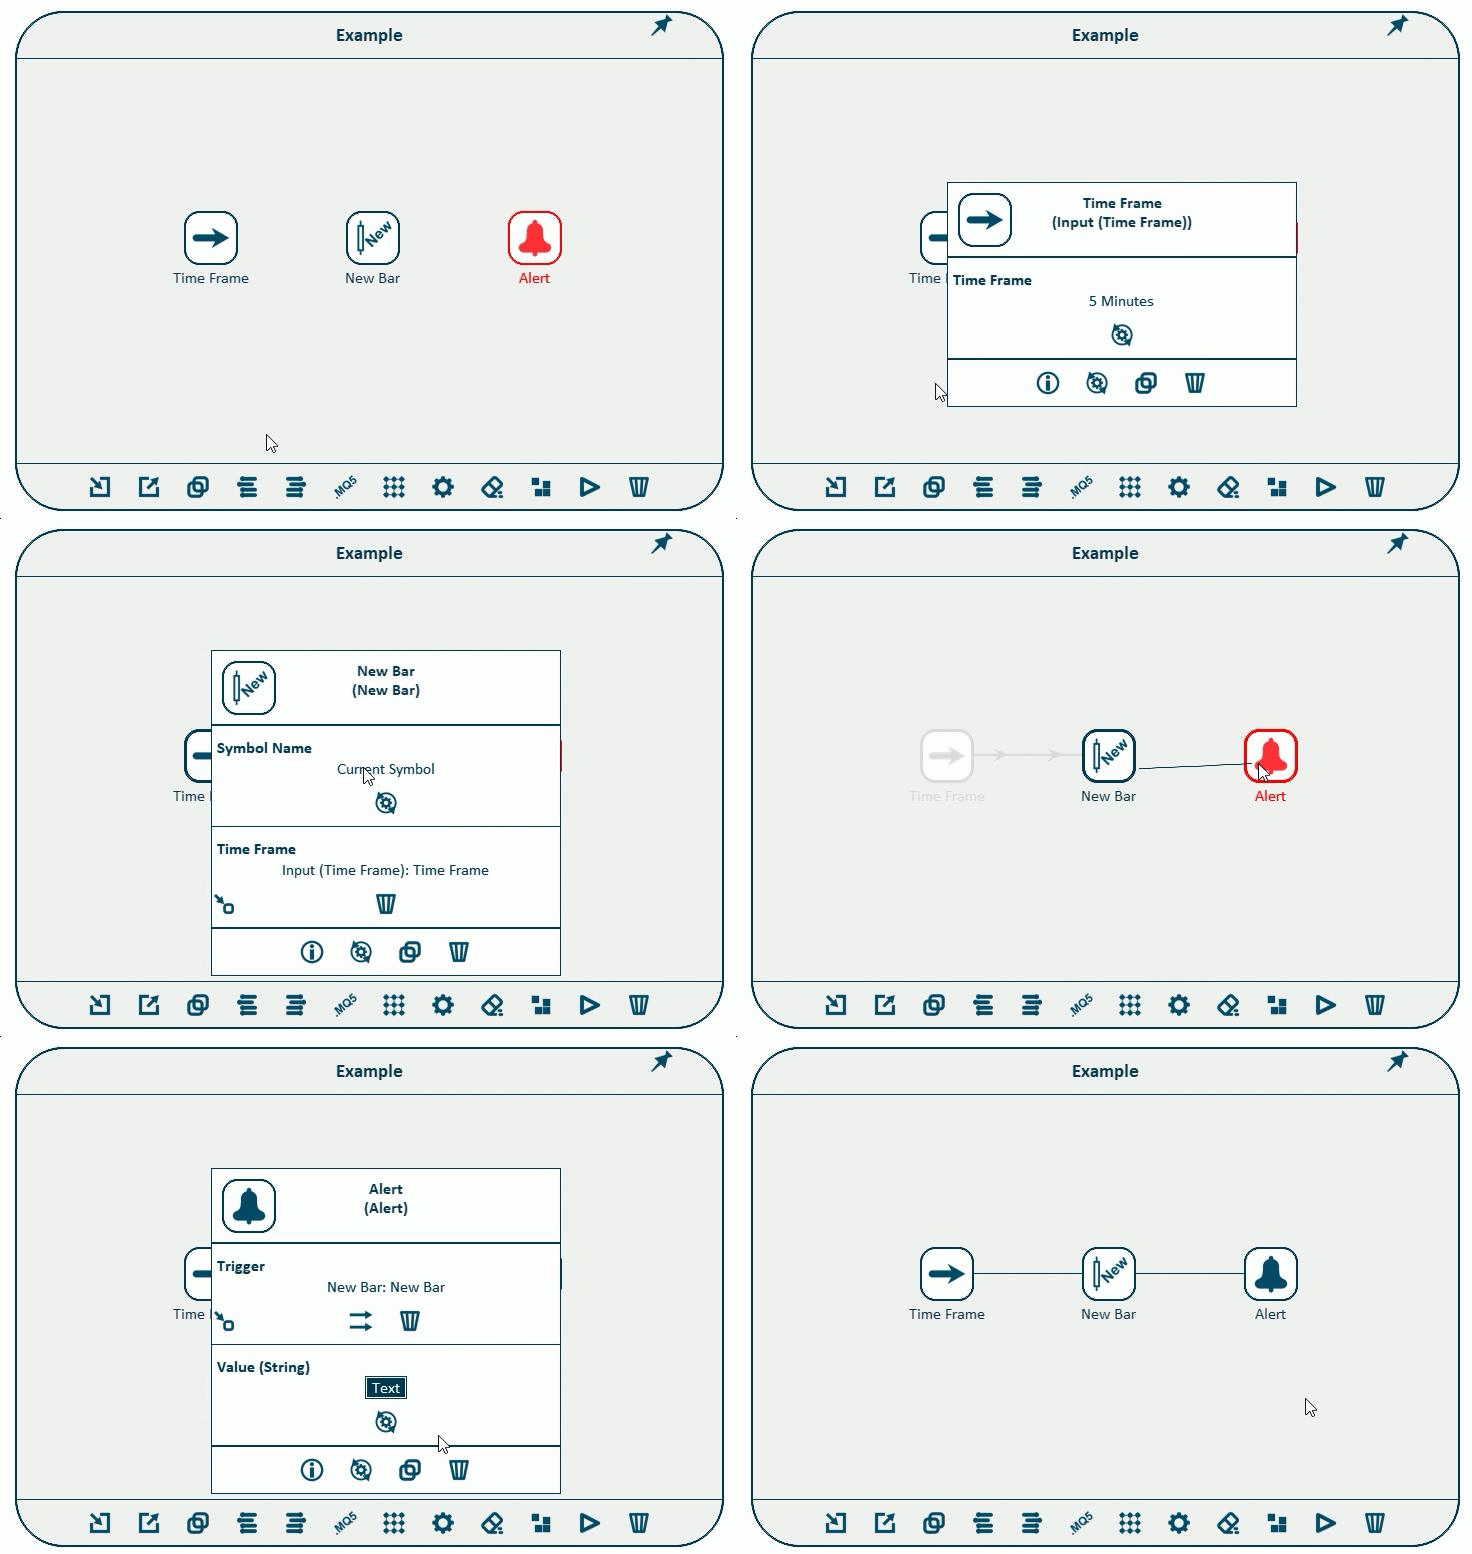
The picture above shows what the "new bar alert notification" utility would look like.
Links can connect only elements and parameters of the same type or the types that can be interconverted with no data loss.
Some actions can be applied to a group of selected elements.
To create a group of elements, select the section of the scheme by holding down the Ctrl key. All elements that fall into this zone will be selected. Also, the element is highlighted if you click on it while holding down the Ctrl key.
After clicking an element in the selected group, the group's settings window appears. The selected group can be cloned, deleted or saved into a file. In addition, you can create a snippet consisting of elements in the group. A new snippet will appear on the snippets bar and will be available for adding into the new schemes. Using snippets bar, you can change the elements parameters of any snippet.
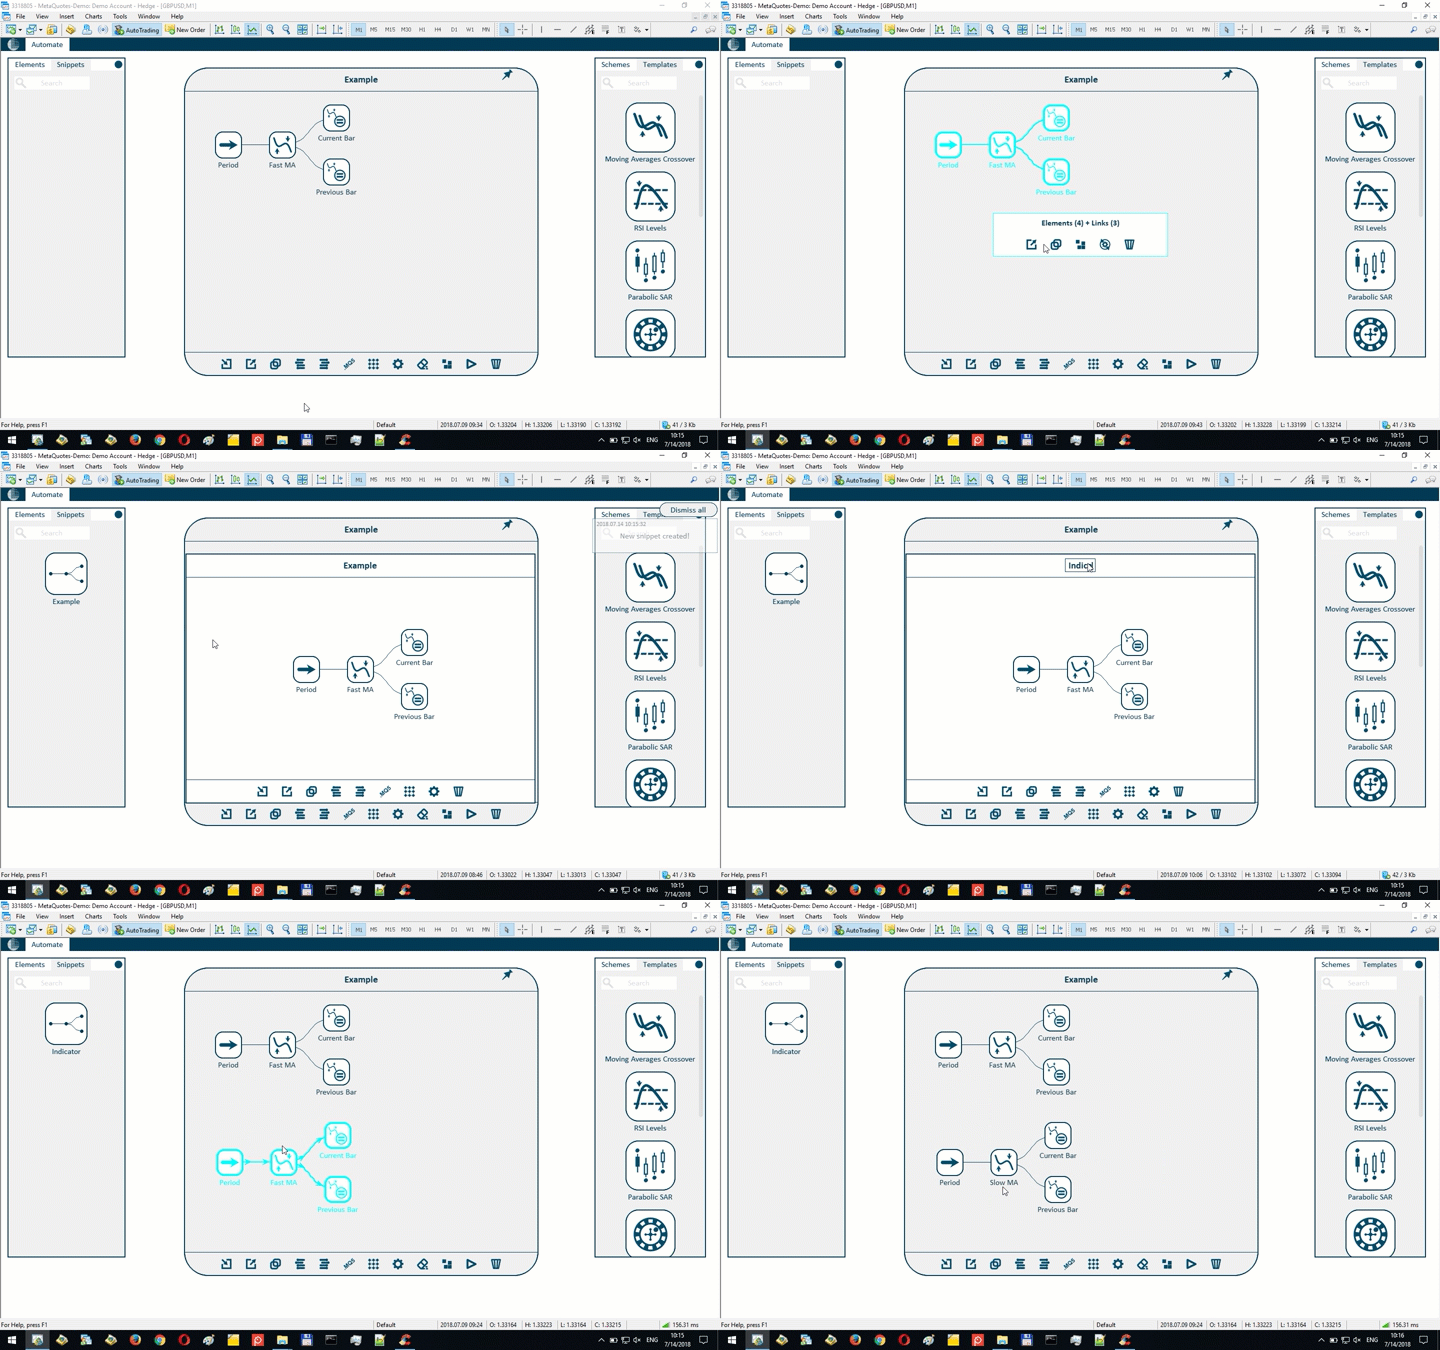
The other features of the program will be reviewed on examples of constructing real Expert Advisors.
Example #1: "Moving Averages Crossover" Expert Advisor
Consider a classic trading strategy based on two moving averages crossover.
The strategy can be briefly described as follows.
We buy when the fast moving average (MA) crosses the slow MA upwards. We sell when the fast MA crosses the slow one downwards. We close positions when the opposite signal occurs, as well as with Stop Loss and Take Profit.
Now let us describe the strategy in a more formal way as a set of rules / conditions.
- Moving Averages should be built using candles Close prices. We work only with the formed bars. All trading actions are performed at the opening of the bar following the appearance of the signal.
- The periods of fast and slow moving averages should be adjustable in input parameters of the EA.
- Signal to Buy (and close sells) is the state when the fast MA was lower than the slow one on the previous bar, and it became higher than it on the current bar.
- Signal to Sell (and close buys) is the state when the fast MA was higher than the slow one on the previous bar, and it became lower than it on the current bar.
- Only one position can exist at any given moment.
- All trades should have fixed lot size. Lot size should be adjustable in the input settings of the EA.
- The values of Stop Loss and Take Profit in points must be adjustable in the input parameters of the EA.
- The EA should work only with the symbol of chart it is placed on. The timeframe for indicators calculation should correspond to the period of the current chart.
- It should be possible for several EAs to work on the same account using a unique Magic Number identifier. This parameter must be set in the EA's input settings.
- It should be possible to specify a custom comment for the Expert Advisor trades.
This set of rules is good enough to serve as EA specification. Let's start developing this trading robot with visual strategy builder.
The periods of moving averages should be created as input parameters of the Expert Advisor.
To do so, use one of the Input elements. There is a separate element for different types of input parameters.
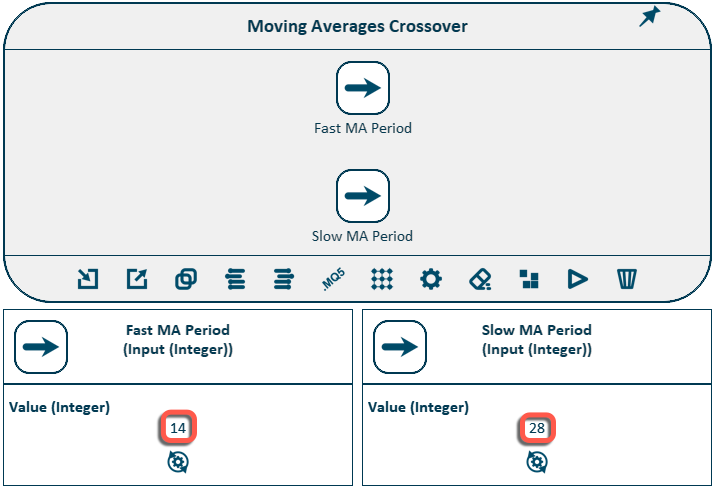
Indicator period is an integer. We will use the corresponding element. Let's create a new scheme and add two such elements into it, give them names and adjust their values. For the fast MA, we set the default value to 14, and for the slow MA = 28. These values can be further optimized in the strategy tester.
Our strategy uses one standard indicator, but with two different periods.
We need two elements called Moving Average.
Let's add them to our scheme and connect the indicator periods elements to the Indicator Period parameters. After that, the scheme will look like this:
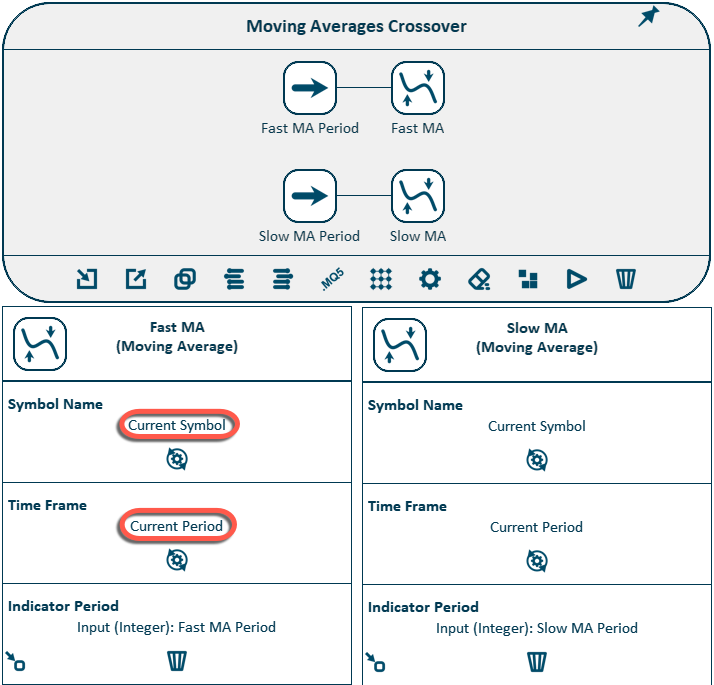
By default, indicators use the symbol and time frame of the current chart. This is exactly what we need. The period for calculating the indicators will be taken from the corresponding elements.
Now, in order to determine the conditions for buy / sell signals, we need to get two values for each indicator - for the previous bar and for the current bar.
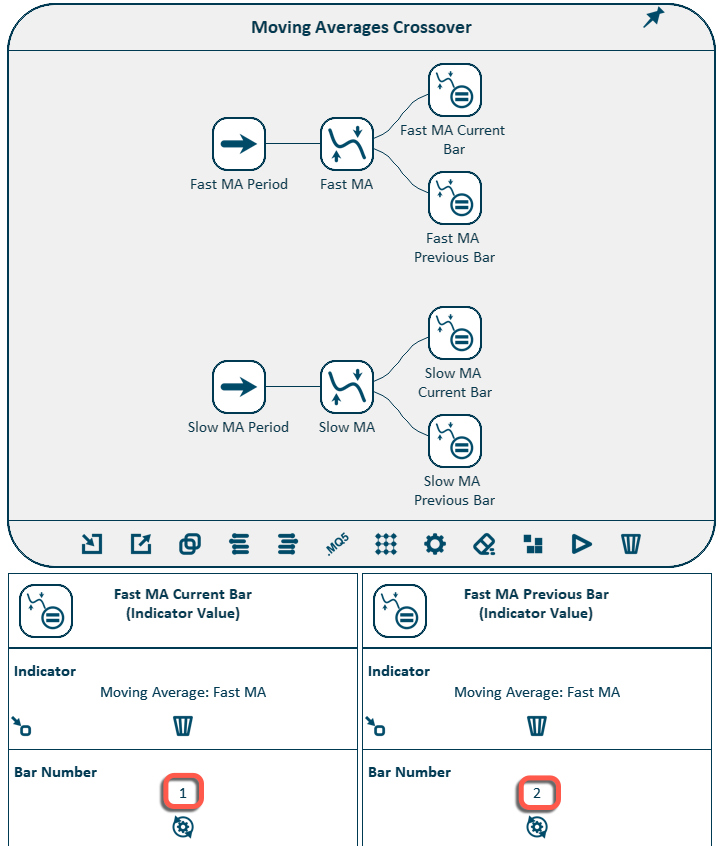
To get the indicator value, the Indicator Value element should be used. Let's add 4 such elements onto our scheme and create the corresponding links.
Bars are numbered from the present to the past. The current incomplete bar has the number 0. Number 1 is assigned to the previous formed bar, number 2 to the bar before it and so on.
Only formed bars are used In our strategy. Thus, for the current bar we use value = 1, and for the previous bar we use value = 2. Corresponding values are set for all four elements.
Now we need to compare the values of the indicators and check whether or not the entry conditions are met.
To compare numbers, use the Compare element. This element outputs the value "true" if two numbers satisfy the specified relation, and the value "false" if not. Let's add two such elements to our scheme. In the first one, we will check if the fast MA was above the slow one on the previous bar. In the second element, we check if the fast MA has become higher than the slow one at the current bar. Let's create the appropriate links and configure the parameters for these comparison elements.
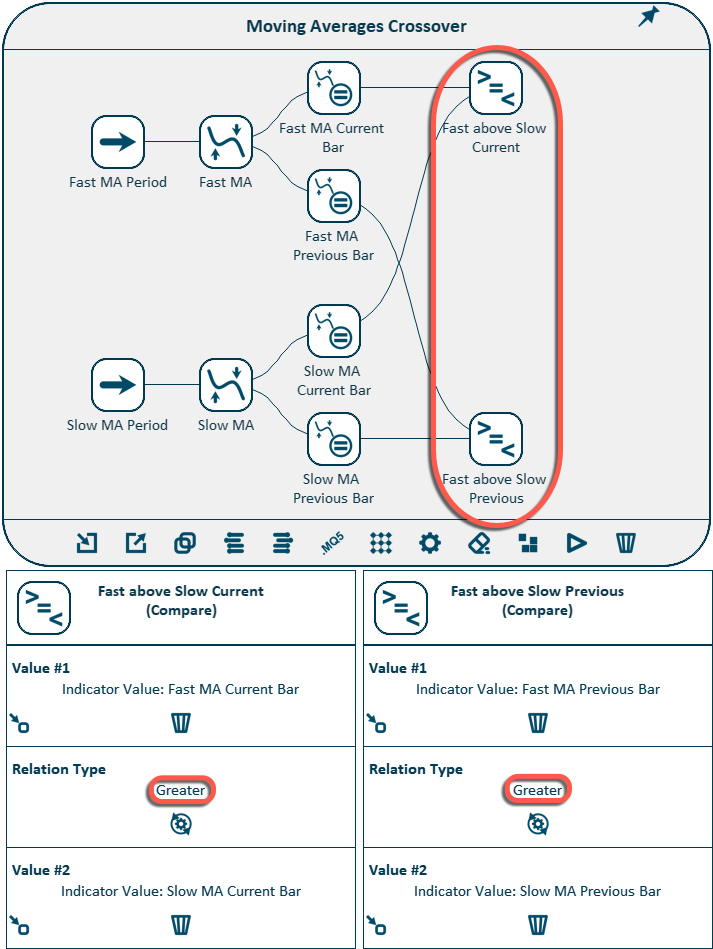
The Buy signal is the simultaneous fulfillment of two conditions:
- the fast MA was NOT above the slow MA at the previous bar
- the fast MA has become higher than the slow MA at the current bar
To check the simultaneous fulfillment of these conditions, use the element "logical AND". This element outputs the value "true" if ALL conditions are met and the value "false" if at least one of them is not fulfilled.
Add two such elements to the scheme and connect both Compare elements to each of them.
When doing so, we need to "reverse" some of the links. The Compare element yields "true" if the fast MA was higher than the slow MA on the previous bar, but we need to check that it was NOT higher. Therefore, we will flip the output value by adjusting the corresponding links in the parameters of the elements. Reversed links are drawn with red color on the scheme.
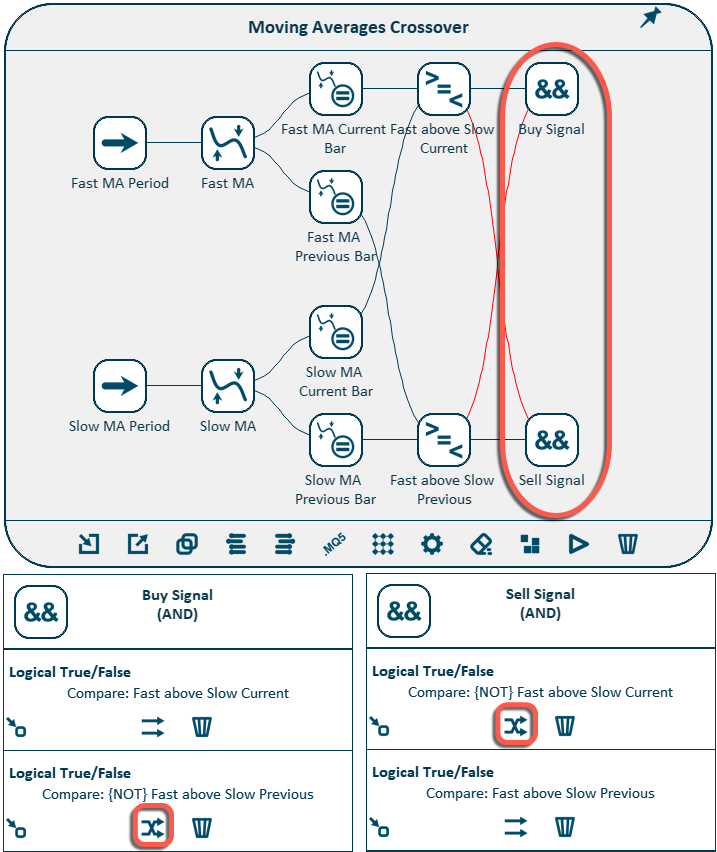
Let's proceed to the implementation of trading operations. Before opening a new position, we must check the current state and ignore the signal if the trade in the desired direction is already open, or close the position if it is open in the opposite direction. To do this, we need to know the number of existing Buy and Sell positions at the current moment.
To access the trades information, use the Trades Group element. This element forms a group of trades which satisfy certain criteria. Trades can be filtered by various parameters, such as symbol, magic, comment, etc.
We need one such element for buys and one for sells. Let's add these two elements to the scheme and configure them accordingly:
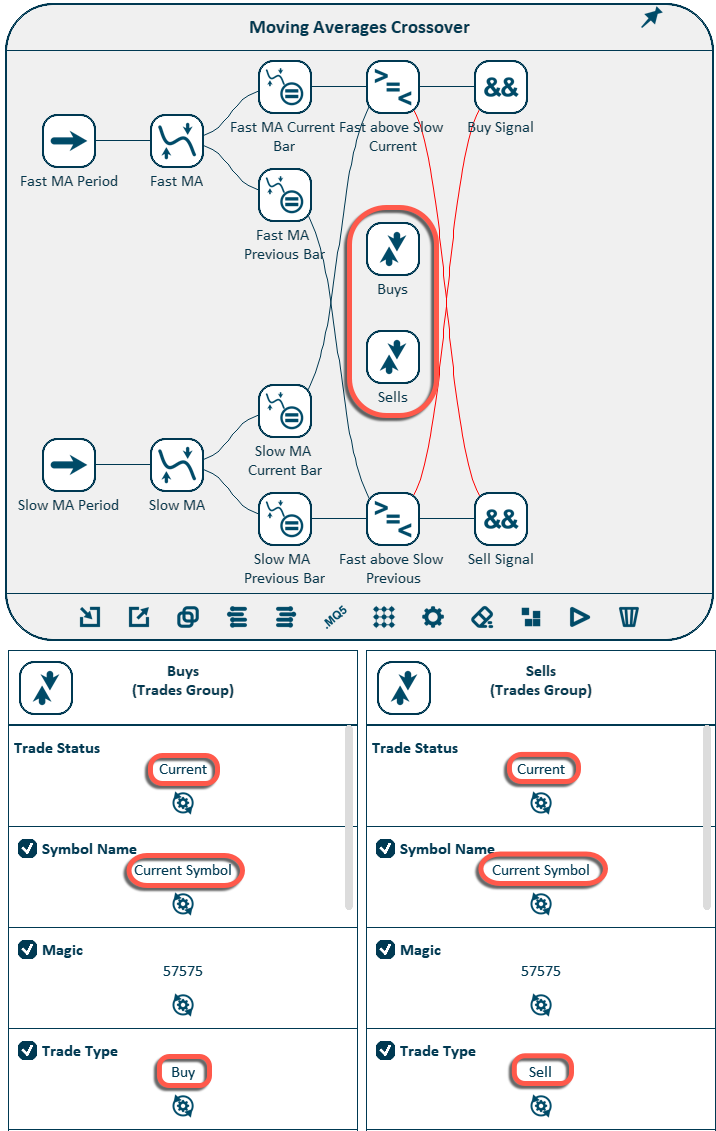
To get information about a trades group (we need to know number of trades in it), we will use the Trades Group Information (Integer) element. Let's add two such elements to our scheme. Their output values will be compared with zero using the Compare elements.
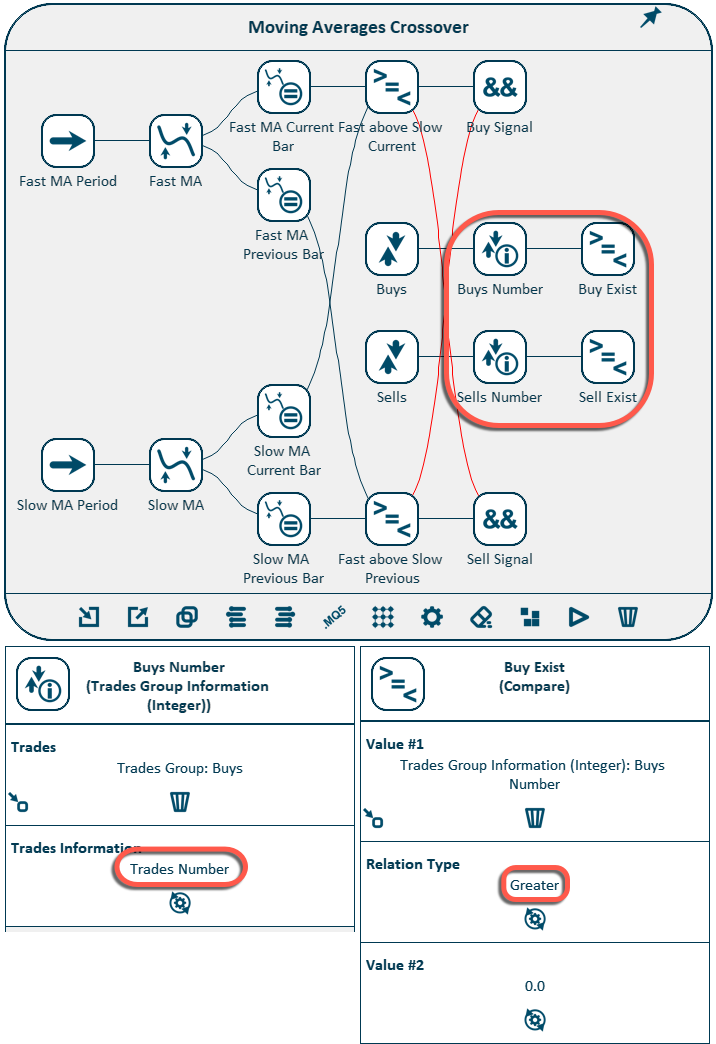
Now we need to form the final conditions - triggers for trading operations. Each trigger contains two conditions.
- Trigger to open a buy - (1) no open buy trades exist at them moment and (2) there is a buy signal
- Trigger to open a sell - (1) no open sale trades exist at the moment and (2) there is a sell signal
- Trigger to close a buy - (1) there is an open buy position and (2) there is a sell signal
- Trigger to close a sell - (1) there is an open sell position and (2) there is a buy signal
Since we need to check the fulfillment of several conditions, we will use the logical AND elements again, one for each trigger. Add 4 such elements to the scheme and create the corresponding links.
Note that for triggers to open positions, the links from the Compare elements must be reversed.
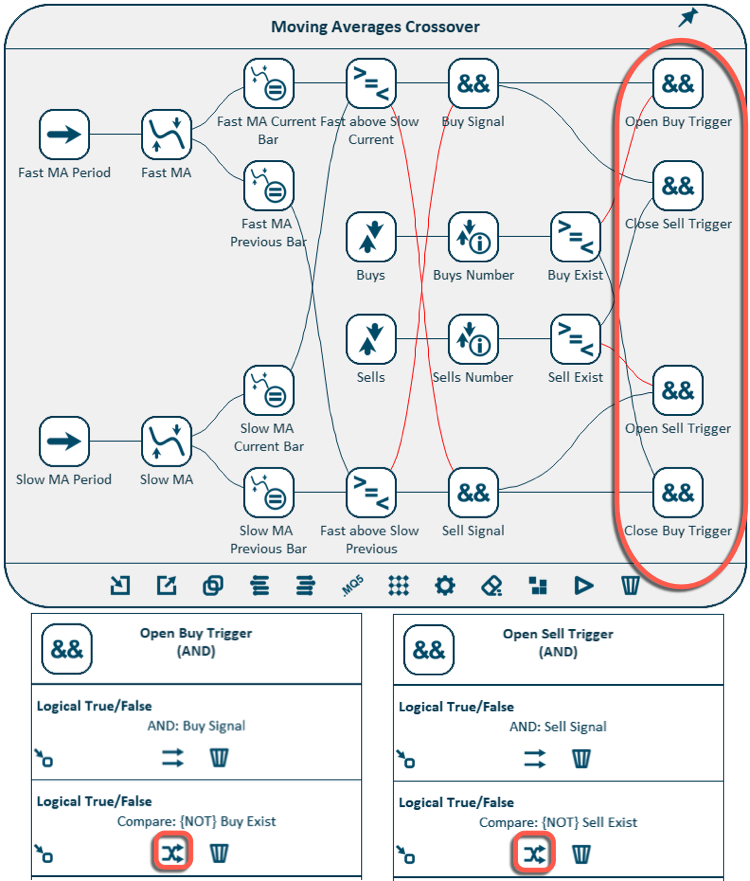
Triggers are ready. The only thing left is to add the trading elements.
To open a position, use the Open Trade element. We need one for opening buys and one for opening sells.
To close trades, use the Close Trades Group element. Here we also need one element for closing sells and another one for closing buys.
Other than triggers, we also need to connect the trades groups themselves to the Close Trades Group elements. After adding these elements and creating the appropriate links, the scheme will look like this:
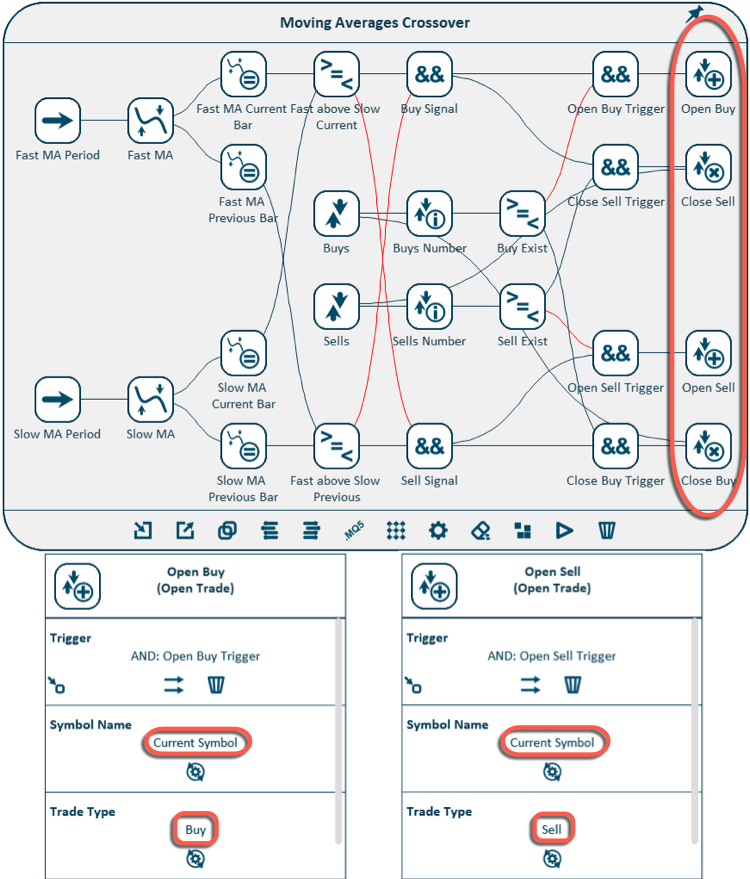
The trading logic of the EA is completely ready. Now we need to make sure that the trading lot size, magic, trades comment and the Stop Loss / Take Profit values can be adjusted from the input parameters of the Expert Advisor. To do this, we again need the elements from the Input Parameters group.
The trading lot is given by a decimal number, trade comment is a string, while the magic number, stop loss and take profit are integers. Add these elements to the scheme and attach them to the corresponding parameters of the trading elements.
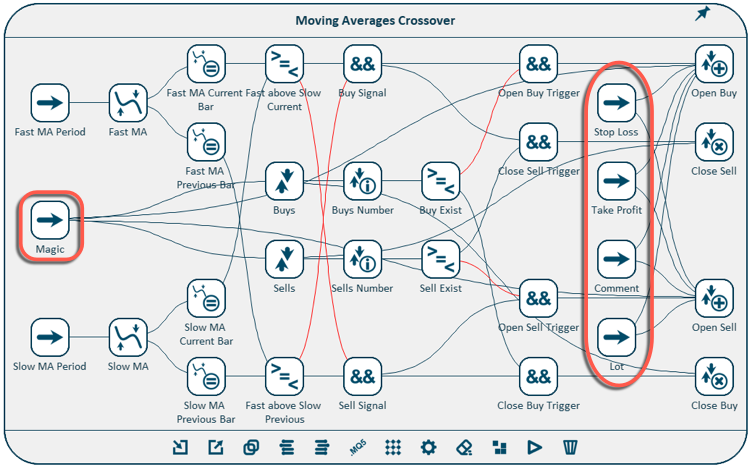
The scheme is ready. Now you need to create an executable EA file.
If you want the EA's input parameters to go in a specific order, you can use the Arrange Inputs option. This will list all the elements that are responsible for the input parameters, and they can be moved up / down, specifying their order of appearance in the EA settings window.
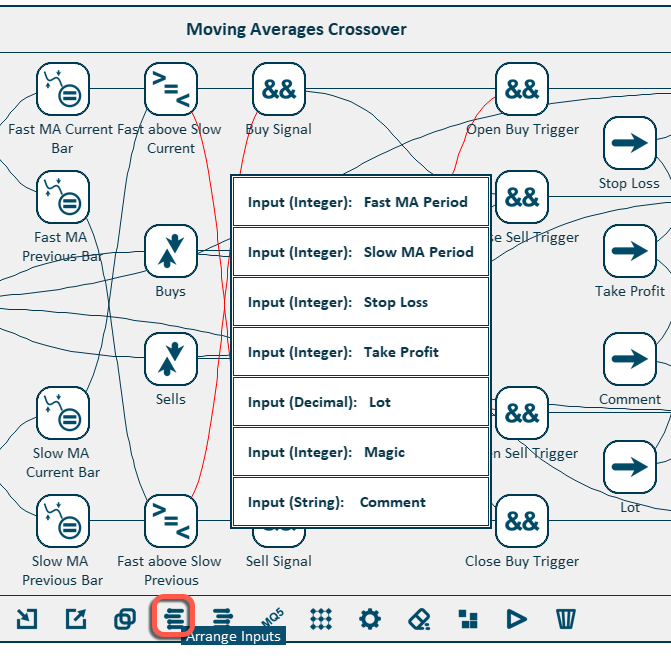
- The EA file generation using file navigator of the strategy builder.
- Opening the created EA source code file (.mq5) in the MetaEditor program.
- Compiling the Expert Advisor and obtaining the executable EA file (.ex5).
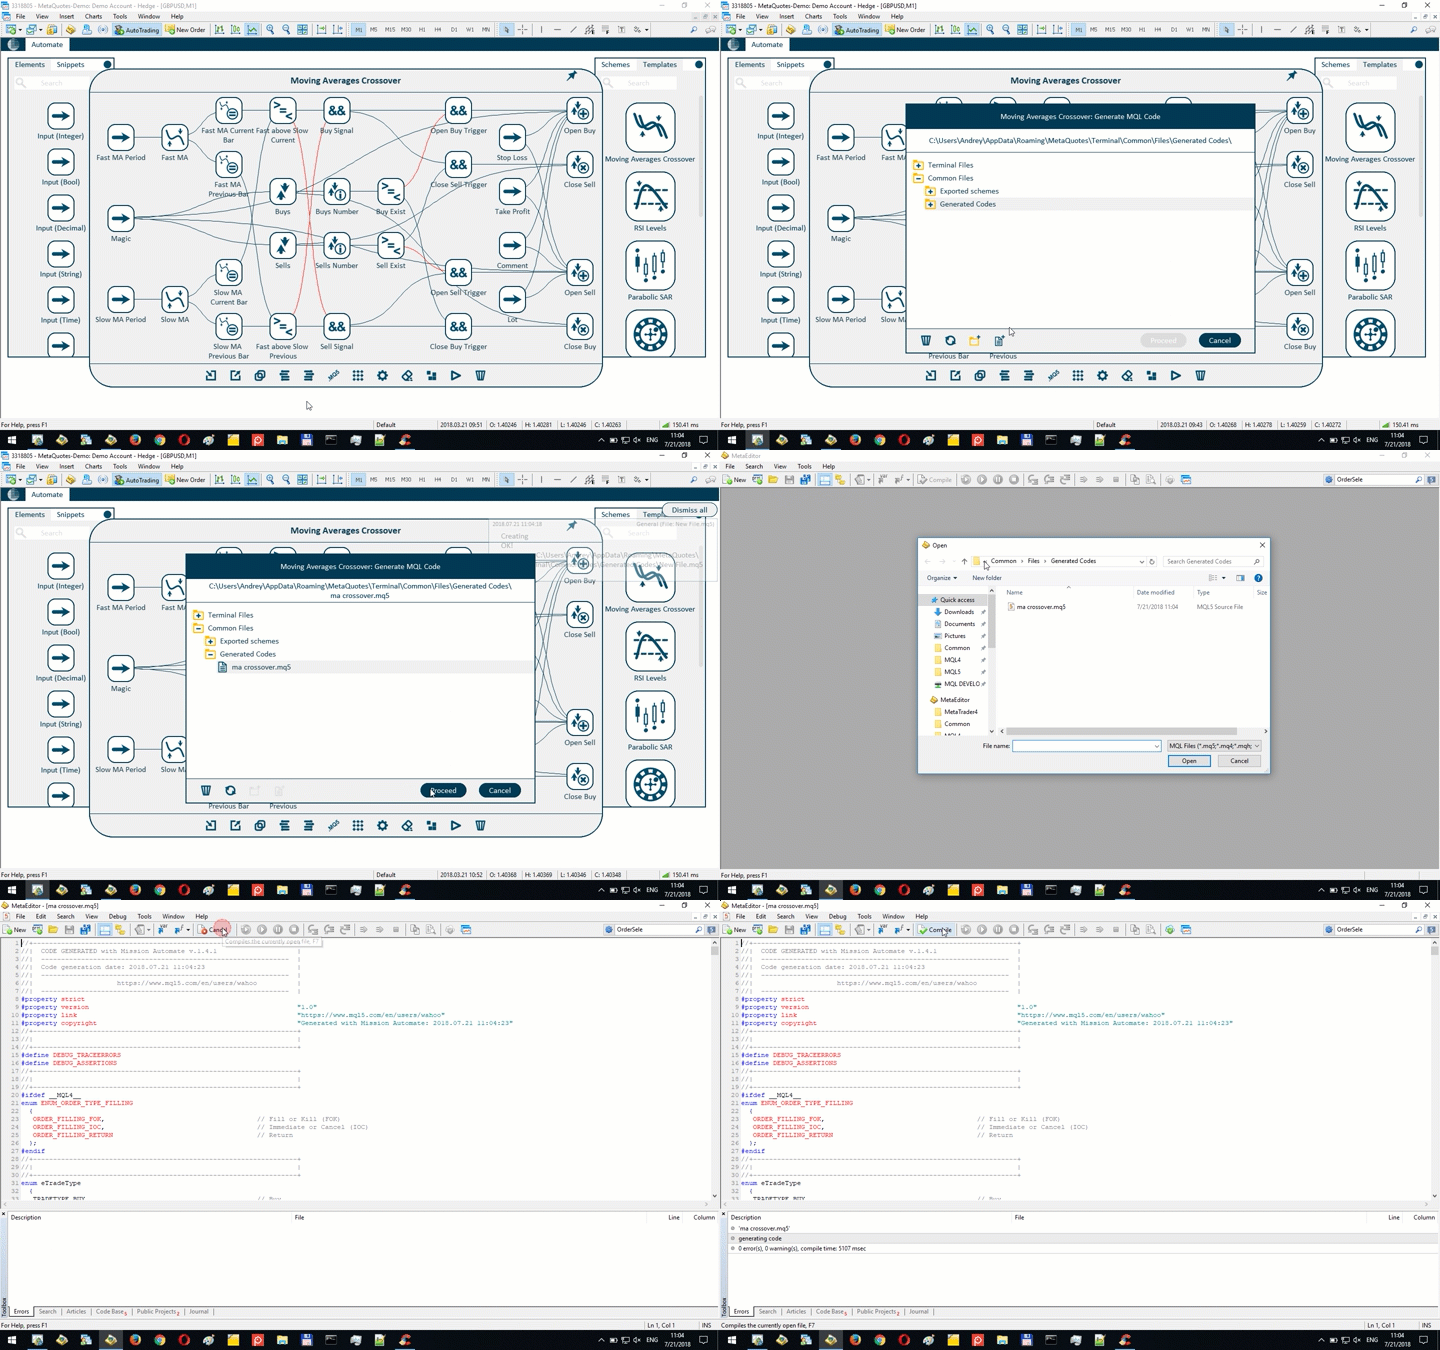
After successful compilation, an EA file with .ex5 extension and the same name as the source code file will appear in the same folder where the source file (.mq5) is located.
This EA file should be placed in the Experts folder of the trading terminal, and then it will be available for use in the trading terminal.
If we run the created Expert Advisor in the strategy tester, we'll see the following picture:
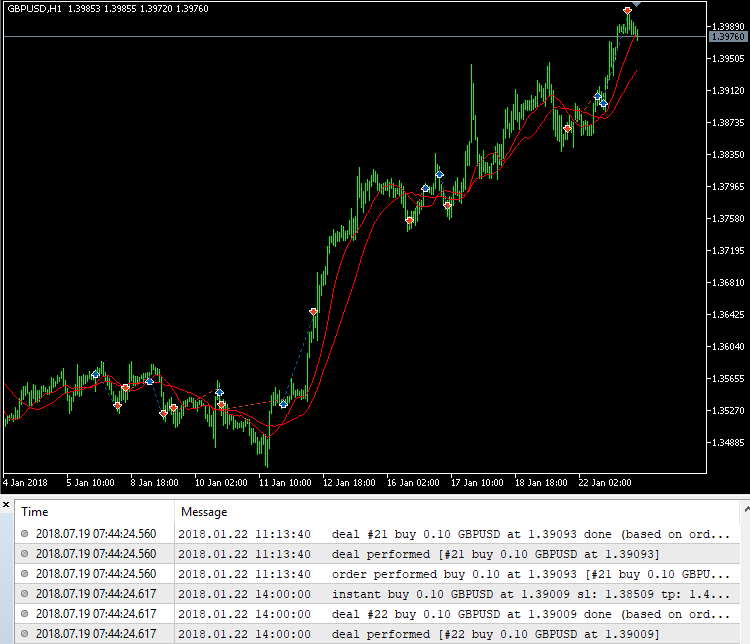
The EA is ready and it fully complies with the original rules of the trading strategy!
Example #2: "Reversing Martingale" Expert Advisor
Let's consider another very popular trading strategy based on the Martingale system. The strategy can be described as follows.
We open a position in any direction with the initial lot size. We set Stop Loss and Take Profit equal to each other. If the position is closed in profit, the next one is opened with the initial lot size again. If the position is closed at a loss, then the next trade should have an increased lot size, so that closing in profit compensates for the previous losses.
The technical specification for such a robot might look like this.
- The first trade should be opened in the user-defined direction (input parameter) and with the initial lot size (input parameter).
- For any open position, the same stop loss and take profit levels are set in points (input parameter).
- If the trade closes in profit, the next position is opened in the opposite direction with the initial lot size.
- If the trade is closed at a loss, the next position is opened in the opposite direction with an increased lot size (Lot Multiplier - input parameter).
- It should be possible to specify the comment for all EA's trades (input parameter).
- It should be possible to run several EAs simultaneously (Magic - input parameter).
- The EA should trade the instrument of the chart it is attached to. The timeframe does not matter.
Let's start creating this Expert Advisor using the visual strategy builder.
To implement the strategy, we need to have information about the current state (the presence of open positions) and the trade history (we need to know the direction, profit and lot size of the previous trade).
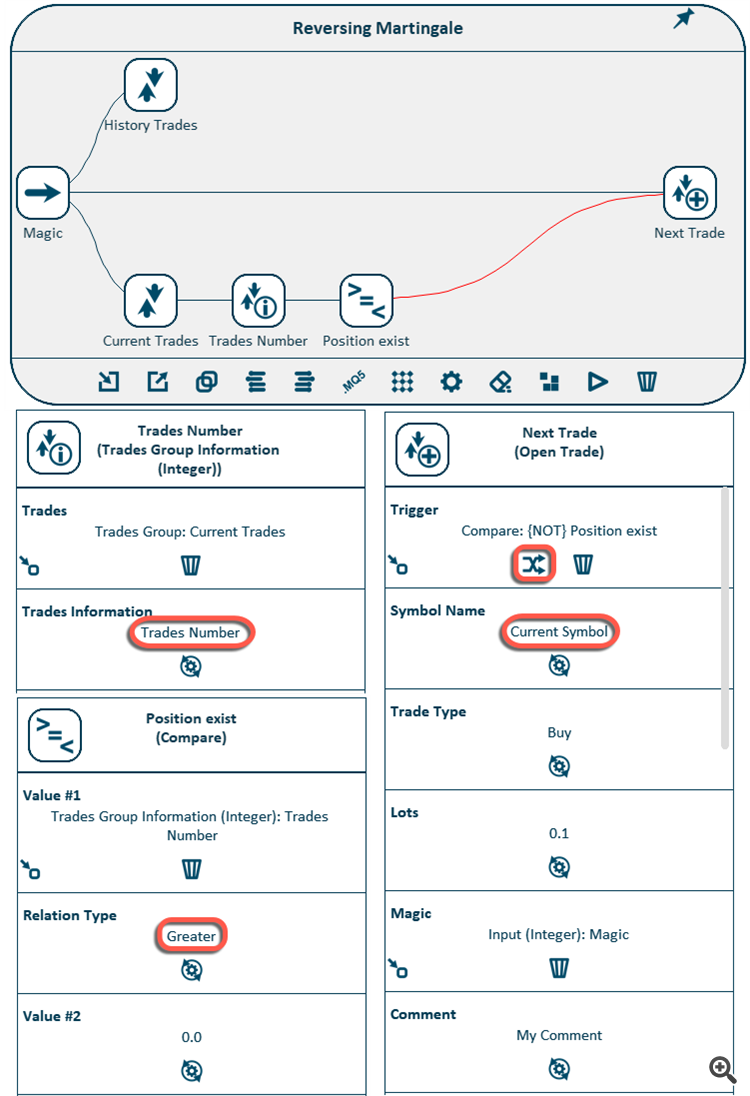
Form two trades groups: one with closed positions (history) and another with current positions (current). Also add the Input Parameter element for the Magic number.
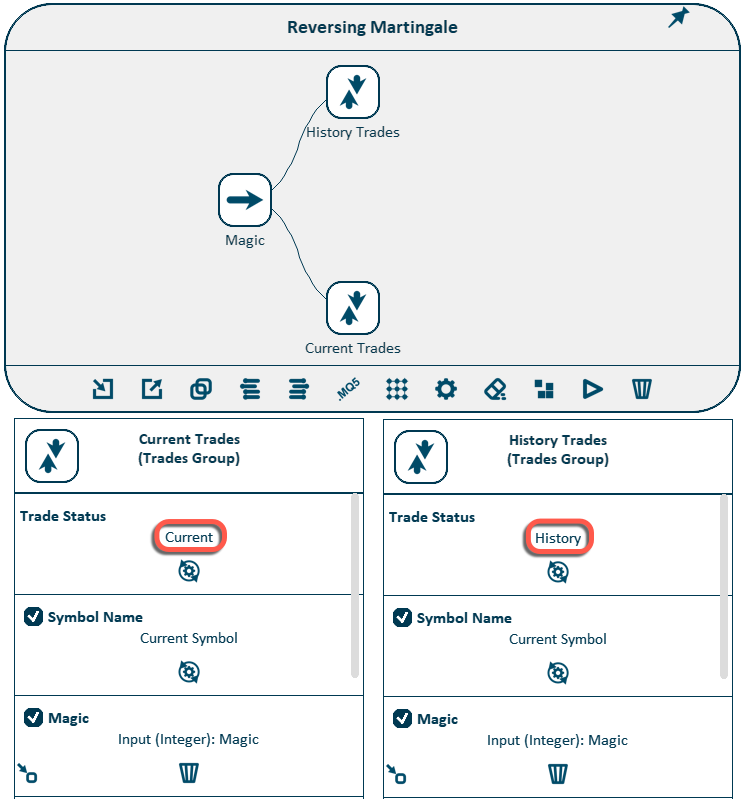
If no open position is present, it must be opened. As in the previous example, determine the number of open positions using the Trades Group Information element, and compare the obtained value with zero. If there are no positions, this will be a trigger for opening a new trade. In our case, this link must be reversed.
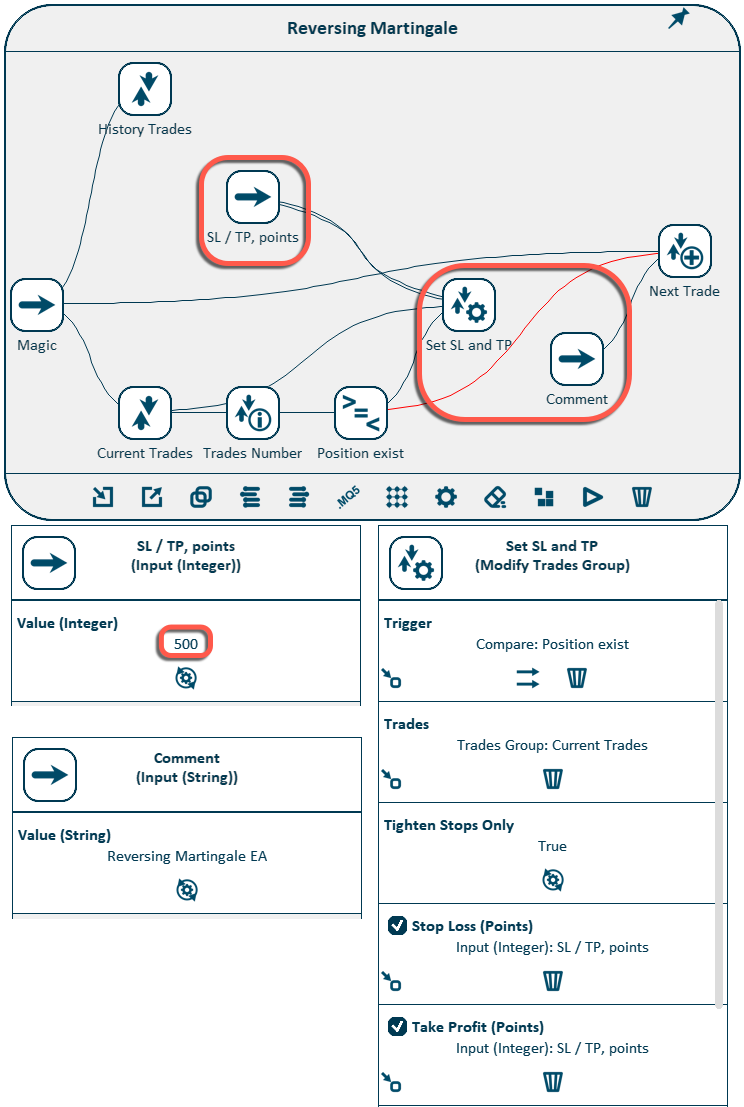
If there is an open position, we need to set Stop Loss and Take Profit for it.
In the previous example, this was done immediately at the time the trade was opened, but not all execution modes / brokers allow doing this. Therefore, consider the case of opening a position without SL and TP and their placement in the future.
Placing (modification) of the SL and TP levels is performed by the Modify Trades Group element.
In addition, add elements for the input parameter with trades Comment and for the input parameters with the SL and TP values in points.
To determine the type of the next trade, we need to know the direction of the last closed position. To access information about the position, use the Trade Information element. For doing this, we need to know the ticket of the last trade. We can obtain it using the Trades Group Information element.
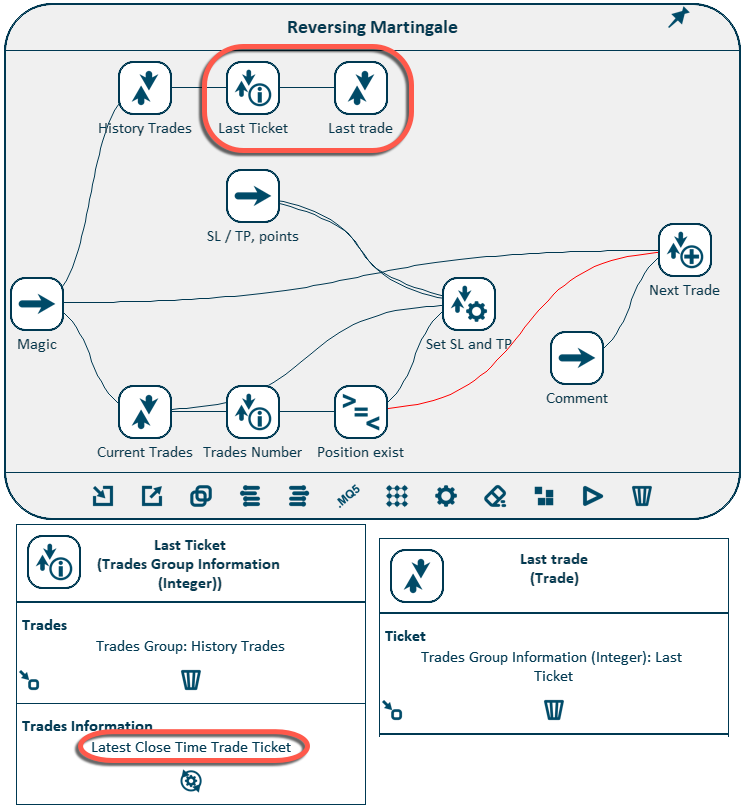
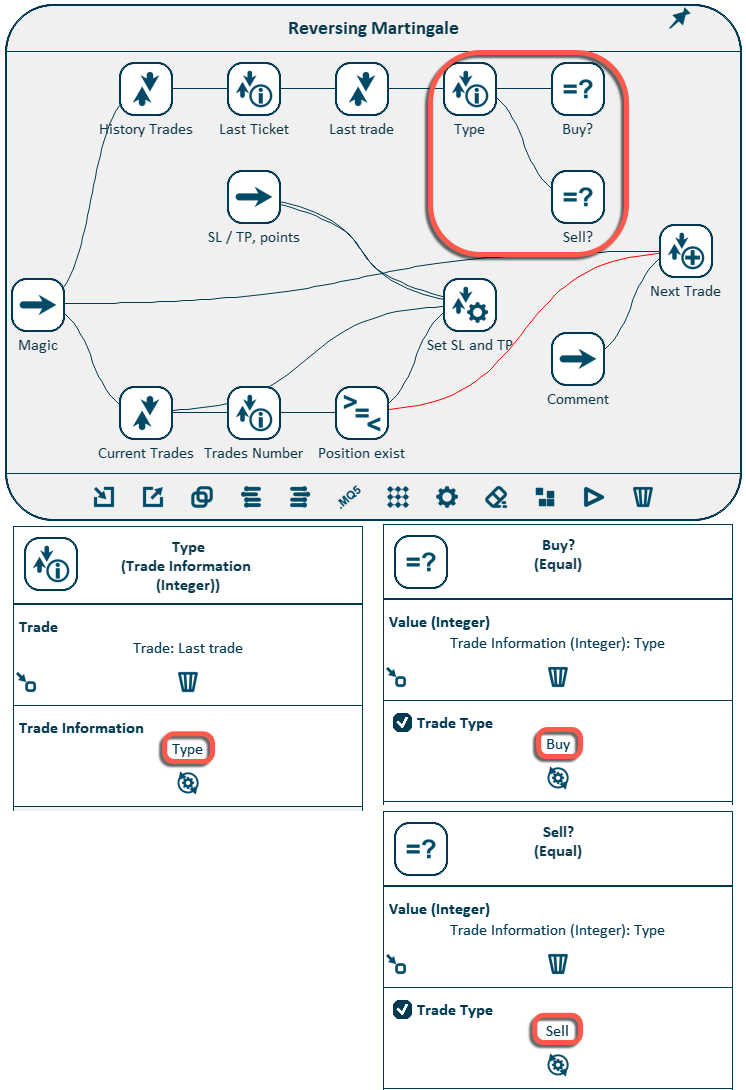
Let's get the type of the last trade and find out whether it was a buy or a sell. To do this, use the Equal element. It allows comparing numbers with different types of data and it outputs "true" if they are equal.
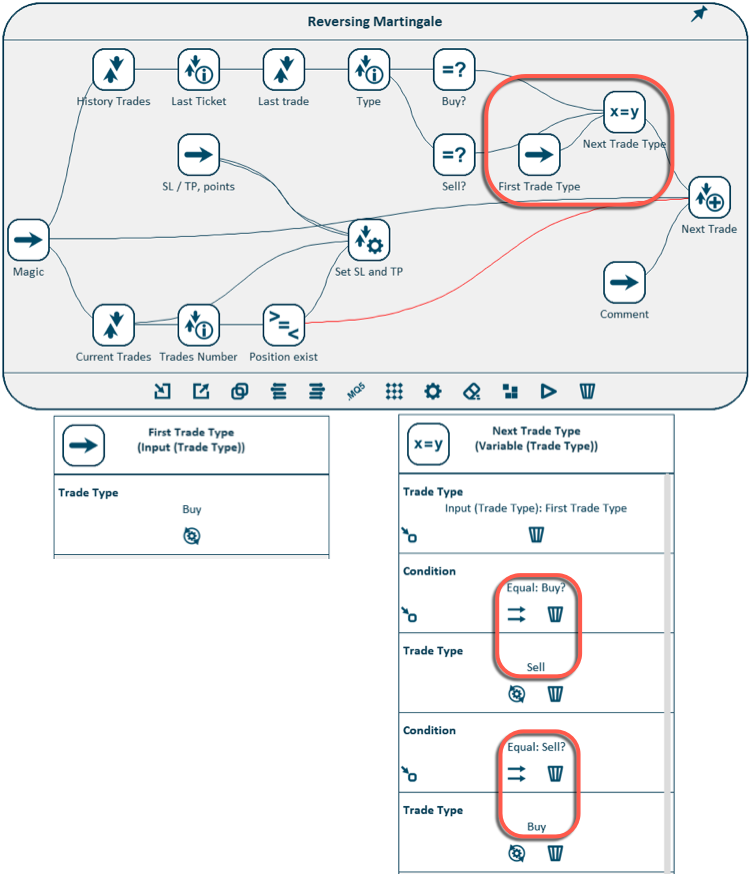
Using the Variable element, create a type for the next trade. This element outputs different values when different conditions are fulfilled and serves as a kind of switch.
If the previous trade was a buy, then the next one will be a sell, and vice versa. If the type of the last trade is unknown (if no position has been opened yet), then the type from the input settings will be used. Create it with the help of the corresponding element.
Now we need to calculate the volume for the next trade. To do this, we need to know the result of the last closed position, and its volume. The profit and volume of the trade is obtained using the Trade Information elements. The profit will be compared with zero to determine whether the trade was closed in profit or loss.
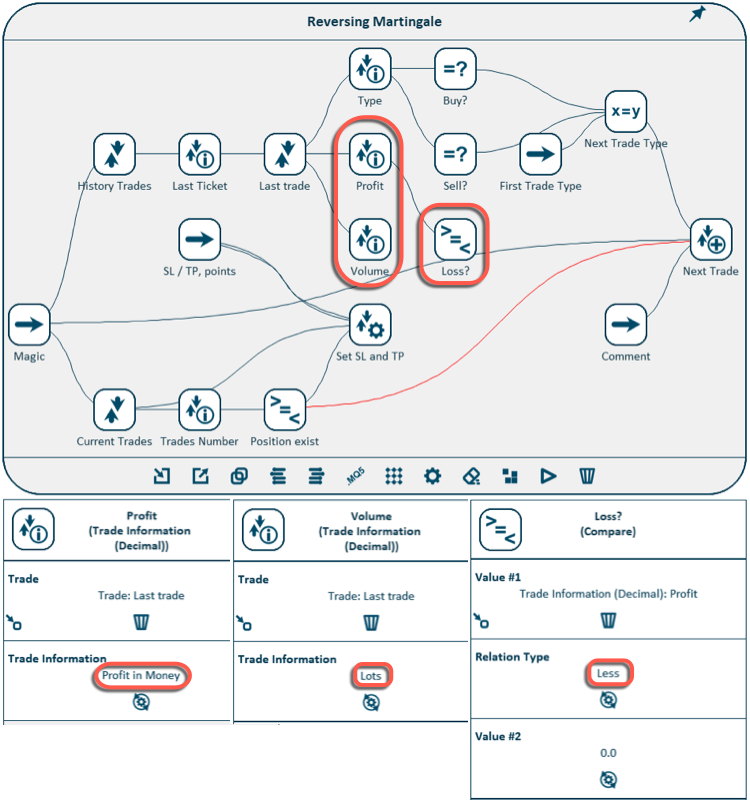
If this is the first trade or if the last position was closed in profit, we start a new cycle with the initial lot.
To determine the condition for a new cycle start, use the logical OR element. It returns "true" if at least one of the conditions is met, and "false" if all conditions are not met. We need to check two conditions. (1) The condition for closing the trade in profit is taken from the Compare element, which checks if the profit was less than zero (this connection to the OR element must be reversed). (2) To check if this is the first trade, use the AND element, where we connect the inverted values from the Equal elements. After all, if the previous trade is neither a buy nor a sell, it means that this is the situation when there is simply no previous position.
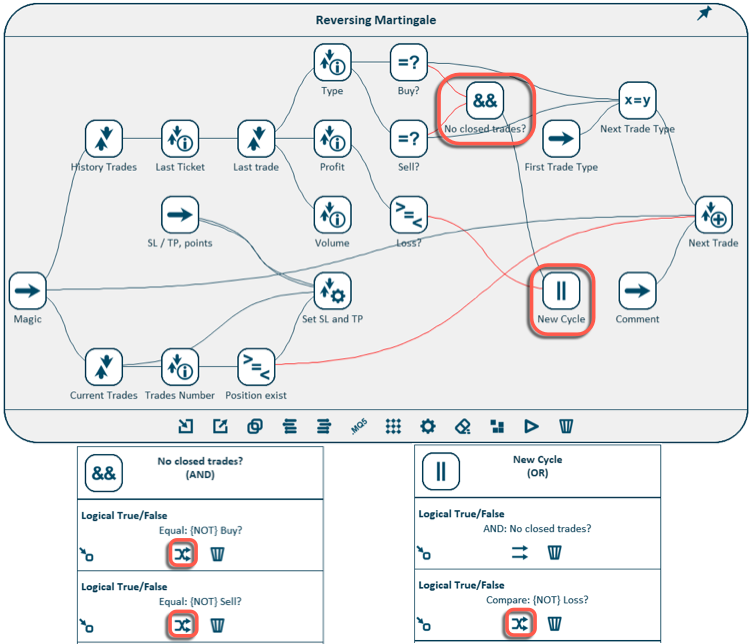
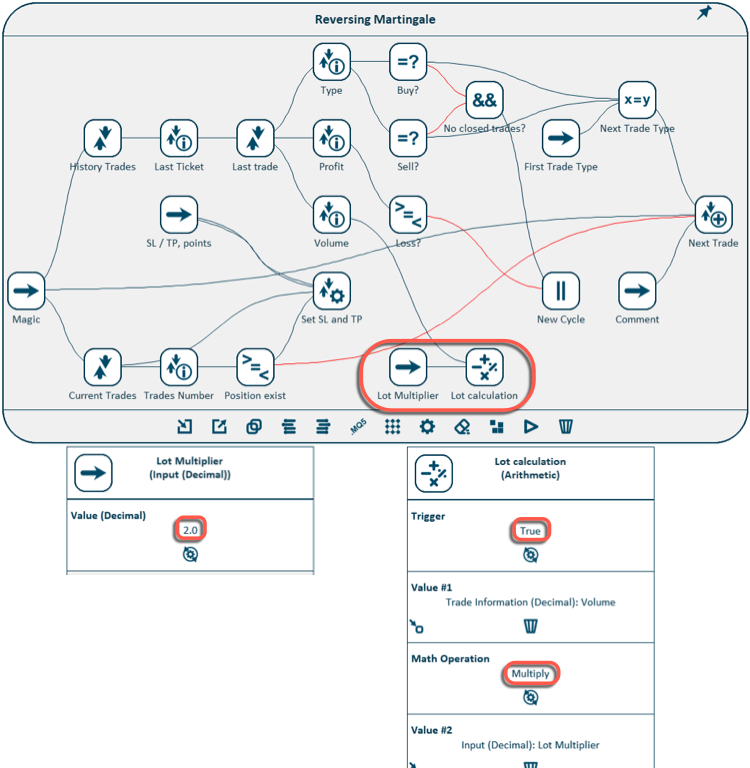
If there was a previous position, then we need to calculate the next trade volume. To do this, use the Arithmetic element. It performs various mathematical operations with two numbers. In this case, we multiply the lot of the previous trade by the Lot Multiplier parameter, created using the Input Parameter element. For our strategy, set its default value to 2.
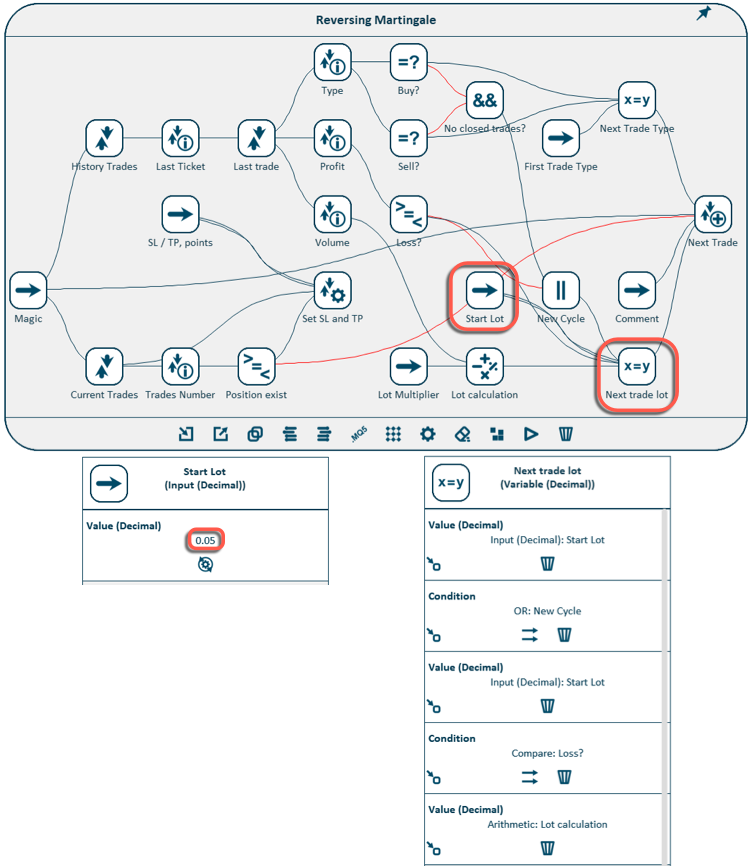
For the final calculation of the next trade lot size, use the Variable element, similar to determining the next trade type. For if we start a new cycle, then we need to use the initial lot, but if we continue the cycle after a losing trade, then we need to use the lot size of the next trade, calculated in the previous stage.
In addition, add an element for the initial lot size (input parameter). The completed scheme will look like this:
For a quick overview of the parameters of all the elements of the scheme / strategy, you can use the Parameters Layout view function.
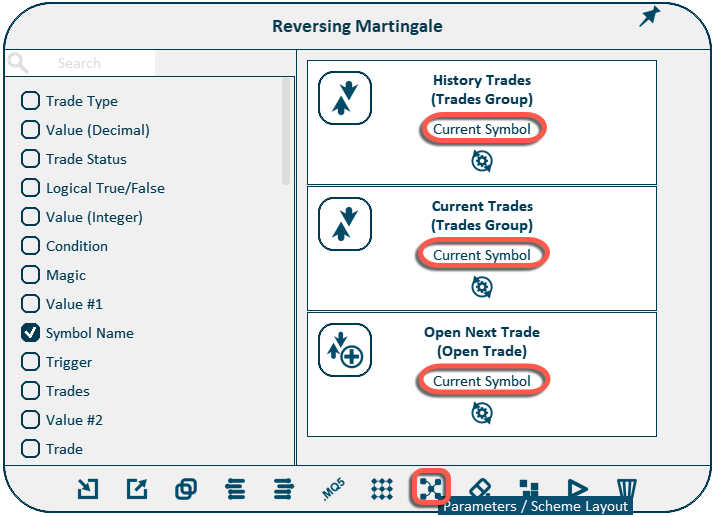
In this case, the scheme will change its appearance and split into two areas. The first one lists all the parameters that are present in the scheme, and the second part lists all the elements that contain each of the parameters. In this layout we can check the settings for each of the parameters in all elements.
Let's make sure that all elements use the current symbol of the chart on which the expert is running. To do this, switch the scheme into the Parameter Layout mode and select the Symbol Name parameter in the left hand side list. Then, in the right hand side area, you can see see that this parameter is present in three elements of the scheme and is set to Current Symbol in every one of them, which means using the current chart instrument. If necessary, this value can be changed to the name of any other currency pair from the Market Watch.
Let's check our completed Expert Advisor in the strategy tester. For doing this, as in the previous example, we need to generate a source code file and compile it in the MetaEditor program.
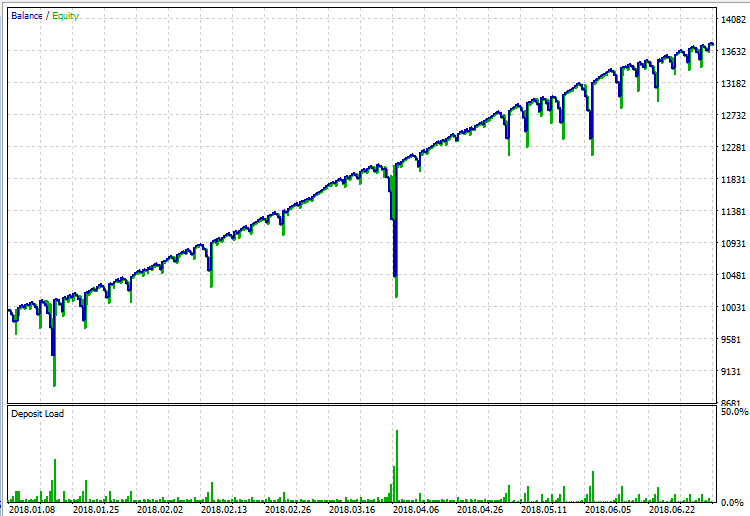
The strategy is risky, but it works according to the given algorithm! There is plenty of room for improving the strategy further, optimizing its parameters and reducing risks. You can add different entry filters, add a spread filter, disable the start of a new cycle on Friday before the weekend, limit the maximum lot size or the maximum number of trades in a cycle, or come up with something else.
Example #3: "Closing a Trades Group on Total Profit" Utility
Using this visual strategy builder, one can create not only trading strategies, but also simpler tools - trading utilities.
Now we will create a utility that closes a group of trades when the specified profit level is reached.
The utility must meet the following requirements.
- It should NOT open any positions.
- It should trace the current positions on the account with a given Magic number (input parameter).
- When these trades reach a given level of total profit (input parameter), all positions must be closed.
- The tool must generate an alert when closing a group of trades, indicating the total profit and the number of attempts to close the entire trades group.
The last point of the requirements is due to the fact that it is not always possible to close the position on the first attempt. The reasons for this may be different. The most frequent is the expiration of the requested price (requotes). The greater the number of positions in a closed group is, the more likely that one of them will not be closed on the first attempt, especially in times of increased volatility.
The trigger for closing a group of trades will be the condition that these positions achieve a given level of profit. Therefore, we need to access this group of positions and its parameters.
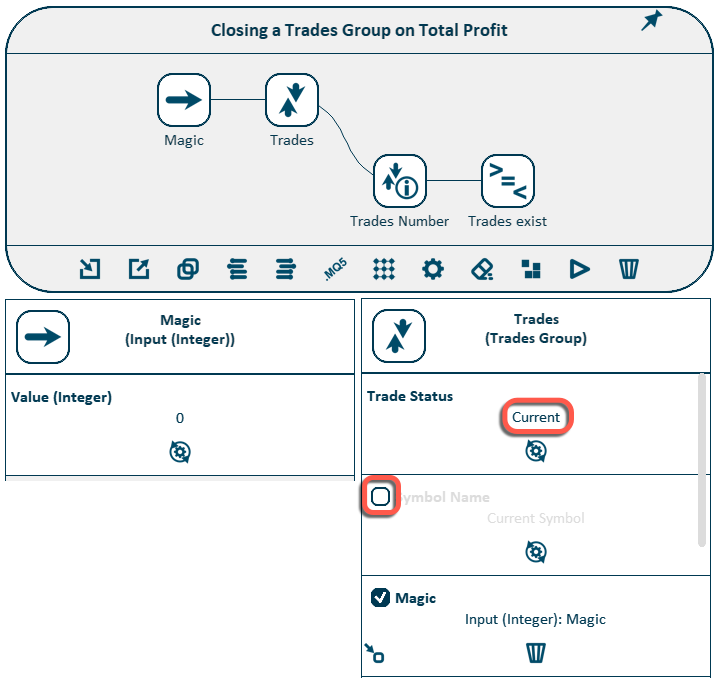
Create a trades group (the Trades Group element) with the specified Magic number (Input Parameter element), find out the number of trades in it and compare the obtained value with zero to determine if there is at least one position to be monitored.
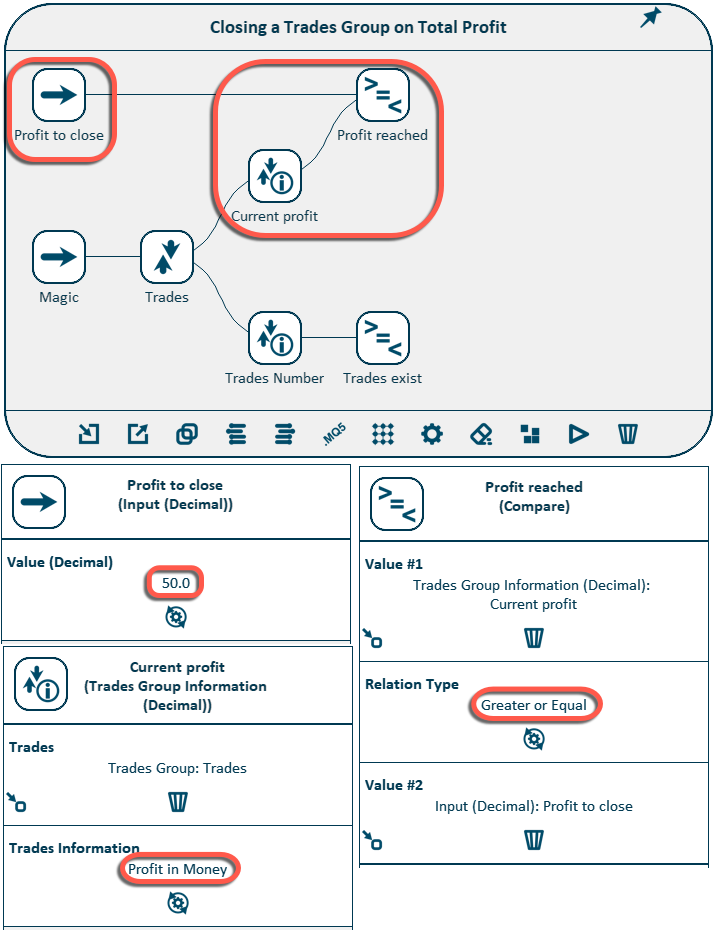
Get the current total profit of this trades group (Trades Group Information element) and compare this value with the given profit level for closing (Input Parameter element).
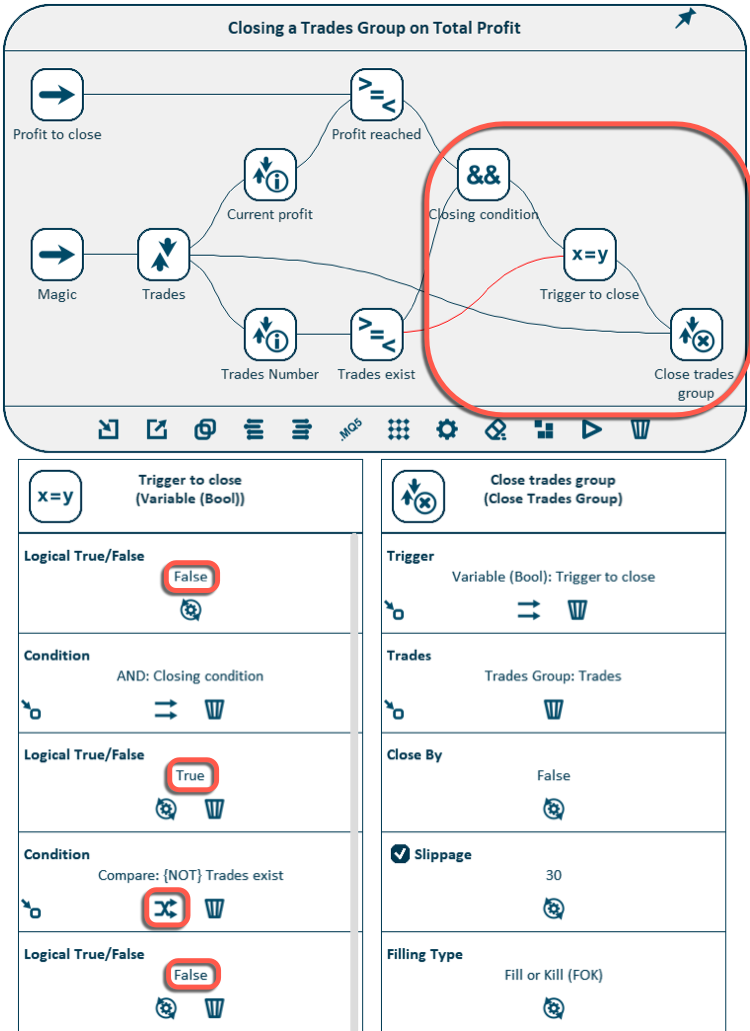
Now we can use the Compare element as a trigger for closing the entire group right away, but we will do it in a slightly different way. The fact is that Expert Advisors are executed on every tick - once for every tick. And in real trading the following situation is possible. The condition for closing all trades was fulfilled, the utility began closing them, but for some reason only a part of these trades could be closed during this tick, and some were left open. On the next tick, the tool will check the fulfillment of the condition again, but it may not be fulfilled anymore, because a part of the positions was closed on the previous tick and they are no longer a part of the considered group.
The solution is to "remember" the fact of meeting the condition for closing the entire group in the Variable element. The EA will close all trades on the following ticks if this variable holds the value "true", until all of them are successfully closed. Once all trades are closed, reset the condition to close (set the value to "false") and wait for the new trigger to close.
Positions closing is implemented with the Close Trades Group element.
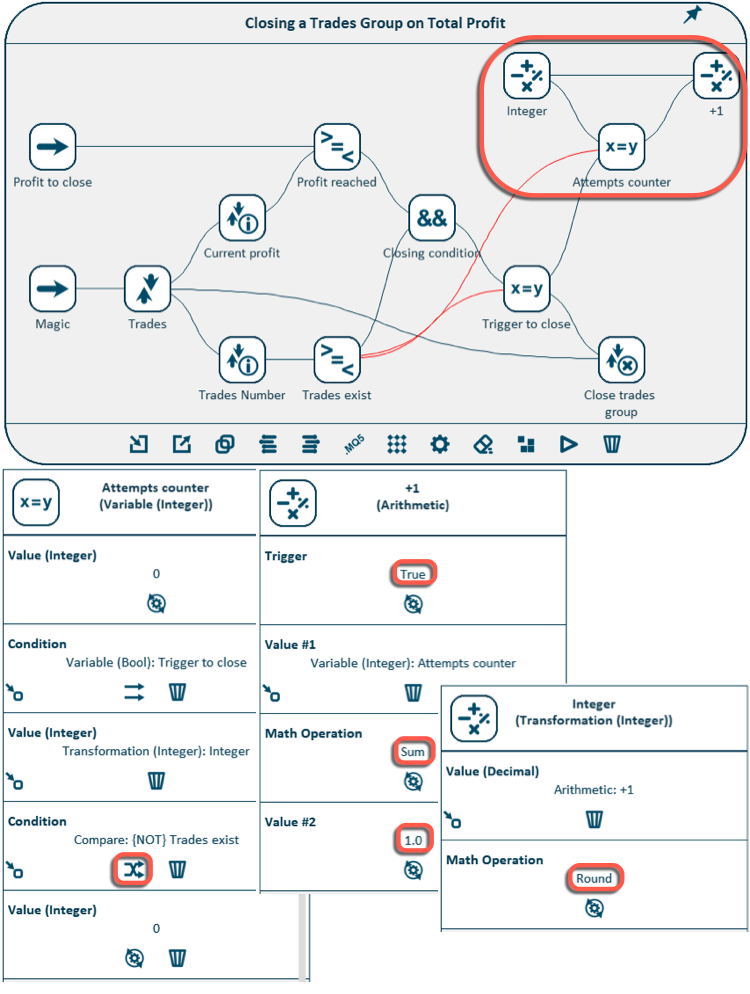
The trading logic of the utility is ready, and it can already fully function. Now we add functionality for counting attempts to close a trades group.
To do this, we use the Variable element again, but this time it serves as a counter. We reset the value to 0 when there are no open trades in the group, and increase the value by 1 (using the Arithmetic element) each time when we try to close a group of positions.
In addition to these two elements, we also need an element to convert a decimal number to an integer (Transformation), because we use an integer type variable for the counter, and the Arithmetic element returns the value of the decimal type. If we used a Variable of decimal type, then this transformation could have been avoided.
Add the elements to the diagram and configure them, as shown below:
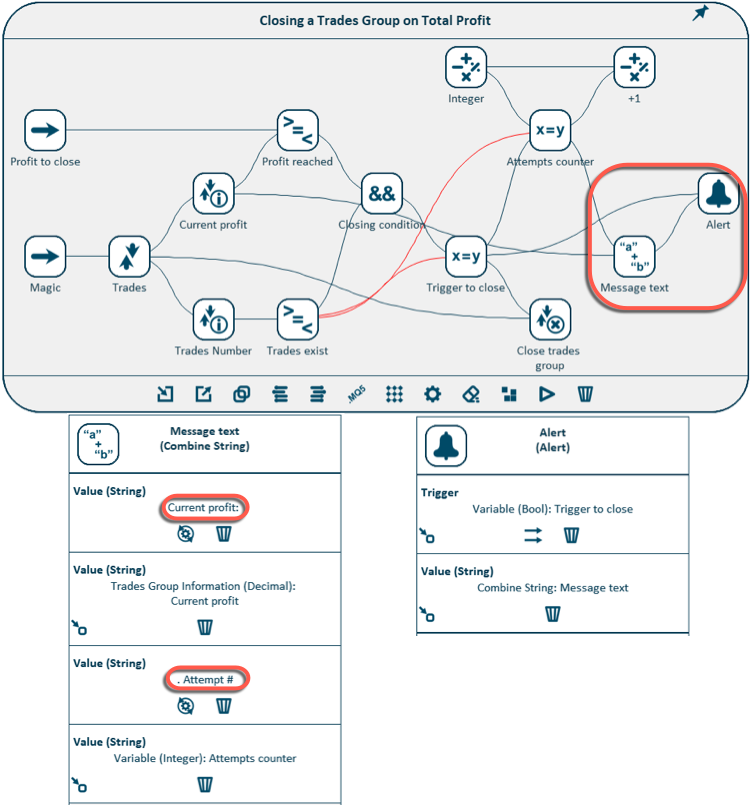
The only thing left is to form the message text and create an alert with it at the moment of positions closing. The message text can be formed using the Combine String element, which combines the message parts into a single string.
MetaTrader5 standard alert functionality is implemented using the Alert element.
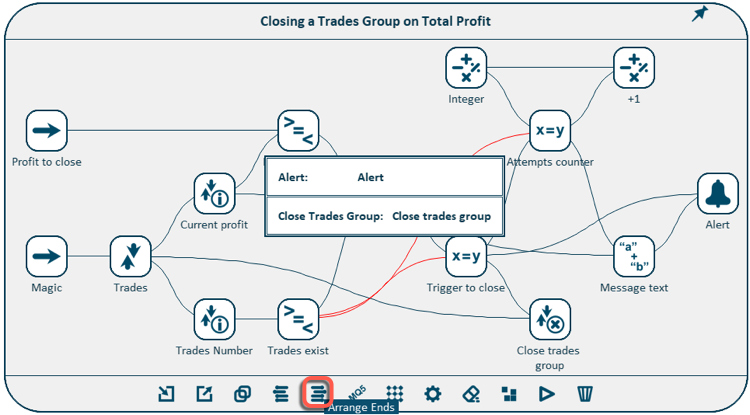
Let's review one more functionality In this example. Each scheme may contain several ends - actions that must be performed as a result of the execution of the scheme and which do not trigger any other actions. In this scheme, it is an alert and trades group closing.
If you want these actions to be performed in a certain order, e.g. to create an Alert before the closing of trades - you need to use the Arrange Ends option. Then a dialog box appears, as in the case of arranging the input parameters, where you can move the elements up and down up specifying their execution sequence.
Our utility is completely ready. Since this Expert Advisor does not open any orders and is just a trading assistant, there is no need to test it in the strategy tester.
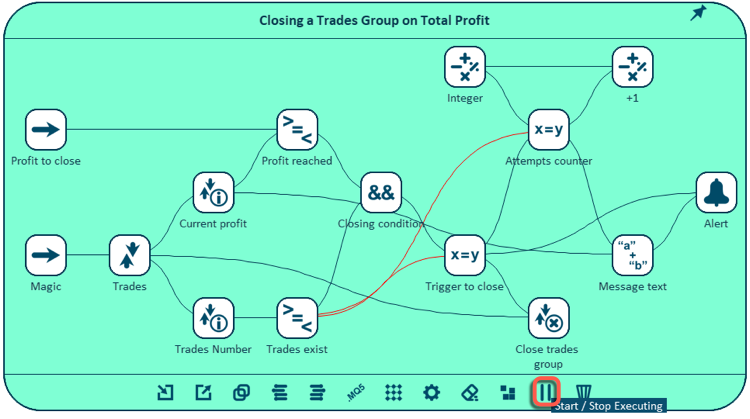
The scheme can be immediately executed live, even without generating the source code and creating an EA file (although this can be done and the ready EA can be run on a separate chart in the terminal). To start the live operation of the scheme, press the Start / Stop Executing button. When it is clicked, the scheme starts executing in the same way as if the EA file was launched on a separate chart. This option can be used for simultaneous execution of several simple utilities without the need to generate source code for them and without running them on separate charts.
Conclusion
This article contains an overview of the visual strategy builder Mission Automate. Using the examples, it shows how anyone can create trading robots without programming.
Downloading the application in the Market and trying it in action is free and easy. Included are 5 ready-made Expert Advisors based on popular strategies.
For MetaTrader4: Mission Automate Demo MT4
For MetaTrader5: Mission Automate Demo MT5
I have big plans for further development of this project, so I would really appreciate any comments and suggestions for improving the program.
Let's make algotrading accessible to everyone!
Translated from Russian by MetaQuotes Ltd.
Original article: https://www.mql5.com/ru/articles/4951
Warning: All rights to these materials are reserved by MetaQuotes Ltd. Copying or reprinting of these materials in whole or in part is prohibited.
This article was written by a user of the site and reflects their personal views. MetaQuotes Ltd is not responsible for the accuracy of the information presented, nor for any consequences resulting from the use of the solutions, strategies or recommendations described.
 Improving Panels: Adding transparency, changing background color and inheriting from CAppDialog/CWndClient
 Processing optimization results using the graphical interface
- Free trading apps
- Over 8,000 signals for copying
- Economic news for exploring financial markets
You agree to website policy and terms of use
Hello
Is there a description of all available functions?
I'd like to create a function where upon a sell signal , if the existing trades are in loss, they are not closed but reverse position with a multiplier is opened and then whole trade is closed when TP target is reached.
After reading the instructions I must say I have no idea how to do it. Can help me with this, which functions to use?
Thanks
If you are referring to the MQL5 functions, then yes — List of MQL5 Functions
The full MQL5 Dcumentation is available both online, and in your MetaEditor Help menu or via (F1 key).
One of many points:
The restriction with 511 characters in #property description is ridiculous.
It should be at least 1024 characters.
Then a reasonable program description is possible,
Agree, I can't see any advantage in this restriction of 511 characters only.
I would prefer to get rid of this restriction or at least make it reasonably high.
16 Oct 2024 :
Unfortunately, "Mission Automate Demo MT4" is unavailable
Thank you!
Andrey Hello !
is the product finally removed ??? because the link : https://www.mql5.com/en/market/product/30173 ==>> nothing ! :(
... is the product expected to be returned to the public ?!