

How to Connect AI Agents to MQL5 Algo Forge via MCP
 2 857
2 857
 0
0

Introduction
In the previous article, we connected an AI agent to MetaTrader 5. We built a Model Context Protocol (MCP) server that gave an AI assistant like Claude Desktop direct access to the trading terminal: pull live quotes, read candles, place orders, and manage positions through natural conversation. That server connected the AI to the place where trades run.
But running trades is only half of an algorithmic trader's life. The other half is building, versioning, and sharing the code that produces those trades. That work used to live on local disks and the old MQL5 Storage. It now lives on MQL5 Algo Forge, the community's Git-based platform for hosting and collaborating on trading projects. If Part 1 connected the AI to where trades run, this article connects it to where the code lives.
The good news is that Algo Forge is built on Git and exposes a standard REST API over HTTPS, which means an AI agent can drive the full developer workflow programmatically: create a repository, commit an Expert Advisor, open a branch, raise a pull request, file an issue, and tag a release. We will build a second MCP server that wraps that API and hands those capabilities to any MCP-compatible client. By the end, you will be able to tell your assistant "create a repository for my new EA and commit this code into it," and watch it happen on Algo Forge. In fact, the very server we build in this article was itself published to Algo Forge by an AI agent using that server, and we will show exactly that.
We will cover:
- From Trading to Building: Why Connect an AI to Algo Forge
- How Algo Forge Exposes Itself: Git and the REST API
- Architecture Overview
- Project Setup and the Forge Client
- Implementing the Tools
- The MCP Server Entry Point
- Connecting to AI Agents
- Conclusion
The complete source code is provided at the end of this article and is also published as a public project on Algo Forge. Everything is written in Python, and because Algo Forge is reached over plain HTTPS, there is no terminal dependency and nothing Windows-specific: this server runs anywhere Python runs. If you read Part 1, the structure will feel familiar by design, but the backend is entirely new and, as we will see, considerably simpler.
From Trading to Building: Why Connect an AI to Algo Forge
It helps to be precise about what "access" means here, because it is a different kind of access than in Part 1. The MetaTrader 5 server gave the AI access to a runtime: a live process holding a broker connection, where the meaningful actions are reading market state and sending orders. The consequences are immediate and financial.
An Algo Forge server gives the AI access to a development lifecycle instead. The meaningful actions are the ones any developer performs against a code host: creating repositories, committing files, branching, reviewing changes through pull requests, tracking work with issues, and marking versions with releases. The consequences are not trades but commits, and they are reversible. This makes the AI a collaborator on your code rather than a hand on your account.
Put the two side by side and the picture is complete. With the Part 1 server, you can ask the AI to analyze EURUSD and place a trade. With the server we build here, you can ask it to write that EA's source into a repository, branch off a fix, and open a pull request for review. One server is the workshop floor where the machines run; the other is the workbench where the machines are built and maintained.

Fig. 1. Two kinds of access: the trading runtime (Part 1) and the development lifecycle (this article)
From the diagram, we can see that the two servers are complementary rather than competing. They expose different surfaces of the same craft to the same AI agent, and nothing prevents you from running both at once so the assistant can move between writing code and testing it. We will return to that combination at the end.
How Algo Forge Exposes Itself: Git and the REST API
Before writing any code, we need to understand what we are connecting to. MQL5 Algo Forge is a Git platform. It lives at forge.mql5.io, and you sign in with your MQL5 account. You interact with it like any Git host: through a web interface for browsing and collaboration, and through Git itself for pushing and pulling code. Under the hood it runs Forgejo, the community-maintained fork of Gitea, which matters for one practical reason: it means Algo Forge speaks the same well-documented REST API that the wider Git tooling ecosystem already understands.
That API is the door we will walk through. It is served under /api/v1 on the same host, so the base address for every call we make is https://forge.mql5.io/api/v1. It exposes everything the developer lifecycle needs: endpoints for repositories, file contents (both reading and writing), branches, issues, pull requests, releases, and search across public projects. An AI agent that can make authenticated HTTPS requests to these endpoints can do everything a developer does in the web interface.
Authentication: the personal access token
The API authenticates with a personal access token, which is the standard, safe way for a program to act on your behalf without handling your password. You generate one in the Algo Forge web interface under Settings → Applications → Generate New Token, give it a name, and select the scopes it is allowed to use. For this server, the relevant scopes cover reading your user profile, and reading and writing repositories, issues, and pull requests. The token is shown to you once; copy it immediately and keep it private, because it grants write access to your account.
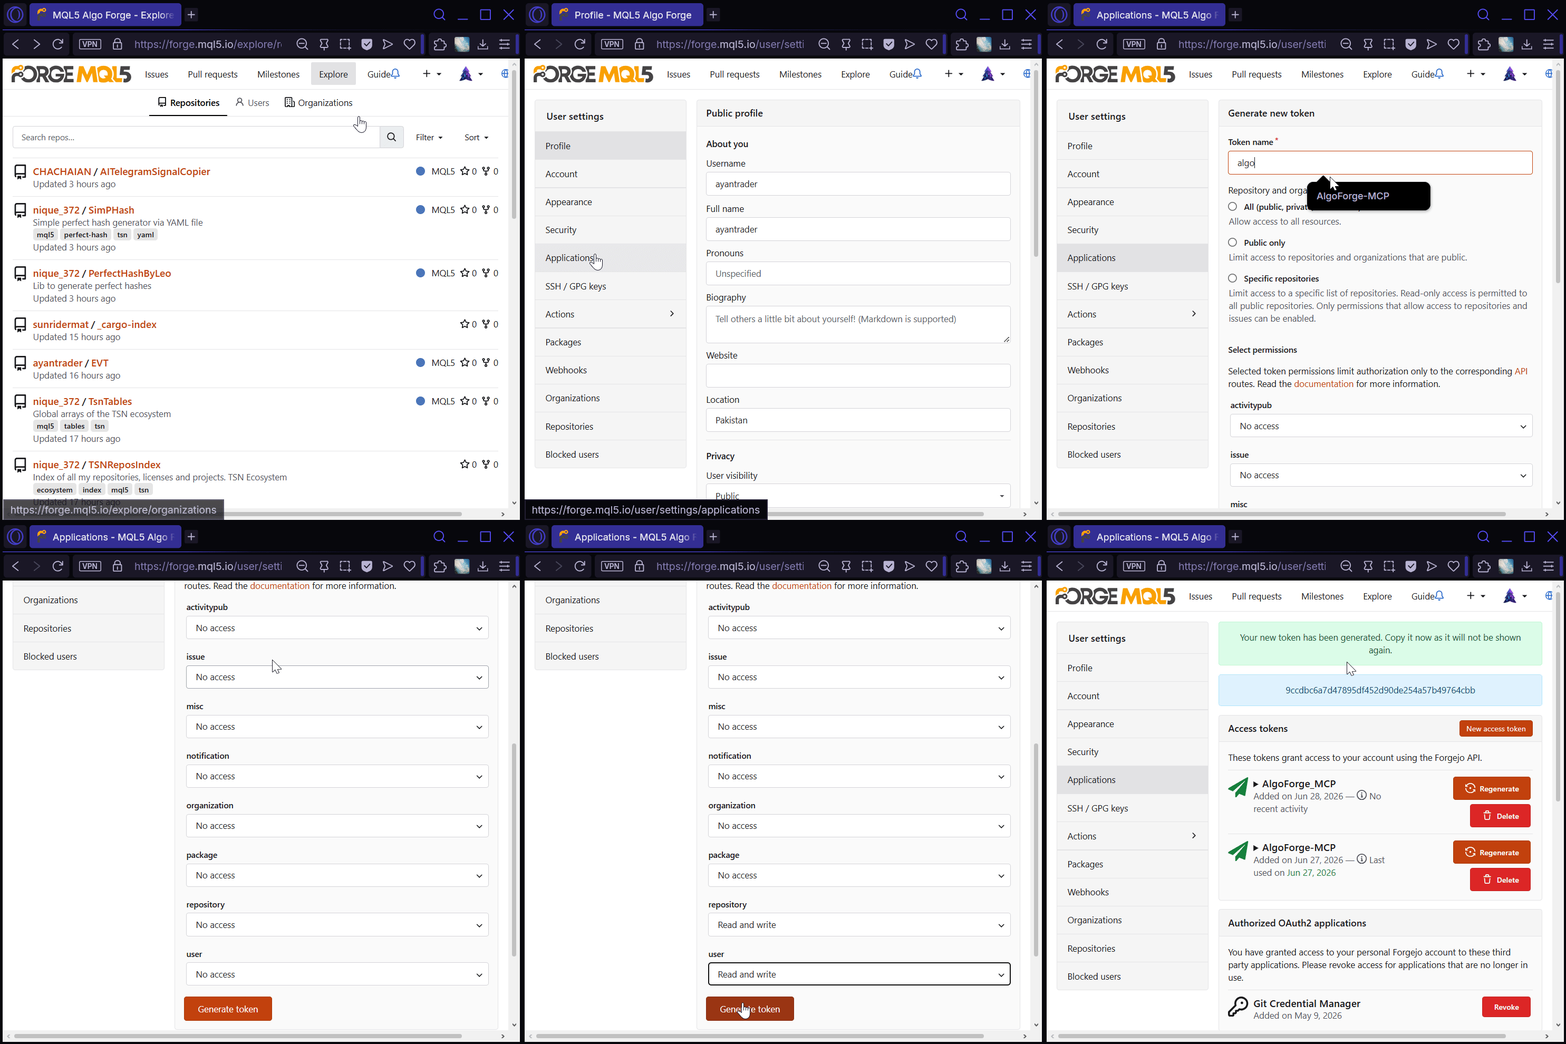
Fig. 2. Generating a personal access token on Algo Forge under Settings, Applications
Once you have a token, every API request carries it in an HTTP header of the form Authorization: token YOUR_TOKEN. That single header is the whole authentication story. There is no login handshake, no session to keep alive, and no terminal to attach to. Compared with Part 1, where the server had to initialize a connection to the MetaTrader 5 terminal, check it was responding, and log in before every operation, this is dramatically simpler, and that simplicity flows through the entire codebase.
Important: a personal access token is as sensitive as a password. Never commit it to a repository, never paste it into shared code, and revoke it immediately if it is ever exposed. The configuration file we use for it should be kept out of version control, which we will arrange explicitly.
Architecture Overview
The server uses the same layered design as the MetaTrader 5 server, so that readers of Part 1 can map one onto the other. Each layer has a single responsibility, and the layers stack from a thin configuration base up to the MCP tool surface.
Layer 1: Configuration (config.json)
A small JSON file holds the three things the server needs to reach Algo Forge: the base URL, the personal access token, and a request timeout. It is the analog of Part 1's config file, but it points at a web host instead of a terminal.
Layer 2: Forge Client (forgeclient.py)
This layer is the counterpart of Part 1's MetaTrader 5 client wrapper, and it is where the difference in backends shows most clearly. It builds one authenticated HTTP client, sends requests, and normalizes every response into either parsed data or a uniform error dictionary. There is no connection to manage, no timeout-protected initialization thread, and no login routine, because an HTTPS request is stateless: it either returns a response or it does not.
Layer 3: Handlers (handlers/*.py)
Five handler modules contain the actual business logic, organized by domain: repositories, file contents, branches, collaboration (issues, pull requests, and releases), and search. Each handler function takes plain Python parameters, calls the Forge client, trims the response down to the fields that matter, and returns a dictionary. No framework concepts appear here, only the API logic.
Layer 4: MCP Server (server.py)
The top layer registers twelve MCP tools using the FastMCP framework, exactly as in Part 1. Each tool is a thin wrapper that checks a token is configured and delegates to a handler. The tool descriptions and the server's global instructions guide the AI agent on how to use the toolset sensibly.
The full project structure looks like this:
algoforge-mcp-server/
├── server.py              # MCP server entry point + 12 tool registrations
├── forgeclient.py         # Forge REST API client + utilities
├── config.json            # base URL, token, timeout
├── handlers/
│   ├── repos.py           # User and repositories (3 functions)
│   ├── contents.py        # Read and commit files (2 functions)
│   ├── branches.py        # Branch management (2 functions)
│   ├── collab.py          # Issues, pull requests, releases (4 functions)
│   └── search.py          # Public project search (1 function)
├── requirements.txt       # httpx + fastmcp
└── README.md              # Setup and usage
There is no MetaTrader 5 dependency, no COM interface, and no platform restriction. The two libraries we depend on are an HTTP client and the MCP framework. Everything else is the standard library.

Fig. 3. Layered architecture of the Algo Forge MCP server, from config up to the twelve MCP tools
From the diagram, the flow is the same shape as Part 1: a request from the AI agent enters at the MCP tool layer, passes down through a handler to the Forge client, and goes out as an authenticated HTTPS call to the Algo Forge REST API. The response travels back up the same path, trimmed to the essentials before it reaches the agent.
Project Setup and the Forge Client
Setup requires three things: Python 3.10 or newer, an MQL5 account with access to Algo Forge, and a personal access token generated as described above. The dependencies are minimal:
httpx>=0.27
fastmcp>=2.0.0
The httpx package is a modern HTTP client for Python; we use its synchronous client to talk to the REST API. The fastmcp package is the same framework from Part 1: it handles the MCP protocol, tool registration, schema generation from type hints, and the stdio transport. Install them with pip:
pip install -r requirements.txt
Configuration File
The configuration file holds the three values the client needs. The token shown here is a placeholder; you replace it with your own:
{
  "base_url": "https://forge.mql5.io",
  "token": "your_personal_access_token",
  "timeout": 30
}
The base URL points at Algo Forge, the token authenticates you, and the timeout (in seconds) bounds how long the client waits for any single request. If you prefer not to keep the token in a file, the client also reads it from a FORGE_TOKEN environment variable, which we will see shortly.
Loading the configuration and building the client
The Forge client begins by loading that file. The path is resolved relative to the script's own location, so the server finds its configuration no matter which working directory it is launched from, just as in Part 1:
import base64
import json
import logging
import os

import httpx

log = logging.getLogger("forgemcp")

DEFAULT_BASE_URL = "https://forge.mql5.io"
DEFAULT_TIMEOUT = 30

_CONFIG_PATH = os.path.join(os.path.dirname(os.path.abspath(__file__)), "config.json")

_client = None


def load_config():
    if not os.path.exists(_CONFIG_PATH):
        return {}
    with open(_CONFIG_PATH, "r") as f:
        return json.load(f)
The client itself is created once and reused. The get_client function builds an httpx client whose base URL already includes the /api/v1 prefix and whose default headers already carry the authorization token, so every later call is just a path and a payload:
def get_client():
    """Return a singleton authenticated httpx client for the Algo Forge API."""
    global _client
    if _client is not None:
        return _client

    config = load_config()
    base_url = config.get("base_url") or DEFAULT_BASE_URL
    token = config.get("token") or os.environ.get("FORGE_TOKEN")
    timeout = config.get("timeout") or DEFAULT_TIMEOUT

    if not token:
        log.warning("No Algo Forge token configured (config.json or FORGE_TOKEN).")

    headers = {"Accept": "application/json"}
    if token:
        headers["Authorization"] = f"token {token}"

    _client = httpx.Client(
        base_url=f"{base_url.rstrip('/')}/api/v1",
        headers=headers,
        timeout=timeout,
    )
    return _client
This is the whole connection story, and it is worth pausing on how short it is. The token can come from the config file or the environment, the authorization header is set once, and the base URL bakes in the API prefix. There is no terminal to initialize and no login to perform. Where Part 1 needed a timeout-protected initialization routine and a three-step connection check before every operation, here the client is ready after a single function call.
Making requests and normalizing responses
Every handler in the project goes through one function: request. It sends the call, catches connection failures, and turns the HTTP response into a predictable shape, either parsed JSON on success or a dictionary with an error key on failure. Because every handler returns errors the same way, the tool layer above never has to guess what a failure looks like:
def request(method, path, **kwargs):
    """Make an API call and normalize the result into a dict or list.

    Returns parsed JSON on success, or {"error": "..."} on any failure.
    """
    try:
        resp = get_client().request(method, path, **kwargs)
    except httpx.RequestError as exc:
        return {"error": f"Connection to Algo Forge failed: {exc}"}

    if resp.status_code == 204:
        return {"ok": True}

    if resp.status_code >= 400:
        return {"error": _error_message(resp)}

    if not resp.content:
        return {"ok": True}

    try:
        return resp.json()
    except ValueError:
        return {"error": "Algo Forge returned a non-JSON response."}
The function handles the cases the API actually produces: a connection failure is caught and returned as an error rather than raised, a 204 No Content (returned by deletions) becomes a simple success marker, any 4xx or 5xx status becomes an error with a readable message, an empty body becomes a success marker, and anything else is parsed as JSON. The error message itself is extracted by a small helper that prefers the API's own message field when one is present:
def _error_message(resp):
    """Extract a human-readable error from a Forgejo error response."""
    try:
        body = resp.json()
        msg = body.get("message") or body.get("error") or str(body)
    except ValueError:
        msg = resp.text or "unknown error"
    return f"HTTP {resp.status_code}: {msg}"
This matters more than it might seem. When an AI agent calls a tool and the call fails, the agent reads the error text and decides what to do next. A message like "HTTP 404: The target couldn't be found" lets the agent recognize that a repository name was wrong and correct itself, where a bare exception would leave it stuck.
Base64 helpers for file contents
One Forgejo detail shapes the rest of the project: the file contents API does not accept or return raw text. File content is carried as Base64, both when you read a file and when you commit one. Two small helpers wrap that conversion so the handlers can work with ordinary strings:
def encode_content(text):
    """Base64-encode file text for the contents API."""
    return base64.b64encode(text.encode("utf-8")).decode("ascii")


def decode_content(b64):
    """Decode Base64 file content returned by the contents API."""
    return base64.b64decode(b64).decode("utf-8", errors="replace")
With the client, the request normalizer, and these helpers in place, the entire Forge client is complete. Every handler we write next is built on just these pieces.
Implementing the Tools
With the client in place, the handlers are short, because each one is essentially a single API call with its result trimmed to the fields an AI agent needs. We organize them into five modules by domain. We will walk through the most important ones; the rest follow the same shape.
Repositories: identity, listing, and creation
The repos module covers three operations: finding out who the token belongs to, listing the user's repositories, and creating a new one. A small helper, _repo_summary, trims a full repository object (which has dozens of fields) down to the handful that matter, so the agent is not flooded with irrelevant data:
from forgeclient import request


def _repo_summary(r):
    """Trim a full repo object down to the fields an agent actually needs."""
    return {
        "full_name": r.get("full_name"),
        "description": r.get("description"),
        "private": r.get("private"),
        "default_branch": r.get("default_branch"),
        "html_url": r.get("html_url"),
        "clone_url": r.get("clone_url"),
        "stars": r.get("stars_count"),
        "updated_at": r.get("updated_at"),
    }
The get_me function is the first tool an agent should call. It confirms the token works and returns the user's login, which is the owner portion of every later repository path. The list_repos function returns the user's repositories as summaries, clamping the requested count to a safe range. The create_repo function makes a new repository, optionally initializing it with a first commit so that files can be committed immediately afterward:
def get_me():
    user = request("GET", "/user")
    if "error" in user:
        return user
    return {
        "login": user.get("login"),
        "full_name": user.get("full_name"),
        "html_url": user.get("html_url"),
        "is_admin": user.get("is_admin"),
    }


def list_repos(limit=30):
    limit = max(1, min(limit, 50))
    data = request("GET", "/user/repos", params={"limit": limit})
    if isinstance(data, dict) and "error" in data:
        return data
    return [_repo_summary(r) for r in data]


def create_repo(name, description="", private=False, auto_init=True,
                default_branch="main", gitignores="", readme=""):
    body = {
        "name": name,
        "description": description,
        "private": bool(private),
        "auto_init": bool(auto_init),
        "default_branch": default_branch,
    }
    # .gitignore / README templates only apply when the repo is auto-initialized
    if auto_init and gitignores:
        body["gitignores"] = gitignores
    if auto_init and readme:
        body["readme"] = readme

    r = request("POST", "/user/repos", json=body)
    if "error" in r:
        return r
    return _repo_summary(r)
Notice that create_repo defaults auto_init to true. An empty Forgejo repository has no branches at all, so committing a file to it would fail; initializing it with a first commit gives it a default branch that subsequent commits can target. This is the kind of small constraint that the handler absorbs so the AI agent does not have to reason about it.
File Contents: reading and committing code
This is the heart of the server. Everything else supports the act of getting source code into and out of a repository. The get_file function reads a file and decodes it from Base64 into ordinary text, returning the content along with the file's sha, which is the identifier needed to update it later:
from forgeclient import request, encode_content, decode_content


def get_file(owner, repo, path, ref=None):
    """Read a file's text content from a repository."""
    params = {"ref": ref} if ref else None
    data = request("GET", f"/repos/{owner}/{repo}/contents/{path}", params=params)
    if "error" in data:
        return data
    if data.get("type") != "file":
        return {"error": f"{path} is not a file (type: {data.get('type')})"}
    return {
        "path": data.get("path"),
        "sha": data.get("sha"),
        "size": data.get("size"),
        "content": decode_content(data.get("content", "")),
    }
The commit_file function is the most interesting handler in the project, because it hides a real awkwardness in the API. Forgejo uses two different HTTP methods for files: POST creates a new file, while PUT updates an existing one, and the update requires the file's current sha so the server can confirm you are editing the version you think you are. An AI agent should not have to know or care which case it is in. So the handler figures it out: if no sha was supplied, it asks the API whether the file already exists, and if it does, it uses the existing sha and switches to an update:
def commit_file(owner, repo, path, content, message, branch=None, sha=None):
    """Create a new file or update an existing one with a single commit.

    To update an existing file, the file's current sha must be supplied — the
    handler fetches it automatically when not provided.
    """
    body = {
        "message": message,
        "content": encode_content(content),
    }
    if branch:
        body["branch"] = branch

    # Decide whether this is a create (POST) or an update (PUT).
    if sha is None:
        existing = request(
            "GET", f"/repos/{owner}/{repo}/contents/{path}",
            params={"ref": branch} if branch else None,
        )
        if isinstance(existing, dict) and existing.get("sha"):
            sha = existing["sha"]

    if sha:
        body["sha"] = sha
        result = request("PUT", f"/repos/{owner}/{repo}/contents/{path}", json=body)
    else:
        result = request("POST", f"/repos/{owner}/{repo}/contents/{path}", json=body)

    if "error" in result:
        return result
    commit = result.get("commit", {})
    return {
        "path": result.get("content", {}).get("path"),
        "commit_sha": commit.get("sha"),
        "html_url": commit.get("html_url"),
    }
The result is a single tool the agent can call the same way every time. "Commit this code to that path" works whether the file is brand new or already there, because the create-versus-update decision is made inside the handler. The function returns the resulting commit's sha and URL so the agent can report exactly what it did.
Branches: working away from main
The branches module lets the agent see what branches exist and create new ones. Creating a branch off the default branch is the first step of any change that should be reviewed before it lands. The create_branch function maps directly onto the Forgejo branches endpoint:
def create_branch(owner, repo, new_branch, from_branch=None):
    """Create a new branch from an existing one (defaults to the repo default)."""
    body = {"new_branch_name": new_branch}
    if from_branch:
        body["old_branch_name"] = from_branch
    b = request("POST", f"/repos/{owner}/{repo}/branches", json=body)
    if "error" in b:
        return b
    return {
        "name": b.get("name"),
        "commit_sha": b.get("commit", {}).get("id"),
    }
Collaboration: issues, pull requests, and releases
The collab module groups the three collaboration operations. Issues track work and bugs, pull requests propose merging one branch into another, and releases mark versions. The pull request handler, open_pull_request, takes a head branch and a base branch and asks Forgejo to open the request between them:
def open_pull_request(owner, repo, title, head, base, body=""):
    """Open a pull request from `head` branch into `base` branch."""
    pr = request("POST", f"/repos/{owner}/{repo}/pulls",
                 json={"title": title, "head": head, "base": base, "body": body})
    if "error" in pr:
        return pr
    return {
        "number": pr.get("number"),
        "title": pr.get("title"),
        "state": pr.get("state"),
        "mergeable": pr.get("mergeable"),
        "html_url": pr.get("html_url"),
    }
Releases deserve a note, because the concept does not map perfectly onto MQL5. In Forgejo, a release is a Git tag with a name and release notes, and optionally attached binary files. It is not a package in the sense that a language ecosystem like Go or Node uses the word, and MQL5 has no standard package format at all. So we treat a release purely as a version marker: a way to stamp "this commit is version 1.0" onto the history, with the option of attaching a compiled program later. The create_release handler reflects that modest scope:
def create_release(owner, repo, tag_name, name=None, body="", target="main",
                   draft=False, prerelease=False):
    """Tag a version of the project. Forgejo releases are Git tags with notes;
    MQL5 has no package format, so this is used purely as a version marker."""
    payload = {
        "tag_name": tag_name,
        "name": name or tag_name,
        "body": body,
        "target_commitish": target,
        "draft": bool(draft),
        "prerelease": bool(prerelease),
    }
    rel = request("POST", f"/repos/{owner}/{repo}/releases", json=payload)
    if "error" in rel:
        return rel
    return {
        "id": rel.get("id"),
        "tag_name": rel.get("tag_name"),
        "name": rel.get("name"),
        "html_url": rel.get("html_url"),
    }
Search: exploring public projects
The last handler lets the agent search the public projects on Algo Forge, the same content you browse in the Explore section of the website. It is useful for finding open-source MQL5 code to study, or for checking whether a project name is already taken before creating one:
from forgeclient import request

from handlers.repos import _repo_summary


def search_repos(query, limit=10):
    """Search public projects across Algo Forge (the Explore section)."""
    limit = max(1, min(limit, 50))
    data = request("GET", "/repos/search", params={"q": query, "limit": limit})
    if isinstance(data, dict) and "error" in data:
        return data
    results = data.get("data", []) if isinstance(data, dict) else []
    return [_repo_summary(r) for r in results]
The search endpoint wraps its results in a data field rather than returning a bare list, so the handler reaches inside it and reuses the same _repo_summary trimming as the repos module. Reusing that helper keeps every repository the agent sees, whether its own or someone else's, in the same consistent shape.
The MCP Server Entry Point
The server file wires the handlers into MCP tools. It follows the same patterns as Part 1: a FastMCP instance with global instructions, a connection guard reused by every tool, and read-only tools separated from tools that write.
Server setup and global instructions
The server is created with a name and an instructions string. As in Part 1, the instructions are a global prompt the AI agent receives when it discovers the server, and they encode the sensible workflow we want the agent to follow: identify yourself first, look before you create, write clear commit messages, prefer branches and pull requests for real changes, and confirm before writing anything:
from fastmcp import FastMCP

from forgeclient import load_config
from handlers import repos, contents, branches, collab, search

mcp = FastMCP(
    "MQL5 Algo Forge Server",
    instructions=(
        "This server manages MQL5 Algo Forge repositories (a Git platform for "
        "algorithmic trading code) on the user's behalf. "
        "Call get_me first to confirm the connection and learn the user's login — "
        "it is the {owner} for their own repositories. "
        "Use list_repos to discover existing projects before creating a new one. "
        "When committing code, write a clear commit message describing the change. "
        "For multi-step changes, create a branch with create_branch, commit to it, "
        "then open a pull request with open_pull_request rather than committing "
        "straight to the default branch. "
        "Confirm with the user before creating repositories, committing files, "
        "opening pull requests, or tagging releases."
    ),
)
The connection guard
Where Part 1 checked that the terminal was connected before every tool call, here the equivalent check is much lighter: confirm that a token is configured at all, in either the config file or the environment. If none is present, the tool returns a clear error instead of making a doomed request:
def _ensure():
    """Check that an Algo Forge token is configured; return error dict if not."""
    config = load_config()
    if not config.get("token"):
        import os
        if not os.environ.get("FORGE_TOKEN"):
            return {"error": "No Algo Forge token configured. Set token in "
                             "config.json or the FORGE_TOKEN environment variable."}
    return None
Read-only tools
Read-only tools are annotated with readOnlyHint, which tells the AI client they are safe to call without asking the user first. The get_me tool is the simplest example, and shows the pattern every tool follows: run the guard, return its error if there is one, otherwise delegate to the handler:
@mcp.tool(annotations={"readOnlyHint": True})
def get_me() -> dict:
    """Get the authenticated Algo Forge user — login, full name, and profile URL.
    Call this first to verify the connection and to learn the username, which is
    the {owner} for the user's own repositories."""
    err = _ensure()
    if err:
        return err
    return repos.get_me()
The docstring is not a comment for the developer; it is the description the AI agent reads to decide when and how to call the tool. That is why it spells out that this tool should be called first and explains what the returned login is used for. The same applies to get_file, list_repos, list_branches, list_issues, and search_repos, which are all annotated read-only.
Write tools
Tools that change state carry no read-only annotation, so a well-behaved client treats them as actions to confirm. The commit_file tool is the central one, and its description tells the agent the one thing it might otherwise get wrong, that the same tool both creates and updates files:
@mcp.tool()
def commit_file(
    owner: str,
    repo: str,
    path: str,
    content: str,
    message: str,
    branch: str | None = None,
    sha: str | None = None,
) -> dict:
    """Create or update a file in a repository with a single commit. Provide the
    full file text in content and a descriptive commit message. The handler detects
    whether the file already exists and updates it in place if so. path is relative
    to the repo root. branch defaults to the repository's default branch. Returns
    the resulting commit sha."""
    err = _ensure()
    if err:
        return err
    return contents.commit_file(owner, repo, path, content, message, branch, sha)
The remaining write tools, create_repo, create_branch, create_issue, open_pull_request, and create_release, follow exactly this pattern: a typed signature that FastMCP turns into a schema, a docstring that guides the agent, the guard, and a delegation to the handler. Twelve tools in total, six read-only and six that write, which is a comparable surface to the fourteen tools of the Part 1 server.
Finally, the server is started on the stdio transport with a single call, identical to Part 1:
if __name__ == "__main__":
    mcp.run()
As before, this reads MCP messages from standard input and writes responses to standard output. The AI client launches the server as a subprocess and communicates through pipes; there is no port to open and no network service to expose.
Connecting to AI Agents
With the server complete, we connect it to an AI client. The process mirrors Part 1: register the server in the client's configuration, restart, and the tools appear. We will use Claude Desktop, and then point at the OpenClaw skill for messaging-app access.
Claude Desktop configuration
Claude Desktop supports MCP servers natively. Edit its configuration file at %APPDATA%\Claude\claude_desktop_config.json and add an entry for our server:
{
    "mcpServers": {
        "algoforge": {
            "command": "python",
            "args": ["C:/path/to/algoforge-mcp-server/server.py"]
        }
    }
}
Replace the path with the location of your server.py, and make sure the config.json next to it contains your personal access token. Restart Claude Desktop, and the twelve Algo Forge tools appear in the tools menu, ready to use.
If you want to verify the tools interactively before connecting an agent, you can point the standard npx @modelcontextprotocol/inspector tool at the server (stdio transport, command python, argument server.py), exactly as in Part 1. It is optional here, because the operations are reversible rather than financial, so we go straight to the real demonstration.
The server publishes itself
The most direct way to show what this server does is to let it do something real, so we used it to publish its own source code to Algo Forge. With the server connected in Claude Desktop and a token-free copy of the project on disk, a single conversational request set the whole workflow in motion: create a new repository, then commit each project file into it with a clear message.
Claude called the tools in sequence. It called get_me to learn the account login, create_repo to make the algoforge-mcp-server repository, and then commit_file once per file, sending the real text of server.py, forgeclient.py, every handler, the README, and a token-free config.json. Each call returned a commit URL, which Claude reported back as it went.
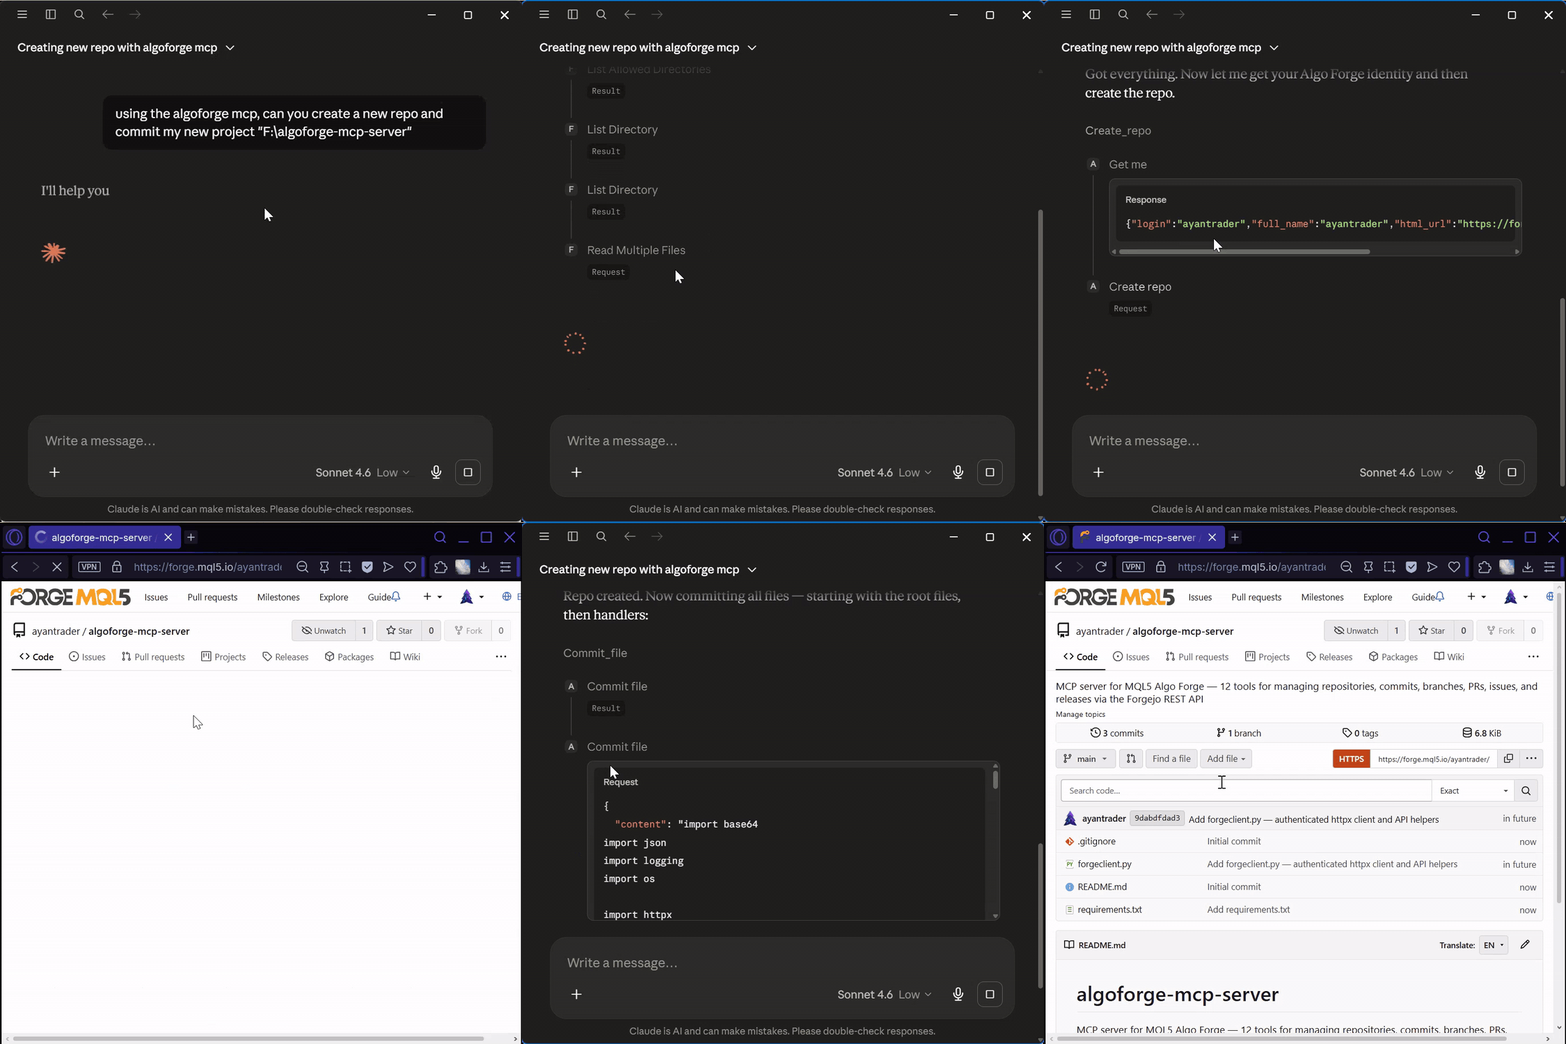
Fig. 4. Claude Desktop calling the Algo Forge MCP tools to create a repository and commit the project files
When it finished, the result was not a throwaway demo but a real, browsable project on Algo Forge, the same repository whose code you have been reading throughout this article. You can open it, study the files, and fork it, which is exactly the point: the demonstration and the article's source distribution are the same artifact.
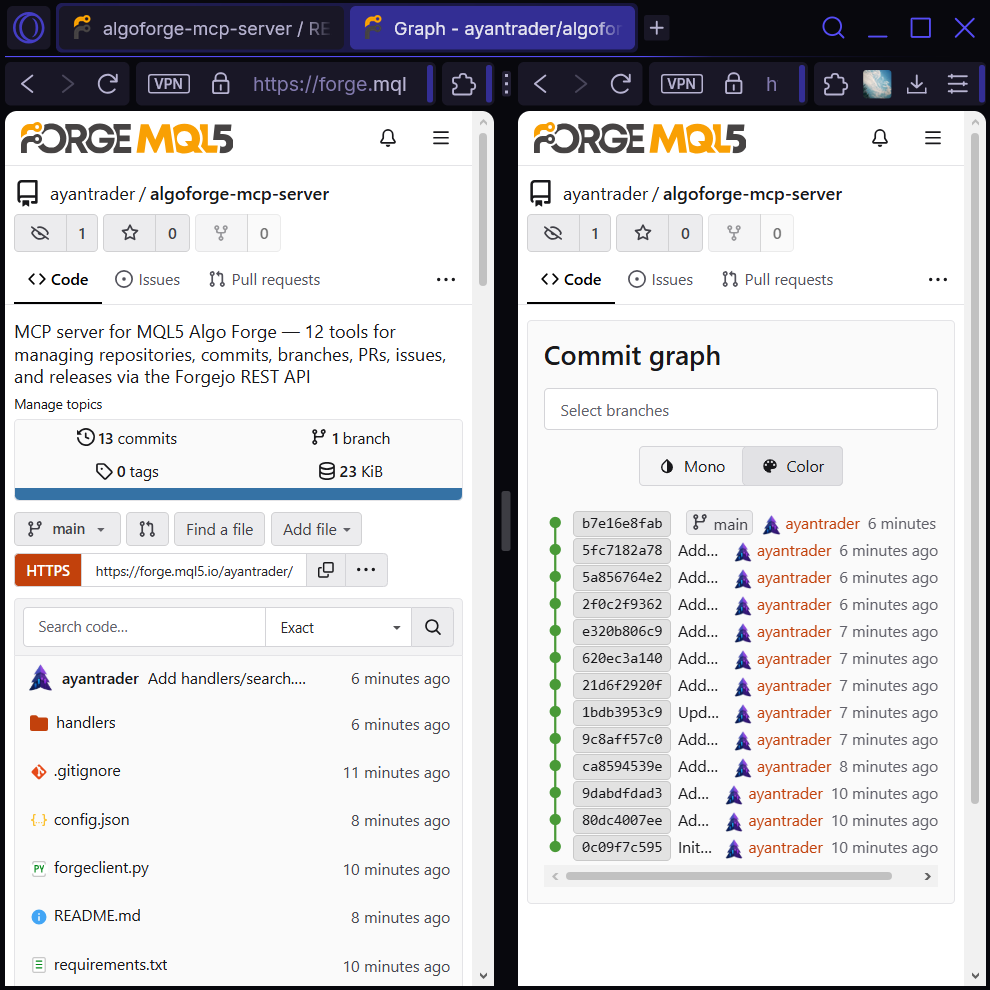
Fig. 5. The resulting repository on Algo Forge, published by the server using its own tools
There is a deliberate detail in that demo worth calling out. The copy of the project that was committed contains a config.json with a placeholder token, not the real one, and the project's .gitignore excludes the working configuration. The token never enters the repository. This is the correct discipline for any credentialed project, and it is the reason we arranged the configuration to read from a file or an environment variable in the first place.
Important: the personal access token grants write access to your Algo Forge account. Keep it in the local config.json or the FORGE_TOKEN environment variable, never in a committed file. If a token is ever exposed, revoke it in the Algo Forge settings and generate a new one.
OpenClaw and messaging apps
For access from a phone, the same approach as Part 1 applies. OpenClaw is an open-source AI agent that connects to messaging platforms, and it uses MCP servers through a skill file: a short markdown document telling the agent when to use the tools and what rules to follow. The skill for this server lists the twelve tools and encodes the same workflow rules as the server's instructions, for example calling get_me first, preferring branches and pull requests, and confirming before any write. With the skill installed and the server configured, you can ask an agent on Telegram to create a repository or commit a fix, and it will use these tools to do it. The complete skill file is included with the source code.
Conclusion
In this article, we built a second MCP server that connects AI agents to MQL5 Algo Forge. Where Part 1 gave an assistant access to the trading runtime, this server gives it access to the development lifecycle: it exposes twelve tools covering identity, repositories, file contents, branches, issues, pull requests, releases, and search, so an AI agent can create projects, commit code, and collaborate on Algo Forge through ordinary conversation.
- A standard API, cleanly wrapped. Because Algo Forge runs on Git and exposes a Forgejo REST API over HTTPS, the server is built from one authenticated HTTP client and a handful of short handlers. There is no terminal, no COM interface, and no platform restriction.
- Simpler than the trading server. The Forge client needs no initialization routine, no timeout-protected threads, and no login sequence, because an HTTPS request is stateless. The connection story is a single function.
- Reversible by nature. The actions here are commits, branches, and issues rather than trades, so the safety model is lighter: the tools are annotated read-only or write, and the server's instructions ask the agent to confirm before writing.
- Self-demonstrating. The server published its own source to Algo Forge using its own tools, which means the article's demonstration and its code distribution are the same live, forkable project.
- Extensible. The handler-based design makes new tools easy to add, for example merging a pull request, commenting on an issue, or managing collaborators and teams.
There are limitations worth stating. The token's scopes bound what the server can do, by design. Some parts of the Forgejo API are deliberately out of scope here, including administrative endpoints, continuous-integration runners, and the package registry, the last of which does not map onto MQL5 in any case. And as always, an AI agent acting on your account should be given a token with only the scopes it needs.
The most interesting direction for future work is to run this server alongside the Part 1 trading server. With both connected, an assistant could write an Expert Advisor, commit it to Algo Forge, and then deploy and test it through the MetaTrader 5 tools, closing the loop from code to commit to backtest in a single conversation. The workbench and the workshop floor, finally connected to the same hands.
Disclaimer: This article is for educational purposes only. The server described here can create and modify real repositories on your MQL5 Algo Forge account. Keep your personal access token private, grant it only the scopes it needs, and review what an AI agent does on your behalf. The author is not responsible for any unintended changes resulting from the use of this software.
Getting the Source Code via MQL5 Algo Forge
All source files are attached to this article below, but the full repository is also available on MQL5 Algo Forge, the community's Git-based platform for sharing and collaborating on trading projects.
| File name | Description |
|---|---|
| server.py | MCP server entry point that registers the twelve Algo Forge tools |
| forgeclient.py | Forge REST API client: authenticated requests, error normalization, and Base64 helpers |
| handlers/repos.py | User identity, repository listing, and repository creation |
| handlers/contents.py | Reading files and committing files (create or update) |
| handlers/branches.py | Listing and creating branches |
| handlers/collab.py | Issues, pull requests, and releases |
| handlers/search.py | Searching public projects on Algo Forge |
| config.json | Configuration: base URL, token placeholder, and request timeout |
| requirements.txt | Python dependencies: httpx and fastmcp |
| README.md | Setup, configuration, and usage instructions |
| SKILL.md | OpenClaw skill definition for Algo Forge access (included in the project) |
Warning: All rights to these materials are reserved by MetaQuotes Ltd. Copying or reprinting of these materials in whole or in part is prohibited.
This article was written by a user of the site and reflects their personal views. MetaQuotes Ltd is not responsible for the accuracy of the information presented, nor for any consequences resulting from the use of the solutions, strategies or recommendations described.

 From Basic to Intermediate: Objects (IV)
 MQL5 Bootstrap (II): Essential Validators for Robust Trading Systems
 Market Simulation (Part 23): Position View (I)
 MQL5 Trading Tools (Part 39): Adding a Pinned-Tools Ribbon for Quick Access to Favorite Tools

- Free trading apps
- Over 8,000 signals for copying
- Economic news for exploring financial markets
You agree to website policy and terms of use