
Understanding Programming Paradigms (Part 2): An Object-Oriented Approach to Developing a Price Action Expert Advisor
Introduction
In the first article I introduced programming paradigms and focused on how to implement procedural programming in MQL5. I also explored functional programming. After gaining a deeper understanding of how procedural programming works, we created a basic price action expert advisor using the exponential moving average indicator (EMA) and candlestick price data.
This article will take a deeper dive into the object-oriented programming paradigm. We'll then apply this knowledge to transform the procedural code of the previously developed expert advisor from the first article into object-oriented code. This process will deepen our understanding of the main differences between these two programming paradigms.
As you read, bear in mind that the primary goal isn't to showcase a price action strategy. Instead, I aim to illustrate and help you gain a deeper understanding of how various programming paradigms function and how we can implement them in MQL5. The simple price action expert advisor we develop is the secondary goal and serves as a guide to demonstrate how we can apply this in a real-world example.
Understanding Object-Oriented Programming
Object-oriented programming (also shortened to OOP) is a coding style that organizes code around the idea of objects. It mainly considers items as models for actual things or concepts.
When venturing into object-oriented programming, beginners often have specific questions. I will begin by addressing these queries, as this will help solidify your grasp of this programming paradigm.
What is a class in object-oriented programming?
A class is a blueprint for creating objects. It has a set of properties (attributes) that describe the characteristics of the object and functions (methods) that perform the different required tasks.
Let me use a phone as an example to explain the object-oriented paradigm better.
Imagine you are starting a new phone manufacturing company, and you are in a meeting with your head of the product design department. Your goal is to create a blueprint for the ideal phone that your company will produce. In this meeting, you discuss the essential features and functionalities that every phone should have.
You start by creating a blueprint that will be the starting point of every phone that your company will produce. In object-oriented programming, this blueprint is called a class.
The product designer suggests that to make the blueprint, you must first come up with a list of different tasks that a phone is capable of performing. You come up with the following tasks list:
- Make and receive phone calls.
- Send and receive short text messages (SMS).
- Send and receive data through the internet.
- Take pictures and record videos.
In object-oriented programming, the tasks described in the blueprint above are called methods. Methods are the same as ordinary functions, but when created in a class, they are called methods or member functions.
You then decide that every phone must have properties and characteristics that better describe it. You brainstorm for five minutes and come up with the following list:
- Model number.
- Color.
- Input type.
- Screen type.
- Screen size.
In object-oriented programming, the properties and characteristics described in the blueprint (class) are called class attributes or member variables. Attributes are declared in a class as variables.
What is an object in object-oriented programming?
An object is an implementation of a class. In simpler terms, a class is the plan or blueprint on paper and the object is the actual implementation of the plan or blueprint in real life.
Continuing with our phone company example, you and your product designer have finished designing the blueprint for the phone on paper. You decide to produce two different phone types for different phone consumer markets. The first model will be a low-end version that can only make or receive calls and send or receive text messages. The second model will be a high-end version (smartphone) with all the features of the first low-end model, a high-end camera, a large battery, and a high-resolution touchscreen.
You excitedly head over to the engineering department, hand over the phone blueprint (class) to the chief engineer, and give him instructions to bring your blueprint design to life. He immediately begins working on the blueprint. It roughly takes the engineers a week to finish engineering the phones. When they complete, they hand over the finished products for you to test.
The phones you now hold in your hands are the objects derived from the class(blueprint). The low-end phone model only implements some class methods while the high-end phone model (smartphone) implements all the class methods.
Let me demonstrate this phone example with some code. Follow the steps below to create a class file in your MetaEditor IDE.
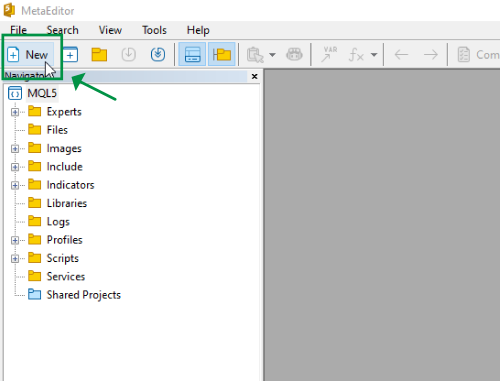
Step 1: Open the MetaEditor IDE and launch MQL Wizard using the New menu item button.
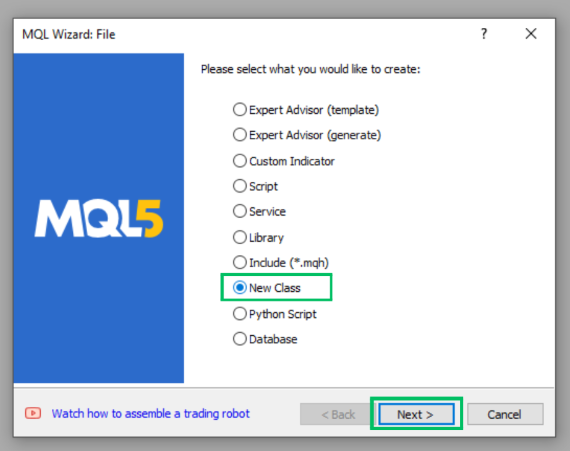
Step 2: Select the New Class option and click Next.
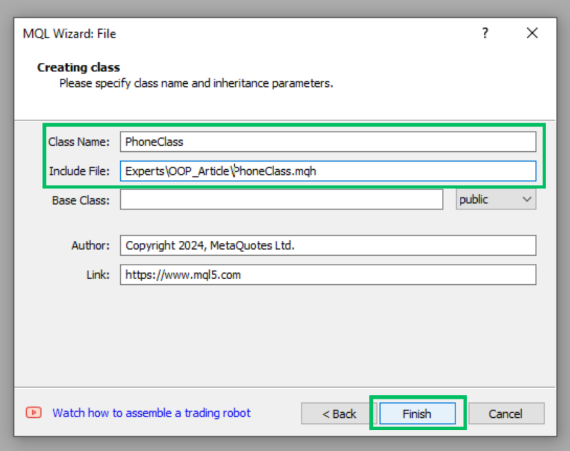
Step 3: In the Creating class window, select the Class Name: input box, type PhoneClass as the class name, and in the Include File: input box type 'Experts\OOP_Article\PhoneClass.mqh' to save the class file in the same folder as our Expert Advisors source code. Leave the Base Class: input box empty. Click Finish to generate a new MQL5 class file.
We now have a blank MQL5 class file. I have added some comments to help us break down the different parts of the class. Coding a new MQL5 class is now a straightforward process and is automatically done for us by the MQL Wizard in the MetaEditor IDE. Study the syntax below as it contains the starting point of a properly structured MQL5 class file.
class PhoneClass //class name
  {
private: //access modifier

public:  //access modifier
                     PhoneClass(); //constructor method declaration
                    ~PhoneClass(); //destructor method declaration
  };
//+------------------------------------------------------------------+
//|                                                                  |
//+------------------------------------------------------------------+
PhoneClass::PhoneClass() //constructor method definition
  {
  }
//+------------------------------------------------------------------+
//|                                                                  |
//+------------------------------------------------------------------+
PhoneClass::~PhoneClass() //destructor method definition
  {
  }
//+------------------------------------------------------------------+
Do not pay any attention to the #properties code as it is not relevant to the topic at hand. The important syntax begins on the line where we have the opening class syntax at: class PhoneClass { just below the #property version "1.00" line.
//+------------------------------------------------------------------+
//|                                                   PhoneClass.mqh |
//|                                  Copyright 2024, MetaQuotes Ltd. |
//|                                             https://www.mql5.com |
//+------------------------------------------------------------------+
#property copyright "Copyright 2024, MetaQuotes Ltd."
#property link      "https://www.mql5.com"
#property version   "1.00"

//---------------------------------------
//Ignore the code segment above
//---------------------------------------
Let us discuss the different parts of the class file we have just generated.
After the class opening curly brace, you find two access modifiers: private, and public. I will explain in detail what they are when I cover the inheritance topic.
Below the private access modifier is where we will add the class attributes (phone properties and characteristics) from our phone blueprint. We will add these properties as global variables.
private: //access modifier
   //class attributes
   int               modelNumber;
   string            phoneColor;
   string            inputType;
   string            screenType;
   int               screenSize;
Next in line below the public: access modifier are the declarations of the constructor and destructor methods. These two methods are similar to the OnInit() and OnDeInit() Expert Advisor standard functions. The class constructor carries out operations similar to OnInit(), while the class destructor performs tasks akin to OnDeinit().
public: //access modifier
                     PhoneClass(); //constructor method declaration
                    ~PhoneClass(); //destructor method declaration
What are constructors and destructors in object-oriented programming?
Constructors
A constructor is a special method within a class that is automatically called and executed when an object of that class is created. Its primary purpose is to initialize the attributes of the object and perform any setup actions needed for the object to be in a valid and updated state.
Key characteristics of constructors:
- Same Name as Class: The constructor method has the same name as the class. This naming convention helps the programming language identify and associate the constructor with the class. In MQL5, all constructors are of type void by default, meaning they do not return a value.
- Initialization: Constructors are responsible for initializing the attributes of an object with default or provided values. This ensures that the object starts with a well-defined state. I will demonstrate how this works in our PhoneClass below.
- Automatic execution: The constructor is automatically called or executed when an object is created. This occurs at the moment the object is instantiated.
- Optional Parameters: Constructors can take parameters, allowing for customization during object creation. These parameters provide values that the constructor uses to set the initial state of the object.
You can have multiple constructors in one class, but they need to be distinguishable by the arguments or parameters they possess. Depending on their parameters, constructors are categorized into:
- Default constructor: This is a constructor without any parameters.
- Parametric constructor: This is a constructor that has parameters. If any of the parameters in this constructor reference to an object of the same class then it automatically becomes a copy constructor.
- Copy constructor: This is a constructor that has one or more parameters that reference to an object of the same class.
We need a way to initialize or save the class attributes (variables) with specific phone details every time we create a new PhoneClass object. We will accomplish this task using a parametric constructor. Let's change the current default constructor and convert it to a parametric constructor with five parameters. Comment out the default constructor function declaration before declaring and defining the new parametric constructor below it.
   //PhoneClass();
   //constructor declaration and definition
   PhoneClass(int modelNo, string colorOfPhone, string typeOfInput, string typeOfScreen, int sizeOfScreen)
     {
      modelNumber = modelNo;
      phoneColor  = colorOfPhone;
      inputType   = typeOfInput;
      screenType  = typeOfScreen;
      screenSize  = sizeOfScreen;
     }
Save and compile the class file. After compiling the class file you will notice there is an error error in line 40 at column 13. Error: PhoneClass - member function already defined with different parameters.
Please note that the code numbering might be different for your class file depending on how you have indented or styled your code. For the correct line number, please refer to your MetaEditor compiler error log at the bottom section of the window, as indicated below.

We have declared and defined our new parametric constructor in one block of code and further down our code on line 40 you will find another code segment that's also defining the constructor. You need to comment out lines 40 to 42 and when you compile the class file it will compile successfully with no errors or warnings. (Note that this code segment might be on different code lines in your class file!)
/*PhoneClass::PhoneClass() //constructor method definition
  {
  }*/
Destructors
A destructor is a special method within a class that is automatically called and executed when an object is terminated. Its primary purpose is garbage collection and cleaning up any resources that the object has allocated when the object's lifespan has ended. This helps to prevent memory leaks and other resource-related issues. A class can only have one destructor.
Key characteristics of destructors:
- Same Name as Class: The destructor shares the same name as the class but is prefixed with a tilde character (~). This naming convention helps the programming language identify and associate the destructor with the class.
- Garbage collection: Cleaning up any resources that the object has allocated, such as memory, strings, dynamic arrays, automatic objects, or network connections.
- Automatic execution: The destructor is automatically called or executed when an object is terminated.
- No Parameters: All destructors do not have any parameters, and are of type void by default, meaning they do not return a value.
Let's add some code that prints some text every time the destructor is executed. Go to the destructor method code definition segment and add the code below:
PhoneClass::~PhoneClass() //destructor method definition
  {
   Print("-------------------------------------------------------------------------------------");
   PrintFormat("(ModelNo: %i) PhoneClass object terminated. The DESTRUCTOR is now cleaning up!", modelNumber);
  }
You will notice that when we declare or define the class constructor and destructor methods we don't give them a return type i.e. (void). Specifying a return type is not necessary as it's a straightforward rule that all constructors and destructors in MQL5 are of type void and the compiler will automatically do it for us.
To give you a clear understanding of how constructors and destructors work, here is a brief example: Imagine a camping trip where you and your friend assign yourselves specific roles. Your friend, responsible for setting up the tent and arranging everything upon arrival, acts as the 'constructor.' Meanwhile, you, handling the packing and cleanup at the end of the trip, play the role of the destructor. In object-oriented programming, constructors initialize objects, while destructors clean up resources when the object's lifespan ends.
Next, we will add the class methods (tasks that the phone will perform as described in the blueprint). Add this methods just below the destructor method declaration: ~PhoneClass();.
//class methods
   bool              MakePhoneCall(int phoneNumber);
   void              ReceivePhoneCall();
   bool              SendSms(int phoneNumber, string message);
   void              ReceiveSms();
   bool              SendInternetData();
   void              ReceiveInternetData();
   void              UseCamera();
   void virtual      PrintPhoneSpecs();
What are virtual methods in MQL5?
In MQL5, virtual methods are special functions inside a class that can be overridden by methods with the same name in derived classes. When a method is marked as "virtual" in the base class, it allows derived classes to provide a different implementation of that method. This mechanism is essential for polymorphism, which means that objects of different classes can be treated as objects of a common base class. It enables flexibility and extensibility in object-oriented programming by allowing specific behavior to be defined in subclasses while maintaining a common interface in the base class.
I will demonstrate how to override the PrintPhoneSpecs() method further down the article when we cover object-oriented inheritance.
To code the method definition for the PrintPhoneSpecs() method. Place this code below the destructor method definition at the bottom of our class file.
void PhoneClass::PrintPhoneSpecs() //method definition
  {
   Print("___________________________________________________________");
   PrintFormat("Model: %i Phone Specs", modelNumber);
   Print("---------------------");
   PrintFormat
      (
         "Model Number: %i \nPhoneColor: %s \nInput Type: %s \nScreen Type: %s \nScreen Size: %i\n",
         modelNumber, phoneColor, inputType, screenType, screenSize
      );
  }
There are two ways to define a class method.
- Inside the class body: You can declare and define a method in one step inside the class body like we did earlier with the parametric constructor. The syntax for declaring and defining a method inside the class body is identical to the ordinary function syntax.
- Outside the class body: The second way is to first declare the method within the class body and then define it outside the class body as we have done with the destructor and PrintPhoneSpecs() methods. To define an MQL5 method outside the class body, you have to first start with the method return type, followed by the class name, the scope resolution operator (::), the method name, and then the parameter list enclosed in parentheses. Next, the method body is enclosed in curly braces {}. This separation of declaration and definition is the preferred option as it allows for a clear organization of the class structure and its associated methods.
What is the scope resolution operator (::) in object-oriented programming?
The :: operator is known as the scope resolution operator, and it is used in C++ and MQL5 to specify the context to which a function or method belongs. It defines or references functions or methods that are members of a class to help us specify that they are members of that specific class.
Let me explain this in more detail by using the PrintPhoneSpecs() method definition:
void PhoneClass::PrintPhoneSpecs() //method definition
  {
   //method body
  }
From the PrintPhoneSpecs() method definition above, you can see that the class name is placed before the scope operator "::". This indicates that this function belongs to the PhoneClass class. It's how you link the method to the class it is associated with. The :: operator is essential for defining and referencing methods within a class. It helps specify the scope or context to which the function or method belongs.
Our class also includes the following declared methods that also need to be defined:
- MakePhoneCall(int phoneNumber);
- ReceivePhoneCall();
- SendSms(int phoneNumber, string message);
- ReceiveSms();
- SendInternetData();
- ReceiveInternetData();
- UseCamera();
Place their method definition code above the PrintPhoneSpecs() definition code segment. Here is how your class file should look with the above method definitions added:
class PhoneClass //class name
  {
private: //access modifier
   //class attributes
   int               modelNumber;
   string            phoneColor;
   string            inputType;
   string            screenType;
   int               screenSize;

public: //access modifier
   //PhoneClass();
   //constructor declaration and definition
   PhoneClass(int modelNo, string colorOfPhone, string typeOfInput, string typeOfScreen, int sizeOfScreen)
     {
      modelNumber = modelNo;
      phoneColor  = colorOfPhone;
      inputType   = typeOfInput;
      screenType  = typeOfScreen;
      screenSize  = sizeOfScreen;
     }

   ~PhoneClass(); //destructor method declaration

   //class methods
   bool              MakePhoneCall(int phoneNumber);
   void              ReceivePhoneCall();
   bool              SendSms(int phoneNumber, string message);
   void              ReceiveSms();
   bool              SendInternetData();
   void              ReceiveInternetData();
   void              UseCamera();
   void virtual      PrintPhoneSpecs();
  };

/*PhoneClass::PhoneClass() //constructor method definition
  {
  }*/

PhoneClass::~PhoneClass() //destructor method definition
  {
   Print("-------------------------------------------------------------------------------------");
   PrintFormat("(ModelNo: %i) PhoneClass object terminated. The DESTRUCTOR is now cleaning up!", modelNumber);
  }

bool PhoneClass::MakePhoneCall(int phoneNumber) //method definition
  {
      bool callMade = true;
      Print("Making phone call...");
      return(callMade);
  }

void PhoneClass::ReceivePhoneCall(void) { //method definition
      Print("Receiving phone call...");
   }

bool PhoneClass::SendSms(int phoneNumber, string message) //method definition
  {
      bool smsSent = true;
      Print("Sending SMS...");
      return(smsSent);
  }

void PhoneClass::ReceiveSms(void) { //method definition
      Print("Receiving SMS...");
   }

bool PhoneClass::SendInternetData(void) //method definition
  {
      bool dataSent = true;
      Print("Sending internet data...");
      return(dataSent);
  }

void PhoneClass::ReceiveInternetData(void) { //method definition
      Print("Receiving internet data...");
   }

void PhoneClass::UseCamera(void) { //method definition
      Print("Using camera...");
   }

void PhoneClass::PrintPhoneSpecs() //method definition
  {
   Print("___________________________________________________________");
   PrintFormat("Model: %i Phone Specs", modelNumber);
   Print("---------------------");
   PrintFormat
      (
         "Model Number: %i \nPhoneColor: %s \nInput Type: %s \nScreen Type: %s \nScreen Size: %i\n",
         modelNumber, phoneColor, inputType, screenType, screenSize
      );
  }
Find the complete PhoneClass.mqh code attached at the bottom of the article.
It's now time to create a PhoneClass object. This is equivalent to how the phone engineers transformed our phone blueprint into a physical product that was able to perform different tasks (e.g. make and receive calls) as we described in the phone company example above earlier on.
Please note that class files are saved with the .mqh extension and are referred to as include files. Create a new ExpertAdvisor in the same folder that holds our PhoneClass.mqh. We saved the PhoneClass.mqh file in the following file path: "Experts\OOP_Article\". Use the MetaEditor MQL Wizard to generate a new Expert Advisor (Template) and save it on the following directory path "Experts\OOP_Article\". Name the new EA 'PhoneObject.mq5'.
Place this code below the EA #property version "1.00" code segment:
// Include the PhoneClass file so that the PhoneClass code is available in this EA
#include "PhoneClass.mqh"

int OnInit()
  {
//---
   // Create instaces or objects of the PhoneClass with specific parameters
   // as specified in the 'PhoneClass' consturctor
   PhoneClass myPhoneObject1(101, "Black", "Keyboard", "Non-touch LCD", 4);
   PhoneClass myPhoneObject2(102, "SkyBlue", "Touchscreen", "Touch AMOLED", 6);

   // Invoke or call the PrintPhoneSpecs method to print the specifications
   myPhoneObject1.PrintPhoneSpecs();
   myPhoneObject2.PrintPhoneSpecs();
//---
   return(INIT_SUCCEEDED);
  }
void OnDeinit(const int reason){}
void OnTick(){}
Find the complete PhoneObject.mq5 code attached at the bottom of the article.
Let's break down what the 'PhoneObject.mq5' EA code does:
Adds a Class File Using an Include Statement:
We first add our PhoneClass code to the EA using #include "PhoneClass.mqh" so that it becomes available for use in our newly created EA (PhoneObject.mq5). We have included this class on a global scope making it available in all sections of the EA.
Creates The PhoneClass Object:
Inside the EA OnInit() function, we have created two instances or objects of the PhoneClass. To create these objects, we started with the class name followed by descriptive names for the phone instances (myPhoneObject1 and myPhoneObject2). Then we used parentheses to enclose values for the phone's specifications, like its model number, color, input type, screen type, and screen size as specified by the PhoneClass constructor parameters.
Calls or Invokes A Class Method:
The lines; myPhoneObject1.PrintPhoneSpecs() and myPhoneObject2.PrintPhoneSpecs() call the PrintPhoneSpecs() method of the PhoneClass object to print the phone specifications.
Outputs The Phone Specs:
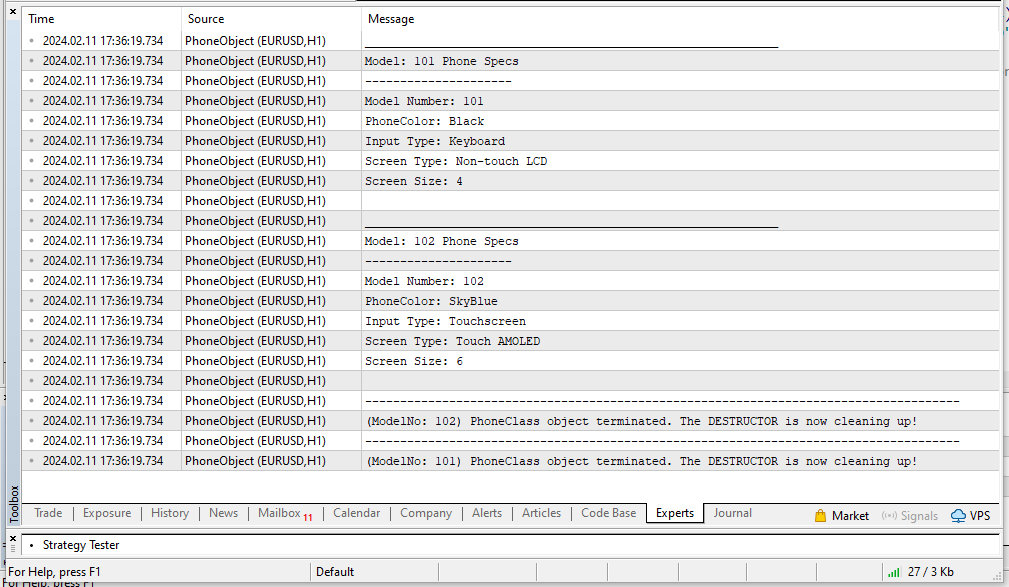
Load the EA on a symbols chart in the MT5 trading terminal to execute the PhoneObjectEA, go to the Toolbox window, and select the Experts tab to check the printed phone specifications.
The printed data also displays a text message from the 'PhoneClass' destructor ('~PhoneClass()'). We can see that each phone object creates a unique independent destructor and calls it at object termination.
What is inheritance in object-oriented programming?
Inheritance is a concept where a new class, called a subclass or child class, can inherit attributes and behaviors (properties and methods) from an existing class, known as a parent class or base class. This allows the child class to reuse and extend the functionalities of the parent class.
In simple terms, inheritance is like a family tree. Picture a 'base class' as the 'parent' or 'mother.' This class has specific traits (properties and methods). Now, think of a 'subclass' as the 'child' or 'daughter.' The subclass automatically inherits all the traits (properties and methods) of the base class, similar to a child inheriting traits from their parent.
For instance, if the mother has brown eyes, the daughter also has brown eyes without explicitly stating it. In programming, a subclass inherits methods and attributes from the base class, creating a hierarchy for organizing and reusing code.'
This "family" structure helps organize and reuse code. The child (subclass) gets everything the parent (base class) has and can even add its own unique features. Programmers use different terms for these "family members":
- Base class: parent class, superclass, root class, foundation class, master class
- Subclass: child class, derived class, descendant class, heir class
Below is how we can implement inheritance in the context of our provided PhoneClass code:
- The PhoneClass serves as a base class (blueprint) that defines the the basic building blocks of the phone's functionality.
- We will create another class to implement the high-end (smartphone) phone model we had discussed earlier in the phone company example.
- We will name this new class SmartPhoneClass. It will inherit all properties and methods from PhoneClass while introducing new features specific to smartphones and override the existing PrintPhoneSpecs() method from PhoneClass to implement smartphone behavior.
#include "PhoneClass.mqh" // Include the PhoneClass file
class SmartPhoneClass : public PhoneClass
{
private:
    string operatingSystem;
    int numberOfCameras;

public:
    SmartPhoneClass(int modelNo, string colorOfPhone, string typeOfInput, string typeOfScreen, int sizeOfScreen, string os, int totalCameras)
        : PhoneClass(modelNo, colorOfPhone, typeOfInput, typeOfScreen, sizeOfScreen)
    {
        operatingSystem = os;
        numberOfCameras = totalCameras;
    }

    void UseFacialRecognition()
    {
        Print("Using facial recognition feature...");
    }

    // Override methods from the base class if needed
    void PrintPhoneSpecs() override
    {
        Print("-----------------------------------------------------------");
        Print("Smartphone Specifications (including base phone specs):");
        Print("-----------------------------------------------------------");
        PrintFormat("Operating System: %s \nNumber of Cameras: %i", operatingSystem, numberOfCameras);
        PhoneClass::PrintPhoneSpecs(); // Call the base class method
        Print("-----------------------------------------------------------");
    }
};
Here is the direct link to the complete SmartPhoneClass.mqh code.
In the above example, SmartPhoneClass inherits from PhoneClass. It introduces new properties (operatingSystem and numberOfCameras) and a new method (UseFacialRecognition). The constructor of SmartPhoneClass also calls the base class constructor (PhoneClass) using ': PhoneClass(...)'. You will also notice that we have overridden the PrintPhoneSpecs() method from the base class. We have included the override specifier at the PrintPhoneSpecs() method definition in the SmartPhoneClass to let the compiler know that we are intentionally overriding a method from the base class.
This way, you can create instances of SmartPhoneClass that include all the features of a regular phone (PhoneClass) and new additional features specific to smartphones.
Access Modifiers
Access modifiers play a crucial role in inheritance in object-oriented programming by defining how members (attributes and methods) of a base class are inherited and accessed in derived classes.
- Public: Public access allows the properties and methods of a class to be accessible from outside the class. You can freely use or modify any public member from any part of the program. This is the most open level of access.
- Private: Private access restricts the visibility of properties and methods to access or modification within the class itself. Members declared as private are not directly accessible from outside the class. This helps in hiding implementation details and enforcing data integrity. This is what is called encapsulation.
- Protected: Protected access is a middle ground between public and private. Members declared as protected are accessible within the class and its subclasses (derived classes). This allows for a certain level of controlled sharing among related classes while still restricting access from the outside.
To create the SmartPhoneClass object, create a new EA and save it as SmartPhoneObject.mq5, and insert the code below:
// Include the PhoneClass file so that it's code is available in this EA
#include "SmartPhoneClass.mqh"

int OnInit()
  {
//---
   // Create instaces or objects of the PhoneClass with specific parameters
   // as specified in the 'PhoneClass' consturctor (base/mother class)
   PhoneClass myPhoneObject1(103, "Grey", "Touchscreen", "Touch LCD", 8);

   // as specified in the 'SmartPhoneClass' consturctor
   SmartPhoneClass mySmartPhoneObject1(104, "White", "Touchscreen", "Touch AMOLED", 6, "Android", 3);

   // Invoke or call the PrintPhoneSpecs method to print the specifications
   myPhoneObject1.PrintPhoneSpecs(); // base class method
   mySmartPhoneObject1.PrintPhoneSpecs(); // overriden method by the derived class (SmartPhoneClass)
//---
   return(INIT_SUCCEEDED);
  }
void OnDeinit(const int reason){}
void OnTick(){}
Find the complete SmartPhoneObject.mq5 code attached at the bottom of the article.
Save and compile the SmartPhoneObject.mq5 source code before loading it on a symbols chart in the MT5 trading terminal to execute the SmartPhoneClass object. Go to the Toolbox window, and select the Experts tab to check the printed EA output.
Main Properties Of Object-Oriented Programming
The six main properties of OOP are:
- Encapsulation: Bundling data and methods into a single unit (class) to hide internal details.
- Abstraction: Simplifying complex systems by focusing on essential properties and behaviors.
- Inheritance: Allowing a class to inherit properties and behaviors from another class for code reusability.
- Polymorphism: Allowing objects of different classes to be treated as objects of a common base class for flexibility.
- Classes and Objects: Classes are blueprints, and objects are instances; they organize code in a modular way.
- Message Passing: Objects communicate by sending messages, promoting interaction.
EIP (Encapsulation, Inheritance, Polymorphism): These are the core principles of object-oriented programming for code organization and flexibility. By understanding and applying these core properties, you can write more organized, maintainable, and reusable code.
MQL5 Class Naming Convention
The naming convention commonly used for class names in MQL5 is to prefix them with a 'C'. However, it is not mandatory to follow this convention. The 'C' stands for "class" and is a common practice to make it clear that a particular identifier represents a class.
For example, you might see class names like CExpert, CIndicator, or CStrategy in MQL5 code. This naming convention helps to distinguish classes from other types of identifiers like functions or variables.
While using 'C' as a prefix is a convention and generally recommended for clarity, MQL5 does not enforce any strict rules regarding the naming of classes. You can technically name your classes without the 'C' prefix, but it's good practice to follow established conventions to enhance code readability and maintainability.
The Object-Oriented Approach To Developing a Price Action EA
Now that you understand all about the object-oriented programming paradigm, it's time to tackle a hands-on example and convert our previously developed price action-based expert advisor from procedural code to object-oriented code. I have attached the price action expert advisor's procedural code Procedural_PriceActionEMA.mq5 at the bottom of this article.
Here is a quick overview of the specifics of the price action trading strategy. For a more detailed explanation of the trading strategy, you can find it in the first article.
The Price Action EMA Strategy
The strategy is very simple and only uses exponential moving averages (EMA) and candlestick prices to make trading decisions. You should use the strategy tester to optimize it for the best EMA setting and timeframe. I prefer trading on the 1-hour or higher timeframes for better results.
Entry Rules:
- BUY: Open a buy position when the most recently closed candle is a buy candle (open < close) and its low and high prices are above the Exponential Moving Average (EMA) line.
- SELL: Open a sell position when the most recently closed candle is a sell candle (open > close) and its low and high prices are below the Exponential Moving Average (EMA) line.
- Continue opening new buy or sell positions when a new candle is formed if any of the above conditions are met.
Exit Rules:
- Automatically close all open positions when the user-specified percentage profit or loss for the account is achieved.
- Alternatively, use predefined traditional stop-loss or take-profit orders to manage and exit positions.
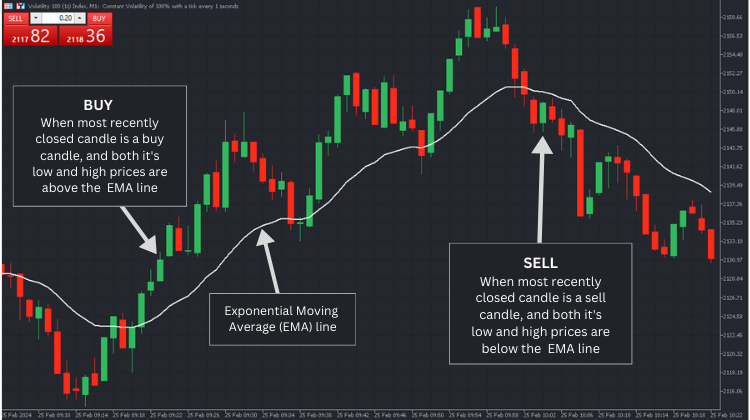
Since the goal of this article is to showcase how you can develop the above strategy into an mql5 EA using object-oriented principles, let's go ahead and write the code.
Create A New CEmaExpertAdvisor Class
Use the MQL5 Wizard to create a blank class file with 'EmaExpertAdvisor' as the class file name and save it in the following file path: 'Experts\OOP_Article\PriceActionEMA\'. Inside the newly created EmaExpertAdvisor.mqh class file, create a new class by the name CEmaExpertAdvisor. We will use the CEmaExpertAdvisor class to encapsulate the EA's behavior, and the member variables to represent its state.
Insert the following class properties/member variable and methods code in the CEmaExpertAdvisor class:
//+------------------------------------------------------------------+
// Include the trade class from the standard library
//---
#include <Trade\Trade.mqh>

class CEmaExpertAdvisor
  {

public:
   CTrade            myTrade;

public:
   // Constructor
                     CEmaExpertAdvisor(
      long _magicNumber, ENUM_TIMEFRAMES _tradingTimeframe,
      int _emaPeriod, int _emaShift, bool _enableTrading,
      bool _enableAlerts, double _accountPercentageProfitTarget,
      double _accountPercentageLossTarget, int _maxPositions, int _tp, int _sl
   );

   // Destructor
                    ~CEmaExpertAdvisor();
  };
Before the class keyword, I included the Trade class from the MQL5 standard library to help us manage various trade operations efficiently and with less code. This means we must rewrite the ManageProfitAndLoss() and BuySellPosition(...) methods to accommodate this new efficient upgrade.
#include <Trade\Trade.mqh> Later down the line, you can see that I have instantiated the CTrade class and created a ready-to-use object with the name myTrade that we will use to open and close new positions.
//Create an instance/object of the included CTrade class
   CTrade myTrade;
All the user-input global variables of the procedural code will become private global variables of the CEmaExpertAdvisor class. The EA user input variables will need to be initialized as soon as the class is instantiated and we will accomplish this by passing them as parameters to the constructor. This will help encapsulate the initialization process within the class.
private:
   // Private member variables/attributes (formerly procedural global variables)
   //------------------------
   // User input varibles
   long              magicNumber;
   ENUM_TIMEFRAMES   tradingTimeframe;
   int               emaPeriod;
   int               emaShift;
   bool              enableTrading;
   bool              enableAlerts;
   double            accountPercentageProfitTarget;
   double            accountPercentageLossTarget;
   int               maxPositions;
   int               TP;
   int               SL;
The remaining global variables from the procedural code will be declared as public and defined as global variables in the class.
public:
   //--- EA global variables
   // Moving average variables
   double            movingAverage[];
   int               emaHandle;
   bool              buyOk, sellOk;
   string            movingAverageTrend;

   // Strings for the chart comments
   string            commentString, accountCurrency, tradingStatus, accountStatus;

   // Capital management variables
   double            startingCapital, accountPercentageProfit;

   // Orders and positions variables
   int               totalOpenBuyPositions, totalOpenSellPositions;
   double            buyPositionsProfit, sellPositionsProfit, buyPositionsVol, sellPositionsVol;

   datetime          closedCandleTime;//used to detect new candle formations
Under the destructor method declaration just above the class curly bracket closing syntax, add all the procedural code functions as class method declarations.
// Class method declarations (formerly procedural standalone functions)
   int               GetInit();
   void              GetDeinit();
   void              GetEma();
   void              GetPositionsData();
   bool              TradingIsAllowed();
   void              TradeNow();
   void              ManageProfitAndLoss();
   void              PrintOnChart();
   bool              BuySellPosition(int positionType, string positionComment);
   bool              PositionFound(string symbol, int positionType, string positionComment);
We will use the C++ style of coding and define all the class methods below the class body like below:
//+------------------------------------------------------------------+
//|   METHODS DEFINITIONS                                                                |
//+------------------------------------------------------------------+
CEmaExpertAdvisor::CEmaExpertAdvisor(long _magicNumber, ENUM_TIMEFRAMES _tradingTimeframe,
                                   int _emaPeriod, int _emaShift, bool _enableTrading,
                                   bool _enableAlerts, double _accountPercentageProfitTarget,
                                   double _accountPercentageLossTarget,
                                   int _maxPositions, int _tp, int _sl)
  {
   magicNumber = _magicNumber;
   tradingTimeframe = _tradingTimeframe;
   emaPeriod = _emaPeriod;
   emaShift = _emaShift;
   enableTrading = _enableTrading;
   enableAlerts = _enableAlerts;
   accountPercentageProfitTarget = _accountPercentageProfitTarget;
   accountPercentageLossTarget = _accountPercentageLossTarget;
   maxPositions = _maxPositions;
   TP = _tp;
   SL = _sl;
  }
//+------------------------------------------------------------------+
CEmaExpertAdvisor::~CEmaExpertAdvisor() {}
//+------------------------------------------------------------------+
int CEmaExpertAdvisor::GetInit()
  {
    //method body....
  }
//+------------------------------------------------------------------+
void CEmaExpertAdvisor::GetDeinit()
  {
    //method body....
  }
//+------------------------------------------------------------------+
void CEmaExpertAdvisor::GetEma()
  {
   //method body....
  }
//+------------------------------------------------------------------+
void CEmaExpertAdvisor::GetPositionsData()
  {
   //method body....
  }
//+------------------------------------------------------------------+
bool CEmaExpertAdvisor::TradingIsAllowed()
  {
   //method body....
  }
//+------------------------------------------------------------------+
void CEmaExpertAdvisor::TradeNow()
  {
   //method body....
  }
//+------------------------------------------------------------------+
void CEmaExpertAdvisor::ManageProfitAndLoss()
  {
   //method body....
  }
//+------------------------------------------------------------------+
void CEmaExpertAdvisor::PrintOnChart()
  {
   //method body....
  }
//+------------------------------------------------------------------+
bool CEmaExpertAdvisor::BuySellPosition(int positionType, string positionComment)
  {
   //method body....
  }
//+------------------------------------------------------------------+
bool CEmaExpertAdvisor::PositionFound(string symbol, int positionType, string positionComment)
  {
   //method body....
  }
All the method definitions will be identical to the syntax in the procedural code except for the ManageProfitAndLoss() and BuySellPosition(...) methods which have been upgraded to make use of the newly created myTrade object of the CTrade class that we earlier imported into the class code.
Here is the new and updated ManageProfitAndLoss() method:
void CEmaExpertAdvisor::ManageProfitAndLoss()
  {
//if the account percentage profit or loss target is hit, delete all positions
   double lossLevel = -accountPercentageLossTarget;
   if(
      (accountPercentageProfit >= accountPercentageProfitTarget || accountPercentageProfit <= lossLevel) ||
      ((totalOpenBuyPositions >= maxPositions || totalOpenSellPositions >= maxPositions) && accountPercentageProfit > 0)
   )
     {
      //delete all open positions
      if(PositionsTotal() > 0)
        {
         //variables for storing position properties values
         ulong positionTicket;
         long positionMagic, positionType;
         string positionSymbol;
         int totalPositions = PositionsTotal();

         //scan all the open positions
         for(int x = totalPositions - 1; x >= 0; x--)
           {
            positionTicket = PositionGetTicket(x);//gain access to other position properties by selecting the ticket
            positionMagic = PositionGetInteger(POSITION_MAGIC);
            positionSymbol = PositionGetString(POSITION_SYMBOL);
            positionType = PositionGetInteger(POSITION_TYPE);
            int positionDigits= (int)SymbolInfoInteger(positionSymbol, SYMBOL_DIGITS);
            double positionVolume = PositionGetDouble(POSITION_VOLUME);
            ENUM_POSITION_TYPE positionType = (ENUM_POSITION_TYPE)PositionGetInteger(POSITION_TYPE);

            if(positionMagic == magicNumber && positionSymbol == _Symbol) //close the position
              {
               //print the position details
               Print("*********************************************************************");
               PrintFormat(
                  "#%I64u %s  %s  %.2f  %s [%I64d]",
                  positionTicket, positionSymbol, EnumToString(positionType), positionVolume,
                  DoubleToString(PositionGetDouble(POSITION_PRICE_OPEN), positionDigits), positionMagic
               );

               //print the position close details
               PrintFormat("Close #%I64d %s %s", positionTicket, positionSymbol, EnumToString(positionType));
               //send the tradeRequest
               if(myTrade.PositionClose(positionTicket, SymbolInfoInteger(_Symbol, SYMBOL_SPREAD) * 3)) //success, position has been closed
                 {
                  if(enableAlerts)
                    {
                     Alert(
                        _Symbol + " PROFIT LIQUIDATION: Just successfully closed POSITION (#" +
                        IntegerToString(positionTicket) + "). Check the EA journal for more details."
                     );
                    }
                  PrintFormat("Just successfully closed position: #%I64d %s %s", positionTicket, positionSymbol, EnumToString(positionType));
                  myTrade.PrintResult();
                 }
               else  //trade tradeRequest failed
                 {
                  //print the information about the operation
                  if(enableAlerts)
                    {
                     Alert(
                        _Symbol + " ERROR ** PROFIT LIQUIDATION: closing POSITION (#" +
                        IntegerToString(positionTicket) + "). Check the EA journal for more details."
                     );
                    }
                  PrintFormat("Position clossing failed: #%I64d %s %s", positionTicket, positionSymbol, EnumToString(positionType));
                  PrintFormat("OrderSend error %d", GetLastError());//print the error code
                 }
              }
           }
        }
     }
  }
Here is the new and updated BuySellPosition(...) method:
bool CEmaExpertAdvisor::BuySellPosition(int positionType, string positionComment)
  {
   double volumeLot = NormalizeDouble(((SymbolInfoDouble(_Symbol, SYMBOL_VOLUME_MIN) * AccountInfoDouble(ACCOUNT_EQUITY)) / 10000), 2);
   double tpPrice = 0.0, slPrice = 0.0, symbolPrice;

   if(positionType == POSITION_TYPE_BUY)
     {
      if(sellPositionsVol > volumeLot && AccountInfoDouble(ACCOUNT_MARGIN_LEVEL) > 200)
        {
         volumeLot = NormalizeDouble((sellPositionsVol + volumeLot), 2);
        }
      if(volumeLot < 0.01)
        {
         volumeLot = SymbolInfoDouble(_Symbol, SYMBOL_VOLUME_MIN);
        }
      if(volumeLot > SymbolInfoDouble(_Symbol, SYMBOL_VOLUME_MAX))
        {
         volumeLot = SymbolInfoDouble(_Symbol, SYMBOL_VOLUME_MAX);
        }

      volumeLot = NormalizeDouble(volumeLot, 2);
      symbolPrice = SymbolInfoDouble(_Symbol, SYMBOL_ASK);

      if(TP > 0)
        {
         tpPrice = NormalizeDouble(symbolPrice + (TP * _Point), _Digits);
        }
      if(SL > 0)
        {
         slPrice = NormalizeDouble(symbolPrice - (SL * _Point), _Digits);
        }
      //if(myTrade.Buy(volumeLot, NULL, 0.0, 0.0, 0.0, positionComment)) //successfully openend position
      if(myTrade.Buy(volumeLot, NULL, 0.0, slPrice, tpPrice, positionComment)) //successfully openend position
        {
         if(enableAlerts)
           {
            Alert(_Symbol, " Successfully openend BUY POSITION!");
           }
         myTrade.PrintResult();
         return(true);
        }
      else
        {
         if(enableAlerts)
           {
            Alert(_Symbol, " ERROR opening a BUY POSITION at: ", SymbolInfoDouble(_Symbol, SYMBOL_ASK));
           }
         PrintFormat("ERROR: Opening a BUY POSITION: ErrorCode = %d",GetLastError());//OrderSend failed, output the error code
         return(false);
        }
     }

   if(positionType == POSITION_TYPE_SELL)
     {
      if(buyPositionsVol > volumeLot && AccountInfoDouble(ACCOUNT_MARGIN_LEVEL) > 200)
        {
         volumeLot = NormalizeDouble((buyPositionsVol + volumeLot), 2);
        }
      if(volumeLot < 0.01)
        {
         volumeLot = SymbolInfoDouble(_Symbol, SYMBOL_VOLUME_MIN);
        }
      if(volumeLot > SymbolInfoDouble(_Symbol, SYMBOL_VOLUME_MAX))
        {
         volumeLot = SymbolInfoDouble(_Symbol, SYMBOL_VOLUME_MAX);
        }
      volumeLot = NormalizeDouble(volumeLot, 2);
      symbolPrice = SymbolInfoDouble(_Symbol, SYMBOL_BID);
      if(TP > 0)
        {
         tpPrice = NormalizeDouble(symbolPrice - (TP * _Point), _Digits);
        }
      if(SL > 0)
        {
         slPrice = NormalizeDouble(symbolPrice + (SL * _Point), _Digits);
        }
      if(myTrade.Sell(volumeLot, NULL, 0.0, slPrice, tpPrice, positionComment)) //successfully openend position
        {
         if(enableAlerts)
           {
            Alert(_Symbol, " Successfully openend SELL POSITION!");
           }
           myTrade.PrintResult();
         return(true);
        }
      else
        {
         if(enableAlerts)
           {
            Alert(_Symbol, " ERROR opening a SELL POSITION at: ", SymbolInfoDouble(_Symbol, SYMBOL_ASK));
           }
         PrintFormat("ERROR: Opening a SELL POSITION: ErrorCode = %d",GetLastError());//OrderSend failed, output the error code
         return(false);
        }
     }
   return(false);
  }
Remember to implement all the methods/member functions with the logic from the original procedural code. You will find the full CEmaExpertAdvisor code inside the EmaExpertAdvisor.mqh include file that is attached at the bottom of this article.
Create The New OOP_PriceActionEMA EA
With the completion of the trading strategy blueprint (CEmaExpertAdvisor class), it's time to put it into action. We'll bring our blueprint to life by creating a real-life object capable of executing trades.
Generate a new expert advisor, naming it "OOP_PriceActionEMA.mq5", and save it in the specified file path: 'Experts\OOP_Article\PriceActionEMA'. This EA will be in charge of executing our trading strategy.
Start by importing the 'EmaExpertAdvisor.mqh' include file, which houses the CEmaExpertAdvisor class.
// Include the CEmaExpertAdvisor file so that it's code is available in this EA
#include "EmaExpertAdvisor.mqh"
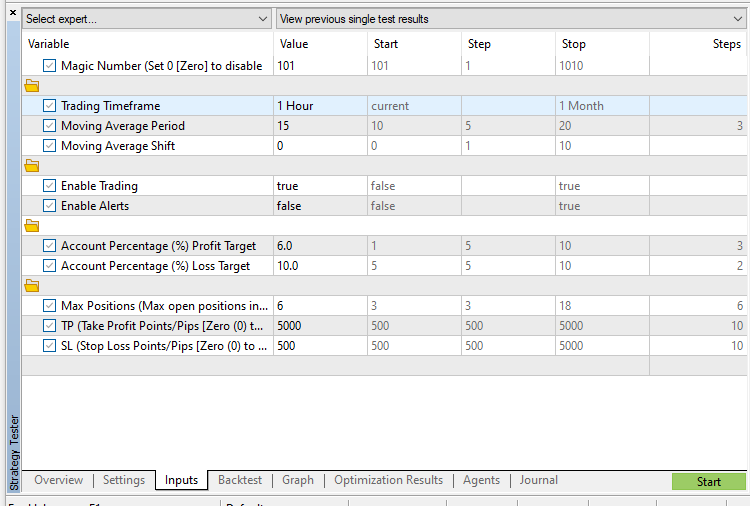
Next, we declare and define the user input variables as global variables. These are the user input variables for configuring the EA. They are similar to the parameters that were previously global variables in the procedural version.
//--User input variables
input long magicNumber = 101;//Magic Number (Set 0 [Zero] to disable

input group ""
input ENUM_TIMEFRAMES tradingTimeframe = PERIOD_H1;//Trading Timeframe
input int emaPeriod = 15;//Moving Average Period
input int emaShift = 0;//Moving Average Shift

input group ""
input bool enableTrading = true;//Enable Trading
input bool enableAlerts = false;//Enable Alerts

input group ""
input double accountPercentageProfitTarget = 6.0;//Account Percentage (%) Profit Target
input double accountPercentageLossTarget = 10.0;//Account Percentage (%) Loss Target

input group ""
input int maxPositions = 3;//Max Positions (Max open positions in one direction)
input int TP = 5000;//TP (Take Profit Points/Pips [Zero (0) to diasable])
input int SL = 500;//SL (Stop Loss Points/Pips [Zero (0) to diasable])
Following that, create an instance of CEmaExpertAdvisor. This line generates an instance (ea) of the CEmaExpertAdvisor class using the constructor, initializing it with the values of the user input variables.
//Create an instance/object of the included CEmaExpertAdvisor class
//with the user inputed data as the specified constructor parameters
CEmaExpertAdvisor ea(
      magicNumber, tradingTimeframe, emaPeriod, emaShift,
      enableTrading, enableAlerts, accountPercentageProfitTarget,
      accountPercentageLossTarget, maxPositions, TP, SL
   );
In the OnInit function, we call the GetInit method of the ea instance. This method is part of the CEmaExpertAdvisor class and is responsible for initializing the EA. If initialization fails, it returns INIT_FAILED; otherwise, it returns INIT_SUCCEEDED.
//+------------------------------------------------------------------+
//| Expert initialization function                                   |
//+------------------------------------------------------------------+
int OnInit()
  {
//---
   if(ea.GetInit() <= 0)
     {
      return(INIT_FAILED);
     }
//---
   return(INIT_SUCCEEDED);
  }
In the OnDeinit function, we call the GetDeinit method of the ea instance. This method is part of the CEmaExpertAdvisor class and is responsible for deinitializing the EA.
//+------------------------------------------------------------------+
//| Expert deinitialization function                                 |
//+------------------------------------------------------------------+
void OnDeinit(const int reason)
  {
//---
   ea.GetDeinit();
  }
In the OnTick function, we call various methods of the ea instance, such as GetEma, GetPositionsData, TradingIsAllowed, TradeNow, ManageProfitAndLoss, and PrintOnChart. These methods encapsulate different aspects of the EA's behavior, making the code more modular and organized.
//+------------------------------------------------------------------+
//| Expert tick function                                             |
//+------------------------------------------------------------------+
void OnTick()
  {
//---
   ea.GetEma();
   ea.GetPositionsData();
   if(ea.TradingIsAllowed())
     {
      ea.TradeNow();
      ea.ManageProfitAndLoss();
     }
   ea.PrintOnChart();
  }
I have attached the complete EA source code at the bottom of this article in the OOP_PriceActionEMA.mq5 file.
Testing Our EA in the Strategy Tester
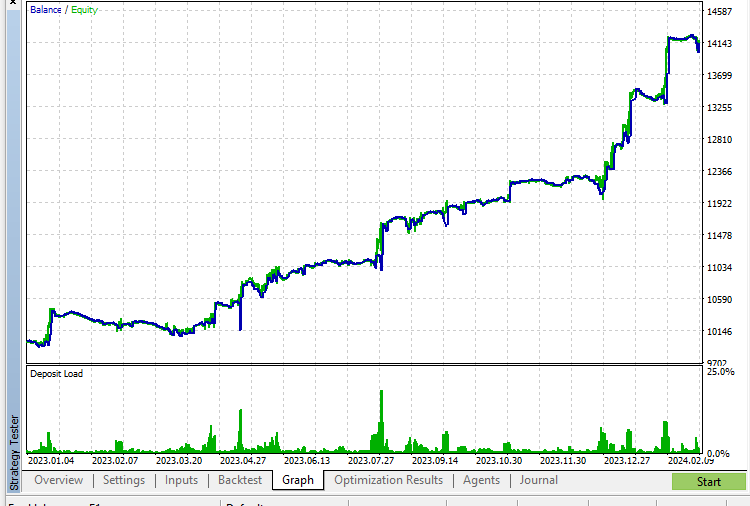
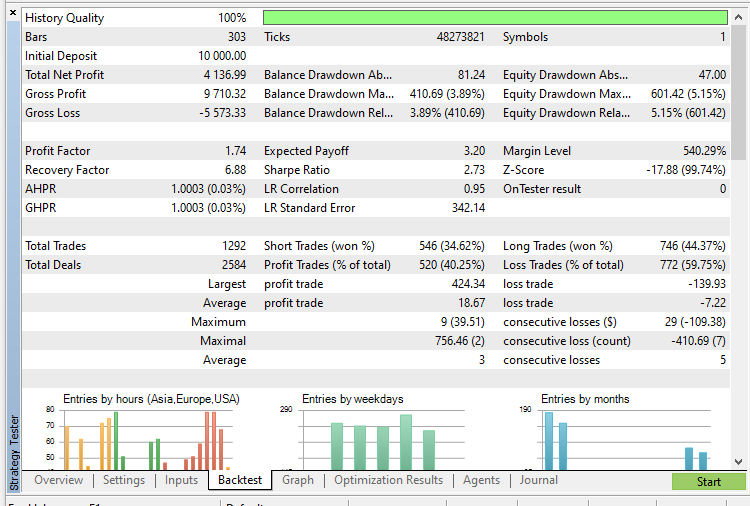
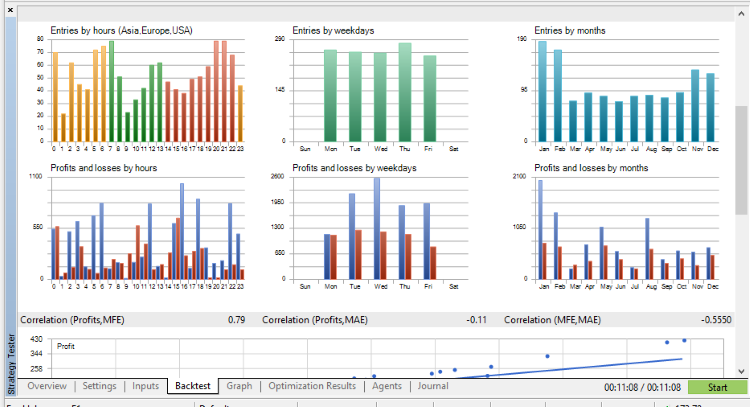
It's mandatory to confirm that our EA operates as planned. This can be done by either loading it onto an active symbol chart and trading it in a demo account or by utilizing the strategy tester for a thorough evaluation. Although you can test it on a demo account, for now, we'll use the strategy tester to assess its performance.
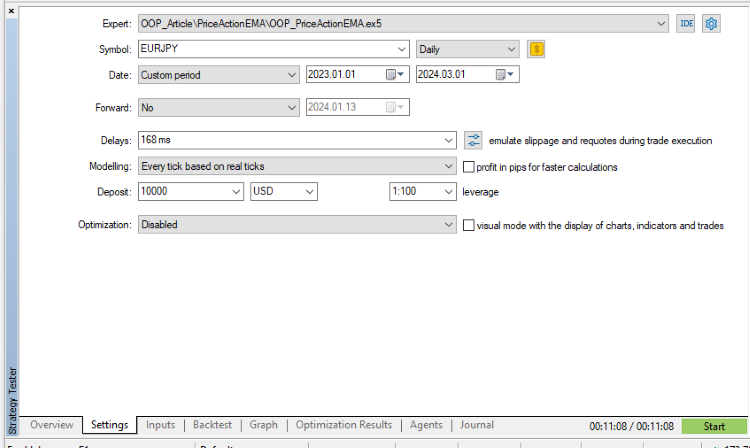
Here are the settings we'll apply in the strategy tester:
-
Broker: MT5 Metaquotes demo account (Automatically created upon MT5 installation)
-
Symbol: EURJPY
-
Testing Period (Date): 1 year 2 months (Jan 2023 to Mar 2024)
-
Modeling: Every tick based on real ticks
-
Deposit: $10,000 USD
-
Leverage: 1:100
Conclusion
We've reached the end of our exploration of the object-oriented programming paradigm, a powerful tool for building software. We've navigated the complexities of this powerful paradigm that transforms code into modular, reusable structures. The shift from procedural to object-oriented programming brings forth a new level of organization, encapsulation, and abstraction, providing developers with a robust framework for managing complex projects.
In this article, you have also learned how to convert procedural MQL5 code to object-oriented code using object-oriented principles, emphasizing the significance of classes, objects, and inheritance. By encapsulating data and functionality within classes, we enhance code modularity and maintainability.
As you take on your own MQL5 projects, remember that the strength of object-oriented programming lies in its ability to model real-world entities and relationships, fostering code that mirrors the complexities of the systems it represents. I have attached all the source code files for the various classes and EAs we created at the end of the article.
Thank you for accompanying me on this deep dive into the different programming paradigms. May your coding endeavors be enriched by the principles and practices we've uncovered. Stay tuned for more insights and practical examples in our ongoing quest to develop simple and practical trading systems with the beloved and powerful MQL5 language.
Thank you for investing the time to read this article, I wish you the very best in your MQL5 development journey and trading endeavors.
Warning: All rights to these materials are reserved by MetaQuotes Ltd. Copying or reprinting of these materials in whole or in part is prohibited.
This article was written by a user of the site and reflects their personal views. MetaQuotes Ltd is not responsible for the accuracy of the information presented, nor for any consequences resulting from the use of the solutions, strategies or recommendations described.
 Modified Grid-Hedge EA in MQL5 (Part III): Optimizing Simple Hedge Strategy (I)
 The Disagreement Problem: Diving Deeper into The Complexity Explainability in AI
 Population optimization algorithms: Charged System Search (CSS) algorithm
- Free trading apps
- Over 8,000 signals for copying
- Economic news for exploring financial markets
You agree to website policy and terms of use
Kelvin, I am an experienced programmer, I know and use OOP well. I would like to note that you are excellent at explaining the material for beginners. I myself have taught MQL4/5 programming to about 500 people, and often I have to think of unexpected moves to explain to my students what they don't understand. A class with a phone is a good idea. Success in everything!
Seconded.
Kelvin, I am an experienced programmer, I know and use OOP well. I would like to note that you do an excellent job of explaining the material for beginners. I myself have taught MQL4/5 programming to about 500 people and I often have to come up with unexpected moves to explain to my students what they don't understand. A class with a phone is a good idea. Success in everything!
Thank you, Alexey, for your kind words and feedback! It's wonderful to hear that you found my explanation helpful, especially coming from someone with your extensive experience in programming and teaching. I appreciate your acknowledgment of the effort that goes into making complex programming concepts accessible to beginners. I wish you continued success in all your endeavors!
Seconded.
HEELO, good developers, i would to get help , iam looking hedging calculator that include:
lot,profit,keep,appl: buy
lot,profit,keep,appl: sell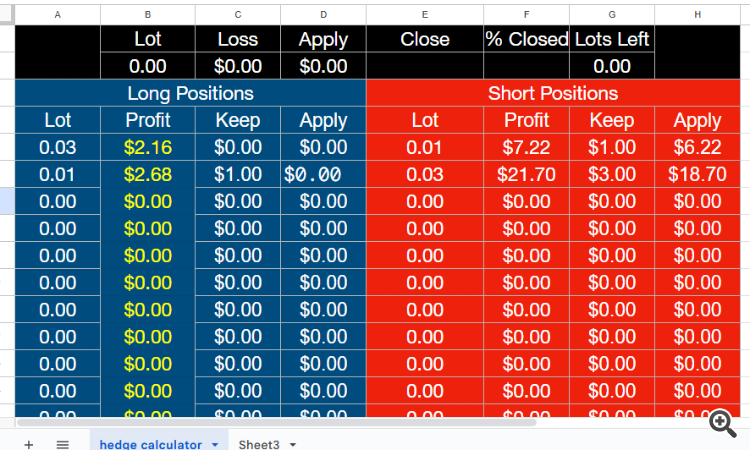
HEELO, good developers, i would to get help , iam looking hedging calculator that include:
lot,profit,keep,appl: buy
lot,profit,keep,appl: sell
Hello Mbuso, This forum is meant for discussing the article above. Please use the MQL5 freelancer service to hire a programmer to work on your project or create a new forum topic in the appropriate category.