
Developing a Replay System — Market simulation (Part 03): Adjusting the settings (I)

Introduction
In the previous article "Developing a Replay System — Market simulation (Part 02): First experiments (II)", we have created a system that can generate a 1-minute bar within an adequate processing time to be used in market simulation. However, we understood that we could not control what was happening. Our capabilities were limited to choosing some points and adjusting others. We had few options left with a running system.
In this article, we will try to improve this situation. We will use some additional controls to make our analysis more manageable. While we still have a lot of work to do to get a fully functional system in terms of statistical analysis and chart control, this is a good start.
In this article, we will only make a few adjustments, so it will be relatively short. We will not go into detail at this step. Our goal here is to lay the groundwork for the necessary controls to make Replay easier to implement and to analyze for those who want to put the system into practice.
Planning
This planning step is quite simple, because if you look at how the system worked in the last article, it becomes clear what we need to do. We need to create a control form in which we can pause, play and, above all, select a specific time to start the study.
In the current view, we will always start with the first traded tick. Suppose we want to conduct research starting from the fifth market hour, that is, from 14:00 (given that the market opens at 9:00). In this case, we would have to wait 5 Replay hours and only then perform the necessary analysis. This is completely impossible, because if we try to stop Replay, it will close, and we will have to start all over again, from the first traded tick.
Now it is clear what we need to do right away, because the way it works now is demotivating, even though the idea itself is interesting.
Now that we have a general direction, we can proceed to the implementation.
Implementation
The implementation will be quite interesting, since we will have to go through different paths, from the simplest to the most diverse, in order to create the true control system. However, all the steps are easy to understand if you carefully read the explanations and follow the articles in order of publication, without skipping any of them and without trying to take several steps forward.
Contrary to what many may think, we are not going to use DLLs in the system. We will implement the Replay system purely using the MQL5 language. The idea is to make the most of MetaTrader 5 and to show how far we can go within the platform when creating the necessary features. Resorting to an external implementation takes a lot of the fun out of working with MQL5, giving the impression that MQL5 can't meet our needs.
If you look at the code used in the previous article, you can see that the system used a service to create the replay. It also included a script that started it. This script allowed the service to send ticks to a custom symbol, thus creating a replay. We used a simple switching mechanism. However, this method is not suitable for more efficient control. We must take a more difficult path.
Creating an ultra-basic EA
Let's try to implement control using an EA. This EA will control when the service should or should not generate ticks for bars.
Why an EA? We could use an indicator instead of an EA, which would work in the same way. However, I want to use an EA as we will need it later to create an order simulation system. In addition, we will try to use the order system that I presented in my other series of articles called "Developing a trading EA from scratch". We don't have to worry about the order system for now as we still have a lot of work to do before we get to it.
The full code of our basic EA is shown below:
#property copyright "Daniel Jose"
#property version   "1.00"
//+------------------------------------------------------------------+
#include <Market Replay\C_Controls.mqh>
//+------------------------------------------------------------------+
C_Controls      Control;
//+------------------------------------------------------------------+
int OnInit()
{
        Control.Init();

        return INIT_SUCCEEDED;
}
//+------------------------------------------------------------------+
void OnDeinit(const int reason) {}
//+------------------------------------------------------------------+
void OnTick() {}
//+------------------------------------------------------------------+
void OnChartEvent(const int id, const long &lparam, const double &dparam, const string &sparam)
{
        Control.DispatchMessage(id, lparam, dparam, sparam);
}
//+------------------------------------------------------------------+
The code is very simple, but it is quite enough to control the operation of the service. Now let's look at a certain part of code, namely the control object class highlighted above. The code is not very complex at this early stage of development. We are going to implement only one button to play and pause the replay service. So, let's take a look at this class at the current stage of development.
The first thing to pay attention to is shown below:
#property copyright "Daniel Jose"
//+------------------------------------------------------------------+
#include <Market Replay\Interprocess.mqh>
//+------------------------------------------------------------------+
#define def_ButtonPlay  "Images\\Market Replay\\Play.bmp"
#define def_ButtonPause "Images\\Market Replay\\Pause.bmp"
#resource "\\" + def_ButtonPlay
#resource "\\" + def_ButtonPause
//+------------------------------------------------------------------+
#define def_PrefixObjectName "Market Replay _ "
The first important point is the header file in BLUE. We will see it in detail later. Then we have some definitions of bitmap objects that will represent the play and pause buttons. Nothing too complicated here. Once these points are defined, we move on to the class code which is quite compact. The full code is shown below.
class C_Controls
{
        private :
//+------------------------------------------------------------------+
                string  m_szBtnPlay;
                long            m_id;
//+------------------------------------------------------------------+
                void CreateBtnPlayPause(long id)
                        {
                                m_szBtnPlay = def_PrefixObjectName + "Play";
                                ObjectCreate(id, m_szBtnPlay, OBJ_BITMAP_LABEL, 0, 0, 0);
                                ObjectSetInteger(id, m_szBtnPlay, OBJPROP_XDISTANCE, 5);
                                ObjectSetInteger(id, m_szBtnPlay, OBJPROP_YDISTANCE, 25);
                                ObjectSetInteger(id, m_szBtnPlay, OBJPROP_STATE, false);
                                ObjectSetString(id, m_szBtnPlay, OBJPROP_BMPFILE, 0, "::" + def_ButtonPause);
                                ObjectSetString(id, m_szBtnPlay, OBJPROP_BMPFILE, 1, "::" + def_ButtonPlay);
                        }
//+------------------------------------------------------------------+
        public  :
//+------------------------------------------------------------------+
                C_Controls()
                        {
                                m_szBtnPlay = NULL;
                        }
//+------------------------------------------------------------------+
                ~C_Controls()
                        {
                                ObjectDelete(ChartID(), m_szBtnPlay);
                        }
//+------------------------------------------------------------------+
                void Init(void)
                        {
                                if (m_szBtnPlay != NULL) return;
                                CreateBtnPlayPause(m_id = ChartID());
                                GlobalVariableTemp(def_GlobalVariableReplay);
                                ChartRedraw();
                        }
//+------------------------------------------------------------------+
                void DispatchMessage(const int id, const long &lparam, const double &dparam, const string &sparam)
                        {
                                u_Interprocess Info;

                                switch (id)
                                {
                                        case CHARTEVENT_OBJECT_CLICK:
                                                if (sparam == m_szBtnPlay)
                                                {
                                                        Info.s_Infos.isPlay = (bool) ObjectGetInteger(m_id, m_szBtnPlay, OBJPROP_STATE);
                                                        GlobalVariableSet(def_GlobalVariableReplay, Info.Value);
                                                }
                                                break;
                                }
                        }
//+------------------------------------------------------------------+
};
Here we have two main functions: Init and DispatchMessage. They implement all the work required for the operation of the EA at this early stage. To better explain some of these details, let's look at these two functions below. Let's start with Init.
void Init(void)
{
        if (m_szBtnPlay != NULL) return;
        CreateBtnPlayPause(m_id = ChartID());
        GlobalVariableTemp(def_GlobalVariableReplay);
        ChartRedraw();
}
When Init is called, it first checks if the control elements have previously been created. If this has already happened, it will return. This is important because if you change the chart period or make any change that requires the EA to reload the chart (which happens quite often), the state of the replay service will not be changed. So, if the service is running, that is, if it is paused, it will continue as it is and if it is in play, it will continue sending ticks.
If it is the first call, then the main controls are created, which are only the play and pause buttons for now. Next, we create a global terminal value that will be used for communication between the EA and the service. At this point, we're just creating a variable without assigning any value to it.
After that, we have to apply the objects on the screen. This is important because if this forced update is not done, the EA will be loaded but the service will be stopped which will make you think that the system crashed. But in fact, we will be waiting for MetaTrader 5 to update the chart for us so that the objects are plotted and we can run the market replay.
Have you noticed how easy it is? Now, let's see the code of the DispatchMessage function which is also very simple at this stage. Below is the code for it:
void DispatchMessage(const int id, const long &lparam, const double &dparam, const string &sparam)
{
        u_Interprocess Info;

        switch (id)
        {
                case CHARTEVENT_OBJECT_CLICK:
                        if (sparam == m_szBtnPlay)
                        {
                                Info.s_Infos.isPlay = (bool) ObjectGetInteger(m_id, m_szBtnPlay, OBJPROP_STATE);
                                GlobalVariableSet(def_GlobalVariableReplay, Info.Value);
                        }
                        break;
        }
}
We use MetaTrader 5 to manage everything for us. We use the u_Interprocess union to set a global terminal value to check the state of the bitmap button. Thus, we adjust the terminal global variable so that it is passed to the service process which is responsible for creating the replay.
Due to this, we will always start the replay system in a paused state. Once the EA with all its objects is loaded on the chart, we can play it or pause market replay whenever we want. This will make things a little more interesting.
Understanding the Interprocess.mqh file
As you may have guessed, switching the system to using an EA instead of a script brought some changes to the replay service. Before considering these changes, let's take a look at the Interprocess.mqh file. Its full code in its current state in the code below:#define def_GlobalVariableReplay "Replay Infos" //+------------------------------------------------------------------+ union u_Interprocess { double Value; struct st_0 { bool isPlay; struct st_1 { char Hours; char Minutes; }Time[3]; }s_Infos; };
This simple definition provides us with a name, but it's not just any name. This will be the name of the global terminal variable which will be used at this stage to allow communication between the EA and the service. But the part that can be complicated for users with less experience is the union.
Let's see what this union actually represents and then understand how it is used to pass information between the EA and the Service. To begin with, to understand the complexity, you have to know how many bits each data type of data when used. See the table below:
| Type | Number of bits |
|---|---|
| Bool | 1 bit |
| Char or UChar | 8 bits |
| Short or UShort | 16 bits |
| Int or UInt | 32 bits |
| Long or ULong | 64 bits |
This table lists signed and unsigned integer types and the number of bits (don't confuse bits with bytes). Bit is the smallest unit of information representing an on or off state, or 1s and 0s in binary. Byte is a set of bits.
When looking at this table, the following idea may not be clear: in a variable of the uchar type we will have 8 variables of bool type. That is, a uchar variable corresponds to a "union" (the word would not be quite this) of 8 bool variable. In code it will look like this:
union u_00
{
        char info;
        bool bits[8];
}Data;
The length of this union is 8 bits, or 1 byte. You can modify the content of the information by writing the bits in the array and selecting a specific position. For example, to make Data.info equal to 0x12, you can do one of the two things shown below:
Data.info = 0x12;

or

Data.bits[4] = true;
Data.bits[1] = true;
Either way, we'll get the same result if the Data.info variable has all initial bits set to 0. That's what a union is.
Now let's get back to our original code. The largest type found on a 64-bit system is the long (signed) or ulong (unsigned) type. If you have a sign, you can represent negative values. Only positive numbers can be represented without the sign. So, in this case we would get something like this:
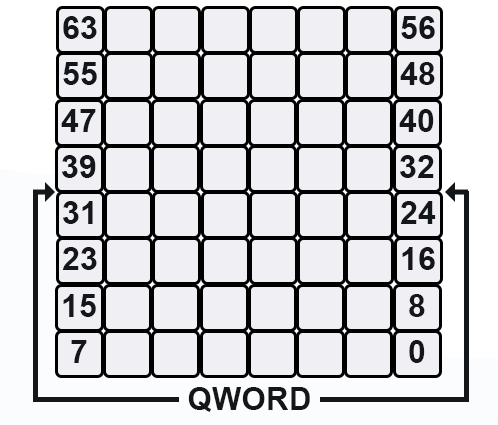
Each of the squares represents 1 bit, and the name "QWORD" comes from Assembly, which is the mother language of all modern programming languages. The same structure occurs in another type – float.
Floats are variables whose value is not exact but can still be used to represent computable values. Basically, there are 2 types:
| Type | Number of bits |
|---|---|
| Float | 32 bits |
| Double | 64 bits |
This is similar to the integer types discussed above, where each bit represents an on or off state. With floats, we don't have the same value representing logic. They follow a slightly different creation principle, but we will not consider it now. The important detail here is different.
When we look at the type used by the terminal global variables, we see that they are only of float type or, to be more precise, the double: 64 bits. Question: What is the integer type that has the same length? Exactly what you have answered: long type that has the same 64 bits. When we unite long and double, we can represent two totally different things at the same time.
But we have a slightly complicated question here: How will you know which type is used? To solve this, we do not use the full type, but only fragments of it, and assign names to these fragments. Thus, we have a union which you can see in the code of the Interprocess.mqh file.
In fact, we are not going to use double. Trying to write directly in the hand the value that should be created in the double type is not at all suitable or simple to do. Instead, we use the named parts to do this creation, and the proper bits will be set with the correct values representing 0s or 1s. After that, we put the double value in the global terminal variable, and the other process, which in this case will be the service, will take the value and decode it knowing exactly what to do.
You see that everything is done using very simple and easy to understand rules. This would be very difficult to do if we tried to directly create floats and then understand their meaning.
I believe that it is clear now what a union is and how we are going to use it. But remember: In case you want to use terminal global variables with type double, having 64 bits, the union created cannot exceed these same 64 bits, otherwise some information will be lost.
Understanding how the replay service is created
This is probably the part that will require the most attention from you in order to understand what is going on. If you do something without understanding, you'll get all screwed up. While this sounds simple, there are details that, if misunderstood, may make you wonder why the system works as described and demonstrated, but you cannot make it work on your workstation.
So, let's see the replay service. It is currently still quite compact and simple. Its entire code is shown below:
#property service
#property copyright "Daniel Jose"
#property version   "1.00"
//+------------------------------------------------------------------+
#include <Market Replay\C_Replay.mqh>
//+------------------------------------------------------------------+
input string    user01 = "WINZ21_202110220900_202110221759"; //File with ticks
//+------------------------------------------------------------------+
C_Replay        Replay;
//+------------------------------------------------------------------+
void OnStart()
{
        ulong t1;
        int delay = 3;
        long id;
        u_Interprocess Info;
        bool bTest = false;

        if (!Replay.CreateSymbolReplay(user01)) return;
        id = Replay.ViewReplay();
        Print("Waiting for permission to start replay ...");
        while (!GlobalVariableCheck(def_GlobalVariableReplay)) Sleep(750);
        Print("Replay service started ...");
        t1 = GetTickCount64();
        while ((ChartSymbol(id) != "") && (GlobalVariableGet(def_GlobalVariableReplay, Info.Value)))
        {
                if (!Info.s_Infos.isPlay)
                {
                        if (!bTest)     bTest = (Replay.Event_OnTime() > 0); else       t1 = GetTickCount64();
                }else if ((GetTickCount64() - t1) >= (uint)(delay))
                {
                        if ((delay = Replay.Event_OnTime()) < 0) break;
                        t1 = GetTickCount64();
                }
        }
        Replay.CloseReplay();
        Print("Replay service finished ...");
}
//+------------------------------------------------------------------+
If you take this code and create the "WINZ21_202110220900_202110221759" file which is used as the basis for creating the replay, and then try to run it, you will see that nothing will happen. Even if you use the file that is in the attachment and try to run it from this code, then nothing will happen either. But why? The reason is in id = Replay.ViewReplay(); this code does something you need to understand to actually be able to use the market replay system. No matter what you do: if you don't understand what's going on, nothing will make sense. But before we look at the code inside ViewReplay(), let's first understand the data flow in the above code.
To understand how this works, let's break it down into smaller parts, starting with the following fragment:
if (!Replay.CreateSymbolReplay(user01)) return;
This line loads the traded tick data from the specified file. If loading fails, the service will simply terminate.
id = Replay.ViewReplay();
This line will load the EA, but we will see this in more detail later, so let's move on.
while (!GlobalVariableCheck(def_GlobalVariableReplay)) Sleep(750);
The above line will be in a loop, waiting for the EA to load or something else to create a global terminal variable. This will serve as a form of communication between processes that are running outside the service environment.
t1 = GetTickCount64();
This line performs the first capture for the service's internal counter. This first capture may or may not be necessary. Usually it is completely unnecessary, since the system goes into pause mode immediately upon being enabled.
while ((ChartSymbol(id) != "") && (GlobalVariableGet(def_GlobalVariableReplay, Info.Value)))
This point is very interesting. We have two tests here. If one of them fails, the replay service will be terminated. In the first case, we check whether the replay asset window is present in the terminal. If the trader closes this window, the replay system will be terminated since the trader will no longer be running the replay. In the second case, we test and at the same time capture the value from the terminal global variable. If this variable ceases to exist, the service will also be terminated.
        u_Interprocess Info;

//...

        if (!Info.s_Infos.isPlay)
Here we check the condition informed by the trader or the replay user. If we are in play mode, this test will fail. But if we are in pause mode, it will succeed. Note how we use the union to capture the correct bit inside the double value. Without this union, this would be something impossible to do.
One we are in the pause mode, we execute the following line:
if (!bTest) bTest = (Replay.Event_OnTime() > 0); else t1 = GetTickCount64();
This line will only allow the first trade tick to be sent to the asset. This is important for some reasons that will be seen later. Once this has been done, any other time the replay service is "paused", we will be capturing the current value of the timer. It is true, that this 'paused' mode does not refer to the fact that the service is actually paused. It is just not sending ticks to the replay symbol, that's why I say that it is "paused".
But if the user or trader wants to start or resume market replay, then we enter a new line of code. It is shown below:
else if ((GetTickCount64() - t1) >= (uint)(delay))
It will check if a new tick needs to be sent or not, based on the value of the delay between ticks. This value is obtained in the next code line.
if ((delay = Replay.Event_OnTime()) < 0) break;
Note that if the delay is less than 0, the replay service will be terminated. This usually happens when the last trading tick has been sent to the replay asset.
These functions will run until the last tick is sent or until the replay asset chart is closed. When this happens, the following line is executed:
Replay.CloseReplay();
This will permanently end the replay.
All this code is quite beautiful and simple to understand. But you may have noticed that there are several points here that refer to one class, C_Replay. So, let's take a look at this class. Its code has a lot in common with what we have seen in previous articles. But there is one part that deserves more attention. This is precisely what we are going to look at now.
ViewReplay of the C_Replay class. Why is it so important?
This code can be seen below:
long ViewReplay(void)
{
        m_IdReplay = ChartOpen(def_SymbolReplay, PERIOD_M1);
        ChartApplyTemplate(m_IdReplay, "Market Replay.tpl");
        ChartRedraw(m_IdReplay);
        return m_IdReplay;
}
You may be thinking: What is so important in these 4 lines to allow or prevent the creation of replay?! Even though this is a fairly simple code, it is very powerful. It is so powerful that it gets in the way, even when everything seems right.
Let's take a look at this moment. The first thing we will do is open a chart with the name of the replay asset and set the period to 1 minute. As you can see from the previous two articles, we can change this time at any time we want.
Once this is done, we load a specific template and apply it to the newly opened chart window. It is important to note that this template is very specific. To create this template, if you have deleted it (it will be in the attachment), you will have to compile the EA from the market replay system and apply this EA to any asset. Then save this chart as a template and name it Market Replay, that's all. In case this file does not exist, or the EA is not present in it, the whole system will fail, no matter what you have done.
In a way, this could be resolved if an indicator were used instead of the EA. In this case we would call this indicator via MQL5 (in theory). But, as I said at the beginning of this article, I have reasons to use an EA instead of an indicator. So, to solve the loading problem in the simplest possible way, we use a template that contains the EA of the replay system.
But the simple fact of doing this does not guarantee much, since when the EA is loaded, it creates a terminal global variable, telling the service that the system is ready to work. However, the controls will take a while to appear. To speed things up a bit, we use a call to force update the objects in the replay asset chart.
Now we return the id of the replay asset chart, as we will not be able to do this elsewhere. We need this information so that the service knows when the chart is closed.
All other functions of the C_Replay class are quite simple to understand, so we will not consider them in this article.
Conclusion
In the video below, you can see how the system loads and how it works in practice.
In the next article, we will create a position control system so that we can choose at what moment the replay system should start. See you!
Translated from Portuguese by MetaQuotes Ltd.
Original article: https://www.mql5.com/pt/articles/10706
Warning: All rights to these materials are reserved by MetaQuotes Ltd. Copying or reprinting of these materials in whole or in part is prohibited.
This article was written by a user of the site and reflects their personal views. MetaQuotes Ltd is not responsible for the accuracy of the information presented, nor for any consequences resulting from the use of the solutions, strategies or recommendations described.

- Free trading apps
- Over 8,000 signals for copying
- Economic news for exploring financial markets
You agree to website policy and terms of use
Oi Daniel. Obrigado por investir seu tempo no desenvolvimento deste EA mágico que irá melhorar imensamente o estudo da ação do preço. Você pode gentilmente adicionar uma linha de pedido ao EA. Isso fará com que o EA tenha mais condições de mercado em tempo real.
Stay tuned for the series on Replay/Emulator because you will be surprised as I will show something in this thread.