
Building A Candlestick Trend Constraint Model (Part 9): Multiple Strategies Expert Advisor (II)
Contents:
- Introduction.
- What is Donchian Channel?
- Accessing the Donchian Channel in MetaTrader 5
- Accessing the Donchian Channel source code in MetaEditor
- Implementation of Donchian Channel Strategies within Trend Constraint Expert.
- Testing and Results
- Conclusion
Introduction
In the 20th century, Richard Donchian established a trend-following strategy through his studies of financial markets, which later evolved into the Donchian Channels. We briefly discussed his work in a previous article, but today we will focus on implementing the strategies associated with his theory. According to various sources, the channels are believed to encompass multiple strategies within their framework. The abundance of literature on Donchian Channels suggests the continued effectiveness of this theory in modern-day trading. By integrating Donchian Channel strategies, we aim to expand the opportunities for our Trend Constraint Expert, enhancing both its profitability and adaptability to diverse market conditions.
Some popular strategies based on the Donchian Channel that are available online include the Breakout Strategy, Crawl Strategy, and Mean Reversion Strategy, among others. Notable traders, such as Rayner Teo, have also produced educational content aimed at teaching traders how to implement these channels effectively.
Donchian Channels are available as free indicators on the MetaTrader 5 platform, which provides us with a significant advantage for this project. This access allows us to utilize the source code of the indicator and gain more in-depth insights into its structure, facilitating adaptation into our Trend Constraint Expert. As our code continues to grow in complexity, we will develop the new strategy independently before integrating it into the main program. In the upcoming segments, we will deepen our understanding of the theories and further enhance our algorithm.
What is Donchian Channel?
The Donchian Channel is a technical analysis indicator that consists of three lines, namely upper band, middle line, and lower band, used to plot higher highs and lower lows during price movement. Credits go to Richard Donchian, a pioneer in the field of trend-following trading, as mentioned earlier. Here is the brief outline of the three lines: - Upper Band: This line represents the highest high over a specified period (e.g., the last 20 periods).
- Lower Band: This line shows the lowest low over the same specified period.
- Middle Line: Often calculated as the average of the upper and lower bands, this line is sometimes used as a reference point.
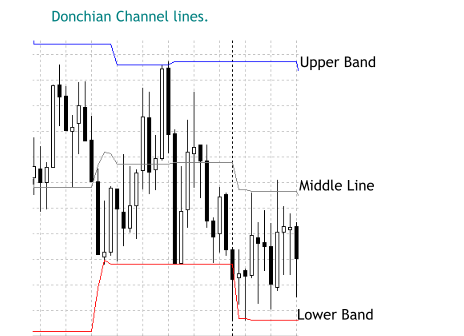
Donchian Channel lines
Accessing the Donchian Channel in MetaTrader 5
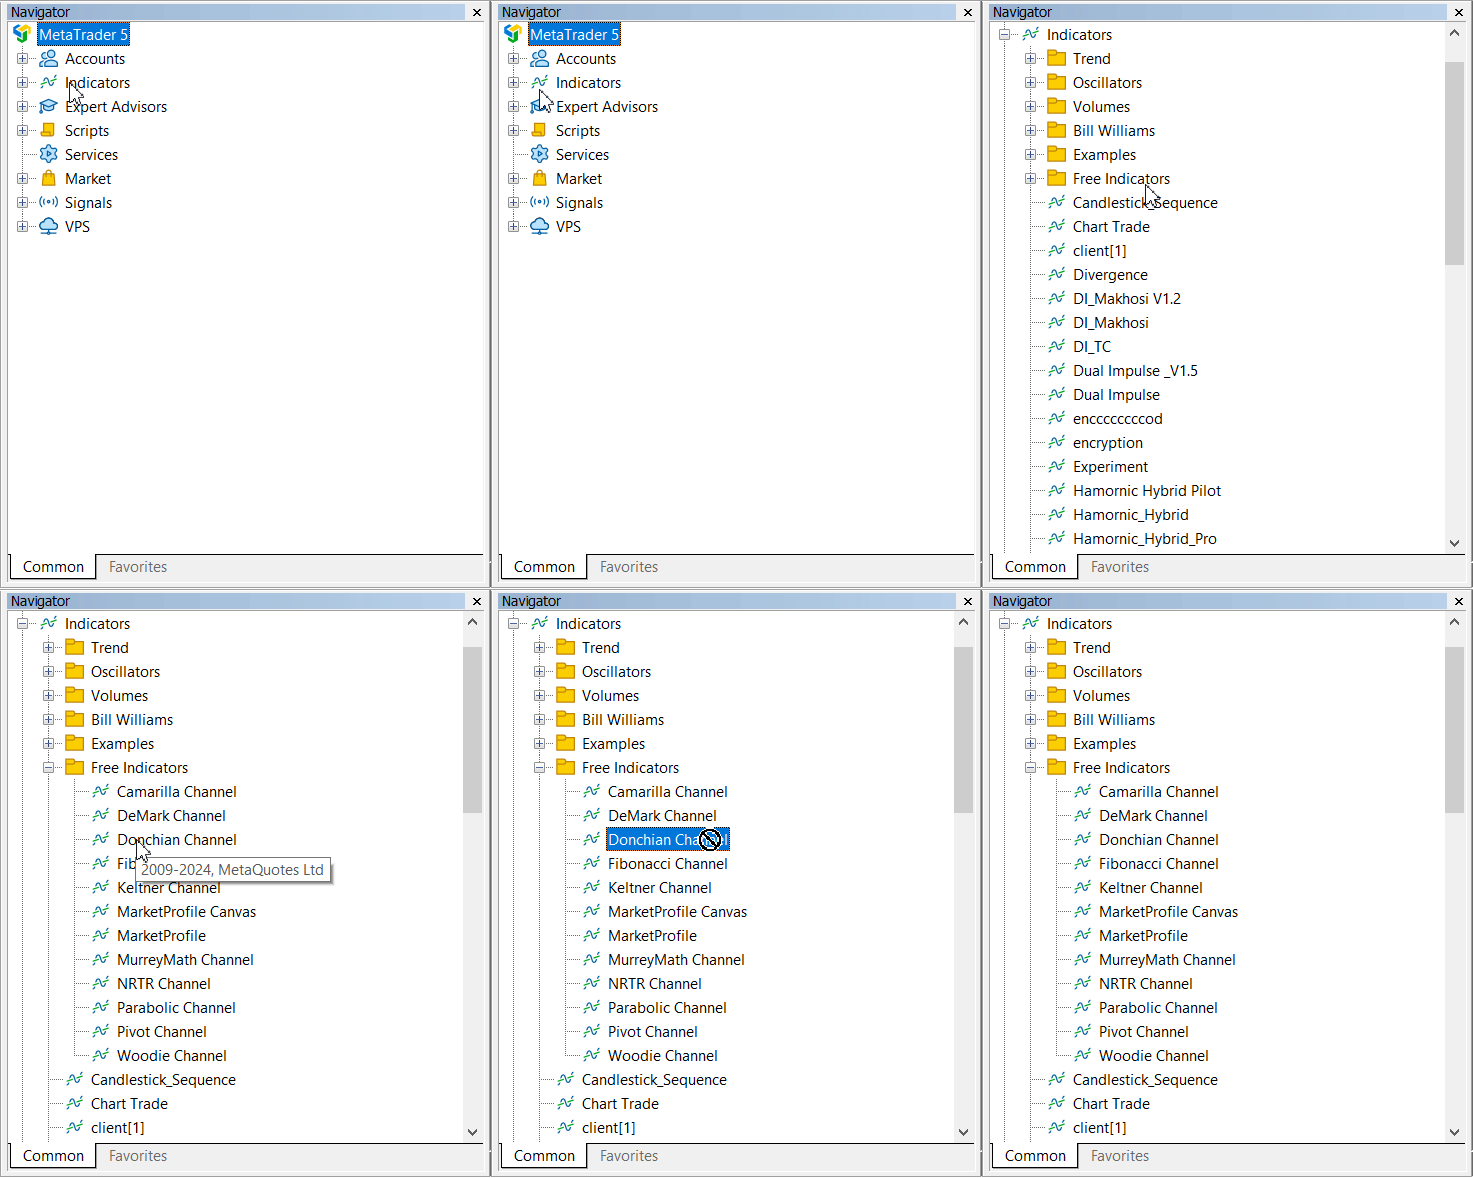
It is typically accessed through the Navigator window under the Indicators tab, as shown in the image below.
MetaTrader 5 Navigator
Once accessed, you can drag the Donchian Channel onto the chart where you intend to use it, as shown in the image below. In this example, we are using the default channel settings on the Volatility 150 (1s) Index.
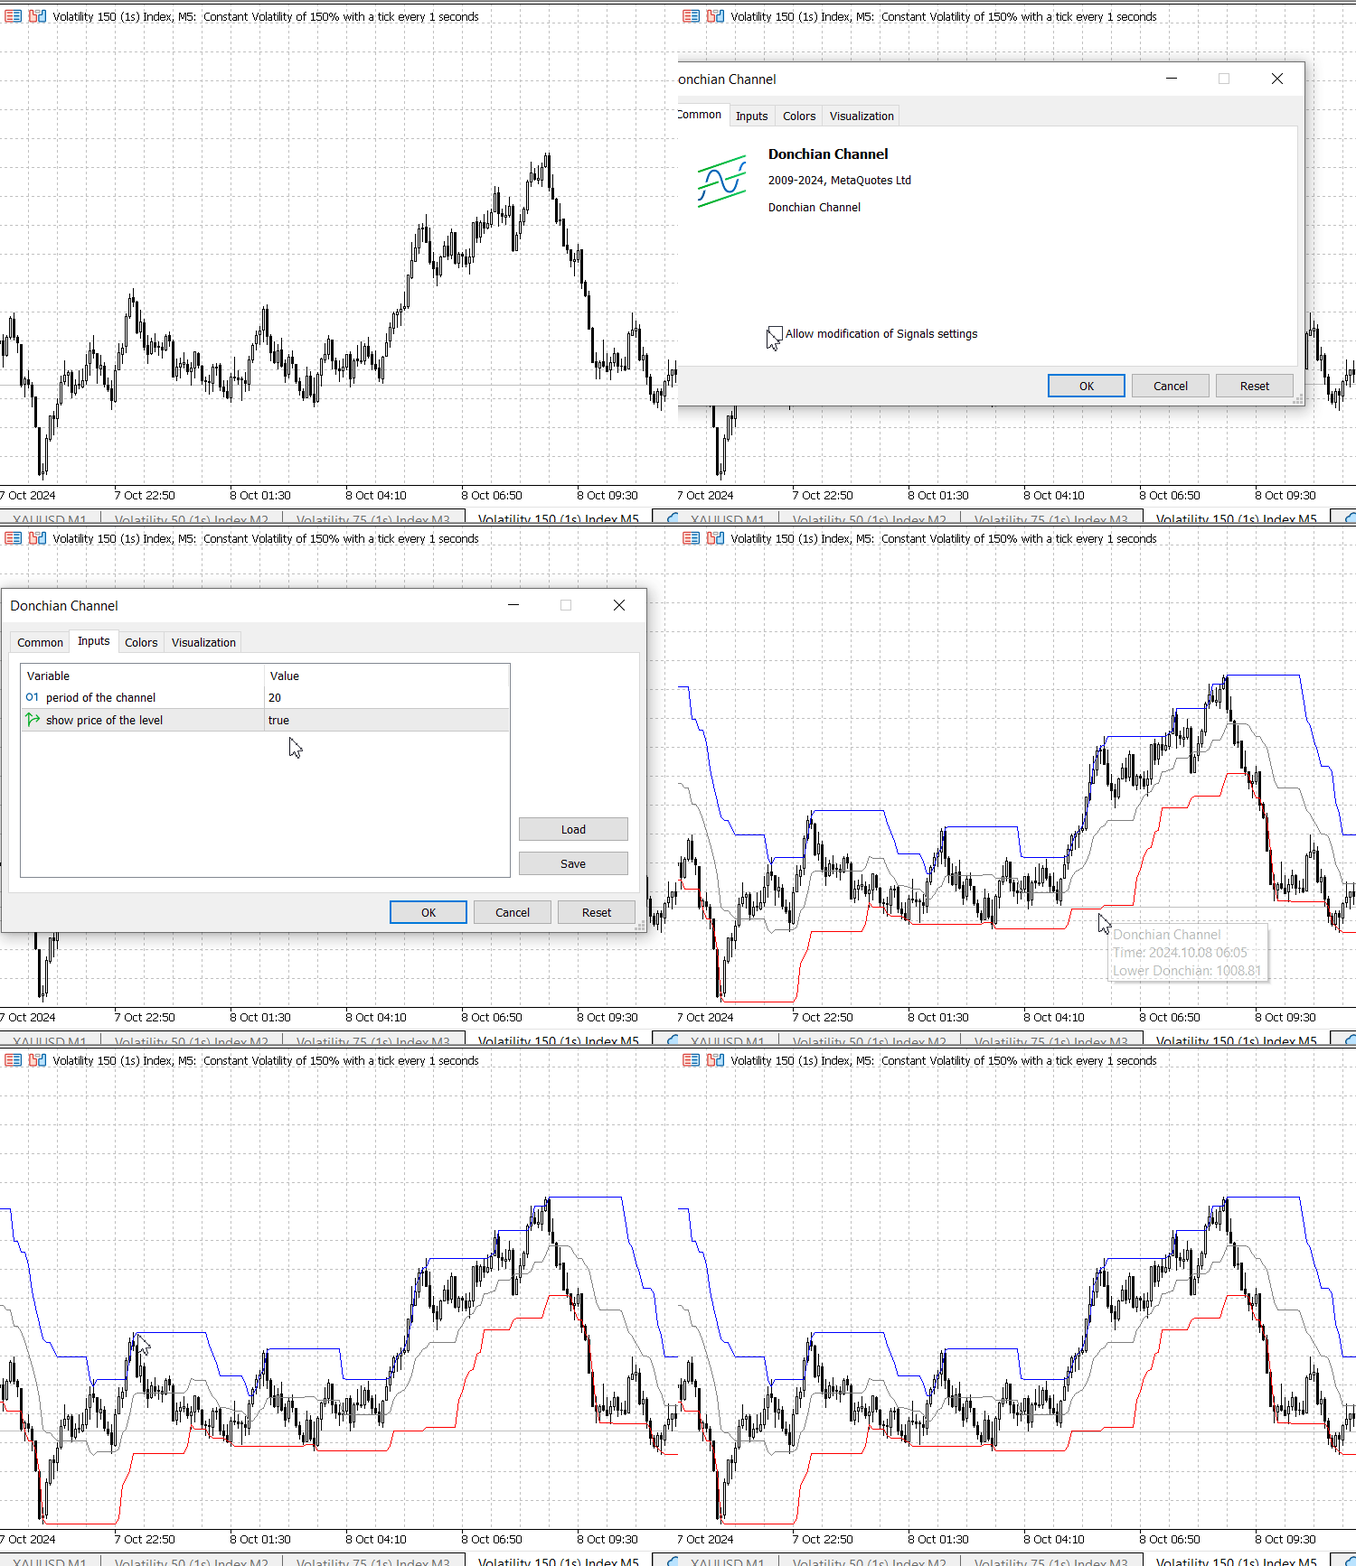
Adding Donchian Channel to the chart in MetaTrader 5
The reason we first apply the indicator to the chart is to study the relationship between price action and the channel. This helps us understand the rules of engagement before beginning algorithm development. Next, we will demonstrate how to access the indicator's source code in MetaEditor 5.
Accessing the Donchian Channel source code in MetaEditor
To access the source file for editing in MetaEditor 5, open the Navigator window and find the indicator under the 'Free Indicators' tab, just like on the MetaTrader 5 platform. The key difference is that here, we're working with the source file, not the compiled version. Double-click the file to view the code. Refer to the images below for easier follow-up.
Accessing the Donchain Channel source code in MetaEditor.
Implementation of Donchian Channel Strategies within Trend Constraint Expert
It is important to highlight the guiding parameters that shape our discussions and establish the rules of engagement when incorporating new tools. From the outset, we always define the constraining conditions. For example, we only buy when there is a bullish D1 candlestick, and we sell when there is a bearish D1 candlestick. With this in mind, we will first identify the constraining conditions before seeking order opportunities presented by the channel setup that align with the market's trend. For instance, in a bullish D1 scenario, we will focus on: - For the price to touch the low bound of the channel to call for buy orders with higher winning probability
- Middle line rebounce with intermediate winning probability
- Breakout of the upper boundary, for low winning probability
I have presented the three ideas in the image below.
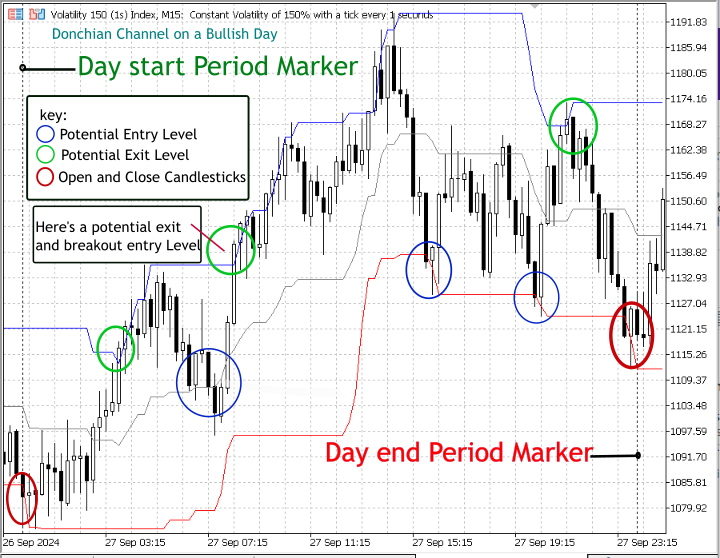
Donchian Channel Strategies
For this presentation, I will use the breakout technique, which monitors conditions when the market price closes outside the outer bounds of the channel. Let's now proceed to view the indicator's source code and identify the relevant buffers.
Preview of indicator source code
The default Donchian Channel indicator is available on the MetaTrader 5 platform. You can also access it directly in MetaEditor 5 using the methods previously discussed.//+------------------------------------------------------------------+ //| Donchian Channel.mq5 | //| Copyright 2009-2024, MetaQuotes Ltd | //| https://www.mql5.com | //+------------------------------------------------------------------+ #property copyright "2009-2024, MetaQuotes Ltd" #property link "http://www.mql5.com" #property description "Donchian Channel" //--- #property indicator_chart_window #property indicator_buffers 3 #property indicator_plots 3 #property indicator_type1 DRAW_LINE #property indicator_color1 clrBlue #property indicator_type2 DRAW_LINE #property indicator_color2 clrGray #property indicator_type3 DRAW_LINE #property indicator_color3 clrRed //--- labels #property indicator_label1 "Upper Donchian" #property indicator_label2 "Middle Donchian" #property indicator_label3 "Lower Donchian" //--- input parameter input int InpDonchianPeriod=20; // period of the channel input bool InpShowLabel =true; // show price of the level //--- indicator buffers double ExtUpBuffer[]; double ExtMdBuffer[]; double ExtDnBuffer[]; //--- unique prefix to identify indicator objects string ExtPrefixUniq; //+------------------------------------------------------------------+ //| Custom indicator initialization function | //+------------------------------------------------------------------+ int OnInit() { //--- define buffers SetIndexBuffer(0, ExtUpBuffer); SetIndexBuffer(1, ExtMdBuffer); SetIndexBuffer(2, ExtDnBuffer); //--- set a 1-bar offset for each line PlotIndexSetInteger(0, PLOT_SHIFT, 1); PlotIndexSetInteger(1, PLOT_SHIFT, 1); PlotIndexSetInteger(2, PLOT_SHIFT, 1); //--- indicator name IndicatorSetString(INDICATOR_SHORTNAME, "Donchian Channel"); //--- number of digits of indicator value IndicatorSetInteger(INDICATOR_DIGITS, _Digits); //--- prepare prefix for objects string number=StringFormat("%I64d", GetTickCount64()); ExtPrefixUniq=StringSubstr(number, StringLen(number)-4); ExtPrefixUniq=ExtPrefixUniq+"_DN"; Print("Indicator \"Donchian Channels\" started, prefix=", ExtPrefixUniq); return(INIT_SUCCEEDED); } //+------------------------------------------------------------------+ //| Custom indicator iteration function | //+------------------------------------------------------------------+ int OnCalculate(const int rates_total, const int prev_calculated, const datetime &time[], const double &open[], const double &high[], const double &low[], const double &close[], const long &tick_volume[], const long &volume[], const int &spread[]) { //--- if the indicator has previously been calculated, start from the bar preceding the last one int start=prev_calculated-1; //--- if this is the first calculation of the indicator, then move by InpDonchianPeriod bars form the beginning if(prev_calculated==0) start=InpDonchianPeriod+1; //--- calculate levels for all bars in a loop for(int i=start; i<rates_total; i++) { //--- get max/min values for the last InpDonchianPeriod bars int highest_bar_index=ArrayMaximum(high, i-InpDonchianPeriod+1, InpDonchianPeriod); int lowest_bar_index=ArrayMinimum(low, i-InpDonchianPeriod+1, InpDonchianPeriod);; double highest=high[highest_bar_index]; double lowest=low[lowest_bar_index]; //--- write values into buffers ExtUpBuffer[i]=highest; ExtDnBuffer[i]=lowest; ExtMdBuffer[i]=(highest+lowest)/2; } //--- draw labels on levels if(InpShowLabel) { ShowPriceLevels(time[rates_total-1], rates_total-1); ChartRedraw(); } //--- succesfully calculated return(rates_total); } //+------------------------------------------------------------------+ //| Custom indicator deinitialization function | //+------------------------------------------------------------------+ void OnDeinit(const int reason) { //--- delete all our graphical objects after use Print("Indicator \"Donchian Channels\" stopped, delete all objects with prefix=", ExtPrefixUniq); ObjectsDeleteAll(0, ExtPrefixUniq, 0, OBJ_ARROW_RIGHT_PRICE); ChartRedraw(0); } //+------------------------------------------------------------------+ //| Show prices' levels | //+------------------------------------------------------------------+ void ShowPriceLevels(datetime time, int last_index) { ShowRightPrice(ExtPrefixUniq+"_UP", time, ExtUpBuffer[last_index], clrBlue); ShowRightPrice(ExtPrefixUniq+"_MD", time, ExtMdBuffer[last_index], clrGray); ShowRightPrice(ExtPrefixUniq+"_Dn", time, ExtDnBuffer[last_index], clrRed); } //+------------------------------------------------------------------+ //| Create or Update "Right Price Label" object | //+------------------------------------------------------------------+ bool ShowRightPrice(const string name, datetime time, double price, color clr) { if(!ObjectCreate(0, name, OBJ_ARROW_RIGHT_PRICE, 0, time, price)) { ObjectMove(0, name, 0, time, price); return(false); } //--- make the label size adaptive long scale=2; if(!ChartGetInteger(0, CHART_SCALE, 0, scale)) { //--- output an error message to the Experts journal Print(__FUNCTION__+", ChartGetInteger(CHART_SCALE) failed, error = ", GetLastError()); } int width=scale>1 ? 2:1; // if chart scale > 1, then label size = 2 ObjectSetInteger(0, name, OBJPROP_COLOR, clr); ObjectSetInteger(0, name, OBJPROP_STYLE, STYLE_SOLID); ObjectSetInteger(0, name, OBJPROP_WIDTH, width); ObjectSetInteger(0, name, OBJPROP_BACK, false); ObjectSetInteger(0, name, OBJPROP_SELECTABLE, false); ObjectSetInteger(0, name, OBJPROP_SELECTED, false); ObjectSetInteger(0, name, OBJPROP_HIDDEN, true); ObjectSetInteger(0, name, OBJPROP_ZORDER, 0); return(true); } //+------------------------------------------------------------------+
The custom code above implements the Donchian Channel. It calculates and displays three lines: the upper channel line (representing the highest high over a specified period), the lower channel line (representing the lowest low over the same period), and a middle line (the average of the upper and lower lines). The indicator is designed to visualize potential breakout points, with customizable input parameters for the channel period and the option to display price labels on the chart. The code includes initialization functions for setting up indicator buffers and properties, a calculation loop that updates the channel lines for each bar on the chart, and functions to manage graphical objects and price labels. Overall, it provides traders with a tool to identify trends and potential trading opportunities based on historical price levels.
For easy understanding, let's slice up the above code snippets and identify our buffers for further development in the next section.
Buffer Declaration:
There are three buffers ExtUpBuffer[], ExtMdBuffer[], and ExtDnBuffer[] declared which store the upper, middle, and lower Donchian Channel values, respectively.
double ExtUpBuffer[];
double ExtMdBuffer[];
double ExtDnBuffer[];
Buffer Setup in OnInit:
The SetIndexBuffer function links the chart plots (lines) to the buffers, allowing them to be drawn and updated on the chart.
SetIndexBuffer(0, ExtUpBuffer);
SetIndexBuffer(1, ExtMdBuffer);
SetIndexBuffer(2, ExtDnBuffer);
Buffer Values Calculation in OnCalculate:
This code calculates the highest, lowest, and average prices over the defined period and stores them in the respective buffers for each bar.
for(int i=start; i<rates_total; i++)
{
   //--- calculate highest and lowest for the Donchian period
   int highest_bar_index = ArrayMaximum(high, i-InpDonchianPeriod+1, InpDonchianPeriod);
   int lowest_bar_index  = ArrayMinimum(low, i-InpDonchianPeriod+1, InpDonchianPeriod);
   double highest = high[highest_bar_index];
   double lowest  = low[lowest_bar_index];

   //--- assign values to buffers
   ExtUpBuffer[i] = highest;
   ExtDnBuffer[i] = lowest;
   ExtMdBuffer[i] = (highest + lowest) / 2;
}
To generate a buy signal, the strategy uses the upper buffer (ExtUpBuffer), triggering a buy when the price closes above the upper Donchian line. Conversely, a sell signal is triggered when the price closes below the lower Donchian line, as defined by the lower buffer (ExtDnBuffer). Additionally, the middle channel (ExtMdBuffer) can act as a filter, refining the strategy by restricting buy trades to instances where the price is above the middle channel, indicating a stronger uptrend. With this briefing in mind, I’m confident we can now proceed to develop our Expert Advisor (EA).
Code development
The availability of the Donchian Channel as a built-in indicator simplifies our task, as we can develop an Expert Advisor (EA) that focuses on the indicator’s buffers to generate signals for trade execution. As mentioned earlier, for clarity, we will first develop a Donchian Channel-based EA before integrating it with our Trend Constraint Expert. Today, we will focus on the breakout strategy using the Donchian Channel. The breakout condition is straightforward: it occurs when the price closes beyond the extreme bands of the channel. You can refer to the earlier image, where we explained various strategies in detail.
To get started, we'll create a new file in MetaEditor 5, as shown in the illustration below. I’ve named it "BreakoutEA" since our primary focus will be on this breakout strategy.
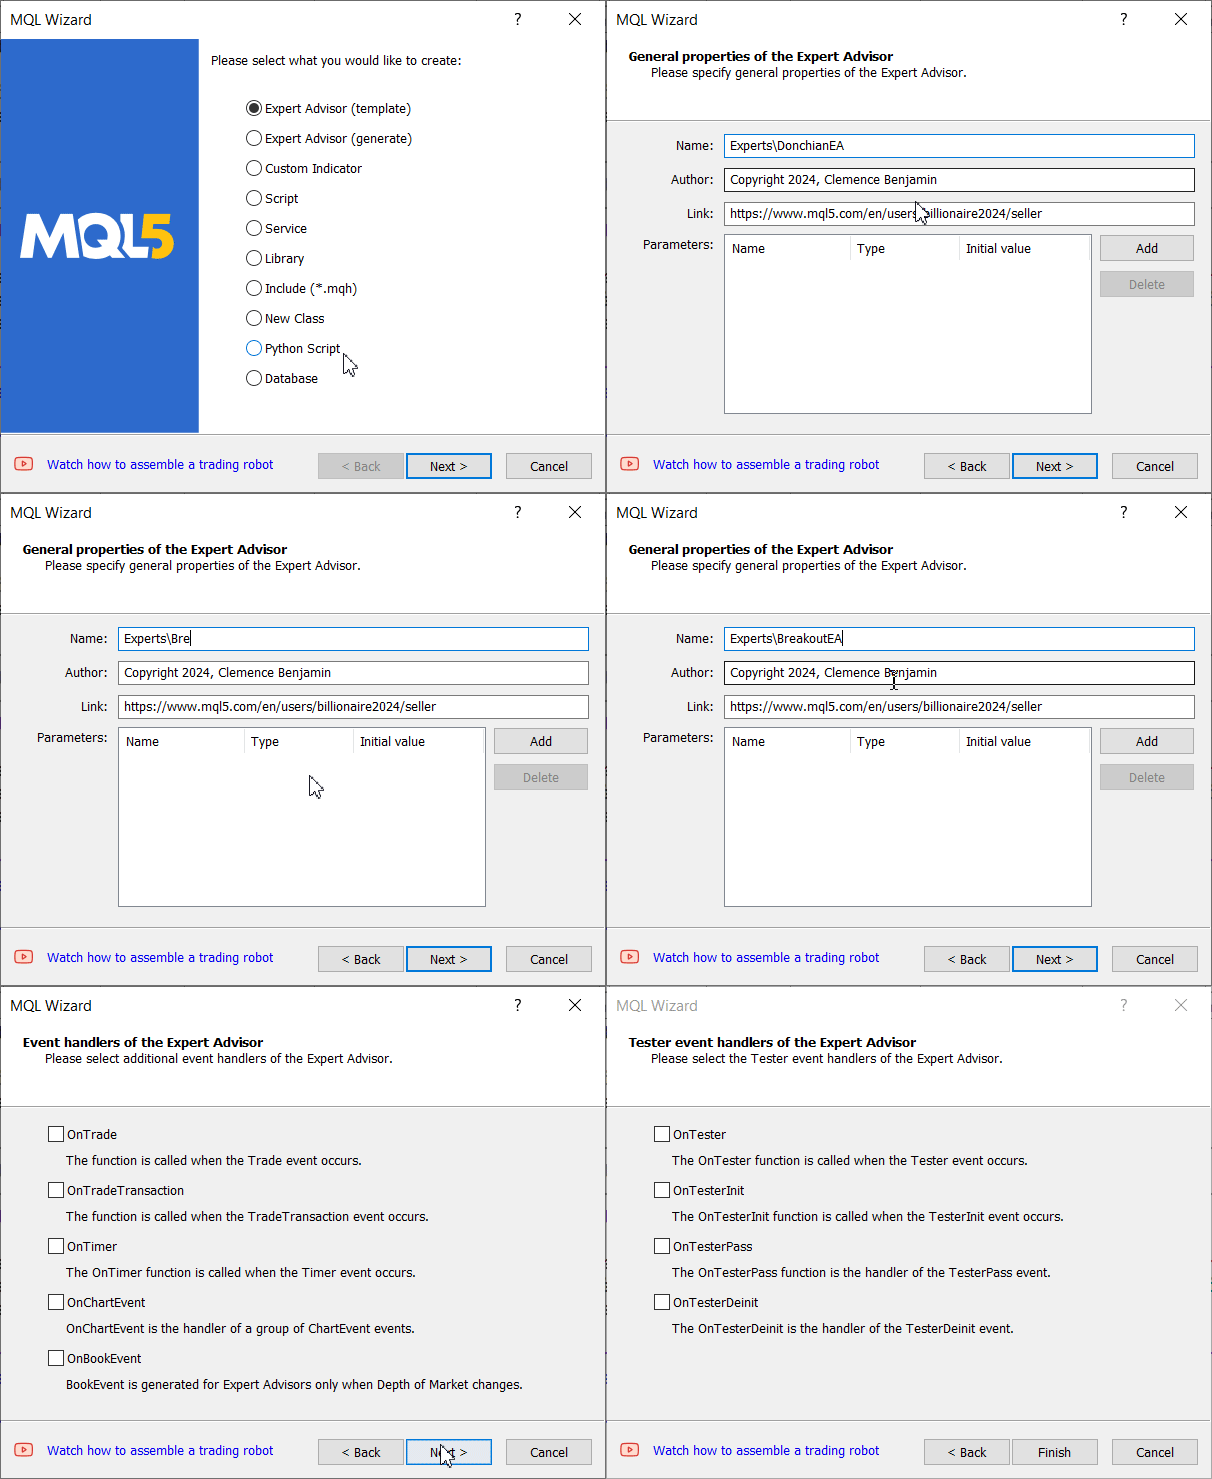
Start a New EA program in MetaEditor
I have divided the building process into five major segments, which you can follow step-by-step below to understand the entire development. Initially, when launching the EA, we will begin with the basic template, leaving other parts unticked. Below this template, we will explain the key components that will come together at the end.
In this basic template, you will find essential properties, such as the (#property strict) directive. This directive ensures that the compiler enforces the correct use of data types, helping to prevent potential programming errors caused by type mismatches. Another crucial aspect is the inclusion of the Trade library, which provides the necessary tools to manage trading operations efficiently. These steps lay a solid foundation for the development process.
//+------------------------------------------------------------------+
//|                                                   BreakoutEA.mq5 |
//|                                Copyright 2024, Clemence Benjamin |
//|             https://www.mql5.com/en/users/billionaire2024/seller |
//+------------------------------------------------------------------+
#property copyright "Copyright 2024, Clemence Benjamin"
#property link      "https://www.mql5.com/en/users/billionaire2024/seller"
#property version   "1.00"
//+------------------------------------------------------------------+
//| Expert initialization function                                   |
//+------------------------------------------------------------------+
int OnInit()
  {
//---

//---
   return(INIT_SUCCEEDED);
  }
//+------------------------------------------------------------------+
//| Expert deinitialization function                                 |
//+------------------------------------------------------------------+
void OnDeinit(const int reason)
  {
//---

  }
//+------------------------------------------------------------------+
//| Expert tick function                                             |
//+------------------------------------------------------------------+
void OnTick()
  {
//---

  }
//+------------------------------------------------------------------+
1. Initialization of the Expert Advisor
In the initialization segment, input parameters are defined for the EA. These parameters allow us to configure the EA according to our trading preferences. Critical inputs include the Donchian Channel period, the risk-to-reward ratio, lot size for trades, and pip values for stop loss and take profit.
// Input parameters
input int InpDonchianPeriod = 20;      // Period for Donchian Channel
input double RiskRewardRatio = 1.5;    // Risk-to-reward ratio
input double LotSize = 0.1;            // Default lot size for trading
input double pipsToStopLoss = 15;      // Stop loss in pips
input double pipsToTakeProfit = 30;    // Take profit in pips

// Indicator handle storage
int handle;
string indicatorKey;

// Expert initialization function
int OnInit() {
    // Create a unique key for the indicator based on the symbol and period
    indicatorKey = StringFormat("%s_%d", Symbol(), InpDonchianPeriod);

    // Load the Donchian Channel indicator
    handle = iCustom(Symbol(), Period(), "Free Indicators\\Donchian Channel", InpDonchianPeriod);

    // Check if the indicator loaded successfully
    if (handle == INVALID_HANDLE) {
        Print("Failed to load the indicator. Error: ", GetLastError());
        return INIT_FAILED;
    }
    return INIT_SUCCEEDED;
}
A unique key is created based on the trading symbol and the defined period, ensuring that each instance of the indicator can be differentiated. The iCustom() function is used to load the Donchian Channel indicator, specifying its path within the MetaTrader directory (Free Indicators\\Donchian Channel). If the loading fails (indicated by an INVALID_HANDLE), an error message is printed, and the initialization fails, preventing further execution without the required indicator data. It is important to specify the storage location since the indicator does not exist in the indicator's root folder and not doing so leads to error as shown below. In most cases, the EA will not run if the indicator fails to load.
//Typical Journal log when the EA fails to locate an indicator in the root indicators storage.
2024.10.20 08:49:04.117 2022.01.01 00:00:00   cannot load custom indicator 'Donchian Channel' [4802]
2024.10.20 08:49:04.118 2022.01.01 00:00:00   indicator create error in 'DonchianEA.mq5' (1,1)
2024.10.20 08:49:04.118 OnInit critical error
2024.10.20 08:49:04.118 tester stopped because OnInit failed
2. Cleanup and Deinitialization
The cleanup segment is responsible for releasing resources that the EA has utilized. This is done in the OnDeinit() function, which is called when the EA is removed or when MetaTrader 5 is shutting down. The function ensures that the indicator handle is released using IndicatorRelease(). Thoroughly cleaning up resources is essential to prevent memory leaks and to maintain overall platform performance.
// Expert deinitialization function
void OnDeinit(const int reason) {
    // Release the indicator handle to free up resources
    IndicatorRelease(handle);
}
3. Main Execution Logic
The main execution logic resides in the OnTick() function, which is triggered on every market tick or price change. In this function, a check is performed to see if there are any currently open positions using the PositionsTotal() function. If no positions are open, the program proceeds to evaluate trading conditions by invoking a separate function. This structure prevents multiple trades from being opened at once, which could lead to overtrading.
// Main execution function with block-based control
void OnTick() {
    // Check if any positions are currently open
    if (PositionsTotal() == 0) {
        CheckTradingConditions();
    }
}
4. Evaluating Trading Conditions
In this segment, the EA checks market conditions against the upper and lower bands of the Donchian Channel. The indicator buffers are resized to accommodate the latest data. The CopyBuffer() function retrieves the most recent values from the Donchian Channel.
// Check trading conditions based on indicator buffers
void CheckTradingConditions() {
    double ExtUpBuffer[], ExtDnBuffer[];  // Buffers for upper and lower Donchian bands

    // Resize buffers to hold the latest data

    ArrayResize(ExtUpBuffer, 2);
    ArrayResize(ExtDnBuffer, 2);

    // Get the latest values from the Donchian Channel
    if (CopyBuffer(handle, 0, 0, 2, ExtUpBuffer) <= 0 || CopyBuffer(handle, 2, 0, 2, ExtDnBuffer) <= 0) {
        Print("Error reading indicator buffer. Error: ", GetLastError());
        return;
    }

    // Get the close price of the current candle
    double closePrice = iClose(Symbol(), Period(), 0);

    // Buy condition: Closing price is above the upper Donchian band
    if (closePrice > ExtUpBuffer[1]) {
        double stopLoss = closePrice - pipsToStopLoss * _Point; // Calculate stop loss
        double takeProfit = closePrice + pipsToTakeProfit * _Point; // Calculate take profit
        OpenBuy(LotSize, stopLoss, takeProfit);
    }

    // Sell condition: Closing price is below the lower Donchian band
    if (closePrice < ExtDnBuffer[1]) {
        double stopLoss = closePrice + pipsToStopLoss * _Point; // Calculate stop loss
        double takeProfit = closePrice - pipsToTakeProfit * _Point; // Calculate take profit
        OpenSell(LotSize, stopLoss, takeProfit);
    }
}
The current closing price is obtained, which is crucial for evaluating trade signals. Trading conditions are defined such that a buy order is triggered if the closing price exceeds the upper band, while a sell order is placed if the price falls below the lower band. Stop loss and take profit levels are calculated based on user-defined pip values to manage risk effectively.
5. Order Placement Functions
The order placement functions handle the execution of buy and sell trades. Each function attempts to place a trade using methods from the CTrade class, which simplifies transaction management. After attempting to execute a trade, the program checks whether the order was successful. If it fails, an error message is printed to inform the trader about the failure. These functions encapsulate the trading logic and provide a clear interface for placing orders based on the conditions established earlier.
// Open a buy order
void OpenBuy(double lotSize, double stopLoss, double takeProfit) {
    // Attempt to open a buy order
    if (trade.Buy(lotSize, Symbol(), 0, stopLoss, takeProfit, "Buy Order")) {
        Print("Buy order placed: Symbol = ", Symbol(), ", LotSize = ", lotSize);
    } else {
        Print("Failed to open buy order. Error: ", GetLastError());
    }
}

// Open a sell order
void OpenSell(double lotSize, double stopLoss, double takeProfit) {
    // Attempt to open a sell order
    if (trade.Sell(lotSize, Symbol(), 0, stopLoss, takeProfit, "Sell Order")) {
        Print("Sell order placed: Symbol = ", Symbol(), ", LotSize = ", lotSize);
    } else {
        Print("Failed to open sell order. Error: ", GetLastError());
    }
}
Our Donchian Channel breakout EA is now fully developed and ready, all in one place.
//+----------------------------------------------------------------------+
//|                                                       BreakoutEA.mq5 |
//|                                    Copyright 2024, Clemence Benjamin |
//|                 https://www.mql5.com/en/users/billionaire2024/seller |
//+----------------------------------------------------------------------+
#property copyright "Copyright 2024, Clemence Benjamin"
#property link      "https://www.mql5.com/en/users/billionaire2024/seller"
#property version   "1.00"
#property strict
#include <Trade\Trade.mqh> // Include the trade library

// Input parameters
input int InpDonchianPeriod = 20;      // Period for Donchian Channel
input double RiskRewardRatio = 1.5;    // Risk-to-reward ratio
input double LotSize = 0.1;            // Default lot size for trading
input double pipsToStopLoss = 15;      // Stop loss in pips
input double pipsToTakeProfit = 30;    // Take profit in pips

// Indicator handle storage
int handle;
string indicatorKey;
double ExtUpBuffer[];  // Upper Donchian buffer
double ExtDnBuffer[];  // Lower Donchian buffer

// Trade instance
CTrade trade;

//+------------------------------------------------------------------+
//| Expert initialization function                                   |
//+------------------------------------------------------------------+
int OnInit()
{
    indicatorKey = StringFormat("%s_%d", Symbol(), InpDonchianPeriod); // Create a unique key for the indicator
    handle = iCustom(Symbol(), Period(), "Free Indicators\\Donchian Channel", InpDonchianPeriod);
    if (handle == INVALID_HANDLE)
    {
        Print("Failed to load the indicator. Error: ", GetLastError());
        return INIT_FAILED;
    }
    return INIT_SUCCEEDED;
}

//+------------------------------------------------------------------+
//| Expert deinitialization function                                 |
//+------------------------------------------------------------------+
void OnDeinit(const int reason)
{
    // Release the indicator handle
    IndicatorRelease(handle);
}

//+------------------------------------------------------------------+
//| Main execution function with block-based control                 |
//+------------------------------------------------------------------+
void OnTick()
{
    // Check if any positions are currently open
    if (PositionsTotal() == 0)
    {
        CheckTradingConditions();
    }
}

//+------------------------------------------------------------------+
//| Check trading conditions based on indicator buffers              |
//+------------------------------------------------------------------+
void CheckTradingConditions()
{
    // Resize buffers to get the latest data
    ArrayResize(ExtUpBuffer, 2);
    ArrayResize(ExtDnBuffer, 2);

    // Get the latest values from the Donchian Channel
    if (CopyBuffer(handle, 0, 0, 2, ExtUpBuffer) <= 0 || CopyBuffer(handle, 2, 0, 2, ExtDnBuffer) <= 0)
    {
        Print("Error reading indicator buffer. Error: ", GetLastError());
        return;
    }

    // Get the close price of the current candle
    double closePrice = iClose(Symbol(), Period(), 0);

    // Buy condition: Closing price is above the upper Donchian band
    if (closePrice > ExtUpBuffer[1])
    {
        double stopLoss = closePrice - pipsToStopLoss * _Point; // Calculate stop loss
        double takeProfit = closePrice + pipsToTakeProfit * _Point; // Calculate take profit
        OpenBuy(LotSize, stopLoss, takeProfit);
    }

    // Sell condition: Closing price is below the lower Donchian band
    if (closePrice < ExtDnBuffer[1])
    {
        double stopLoss = closePrice + pipsToStopLoss * _Point; // Calculate stop loss
        double takeProfit = closePrice - pipsToTakeProfit * _Point; // Calculate take profit
        OpenSell(LotSize, stopLoss, takeProfit);
    }
}

//+------------------------------------------------------------------+
//| Open a buy order                                                 |
//+------------------------------------------------------------------+
void OpenBuy(double lotSize, double stopLoss, double takeProfit)
{
    if (trade.Buy(lotSize, Symbol(), 0, stopLoss, takeProfit, "Buy Order"))
    {
        Print("Buy order placed: Symbol = ", Symbol(), ", LotSize = ", lotSize);
    }
    else
    {
        Print("Failed to open buy order. Error: ", GetLastError());
    }
}

//+------------------------------------------------------------------+
//| Open a sell order                                                |
//+------------------------------------------------------------------+
void OpenSell(double lotSize, double stopLoss, double takeProfit)
{
    if (trade.Sell(lotSize, Symbol(), 0, stopLoss, takeProfit, "Sell Order"))
    {
        Print("Sell order placed: Symbol = ", Symbol(), ", LotSize = ", lotSize);
    }
    else
    {
        Print("Failed to open sell order. Error: ", GetLastError());
    }
}

//+------------------------------------------------------------------+
Let’s test the Breakout EA before incorporating it into the main Trend Constraint code. It’s important to note that this is not the final version, as we have yet to implement the constraining logic aligned with our overall objectives.
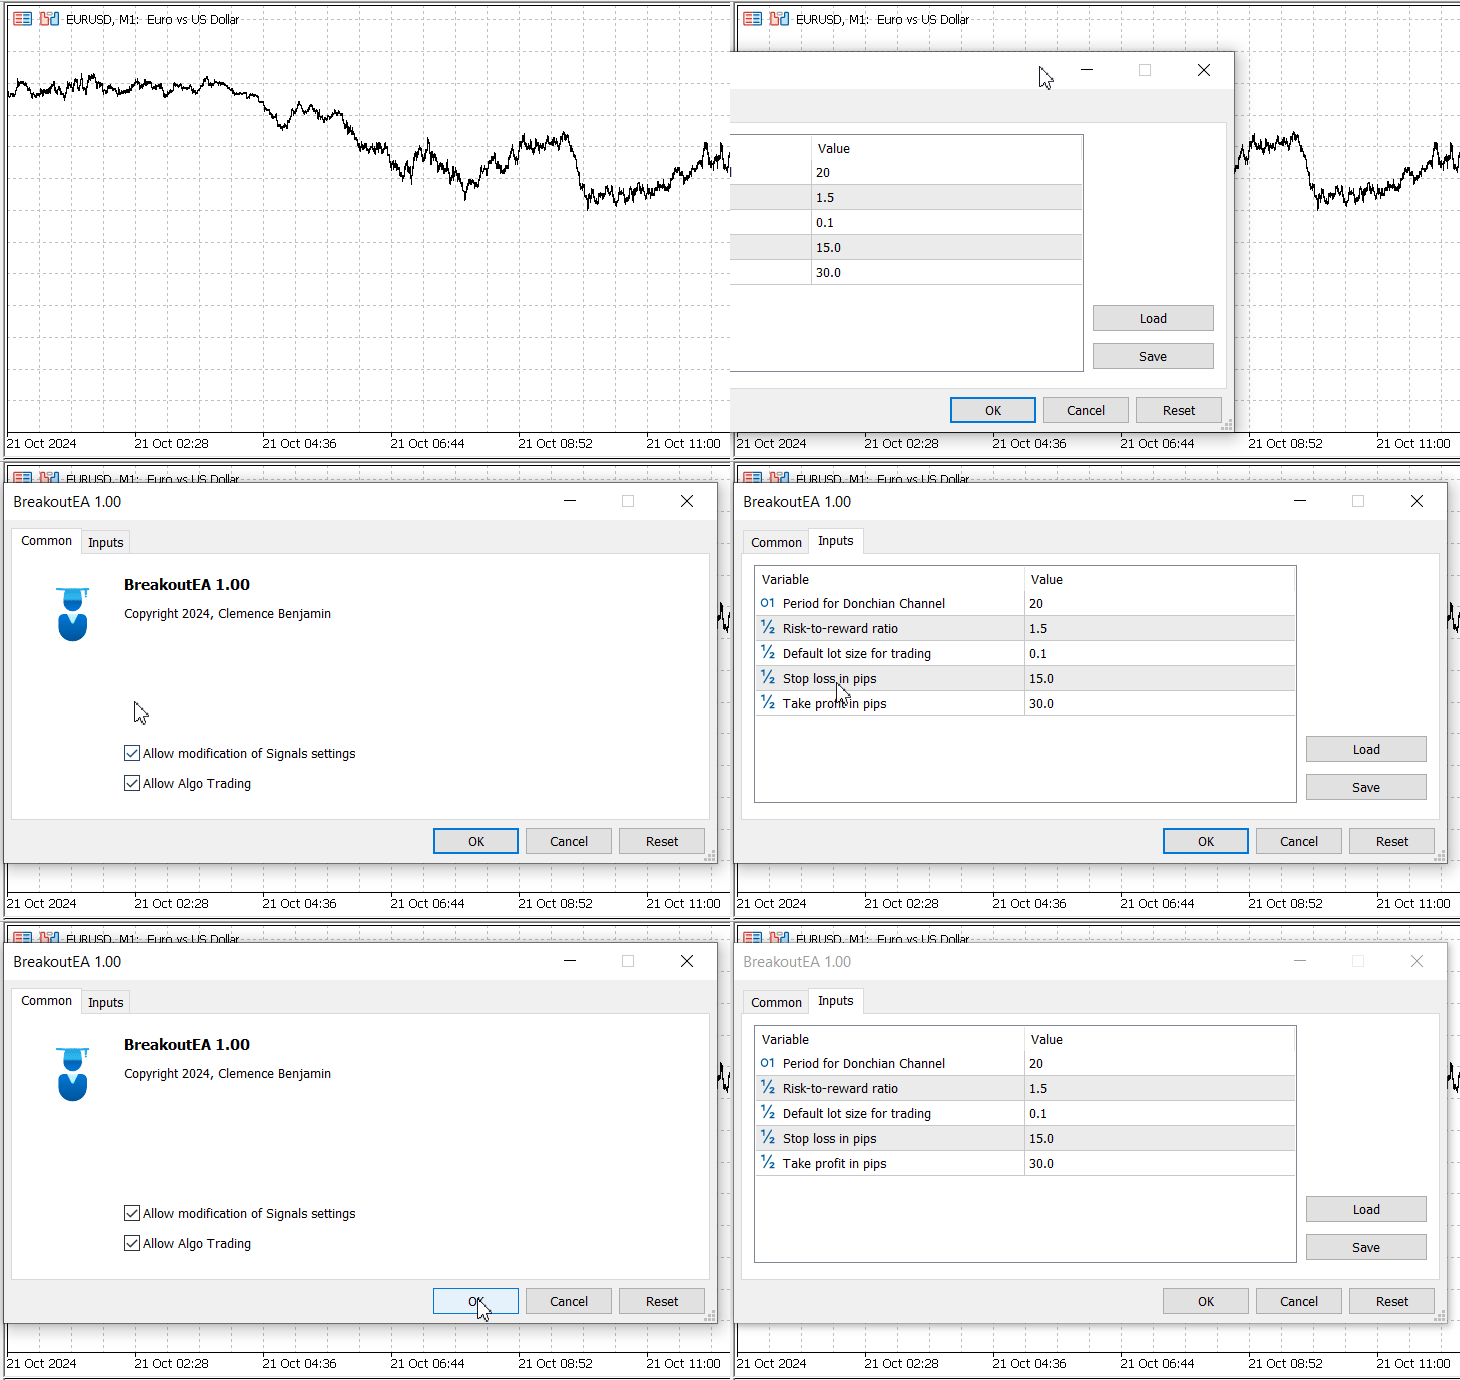
Adding BreakoutEA to chart
Right-click on the Expert Advisor list and select "Test" to open the tester window. From there, you can choose and set the BreakoutEA for testing. See the performance below.
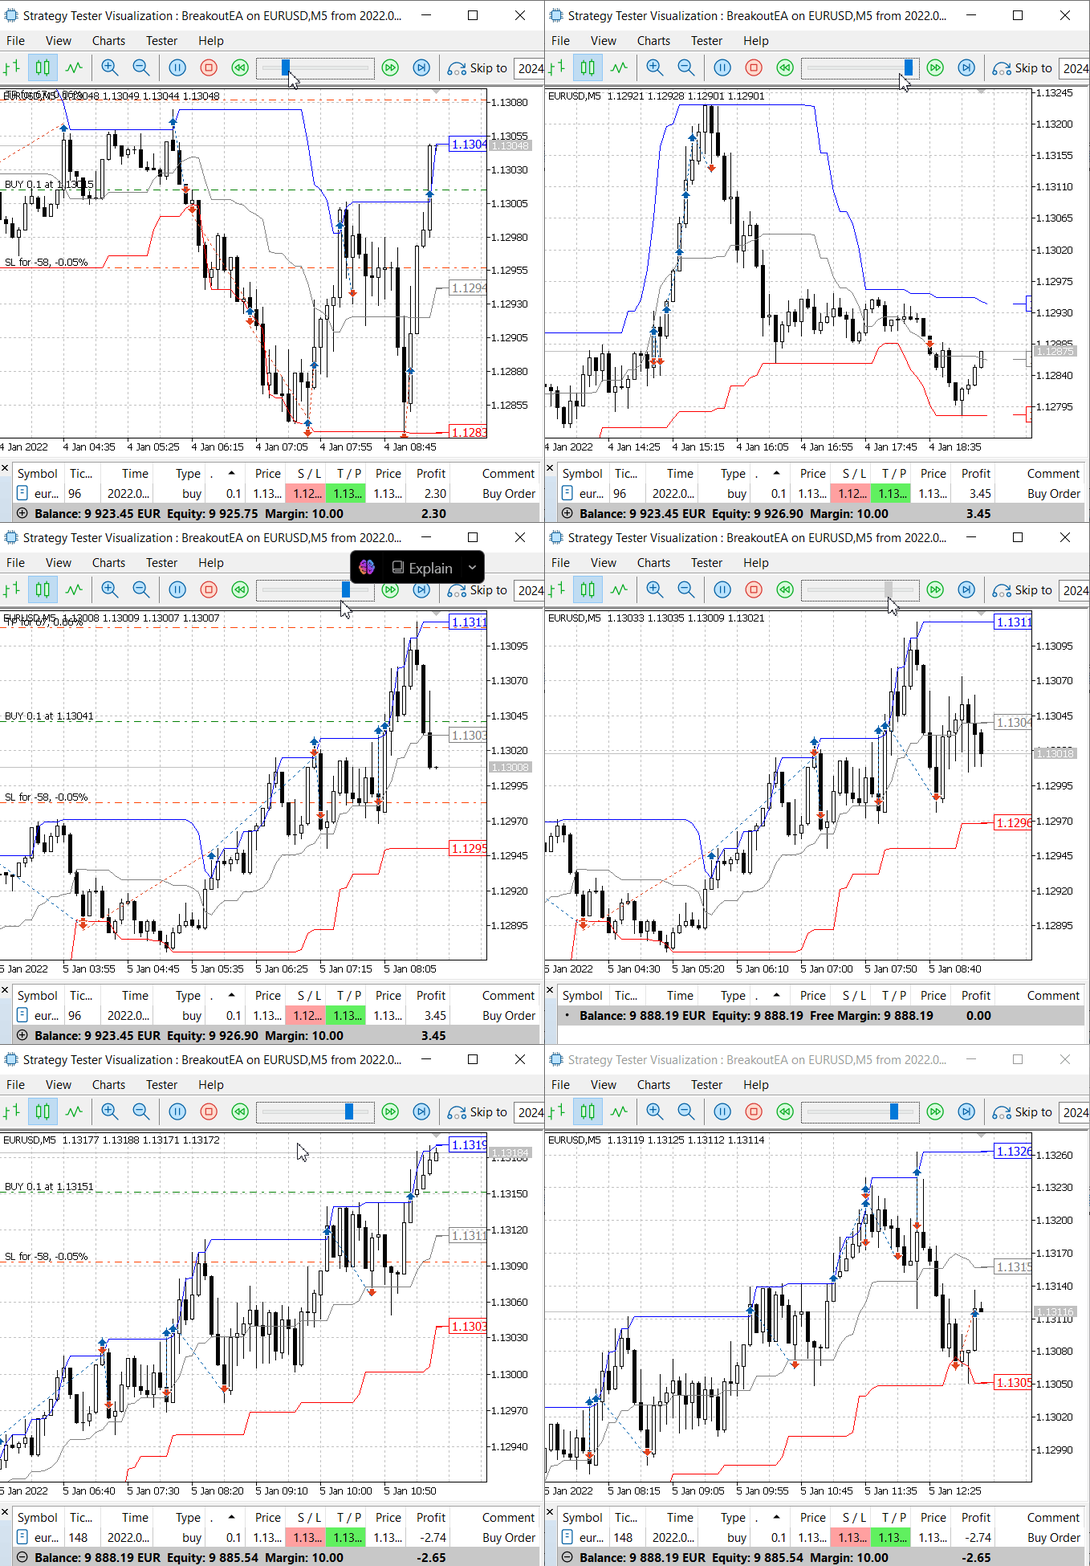
BreakoutEA performing on Strategy Tester
Well done! We successfully executed orders, which is a great achievement. Now we can use this foundation to enhance profitability and filter out unnecessary trades. This highlights the importance of the next stage, where we will incorporate constraints to eliminate less probable trades.Incorporation into Trend Constraint Expert
Merging two EA codes involves combining the functions from both sides, with shared functions becoming primary in the final EA. Additionally, unique functions from each EA will expand the overall size and capabilities of the merged code. For instance, there are properties that exist in both the Trend Constraint Expert and the Breakout EA, and we will incorporate them into one program. Refer to the code snippet below, which highlights these shared properties.
// We merge it to one
#property strict
#include <Trade\Trade.mqh>  // Include the trade library
Now, let's do the incorporation. When merging the two or more strategies into a single Expert Advisor (EA), the primary functions that remain central to the overall trading logic include the OnInit(), OnTick(), and position management functions (such as OpenBuy() and OpenSell()). These functions act as the core of the EA, handling indicator initialization, real-time market analysis, and order placement respectively.
Meanwhile, the features from the Donchian channel breakout strategy and the RSI with moving average trend-following strategy in Trend Constraint Expert become extensions of the existing program, incorporated as distinct conditions within the OnTick() function. The EA evaluates both the breakout signals from the Donchian channel and the trend signals from the RSI and moving averages simultaneously, allowing it to react to market conditions more comprehensively.
By integrating these independent features, the EA enhances its decision-making capabilities, leading to a more robust trading strategy that can adapt to varying market dynamics.
1. Initialization Functions
The initialization function (OnInit()) is crucial as it sets up the necessary indicators for both trading strategies that the Expert Advisor will employ. This function is called when the EA is first loaded and ensures that all essential components are ready before any trading operations commence. It initializes the RSI (Relative Strength Index) and the Donchian Channel indicator. If any of these indicators fail to initialize properly, the function will return an error status, preventing the trading system from running and avoiding potential market risks.
//+------------------------------------------------------------------+
//| Expert initialization function                                   |
//+------------------------------------------------------------------+
int OnInit()
{
    // Initialize RSI handle
    rsi_handle = iRSI(_Symbol, PERIOD_CURRENT, RSI_Period, PRICE_CLOSE);
    if (rsi_handle == INVALID_HANDLE)
    {
        Print("Failed to create RSI indicator handle");
        return INIT_FAILED;
    }

    // Create a handle for the Donchian Channel
    handle = iCustom(Symbol(), Period(), "Free Indicators\\Donchian Channel", InpDonchianPeriod);
    if (handle == INVALID_HANDLE)
    {
        Print("Failed to load the Donchian Channel indicator. Error: ", GetLastError());
        return INIT_FAILED;
    }

    return INIT_SUCCEEDED;
}
2. Main Execution Logic
The main execution logic is handled in the OnTick() function, which is called every time there is a market tick. This function serves as the heart of the EA, orchestrating the evaluation of various trading strategies in response to changing market conditions. It sequentially calls the functions responsible for checking the trend-following strategy and the breakout strategy. Additionally, it includes a check for expired orders, allowing the EA to manage risk effectively by ensuring no outdated positions remain active.
//+------------------------------------------------------------------+
//| Expert tick function                                             |
//+------------------------------------------------------------------+
void OnTick()
{
    // Execute both strategies independently on each tick
    CheckTrendConstraintTrading();
    CheckBreakoutTrading();
    CheckOrderExpiration(); // Check for expired Trend Following orders
}
3. Modular Trading Condition Functions
Trend Following Strategy:
This function checks if there are any open positions before it proceeds with decision-making. If there are no open positions, it retrieves the current RSI value and calculates both short-term and long-term moving averages to determine the market trend. If the market is in an uptrend and the RSI indicates oversold conditions, it may place a buy order. Conversely, if the market is in a downtrend and the RSI signals overbought conditions, it may place a sell order. If there are existing open positions, the function manages them with a trailing stop mechanism.
//+------------------------------------------------------------------+
//| Check and execute Trend Constraint EA trading logic              |
//+------------------------------------------------------------------+
void CheckTrendConstraintTrading()
{
    // Check if there are any positions open
    if (PositionsTotal() == 0)
    {
        // Get RSI value
        double rsi_value;
        double rsi_values[];
        if (CopyBuffer(rsi_handle, 0, 0, 1, rsi_values) <= 0)
        {
            Print("Failed to get RSI value");
            return;
        }
        rsi_value = rsi_values[0];

        // Calculate moving averages
        double ma_short = iMA(_Symbol, PERIOD_CURRENT, 50, 0, MODE_EMA, PRICE_CLOSE);
        double ma_long = iMA(_Symbol, PERIOD_CURRENT, 200, 0, MODE_EMA, PRICE_CLOSE);

        // Determine trend direction
        bool is_uptrend = ma_short > ma_long;
        bool is_downtrend = ma_short < ma_long;

        // Check for buy conditions
        if (is_uptrend && rsi_value < RSI_Oversold)
        {
            double currentPrice = SymbolInfoDouble(_Symbol, SYMBOL_BID);
            double stopLossPrice = currentPrice - StopLoss * _Point;
            double takeProfitPrice = currentPrice + TakeProfit * _Point;

            // Attempt to open a Buy order
            if (trade.Buy(Lots, _Symbol, 0, stopLossPrice, takeProfitPrice, "Trend Following Buy") > 0)
            {
                Print("Trend Following Buy order placed.");
            }
            else
            {
                Print("Error placing Trend Following Buy order: ", GetLastError());
            }
        }
        // Check for sell conditions
        else if (is_downtrend && rsi_value > RSI_Overbought)
        {
            double currentPrice = SymbolInfoDouble(_Symbol, SYMBOL_ASK);
            double stopLossPrice = currentPrice + StopLoss * _Point;
            double takeProfitPrice = currentPrice - TakeProfit * _Point;

            // Attempt to open a Sell order
            if (trade.Sell(Lots, _Symbol, 0, stopLossPrice, takeProfitPrice, "Trend Following Sell") > 0)
            {
                Print("Trend Following Sell order placed.");
            }
            else
            {
                Print("Error placing Trend Following Sell order: ", GetLastError());
            }
        }
    }
    else
    {
        // Implement Trailing Stop for open positions
        TrailingStopLogic();
    }
}
Breakout Strategy Function:
This function is designed to evaluate breakout conditions based on the Donchian Channel indicator. It resizes necessary buffers to capture the latest data and checks for potential breakout opportunities. The strategy looks for specific price levels to exceed, which might indicate a significant price movement in one direction. When these conditions are met, the EA will execute orders accordingly.
/+-------------------------------------------------------------------+
//| Check and execute Breakout EA trading logic                      |
//+------------------------------------------------------------------+
void CheckBreakoutTrading()
{
    // Resize buffers to get the latest data
    ArrayResize(ExtUpBuffer, 2);
    ArrayResize(ExtDnBuffer, 2);

    // Get the latest values from the Donchian Channel
if (CopyBuffer(handle, 0, 0, 2, ExtUpBuffer) <= 0 || CopyBuffer(handle, 2, 0, 2, ExtDnBuffer) <= 0)
    {
        Print("Error reading Donchian Channel buffer. Error: ", GetLastError());
        return;
    }

    // Get the close price of the current candle
    double closePrice = iClose(Symbol(), Period(), 0);

    // Get the daily open and close for the previous day
    double lastOpen = iOpen(Symbol(), PERIOD_D1, 1);
    double lastClose = iClose(Symbol(), PERIOD_D1, 1);

    // Determine if the last day was bullish or bearish
    bool isBullishDay = lastClose > lastOpen; // Bullish if close > open
    bool isBearishDay = lastClose < lastOpen; // Bearish if close < open

    // Check if there are any open positions before executing breakout strategy
    if (PositionsTotal() == 0) // Only proceed if no positions are open
    {
        // Buy condition: Closing price is above the upper Donchian band on a bullish day
        if (closePrice > ExtUpBuffer[1] && isBullishDay)
        {
            double stopLoss = closePrice - pipsToStopLoss * _Point; // Calculate stop loss
            double takeProfit = closePrice + pipsToTakeProfit * _Point; // Calculate take profit
            OpenBreakoutBuyOrder(stopLoss, takeProfit);
        }

        // Sell condition: Closing price is below the lower Donchian band on a bearish day
        if (closePrice < ExtDnBuffer[1] && isBearishDay)
        {
            double stopLoss = closePrice + pipsToStopLoss * _Point; // Calculate stop loss
            double takeProfit = closePrice - pipsToTakeProfit * _Point; // Calculate take profit
            OpenBreakoutSellOrder(stopLoss, takeProfit);
        }
    }
}
Check Breakout Trading:
This function retrieves the latest values from the Donchian Channel indicator to analyze the market conditions. It determines the close price of the current candle and the daily open and close prices for the previous day. Based on the comparison of these prices, it identifies whether the previous day was bullish or bearish. The function then checks if there are any open positions before executing the breakout strategy. If there are no open positions, it checks for conditions to open a buy order (if the closing price is above the upper band on a bullish day) or a sell order (if the closing price is below the lower band on a bearish day). It calculates stop loss and takes profit levels for each trade before attempting to place the order.
//+------------------------------------------------------------------+
//| Open a buy order for the Breakout strategy                       |
//+------------------------------------------------------------------+
void OpenBreakoutBuyOrder(double stopLoss, double takeProfit)
{
    if (trade.Buy(LotSize, _Symbol, 0, stopLoss, takeProfit, "Breakout Buy"))
    {
        Print("Breakout Buy order placed.");
    }
    else
    {
        Print("Error placing Breakout Buy order: ", GetLastError());
    }
}

//+------------------------------------------------------------------+
//| Open a sell order for the Breakout strategy                      |
//+------------------------------------------------------------------+
void OpenBreakoutSellOrder(double stopLoss, double takeProfit)
{
    if (trade.Sell(LotSize, _Symbol, 0, stopLoss, takeProfit, "Breakout Sell"))
    {
        Print("Breakout Sell order placed.");
    }
    else
    {
        Print("Error placing Breakout Sell order: ", GetLastError());
    }
}
4. Order Expiration Check
The CheckOrderExpiration function reviews all open positions to identify and close any that have exceeded a specified lifetime. This functionality is crucial for maintaining a fresh trading environment, managing risk effectively, and preventing old positions from remaining open longer than is strategically advisable. The function checks the magic number of each position to determine if it is part of the trend-following strategy and compares the current time with the open time of the position to see if it should be closed.
//+------------------------------------------------------------------+
//| Check for expired Trend Following orders                         |
//+------------------------------------------------------------------+
void CheckOrderExpiration()
{
    for (int i = PositionsTotal() - 1; i >= 0; i--)
    {
        ulong ticket = PositionGetTicket(i);
        if (PositionSelectByTicket(ticket))
        {
            long magicNumber = PositionGetInteger(POSITION_MAGIC);

            // Check if it's a Trend Following position
            if (magicNumber == MagicNumber)
            {
                datetime openTime = (datetime)PositionGetInteger(POSITION_TIME);
                if (TimeCurrent() - openTime >= OrderLifetime)
                {
                    // Attempt to close the position
                    if (trade.PositionClose(ticket))
                    {
                        Print("Trend Following position closed due to expiration.");
                    }
                    else
                    {
                        Print("Error closing position due to expiration: ", GetLastError());
                    }
                }
            }
        }
    }
}
5. Trailing Stop Logic
The TrailingStopLogic method is responsible for managing existing open positions by adjusting their stop-loss levels according to trailing stop rules. For long positions, it moves the stop loss up if the current price exceeds the trailing stop threshold. For short positions, it lowers the stop loss when conditions are met. This approach helps secure profits by allowing the stop loss to follow favorable price movements, reducing the risk of loss if the market reverses.
//+------------------------------------------------------------------+
//| Manage trailing stops for open positions                         |
//+------------------------------------------------------------------+
void TrailingStopLogic()
{
    for (int i = PositionsTotal() - 1; i >= 0; i--)
    {
        ulong ticket = PositionGetTicket(i);
        if (PositionSelectByTicket(ticket))
        {
            double currentPrice = SymbolInfoDouble(_Symbol, SYMBOL_BID);
            double stopLoss = PositionGetDouble(POSITION_SL);

            // Update stop loss for long positions
            if (PositionGetInteger(POSITION_TYPE) == POSITION_TYPE_BUY)
            {
                if (currentPrice - stopLoss > TrailingStop * _Point || stopLoss == 0)
                {
                    trade.PositionModify(ticket, currentPrice - TrailingStop * _Point, PositionGetDouble(POSITION_TP));
                }
            }
            // Update stop loss for short positions
            else if (PositionGetInteger(POSITION_TYPE) == POSITION_TYPE_SELL)
            {
                if (stopLoss - currentPrice > TrailingStop * _Point || stopLoss == 0)
                {
                    trade.PositionModify(ticket, currentPrice + TrailingStop * _Point, PositionGetDouble(POSITION_TP));
                }
            }
        }
    }
}
6. Cleanup Function
The OnDeinit() function acts as a cleanup routine that is executed when the Expert Advisor (EA) is removed from the chart. This function handles the release of any allocated resources or indicator handles, ensuring that there are no memory leaks or dangling references. It confirms that the EA has been properly deinitialized and logs this action.
//+------------------------------------------------------------------+
//| Expert deinitialization function                                 |
//+------------------------------------------------------------------+
void OnDeinit(const int reason)
{
    // Release indicators and handles
    IndicatorRelease(rsi_handle);
    IndicatorRelease(handle);
    Print("Expert deinitialized.");
}
Testing and Results
Here's our strategy tester exprience in the image below with new features are working.
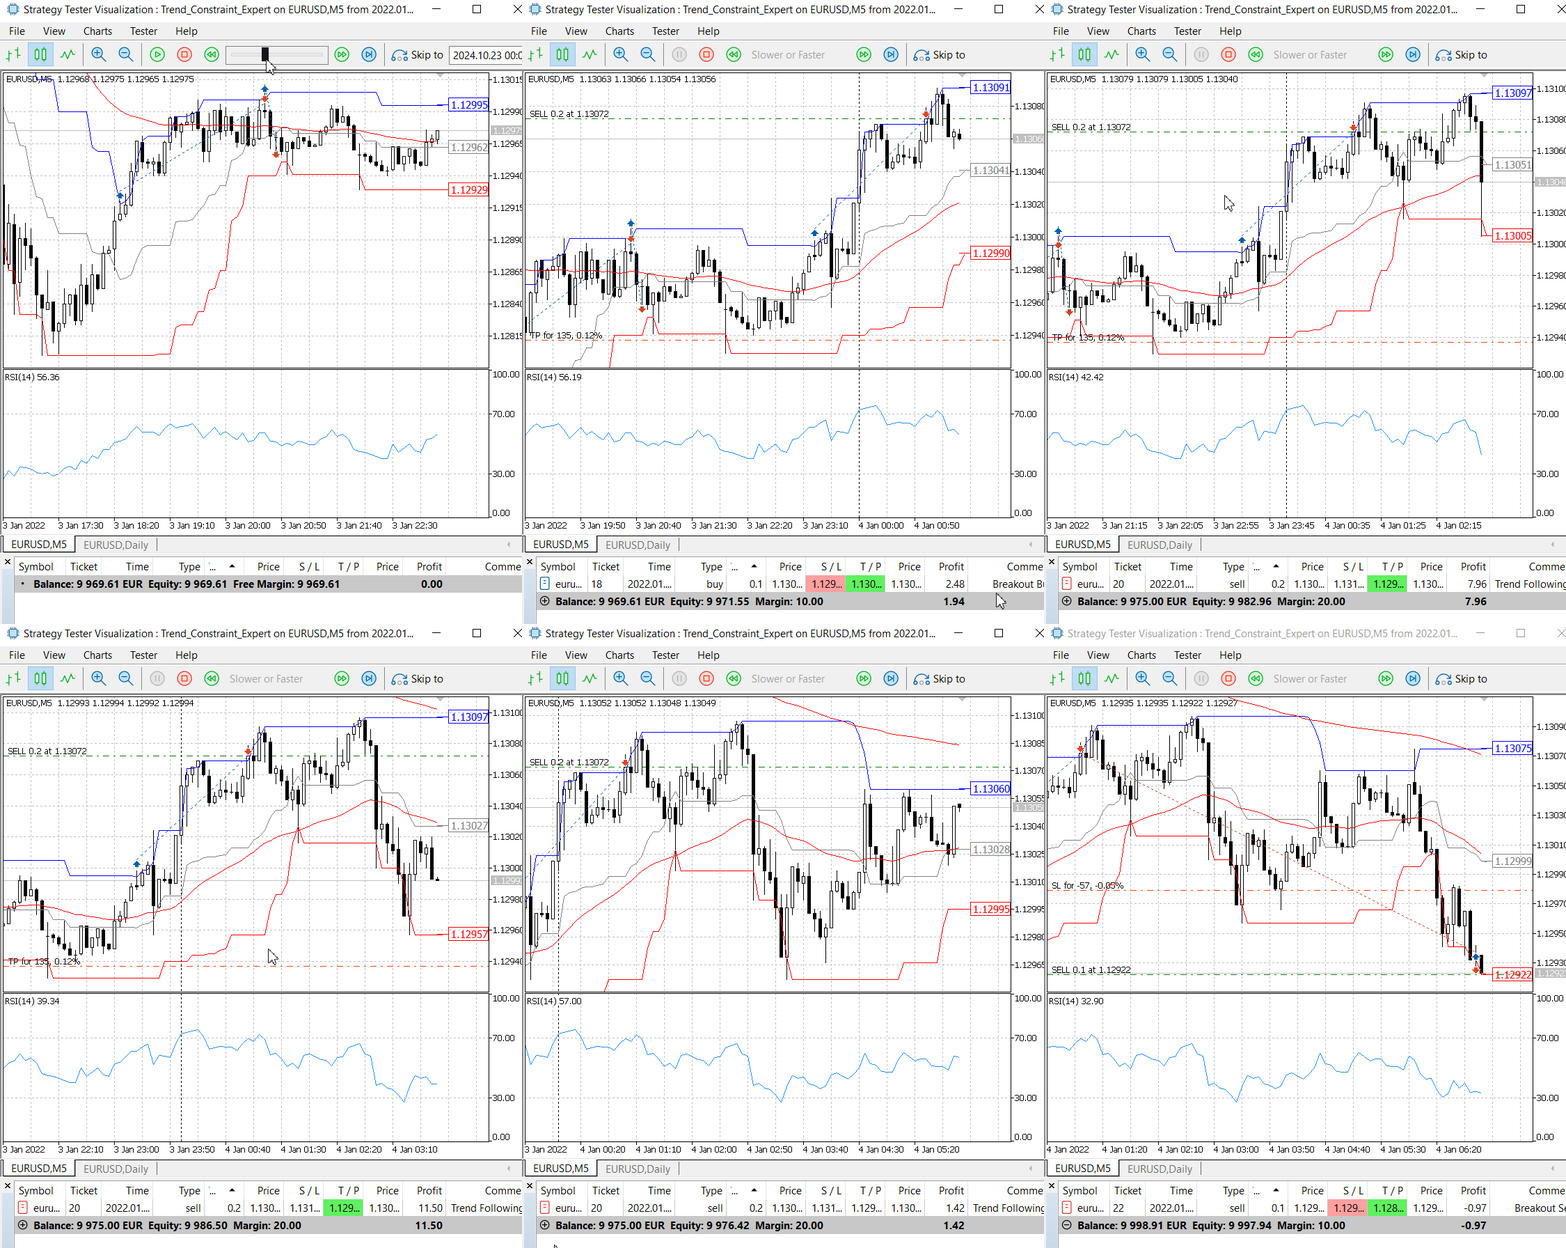
Trend Constraint Expert: Donchian Channel Breakout and Trend Following Strategies
Conclusion
Our discussion, addressed the challenge of adapting to varying market conditions by incorporating multiple strategies into a single Expert Advisor (EA). We initially developed a mini breakout EA to effectively manage the breakout process before integrating it into our main Trend Constraint Expert. This integration enhanced the EA's functionality by aligning the breakout strategy with higher timeframe market sentiment, specifically the D1 candlestick analysis, which reduced excessive trade executions.
Each trade executed in the Strategy Tester was clearly annotated with the strategy employed, providing transparency and clarity in understanding the underlying mechanics at work. I can say to tackle a complex problem effectively, break it down into smaller, manageable components and address each one step by step, so is what we did by developing a mini EA before incorporating into one.
While our implementation shows potential, it remains a work in progress with room for improvement. The EA serves as an educational tool, demonstrating how different strategies can work together for better trading outcomes. I encourage you to experiment with the provided EAs and modify them to fit your trading strategies. Your feedback is essential as we collectively explore the possibilities of combining multiple strategies in algorithmic trading.
Warning: All rights to these materials are reserved by MetaQuotes Ltd. Copying or reprinting of these materials in whole or in part is prohibited.
This article was written by a user of the site and reflects their personal views. MetaQuotes Ltd is not responsible for the accuracy of the information presented, nor for any consequences resulting from the use of the solutions, strategies or recommendations described.
 Most notable Artificial Cooperative Search algorithm modifications (ACSm)
 Exploring Cryptography in MQL5: A Step-by-Step Approach
 MQL5 Wizard Techniques you should know (Part 45): Reinforcement Learning with Monte-Carlo
 Developing a Replay System (Part 50): Things Get Complicated (II)
- Free trading apps
- Over 8,000 signals for copying
- Economic news for exploring financial markets
You agree to website policy and terms of use
Check out the new article: Building A Candlestick Trend Constraint Model (Part 9): Multiple Strategies Expert Advisor (II).
Author: Clemence Benjamin