MR Range Breakouts 5
- インディケータ
- バージョン: 4.0
- アップデート済み: 5 3月 2026
- アクティベーション: 20
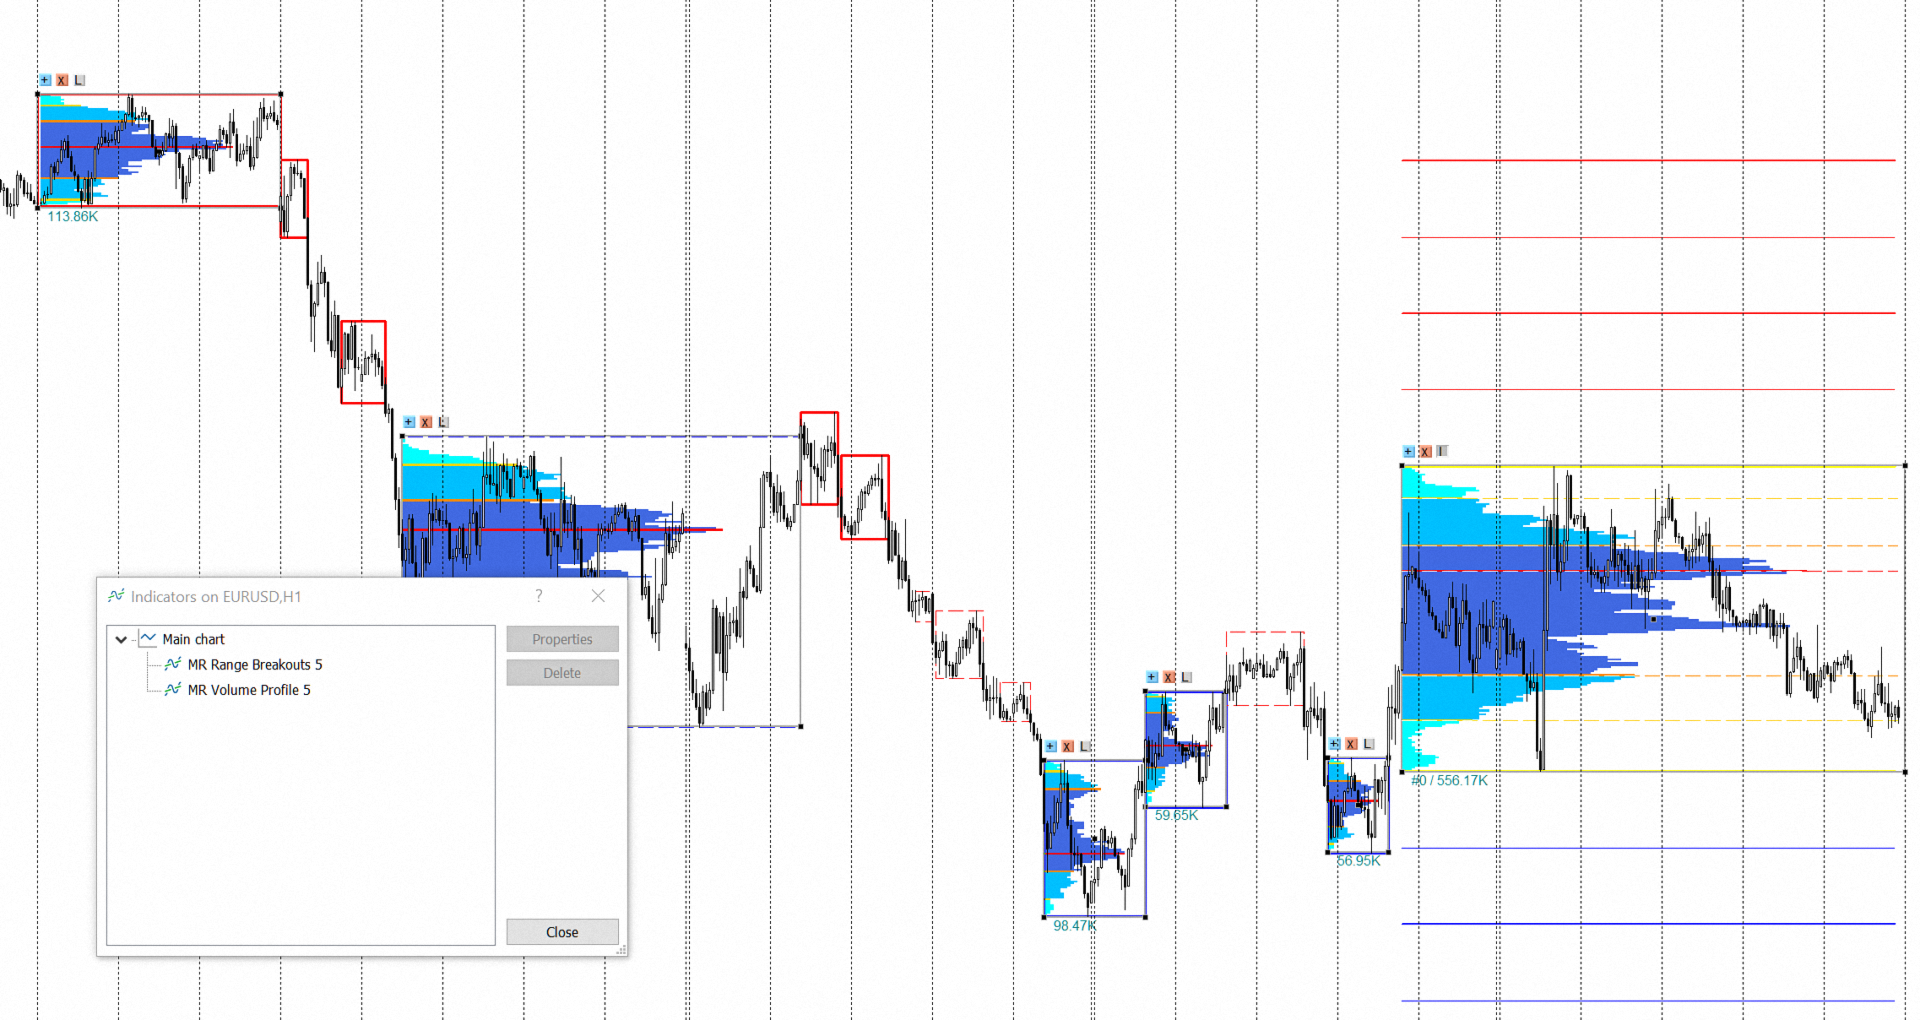
To give you some idea, we will briefly introduce the processes that take place in the range:
1. When we have two extremes and the price has tested at least 75% of the distance between them in the form of a corrective movement, we say that a “Balance” has been established between buyers and sellers. Usually, the intentions to achieve a "Balance" of prices are known only by the "Big" players in the markets. If the price continues or makes a new impulse, renews one of the extremes, and does not return to them again in the form of a correction, we say that the "Balance" is broken and we now have an "Imbalance".
2. If, after reaching a "Balance" between buyers and sellers, the price continues to move between two price extremes, we say that a "Range" has developed between the two price extremes. Here, along with the "Big" market players, the "Professional" traders also enter positions.
3. When the prices remain in the "Range" for a longer time, this "Range" is also seen (perceived) by the "Non-professional" market participants. Usually their stop-losses are placed above or below the boundaries of the "Range". This is where we say we have an "Open Range" because all market participants can actively enter positions and trade the distance between the two extremes that define the upper and lower boundaries of the "Range".
4. When enough participants accumulate in the "Range" with their stop-losses, some of the "Big" players try to close the "Range" of prices by exiting it at the expense of these stop-losses. If they succeed and there is a "correction" beyond the "Range", we say that the "Open Range" is locked by these "Big" players and we have a "Range of Buyers" or a "Range of Sellers".
5. If another portion of the "Big" players decide they don't like it and returns the price to the "Range" and tests a minimum of 75% of the distance between the two extremes that define the boundaries of the "Range", then we say we have an "Extension" of the boundaries of the "Open Range". In this case, the distance between the upper and lower boundaries of the "Open Range" is updated, and a new range test distance of 75% is determined.
6. If these “Big” players fail to return the price to at least 75% after exiting the range, then we say that there is a struggle for dominance between different groups of "Big" players. This usually happens at the upper or lower boundaries of the "Open Range" and between the bearish or bullish "limit orders" barriers. Then we say that we have an "Expansion" of sellers or an "Expansion" of buyers.
7. According to our experience with the indicator, the best places to enter a position are in the "limit orders" barrier areas in the direction of the trend. For example, if we have a downtrend, we are looking for a sell entry in the "limit orders" barrier area of sellers, and accordingly, if we have an uptrend, we are looking for a buy entry in the "limit orders" barrier area of buyers. Of course, all our decisions must be confirmed by other indicators in these zones.
What the indicator shows:
- "Red" rectangles show "Ranges of Sellers", where buyers remain in a "Locked-in Range", and sellers win. If you place a volume profile in a "Range of Sellers", in the area below the "POC" volume, there are buyers in a "Locked-in Range".
- "Blue" rectangles show "Ranges of Buyers", where sellers remain in a "Locked-in Range", and buyers win. If you place a volume profile in a "Range of Buyers", in the area above the "POC" volume there are sellers in a "Locked-in Range".
- "Dashed" rectangles show closed "Ranges"—the places where the price absorbed the volumes in the ranges.
- "Yellow" lines show the upper and lower boundaries of the "Open Range"—it is not yet determined whether this will be a range of buyers or sellers. The "Open Range" is a new and not yet finished range. In it, positions are recruited for the "Big" players, there is a struggle for initiative between the "Big" players, and various tools are used in the confrontation between them. Unfortunately, this is also the place where "non-professional" market participants lose their money because they don't understand the processes that go on in the range.
- "Blue (dash-dot-dot line)" rectangle indicates the beginning of the buyers' "Expansion" initiative. It shows the struggle between the "Big" players in the market, the potential expansion of the "Open Range" boundary, or the possible formation of a new "Open Range".
- "Red (dash-dot-dot line)" rectangle indicates the beginning of the sellers' "Expansion" initiative. It shows the struggle between the "Big" players in the market, the potential expansion of the "Open Range" boundary, or the possible formation of a new "Open Range".
- "Red" lines above the "Open Range" indicate possible areas of "limit orders" barriers of sellers.
- "Blue" lines below the "Open Range" indicate possible areas of "limit orders" barriers of buyers.
"Barriers of "limit orders" are structures designed to restrict price movement in any direction by constantly placing limit orders against the movement. They are typically observed above and below accumulation (range, balance). Barriers of "limit orders" are very similar in functionality to Iceberg orders, which can be tracked on other trading platforms. Instead of the price breaking through a level, the volume of limit orders at that price level "renews" again and again. The "Time & Sales" tape shows a flurry of aggressive trades, but the price stays in place. This is a signal of strong passive interest. The price will not move until the entire hidden volume is executed or canceled. For the market, this represents a powerful barrier. Often after this, the price makes a sharp impulse, as the resistance has disappeared."
- In combination with the "MR Reversal Patterns 5" indicator, you can see how buyers and sellers are distributed in the "Range". Since every trader waits for confirmation that their market entry is correct, the appearance of "Reversal Patterns" in the "Range" forms the accumulation of open positions in a place that we define as a "Point of Control" in the Volume Profile of the Range ". During the movement of the price in a trend, you can see how "Balances" are formed according to the "Auction Market Theory".
- In combination with the "MR Volume POC Levels 5" indicator, you can see where important volumes are left after the exit from the "Balances" and "Ranges". In addition, you can see how the volumes are absorbed in the "Range" and accumulate positions of buyers and sellers.
- In combination with the "MR Volume Profile 5" indicator, you can see where the places with the highest concentration of open positions are. In the "Range of Sellers", buyers remain in the "Locked-in Range"—in the area below the "POC" volume, while in the "Range of Buyers", sellers remain in the "Locked-in Range"—in the area above the "POC" volume.
- In combination with the "Volumes and Sentiments 5" indicator, you can see the "Sentiments" inside the range. When we also have an "Expansion" of the sellers or the buyers, you can see the imbalance of all participants in the range relative to those in the "Expansion".
- In combination with the "Pullbacks on Trend 5" indicator, you can track the places where the volumes accumulate in the "Balances" and "Ranges" along the trend. Then, the volumes of these places are absorbed in the "Correction" movements.
Note:
There may be slight differences between the figures that are drawn on the chart of the time frame that you selected in the indicator settings and the figures that are drawn on the chart of the smaller time frames. This is related to the decomposition of the bar from the selected time frame to the smaller time frames. The bar of the selected time frame has a different structure than the smaller time frames. This is not a mistake! This is the option we have adopted to correctly determine the inputs and outputs of the ranges.
If you liked the indicator, please support our work by giving it 5 stars!
For MetaTrader 4 https://www.mql5.com/en/market/product/63855
Indicator settings:
Show Multi-Time Frame from: - Multi-time frame on which to calculate the indicator. By default, the indicator works with data from the H4 time frame.
Bars History for calculation: - Number of bars on which the indicator works from the H4 multi-time frame.
Section Visual Trading Styles settings
Style 1: Delete inactive "Ranges" - Shows or deletes "Ranges" closed by the price and shown with a dashed line.
Style 2: Show "Open Range" only - Shows only "Open Range" when this option is selected.
Style 3: Show "Internal proportions" - Shows or hides "Internal proportions" in the "Open Range".
Style 4: Show "limit orders" Barriers - Shows or hides "limit orders" Barriers.
Section Alert settings for "Ranges"
Alert when "Range" is closed: - Displays an alert when a "Range" is closed by the price movement and is shown with a dashed line.
Section Settings for "Ranges"
Line width for "Ranges": - You can select the line width for all non-closed Ranges.
Color for "Range of Sellers": - You can select a color for "Range of Sellers".
Color for "Range of Buyers": - You can select a color for "Range of Buyers".
Color for "Open Range": - You can select a color for "Open Range".
"Open Range" confirmation percentage: - You can choose another setting to fulfill the "Range" formation criterion. By default, we set the test distance between two extremums equal to 75%. Other acceptable values are up to 50%.
Section Settings for "Limit Orders" (LO) Barriers
Line width for (LO) "Barriers" 1 & 3: - You can select the line width for "limit orders" Barriers 1 and 3. According to our research, these lines are less important for containing the price movement.
Line width for (LO) "Barriers" 2 & 4: - You can select the line width for "limit orders" Barriers 2 and 4. According to our research, these lines are more important for containing the price movement.
Color for (LO) "Barriers" of Sellers: - You can select a color for "limit orders" Barriers of Sellers.
Color for (LO) "Barriers" of Buyers: - You can select a color for "limit orders" Barriers of Buyers.
Section Settings for "Expansion"
"Expansion" line drawing style: - You can select the line style for "Expansion".
"Expansion" line width: - You can select the line width for "Expansion".
Color for "Expansion" of Buyers: - You can select a color for "Expansion" of Buyers.
Color for "Expansion" of Sellers: - You can select a color for "Expansion" of Sellers.


Masters of Risk indicators (all 4 in the series) is a serious product for serious traders. MR Reversals are not a quick fix; however, I believe the trading style will work well for any trader willing to put in the work to learn the process and theory behind the indicators and overall trading strategy. More importantly, the developers of the MR indicators stand by their product. Svetoslav has been helping me learn the MR trading strategy - which goes way above and beyond the indicators. We have exchanged nearly 50 emails over the past 30-60 days. I have purchased 25+ indicators to help me get a better handle on institutional-level trading volumes and price action, I believe the MR indicator series is the only product that has put all of the pieces together in one system. As a trader you must still be committed to learning and applying yourself further every day, no tool/indicator will do your job for you. If you want long-term success as a trader - in almost any market - I believe the MR strategy can fill the gaps and provide the solutions for continued success. THANK YOU SVETOSLAV!!