Deriv Intelligence Analyzer
- Indicatori
- Versione: 2.0
- Attivazioni: 5

Here our more valuable tools
SMC Trend Trading , Easy SMC Trading , Institutional SMC Architect
Purpose: Measures market pressure by analyzing tick movements, volume, and speed within a time window. How it works: Calculates weighted price changes, considers tick velocity and volatility, and applies EMA smoothing. Trading use:
- Strong positive values indicate buying pressure
- Strong negative values indicate selling pressure
- Use as confirmation for entry/exit signals
2. Flow Pattern Detector
Purpose: Identifies recurring tick patterns in market flow. How it works: Analyzes sequences of tick movements and matches them against known patterns (Buyer Re-entry, Seller Exhaustion, etc.). Trading use:
- "Buyer Re-entry" pattern suggests continuation of uptrend
- "Seller Exhaustion" pattern suggests potential reversal to upside
- High confidence patterns (>70%) are more reliable
3. Weighted Volume Delta
Purpose: Measures buying vs selling pressure with volume weighting. How it works: Applies exponential weighting to volume and calculates buy/sell imbalance. Trading use:
- Positive delta indicates accumulation (buying pressure)
- Negative delta indicates distribution (selling pressure)
- Divergence with price signals potential reversals
4. Candle Forecast Engine
Purpose: Predicts next candle direction using multiple inputs. How it works: Combines pressure, delta, patterns, TPS, and trend using neural network-like processing. Trading use:
- Confidence >70% = Strong signal
- Confidence 40-70% = Evaluate
- Confidence <40% = Weak signal, avoid trading
5. Adaptive Thresholds
Purpose: Dynamically adjusts risk levels based on market conditions. How it works: Uses ATR and volatility scaling to set appropriate stop loss/take profit distances. Trading use:
- Higher thresholds in volatile markets
- Lower thresholds in quiet markets
- Use for setting SL/TP levels
6. Tick Density Clock
Purpose: Measures market activity and session state. How it works: Counts ticks per second and compares to historical averages. Trading use:
- High TPS = Active session, good for trading
- Low TPS = Quiet session, avoid trading
- Use to filter trades during low activity
7. Market Reaction Memory
Purpose: Learns from past forecast accuracy. How it works: Stores forecast results and compares with actual outcomes. Trading use:
- Accuracy >65% = System performing well
- Accuracy <50% = System struggling, reduce position size
- Bias correction helps adjust for systematic errors
8. Decision Layer
Purpose: Generates final trading recommendations. How it works: Combines all module outputs with risk management rules. Trading use:
- "Enter Long/Short" = Clear signal
- "Prepare" = Getting ready, monitor closely
- "Wait" = No trade, stay out
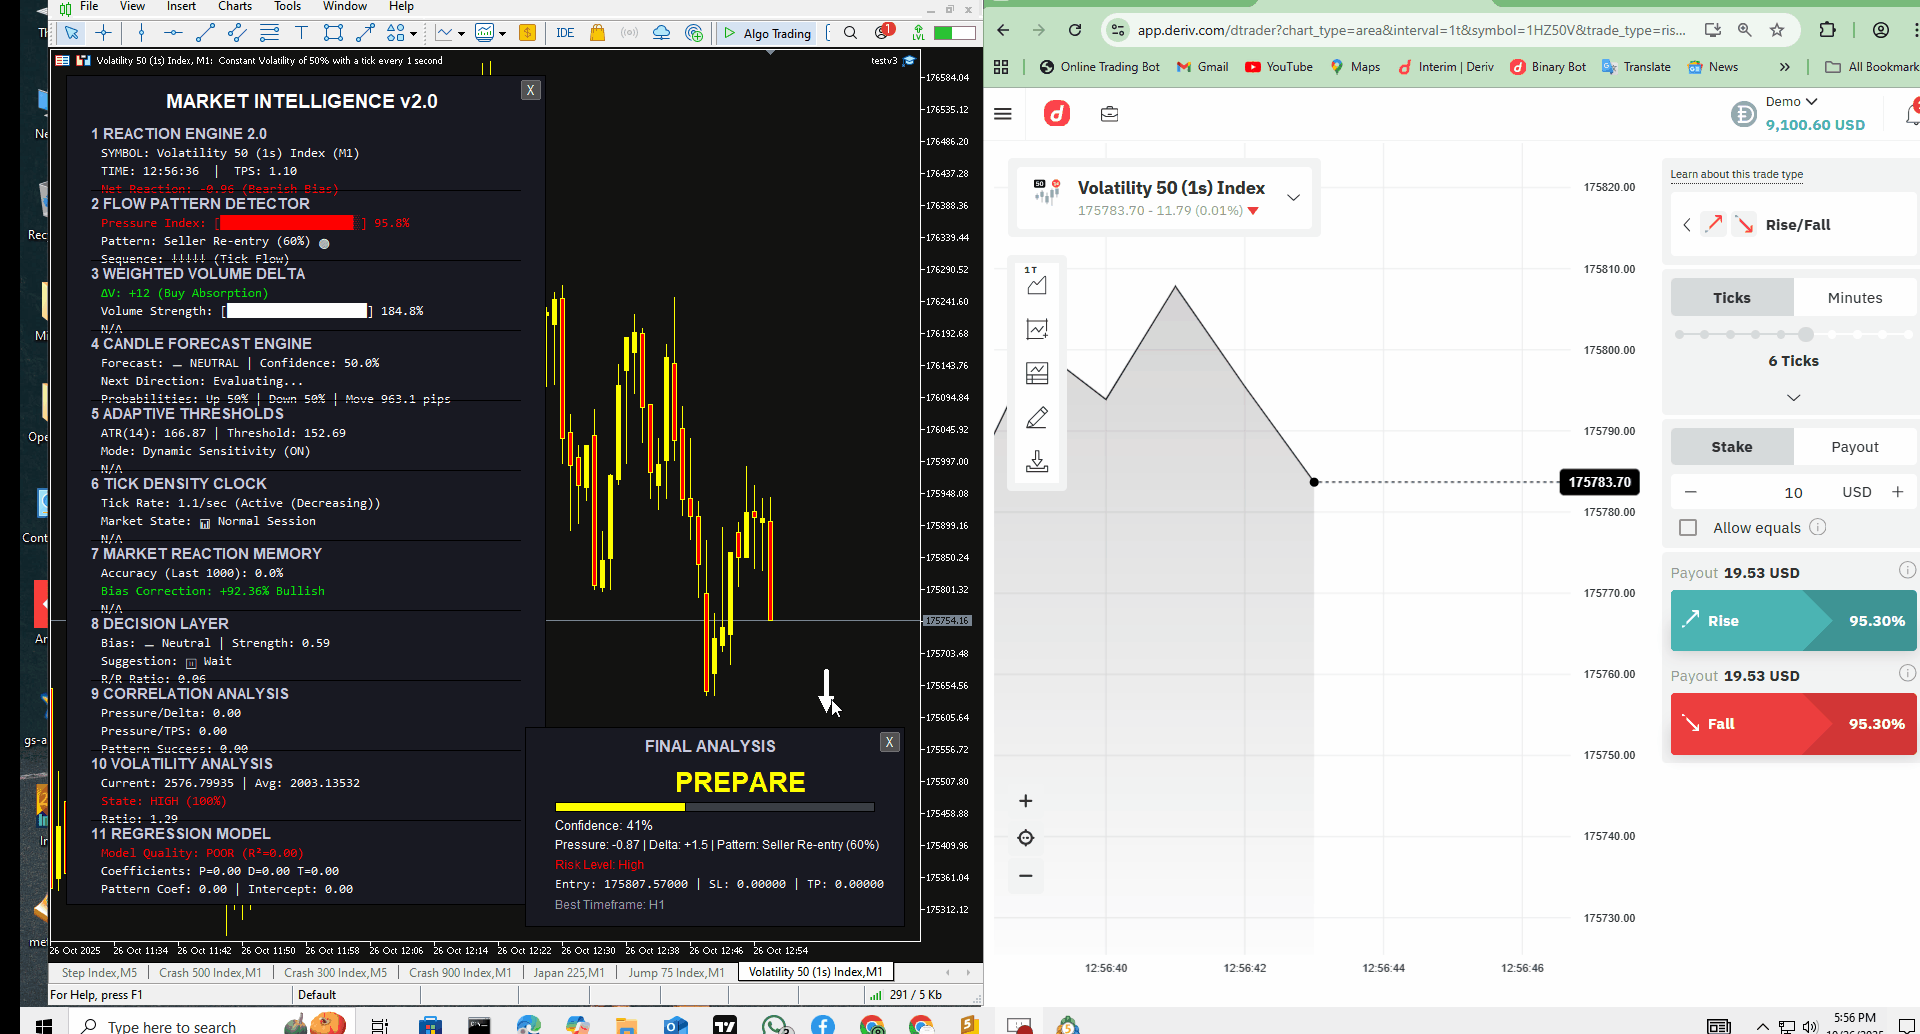
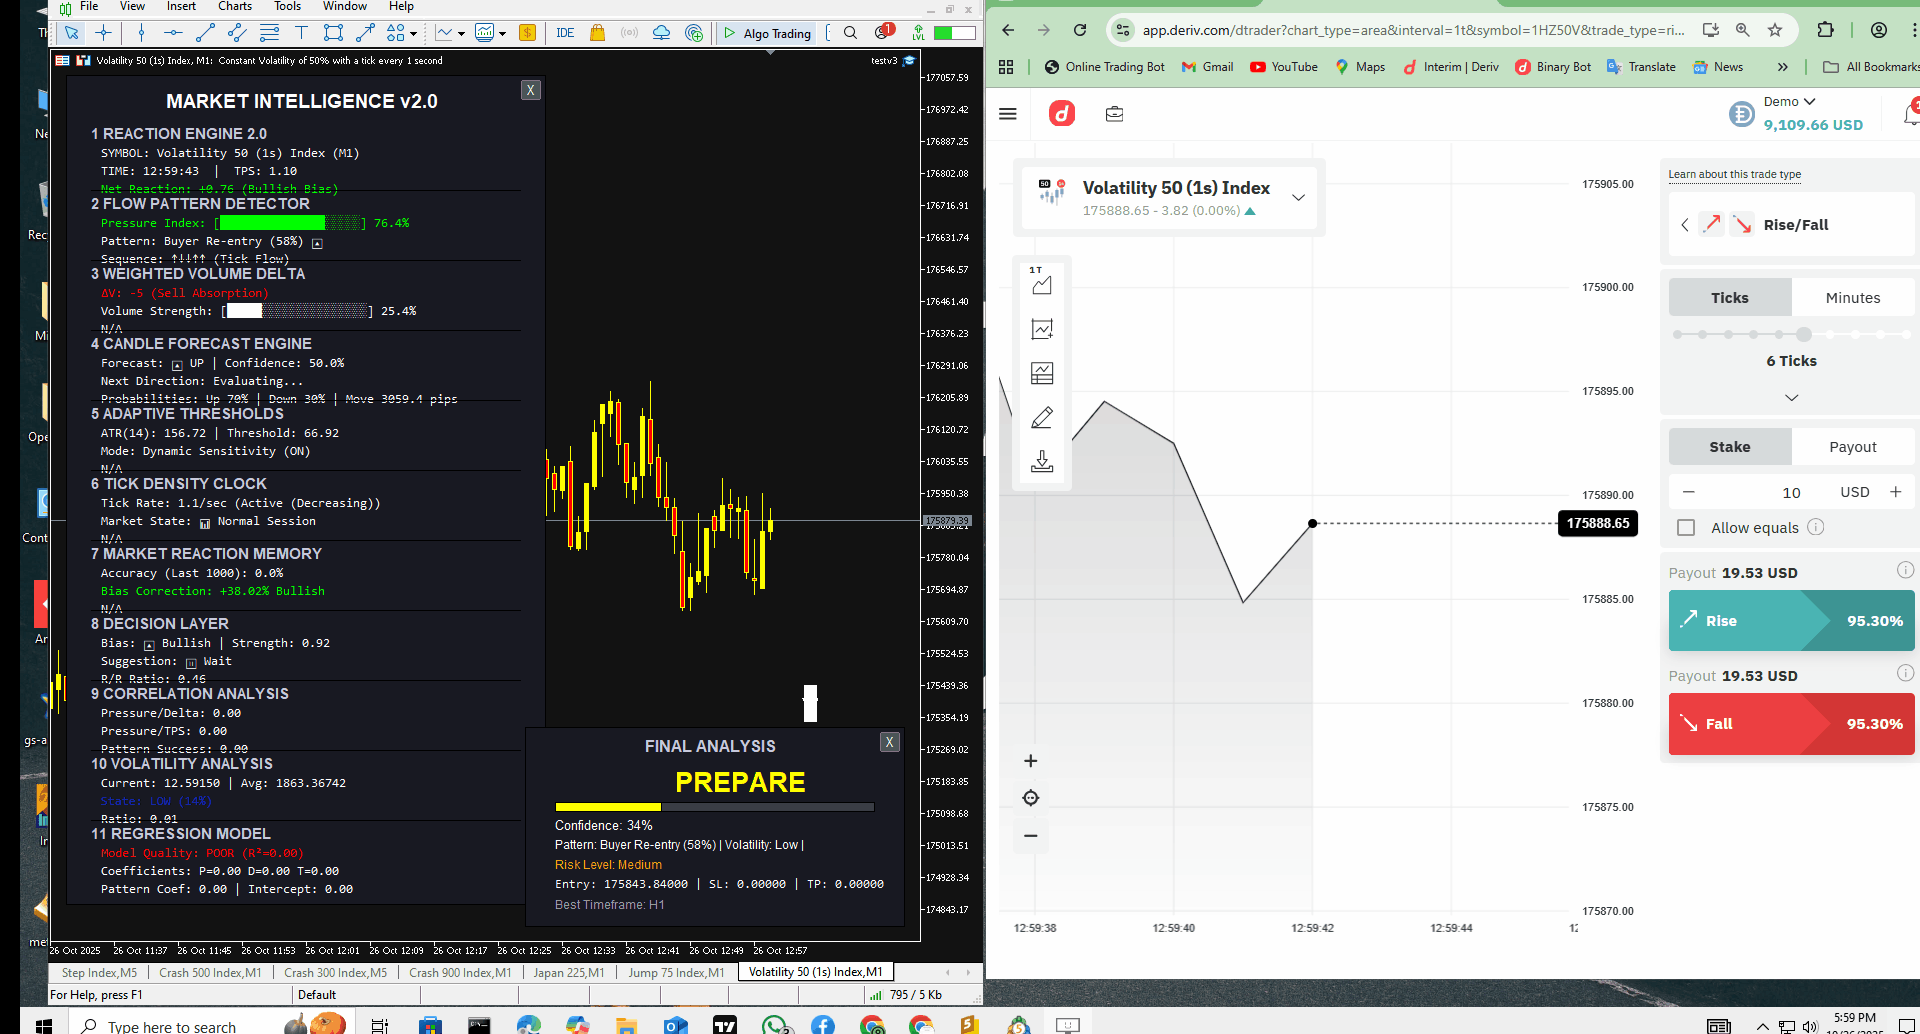
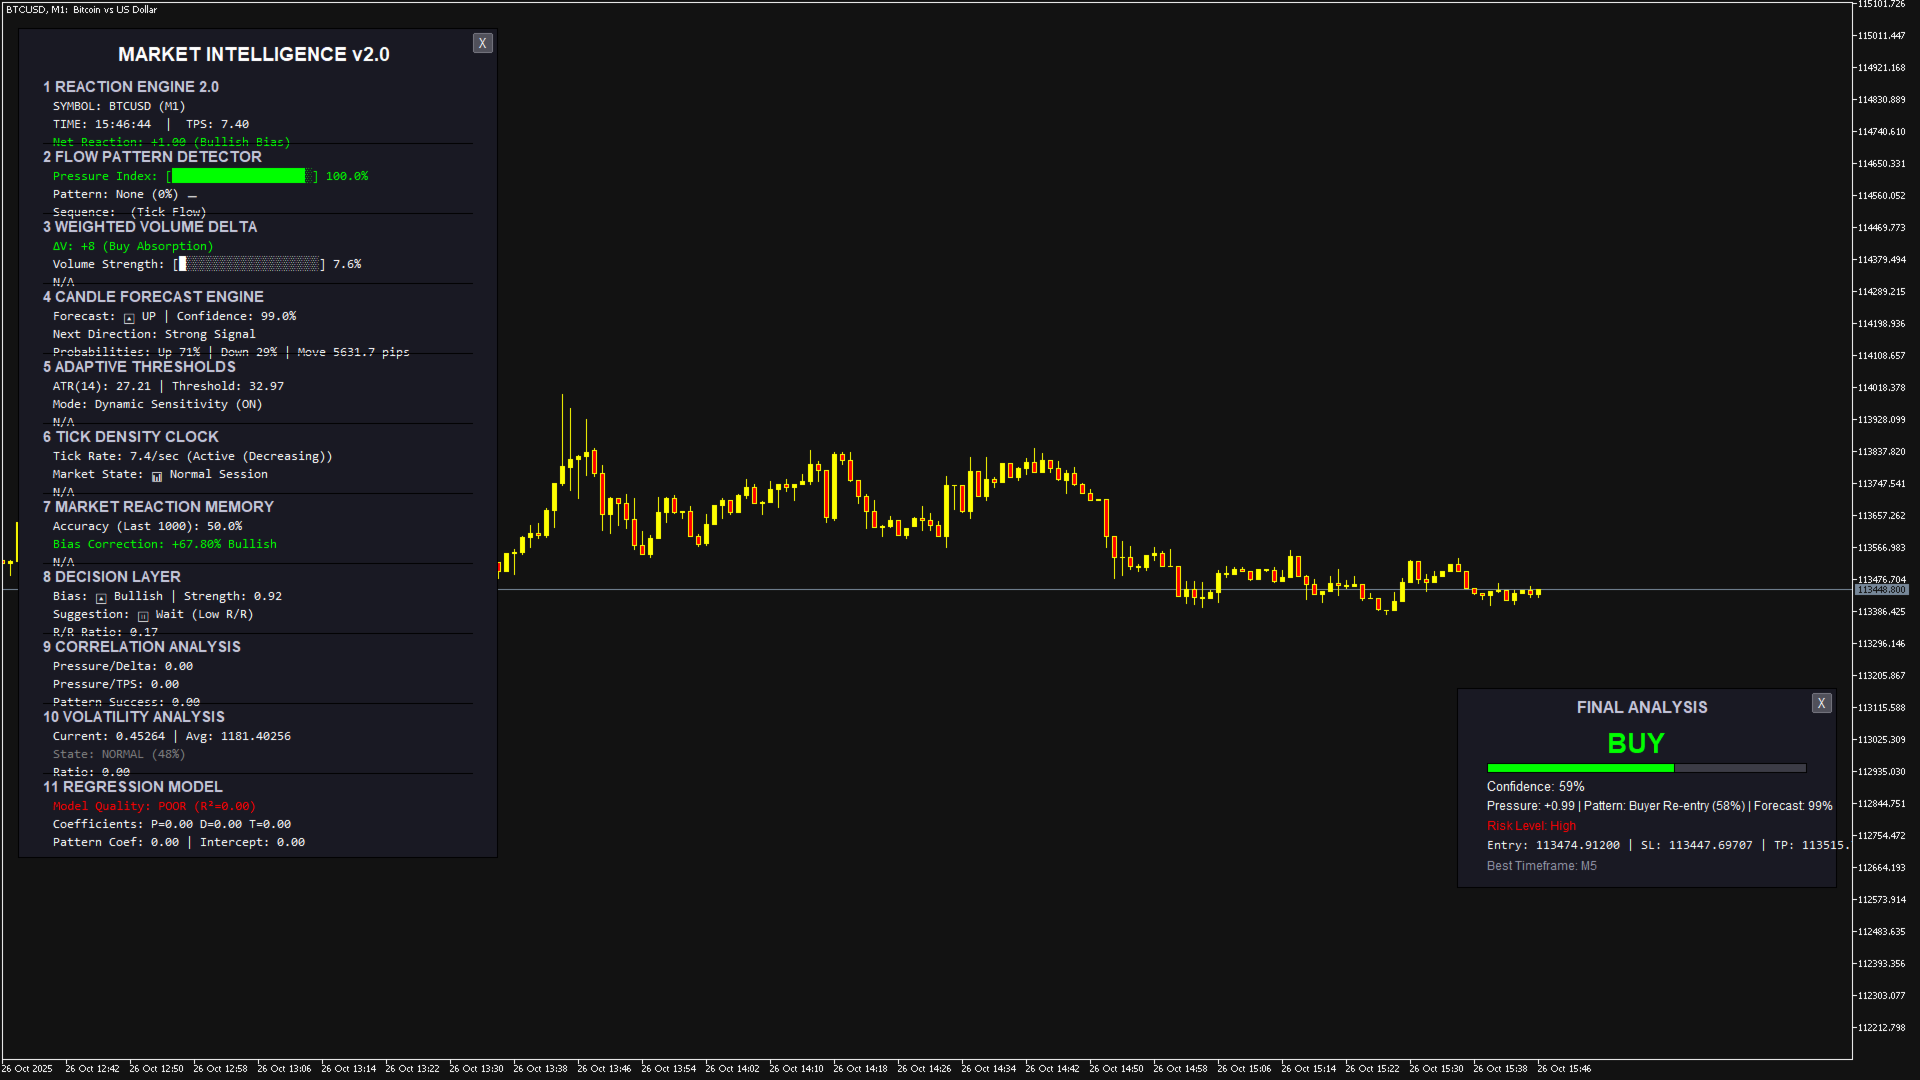
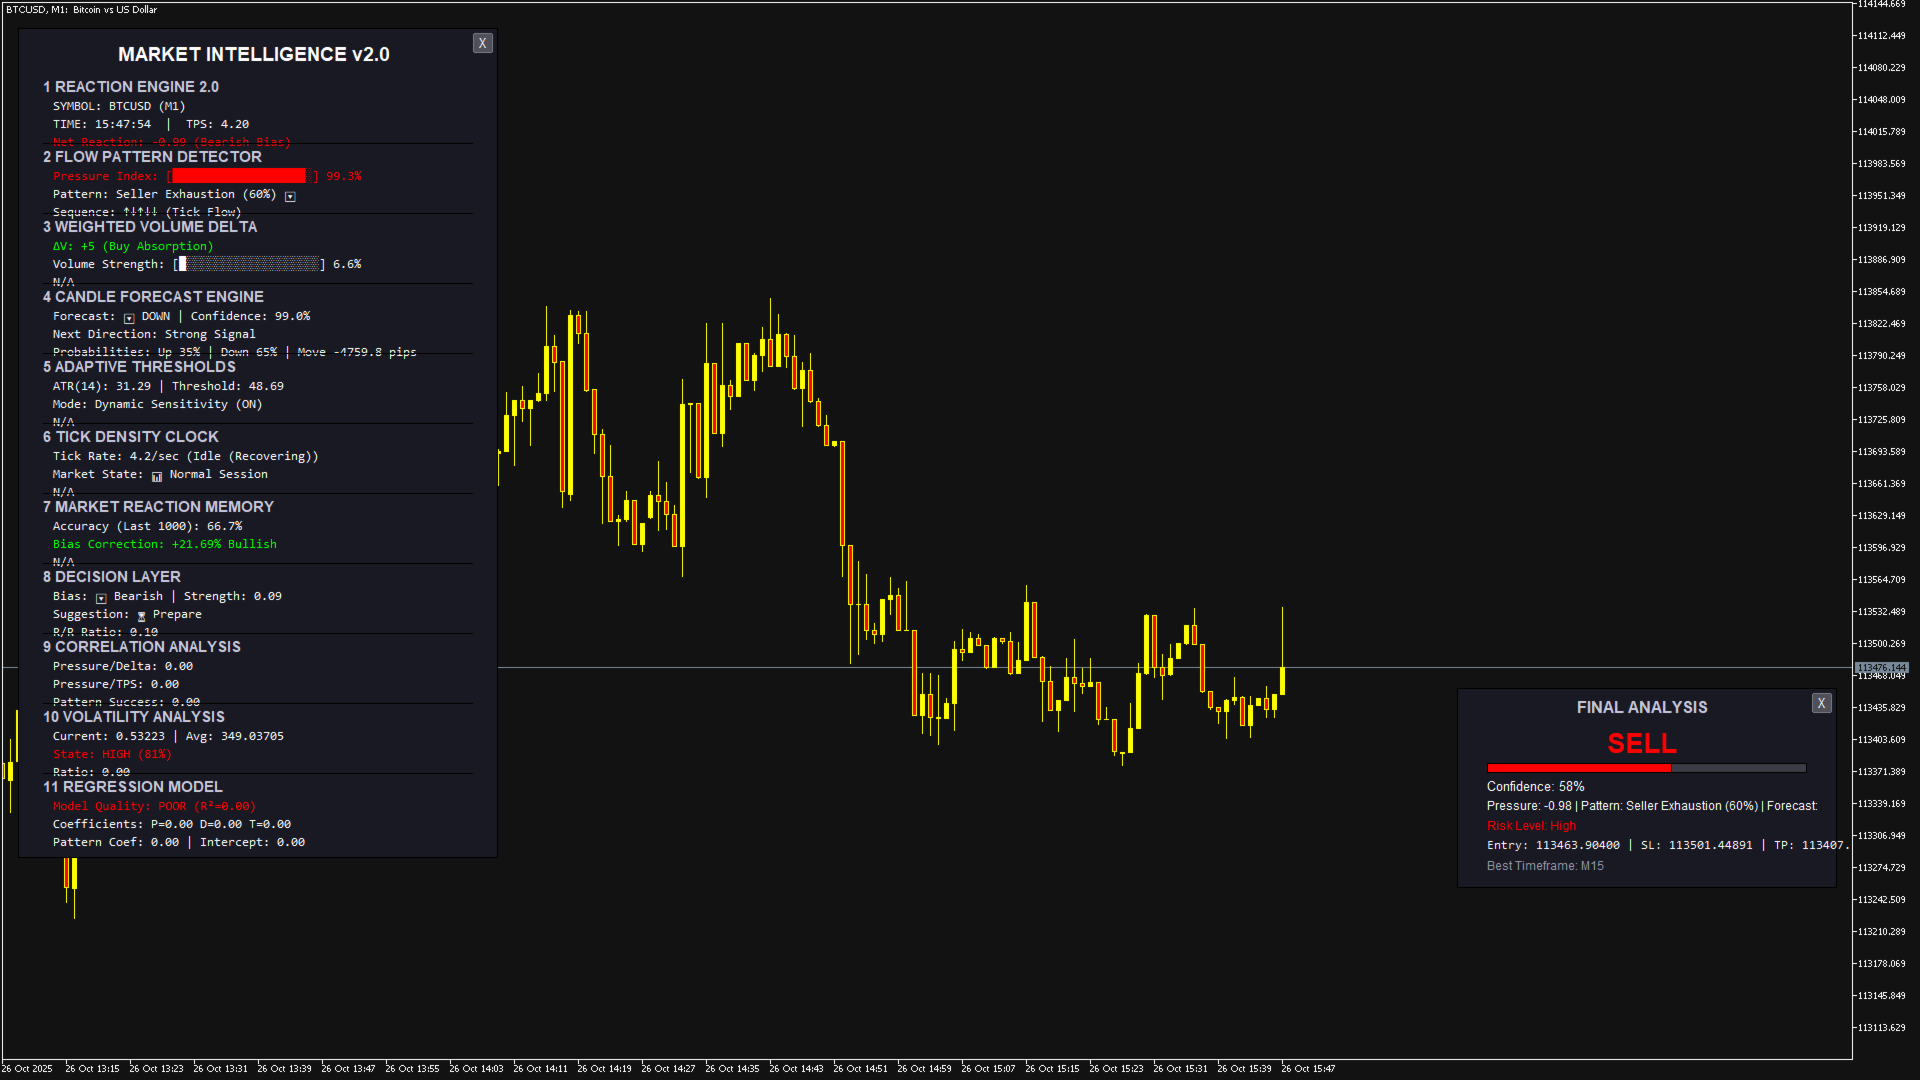
9. Final Analysis
Purpose: Consolidates all outputs into actionable trading signal. How it works: Synthesizes data from all modules into unified recommendation. Trading use: MAIN TRADING SIGNAL
10. Correlation Analysis (Advanced)
Purpose: Measures relationships between different indicators. How it works: Calculates correlation coefficients between module outputs. Trading use:
- High correlation (>0.7) confirms signal strength
- Low/negative correlation suggests conflicting signals
- Use to gauge signal reliability
11. Volatility Analysis (Advanced)
Purpose: Analyzes current volatility relative to history. How it works: Compares current volatility to historical distribution. Trading use:
- High volatility = Wider stops, smaller position size
- Low volatility = Tighter stops, normal position size
- Avoid trading during extreme volatility
How to Use Final Analyzer for Trading
Step 1: Signal Identification
- BUY Signal: When Final Analysis shows "BUY" with confidence >60%
- SELL Signal: When Final Analysis shows "SELL" with confidence >60%
- WAIT: When signal is "WAIT" or confidence <60%
Step 2: Entry Execution
- For BUY: Enter at ask price shown in Final Analysis
- For SELL: Enter at bid price shown in Final Analysis
- Use limit orders for better fills
Step 3: Risk Management
- Stop Loss: Use the SL level provided (1.5x ATR away)
- Take Profit: Use the TP level provided (2x ATR away)
- Position Sizing:
- Confidence 60-70%: 1% risk
- Confidence 70-80%: 1.5% risk
- Confidence >80%: 2% risk
Step 4: Trade Management
- Move to BE: When price reaches 1x ATR in profit
- Partial TP: Close 50% at 1.5x ATR, let rest run to TP
- Trailing Stop: Use 1x ATR trailing after BE
Step 5: Confirmation Checklist
Before entering any trade, verify:
- Signal strength >50%
- Volatility not extreme (not in top 10%)
- Historical accuracy >60%
- R/R ratio >1.5
- No major news upcoming
Step 6: Exit Rules
- Stop Loss Hit: Exit immediately, no questions
- Take Profit Hit: Take full profit or partial based on plan
- Signal Reversal: Exit if Final Analysis changes signal
- Time Exit: Close if no movement after 3 candles
Step 7: Performance Tracking
- Record all trades with entry/exit, reason, and outcome
- Monitor system accuracy weekly
- Adjust position sizes based on performance
- Review losing trades for improvement
Pro Tips
- Best Times: Trade during high TPS (active sessions)
- Avoid: News events, low liquidity, extreme volatility
- Confirmation: Wait for candle close if uncertain
- Patience: Better to miss a trade than take a bad one
- Consistency: Follow rules strictly, no emotional decisions
Example Trade Setup
- Final Analysis shows:
- - Signal: BUY
- - Entry: 1.08500
- - SL: 1.08250
- - TP: 1.09000
- - Confidence: 75%
- - Strength: 68%
- - Volatility: 45%
- Action:
- 1. Enter BUY at 1.08500 with 1.5% risk
- 2. Set SL at 1.08250, TP at 1.09000
- 3. Move to BE at 1.08750
- 4. Close 50% at 1.08875
Remember: The Final Analyzer is a powerful tool, but always combine it with your own analysis and risk management rules. No system is 100% accurate - focus on consistent execution and proper risk management.