
Integrate Your Own LLM into EA (Part 2): Example of Environment Deployment
Introduction
In the previous article, we introduced the basic hardware knowledge for running LLMs locally, and also mentioned the differences between different environments and their respective advantages and disadvantages. Therefore, in this article, we will not discuss the environment setup of other systems such as Windows, Linux, and MacOS, but only the configuration of Windows+WSL. We will step by step configure the environment and achieve local LLMs operation.
Table of contents:
- Introduction
- WSL2
- WSL2 Installation
- Configuration
- The Common Commands for WSL
- Software Configuration
- Conclusion
WSL2
1. About WSL2
WSL2 is a major upgrade to the original version of WSL launched by Microsoft as early as 2017. WSL2 is not just a version upgrade, it is faster, more universal, and uses a real Linux kernel. To this day, I believe that many people do not know the existence of WSL, including some IT practitioners. They are still continuing with Windows+VirtualMachine, or using dual system mode, switching from Windows when they need to use Linux.
Of course, it cannot be denied that some tasks may require a complete Linux environment, which WSL cannot replace, so these methods are not without reason.
2. Why use WSL2
For artificial intelligence, we mainly use Linux's powerful command line tools and GPU accelerated computing, so the configuration of dual systems or Windows+VirtualMachines seems a bit bloated. WSL2 itself has a complete Linux kernel, which is closer to the real Linux environment, and WSL2 can seamlessly dock with the Windows file system. You can manage its file system like managing a folder under Windows. In less than a second, you can run the Linux command line from Windows. So if you want to use Linux functions and tools efficiently and conveniently in the Windows environment, you will never regret choosing WSL2.
WSL2 Installation
1. Installation requirements:
1). The Windows version must be Windows 10 version 2004 or higher (internal version 19041 or higher) or Windows 11, and the KB4566116 update has been installed. Of course, if the version is older, it can still be used, but manual operation is required. We will discuss this later.
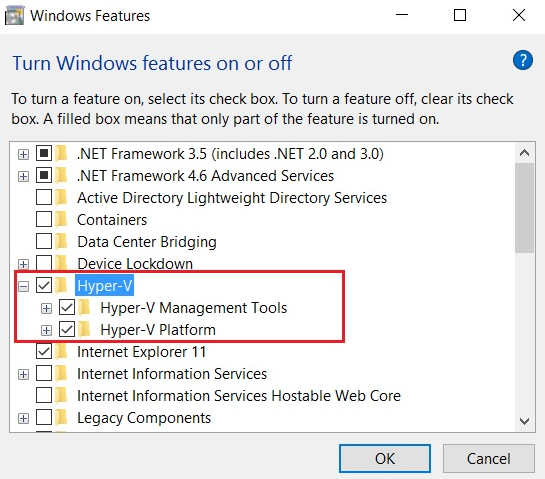
2). WSL2 may need to enable the "Virtual Machine Platform" feature of Windows. Why use "may"? Because I have not experimented with whether it can be installed without enabling it on Windows 10, but it can also be installed without enabling it on my computer (Win11-22H2). So if your installation fails, please search for "Windows features" in "Start" and turn on Hyper-V as marked in the figure below.
3). The disk has enough reserved space, probably at least 1G. Of course, this is the basis for everything to run normally. The default installation will be installed under the C drive, but if you are worried about your C drive space, we can also migrate to other partitions, which will be mentioned later.
2. Installation
1). If you have no requirements for the Linux distribution version (if you have special requirements for its version, don't rush to enter the command, please refer to the next content), you only need to open PowerShell as an administrator and enter: wsl --install.
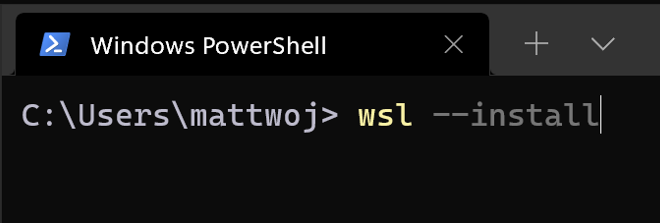
2). If you want to specify a version of the Linux distribution, open PowerShell as an administrator, and then run the following command to install WSL2 in a way that specifies the Linux distribution version:
wsl --install -d <Distribution Name> (replace <Distribution Name> with the name of the distribution you want to install, for example: Ubuntu-20.04).
If you want more choices, you can use wsl --list --online (or use wsl -l -o) to view available Linux distributions. The good news is that you can install multiple different versions of Linux, and you only need to switch when running.
Tip: If you want to install a Linux distribution that is not listed as available, you can use TAR files to import any Linux distribution, we will not discuss it here.
3). There are several ways to run the subsystem:
- Open the distribution from the "Start" menu (Ubuntu by default).
- Directly type 'wsl' in the Windows command prompt or PowerShell and press enter.
- In the Windows command prompt or PowerShell, you can enter the name of the installed distribution. For example: ubuntu.
- If you have installed multiple versions of Linux, you can use the command wsl -l -v to view related information, and then use the command wsl [name] to choose which version to start. For example: wsl ubuntu.
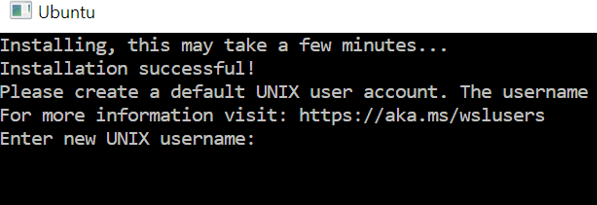
4). The first time you run it, there will be a prompt for you to set up a username and password. Please note that when you enter the password, it will not be displayed, and the cursor will not move. You just need to remember the password and then hit the enter key. The system will ask you to enter it when you need administrator privileges (such as sudo operations). But if you accidentally forget it, don't worry, there is a way to solve this problem without reinstalling the subsystem.
5). If you want to exit the subsystem, just type "exit" in the command line. If you are not sure whether the subsystem is running, you can use 'wsl -l -v' in the command prompt or PowerShell to view related information, and use 'wsl --shutdown' to shut down all subsystems.
Tip: If you want to use a graphical subsystem, you can refer to the relevant content on Microsoft's official website to implement it, but the author strongly advises against doing so!
Configuration
1. Migration to Other Partitions
If your system disk resources are relatively tight, you can consider migrating the subsystem to other disks or partitions. The specific operations are as follows:
1). Type in Windows command prompt or PowerShell: 'wsl -l -v --all' to view the subsystem you need to migrate.
2). Type in Windows command prompt or PowerShell: 'wsl --shutdown' to ensure that all subsystems are closed.
3). Type in Windows command prompt or PowerShell: 'wsl --export <Subsystem Name> <Path to Store Subsystem Compressed Package>', for example: 'wsl --export ubuntu f:\wsl-ubuntu.tar'.
4). Type in Windows command prompt or PowerShell: 'wsl --unregister <Subsystem Name>', for example: 'wsl --unregister ubuntu'.
5). Type in Windows command prompt or PowerShell: 'wsl --import <Subsystem Name> <Path to Migrate Subsystem> <Original Exported Subsystem Compressed Package Path> --version 2', for example: 'wsl --import new_ubuntu F:\wsl\ubuntu_wsl f:\wsl-ubuntu.tar --version 2'.
6). The original exported subsystem compressed package can be deleted, or it can be used as a backup file.
Note: If you want to back up your subsystem, you can refer to the content here.
2. Setting Configuration Files
There are two types of WSL2 subsystem configuration files, one is the global configuration under Windows, and the other is the local configuration file under the subsystem. We mainly configure the global configuration file, the path of this file is 'C:\Users\<UserName>\.wslconfig'. You need to open it with a text editor for editing. The main options we need to configure are memory, swap, and swapfile. Before setting, make sure that the subsystem is in a closed state, this is very important!
- -memory: Configure the maximum memory we allocate to the subsystem.
- -swap: The amount of swap space to add to the WSL 2 VM, 0 means no swap file. Swap storage is disk-based RAM used when memory demand exceeds the limits on hardware devices.
- -swapfile: The absolute Windows path of the swap virtual hard disk. This path can be set according to your own situation and can be anywhere.
Go directly into the configuration file path, then open it with Notepad, add the following 4 lines of content, note that there is no punctuation mark at the end:
[wsl2]
memory=8GB
swap=60GB
swapfile=G:\\wsl\\swap\\wsl-swap.vhdx
You need to replace 'G:\\wsl\\swap\\wsl-swap.vhdx' with your own path.
Note: There is a very important issue here that when running LLM, try to ensure that your memory + swap value is larger than the model size, otherwise problems will occur when reading the model.
3. Installation of WSL2 on Older Versions of Windows 10
1). Ensure that the system version is 1903 or higher, and the internal version is 18362.1049 or higher.
2). Open PowerShell as an administrator and run the command: 'dism.exe /online /enable-feature /featurename:VirtualMachinePlatform /all /norestart', then restart the computer.
3). Download the Linux kernel package, download link: 'https://wslstorestorage.blob.core.windows.net/wslblob/wsl_update_x64.msi'.
4). Double-click to run the downloaded kernel package and complete the installation.
5). Open PowerShell as an administrator and run the command: 'wsl --set-default-version 2'.
6). Open Microsoft Store, and choose your preferred Linux distribution, click on the icon to install.
As shown in the figure:

Note: After using the subsystem for a period of time, you may clean up some content that is no longer needed to free up space (such as cache). Although the content has been deleted, you will find that the space occupied by the subsystem's virtual hard disk has not decreased. At this time, we can run the command prompt or PowerShell with administrator privileges, and use the virtual hard disk management command 'vdisk' in Disk Part to compress the virtual hard disk.
The Common Commands for WSL
Usage: wsl.exe [Argument] [Options...] [CommandLine]
1. Arguments for running Linux binary files
If no command line is provided, wsl.exe will start the default shell.
--exec, -e <CommandLine>
Execute the specified command without using the default Linux shell.
--shell-type <Type>
Execute the specified command using the provided shell type.
Types:
- standard
Execute the specified command using the default Linux shell.
- login
Execute the specified command using the default Linux shell as a login shell.
- none
Execute the specified command without using the default Linux shell.
--
Pass the remaining part of the command line as is.
2. Options
--cd <Directory>
Set the specified directory as the current working directory.
If ~ is used, it will use the main path of the Linux user. If the path starts with character, it will be interpreted as an absolute Linux path.
Otherwise, this value must be an absolute Windows path.
--distribution, -d <Distro>
Run the specified distribution.
--user, -u <UserName>
Run as a specified user.
--system
Start a shell for system distribution.
3. Arguments for managing Windows Subsystem for Linux
--help
Display usage information.
--debug-shell
Open WSL2 debug shell for diagnosis.
--event-viewer
Open the application view of Windows Event Viewer.
--install [Distro] [Options...]
Install a distribution of Windows Subsystem for Linux.
To view a list of available distributions, use 'wsl.exe --list --online'.
Options:
--no-launch, -n
Do not start distribution after installation.
--web-download
Download distribution from Internet instead of Microsoft Store.
--mount <Disk>
Attach and mount physical or virtual disks in all WSL 2 distributions.
Options:
--vhd
Specify that <Disk> represents a virtual hard disk.
--bare
Attach disk to WSL2 but do not mount it.
--name <Name>
Mount disk using custom name for mount point.
--type <Type>
File system used when mounting disk, if not specified, default to ext4.
--options <Options>
Other mounting options.
--partition <Index>
The partition index to be mounted, if not specified, default to entire disk.
--release-notes
Open web browser to view WSL release notes page.
--set-default-version <Version>
Change default installation version for new distributions.
--shutdown
Immediately terminate all running distributions and WSL 2 lightweight virtual machine.
--status
Display status of Windows Subsystem for Linux.
--unmount [Disk]
Unmount and detach a disk from all WSL2 distributions. If called without arguments, unmount and detach all disks.
--update
Update package of Windows Subsystem for Linux.
Options:
--web-download
Download updates from Internet instead of Microsoft Store.
--pre-release
Download pre-release version if available. Indicates use of --web-download.
--version, -v
Display version information.
4. Arguments for managing distributions in Windows Subsystem for Linux
--export <Distro> <FileName> [Options]
Export distribution as tar file.
For standard output, filename can be "-".
Options:
--vhd
Specify distribution to be exported as .vhdx file.
--import <Distro> <InstallLocation> <FileName> [Options]
Import specified tar as new distribution. For standard input, filename can be "-".
Options:
--version <Version>
Specify version to be used for new distribution.
--vhd
Specify that provided file is .vhdx file instead of tar file.
This operation will generate a copy of .vhdx file at specified installation location.
--import-in-place <Distro> <FileName>
Import specified .vhdx as a new distribution.
This virtual hard disk must be formatted with ext4 file system type.
--list, -l [Options]
List distributions.
Options:
--all
List all distributions, including those currently being installed or uninstalled.
--running
Only list currently running distributions.
--quiet, -q
Only display distribution names.
--verbose, -v
Display detailed information about all distributions.
--online, -o
Use 'wsl.exe –install' to display list of available distributions that can be installed.
--set-default, -s <Distro>
Set distribution as default distribution.
--set-version <Distro> <Version>
Change version of specified distribution.
--terminate, -t <Distro>
Terminate specified distribution.
--unregister <Distro>
Unregister distribution and delete root file system.
Software Configuration
Next, we will deploy related software in WSL, including environment management software, code editing software, etc., and show an example to demonstrate how to run LLMs in WSL2.
1. Python Library Management
We mainly use miniconda to manage python libraries.
- First, we start the WSL command line and enter in the command line: wget https://repo.anaconda.com/miniconda/Miniconda3-latest-Linux-x86_64.sh.
- After waiting for the download to complete, we need to give this file higher permissions: sudo chmod 777 Miniconda3-latest-Linux-x86_64.sh, at this time the system will prompt you to enter a password, this password is the password we entered when creating WSL2.
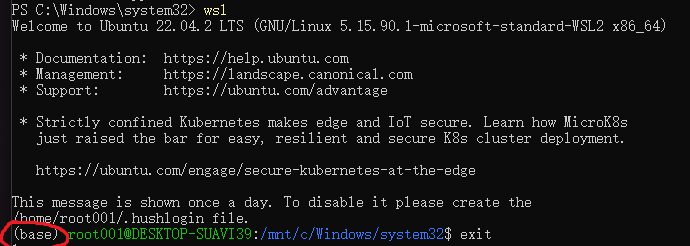
- Enter in the command line: ./Miniconda3-latest-Linux-x86_64.sh, after the installation is complete, your command line will have more (base) words at the front end as shown in the figure:
2. Code Editor
- If you have already installed code editors such as Pycharm or vscode in the Windows environment, you can find the python environment of WSL2 through settings.
- If not, you only need to enter 'code .' in the WSL2 command prompt and wait for it to be automatically installed for you and vscode will be launched directly. After starting, you will find the word WSL in the lower left corner, indicating that vscode has been connected to WSL.As shown in the figure:

Tip: In the wsl2 subsystem command line, use the cd command to go directly to the location where you need to edit the code and then 'code .' will directly start vscode and locate that folder, which is very convenient.
3. GPU Accelerated Inference
Here we only discuss NVIDIA's graphics card acceleration. If you use other cards, please search for related configuration methods. We will not list them one by one.
1). Setting up NVIDIA CUDA acceleration with Docker
- Install Docker support: Run 'curl https://get.docker.com | sh' in the command line, and then run 'sudo service docker start'. This will start the Docker service.
- Set up a stable repository for the NVIDIA container toolkit: Run the following commands in sequence in the command line:
- distribution=$(. /etc/os-release;echo $ID$VERSION_ID);
- curl -s -L https://nvidia.github.io/nvidia-docker/gpgkey | sudo gpg --dearmor -o /usr/share/keyrings/nvidia-docker-keyring.gpg;
- curl -s -L https://nvidia.github.io/nvidia-docker/$distribution/nvidia-docker.list | sed 's#deb https://#deb [signed-by=/usr/share/keyrings/nvidia-docker-keyring.gpg] https://#g' | sudo tee /etc/apt/sources.list.d/nvidia-docker.list.
- Install NVIDIA runtime package and dependencies: Run the following commands in sequence in the command line: sudo apt-get update; sudo apt-get install -y nvidia-docker2.
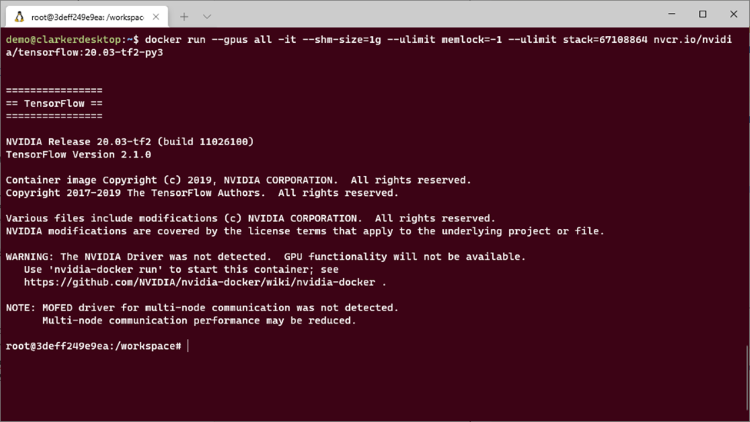
- Start the container: Run 'docker run --gpus all -it --shm-size=1g --ulimit memlock=-1 --ulimit stack=67108864 nvcr.io/nvidia/tensorflow:20.03-tf2-py3' in the command line. After completion, we will enter a docker container with CUDA acceleration capability. As shown in the figure:
2). Manual installation of NVIDIA CUDA acceleration
- - Get the installation package: Run 'wget https://developer.download.nvidia.com/compute/cuda/12.2.2/local_installers/cuda_12.2.2_535.104.05_linux.run' in the command line.
- - Run the installation package: Run 'sudo sh cuda_12.2.2_535.104.05_linux.run' in the command line. If there is an error, add '--override' to the command, for example: sudo sh cuda_12.2.2_535.104.05_linux.run --override.
- - Add corresponding environment variables: Run 'sudo vim ~/.bashrc' in the command line, and add the following content at the end of the file:
```
export PATH=/usr/local/cuda-12.2.2/bin${PATH:+:${PATH}}

export LD_LIBRARY_PATH=/usr/local/cuda-12.2.2/lib64${LD_LIBRARY_PATH:+:${LD_LIBRARY_PATH}}

export CUDA_HOME=/usr/local/cuda-12.2.2${CUDA_HOME:+:${CUDA_HOME}}
```
- - Update environment variables: Run 'source ~/.bashrc' in the command line.
Note: If you run 'sudo vim ~/.bashrc' and find that you are not familiar with vim, you can also find this file and copy it to the Windows environment to use a text editor to edit and add relevant content, and then copy it back after editing is complete. The advantage of doing this is that it also backs up '.bashrc'.
4. Run LLM
1). Create a conda virtual environment: Enter 'conda create -n llm python=3.10' in the command line.
Note:
- 'llm' is the name of the virtual environment we want to create, which can be changed arbitrarily.
- '-python=3.10' specifies the python version used by the virtual environment. Although 'conda create -n llm' is also possible, it is strongly recommended to specify the version!
2). Switch to the virtual environment: Enter 'conda activate llm' in the command line to activate our virtual environment.
The '(base)' at the front end of the command prompt will switch to '(llm)'. If you want to exit the virtual environment, use 'conda deactivate'.
3). Find the LLM you want to use from huggingface: https://huggingface.co.
Since there are too many models, you can refer to the open source model ranking at https://huggingface.co/spaces/HuggingFaceH4/open_llm_leaderboard. It is recommended to use the format supported by llama.cpp. If your country (region) cannot access huggingface, please use magic to defeat magic!
4). Download the model: First, you need to enable git's large file support, enter 'git lfs install' in the command line.
After running, enter 'git clone https://huggingface.co/<library name>', replace '<library name>' with the name of the model you want to download. For example: 'git clone https://huggingface.co/Phind/Phind-CodeLlama-34B-v2', wait for the download to complete.
5). Install llama.cpp's python version llama-cpp-python: Enter 'CMAKE_ARGS="-DLLAMA_CUBLAS=on" pip install llama-cpp-python' in the command line and wait for the installation to complete. After installation, llama.cpp supports both CPU and GPU inference (of course they also support acceleration of other brand graphics cards, please refer to: https://github.com/abetlen/llama-cpp-python).
Note: If you don't have a graphics card, or haven't installed GPU acceleration support, please use 'pip install llama-cpp-python' for installation. Although inference is slower, it is not unusable.
6). Run inference: Create a py file, let's name it test.py. Copy the following content into the file:
from llama_cpp import Llama
llm = Llama(model_path="./models/7B/llama-model.gguf")
output = llm("Q: Name the planets in the solar system? A: ", max_tokens=32, stop=["Q:", "\n"], echo=True)
print(output)
Then run 'python test.py' in the command line, and then you can see the output:
{
  "id": "cmpl-xxxxxxxx-xxxx-xxxx-xxxx-xxxxxxxxxxxx",
  "object": "text_completion",
  "created": 1679561337,
  "model": "./models/7B/llama-model.gguf",
  "choices": [
    {
      "text": "Q: Name the planets in the solar system? A: Mercury, Venus, Earth, Mars, Jupiter, Saturn, Uranus, Neptune and Pluto.",
      "index": 0,
      "logprobs": None,
      "finish_reason": "stop"
    }
  ],
  "usage": {
    "prompt_tokens": 14,
    "completion_tokens": 28,
    "total_tokens": 42
  }
}
Note:
1. 'model_path' is where you downloaded model files;
2. The content after Q in "Q: Name the planets in the solar system? A: " is the question you want to ask, which can be changed to any question.
3. The content after A in "Q: Name the planets in the solar system? A: " is the answer from the LLM.
Conclusion
In this article, we have step by step explored how to create a WSL2 environment that can run LLM, and detailed the various details of WSL2 in use. Then we introduced a simple example of running LLM inference with the least amount of code, and we also believe that you have also experienced the simplicity and power of the llama.cpp. In the next article, we will discuss how to select a suitable model from many LLMs to adapt to our purpose of integrating it into algorithmic trading.
Stay tuned!
Warning: All rights to these materials are reserved by MetaQuotes Ltd. Copying or reprinting of these materials in whole or in part is prohibited.
This article was written by a user of the site and reflects their personal views. MetaQuotes Ltd is not responsible for the accuracy of the information presented, nor for any consequences resulting from the use of the solutions, strategies or recommendations described.
 Permuting price bars in MQL5
- Free trading apps
- Over 8,000 signals for copying
- Economic news for exploring financial markets
You agree to website policy and terms of use
Check out the new article: Integrate Your Own LLM into EA (Part 2): Example of Environment Deployment.
Author: Yuqiang Pan
Very good articles regarding LLM. Is there part3 regarding LLM?
Thank you very much for your recognition. Yes, will come soon!