
风险管理(第二部分):在图形界面中实现手数计算

- 概述
- 改进了手数和止损检索函数
- 探索 MQL5 中的控件和面板库
- 用于创建面板组件(标签、按钮等)的函数
- 在客户区域中创建对象
- 用于动态更新组合框和其他元素的函数
- 处理键盘事件:实现 OnCharEvent
- 面板初始化:使用 OnInit 事件和常规设置
- 面板测试与验证
- 结论
概述
欢迎大家!在本文中,作为上一篇文章的延续,我们将把我们讨论的所有内容付诸实践,此外,还将改进文件中的一些函数。为了简化我们的工作,我们将利用 MQL5 强大的控件库。我们的目标是将所学知识更有效地应用于实践,向您展示如何将图形界面与我们的风险管理函数相结合。最终,您将拥有一个可靠的工具,可以准确有效地计算手数和止损 (SL)。
改进了手数和止损检索函数
本文将首先改进之前创建的函数,重点在于简化和优化其操作。主要变化包括增加了调试消息(PrintFormat 和 Print),这有助于实时识别错误,以及创建了新的函数,以更有效地计算理想的交易手数和止损距离。
对 GetMaxLote 函数的改进
该函数根据可用可用预付款和交易品种规格计算可交易的最大手数。
//+----------------------------------------------------------------------------------------------+
//| Calculates the maximum lot size that can be traded based on free margin and symbol specifics |
//+----------------------------------------------------------------------------------------------+
double GetMaxLote(ENUM_ORDER_TYPE type, double DEVIATION = 100, double STOP_LIMIT = 50)
  {
   double VOLUME = 1.0; // Initial volume size
   ENUM_ORDER_TYPE new_type = MarketOrderByOrderType(type);
   double price = PriceByOrderType(_Symbol, type, DEVIATION, STOP_LIMIT); // Price for the given order type
   double volume_step = SymbolInfoDouble(_Symbol, SYMBOL_VOLUME_STEP); // Volume step for the symbol
   double margin = EMPTY_VALUE; // Required margin, initialized as empty

   ResetLastError();
   if(!OrderCalcMargin(new_type, _Symbol, VOLUME, price, margin))
     {
      Print("OrderCalcMargin() failed. Error ", GetLastError());
      return 0; // Exit the function if margin calculation fails
     }
   if(AccountInfoDouble(ACCOUNT_MARGIN_FREE)  <= 0)
     {
      PrintFormat("Free margin of %+.2f is invalid, you cannot open trades right now",AccountInfoDouble(ACCOUNT_MARGIN_FREE));
      return 0;
     }

   double result = MathFloor((AccountInfoDouble(ACCOUNT_MARGIN_FREE) / margin) / volume_step) * volume_step;
   return result; // Return the calculated maximum lot size
  }
已实现的改进措施:
- 调试信息:现在,当预付款计算失败或可用预付款不足时,系统会通知用户。
- 可用预付款验证:包含一项检查,以防止在可用预付款小于或等于零时进行计算。
GetIdealLot 函数
该函数根据每笔交易允许的最大风险和当前市场状况计算理想的交易手数。
//+---------------------------------------------------------------------+
//| Determine the optimal lot size based on risk and current conditions |
//+---------------------------------------------------------------------+
void GetIdealLot(double& nlot, double glot, double max_risk_per_operation, double& new_risk_per_operation, long StopLoss)
  {
   if(StopLoss <= 0)
     {
      Print("[ERROR SL] Stop Loss distance is less than or equal to zero, now correct the stoploss distance: ", StopLoss);
      nlot = 0.0;
      return;
     }

   Print("Max Lot: ", glot, "  |  RiskPerOperation: ", max_risk_per_operation);

   new_risk_per_operation = 0;
   long spread = (long)SymbolInfoInteger(_Symbol, SYMBOL_SPREAD);
   double tick_value = SymbolInfoDouble(_Symbol, SYMBOL_TRADE_TICK_VALUE);
   double step = SymbolInfoDouble(_Symbol, SYMBOL_VOLUME_STEP);

   double rpo = (glot * (spread + 1 + (StopLoss * tick_value)));

   if(rpo > max_risk_per_operation)
     {
      if(max_risk_per_operation <= 0)
         return;

      double new_lot = (max_risk_per_operation / rpo) * glot;
      new_lot  = MathFloor(new_lot / step) * step;
      new_risk_per_operation =  new_lot * (spread + 1 + (StopLoss * tick_value));
      nlot =  new_lot;
     }
   else
     {
      new_risk_per_operation = rpo;
      nlot = glot;
     }

   if(nlot <= 0)
      PrintFormat("The lot %.2f is invalid, the risk %.2f increases or the sl %i decreases",nlot,max_risk_per_operation,StopLoss);
  }
此函数的改进之处:
- 止损验证:确认止损距离有效后再继续操作。
- 清晰的信息:告知计算出的手数是否无效,或者风险是否需要调整。
新增 GetLotByRiskPerOperation 函数
此函数允许仅根据每次操作的风险(以美元计)和订单类型计算理想的手数,从而无需指定止损距离。
//+--------------------------------------------------------------------+
//| Function to obtain the ideal lot based on your risk per operation  |
//+--------------------------------------------------------------------+
// risk_per_operation in USD, not %

double GetLotByRiskPerOperation(double risk_per_operation, const ENUM_ORDER_TYPE order_type, double DEVIATION = 100, double STOP_LIMIT = 50)
  {
   double VOLUME = 1.0; // Initial volume size
   ENUM_ORDER_TYPE new_type = MarketOrderByOrderType(order_type);
   double price = PriceByOrderType(_Symbol, order_type, DEVIATION, STOP_LIMIT); // Price for the given order type
   double volume_step = SymbolInfoDouble(_Symbol, SYMBOL_VOLUME_STEP); // Volume step for the symbol
   double margin = EMPTY_VALUE; // Required margin, initialized as empty

   ResetLastError();
   if(!OrderCalcMargin(new_type, _Symbol, VOLUME, price, margin))
     {
      Print("OrderCalcMargin() failed. Error ", GetLastError());
      return 0; // Exit the function if margin calculation fails
     }
   double result = MathFloor((risk_per_operation / margin) / volume_step) * volume_step;

   if(result <= 0)
     {
      PrintFormat("The lot %.2f is invalid, the risk %.2f increases",result,risk_per_operation);
      return 0;
     }

   PrintFormat("The ideal lot for %.2f risk per trade is %.2f lots",risk_per_operation,result);

   return result; // Return the calculated maximum lot size
  }
//+------------------------------------------------------------------+
主要特点:
- 简化的计算:仅使用美元计价的风险,无需依赖其他数值。
- 调试:针对无效手数大小或过高风险发出明确提示信息。
对 CalculateSL 函数的改进
该函数根据每笔交易的风险和所选手数计算理想的止损距离(以点为单位)。
//+-----------------------------------------------------------------------+
//| Calculate the stop loss distance in points based on risk and lot size |
//+-----------------------------------------------------------------------+
long CalculateSL(const ENUM_ORDER_TYPE type, double risk_per_operation, double &chosen_lot, double DEVIATION = 100, double STOP_LIMIT = 50)
  {
   double lot = GetLotByRiskPerOperation(risk_per_operation,type,DEVIATION,STOP_LIMIT);
   chosen_lot = lot;
   long spread = (long)SymbolInfoInteger(_Symbol, SYMBOL_SPREAD);
   double tick_value = SymbolInfoDouble(_Symbol, SYMBOL_TRADE_TICK_VALUE);
   double result = ((risk_per_operation / lot) - spread - 1) / tick_value;
   long ideal_sl =  long(MathRound(result));

   if(ideal_sl <= 0)
     {
      PrintFormat("Stop loss %i invalid, please increase the risk per trade %.2f",ideal_sl,risk_per_operation);
      return 0;
     }

   return ideal_sl;
  }
改进之处:
- 与 GetLotByRiskPerOperation 集成:使用计算出的交易手数来确定止损位。
- 改进后的计算方法:确保止损始终有效且为正值。
经过这些改进,这些函数现在更加稳健、更容易调试、也更加灵活。错误信息可以快速识别问题,新的实现方式简化了交易手数和止损的计算过程。
探索 MQL5 中的控件和面板库
在开始学习 MQL5 控件库之前,我们需要了解一些关于 MQL5 对象如何工作的基本知识。
MQL5中的图形对象:
在 MQL5 中,图形对象是您可以放置在图表上的可见元素,用于表示信息或与用户交互。这些对象的定位主要基于两个坐标:
- X(水平)- 定义对象沿水平轴的位置。
- Y(垂直)- 定义对象沿垂直轴的位置。
这些坐标可以精确地确定对象在图表或面板上的位置。
图形对象的基本属性
除了位置之外,图形对象还具有以下特征:
- 高度 —— 对象所占垂直空间的大小。
- 宽度 —— 它所占据的水平空间大小。
应正确设置这些属性,以确保对象不会超出其应显示的区域。例如,如果您正在设计界面,这些大小可以确保元素保持有序并位于可见的边界内。
锚点
锚点是使用 X 和 Y 坐标时用作参考的对象部分。这个点决定了对象位置的判定方式。锚点有四种类型:
标识符 | 描述 |
|---|---|
CORNER_LEFT_UPPER | 坐标中心位于图表的左上角。 |
CORNER_LEFT_LOWER | 坐标中心位于图表的左下角。 |
CORNER_RIGHT_LOWER | 坐标中心位于图表的右下角。 |
CORNER_RIGHT_UPPER | 坐标中心位于图表的右上角。 |
这 4 种锚点类型可以在图中表示如下:

请注意:通常情况下,默认最常用的锚点类型是 CORNER_LEFT_UPPER。具体情况取决于使用场景,或者选择对您来说更简单的方式。在本文中,我们将只使用上述锚点。
MQL5 控件库
MQL5 控件库是一个用于创建控件、面板等的类库。有关控件的说明,请参阅文档。
为此,请在 MetaEditor 中按 F1 打开文档。进入页面后,转到“内容”部分,然后单击 “MQL5 帮助文件” 。滚动到页面底部,您会找到一个名为 “标准库” 的部分。点击它会打开不同应用程序的各种库的列表。我们感兴趣的是控件库。
通过选择此库,您可以访问多个表格,其中描述了每个控件的用途和功能及其分组。为了帮助您更好地理解控件类之间的结构和关系,我准备了一张图表,展示了与这些控件相关的继承和类是如何工作的。

我们可以看到,主类是 CObject,CWnd 类继承自它。从 CWnd 派生出两个额外的类:CWndContainer 用于复杂的控件,CWndObj 用于简单的控件。在我们的面板中,我们将根据具体情况使用两种类型的控件。不过,现在我们将重点关注 CAppDialog 控件,即创建主面板的类,就像我们正在开发的这个面板一样。

在此面板中,我们将开始添加基本控件,如显示文本的标签、选择订单类型的组合框、保存变量和获取结果的按钮,以及编辑用户可以手动输入值的字段,如每笔交易的预期风险。
使用 MQL5 设计面板:规划和图形元素
在开始用 MQL5 编写面板代码之前,让我们计划一下它的设计。最好的方法是使用 Paint、Canva 等简单工具创建视觉草图,就像附图中显示的那样。这一步确保每个必要的元素都包含在内并正确定位,防止遗漏,使实现更容易。我按以下方式完成了这项工作:
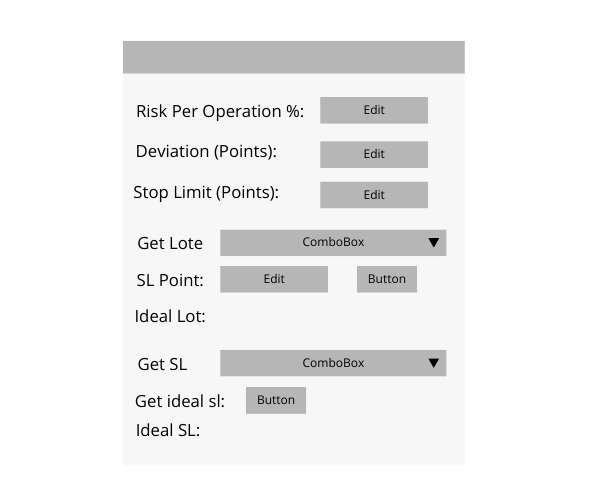
分析面板图像,我们可以看到几个控件发挥着不同的功能。这些控件允许用户以清晰实用的方式与界面交互。以下是对主要要素及其在类中应用方式的详细描述:
| 控件 | 函数 | 面板中的示例 | 基础对象 |
|---|---|---|---|
| CLabel | 用于在面板上显示静态文本,例如用户描述或说明。 | 标签包括“每次操作风险百分比”、“偏差(点数)”和“止损限额(点数)”。 | 派生于图形对象 OBJ_LABEL |
| CComboBox | 允许用户从下拉列表中选择一个选项。 | “获取手数” 和 “获取止损”,分别用于选择相应手数的订单类型和止损计算。 | 复合对象(并非派生于单个图形对象) |
| CButton | 交互式按钮,按下时可执行操作。 | “止损点数” 旁边的按钮,用于执行计算或确认值等操作。还包括 “获取理想止损” 按钮。 | 派生于图形对象 OBJ_BUTTON |
| CEdit | 允许用户输入或手动编辑数据。 | 用户可在“每次操作风险百分比”、“偏差(点数)”和“止损限额(点数)”等字段中输入值。 | 对应于图形对象 OBJ_EDIT |
用于创建面板组件(标签、按钮等)的函数
在开始创建函数之前,我们首先需要在 MetaEditor 中创建一个 EA 交易模板。此文件最初为空,一旦准备就绪,我们就可以开始包含使用图形界面组件所需的库。
为此,请在文件开头添加以下代码行:
#include <Controls\Dialog.mqh>
#include <Controls\Edit.mqh>
#include <Controls\Label.mqh>
#include <Controls\Button.mqh>
#include <Risk Management.mqh>
#include <Controls\ComboBox.mqh>
创建主类
我们将首先定义用于设置各个控件尺寸的参数。这些值将允许我们调整按钮、文本框和下拉列表等界面组件的大小。
//+------------------------------------------------------------------+
//| defines                                                          |
//+------------------------------------------------------------------+
//--- for edits
#define EDIT_HEIGHT                         (20)      // edit height

//--- for buttons
#define BUTTON_WIDTH                        (80)     // size by X coordinate
#define BUTTON_HEIGHT                       (20)      // size by Y coordinate

//--- for combo box
#define COMBO_BOX_WIDTH                        (200)     // size by X coordinate
#define COMBO_BOX_HEIGHT                       (20)      // size by Y coordinate
接下来,我们将创建一个容量为 8 个元素的字符串数组。该数组将用于以文本格式存储不同的订单类型。
string elements_order_type[8] =
  {
   "ORDER_TYPE_BUY",
   "ORDER_TYPE_SELL",
   "ORDER_TYPE_BUY_LIMIT",
   "ORDER_TYPE_SELL_LIMIT",
   "ORDER_TYPE_BUY_STOP",
   "ORDER_TYPE_SELL_STOP",
   "ORDER_TYPE_BUY_STOP_LIMIT",
   "ORDER_TYPE_SELL_STOP_LIMIT"
  };
创建风险管理面板类
现在我们将创建一个新类,该类将继承 CAppDialog 类的公有部分,CAppDialog 类是用于面板的主要类。本类将作为我们风险管理面板的基础。
//+-------------------------------------------------------------------+
//| Class CRiskManagementPanel                                        |
//| This class inherits from CAppDialog and will define the panel for |
//| managing risk parameters.                                         |
//+-------------------------------------------------------------------+
class CRiskManagementPanel : public CAppDialog
{
    // Declare private members here.
};
添加方法和属性
接下来,我们将开始为类添加方法和属性。如前所述,我们需要几个图形控件,如上图所示,这些控件将被添加到类的私有部分。
private:
   CLabel            m_label_risk_per_operation;
   CEdit             m_edit_risk_per_operation;

   CLabel            m_label_deviaiton;
   CEdit             m_edit_deviaiton;

   CLabel            m_label_stop_limit;
   CEdit             m_edit_stop_limit;

   CLabel            m_label_get_lote;
   CComboBox         m_combobox_odertype_get_lot;

   CLabel            m_label_sl;
   CEdit             m_edit_sl;
   CButton           m_buttom_get_lote;
   CLabel            m_label_result_lote;
   CLabel            m_label_the_result_lote;

   CLabel            m_label_get_sl;
   CComboBox         m_combobox_odertype_get_sl;
   CLabel            m_label_lote;
   CButton           m_buttom_get_sl;
   CLabel            m_label_result_sl;
   CLabel            m_label_the_result_sl;
用于存储数据的私有变量
除了控件之外,我们还需要私有变量来存储用户通过编辑框和组合框控件输入的数据。这些变量将包含诸如每次操作的风险、偏差、订单类型和止损值等值。
    // Variables to store the data entered by the user
    double            deviation;                    // Stores deviation entered by the user
    double            stop_limit;                   // Stores stop limit entered by the user
    double            risk_per_operation;          // Stores risk per operation entered by the user
    long              sl;                           // Stores stop loss value entered by the user
    ENUM_ORDER_TYPE   order_type_get_sl;           // Stores the selected order type for stop loss
    ENUM_ORDER_TYPE   order_type_get_lot;          // Stores the selected order type for lot size
为了完成我们类的私有部分,我们将声明处理图形控件和用户交互所需的所有函数。这些函数包括对象创建、用户更改组合框中选定项时触发的函数以及更新标签值的函数等等。
私有函数声明:
//--- create labels and buttons
bool CreateAreaClientPanel();

//--- functions to edit labels dynamically
void EditLabelResultSL(string text);
void EditLabelResultLote(string text);

//--- create controls (buttons, labels, edits, combo boxes)
bool CreateEdit(CEdit &m_edit, const string name, const int x1, const int y1, string initial_Text = "");
bool CreateLabel(CLabel &label, const string name, const string text, const int x1, const int y1);
bool CreateButton(CButton &button, const string name, const string text, const int x1, const int y1, int x2_ = BUTTON_WIDTH, int y2_ = BUTTON_HEIGHT);
bool CreateComboBox(CComboBox &combo_box, const string name, string &elements[], string initial_text, const int x1, const int y1);

//--- combo box functions for handling user input
void OnChangeComBoxOrderTypeGetLote();
void OnChangeComBoxOrderTypeGetSL();
公有方法声明:
在类的公有部分,我们添加了两个函数,分别用于创建面板和客户端区域中的控件。除了构造函数和析构函数之外,我们还声明了一个 OnEvent 处理程序来处理图表事件,以及一个将字符串转换为 ENUM_ORDER_TYPE 的函数。
public:
    CRiskManagementPanel(void);
    ~CRiskManagementPanel(void);

    //--- create panel and controls
    virtual bool Create(const long chart, const string name, const int subwin, const int x1, const int y1, const int x2, const int y2);

    //--- chart event handler
    virtual bool OnEvent(const int id, const long &lparam, const double &dparam, const string &sparam);

    //--- function to convert string to ENUM_ORDER_TYPE
    static ENUM_ORDER_TYPE StringOrderTypeToEnum(const string OrderType);
有了这些声明,我们就拥有了创建面板、控件和管理图表事件所需的一切。
创建添加控件的方法
在本节中,我们将详细介绍创建基本控件(如标签、按钮、编辑框和组合框)所需的方法,这些控件将构成我们的风险管理面板的一部分。此外,我们还将看到一种重要方法,即通过将控件绑定到客户区域来确保面板正常运行。这样可以确保在移动或调整面板大小时,控件始终与面板保持对齐。
将控件绑定到客户区域
为了使控件(例如按钮、标签等)在用户与面板交互时随面板一起移动,必须将它们锚定到面板的客户区。为了实现这一点,我们使用 CDialog 类中的 Add 方法。此方法将控件注册到客户区域对象列表中,以便它们与面板保持同步。以下是它在 CDialog 中的定义:
//+------------------------------------------------------------------+
//| Add control to the client area (by pointer)                      |
//+------------------------------------------------------------------+
bool CDialog::Add(CWnd *control)
  {
   return(m_client_area.Add(control));
  }
//+------------------------------------------------------------------+
//| Add control to the client area (by reference)                    |
//+------------------------------------------------------------------+
bool CDialog::Add(CWnd &control)
  {
   return(m_client_area.Add(control));
  }
Add 方法有两个版本:一个版本接收指向控件的指针,另一个版本接收引用。这两个版本都将控件添加到 m_client_area 容器中,该容器管理与面板关联的所有元素。
如果我们省略此链接,控件将不会跟随面板移动,这可能会导致视觉上不一致或交互问题。
创建基础控件的方法
1.创建标签的函数
标签用于在面板中显示静态文本,例如标题或说明。创建标签的函数包括:
- 定义控件坐标。
- 使用 Create 方法创建标签对象。
- 使用 Text 设置标签文本。
- 使用 Add 将标签链接到客户区域。
代码示例:
//+------------------------------------------------------------------+
//| Function to create labels                                        |
//+------------------------------------------------------------------+
bool CRiskManagementPanel::CreateLabel(CLabel &label,const string name, const string text, const int x1, const int y1)
  {
//--- coordinates
   int x2=x1+50;
   int y2=y1+20;
//--- create
   if(!label.Create(m_chart_id,name+"Label",m_subwin,x1,y1,x2,y2))
      return(false);
   if(!label.Text(text))
      return(false);
   if(!Add(label))
      return(false);

//--- succeed
   return(true);
  }
- label.Create:在给定坐标处创建图形控件。
- label.Text:设置标签上显示的文本。
- Add:将标签添加到面板,以便可以与其他控件一起进行管理。
2.创建按钮的函数
按钮允许用户直接与面板进行交互。该函数包含文本、尺寸和起始坐标等参数。它还允许使用默认值调整按钮大小。
代码示例:
//+------------------------------------------------------------------+
//| Function to create buttons                                       |
//+------------------------------------------------------------------+
bool CRiskManagementPanel::CreateButton(CButton &buttom,const string name, const string text, const int x1, const int y1,int x2_= BUTTON_WIDTH,int y2_ = BUTTON_HEIGHT)
  {
   int x2=x1+x2_;
   int y2=y1+y2_;
//--- create
   if(!buttom.Create(m_chart_id,name,m_subwin,x1,y1,x2,y2))
      return(false);
   if(!buttom.Text(text))
      return(false);
   if(!Add(buttom))
      return(false);
//--- succeed
   return(true);
  }
按钮尺寸:
- x2 和 y2:定义按钮宽度和高度的可选参数。如果未指定,则使用默认值(BUTTON_WIDTH 和 BUTTON_HEIGHT)。
使用方法:
- button.Create:在指定坐标处创建按钮。
- button.Text:设置按钮上显示的文本。
- Add:将按钮注册到面板的元素列表中。
3.创建编辑框的函数
编辑框控件允许用户在面板中输入文本。该函数包含一个可选参数,用于设置初始文本值。
代码示例:
//+------------------------------------------------------------------+
//| Function to create edits                                         |
//+------------------------------------------------------------------+
bool CRiskManagementPanel::CreateEdit(CEdit &m_edit, const string name, const int x1, const int y1, string initial_Text = "")
  {
//--- coordinates
   int y2=y1+EDIT_HEIGHT;
   int x2 =x1 +100;
//--- create
   if(!m_edit.Create(m_chart_id,name+"Edit",m_subwin,x1,y1,x2,y2))
      return(false);
//--- allow editing the content
   if(!m_edit.ReadOnly(false))
      return(false);
   if(!Add(m_edit))
      return(false);

   m_edit.Text(initial_Text);

//--- succeed
   return(true);
  }
文本字段尺寸:
- 字段的宽度固定为 100,高度由 EDIT_HEIGHT 定义,以此决定字段的大小。
使用方法:
- m_edit.ReadOnly(false):允许编辑该字段。
- m_edit.Text:设置字段中显示的初始文本。
4.创建组合框的函数
组合框是一种复杂的控件,允许用户从下拉列表中选择项目。此函数还包括设置初始文本和添加多个项目的选项。
代码示例:
//+-------------------------------------------------------------------+
//| Function to create the complex object: combo box                  |
//| This function creates a combo box with multiple selectable items. |
//+-------------------------------------------------------------------+
bool CRiskManagementPanel::CreateComboBox(CComboBox &combo_box, const string name, string &elements[], string initial_text, const int x1, const int y1)
{
   //--- calculate coordinates for the combo box
   int x2 = x1 + COMBO_BOX_WIDTH;
   int y2 = y1 + COMBO_BOX_HEIGHT;

   //--- create the combo box control
   if (!combo_box.Create(m_chart_id, name, m_subwin, x1, y1, x2, y2))
      return (false);

   //--- add items to the combo box
   for (int i = 0; i < ArraySize(elements); i++)
   {
      if (!combo_box.AddItem(elements[i], i))
         return (false);
   }

   //--- select the initial text
   combo_box.SelectByText(initial_text);

   //--- add the combo box to the panel
   if (!Add(combo_box))
      return (false);

   //--- successfully created the combo box
   return (true);
}
组合框元素:
- elements[]:包含下拉列表中显示项目的字符串数组。
- combo_box.AddItem:将每个元素添加到组合框中,并为其分配一个唯一的索引。
初始选择:
- combo_box.SelectByText(initial_text):定义创建组合框时可见的项。
使用方法:
- combo_box.Create:在指定坐标处初始化组合框。
- Add:将组合框添加到面板中。
在客户区域中创建对象
在本节中,我们将开始设计和创建用户界面中的客户区域元素。目标是提供一个功能空间,用户可以在其中管理和调整与风险和交易订单相关的配置。下面,我将描述如何划分区域以及如何创建每个组件。
客户面板分为三个主要部分:

通用部分:在本部分,用户可以编辑通用方面,例如每次操作的风险、偏差和止损限值。
手数计算:面板的第二部分专门用于根据每次操作的风险和止损距离(以点数为单位)来计算手数大小。这里,会自动估计用户愿意承担多大的风险。
止损计算:最后,面板的下部允许根据每次操作的可接受损失百分比计算止损。
bool CRiskManagementPanel::CreateAreaClientPanel(void)
{
   int x1 = 11; // Initial X coordinate
   int y1 = 15; // Initial Y coordinate

   // --- General Section: Risk Per Operation Configuration ---
   if (!CreateLabel(m_label_risk_per_operation, "L-Risk-Per-operation", "Risk per operation %: ", x1, y1))
      return false; // Create the label for risk per operation
   if (!CreateEdit(m_edit_risk_per_operation, "Risk-Per-operation", x1 + 150, y1))
      return false; // Create the editable field for risk per operation

   y1 += 30; // Move the Y coordinate down for the next section

   if (!CreateLabel(m_label_deviation, "L-Deviation", "Deviation (Points):", x1, y1))
      return false; // Create the label for deviation
   if (!CreateEdit(m_edit_deviation, "Deviation", x1 + 150, y1, "100"))
      return false; // Create the editable field for deviation

   this.deviation = 100; // Default value for deviation

   y1 += 30;

   if (!CreateLabel(m_label_stop_limit, "L-StopLimit", "Stop Limit (Points):", x1, y1))
      return false; // Create the label for stop limit
   if (!CreateEdit(m_edit_stop_limit, "Stop Limit", x1 + 150, y1, "50"))
      return false; // Create the editable field for stop limit

   this.stop_limit = 50; // Default value for stop limit

   y1 += 50;

   // --- Lot Calculation Section ---
   if (!CreateLabel(m_label_get_lote, "L-Get-Lote-Title", "Get Lote", x1, y1))
      return false; // Create the label for lot calculation section
   if (!CreateComboBox(m_combobox_order_type_get_lot, "ORDER_TYPE_LOT", elements_order_type, "ORDER_TYPE_BUY", x1 + 60, y1))
      return false; // Create the combo box to select order type for lot calculation

   this.order_type_get_lot = ORDER_TYPE_BUY; // Default order type

   y1 += 30;

   if (!CreateLabel(m_label_sl, "L-SL", "SL Point: ", x1, y1))
      return false; // Create the label for SL point
   if (!CreateEdit(m_edit_sl, "WRITE-SL", x1 + 60, y1))
      return false; // Create the editable field for SL
   if (!CreateButton(m_button_get_lote, "GET-LOTE", "Save", x1 + 160 + 5, y1))
      return false; // Create the button to save the lot calculation

   y1 += 25;

   if (!CreateLabel(m_label_result_lote, "L-Result-Lote", "Ideal Lot: ", x1, y1))
      return false; // Create the label for displaying the ideal lot
   if (!CreateLabel(m_label_the_result_lote, "L-The-Result-lot", "  ", x1 + 65, y1))
      return false; // Create a label to display the calculated ideal lot

   y1 += 50;

   // --- Stop Loss Calculation Section ---
   if (!CreateLabel(m_label_get_sl, "L-Get-SL-Title", "Get SL", x1, y1))
      return false; // Create the label for stop loss calculation section
   if (!CreateComboBox(m_combobox_order_type_get_sl, "ORDER_TYPE_SL", elements_order_type, "ORDER_TYPE_BUY", x1 + 50, y1))
      return false; // Create the combo box to select order type for stop loss calculation

   this.order_type_get_sl = ORDER_TYPE_BUY; // Default order type

   y1 += 30;

   if (!CreateLabel(m_label_lote, "L-LOTE", "Get ideal sl:", x1, y1))
      return false; // Create the label for getting the ideal stop loss
   if (!CreateButton(m_button_get_sl, "GET-SL", "Get", x1 + 90, y1))
      return false; // Create the button to get the stop loss value

   y1 += 25;

   if (!CreateLabel(m_label_result_sl, "L-Result-sl", "Ideal SL:", x1, y1))
      return false; // Create the label for displaying the ideal stop loss
   if (!CreateLabel(m_label_the_result_sl, "L-The-result-sl", "  ", x1 + 65, y1))
      return false; // Create a label to display the calculated ideal stop loss

   return true; // If all components are successfully created
}
创建面板的主要函数:
Create 函数是用于初始化用户界面中图形面板的核心方法。此函数将设置和配置面板所需的关键元素整合在一起,确保面板与图表正确关联,并正确分配其坐标和尺寸。
输入参数详情
chart (long):
- 表示将要创建面板的图表的 ID。
- 在 MQL5 中,当前图表的 ID 默认为 0。
name (string):
- 用于标识面板的名称。
- 该名称是唯一的,用于在其他操作中引用该面板。
subwin (int):
- 面板将放置的图表子窗口的索引。
- 如果面板放置在主窗口中,则该值为 0。对于其他子窗口,使用递增值(1、2 等)。
x1 和 y1 (int):
- 这些是图表上面板的初始坐标(左上角)。
x2 和 y2 (int):
- 这些参数指定了面板的尺寸:
- x2:宽度
- y2:高度
- 这些尺寸以像素为单位。
- 这些参数指定了面板的尺寸:
//+------------------------------------------------------------------+
//| function to create the interface                                 |
//+------------------------------------------------------------------+
bool CRiskManagementPanel::Create(const long chart,const string name,const int subwin,const int x1,const int y1,const int x2,const int y2)
  {
   if(!CAppDialog::Create(chart,name,subwin,x1,y1,x2,y2))
      return(false);
   if(!CreateAreaClientPanel())
      return(false);
//--- succeed
   return(true);
  }
用于动态更新组合框和其他元素的函数
接下来,我们将继续创建函数,现在我们将完成动态函数的实现,这些函数会修改显示计算出的交易手数和止损 (SL) 的 组合框和标签等界面元素的值。这些函数可以快速更新标签,并使界面能够对用户在组合框中所做的更改做出反应。
1.标签编辑函数
这些函数允许修改界面中结果标签的文本,特别是根据计算值显示计算出的交易手数和止损 (SL) 的标签。
//+------------------------------------------------------------------+
//| Function to edit the text of the lot size label                   |
//+------------------------------------------------------------------+
void CRiskManagementPanel::EditLabelResultLote(string text)
{
   // This function updates the text of the label that shows the ideal lot size.
   this.m_label_the_result_lote.Text(text); // Set the new text to the label
}
此函数更新显示计算出的手数大小的标签。它接收一个文本值作为参数,并使用该值更新相应的标签。
//+------------------------------------------------------------------+
//| Function to edit the text of the stop loss label                 |
//+------------------------------------------------------------------+
void CRiskManagementPanel::EditLabelResultSL(string text)
{
   // This function updates the text of the label that shows the ideal stop loss value.
   this.m_label_the_result_sl.Text(text); // Set the new text to the stop loss label
}
同样,该函数会更新显示理想止损值的标签。它也接收文本作为参数,并更新相应的标签。
2.用于处理组合框更改的函数
每当用户在确定订单类型的组合框中选择新值(例如买入或卖出)时,这些函数就会被触发。它们会更新存储所选订单类型的内部变量。
//+------------------------------------------------------------------+
//| Function to update the variable that stores                      |
//| the order type to obtain the ideal sl                            |
//+------------------------------------------------------------------+
void CRiskManagementPanel::OnChangeComBoxOrderTypeGetSL(void)
{
   // Iterate through the order types array to find the selected type
   for(int i = 0; i < ArraySize(elements_order_type); i++)
   {
      // If the selected order type matches the one in the array
      if(m_combobox_order_type_get_sl.Select() == elements_order_type[i])
      {
         // Update the order type variable for stop loss
         this.order_type_get_sl = StringOrderTypeToEnum(m_combobox_order_type_get_sl.Select());
         Print("New order type for sl: ", EnumToString(this.order_type_get_sl)); // Log the selected order type
         break;
      }
   }
}
当用户在用于获取止损组合框中更改订单类型时,将触发此函数。它遍历订单类型数组,并识别组合框中当前选择的订单类型。然后,它使用函数 StringOrderTypeToEnum 将相应的枚举值更新到内部变量 order_type_get_sl 中。
//+------------------------------------------------------------------+
//| Function to update the variable that stores                      |
//| the order type to obtain the ideal lot                           |
//+------------------------------------------------------------------+
void CRiskManagementPanel::OnChangeComBoxOrderTypeGetLote(void)
{
   // Iterate through the order types array to find the selected type
   for(int i = 0; i < ArraySize(elements_order_type); i++)
   {
      // If the selected order type matches the one in the array
      if(m_combobox_order_type_get_lot.Select() == elements_order_type[i])
      {
         // Update the order type variable for lot size
         this.order_type_get_lot = StringOrderTypeToEnum(m_combobox_order_type_get_lot.Select());
         Print("New order type for lot: ", EnumToString(this.order_type_get_lot)); // Log the selected order type
         break;
      }
   }
}
与前一个函数类似,该函数执行相同的任务,但用于计算手数大小。当用户在用于计算理想手数的组合框中更改订单类型时,该函数会使用选定的订单类型更新变量 order_type_get_lot。
3.用于将字符串转换为 ENUM_ORDER_TYPE 的附加函数
最后,该函数将表示订单类型的文本字符串(例如,“ORDER_TYPE_BUY”)转换为其对应的 ENUM_ORDER_TYPE 枚举值。
//+------------------------------------------------------------------+
//| Function to convert a string into an order type                  |
//+------------------------------------------------------------------+
ENUM_ORDER_TYPE CRiskManagementPanel::StringOrderTypeToEnum(const string OrderType)
{
   // Convert the string order type to its corresponding enum value
   if(OrderType == "ORDER_TYPE_BUY")
      return ORDER_TYPE_BUY;
   if(OrderType == "ORDER_TYPE_SELL")
      return ORDER_TYPE_SELL;
   if(OrderType == "ORDER_TYPE_BUY_LIMIT")
      return ORDER_TYPE_BUY_LIMIT;
   if(OrderType == "ORDER_TYPE_SELL_LIMIT")
      return ORDER_TYPE_SELL_LIMIT;
   if(OrderType == "ORDER_TYPE_BUY_STOP")
      return ORDER_TYPE_BUY_STOP;
   if(OrderType == "ORDER_TYPE_SELL_STOP")
      return ORDER_TYPE_SELL_STOP;
   if(OrderType == "ORDER_TYPE_BUY_STOP_LIMIT")
      return ORDER_TYPE_BUY_STOP_LIMIT;
   if(OrderType == "ORDER_TYPE_SELL_STOP_LIMIT")
      return ORDER_TYPE_SELL_STOP_LIMIT;

   // Return WRONG_VALUE if no match is found
   return WRONG_VALUE;
}
处理键盘事件:实现 OnCharEvent
本文最后,我们将定义之前在类中声明的 OnChartEvent 方法。此方法将执行上一节中创建的函数,在按下相应的按钮时计算手数和止损,更新编辑框字段等等。
但在完成该函数之前,我们必须了解 MQL5 控件库中的事件是如何工作的。
需要澄清的是,我们不使用诸如 CHARTEVENT_OBJECT_CLICK 之类的默认事件(这些事件在许多编程环境中很常见),而是使用自定义事件。这些事件在名为 “Defines.mqh” 的特定文件中定义,该文件位于我们项目的 Includes\Controls\Defines.mqh 文件夹中。
Defines.mqh 文件包含控件所需的枚举和定义。除了控件或面板颜色等默认值之外,对于我们的用例来说,最相关的部分是文件末尾的事件定义。以下是它们的结构和使用方式。
事件定义
Defines.mqh 文件中定义了几个自定义事件,供控件使用。
//+------------------------------------------------------------------+
//| Events                                                           |
//+------------------------------------------------------------------+
#define ON_CLICK                (0)   // clicking on control event
#define ON_DBL_CLICK            (1)   // double clicking on control event
#define ON_SHOW                 (2)   // showing control event
#define ON_HIDE                 (3)   // hiding control event
#define ON_CHANGE               (4)   // changing control event
#define ON_START_EDIT           (5)   // start of editing event
#define ON_END_EDIT             (6)   // end of editing event
#define ON_SCROLL_INC           (7)   // increment of scrollbar event
#define ON_SCROLL_DEC           (8)   // decrement of scrollbar event
#define ON_MOUSE_FOCUS_SET      (9)   // the "mouse cursor entered the control" event
#define ON_MOUSE_FOCUS_KILL     (10)  // the "mouse cursor exited the control" event
#define ON_DRAG_START           (11)  // the "control dragging start" event
#define ON_DRAG_PROCESS         (12)  // the "control is being dragged" event
#define ON_DRAG_END             (13)  // the "control dragging end" event
#define ON_BRING_TO_TOP         (14)  // the "mouse events priority increase" event
#define ON_APP_CLOSE            (100) // "closing the application" event
//+------------------------------------------------------------------+
在面板中使用事件
就我们的具体情况而言,我们不需要关注所有事件;相反,我们只关注三个关键事件:
- ON_CLICK:当控件(例如按钮)被点击时触发。
- ON_CHANGE:当控件(例如组合框)的值发生变化时触发。
- ON_END_EDIT:当用户完成对字段(例如编辑框控件)的编辑时触发。
OnChartEvent 中事件实现的示例
Defines.mqh 中定义的事件对应于 OnChartEvent 函数中的 id 参数。此函数处理图表或面板中发生的事件。该 ID 与 CHARTEVENT_CUSTOM 结合,为每个事件创建一个唯一的标识符。
例如,ON_CLICK 事件可以这样使用:
if(id == ON_CLICK + CHARTEVENT_CUSTOM && lparam == m_button_get_lote.Id())
{
    // Acción a ejecutar cuando el botón de obtener lote es presionado
    // Aquí se llamaría a la función correspondiente para gestionar la acción del botón
}
创建 OnEvent 函数
1.函数声明
bool CRiskManagementPanel::OnEvent(const int id,const long &lparam,const double &dparam,const string &sparam)
OnEvent 函数是一个事件处理程序,它接收多个参数:
- id:所发生事件的标识符。
- lparam:附加参数通常包含有关控件或组件的特定信息。
- dparam:用于传递数值的数值(双精度型)参数。
- sparam:用于传递文本值的字符串型参数。
此函数的目的是管理界面事件,例如文本字段更改或按钮点击。
2.检测订单类型组合框的变化
组合框允许用户从下拉列表中选择一个值。在此步骤中,我们将检查用户是否修改了组合框的值。
对于手数类型组合框:
if(id == ON_CHANGE + CHARTEVENT_CUSTOM && lparam == m_combobox_order_type_get_lot.Id())
{
    OnChangeComBoxOrderTypeGetLote();
}
止损(SL)组合框:
if(id == ON_CHANGE + CHARTEVENT_CUSTOM && lparam == m_combobox_order_type_get_sl.Id())
{
    OnChangeComBoxOrderTypeGetSL();
}
- ON_CHANGE + CHARTEVENT_CUSTOM:表示控件值已发生变化的事件。
- 条件 lparam == m_combobox_order_type_get_lot.Id() 通过检查其 ID 来确保事件与正确的组合框相对应。
在这些条件下,将执行函数 OnChangeComBoxOrderTypeGetLote 和 OnChangeComBoxOrderTypeGetSL 来更新表示所选订单类型的内部 ENUM_ORDER_TYPE 变量。
3.编辑框
编辑框字段允许用户手动输入值。在这里,我们会检查并更新与每个已编辑文本字段关联的内部变量。
对于“每次操作风险”字段:
if(id == ON_END_EDIT + CHARTEVENT_CUSTOM && lparam == m_edit_risk_per_operation.Id())
{
    this.risk_per_operation = StringToDouble(m_edit_risk_per_operation.Text());
    this.risk_per_operation = NormalizeDouble((this.risk_per_operation / 100.0) * AccountInfoDouble(ACCOUNT_BALANCE), 2);
    Print("Edit Risk Per Operation: ", this.risk_per_operation);
}
对于止损字段:
if(id == ON_END_EDIT + CHARTEVENT_CUSTOM && lparam == m_edit_sl.Id())
{
    this.sl = StringToInteger(m_edit_sl.Text());
    Print("Edit SL: ", this.sl);
}
以及其他字段,例如偏差和止损限值:
if(id == ON_END_EDIT + CHARTEVENT_CUSTOM && lparam == m_edit_deviation.Id())
{
    this.deviation = StringToDouble(m_edit_deviation.Text());
    Print("Edit Deviation: ", this.deviation);
}
if(id == ON_END_EDIT + CHARTEVENT_CUSTOM && lparam == m_edit_stop_limit.Id())
{
    this.stop_limit = StringToDouble(m_edit_stop_limit.Text());
    Print("Edit Stop Limit: ", this.stop_limit);
}
- ON_END_EDIT + CHARTEVENT_CUSTOM:当用户完成字段编辑时触发。
- 每个 if 语句都会检查 lparam 是否与相应控件(例如编辑框控件)的 ID 匹配。如果用户输入新值,则内部变量将被更新。必要时,值会被转换为适当的类型(double、int 等)并进行规范化。
4.如何确定理想的交易手数和止损位
在这里,我们检查用户是否点击了某个按钮来获取理想的手数或理想的止损价。根据按下的按钮,执行相应的计算。
对于“获取手数”按钮:
if(id == ON_CLICK + CHARTEVENT_CUSTOM && lparam == m_button_get_lote.Id())
{
    Print("Risk Per operation: ", this.risk_per_operation);
    Print("SL in points: ", this.sl);
    Print("Order type get lot: ", EnumToString(this.order_type_get_lot));

    double new_lot;
    double new_risk_per_operation;

    GetIdealLot(new_lot, GetMaxLote(this.order_type_get_lot), this.risk_per_operation, new_risk_per_operation, this.sl);

    PrintFormat("Loss in case the following operation fails, with the parameters: lot %.2f and stop loss of %i points will be %.2f ", new_lot, this.sl, new_risk_per_operation);

    EditLabelResultLote(DoubleToString(new_lot, 2));
    m_button_get_lote.Pressed(false);
}
对于“获取止损”按钮:
if(id == ON_CLICK + CHARTEVENT_CUSTOM && lparam == m_button_get_sl.Id())
{
    Print("Risk Per operation: ", this.risk_per_operation);
    Print("Order type get sl: ", EnumToString(this.order_type_get_lot));

    double new_lot;
    long new_sl = CalculateSL(this.order_type_get_sl, this.risk_per_operation, new_lot, this.deviation, this.stop_limit);

    PrintFormat("For the risk per operation %.2f the chosen lot is %.2f and the ideal stop loss in points is %i", this.risk_per_operation, new_lot, new_sl);

    EditLabelResultSL(IntegerToString(new_sl));
    m_button_get_sl.Pressed(false);
}
- ON_CLICK + CHARTEVENT_CUSTOM:检查点击事件是否与特定按钮(m_button_get_lote 或 m_button_get_sl)相对应。
- 使用 GetIdealLot 和 CalculateSL 函数进行计算,以确定理想的交易手数和止损价。
- 结果显示在面板标签(EditLabelResultLote 和 EditLabelResultSL)中。
- 最后,通过将其状态设置为 false 来停用按钮(m_button_get_lote。Pressed(false))。
5.返回 OnChartEvent
处理完事件后,该函数会将事件返回给基类 CAppDialog,以便基类函数也能处理可能发生的任何其他事件:
return(CAppDialog::OnEvent(id, lparam, dparam, sparam));
这一步骤很重要,可以确保OnEvent中未明确处理的其他重要事件不会丢失。
面板初始化:使用 OnInit 事件和常规设置
在本部分中,我们将使用自定义的 CRiskManagementPanel 类配置风险管理面板。该面板将管理手数大小和止损计算,以及其他重要的交易函数,并通过图形界面呈现。下面,我们将介绍如何在程序中声明、初始化和管理此面板。
1.全局对象声明
首先,我们在程序的全局部分声明 CRiskManagementPanel 对象。这样就可以从代码中的不同方法访问面板,例如 OnInit、OnDeinit 和 OnChartEvent。
//+------------------------------------------------------------------+
//| Global Variables                                                 |
//+------------------------------------------------------------------+
CRiskManagementPanel risk_panel; // Declare the panel object globally
2.OnInit 事件中的面板设置
在 OnInit 事件中,我们使用 Create 方法配置面板。此方法初始化面板的图形窗口,并定义其位置和大小。如果面板创建失败,程序将返回 INIT_FAILED 以指示初始化错误。之后,使用 run 方法执行面板,从而激活用户交互界面。
//+------------------------------------------------------------------+
//| Expert initialization function                                   |
//+------------------------------------------------------------------+
int OnInit()
  {
   //--- Create the risk management panel
   if(!risk_panel.Create(0, "Test Risk Management", 0, 40, 40, 380, 380))
      return(INIT_FAILED); // If panel creation fails, return an error code

   //--- Run the panel
   risk_panel.Run(); // Start the graphical interface

   //--- Return success
   return(INIT_SUCCEEDED);
  }
- 0 (chart_id):表示该面板将在图表的主窗口中创建。
- "Test Risk Management" (name):定义面板窗口中显示的标题。
- 0 (subwin):指示面板将显示在哪个子窗口中。由于我们正在机器人中创建面板,因此我们使用 0。
- 40, 40 (coordinates):指定面板的初始位置(x=40,y=40)。
- 380, 380 (dimensions):以像素为单位定义面板的宽度和高度。
3.OnDeinit 事件中的面板销毁
当程序终止或关闭时,我们必须释放面板使用的资源。为此,我们在 OnDeinit 事件中使用 Destroy 方法。这确保了没有残留的图形元素会干扰未来的程序。
//+------------------------------------------------------------------+
//| Expert deinitialization function                                 |
//+------------------------------------------------------------------+
void OnDeinit(const int reason)
  {
   //--- Destroy the risk management panel
   risk_panel.Destroy(reason); // Free resources and remove the panel
  }
4.使用 OnChartEvent 处理事件
OnChartEvent 方法对于捕获和解释用户与面板的交互至关重要,例如按钮点击、文本框字段输入或组合框中的选择更改。这些事件通过 CRiskManagementPanel 类的 ChartEvent 方法进行处理。
//+------------------------------------------------------------------+
//| Expert chart event function                                      |
//+------------------------------------------------------------------+
void OnChartEvent(const int id,         // Event ID
                  const long& lparam,   // Event parameter of type long
                  const double& dparam, // Event parameter of type double
                  const string& sparam) // Event parameter of type string
  {
   //--- Pass the chart event to the risk panel for processing
   risk_panel.ChartEvent(id, lparam, dparam, sparam);
  }
面板测试与验证
现在,我们运行 EA 交易系统来交易某个品种;就我而言,我将使用 XAUUSD(黄金)。图表如下所示:

为了透明起见和便于调试,我的账户余额如下:

目前,经验证,我没有任何未平仓位。
以下是面板的使用方法:
1.在“每次操作风险”字段中填写百分比(应用于当前账户余额)。在这个例子中,我选择我账户的 3%。

请注意:您还可以修改偏差和止损限额的编辑设置。
2.选择您要计算的内容。我们将从根据止损点数、每次操作风险和订单类型来获取我的理想交易手数的函数开始。我为买入订单(ORDER_TYPE_BUY)选择 500 个点的止损。

点击“止损点数”行中的“保存”按钮。结果为:

结果在面板上显示 0.03 手。此外,在“专家”选项卡中,还会显示以下内容:

此消息提供诸如最大手数 (0.45)、每次操作的风险以及使用计算出的手数和止损价进行交易失败时的潜在损失(15.45 美元)等信息。
3.接下来,我们测试基于每次操作风险计算手数大小的方法。点击与“获取理想止损”标签位于同一行的“获取”按钮:

最终止损位设在 1856 个点,此外:

理想的交易量为 0.01 手,风险为 3.0%。
结论
在本文中,我们学习了如何实现手数和止损“计算器”,这是一个对任何交易者都非常有用的工具。我们还探讨了如何使用 MQL5 类和库创建自定义面板。此外,我们还深入研究了 MQL5 类结构,包括继承以及编辑框、组合框和按钮等对象的使用,从而能够构建动态且功能齐全的图形界面。
这种方法不仅优化了工作流程,还为在 MQL5 中开发自定义工具开辟了广泛的可能性。在下一篇文章中,我们将开始处理主类,巩固这里提出的概念。我希望本指南对您有所帮助,并鼓励您继续探索和创建高级图形界面,以增强您的交易体验。
本文中创建和使用的所有文件均列于下表中:| 文件名称 | 描述 |
|---|---|
| "Risk_Management_Panel.mq5" | 本文开发的风险管理面板的 EA 交易文件。 |
| "Risk_Management.mqh" | 包含用于计算交易手数、止损和其他风险管理功能的文件定义函数。 |
本文由MetaQuotes Ltd译自西班牙语
原文地址: https://www.mql5.com/es/articles/16985
注意: MetaQuotes Ltd.将保留所有关于这些材料的权利。全部或部分复制或者转载这些材料将被禁止。
本文由网站的一位用户撰写,反映了他们的个人观点。MetaQuotes Ltd 不对所提供信息的准确性负责,也不对因使用所述解决方案、策略或建议而产生的任何后果负责。
