
Risk Management (Part 2): Implementing Lot Calculation in a Graphical Interface

- Introduction
- Improvements to the Lot and Stop Loss Retrieval Functions
- Exploring the Control and Panel Libraries in MQL5
- Functions for Creating Panel Components (Labels, Buttons, etc.)
- Creating Objects in the Client Area
- Functions for Dynamically Updating Comboboxes and Other Elements
- Handling Keyboard Events: Implementing OnCharEvent
- Panel Initialization: Using the OnInit Event and General Setup
- Panel Testing and Validation
- Conclusion
Introduction
Welcome! In this article, as a continuation of the previous one, we will put into practice everything we discussed and, in addition, improve some of the functions in the file. To make our work easier, we will take advantage of MQL5's powerful control libraries. The goal is to apply what we've learned more efficiently in practice, showing you how to combine graphical interfaces with our risk management functions. In the end, you will have a solid tool that will allow you to calculate lot size and Stop Loss (SL) accurately and effectively.
Improvements to the Lot and Stop Loss Retrieval Functions
We will begin this article by improving the functions created earlier, focusing on simplifying and optimizing their operation. The main changes include the addition of debugging messages (PrintFormat and Print), which help identify errors in real time, and the creation of new functions to calculate the ideal lot size and Stop Loss distance more efficiently.
Improvements to the GetMaxLote Function
This function calculates the maximum lot size that can be traded based on available free margin and symbol specifications.
//+----------------------------------------------------------------------------------------------+
//| Calculates the maximum lot size that can be traded based on free margin and symbol specifics |
//+----------------------------------------------------------------------------------------------+
double GetMaxLote(ENUM_ORDER_TYPE type, double DEVIATION = 100, double STOP_LIMIT = 50)
  {
   double VOLUME = 1.0; // Initial volume size
   ENUM_ORDER_TYPE new_type = MarketOrderByOrderType(type);
   double price = PriceByOrderType(_Symbol, type, DEVIATION, STOP_LIMIT); // Price for the given order type
   double volume_step = SymbolInfoDouble(_Symbol, SYMBOL_VOLUME_STEP); // Volume step for the symbol
   double margin = EMPTY_VALUE; // Required margin, initialized as empty

   ResetLastError();
   if(!OrderCalcMargin(new_type, _Symbol, VOLUME, price, margin))
     {
      Print("OrderCalcMargin() failed. Error ", GetLastError());
      return 0; // Exit the function if margin calculation fails
     }
   if(AccountInfoDouble(ACCOUNT_MARGIN_FREE)  <= 0)
     {
      PrintFormat("Free margin of %+.2f is invalid, you cannot open trades right now",AccountInfoDouble(ACCOUNT_MARGIN_FREE));
      return 0;
     }

   double result = MathFloor((AccountInfoDouble(ACCOUNT_MARGIN_FREE) / margin) / volume_step) * volume_step;
   return result; // Return the calculated maximum lot size
  }
Implemented improvements:
- Debug messages: The user is now notified when the margin calculation fails or when free margin is insufficient.
- Free margin validation: A check is included to prevent calculations if free margin is less than or equal to zero.
GetIdealLot Function
This function calculates the ideal lot size based on the maximum risk allowed per trade and current market conditions.
//+---------------------------------------------------------------------+
//| Determine the optimal lot size based on risk and current conditions |
//+---------------------------------------------------------------------+
void GetIdealLot(double& nlot, double glot, double max_risk_per_operation, double& new_risk_per_operation, long StopLoss)
  {
   if(StopLoss <= 0)
     {
      Print("[ERROR SL] Stop Loss distance is less than or equal to zero, now correct the stoploss distance: ", StopLoss);
      nlot = 0.0;
      return;
     }

   Print("Max Lot: ", glot, "  |  RiskPerOperation: ", max_risk_per_operation);

   new_risk_per_operation = 0;
   long spread = (long)SymbolInfoInteger(_Symbol, SYMBOL_SPREAD);
   double tick_value = SymbolInfoDouble(_Symbol, SYMBOL_TRADE_TICK_VALUE);
   double step = SymbolInfoDouble(_Symbol, SYMBOL_VOLUME_STEP);

   double rpo = (glot * (spread + 1 + (StopLoss * tick_value)));

   if(rpo > max_risk_per_operation)
     {
      if(max_risk_per_operation <= 0)
         return;

      double new_lot = (max_risk_per_operation / rpo) * glot;
      new_lot  = MathFloor(new_lot / step) * step;
      new_risk_per_operation =  new_lot * (spread + 1 + (StopLoss * tick_value));
      nlot =  new_lot;
     }
   else
     {
      new_risk_per_operation = rpo;
      nlot = glot;
     }

   if(nlot <= 0)
      PrintFormat("The lot %.2f is invalid, the risk %.2f increases or the sl %i decreases",nlot,max_risk_per_operation,StopLoss);
  }
Improvements to this function:
- Stop Loss validation: Verifies that the stop-loss distance is valid before proceeding.
- Clear messages: Informs whether the calculated lot is invalid or whether the risk needs adjustment.
New GetLotByRiskPerOperation Function
This function allows calculation of the ideal lot size exclusively based on risk per operation (in USD) and the order type, eliminating the need to specify the Stop Loss distance.
//+--------------------------------------------------------------------+
//| Function to obtain the ideal lot based on your risk per operation  |
//+--------------------------------------------------------------------+
// risk_per_operation in USD, not %

double GetLotByRiskPerOperation(double risk_per_operation, const ENUM_ORDER_TYPE order_type, double DEVIATION = 100, double STOP_LIMIT = 50)
  {
   double VOLUME = 1.0; // Initial volume size
   ENUM_ORDER_TYPE new_type = MarketOrderByOrderType(order_type);
   double price = PriceByOrderType(_Symbol, order_type, DEVIATION, STOP_LIMIT); // Price for the given order type
   double volume_step = SymbolInfoDouble(_Symbol, SYMBOL_VOLUME_STEP); // Volume step for the symbol
   double margin = EMPTY_VALUE; // Required margin, initialized as empty

   ResetLastError();
   if(!OrderCalcMargin(new_type, _Symbol, VOLUME, price, margin))
     {
      Print("OrderCalcMargin() failed. Error ", GetLastError());
      return 0; // Exit the function if margin calculation fails
     }
   double result = MathFloor((risk_per_operation / margin) / volume_step) * volume_step;

   if(result <= 0)
     {
      PrintFormat("The lot %.2f is invalid, the risk %.2f increases",result,risk_per_operation);
      return 0;
     }

   PrintFormat("The ideal lot for %.2f risk per trade is %.2f lots",risk_per_operation,result);

   return result; // Return the calculated maximum lot size
  }
//+------------------------------------------------------------------+
Main features:
- Simplified calculation: Uses only the risk in USD, removing dependence on additional values.
- Debugging: Clear messages for invalid lot sizes or excessive risk.
Improvements to the CalculateSL Function
This function calculates the ideal SL distance in points according to the risk per trade and the chosen lot size.
//+-----------------------------------------------------------------------+
//| Calculate the stop loss distance in points based on risk and lot size |
//+-----------------------------------------------------------------------+
long CalculateSL(const ENUM_ORDER_TYPE type, double risk_per_operation, double &chosen_lot, double DEVIATION = 100, double STOP_LIMIT = 50)
  {
   double lot = GetLotByRiskPerOperation(risk_per_operation,type,DEVIATION,STOP_LIMIT);
   chosen_lot = lot;
   long spread = (long)SymbolInfoInteger(_Symbol, SYMBOL_SPREAD);
   double tick_value = SymbolInfoDouble(_Symbol, SYMBOL_TRADE_TICK_VALUE);
   double result = ((risk_per_operation / lot) - spread - 1) / tick_value;
   long ideal_sl =  long(MathRound(result));

   if(ideal_sl <= 0)
     {
      PrintFormat("Stop loss %i invalid, please increase the risk per trade %.2f",ideal_sl,risk_per_operation);
      return 0;
     }

   return ideal_sl;
  }
Improvements:
- Integration with GetLotByRiskPerOperation: Uses the calculated lot size to determine Stop Loss.
- Improved calculation: Ensures the Stop Loss is always positive and valid.
With these improvements, the functions are now more robust, easier to debug, and more flexible. Error messages allow quick identification of issues, and the new implementations simplify the calculation process for both lot size and stop loss.
Exploring the Control and Panel Libraries in MQL5
Before proceeding with the MQL5 control libraries, we need to understand some basics about how objects work in MQL5.
Graphical Objects in MQL5:
In MQL5, graphical objects are visual elements you can place on a chart to represent information or interact with the user. These objects are positioned using two main coordinates:
- X (horizontal) - defines the object's position along the horizontal axis.
- Y (vertical) - defines the position along the vertical axis.
These coordinates determine exactly where the object appears on the chart or panel.
Basic properties of graphic objects
In addition to position, graphical objects have characteristics such as:
- Height - the amount of vertical space the object occupies.
- Width - the horizontal space it occupies.
These properties should be set properly to ensure the object does not overflow from the area where it is meant to appear. For example, if you're designing an interface, these dimensions ensure that elements remain organized and within visible boundaries.
Anchor corner
The anchor point is the part of the object used as a reference when using the X and Y coordinates. This point determines how the object position is interpreted. There are four types of anchor points:
Identifier | Description |
|---|---|
CORNER_LEFT_UPPER | Coordinate center is located at the top-left corner of the chart |
CORNER_LEFT_LOWER | Coordinate center is located at the bottom-left corner of the chart |
CORNER_RIGHT_LOWER | Coordinate center is located at the bottom-right corner of the chart |
CORNER_RIGHT_UPPER | Coordinate center is located at the top-right corner of the chart |
These 4 anchor types can be represented in the image as follows:

Note: Generally, and by default, the most commonly used anchor type is CORNER_LEFT_UPPER. This can vary depending on the use case or whichever is simpler for you. In this article, we will work only with the anchor mentioned above.
MQL5 Controls Library
The MQL5 controls library is a class library for creating controls, panels, and more. For the descriptions of the controls, please refer to the documentation.
To do this, open the documentation by pressing F1 in your MetaEditor. Once there, go to the Content section and click on MQL5 Reference Manual. Scroll to the bottom of the page, where you will find a section called Standard Library. Clicking on it opens a list of various libraries for different applications. The one we're interested in is the Controls Library.
By selecting this library, you gain access to several tables describing the uses and functionalities of each control along with their groupings. To help you better understand the structure and relationships between the control classes, I have prepared a diagram showing how inheritances and classes associated with these controls work.

As we can see, the main class is CObject, from which the class CWnd is inherited. From CWnd, two additional classes are derived: CWndContainer, intended for complex controls, and CWndObj, used for simpler controls. In our panels, we will use both types of controls depending on each specific case. For now, however, we will focus on the CAppDialog control, the class that creates the main panel, like the one we are developing.

Inside this panel, we will begin adding basic controls such as labels to display text, combo boxes to select order types, buttons to save variables and obtain results, and edit fields where the user can manually enter values, such as the desired risk per trade.
Designing a Panel in MQL5: Planning and Graphical Elements
Before starting to code a panel in MQL5, let's plan its design. The best way to do this is to create a visual sketch, like the one shown in the attached image, using simple tools like Paint, Canva, etc. This step ensures that every necessary element is included and properly positioned, preventing omissions and making implementation easier. I have made this the following way:
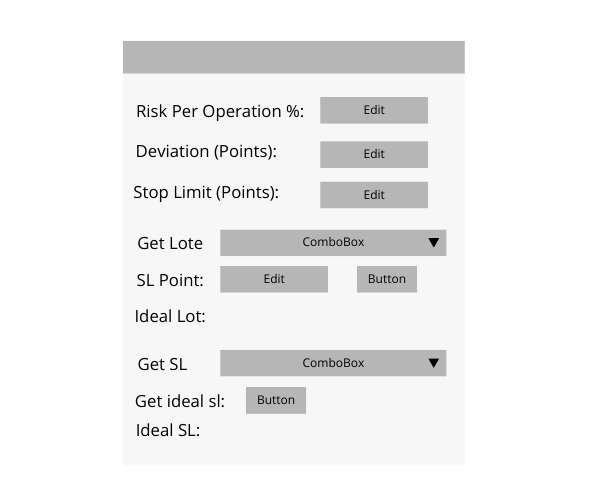
Analyzing the panel image, we can see several controls fulfilling different functions. These controls allow the user to interact with the interface in a clear and functional way. Below is a detailed description of the main elements and how they will be used in our class:
| Control | Function | Example in the panel | Basic object |
|---|---|---|---|
| CLabel | Used to display static text on the panel, such as descriptions or instructions for the user. | Labels such as "Risk Per Operation %", "Deviation (Points)" and "Stop Limit (Points)". | Derived from graphical object OBJ_LABEL |
| CComboBox | Allows the user to select an option from a dropdown list. | "Get Lot" and "Get SL", which allow selecting the order type for the corresponding lot and stop-loss calculation. | Composite object (not derived from a single graphical object) |
| CButton | Interactive buttons that execute actions when pressed. | The button next to "SL Point" that performs an action such as calculating or confirming a value. Also includes the "Get ideal sl" button. | Derived from graphical object OBJ_BUTTON |
| CEdit | Allows the user to input or manually edit data. | Fields such as "Risk Per Operation %", "Deviation (Points)", and "Stop Limit (Points)" where the user enters values. | Corresponds to graphical object OBJ_EDIT |
Functions for Creating Panel Components (Labels, Buttons, etc.)
Before starting to create the functions, we first need to create an Expert Advisor template in MetaEditor. This file will initially be empty, and once it is ready, we can begin including the necessary libraries to work with the components of our graphical interface.
To do this, add the following lines of code at the beginning of your file:
#include <Controls\Dialog.mqh>
#include <Controls\Edit.mqh>
#include <Controls\Label.mqh>
#include <Controls\Button.mqh>
#include <Risk Management.mqh>
#include <Controls\ComboBox.mqh>
Creation of the Main Class
We will begin by defining the parameters that we will use to set the dimensions of various controls. These values will allow us to adjust the size of interface components such as buttons, text boxes, and dropdown lists.
//+------------------------------------------------------------------+
//| defines                                                          |
//+------------------------------------------------------------------+
//--- for edits
#define EDIT_HEIGHT                         (20)      // edit height

//--- for buttons
#define BUTTON_WIDTH                        (80)     // size by X coordinate
#define BUTTON_HEIGHT                       (20)      // size by Y coordinate

//--- for combo box
#define COMBO_BOX_WIDTH                        (200)     // size by X coordinate
#define COMBO_BOX_HEIGHT                       (20)      // size by Y coordinate
Next, we will create a string array with a capacity of 8 elements. This array will be used to store the different order types in text format.
string elements_order_type[8] =
  {
   "ORDER_TYPE_BUY",
   "ORDER_TYPE_SELL",
   "ORDER_TYPE_BUY_LIMIT",
   "ORDER_TYPE_SELL_LIMIT",
   "ORDER_TYPE_BUY_STOP",
   "ORDER_TYPE_SELL_STOP",
   "ORDER_TYPE_BUY_STOP_LIMIT",
   "ORDER_TYPE_SELL_STOP_LIMIT"
  };
Creation of the Class for the Risk Management Panel
We will now create a new class that will inherit the public part of the CAppDialog class, which is the main class used for panels. This class will serve as the foundation of our risk-management panel.
//+-------------------------------------------------------------------+
//| Class CRiskManagementPanel                                        |
//| This class inherits from CAppDialog and will define the panel for |
//| managing risk parameters.                                         |
//+-------------------------------------------------------------------+
class CRiskManagementPanel : public CAppDialog
{
    // Declare private members here.
};
Adding Methods and Attributes
Next, we will begin adding methods and attributes to our class. As mentioned earlier, we will need several graphical controls, and as shown in the previous image, these controls will be added to the private section of the class.
private:
   CLabel            m_label_risk_per_operation;
   CEdit             m_edit_risk_per_operation;

   CLabel            m_label_deviaiton;
   CEdit             m_edit_deviaiton;

   CLabel            m_label_stop_limit;
   CEdit             m_edit_stop_limit;

   CLabel            m_label_get_lote;
   CComboBox         m_combobox_odertype_get_lot;

   CLabel            m_label_sl;
   CEdit             m_edit_sl;
   CButton           m_buttom_get_lote;
   CLabel            m_label_result_lote;
   CLabel            m_label_the_result_lote;

   CLabel            m_label_get_sl;
   CComboBox         m_combobox_odertype_get_sl;
   CLabel            m_label_lote;
   CButton           m_buttom_get_sl;
   CLabel            m_label_result_sl;
   CLabel            m_label_the_result_sl;
Private Variables to Store Data
In addition to the controls, we will need private variables to store the data entered by the user through the Edit and ComboBox controls. These variables will hold values such as risk per operation, deviation, order type, and stop-loss values.
    // Variables to store the data entered by the user
    double            deviation;                    // Stores deviation entered by the user
    double            stop_limit;                   // Stores stop limit entered by the user
    double            risk_per_operation;          // Stores risk per operation entered by the user
    long              sl;                           // Stores stop loss value entered by the user
    ENUM_ORDER_TYPE   order_type_get_sl;           // Stores the selected order type for stop loss
    ENUM_ORDER_TYPE   order_type_get_lot;          // Stores the selected order type for lot size
To finish the private section of our class, we will declare all the necessary functions for handling graphical controls and user interaction. These functions will include object creation, functions triggered when the user changes the selected item in a ComboBox, and functions for updating Label values, among others.
Declaration of Private Functions:
//--- create labels and buttons
bool CreateAreaClientPanel();

//--- functions to edit labels dynamically
void EditLabelResultSL(string text);
void EditLabelResultLote(string text);

//--- create controls (buttons, labels, edits, combo boxes)
bool CreateEdit(CEdit &m_edit, const string name, const int x1, const int y1, string initial_Text = "");
bool CreateLabel(CLabel &label, const string name, const string text, const int x1, const int y1);
bool CreateButton(CButton &button, const string name, const string text, const int x1, const int y1, int x2_ = BUTTON_WIDTH, int y2_ = BUTTON_HEIGHT);
bool CreateComboBox(CComboBox &combo_box, const string name, string &elements[], string initial_text, const int x1, const int y1);

//--- combo box functions for handling user input
void OnChangeComBoxOrderTypeGetLote();
void OnChangeComBoxOrderTypeGetSL();
Declaration of Public Methods:
In the public section of the class, we add two functions for creating the panel and the controls within the client area. We also declare an OnEvent handler to process chart events and a function to convert a string into an ENUM_ORDER_TYPE, in addition to the constructor and destructor.
public:
    CRiskManagementPanel(void);
    ~CRiskManagementPanel(void);

    //--- create panel and controls
    virtual bool Create(const long chart, const string name, const int subwin, const int x1, const int y1, const int x2, const int y2);

    //--- chart event handler
    virtual bool OnEvent(const int id, const long &lparam, const double &dparam, const string &sparam);

    //--- function to convert string to ENUM_ORDER_TYPE
    static ENUM_ORDER_TYPE StringOrderTypeToEnum(const string OrderType);
With these declarations, we have everything needed to create the panel, the controls, and manage chart events.
Creating Methods for Adding Controls
In this section, we will take a detailed look at the methods needed to create basic controls such as labels, buttons, edits, and combo boxes, which will form part of our risk-management panel. Additionally, we will see an important method that ensures the panel functions correctly by binding controls to the client area. This ensures that the controls remain aligned with the panel when it is moved or resized.
Binding Controls to the Client Area
For the controls (such as buttons, labels, etc.) to move along with the panel when the user interacts with it, they must be anchored to the panel's client area. To achieve this, we use the Add method from the CDialog class. This method registers controls in the client-area object list so that they stay synchronized with the panel. Below is its definition in CDialog:
//+------------------------------------------------------------------+
//| Add control to the client area (by pointer)                      |
//+------------------------------------------------------------------+
bool CDialog::Add(CWnd *control)
  {
   return(m_client_area.Add(control));
  }
//+------------------------------------------------------------------+
//| Add control to the client area (by reference)                    |
//+------------------------------------------------------------------+
bool CDialog::Add(CWnd &control)
  {
   return(m_client_area.Add(control));
  }
The Add method has two versions: one that receives a pointer to the control and another that receives a reference. Both versions add the control to the m_client_area container, which manages all elements associated with the panel.
If we omit this linkage, the controls will not follow the panel movement, potentially causing visual inconsistencies or interaction issues.
Methods for Creating Basic Controls
1. Function to Create Labels
Labels are used to display static text in the panel, such as headings or instructions. The function to create a label includes:
- Defining the control coordinates.
- Creating the label object using the Create method.
- Setting the label text using Text.
- Linking the label to the client area using Add.
Code example:
//+------------------------------------------------------------------+
//| Function to create labels                                        |
//+------------------------------------------------------------------+
bool CRiskManagementPanel::CreateLabel(CLabel &label,const string name, const string text, const int x1, const int y1)
  {
//--- coordinates
   int x2=x1+50;
   int y2=y1+20;
//--- create
   if(!label.Create(m_chart_id,name+"Label",m_subwin,x1,y1,x2,y2))
      return(false);
   if(!label.Text(text))
      return(false);
   if(!Add(label))
      return(false);

//--- succeed
   return(true);
  }
- label.Create: Creates the graphical control at the given coordinates.
- label.Text: Sets the text to be displayed on the label.
- Add: Adds the label to the panel so it can be managed along with other controls.
2. Function to Create Buttons
Buttons allow direct user interaction with the panel. The function includes parameters for text, dimensions, and starting coordinates. It also allows adjusting button size using default values.
Code example:
//+------------------------------------------------------------------+
//| Function to create buttons                                       |
//+------------------------------------------------------------------+
bool CRiskManagementPanel::CreateButton(CButton &buttom,const string name, const string text, const int x1, const int y1,int x2_= BUTTON_WIDTH,int y2_ = BUTTON_HEIGHT)
  {
   int x2=x1+x2_;
   int y2=y1+y2_;
//--- create
   if(!buttom.Create(m_chart_id,name,m_subwin,x1,y1,x2,y2))
      return(false);
   if(!buttom.Text(text))
      return(false);
   if(!Add(buttom))
      return(false);
//--- succeed
   return(true);
  }
Button Dimensions:
- x2 and y2: Optional parameters defining button width and height. If not specified, default values (BUTTON_WIDTH and BUTTON_HEIGHT) are used.
Methods Used:
- button.Create: Creates the button at the given coordinates.
- button.Text: Assigns the text that will appear on the button.
- Add: Registers the button in the panel's element list.
3. Function to Create Edits
Edit controls allow users to input text in the panel. This function includes an optional parameter to set an initial text value.
Code example:
//+------------------------------------------------------------------+
//| Function to create edits                                         |
//+------------------------------------------------------------------+
bool CRiskManagementPanel::CreateEdit(CEdit &m_edit, const string name, const int x1, const int y1, string initial_Text = "")
  {
//--- coordinates
   int y2=y1+EDIT_HEIGHT;
   int x2 =x1 +100;
//--- create
   if(!m_edit.Create(m_chart_id,name+"Edit",m_subwin,x1,y1,x2,y2))
      return(false);
//--- allow editing the content
   if(!m_edit.ReadOnly(false))
      return(false);
   if(!Add(m_edit))
      return(false);

   m_edit.Text(initial_Text);

//--- succeed
   return(true);
  }
Text Field Dimensions:
- A fixed width of 100 and a height defined by EDIT_HEIGHT determine the size of the field.
Methods Used:
- m_edit.ReadOnly(false): Allows the field to be editable.
- m_edit.Text: Sets the initial text displayed in the field.
4. Function to Create ComboBoxes
ComboBoxes are complex controls that allow users to select an item from a dropdown list. This function also includes the option to set an initial text and add multiple items.
Code example:
//+-------------------------------------------------------------------+
//| Function to create the complex object: combo box                  |
//| This function creates a combo box with multiple selectable items. |
//+-------------------------------------------------------------------+
bool CRiskManagementPanel::CreateComboBox(CComboBox &combo_box, const string name, string &elements[], string initial_text, const int x1, const int y1)
{
   //--- calculate coordinates for the combo box
   int x2 = x1 + COMBO_BOX_WIDTH;
   int y2 = y1 + COMBO_BOX_HEIGHT;

   //--- create the combo box control
   if (!combo_box.Create(m_chart_id, name, m_subwin, x1, y1, x2, y2))
      return (false);

   //--- add items to the combo box
   for (int i = 0; i < ArraySize(elements); i++)
   {
      if (!combo_box.AddItem(elements[i], i))
         return (false);
   }

   //--- select the initial text
   combo_box.SelectByText(initial_text);

   //--- add the combo box to the panel
   if (!Add(combo_box))
      return (false);

   //--- successfully created the combo box
   return (true);
}
ComboBox Elements:
- elements[]: An array of strings containing the items displayed in the dropdown list.
- combo_box.AddItem: Adds each element to the ComboBox, associating it with a unique index.
Initial Selection:
- combo_box.SelectByText(initial_text): Defines the visible item when the ComboBox is created.
Methods Used:
- combo_box.Create: Initializes the ComboBox at the specified coordinates.
- Add: Adds the ComboBox to the panel.
Creating Objects in the Client Area
In this section, we begin designing and creating the elements of the client area in our user interface. The goal is to provide a functional space where the user can manage and adjust configurations related to risk and trading orders. Below, I describe how the area is divided and how each component is created.
The client panel is divided into three main sections:

General Section: In this section, the user can edit general aspects such as risk per operation, deviation, and stop limit.
Lot Calculation: The second part of the panel is dedicated to calculating lot size based on risk per operation and stop-loss distance in points. Here, an automatic estimation is made of how much risk the user is willing to take.
Stop-Loss Calculation: Finally, the lower part of the panel allows calculation of the stop loss based on the acceptable loss percentage per operation.
bool CRiskManagementPanel::CreateAreaClientPanel(void)
{
   int x1 = 11; // Initial X coordinate
   int y1 = 15; // Initial Y coordinate

   // --- General Section: Risk Per Operation Configuration ---
   if (!CreateLabel(m_label_risk_per_operation, "L-Risk-Per-operation", "Risk per operation %: ", x1, y1))
      return false; // Create the label for risk per operation
   if (!CreateEdit(m_edit_risk_per_operation, "Risk-Per-operation", x1 + 150, y1))
      return false; // Create the editable field for risk per operation

   y1 += 30; // Move the Y coordinate down for the next section

   if (!CreateLabel(m_label_deviation, "L-Deviation", "Deviation (Points):", x1, y1))
      return false; // Create the label for deviation
   if (!CreateEdit(m_edit_deviation, "Deviation", x1 + 150, y1, "100"))
      return false; // Create the editable field for deviation

   this.deviation = 100; // Default value for deviation

   y1 += 30;

   if (!CreateLabel(m_label_stop_limit, "L-StopLimit", "Stop Limit (Points):", x1, y1))
      return false; // Create the label for stop limit
   if (!CreateEdit(m_edit_stop_limit, "Stop Limit", x1 + 150, y1, "50"))
      return false; // Create the editable field for stop limit

   this.stop_limit = 50; // Default value for stop limit

   y1 += 50;

   // --- Lot Calculation Section ---
   if (!CreateLabel(m_label_get_lote, "L-Get-Lote-Title", "Get Lote", x1, y1))
      return false; // Create the label for lot calculation section
   if (!CreateComboBox(m_combobox_order_type_get_lot, "ORDER_TYPE_LOT", elements_order_type, "ORDER_TYPE_BUY", x1 + 60, y1))
      return false; // Create the combo box to select order type for lot calculation

   this.order_type_get_lot = ORDER_TYPE_BUY; // Default order type

   y1 += 30;

   if (!CreateLabel(m_label_sl, "L-SL", "SL Point: ", x1, y1))
      return false; // Create the label for SL point
   if (!CreateEdit(m_edit_sl, "WRITE-SL", x1 + 60, y1))
      return false; // Create the editable field for SL
   if (!CreateButton(m_button_get_lote, "GET-LOTE", "Save", x1 + 160 + 5, y1))
      return false; // Create the button to save the lot calculation

   y1 += 25;

   if (!CreateLabel(m_label_result_lote, "L-Result-Lote", "Ideal Lot: ", x1, y1))
      return false; // Create the label for displaying the ideal lot
   if (!CreateLabel(m_label_the_result_lote, "L-The-Result-lot", "  ", x1 + 65, y1))
      return false; // Create a label to display the calculated ideal lot

   y1 += 50;

   // --- Stop Loss Calculation Section ---
   if (!CreateLabel(m_label_get_sl, "L-Get-SL-Title", "Get SL", x1, y1))
      return false; // Create the label for stop loss calculation section
   if (!CreateComboBox(m_combobox_order_type_get_sl, "ORDER_TYPE_SL", elements_order_type, "ORDER_TYPE_BUY", x1 + 50, y1))
      return false; // Create the combo box to select order type for stop loss calculation

   this.order_type_get_sl = ORDER_TYPE_BUY; // Default order type

   y1 += 30;

   if (!CreateLabel(m_label_lote, "L-LOTE", "Get ideal sl:", x1, y1))
      return false; // Create the label for getting the ideal stop loss
   if (!CreateButton(m_button_get_sl, "GET-SL", "Get", x1 + 90, y1))
      return false; // Create the button to get the stop loss value

   y1 += 25;

   if (!CreateLabel(m_label_result_sl, "L-Result-sl", "Ideal SL:", x1, y1))
      return false; // Create the label for displaying the ideal stop loss
   if (!CreateLabel(m_label_the_result_sl, "L-The-result-sl", "  ", x1 + 65, y1))
      return false; // Create a label to display the calculated ideal stop loss

   return true; // If all components are successfully created
}
Main function to create the panel:
The Create function is the core method used to initialize the graphical panel in the user interface. This function brings together the key elements needed to set up and configure the panel, ensuring that it is properly associated with the chart and that its coordinates and dimensions are assigned correctly.
Input Details
chart (long):
- Represents the ID of the chart where the panel will be created.
- By default in MQL5, the current chart has an ID of 0.
name (string):
- The name that identifies the panel.
- This name is unique and is used to reference the panel in other operations.
subwin (int):
- The index of the chart subwindow where the panel will be placed.
- If the panel is placed in the main window, this value will be 0. For additional subwindows, incremental values are used (1, 2, etc.).
x1 and y1 (int):
- These are the initial coordinates (top-left corner) of the panel on the chart.
x2 and y2 (int):
- These specify the panel dimensions:
- x2: Width
- y2: Height
- These dimensions are given in pixels.
- These specify the panel dimensions:
//+------------------------------------------------------------------+
//| function to create the interface                                 |
//+------------------------------------------------------------------+
bool CRiskManagementPanel::Create(const long chart,const string name,const int subwin,const int x1,const int y1,const int x2,const int y2)
  {
   if(!CAppDialog::Create(chart,name,subwin,x1,y1,x2,y2))
      return(false);
   if(!CreateAreaClientPanel())
      return(false);
//--- succeed
   return(true);
  }
Functions for Dynamically Updating Comboboxes and Other Elements
Continuing with the creation of functions, we will now finish implementing the dynamic functions that modify the values of interface elements such as ComboBoxes and Labels that display the calculated lot size and stop loss (SL). These functions allow the labels to be updated quickly and enable the interface to react to changes the user makes in the ComboBoxes.
1. Functions for Editing Labels
These functions allow modifications to the text of result labels in the interface, specifically the labels displaying the calculated Lot Size and Stop Loss (SL), based on the computed values.
//+------------------------------------------------------------------+
//| Function to edit the text of the lot size label                   |
//+------------------------------------------------------------------+
void CRiskManagementPanel::EditLabelResultLote(string text)
{
   // This function updates the text of the label that shows the ideal lot size.
   this.m_label_the_result_lote.Text(text); // Set the new text to the label
}
This function updates the label that displays the calculated lot size. It receives a text value as a parameter and updates the corresponding label with that value.
//+------------------------------------------------------------------+
//| Function to edit the text of the stop loss label                 |
//+------------------------------------------------------------------+
void CRiskManagementPanel::EditLabelResultSL(string text)
{
   // This function updates the text of the label that shows the ideal stop loss value.
   this.m_label_the_result_sl.Text(text); // Set the new text to the stop loss label
}
Similarly, this function updates the label that displays the ideal stop loss value. It also receives text as a parameter and updates the corresponding label.
2. Functions to Handle Changes in ComboBoxes
Whenever the user selects a new value in a ComboBox that determines the order type (such as buy or sell), these functions are triggered. They update the internal variable that stores the selected order type.
//+------------------------------------------------------------------+
//| Function to update the variable that stores                      |
//| the order type to obtain the ideal sl                            |
//+------------------------------------------------------------------+
void CRiskManagementPanel::OnChangeComBoxOrderTypeGetSL(void)
{
   // Iterate through the order types array to find the selected type
   for(int i = 0; i < ArraySize(elements_order_type); i++)
   {
      // If the selected order type matches the one in the array
      if(m_combobox_order_type_get_sl.Select() == elements_order_type[i])
      {
         // Update the order type variable for stop loss
         this.order_type_get_sl = StringOrderTypeToEnum(m_combobox_order_type_get_sl.Select());
         Print("New order type for sl: ", EnumToString(this.order_type_get_sl)); // Log the selected order type
         break;
      }
   }
}
This function is triggered when the user changes the order type in the ComboBox used for getting the stop loss. It iterates through an array of order types and identifies which one is currently selected in the ComboBox. It then updates the internal variable order_type_get_sl with the corresponding ENUM value, using the function StringOrderTypeToEnum.
//+------------------------------------------------------------------+
//| Function to update the variable that stores                      |
//| the order type to obtain the ideal lot                           |
//+------------------------------------------------------------------+
void CRiskManagementPanel::OnChangeComBoxOrderTypeGetLote(void)
{
   // Iterate through the order types array to find the selected type
   for(int i = 0; i < ArraySize(elements_order_type); i++)
   {
      // If the selected order type matches the one in the array
      if(m_combobox_order_type_get_lot.Select() == elements_order_type[i])
      {
         // Update the order type variable for lot size
         this.order_type_get_lot = StringOrderTypeToEnum(m_combobox_order_type_get_lot.Select());
         Print("New order type for lot: ", EnumToString(this.order_type_get_lot)); // Log the selected order type
         break;
      }
   }
}
Similar to the previous function, this one performs the same task but for lot size calculation. When the user changes the order type in the ComboBox for calculating the ideal lot, the function updates the variable order_type_get_lot with the selected order type.
3. Extra Function to Convert a String into an ENUM_ORDER_TYPE
Finally, this function converts a text string representing an order type (for example, "ORDER_TYPE_BUY") into its corresponding ENUM_ORDER_TYPE enumerated value.
//+------------------------------------------------------------------+
//| Function to convert a string into an order type                  |
//+------------------------------------------------------------------+
ENUM_ORDER_TYPE CRiskManagementPanel::StringOrderTypeToEnum(const string OrderType)
{
   // Convert the string order type to its corresponding enum value
   if(OrderType == "ORDER_TYPE_BUY")
      return ORDER_TYPE_BUY;
   if(OrderType == "ORDER_TYPE_SELL")
      return ORDER_TYPE_SELL;
   if(OrderType == "ORDER_TYPE_BUY_LIMIT")
      return ORDER_TYPE_BUY_LIMIT;
   if(OrderType == "ORDER_TYPE_SELL_LIMIT")
      return ORDER_TYPE_SELL_LIMIT;
   if(OrderType == "ORDER_TYPE_BUY_STOP")
      return ORDER_TYPE_BUY_STOP;
   if(OrderType == "ORDER_TYPE_SELL_STOP")
      return ORDER_TYPE_SELL_STOP;
   if(OrderType == "ORDER_TYPE_BUY_STOP_LIMIT")
      return ORDER_TYPE_BUY_STOP_LIMIT;
   if(OrderType == "ORDER_TYPE_SELL_STOP_LIMIT")
      return ORDER_TYPE_SELL_STOP_LIMIT;

   // Return WRONG_VALUE if no match is found
   return WRONG_VALUE;
}
Handling Keyboard Events: Implementing OnCharEvent
To conclude this article, we will define the OnChartEvent method previously declared in our class. This method will execute the functions created in the previous section, calculate lot size and stop loss when the appropriate buttons are pressed, update edit fields, and more.
But before completing the function, we must understand how events work in the MQL5 controls library.
It is important to clarify that, instead of using default events such as CHARTEVENT_OBJECT_CLICK (which are common in many programming environments), we use custom events. These events are defined in a specific file named "Defines.mqh", located in the folder Includes\Controls\Defines.mqh in our project.
The Defines.mqh file contains enumerations and definitions needed for the controls. In addition to default values such as control or panel colors, the most relevant part for our use case is the event definitions found at the end of the file. Here is how they are structured and used.
Event Definitions
Inside Defines.mqh, several custom events are defined for use in controls.
//+------------------------------------------------------------------+
//| Events                                                           |
//+------------------------------------------------------------------+
#define ON_CLICK                (0)   // clicking on control event
#define ON_DBL_CLICK            (1)   // double clicking on control event
#define ON_SHOW                 (2)   // showing control event
#define ON_HIDE                 (3)   // hiding control event
#define ON_CHANGE               (4)   // changing control event
#define ON_START_EDIT           (5)   // start of editing event
#define ON_END_EDIT             (6)   // end of editing event
#define ON_SCROLL_INC           (7)   // increment of scrollbar event
#define ON_SCROLL_DEC           (8)   // decrement of scrollbar event
#define ON_MOUSE_FOCUS_SET      (9)   // the "mouse cursor entered the control" event
#define ON_MOUSE_FOCUS_KILL     (10)  // the "mouse cursor exited the control" event
#define ON_DRAG_START           (11)  // the "control dragging start" event
#define ON_DRAG_PROCESS         (12)  // the "control is being dragged" event
#define ON_DRAG_END             (13)  // the "control dragging end" event
#define ON_BRING_TO_TOP         (14)  // the "mouse events priority increase" event
#define ON_APP_CLOSE            (100) // "closing the application" event
//+------------------------------------------------------------------+
Using Events in the Panel
In our specific case, we don't need every event; instead, we focus on three key events:
- ON_CLICK: Triggered when a control, such as a button, is clicked.
- ON_CHANGE: Triggered when the value of a control changes, such as a ComboBox.
- ON_END_EDIT: Triggered when the user finishes editing a field, such as an Edit control.
Example of Event Implementation in OnChartEvent
The events defined in Defines.mqh correspond to the id parameter in the OnChartEvent function. This function handles events that occur in the chart or panel. The ID is combined with CHARTEVENT_CUSTOM to create a unique identifier for each event.
For example, the ON_CLICK event would be used as follows:
if(id == ON_CLICK + CHARTEVENT_CUSTOM && lparam == m_button_get_lote.Id())
{
    // Acción a ejecutar cuando el botón de obtener lote es presionado
    // Aquí se llamaría a la función correspondiente para gestionar la acción del botón
}
Creation of the OnEvent Function
1. Function Declaration
bool CRiskManagementPanel::OnEvent(const int id,const long &lparam,const double &dparam,const string &sparam)
The OnEvent function is an event handler that receives several parameters:
- id: Identifier of the event that occurred.
- lparam: Additional parameter generally containing specific information about a control or component.
- dparam: A numeric (double) parameter used to pass numerical values.
- sparam: A string parameter used to pass text values.
The purpose of this function is to manage interface events such as text field changes or button clicks.
2. Detecting Changes in the Order Type ComboBoxes
ComboBoxes allow users to select a value from a dropdown list. In this step, we check whether the user has modified the ComboBox value.
For the lot type ComboBox:
if(id == ON_CHANGE + CHARTEVENT_CUSTOM && lparam == m_combobox_order_type_get_lot.Id())
{
    OnChangeComBoxOrderTypeGetLote();
}
For the stop loss (SL) ComboBox:
if(id == ON_CHANGE + CHARTEVENT_CUSTOM && lparam == m_combobox_order_type_get_sl.Id())
{
    OnChangeComBoxOrderTypeGetSL();
}
- ON_CHANGE + CHARTEVENT_CUSTOM: The event indicating that a control value has changed.
- The condition lparam == m_combobox_order_type_get_lot.Id() ensures the event corresponds to the correct ComboBox by checking its ID.
Inside these conditions, the functions OnChangeComBoxOrderTypeGetLote and OnChangeComBoxOrderTypeGetSL are executed to update the internal ENUM_ORDER_TYPE variable representing the selected order type.
3. Edits
Edit fields allow users to enter values manually. Here we check and update the internal variables associated with each edited text field.
For the Risk per Operation field:
if(id == ON_END_EDIT + CHARTEVENT_CUSTOM && lparam == m_edit_risk_per_operation.Id())
{
    this.risk_per_operation = StringToDouble(m_edit_risk_per_operation.Text());
    this.risk_per_operation = NormalizeDouble((this.risk_per_operation / 100.0) * AccountInfoDouble(ACCOUNT_BALANCE), 2);
    Print("Edit Risk Per Operation: ", this.risk_per_operation);
}
For the SL field:
if(id == ON_END_EDIT + CHARTEVENT_CUSTOM && lparam == m_edit_sl.Id())
{
    this.sl = StringToInteger(m_edit_sl.Text());
    Print("Edit SL: ", this.sl);
}
And for other fields such as Deviation and Stop Limit:
if(id == ON_END_EDIT + CHARTEVENT_CUSTOM && lparam == m_edit_deviation.Id())
{
    this.deviation = StringToDouble(m_edit_deviation.Text());
    Print("Edit Deviation: ", this.deviation);
}
if(id == ON_END_EDIT + CHARTEVENT_CUSTOM && lparam == m_edit_stop_limit.Id())
{
    this.stop_limit = StringToDouble(m_edit_stop_limit.Text());
    Print("Edit Stop Limit: ", this.stop_limit);
}
- ON_END_EDIT + CHARTEVENT_CUSTOM: Triggered when the user finishes editing a field.
- Each if statement checks whether lparam matches the ID of the corresponding control (such as an edit control). If so, the internal variable is updated with the new value entered by the user. Values are converted to the appropriate types (double, int, etc.) and normalized when needed.
4. Retrieving the Ideal Lot Size and Stop Loss
Here we check whether the user has clicked one of the buttons to retrieve the ideal lot size or ideal stop loss. Depending on which button was pressed, the corresponding calculations are performed.
For the "Get Lot" button:
if(id == ON_CLICK + CHARTEVENT_CUSTOM && lparam == m_button_get_lote.Id())
{
    Print("Risk Per operation: ", this.risk_per_operation);
    Print("SL in points: ", this.sl);
    Print("Order type get lot: ", EnumToString(this.order_type_get_lot));

    double new_lot;
    double new_risk_per_operation;

    GetIdealLot(new_lot, GetMaxLote(this.order_type_get_lot), this.risk_per_operation, new_risk_per_operation, this.sl);

    PrintFormat("Loss in case the following operation fails, with the parameters: lot %.2f and stop loss of %i points will be %.2f ", new_lot, this.sl, new_risk_per_operation);

    EditLabelResultLote(DoubleToString(new_lot, 2));
    m_button_get_lote.Pressed(false);
}
For the "Get SL" button:
if(id == ON_CLICK + CHARTEVENT_CUSTOM && lparam == m_button_get_sl.Id())
{
    Print("Risk Per operation: ", this.risk_per_operation);
    Print("Order type get sl: ", EnumToString(this.order_type_get_lot));

    double new_lot;
    long new_sl = CalculateSL(this.order_type_get_sl, this.risk_per_operation, new_lot, this.deviation, this.stop_limit);

    PrintFormat("For the risk per operation %.2f the chosen lot is %.2f and the ideal stop loss in points is %i", this.risk_per_operation, new_lot, new_sl);

    EditLabelResultSL(IntegerToString(new_sl));
    m_button_get_sl.Pressed(false);
}
- ON_CLICK + CHARTEVENT_CUSTOM: Checks that the click event corresponds to the specific buttons (m_button_get_lote or m_button_get_sl).
- The calculations are performed using the GetIdealLot and CalculateSL functions to determine the ideal lot size and stop loss.
- The results are displayed in the panel labels (EditLabelResultLote and EditLabelResultSL).
- Finally, the button is deactivated by setting its state to false (m_button_get_lote. Pressed(false)).
5. Returning the OnChartEvent
After handling the events, the function returns the event to the base class CAppDialog, so that the base function can also process any other events that may have occurred:
return(CAppDialog::OnEvent(id, lparam, dparam, sparam));
This step is important to ensure that other important events not explicitly handled in OnEvent are not lost.
Panel Initialization: Using the OnInit Event and General Setup
In this section, we configure the risk-management panel using the custom CRiskManagementPanel class. This panel will manage lot size and stop-loss calculations, along with other essential trader functions, presented through a graphical interface. Below, we see how to declare, initialize, and manage this panel in the program.
1. Global Object Declaration
First, we declare the CRiskManagementPanel object in the program's global section. This allows the panel to be accessible from different methods in the code, such as OnInit, OnDeinit, and OnChartEvent.
//+------------------------------------------------------------------+
//| Global Variables                                                 |
//+------------------------------------------------------------------+
CRiskManagementPanel risk_panel; // Declare the panel object globally
2. Panel Setup in the OnInit Event
In the OnInit event, we configure the panel using the Create method. This method initializes the panel's graphical window and defines its position and size. If panel creation fails, the program returns INIT_FAILED to indicate an initialization error. Afterwards, the panel is executed using the run method, which activates the interface for user interaction.
//+------------------------------------------------------------------+
//| Expert initialization function                                   |
//+------------------------------------------------------------------+
int OnInit()
  {
   //--- Create the risk management panel
   if(!risk_panel.Create(0, "Test Risk Management", 0, 40, 40, 380, 380))
      return(INIT_FAILED); // If panel creation fails, return an error code

   //--- Run the panel
   risk_panel.Run(); // Start the graphical interface

   //--- Return success
   return(INIT_SUCCEEDED);
  }
- 0 (chart_id): Indicates that the panel will be created in the chart's main window.
- "Test Risk Management" (name): Defines the title that appears on the panel window.
- 0 (subwin): Indicates the subwindow where the panel will appear. As we are creating the panel in a bot, we use 0.
- 40, 40 (coordinates): Specifies the panel's initial position in pixels (x=40, y=40).
- 380, 380 (dimensions): Defines the panel width and height in pixels.
3. Panel Destruction in the OnDeinit Event
When the program terminates or closes, we must release the resources used by the panel. For this, we use the Destroy method inside the OnDeinit event. This ensures that no residual graphical elements remain that could interfere with future programs.
//+------------------------------------------------------------------+
//| Expert deinitialization function                                 |
//+------------------------------------------------------------------+
void OnDeinit(const int reason)
  {
   //--- Destroy the risk management panel
   risk_panel.Destroy(reason); // Free resources and remove the panel
  }
4. Handling Events with OnChartEvent
The OnChartEvent method is key for capturing and interpreting user interactions with the panel, such as button clicks, text field input, or selection changes in ComboBoxes. These events are processed via the ChartEvent method of the CRiskManagementPanel class.
//+------------------------------------------------------------------+
//| Expert chart event function                                      |
//+------------------------------------------------------------------+
void OnChartEvent(const int id,         // Event ID
                  const long& lparam,   // Event parameter of type long
                  const double& dparam, // Event parameter of type double
                  const string& sparam) // Event parameter of type string
  {
   //--- Pass the chart event to the risk panel for processing
   risk_panel.ChartEvent(id, lparam, dparam, sparam);
  }
Panel Testing and Validation
Now, we run the Expert Advisor on a symbol; in my case, I will use XAUUSD (gold). The chart appears as follows:

For transparency and debugging purposes, my account balance is as follows:

At this moment, as can be verified, I have no open positions.
Here's how to use the panel:
1. Fill in the "Risk Per Operation" field with a percentage (applied to the current account balance). In this example, I choose 3% of my account.

Note: You can also modify the edits for deviation and stop limit.
2. Select what you want to calculate. We will start with the function to obtain the ideal lot for my trade based on stop loss in points, risk per operation, and order type. I choose a stop loss of 500 points for a buy order (ORDER_TYPE_BUY).

Click the "Save" button in the "SL Point" line. The result is:

The result shows a lot of 0.03 on the panel. Additionally, in the Experts tab, the following appears:

This message provides information such as the maximum lot size (0.45), risk per operation, and the potential loss if the trade fails using the calculated lot and stop loss ($15.45 USD).
3. Next, we test the method for calculating lot size based on risk per operation. Click the "get" button on the same line as the "Get ideal SL" label:

The result is a stop loss of 1856 points, as well as:

An ideal lot of 0.01 for a 3.0% risk.
Conclusion
In this article, we have learned how to implement a lot-size and stop-loss "calculator", a highly useful tool for any trader. We also explored how to use MQL5 classes and libraries to create custom panels. Furthermore, we delved into MQL5 class structures, including inheritance and the use of objects such as edits, ComboBoxes, and buttons, enabling us to build dynamic and functional graphical interfaces.
This approach not only optimizes workflow but also opens a wide range of possibilities for developing custom tools in MQL5. In the next article, we will begin working on the main class, consolidating the concepts presented here. I hope this guide has been helpful and encourages you to continue exploring and creating advanced graphical interfaces to enhance your trading experience.
All files created and used in this article are shown in the table:| File name | Description |
|---|---|
| "Risk_Management_Panel.mq5" | Expert Advisor file containing the risk-management panel developed in this article. |
| "Risk_Management.mqh" | Include file defining functions for lot size calculation, stop loss, and other risk-management functionalities. |
Translated from Spanish by MetaQuotes Ltd.
Original article: https://www.mql5.com/es/articles/16985
Warning: All rights to these materials are reserved by MetaQuotes Ltd. Copying or reprinting of these materials in whole or in part is prohibited.
This article was written by a user of the site and reflects their personal views. MetaQuotes Ltd is not responsible for the accuracy of the information presented, nor for any consequences resulting from the use of the solutions, strategies or recommendations described.

- Free trading apps
- Over 8,000 signals for copying
- Economic news for exploring financial markets
You agree to website policy and terms of use