
This guide shows how to use DRX Smart RR step by step. It is written for two kinds of trader: those who only want a clean risk-reward tool, and those who need a hard guard around a prop-firm account. Open a demo chart and follow along. This is part 1. Part 2 covers the limits, the lock and prop firms.
DRX Smart RR on the MQL5 Market →
What Smart RR is, and what it is not
| ✓ What it is A trade manager for manual traders. You draw the trade, the tool works out the lots, one held button sends it, and a guard stops you at your limits. | ✗ What it is not No signals, no strategy, no auto-trading, no promise of profit. Every trade starts with your hand on the button. Whether your trades make money is still your work. |
Quick start in three steps
| 1 Install From Market → Purchased. Turn on Algo Trading in the toolbar and drag the tool onto a chart. | 2 Set your limits The assistant asks for your mode, limits and risk, and shows them in money. | 3 First trade On demo: drag the stop, click 2R, then hold BUY for a moment. |
1. The first start
On the first start, an assistant opens in the middle of the chart. You cannot trade from the cockpit until you finish it, because the guard must know your limits first.
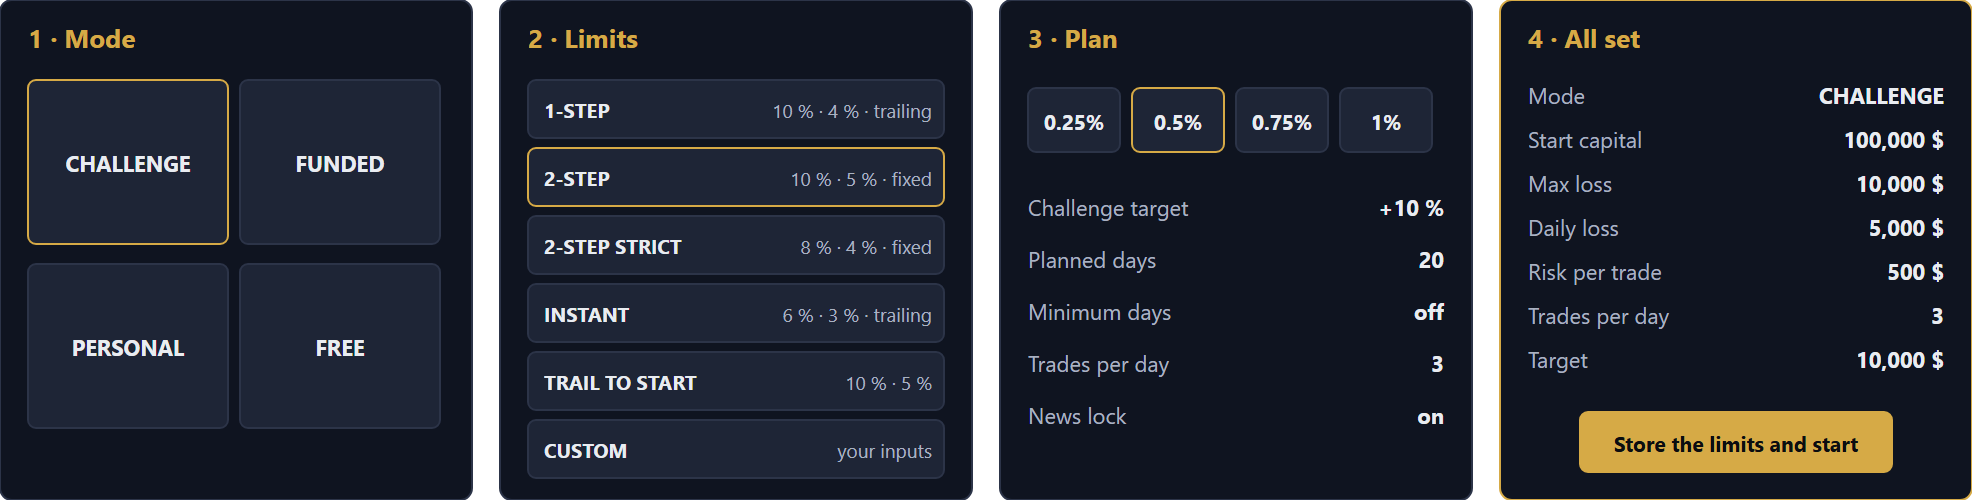
| Mode | For | In short |
|---|---|---|
| Challenge | Prop-firm evaluation | Target first, hard limits |
| Funded | Prop-firm funded account | Payout first, hard limits |
| Personal | Your own account | Own limits, only stricter |
| Free | Only the trade tool | Hints and statistics, nothing locks |
In Challenge and Funded you pick a rule profile. In Personal and Free you set the limits yourself.
| Profile | Max drawdown | Daily loss | Type |
|---|---|---|---|
| 1-Step | 10 % | 4 % | Trailing |
| 2-Step | 10 % | 5 % | Fixed |
| 2-Step strict | 8 % | 4 % | Fixed |
| Instant | 6 % | 3 % | Trailing |
| Trail to start | 10 % | 5 % | Trailing until start |
| Custom | your input | your input | your input |
Profiles are templates, not the rules of a specific company. Compare them with your provider's rules. If they differ, use Custom with the exact numbers.
Key idea After the assistant, in Challenge, Funded and Personal, the limits can only get stricter from inside the tool. That is the difference between a rule and a good intention.
If you attach the tool to a challenge that already runs, enter the original account size in the input Start capital for the limits, for example 100000, so the percentages match your provider's.
2. The window at a glance
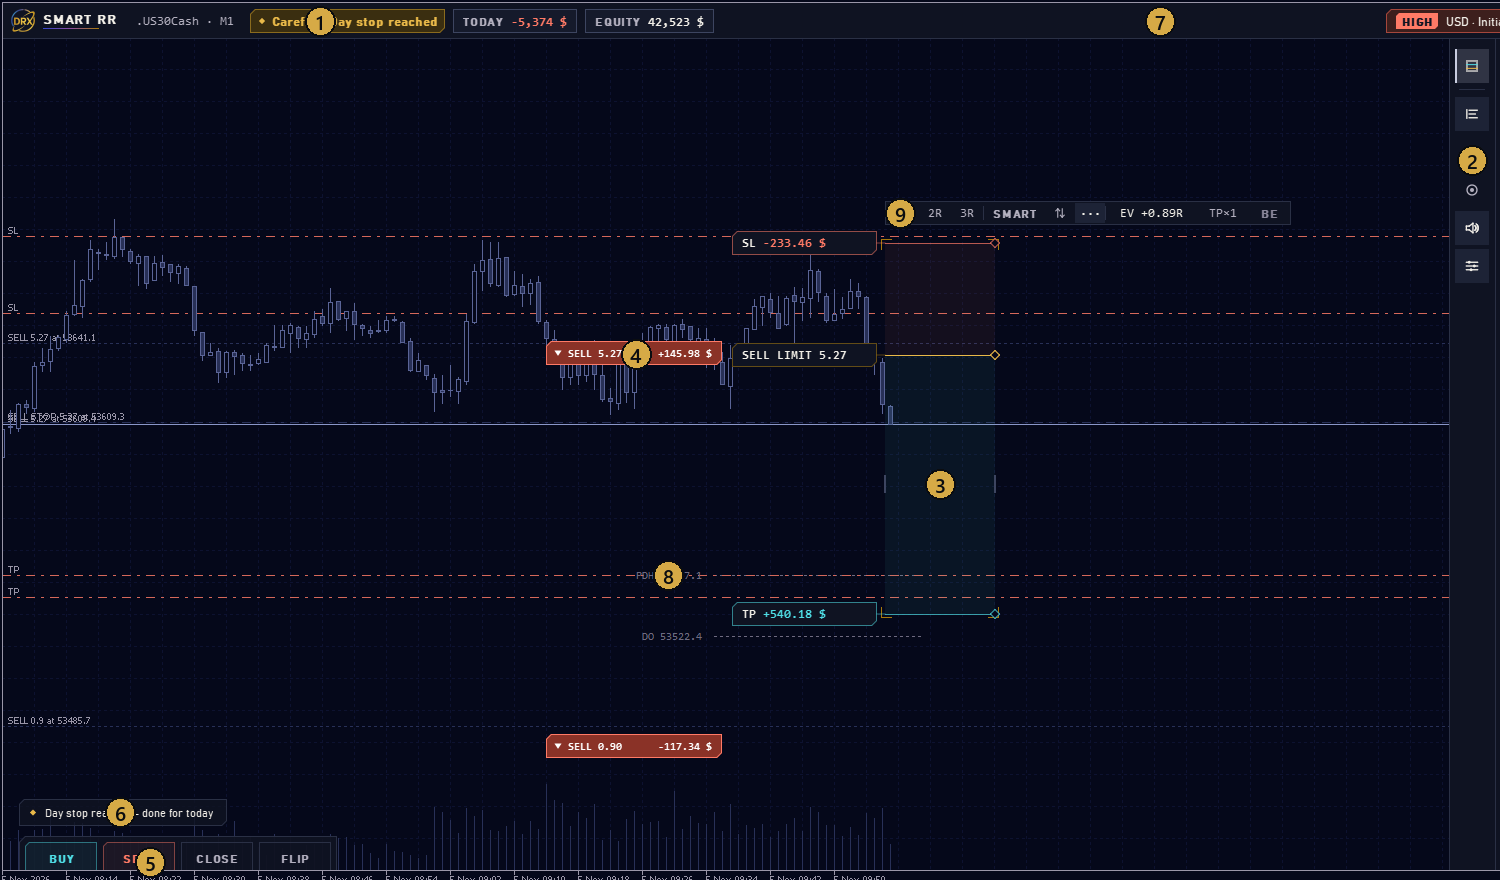
| Area | What it is | |
|---|---|---|
| 1 | State chip | One word for the state of the account |
| 2 | Rail | Planner, compact cards, scalp / swing, focus, sounds, zones |
| 3 | Planner | Your next trade: lines, cards and zones |
| 4 | Position tag | An open position with lots and live profit |
| 5 | Quick bar | BUY, SELL, CLOSE, FLIP |
| 6 | Message line | One short message at a time |
| 7 | News chip | The next important event |
| 8 | Key level | For example the previous day high |
| 9 | Planner bar | 1R, 2R, 3R, SMART, flip, and more |
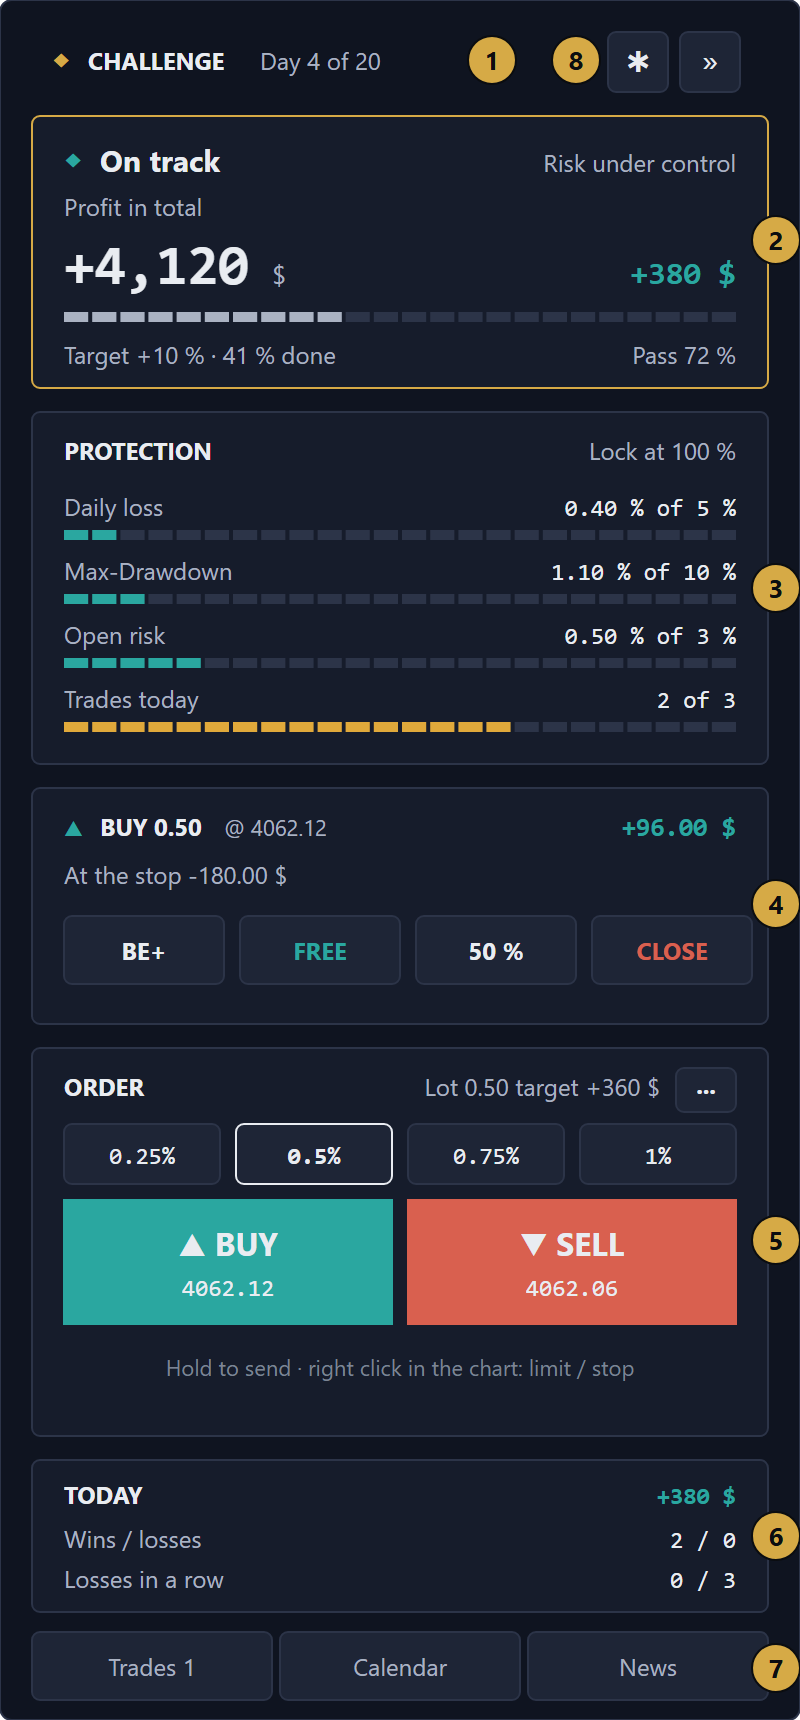
| Block | What it shows | |
|---|---|---|
| 1 | Mode line | Mode and the day of the period |
| 2 | Hero card | State, total profit, today, progress, pass chance |
| 3 | Protection | Daily loss, max drawdown, open risk, trades today |
| 4 | Position card | Lots, profit, what happens at the stop, BE+, FREE, partial, CLOSE |
| 5 | Order | Lots, target, risk chips, BUY and SELL |
| 6 | Today | Wins and losses, streak, next news |
| 7 | Pages | Trades, Calendar, News |
| 8 | Gear and fold | Settings, and fold the panel |
Colors carry meaning: cyan is long or positive, coral is short, negative or locked, gold is a warning or something selected.
3. The planner
The planner is your next trade before it exists. It sits right of the last candle, so it never covers the price, and it cannot slide under the panel.
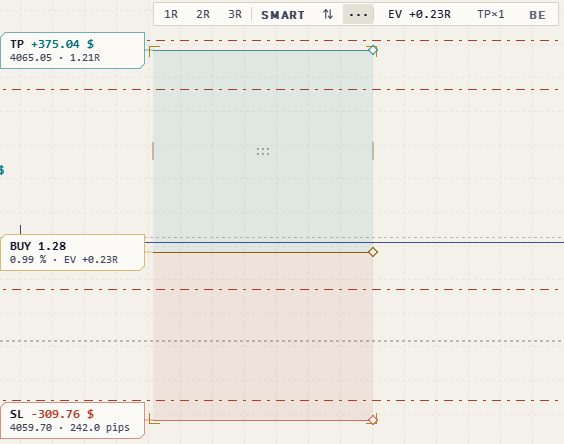
| Action | Result |
|---|---|
| Drag the target or stop | Moves that price. Lots adapt. Snaps to S/R zones. |
| Drag the entry | Moves the whole plan and makes it a pending order. |
| Drag the box or an edge | Moves it sideways, or changes the width. |
| Double-click a card | Type pips or a price: 13.6 means pips, 4040.5 means a price. |

| Cell | What it does |
|---|---|
| 1R, 2R, 3R | Target at 1, 2 or 3 times the risk |
| SMART | Stop behind the nearest zone, target at the next |
| Flip arrows | Turns the plan from long to short |
| ··· | Shows EV, TP× and BE |
| EV | Expectancy of this plan |
| TP× | 1, 2 or 3 targets |
| BE | After TP1, the rest goes to BE+ |
Market or pending. In market mode the entry follows the live price. In pending mode it stays at your price, and the order type follows from where it sits: BUY STOP above the price, BUY LIMIT below it, SELL LIMIT above it, SELL STOP below it. Press 8 to switch.
4. R: the one idea behind everything
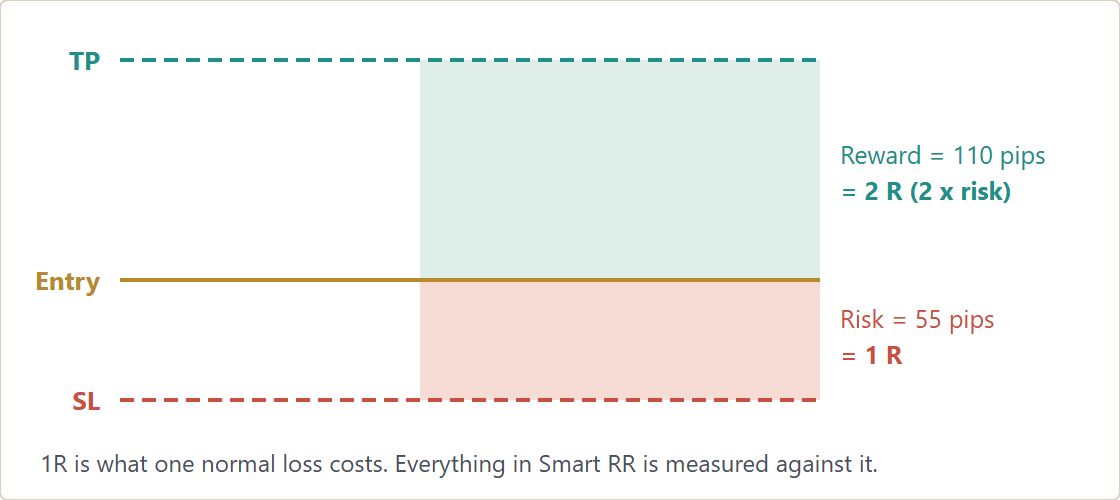
1R is what you lose if the stop is hit. A trade that wins twice that is +2R. R makes trades comparable, and Smart RR uses it everywhere.
A plan only pays if reward:risk and win rate fit together:
| Win rate | You need at least |
|---|---|
| 30 % | 2.33 R |
| 40 % | 1.50 R |
| 50 % | 1.00 R |
| 60 % | 0.67 R |
The EV on the planner is win rate × reward:risk - (1 - win rate) . It uses your real statistics from 10 closed trades on. If a plan has a negative EV, the tool asks once more before sending.
5. Position size
You decide what a loss may cost, and the lots follow:
lots = risk money / (stop distance in ticks × tick value per lot)
Example. 100,000 $, risk 0.5 % = 500 $, EURUSD, 25-pip stop, about 10 $ per pip and lot: 500 / (25 × 10) = 2.00 lots. With a 50-pip stop, the same 500 $ means 1.00 lot. Tick values come from your broker, so gold, indices and crypto work the same way.
| Risk base | One chip means | Best for |
|---|---|---|
| % of start capital | The same money every time | Prop firms |
| % of equity | Follows the account now | Compounding |
| % of balance | Like equity, without open trades | Own account |
| Fixed money | A fixed amount | Traders who think in money |
| Fixed lots | A fixed size, no calculation | A fixed routine |
Open the dots in the Order block to change it.
A stop is an order, not a guarantee. Spread, slippage and gaps can make a loss bigger than 1R. Leave a margin to your limits.
6. Sending an order
BUY and SELL are held, not clicked. The button fills for 0.4 seconds, then the order goes out. Let go early, and nothing is sent.
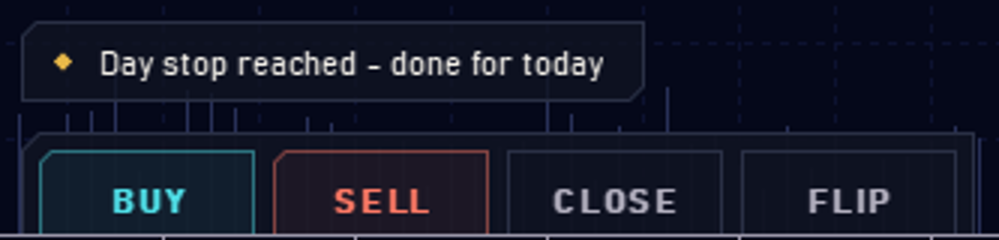
With the keyboard, press 1 for BUY or 2 for SELL. The risky keys need a second press within 1.2 seconds.
File: blog_bilder/s_keys.png
If something blocks you, BUY and SELL look dim and the line under them gives the reason. Click anyway, and the message tells you exactly what stops you.
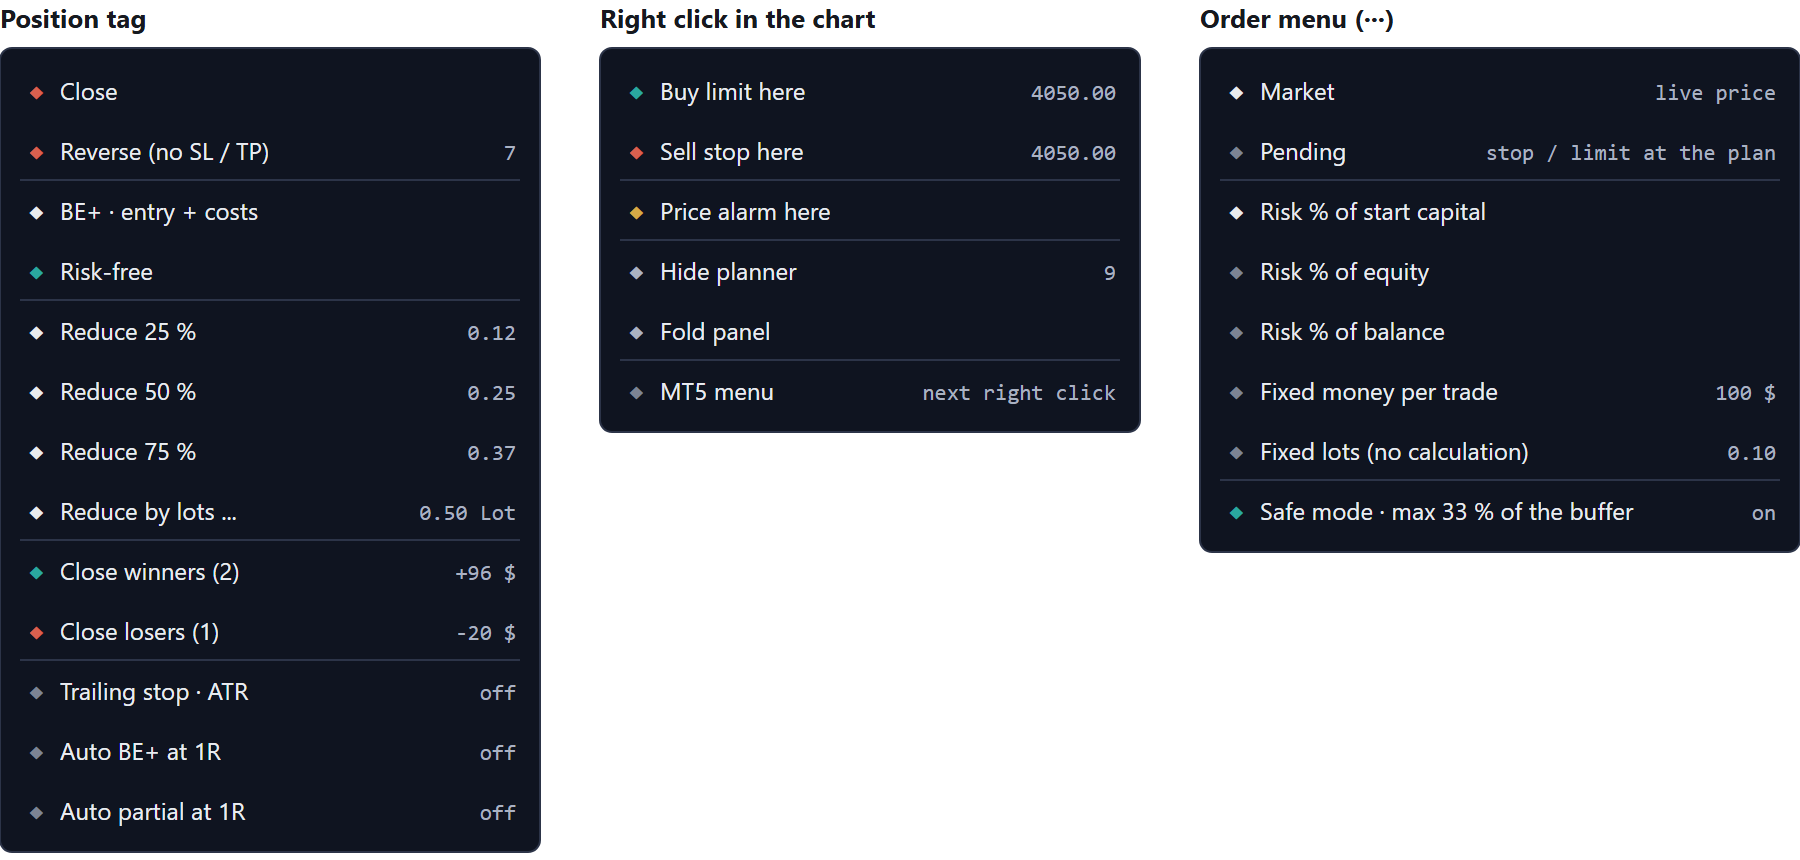
Limit and stop orders: right click at a price in the chart and choose the order. The plan moves there, and you still hold BUY or SELL to send.
7. Partial targets
Click TP× to use two or three targets. Each becomes its own position with its own take profit at the broker, so targets work even when MT5 is closed.
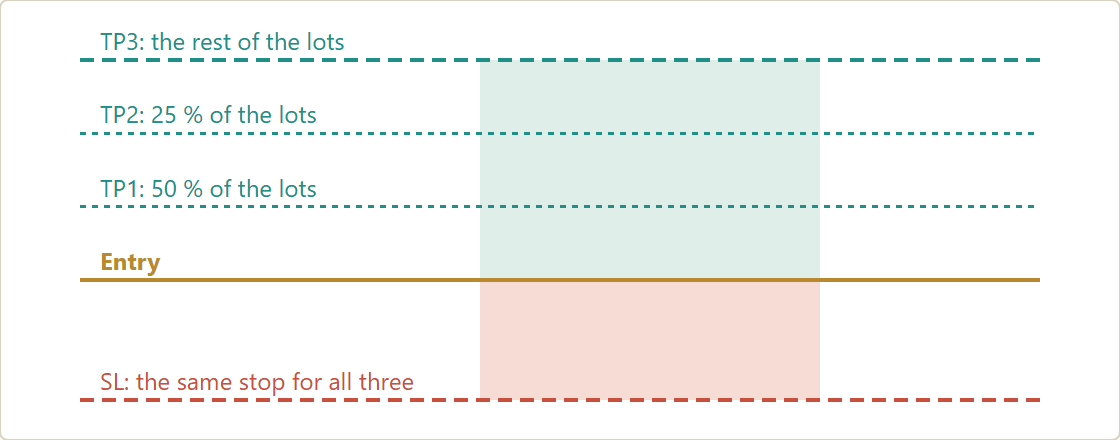
Two targets split 50 % and the rest, three split 50, 25 and the rest. Drag the small lines to move them. Click BE so that the rest goes to BE+ after TP1, which works while MT5 runs. Partial targets need a hedging account. On netting you get one trade with the full target.
8. SMART and S/R zones
The tool scores swing highs and lows on H1, H4 and D1 into zones of 0 to 100 %. Timeframe, age, reaction, role reversal and touches raise a zone, and candles cutting through it lower it. Point at a zone, and it tells you why it exists. Key levels show the previous day and week high and low, and the day open.
SMART makes a plan in one click: long near support, short near resistance, stop behind the zone, target at the next zone. Nothing is sent.
SMART is a starting point, not a signal. It saves the dragging when you have already decided.
9. Manage a position
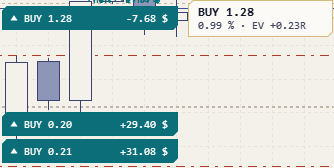
Every position gets a tag on the chart. Click it: the menu opens, and the planner shows that position. Drag its stop or target, and the change goes to the broker when you release. Esc lets go.
| Action | What it does |
|---|---|
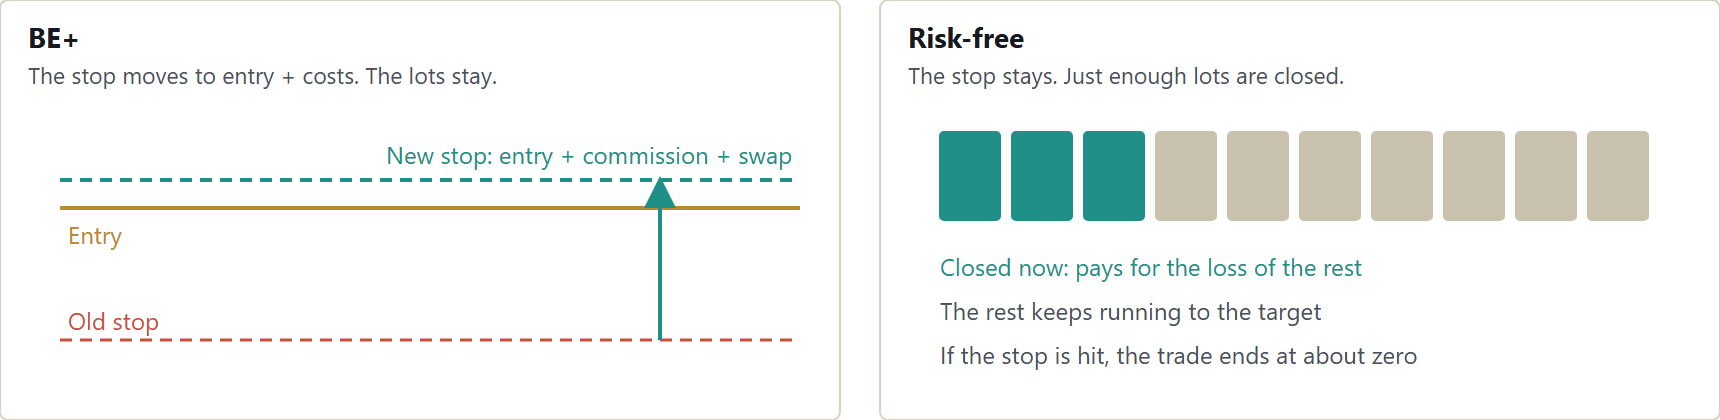
| BE+ (key 4) | Stop to entry plus real costs: commission both ways and negative swap |
| Risk-free (key 5) | Closes exactly enough that the rest cannot lose at its stop |
| Partial (key 6) | Closes your set share, 50 % by default |
| Reduce | 25, 50, 75 % or a typed lot size |
| Close winners / losers | One click, with the sum shown first |
| Reverse (key 7, twice) | Closes and opens the other way, without stop or target |
Automatic management is off by default. Switch it on in the position menu or the settings. All of it needs MT5 running.
| Method | The stop follows |
|---|---|
| ATR | The price at x × ATR(14) |
| Points | The price at a fixed distance |
| Bar high / low | The last closed bar |
| Fractal | The latest confirmed fractal |
| EMA | A moving average, default 20 |
Auto BE+ and auto partial close work at a chosen R, once per position. Scalp and swing presets set the method and level for you.
| Scalp | Swing | |
|---|---|---|
| Targets | 1 | 2 |
| Auto BE+ level | 0.5R | 1R |
| Trailing method | Bar | Fractal |
| Planner | Mini | Full |
| ATR for a new stop | Chart | H1 below H1 |
The Trades page lists all positions and orders of the account. The journal writes a CSV line and a screenshot per trade into MQL5\Files\DRX_Cockpit .
The limits, the lock, safe mode, challenges, funded accounts, news and questions.
Read part 2
DRX Smart RR on the MQL5 Market →
Trading leveraged products involves a high risk of losing money. DRX Smart RR is a software tool. It gives no investment advice and makes no promise of profit, of passing a challenge or of keeping an account. Simulated numbers are estimates. Test on a demo account first.