

Reversal Liquidity Grab Strategy: A Full Forex Strategy Tutorial by PipModo
1. Short Introduction
The Reversal Liquidity Grab Strategy looks for a failed breakout at an obvious support or resistance area. Instead of trying to guess the exact top or bottom, the trader waits for price to sweep a prior high or low, reject the sweep, and then checks three more confluences: a compact candle structure, Williams Percent Range divergence, and a clear support or resistance location. The trade is taken only after the reversal is confirmed.
2. Strategy at a Glance
| Item | Details |
|---|---|
| Style | Price-action reversal using a liquidity sweep and confirmation |
| Market | Liquid Forex pairs |
| Timeframes | H1 primary; 15M can be used for tighter execution when the same rules are present |
| Direction | Buy and Sell |
| Core confluences | Liquidity grab, candle rule, Williams Percent Range divergence, support/resistance |
| Buy trigger | Sweep below support/prior low, upward rejection, then bullish confirmation |
| Sell trigger | Sweep above resistance/prior high, downward rejection, then bearish confirmation |
| Stop method | Beyond the liquidity-grab wick |
| Target method | Next support/resistance, opposite range edge, or nearest realistic liquidity level |
| Filters | All four confluences; compact structure; clear level; clean distance to target |
3. Core Market Idea
The simple idea is this: obvious prior highs and lows often attract stop orders. Price can push through one of these levels, take the liquidity sitting beyond it, and then fail to continue. That failed breakout becomes interesting only when the move is at a meaningful support or resistance area, the structure is compact, and Williams Percent Range shows divergence. All four confluences should agree before entry.
4. Markets and Timeframes
Use the method on liquid Forex pairs. Use H1 as the primary chart for finding cleaner support and resistance locations. A 15-minute chart can also be used for tighter execution when the same reversal rules are present.
5. Indicator Setup
Williams Percent Range is the divergence tool in this strategy. It is not an entry signal by itself. Use it to compare the latest price extreme with the earlier extreme while price is sweeping support or resistance.
| Indicator | Role | Trading use |
|---|---|---|
| Williams Percent Range | Divergence confirmation | Bullish: price lower low + WPR higher low. Bearish: price higher high + WPR lower high. |
6. Chart Setup
- Open a liquid Forex pair on H1.
- Mark obvious support and resistance. Give extra attention to equal highs, equal lows, prior swing highs, and prior swing lows.
- Add Williams Percent Range below the price chart.
- Wait for price to attack one of the marked levels and sweep the prior high or low.
- Check the candle rule, the Williams Percent Range divergence, and the support/resistance location before considering an entry.
- If using 15M for tighter execution, keep the same four-confluence rule.
7. Buy Setup
Conditions
- Price is moving down into a visible support area or prior low.
- Price trades below that low or support and sweeps sell-side liquidity.
- Price rejects the sweep and moves back above the swept area.
- The structure is compact; the preferred setup has fewer than 10 candles between the key touches.
- Price makes a lower low while Williams Percent Range makes a higher low.
- The setup is located at clear support rather than in the middle of the range.
Trigger
After the sweep rejects, wait for a small bullish confirmation level or structure break. This is the bullish reversal trigger.
Entry & Management
Entry: Enter only after price has rejected the swept low and the bullish confirmation is present.
Stop Loss: Place the stop below the liquidity-grab wick or below the support invalidation area.
Take Profit / Exit: Target the next resistance, the opposite side of the range, or the nearest realistic liquidity/support-resistance level above.
8. Sell Setup
Conditions
- Price is moving up into a visible resistance area or prior high.
- Price trades above that high or resistance and sweeps buy-side liquidity.
- Price fails above the level and moves back below the swept area.
- The structure is compact; the preferred setup has fewer than 10 candles between the key touches.
- Price makes a higher high while Williams Percent Range makes a lower high.
- The setup is located at clear resistance rather than in the middle of the range.
Trigger
After the sweep rejects, wait for a small bearish confirmation level or structure break. This is the bearish reversal trigger.
Entry & Management
Entry: Enter only after price has rejected the swept high and the bearish confirmation is present.
Stop Loss: Place the stop above the liquidity-grab wick or above the resistance invalidation area.
Take Profit / Exit: Target the next support, the opposite side of the range, or the nearest realistic liquidity/support-resistance level below.
9. Stop Loss
The sweep wick is the main invalidation reference. For a buy, the stop sits below the sweep low. For a sell, the stop sits above the sweep high. Do not place the stop inside the level that has just been swept.
10. Take Profit
Use structure for the target. Aim for the next realistic support or resistance level, the opposite side of a clear range, or nearby liquidity in the direction of the reversal. A larger target makes sense only when the chart has clear open space.
11. Filters and No-Trade Conditions
- Take the setup only when liquidity grab, candle rule, divergence, and support/resistance are all present.
- Do not trade a support or resistance touch by itself. The liquidity sweep and rejection must come first.
- Prefer compact structures with fewer than 10 candles between the key touches. Structures with more than 10 candles are weaker or not preferred.
- Avoid entries in the middle of a range without nearby support or resistance.
- In a trending market, use the reversal only when the sweep occurs at a major prior level, not randomly in the middle of the move.
- Do not chase after price has already moved far away from the reversal point.
- Check that there is clean distance to the next support or resistance target.
12. Strategy Logic (MQL5 Conceptual Code)
For algorithmic traders looking to map these manual rules into an Expert Advisor, the logic structure translates to the following strict conditions:
bool isSetupValid = false; // Core 4-Point Confluence Check if ((LiquiditySweep == true) && (WPR_Divergence == true) && (CandlesBetweenTouches <= 10) && (IsMajorSupportResistance == true)) { isSetupValid = true; } // Entry Trigger Check if (isSetupValid && ReversalConfirmation == true) { ExecuteTrade(); }
13. Worked Example 1
Price reaches a prior support area and briefly trades below the old low. That sweep creates the liquidity-grab condition. Price then rejects upward. The new price low is lower than the earlier low, while Williams Percent Range forms a higher low. With the compact candle structure and support confluence in place, the bullish confirmation provides the entry. The stop goes below the sweep wick and the target is the next resistance.
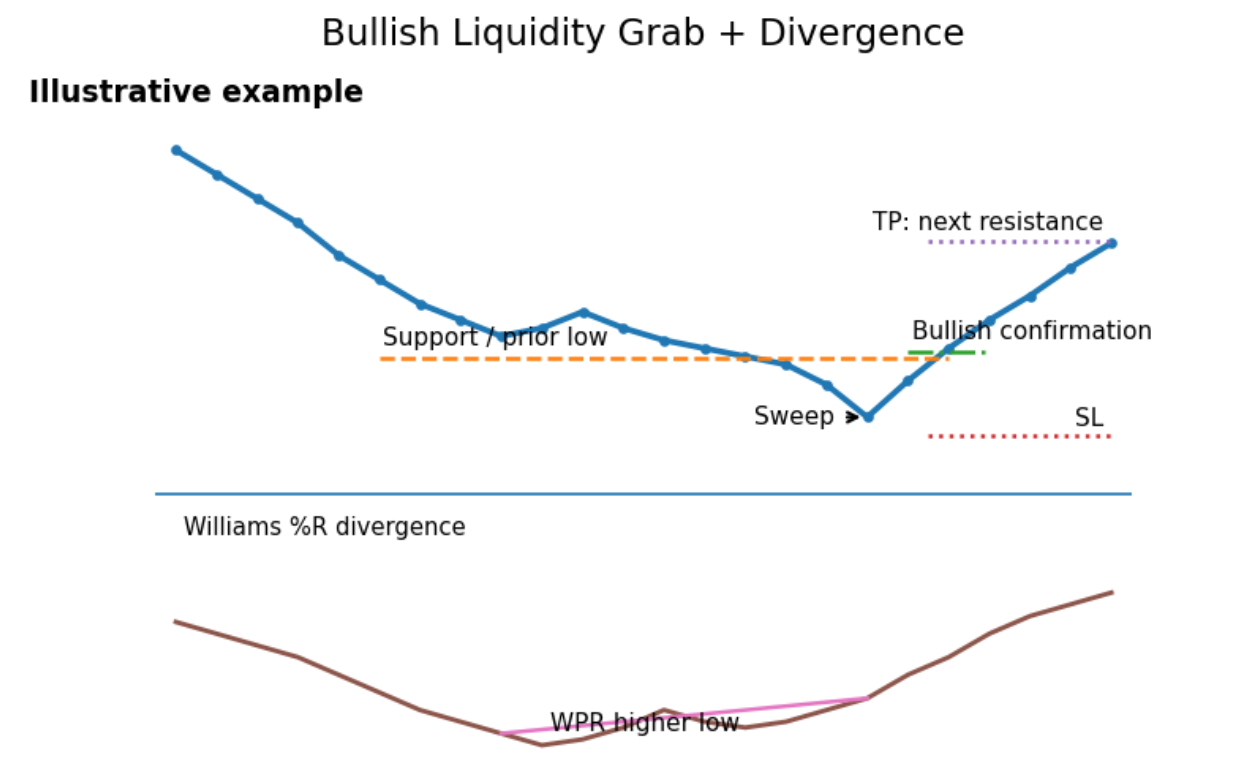
Figure 1. Illustrative example - Bullish liquidity grab at support with bullish Williams Percent Range divergence.
14. Worked Example 2
Price pushes into a prior resistance area and trades above the old high. The breakout then fails and price moves back below the swept area. Price has made a higher high, but Williams Percent Range forms a lower high. With a compact structure and resistance confluence, the bearish confirmation provides the entry. The stop goes above the sweep wick and the target is the next support.
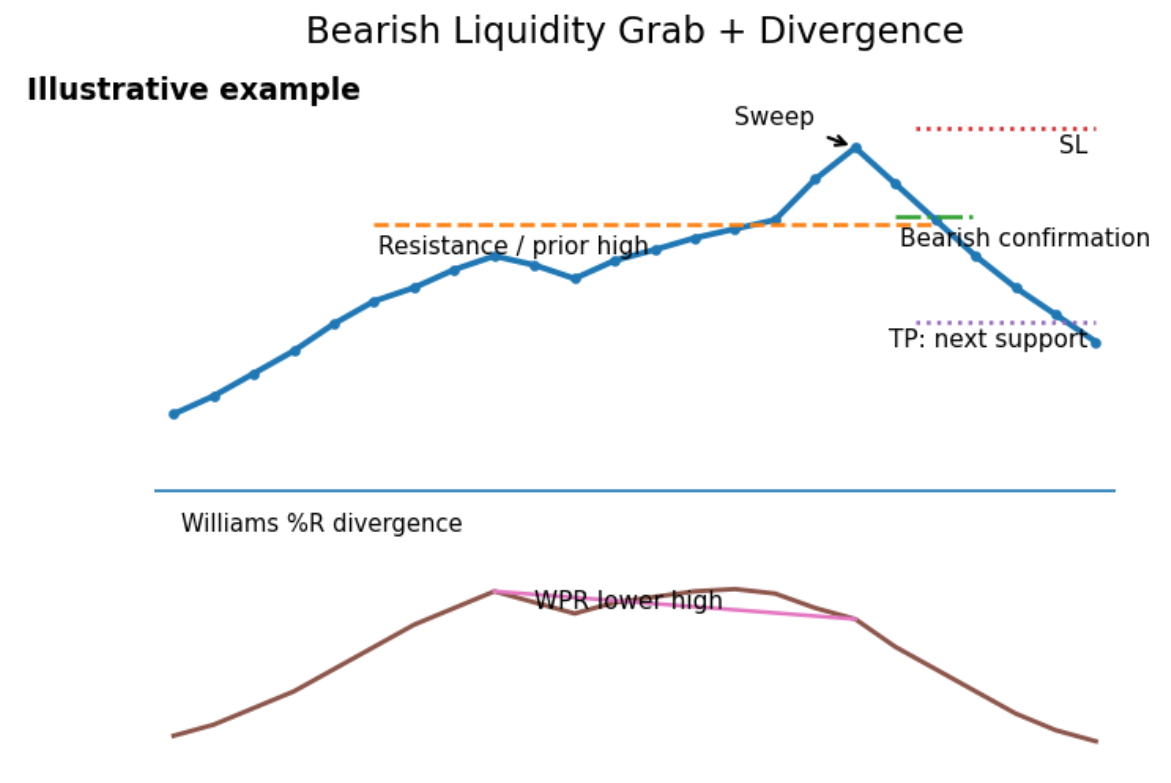
Figure 2. Illustrative example - Bearish liquidity grab at resistance with bearish Williams Percent Range divergence.
15. Common Trading Mistakes
- Buying support or selling resistance before a liquidity sweep appears.
- Entering immediately on the sweep without waiting for rejection and confirmation.
- Using Williams Percent Range divergence by itself without the other confluences.
- Treating a stretched structure with more than 10 candles between the key touches as a preferred setup.
- Taking reversals in the middle of the range.
- Placing the stop inside the liquidity-grab wick.
- Chasing an entry after price has already moved away from the reversal area.
- Ignoring nearby support or resistance when selecting the target.
16. Quick Trading Checklist
- Is price at an obvious support or resistance level?
- Did price sweep the prior low for a buy or the prior high for a sell?
- Did price reject back away from the swept level?
- Is the structure compact, preferably fewer than 10 candles between the key touches?
- Is Williams Percent Range showing the correct bullish or bearish divergence?
- Are all four confluences present before entry?
- Can the stop sit beyond the liquidity-grab wick?
- Is there enough clean distance to the next support or resistance target?
- Is the setup clear without forcing the pattern?
17. Final Summary
This strategy is built around patience. First mark a meaningful support or resistance area. Then wait for price to sweep the level instead of entering on the first touch. A valid reversal combines the liquidity grab with a compact candle structure and Williams Percent Range divergence. Enter only after the sweep is rejected and the small confirmation level or structure break appears. Keep the stop beyond the sweep wick and use the next realistic support or resistance area as the target.
18. PipModo Footer
Join the Public group discussion: PipModo - Strategy Lab
Featured Product: Gold Beast MT5


