
I. Introduction
This post will explain the input settings of the EA and provide some operational tips.
Boring Pips EA combines modern trading algorithms with classic trading techniques involving momentum, supply, and demand. Despite this, it maintains simplicity and effectiveness in both setup and operation.
Unlike many other EAs that overwhelm users with a long list of input parameters, Boring Pips allows only a few settings adjustments based on user risk appetite. I spent 2 years optimizing entry and exit parameters of the EA using 5 different variations of Boring Pips, integrating the best settings into the default EA and hiding them. This prevents users from over-optimizing risks and ensures consistency in EA usage.
The typical EA setup process only takes 1-2 minutes, with the settings file prepared and sent to you.
My advice is to use 3 risk modes: Boring, Low risk, or Medium risk for the first 2-3 months. Make sure you are familiar with how EAs work and understand their settings before making any changes related to "Personalized Settings."
You can also refer to frequently asked questions at the following link:
MT4 version
MT5 version
Live signal
FAQ
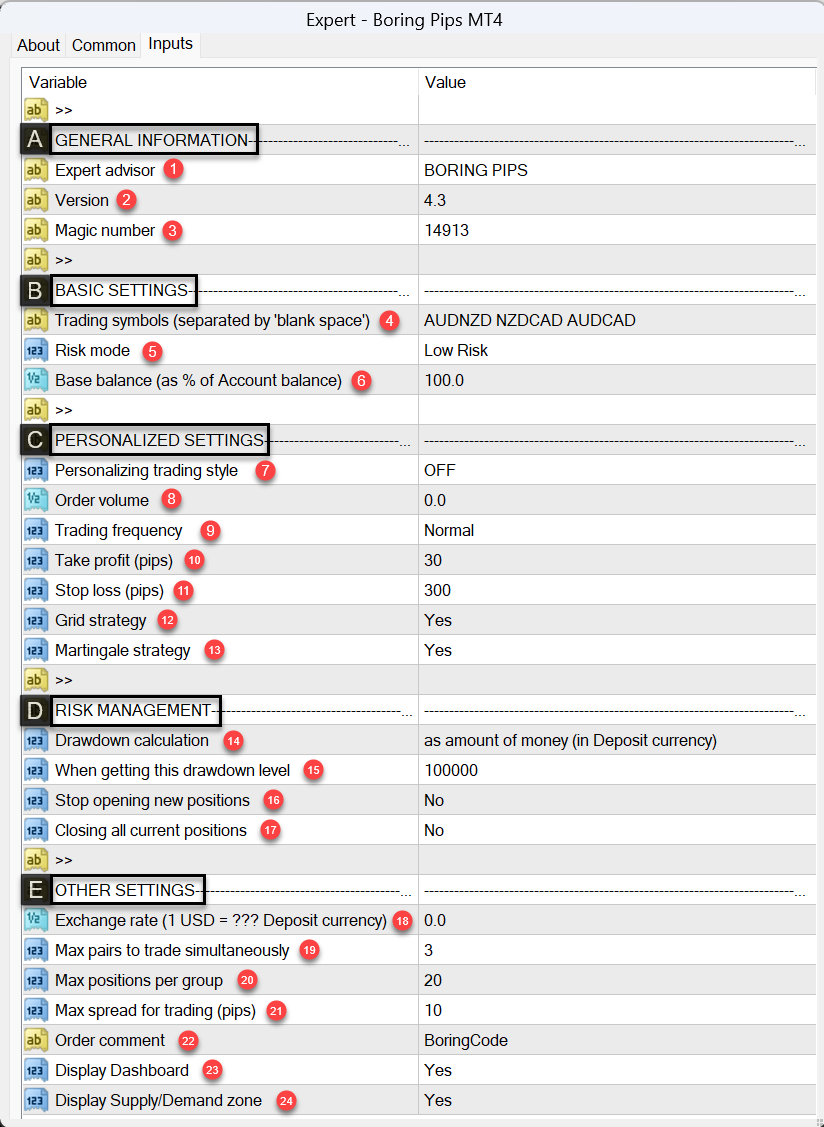
Figure 1: Version 4.3 - Installation interface
A. General information
Introducing the name and version of the EA, users can also change the 'magic number' for the EA.
1. Expert advisor: Name of the EA.
2. Version: Current version.
3. Magic number: the ID that positions of Boring Pips will carry, helping the EA manage its positions separately. If you use Boring Pips along with other EAs, ensure that the magic numbers of each EA are unique.
B. Basic Settings
4. Trading symbols: enter the currency pairs you want to trade with Boring Pips, some notes when entering currency pairs:
- Enter currency pairs exactly as provided by your broker, including any suffix/prefix if applicable (e.g., AUDNZDf, AUDNZD.g…)
- Separate currency pairs with spaces.
- The maximum number of entries in 'Trading symbols' is 3 currency pairs. If you enter 1 or 2 currency pairs, only those will be traded. If you enter more than 3 currency pairs, only a maximum of 3 currency pairs will be traded.
- If you want to trade more than 3 currency pairs, it is recommended to install Boring Pips on more than 1 chart, where the 'Trading symbols' on these charts will enter different currency pairs.
Please refer to question 28 in the FAQ for more information.
5. Risk mode: choose a risk mode that suits you, with 4 risk modes from low to high: Boring Mode, Low risk, Medium risk, High risk.
Please refer to question 12 in the FAQ for more information.
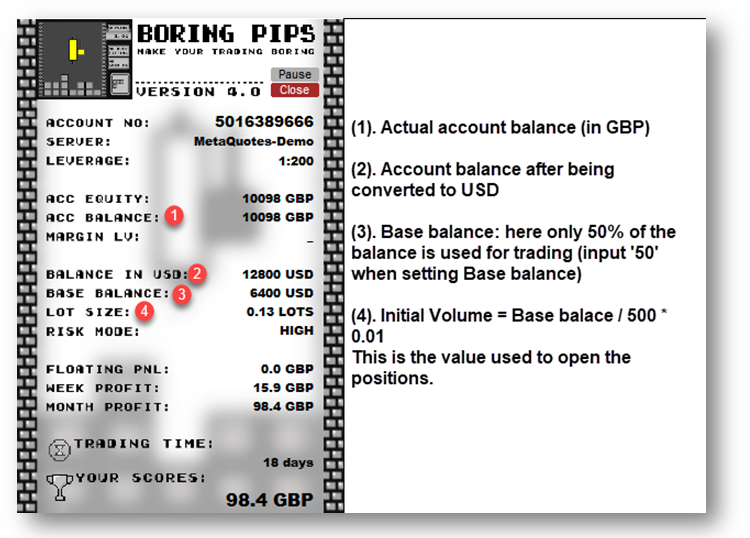
6. Base balance: This represents the percentage of your account balance allocated for trading with the EA.
- For example, if your account balance is $1000 and you want to use the full amount, enter '100' in the Base Balance input. The EA will then treat 100% of your balance as the base for calculating position size, starting with 0.02 lots.
- If you only want to use 50% of your capital, enter ‘50’, and the EA will consider $500 as the base, starting with 0.01 lot.
- For higher risk exposure, entering ‘200’ will make the EA operate as if the account has $2,000, opening positions from 0.04 lots.
❓How is the initial trading volume calculated?
Initial Volume = (Base Balance in USD / 500) × 0.01 lots💡Tip: Please verify the displayed Base Balance and calculated lot size in the Dashboard to ensure everything is working as expected. The Lot Size shown reflects the actual volume the EA will use to open trades — adjust this setting carefully based on your risk preference.
Figure 2: Dashboard interface
C. Personalized Settings
Personalised Settings allow for deeper customization across all aspects of the EA. These settings override the parameters defined in the Basic Settings.
For example, if the Risk Mode is set to Medium in the Basic Settings, then adjusting trading frequency here will affect how medium-risk signals are interpreted and used.
The current values in this section (under default settings) mirror those in Basic Settings. If you wish to modify a specific parameter, you must first enable 'Personalizing trading style' and then adjust the corresponding settings. Parameters that are not adjusted will retain their original behavior.
It is recommended to make changes in Personalized Settings only after operating the EA for 2-3 months and understanding how it functions.
7. Personalizing trading style: You need to switch it to ON first for changes in Personalized Settings to take effect.
8. Order volume: Sets the volume of the initial position.
Default is 0, meaning the volume from Basic Settings will be used.If a specific number is entered, that value will be used for initial trade entries.
Note: Use a period . for decimals (not a comma , ).
The volume must be within your broker’s allowed range (typically 0.01 to 100), and no more than 2 digits after the decimal.
9. Trading frequency: Adjust how often the EA opens trades:
This setting tightens or relaxes signal criteria, directly affecting how frequently signals are triggered.
Low
Normal
High
10. Take profit (pips): Set the profit-taking level for the EA's trades. Note that this is only for the first position, subsequent positions in the grid sequence will be closed based on Fibonacci retracement levels.
11. Stop loss (pips): Set the stop-loss level for the EA's positions.
12. Grid strategy: Enabled by default. If you turn off the Grid, each signal generated by the EA will enter 1-2 positions depending on the Risk mode in use.
13. Martingale strategy: Enabled by default. If you disable Martingale, the EA's positions will enter with the same volume as the initial position. Martingale will be meaningless if the Grid strategy is turned off.
D. Risk Management
This risk management option allows the EA to perform certain actions (such as stopping trading or closing positions) when the drawdown reaches a predefined threshold.
14. Drawdown calculation:Allows users to define how drawdown is measured — either as a percentage of the account balance or as a fixed value in the base currency (e.g. USD). This setting determines how the actions in items 16 and 17 will be triggered.
15. When getting this drawdown level:
Set the specific drawdown value here. It must match the method chosen in item 14:
If using percentage-based calculation, a value of 100 means 100% of the account balance.
- If using currency-based calculation, a value of 100 means 100 units of the account’s base currency (e.g., 100 USD for a USD-denominated account, 100 EUR for a EUR account).
16. Stop opening new positions: Yes/No. Option to stop opening new positions when condition 15 is met. In this case, the EA will halt opening new positions.
Existing positions will still be managed and closed according to the EA’s logic.
17. Closing all current positions: Yes/No. Option to close all current positions managed by the EA when condition 15 is met.
⚠️ The EA will only calculate drawdown and manage/close positions that it has opened.
💡 Tip: You can also manually pause trading or close positions on a specific symbol via the Dashboard. See more in the "Pause Trading and Close Positions Manually" section at the end of this guide.
E. Other Settings
18. Exchange rate:
To maintain consistent trading performance across accounts, regardless of the deposit currency, EA will convert the account balance to USD to calculate a suitable trading volume. This conversion process is automated.
If the conversion cannot be done automatically or the applied exchange rate is incorrect, users can update the exchange rate in the 'Exchange rate' section.
For example, if the trading account's currency is GBP and the exchange rate is 1 USD = 0.79 GBP, then enter 0.79 into "Exchange Rate".
19. Max simultaneous trading pairs:
This setting determines the maximum number of currency pairs that can be traded simultaneously.
If set to '1', pairs are traded sequentially. Once a pair closes its position, the next pair can be traded.
20. Max positions per group:
The EA organizes positions into groups, with each group consisting of a series of grid positions closed together. This setting dictates the maximum number of positions each group can have. For optimal performance, it is recommended to allow each group to have up to 8-15 positions.
21. Max spread for trading (pips):
This value, measured in pips (10 points), sets the maximum allowable spread for opening positions. Positions will not be openned if the floating spread exceeds this limit. This feature helps prevent trading in low liquidity conditions or during major news releases.
22. Order comments:
Here, users can input text to be displayed in the order comment section. A maximum of 15 characters is supported. It's important to note that the system will also include a character string dedicated to position management along with the user's input.
23. Display Dashboard:
This option toggles the visibility of the Dashboard on/off.
24. Display Supply/Demand zones:
This setting controls the display of supply and demand areas on the trading chart. Users can opt to show or hide these zones as needed.
II. Pause Trading and Close Positions Manually
Users of Boring Pips can also utilize the Pause and Close buttons on the control panel to Pause trading or Close all positions whenever desired.
- The 'Pause' button
: in its normal state, it is gray; when clicked, a confirmation dialog for Pausing trading will appear. Once confirmed, the EA will temporarily stop opening new positions, while current positions are still managed and closed as usual.
While the EA is Paused, the 'Pause' button changes to 'Paused' and turns red.
You can click this button again to return the EA to normal trading mode.
Note that if you are unable to reactivate the EA (the 'Pause' button still shows 'Paused' in red), go to the settings and check sections 14, 15 under 'Risk management'; the EA might have reached the maximum allowed drawdown and halted trading. In this case, adjust conditions in section 14 and/or disable actions in section 15 first, then reactivate the EA using the 'Pause' button.
- The 'Close' button
: Used to close all positions managed by Boring Pips. After clicking this button, a confirmation dialog will appear to confirm your intention to close all positions. Once confirmed, the EA will close all current positions it has opened.
If you have read this far and still have questions about EA, please refer to 31 frequently asked questions here.
Or feel free to leave me a private massage.
Thanks and Best Regards, Andy.


![[Two Different Approaches to Market Timing]: The Spiral Calendar and the VISTmany Research Project](https://c.mql5.com/6/1012/splash-preview-771691.png "[Two Different Approaches to Market Timing]: The Spiral Calendar and the VISTmany Research Project")
