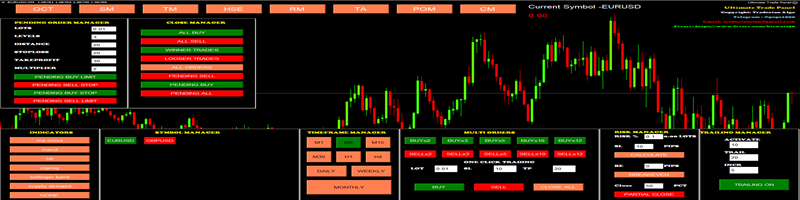

MT4 Version: Ultimate Trade Panel MT4
MT5 Version: Ultimate Trade Panel MT5
Complete User Documentation — MT4 & MT5
1. OVERVIEW
The Ultimate Trade Panel is a full-featured trading utility for MetaTrader 4 and 5 that puts one-click order entry, advanced risk management, and automated trade handling right on your chart. It uses a modular panel system with built-in support for trailing stops, breakeven, and a visual SL/TP preview overlay — so you can set your risk/reward ratios by dragging lines directly on the price chart. This tool solves the problem of slow, multi-click order execution and scattered position management, giving you a single control center for all your trades.
Who Should Use It: Active retail forex traders who want to cut down on execution time, manage multiple positions from one panel, and use visual risk tools without switching windows.
Main Benefit: Execute, modify, and close trades in one click while seeing your exact risk/reward ratio plotted on the chart before you confirm.
2. INPUT PARAMETERS & SETTINGS
This product shares a common set of general input settings with all Expert Advisor products in this series. The following sections are covered in the common guide: General Settings (lot size, SL/TP modes, magic number, trade direction), Breakeven Settings, Trailing Stop Settings, News Filter Settings and News Action Settings, Martingale Settings, Grid Settings, Hedge Settings, Risk Settings, Position Sizing, Alert Settings, Display Settings, Trade Time Settings, Trade Days Settings, Safeguard Settings, and Trend Filter Settings (MA Filter, ADX Filter, RSI Filter, MACD Filter, Parabolic SAR Filter — each with their own strategy options). All of these are fully documented in the Common General Input Settings for Expert Advisors. The sections below cover only the product-specific inputs unique to this product.
_______________________general Settings _________________________
These settings control the core trading behavior of the panel — how orders are executed, how the panel looks on your chart, and how you visually identify different currency pairs.
| Setting Name | Type | Default Value | Description | Example |
|---|---|---|---|---|
| Slippage | int | 3 | Defines the maximum price slippage in points allowed when your order is executed. If the market moves beyond this, the order won't fill — protecting you from unexpected fills during fast moves. | 5 — Use a higher value during news events to ensure your order still gets filled despite brief spikes. |
| Vertical gap between buttons (% of chart height) | double | 2 | Controls the vertical spacing between rows of buttons on the panel. Increase it if you find the panel too cramped, or decrease it to fit more controls on a smaller chart. | 3.5 — Bump it up when using a 4K monitor so buttons don't feel squished together. |
| Stoploss and Takeprofit Level Check | bool | false | When enabled, the panel verifies that your stop loss and take profit levels are valid according to your broker's minimum distance rules before placing a trade. This prevents rejected orders. | true — Turn this on if your broker enforces strict minimum SL/TP distances, especially on exotic pairs. |
| Preview SL/TP on chart; confirm with tick button | bool | true | Shows a visual overlay on the chart with your proposed stop loss and take profit levels before you commit. You can drag these lines to adjust, then click the tick button to confirm. Speeds up risk/reward assessment. | true — Keep it on for manual trading so you can see your R:R ratio before pulling the trigger. |
| Confirm before market orders | bool | false | Adds a confirmation dialog before any market order is placed. Useful if you're worried about accidental clicks during fast trading, but it does slow down execution slightly. | true — Enable this when you're testing a new strategy and want to double-check every entry. |
| _______________________SYMBOL COLORS _________________________ | string | ______________SYMBOL COLORS____________________ | This is a section header in the input list — it groups the individual currency color settings below. You don't change this value; it just organizes the parameters visually in the editor. | Leave as-is. It's a label, not a functional setting. |
| Eur | color | C'0,60,120 | Sets the display color for the Euro on the panel. Helps you quickly spot which currency you're trading when scanning multiple pairs at once. | C'0,80,160 — A brighter blue if you're using a dark chart background for better contrast. |
| Chf | color | C'70,90,25 | Defines the color for the Swiss Franc on the panel. Customize it to match your own color-coding scheme for faster visual recognition. | C'100,120,40 — Make it more vivid if you trade CHF pairs frequently and want them to stand out. |
| Aud | color | C'120,85,0 | Color setting for the Australian Dollar. Use it to differentiate AUD pairs from others in a multi-panel setup. | C'150,100,0 — A warmer gold tone that's easier to pick out on a busy screen. |
| Usd | color | C'0,75,45 | Sets the color for the US Dollar. Since USD is in most pairs, a distinct color helps you quickly identify when you're trading a dollar-based instrument. | C'0,100,60 — A deeper green that's still visible on light chart backgrounds. |
| Gbp | color | C'120,30,30 | Color for the British Pound. A strong red helps GBP pairs stand out, especially if you trade cable or GBP crosses regularly. | C'150,40,40 — Bump up the brightness if the default red blends into your chart's red elements. |
| Nzd | color | C'25,70,105 | Defines the color for the New Zealand Dollar. A muted blue works well, but you can change it to something more distinct if you trade NZD pairs often. | C'40,90,130 — A slightly brighter blue to differentiate from the Euro color. |
| Cad | color | C'70,35,95 | Sets the color for the Canadian Dollar. A purple tone helps it stand out from the other commodity currencies. | C'90,50,120 — Make it more vibrant if you trade USDCAD and want it to pop on the panel. |
| Jpy | color | C'110,45,70 | Color for the Japanese Yen. A pinkish tone makes JPY pairs easy to spot, which is handy given how many yen crosses there are. | C'140,60,90 — A stronger pink for better visibility on dark themes. |
| Xau | color | C'130,95,10 | Sets the color for Gold (XAU/USD). A golden-brown shade is the default, but you can pick any color that helps gold stand out from currency pairs. | C'180,130,20 — A brighter gold that's unmistakable on the panel. |
| Btc | color | C'35,60,95 | Color for Bitcoin. If you trade crypto pairs, this helps you quickly identify BTC-related instruments in the panel. | C'50,80,120 — A slightly lighter blue to differentiate from NZD and EUR. |
| _________________________Fund management_________________________ | string | ______________Fund management____________________ | Another section header in the input list. It groups the fund management settings below. You don't change this value — it's purely organizational. | Leave as-is. It's a label. |
| Display fund management option | bool | false | When enabled, shows a fund management section on the panel where you can set daily risk and profit limits. Useful for traders who want to cap losses or lock in profits automatically. | true — Turn it on if you're running a funded account and need to enforce a daily drawdown limit. |
__________display Settings__________
These settings control the visual appearance of the panel's buttons and interface elements.
| Setting Name | Type | Default Value | Description | Example |
|---|---|---|---|---|
| Normal Button Color | color | C'0,62,78 | Sets the default background color for all buttons on the panel. Changing this lets you match the panel to your chart's color scheme or your personal preference. | C'30,30,30 — A dark gray if you prefer a stealthy, low-contrast panel that doesn't distract from the chart. |
__________indicator Settings__________
These settings let you assign up to seven chart templates that the panel can load with a single click, so you can quickly switch between different indicator setups.
| Setting Name | Type | Default Value | Description | Example | ||||||||
|---|---|---|---|---|---|---|---|---|---|---|---|---|
3. HOW IT WORKS Core Calculation & LogicThe Ultimate Trade Panel doesn't rely on a single mathematical formula — instead, it acts as a command center that reads your account equity, current positions, and market prices in real time. Every button you click triggers a series of checks: available margin, lot size constraints from your broker, and any risk limits you've set in the Fund Management section. The panel calculates position sizes based on your chosen risk percentage or fixed lots, then submits market, limit, or stop orders with the slippage tolerance you defined. Behind the scenes, the EA maintains a running tally of daily profit/loss and total account drawdown. If you've enabled the fund management features, it will block new trades when your daily loss limit or account risk threshold is breached. The panel also tracks open positions for breakeven and trailing stop adjustments, recalculating these levels each tick. This isn't a black-box strategy — it's a transparent tool that executes your decisions with precision, nothing more. Entry Strategies ExplainedThe panel itself doesn't generate trading signals — it's a manual execution tool. However, it does include optional indicator-based filters that can help you decide when to enter. These are accessed through the Trend Filter Settings in the common guide. Here's how each filter works: Moving Average FilterBUY Signal: Price crosses above the MA line, or the faster MA crosses above the slower MA, depending on your chosen strategy. SELL Signal: Price crosses below the MA line, or the faster MA crosses below the slower MA. Best For: Trending markets where you want to avoid counter-trend entries. ADX FilterBUY Signal: ADX line rises above the threshold (typically 25) and the +DI line is above the -DI line. SELL Signal: ADX rises above threshold and -DI is above +DI. Best For: Strong trending conditions — the filter keeps you out of choppy, low-momentum periods. RSI FilterBUY Signal: RSI crosses above the oversold level (default 30) from below. SELL Signal: RSI crosses below the overbought level (default 70) from above. Best For: Range-bound markets where mean reversion strategies work well. MACD FilterBUY Signal: MACD line crosses above the signal line. SELL Signal: MACD line crosses below the signal line. Best For: Confirming momentum shifts before entering a position. Parabolic SAR FilterBUY Signal: Parabolic SAR dots appear below the price. SELL Signal: Parabolic SAR dots appear above the price. Best For: Following strong trends with a trailing stop-style indicator. Step-by-Step WorkflowStep 1: Attach the EA to a chart. Drag Ultimate Trade Panel onto any currency pair chart in MT4 or MT5. You'll see the panel appear on the right side of your chart. Step 2: Configure your inputs. Open the EA properties (F7) and set your Magic Number, slippage, and risk parameters. I'd recommend starting with the default values and adjusting as you get comfortable. Step 3: Set your symbol colors. Scroll down to the SYMBOL COLORS section and assign colors to the pairs you trade most. This makes the panel much easier to read at a glance. Step 4: Enable fund management (optional). If you want daily loss limits or account-level risk caps, set DISPLAY_FUND_MANAGEMENT to true and configure the risk percentages. Step 5: Click to trade. Use the BUY and SELL buttons on the panel to open market orders. The panel will calculate lot size based on your settings and apply any SL/TP levels you've predefined. Step 6: Manage open positions. Right-click any position in the panel to modify SL/TP, close partially, or apply breakeven/trailing stop features. Step 7: Monitor your daily stats. Keep an eye on the fund management display (if enabled) to see your current P&L and remaining risk allowance for the day. 4. RISK MANAGEMENT FEATURESThe Ultimate Trade Panel includes several built-in risk controls that help you protect your account without needing to watch the screen constantly. Here's what's available:
Quick Start GuideFollow these steps to get started in under 5 minutes:
Installation Guide for MQL Products | Updating Purchased MQL Products on MT4/MT5 | General Troubleshooting Guide | Backtest and Set Files Check all my products: https://www.mql5.com/en/users/biswait50/seller Contact me for support: https://www.mql5.com/en/users/biswait50 |