![[USER GUIDE] - PZ Averaging EA (MT4/MT5)](https://c.mql5.com/6/839/splash-729075-1566419417.png "[USER GUIDE] - PZ Averaging EA (MT4/MT5)")

Averaging EA is a Metatrader Expert Advisor that provides a suitable framework for your trading activity and recovers trades using averaging. It provides proper risk calculations and a very smart position management strategy that will manage your trades automatically and recover your trading losses. By properly using this expert advisor, your losing trades will be recovered, with occasional exceptions.
Product Links
- For Metatrader4: https://www.mql5.com/en/market/product/36156
- For Metatrader5: https://www.mql5.com/en/market/product/36157
1. What this EA is
Averaging EA is a Metatrader Expert Advisor that provides a suitable framework for your trading activity and recovers trades using averaging. It provides proper risk calculations and a very smart position management strategy that will manage your trades automatically and recover your trading losses. By properly using this expert advisor, your losing trades will be recovered, with occasional exceptions. Once the EA is attached to the chart and properly configured, all you need to do is take trades by clicking “buy” or “sell” on the chart buttons displayed at the top-right corner of the chart or enable one of the automated entry strategies the EA offers. Once a trade is taken, the EA will then take over position management for you and all you have to do is wait until the chart is flat -no trades- to trade again. It is paramount not to meddle with the initial trade once a recovery trade has been placed.
This EA implements an averaging recovery strategy made simple for the retail user. Input parameters are limited and understandable. Most inputs of the EA are drop-down menus which makes it almost impossible for the user to enter unreasonable values. Any parameter that can be auto-calculated by the EA has been removed from the inputs to avoid confusion. Others have been broken down into ratios based on others.This expert advisor is, probably, one of the most effective loss recovery expert advisor you can find on the internet, and also very easy to use. I have spent a tremendous amount of time coding the visual elements of this tool, to make sure you understand how it works and to make the EA behave as you'd expect it to, in a predictable fashion.
This user guide will allow you to understand the EA and start trading in one hour.
2. What does it do?
Once a trade has been taken, one of the two scenarios will take place.
a) The trade is correct: If your trade goes into profits, the EA will apply a straightforward management comprised of a break-even in pips and a trailing-stop until the trade is stopped out at a profit. Optionally, you can set a take-profit in pips which is evaluated in stealth mode – without sending the take-profit order to the broker.
b) The trade goes straight into losses: If your initial trade is incorrect and goes into red, the EA will apply an averaging strategy to exit the deal at a small profit, placing consecutive market orders in the same direction, increasing the distance between these orders and the lot size, until an exit point is reached, or until the trade plan is fully allocated.
Occasionally, the trade plan will be fully allocated without reaching an exit point and the price will go against the deal enough to justify closing the deal at a loss. The loss the EA will take is pre-calculated and displayed on the top-right corner of the chart before trading.
3. Broker and account selection
The EA can be applied to any symbol offered by your broker. That being said, you should avoid...
-
Symbols with big spreads
-
Symbols with big swap costs
-
Futures with rollover fees
If you must trade symbols with high spreads or with low liquidity, make sure to increase the spacing parameter to avoid spread hikes executing a large portion of your trade plan in a short period of time. We will review this further in the user guide.
You can trade with any broker of your choosing, but it is recommended to use a fixed spread account. A fixed spread account will have the same spread all the time, no matter what, albeit a big higher than variable spread accounts.
4. Loading the EA to the chart
The download page of the product has straightforward download and install instructions which you will be able to follow easily. Once the EA has been installed in your Metatrader4 platform, load it to an empty chart from navigator->expert advisors.
The EA can be loaded to any timeframe without making any change in settings: since the EA does not use high-low-close-open data from the chart, the timeframe where it is loaded is irrelevant. You can change between timeframes, even if the recovery process is active, without problems and without need of changing the settings.
Congratulations! You have loaded the EA to the chart and it is displaying a lot of information which you'll need to understand to make good decisions.
Information is grouped and displayed in different corners of the chart.
-
The top-right corner holds risk allocation and displays the risk profile
-
The top-left corner holds current settings and market conditions
-
The bottom of the chart holds information for the current symbol
You will also see four horizontal colored lines. The solid blue line is the average price of a long deal, if the trade plan is fully allocated. The solid red line is the average price of a short deal, if the trade plan is fully allocated. These solid lines are the exit prices, if the trade plan is fully allocated. The dashed lines are the outer ranges of both deals. Leave it at that for now, we will review all this information further in the user guide.
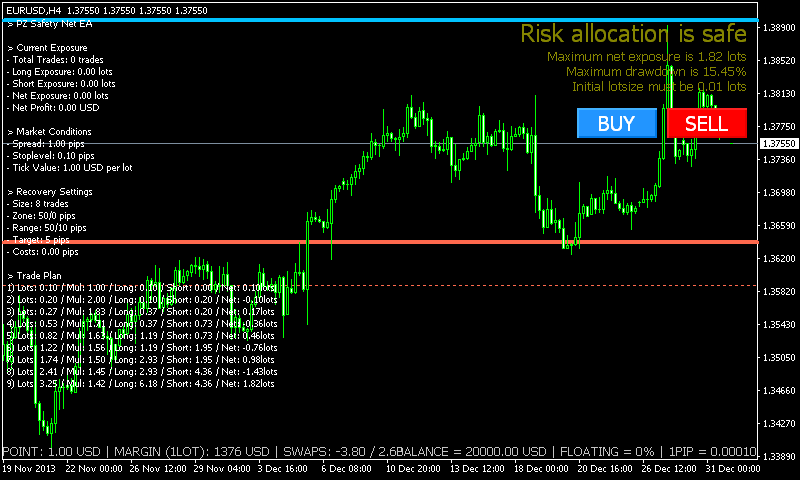
5. The risk settings
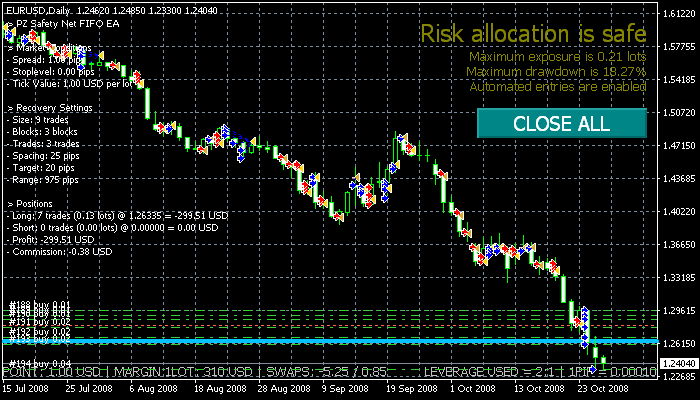
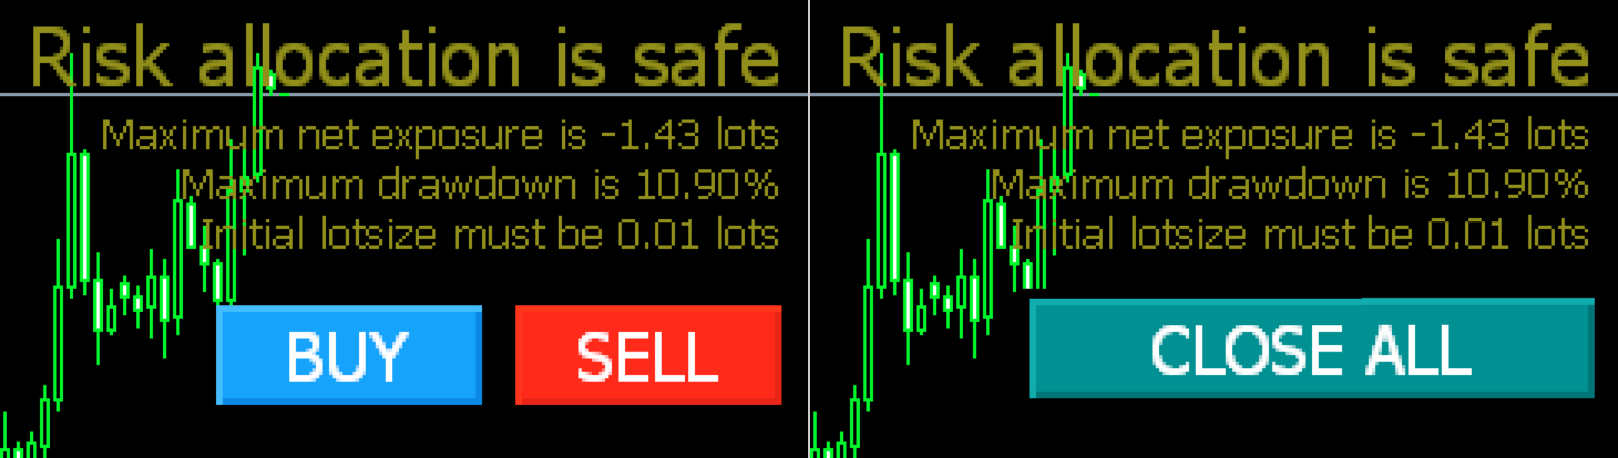
The risk allocation is directly related to the recovery inputs the EA mades available for you. It is your job to enter the recovery settings which best fit your trading activity, and to do so before taking a single trade. The maximum net exposure is the total exposure your account will have if all trade plan is allocated. The maximum drawdown is the maximum loss expressed as percentage of balance the EA has calculated you will suffer if all the trades of the recovery process must be closed at a loss. The EA will evaluate the maximum drawdown and display risk allocation as safe, aggressive or dangerous.

The risk responds to total exposure, and the total exposure depends directly of the recovery settings of the EA. This means that you can edit the settings of the EA to tailor the risk for each symbol to your liking. To do so, you'll need to change the following parameters. As you read the guide, feel free to play around with them and see the impact on the risk and total exposure on the chart.
-
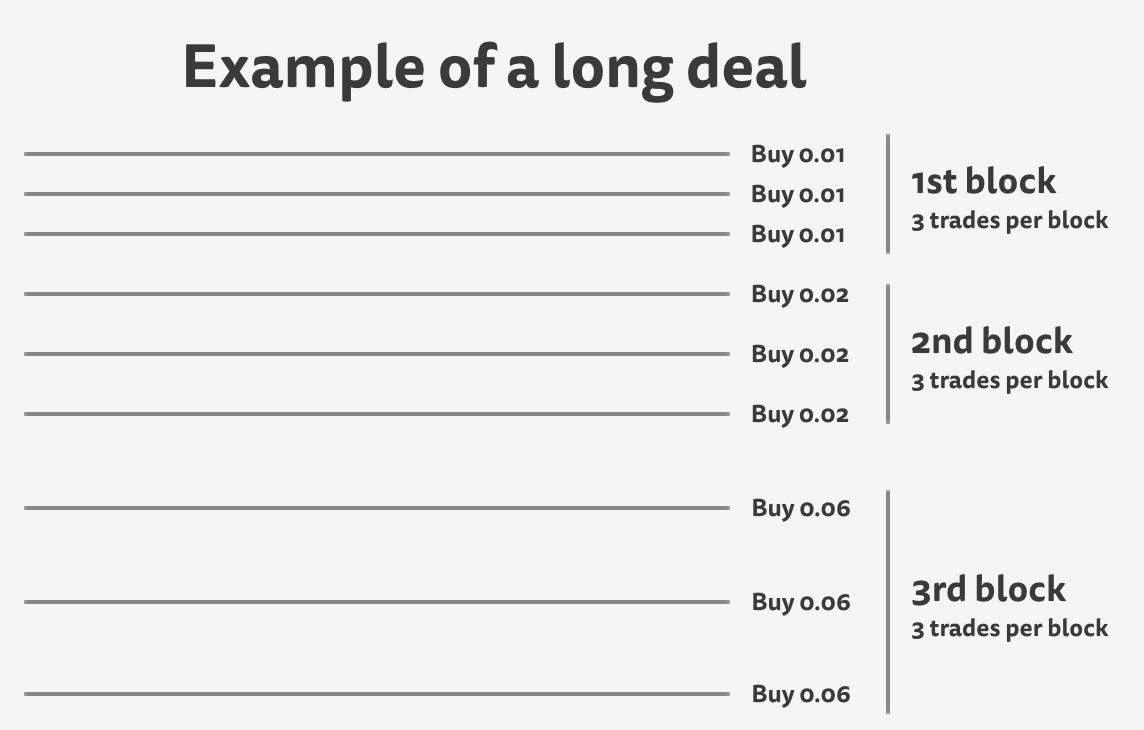
Blocks of trades: This parameter is the amount of blocks of trades which are going to be placed during the recovery process. A block of trades can have any number of trades, which is controlled with other parameter. The recovery process is separated into blocks because spacing and lot size increase from one block to the next. More blocks make the recovery process more aggressive, uses more free margin and means more exposure -and drawdown-.
-
Trades per block: This parameter controls the amount of trades existing in a block. All the trades of a block have the same spacing between them and are of the same lot size. Generally speaking, you can have a recovery process built up of several blocks of only a few trades -which is very aggressive-, or a recovery process built up of very few blocks with several trades in it, which is more conservative.
-
Spacing in pips: This parameter controls the spacing in pips between trades of the same block. A small spacing makes the recovery process faster, but makes it easier for the market to allocate your trade plan.
-
Profit Target in Pips: The profit target only applies during the recovery process and is the amount of pips you want to earn before closing all trades. A higher profit target means that deals will take more time to close, and a small target means deals will close faster, allowing more rotation in your trades. This value can be changed in real time: for instance, as a deal grows larger you might want to decrease this value to accelerate the closing.
-
Lotsize Multiplier: The EA increases the lot size when the recovery process jumps from one block of trades to the next. A high multiplier makes the recovery process faster, but uses more margin doing so.
-
Spacing Multiplier: The EA increases the spacing between trades when the recovery process jumps from one block to the next. The spacing multiplier affects the price range in which the recovery process acts. A high multiplier means that the recovery process covers more price but the exit of the deals will take more time.
The above explained risk settings allow for infinite combinations. For instance, if you don't want to trade with 0.01 lots because your trades are often accurate, you can increase the initial lot size and then decrease the amount of trades in the recovery process or multipliers, to lower the risk back to a safe level. In the EA input list, all parameters affecting the risk are highlighted with two asteriscs in their name.
Play around with these settings until you find a reasonable risk for each pair you are trading.
6. Multi-pair risk considerations
If you are going to trade several pairs, as we all do, it is imperative that you know that risks aggregate. For instance if you trade EURUSD, GBPUSD and USDJPY with a risk of 15% each and you take a trade in all those at the same time, the total risk is actually 45%, which is not good, even though the EA will say that the risk is safe for those pairs individually.
The above happens because you are setting into motion three trade plans which, god forbid, can be fully allocated at the same time, incurring into a combined loss on the three symbols at the same time.
So, what can you do to keep risk in check? You should configure the EA in all the pairs you want to trade, which can be as many as you like, and then make sure not to trade more than 2 pairs simultaneously. For example, you can configure a 10% risk in all pairs and avoid having more than two active pairs, limiting the final exposure to a 20% of your account.
The amount of simultaneous pairs you want to trade call for different settings, regardless of the risk profile displayed on screen. If, on the other hand, you want to trade only EURUSD you can configure the EA to behave aggressively.
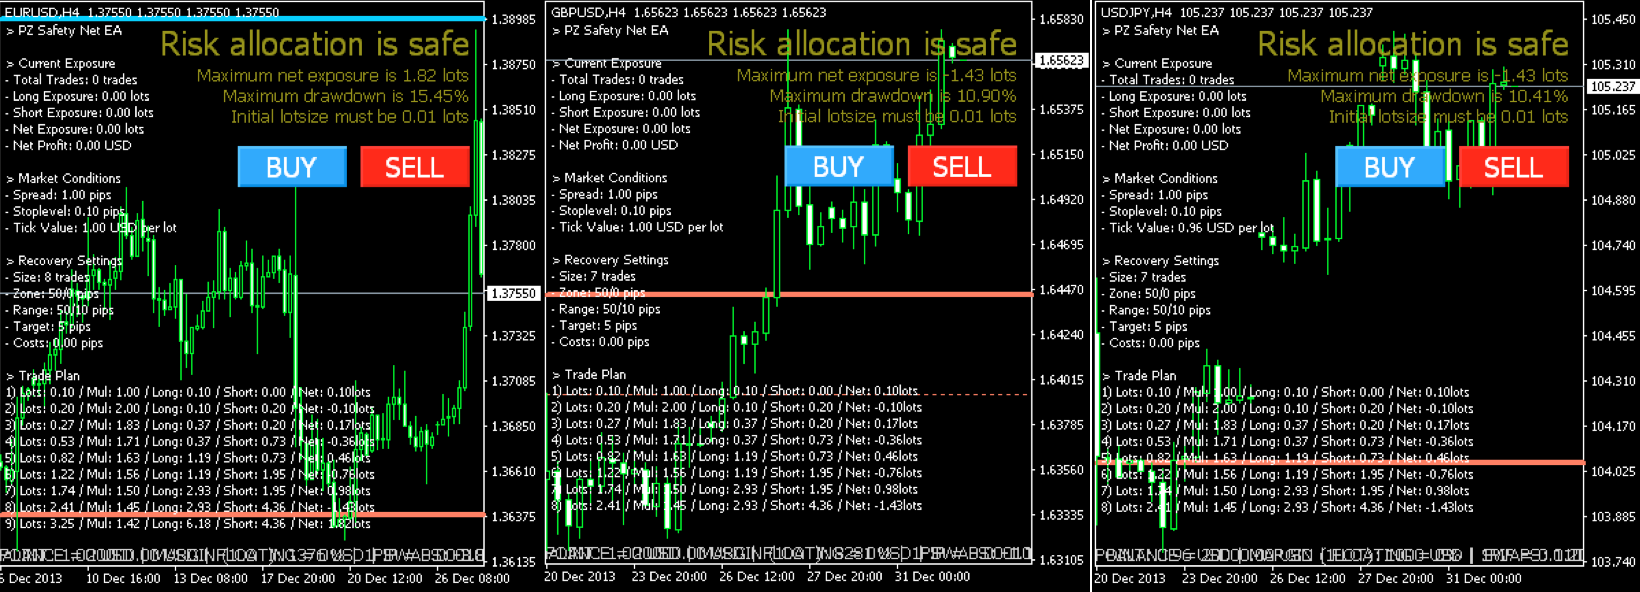
In the above example, we have the following risks for each pair:
-
15,45% for EURUSD
-
10,90% for GBPUSD
-
10.41% for USDJPY
7. Safety checks
Once you have configure the EA to have an acceptable individual and aggregated risk for the currencies wish to trade, it is time to trade! But before that, it is recommended to evaluate market conditions and review the trade plan, just like pilots review weather forecasts before taking off from the airport.
A) Make sure the exit prices are realistic: The EA displays two thick lines on the chart, a blue line and a red line. These are the break-even points and represent how far away from the current price the exit point will be if the complete trade plan is allocated.
B) Make sure swaps are acceptable: Just as we pay monthly interest payments to the bank when we purchase a house with borrowed money, we have to pay daily carry costs to the broker when we trade on margin. Swaps reflect the cost to carry the trade from today to tomorrow. Some brokers artificially inflate the swap costs received from their liquidity provider while keeping a very low spread, which looks good on advertisements and brings in a lot of uninformed customers. But swap costs can pile up very quickly and delay the recovery process, because transaction costs must also be recovered. If you must trade a symbol with big swaps, try to make the recovery process shorter by decreasing the amount of trades and aggression level of the EA. But it is much better to trade only those pairs offering good swap costs relative to others. Swap costs are displayed at the bottom of the chart.

8. Position management settings
I know you are eager to trade now, but first let's review the position management settings. The first thing you need to know is that the position management settings only apply to your first trade, and not during the recovery process. The following parameters control how your initial trade is managed, if your initial trade is correct. Once the second trade of the trade plan is executed, the following settings are completely ignored and the recovery settings come into play.
-
Break-even in pips: This parameter controls how fast does the EA make the first trade risk free. Once the trade reaches the break-even level, the stop-loss is moved above the entry price, leaving equal distance between the entry price and the current price. For example, a break-even of 10 pips will move the stop-loss to +5 pips when the trade is +10 pips in profit. A small break-even value will cause more trades to be stopped out at a small profit prematurely, but on the flip side, less trades will fall into the recovery process. A big value aims for longer trades, but will cause more trades to fall into recovery before the break-even applies.
-
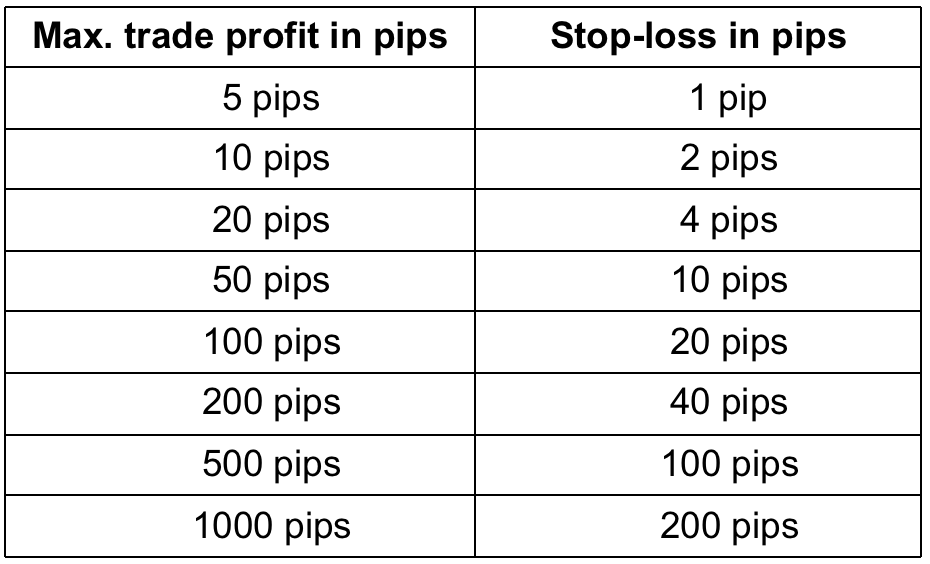
Trailing-Stop: The trailing stop is expressed as percentage of the maximum achieved trade profits. This particular trailing-stop method allows profits to run without neglecting the trailing-stop when profits are small. The actual trailing-stop value in pips will change according to the trade profit. A 50% trailing stop is a very wide one, leaving 50% of the trade profits as wiggle room for the market. On the other hand, a 10% trailing stop is very tight, leaving only 10% wiggle room for the market before the trailing-stop it hit. For example, assuming a 20% trailing-stop, values would change as exemplified below.

-
Trailing-Step in pips: The trailing step in pips represents the minimum increase from the last trailing-stop value. For instance, if you set a trailing-step of 5 pips, the trailing-stop won't be moved unless the new value is at least 5 pips away from the current one, and 5 pips away from the current market price.
-
Take-Profit in pips: Optionally, you can set a take-profit level in pips for your first order. This take-profit level is not sent to the broker, but evaluated and executed in stealth mode instead. If set to zero, it is not used. Default settings are risk-averse and will break-even trades fast.
9. Starting trades
To take a trade, click on BUY or SELL button on the chart and the trade will be placed for you with the proper lot size automatically. These buttons, besides being awfully convenient, are only displayed on the chart when the EA is ready to manage new trade. Once the initial trade is placed, the trade buttons disappear and a another to close all trades is displayed instead. If you click on it, a confirmation dialog will prompt you for confirmation and close all trades in the chart immediately after if you confirm.

Once the EA is properly configured, your trading activity becomes very simple. All you need to do is taking the initial trade clicking on BUY or SELL, and then wait until the chart is flat again -no trades- to start a new trade. Once you have taken the initial trade, a pending order will be placed in the opposite side of the zone matching the second trade of the trade plan. This pending order will be deleted automatically by the EA when the initial trade is closed by you, or by the EA.
The EA is theoretically capable of managing one buy and sell trade at the same time, but since this is forbidden in US Brokers, the feature is not covered by the chart buttons. Do not add additional trades to the initial trade, as each additional trade would double the risk of the recovery process or make it unfeasible altogether. This ensures that the recovery risk is controlled and exactly the same all the time.
If you want to start the deal placing pending orders, you can do so. If you place multiple pending orders on the chart, the EA will delete all others when the first one is executed, and start the recovery process on a clean chart.
10. Automated entry strategies
The EA provides many simple automated entry strategies as an alternative to manual trading. This provides a certain level of automation to your trading, but will never match the quality of your discretional entries, as no entry strategy is profitable in all market conditions. That being said, you can switch between them according to what you see on the market. The list of automated entry strategies available is listed later in this guide. Eventually more entry strategies will be added, which might not be included in this list.
11. Starting trades reading a custom indicator
This EA is equipped to take trades according to a custom indicator of your choosing, which must follow certain conventions. It must store one of the following constants into a non-drawing but accessible buffer.
-
Buy: Store 0 in the buffer
-
Sell: Store 1 in the buffer
- Do nothing: Store EMPTY_VALUE in the buffer
By storing one of the following values into a buffer in your indicator, and making the EA to read from it, it will be able to buy, sell and close trades when your custom indicator wants to. Kindly note that, closing trades will only work if there are no recovery trades opened. The indicator is read upon bar closing and the trade session filters applied.
To make things simpler, consider the example below, named MyIndicator.mq4, which buys when a bar closes above the high of the last bar, and shorts when a bar closes below the low of the last bar.
#property link "http://www.pointzero-trading.com"
#property description "Indicator example for the custom indicator feature."
#property version "1.0"
#property strict
//---- indicator settings
#property indicator_chart_window
#property indicator_buffers 0
//---- constants
#define ShortName "My Indicator"
#define OP_CLOSE_BUY 3
#define OP_CLOSE_SELL 4
#define OP_CLOSE_ALL 5
//---- indicator buffers
double SignalBuffer[];
//+------------------------------------------------------------------+
//| Custom indicator initialization function |
//+------------------------------------------------------------------+
int init()
{
IndicatorBuffers(1); // We only need one buffer
SetIndexBuffer(0,SignalBuffer); // This is the signal buffer (0)
return(0);
}
int deinit()
{
return(0);
}
//+------------------------------------------------------------------+
//| Custom indicator iteration function |
//+------------------------------------------------------------------+
int start()
{
int start = 1;
int limit;
int counted_bars = IndicatorCounted();
// check for possible errors
if(counted_bars < 0)
return(-1);
// Iteration Limit
limit = Bars - 1 - counted_bars;
// Iterate all bars from past to present
for(int i = limit; i >= start; i--)
{
// Ignore first bar
if(i >= Bars-1) continue;
// Store empty value first, no action by default
SignalBuffer[i] = EMPTY_VALUE;
// If bullish breakout
if(Close[i] > High[i+1]) SignalBuffer[i] = OP_BUY;
// If bearish breakout
if(Close[i] < Low[i+1]) SignalBuffer[i] = OP_SELL;
}
return(0);
}
Please copy the above code into your MetaEditor, and click compile.
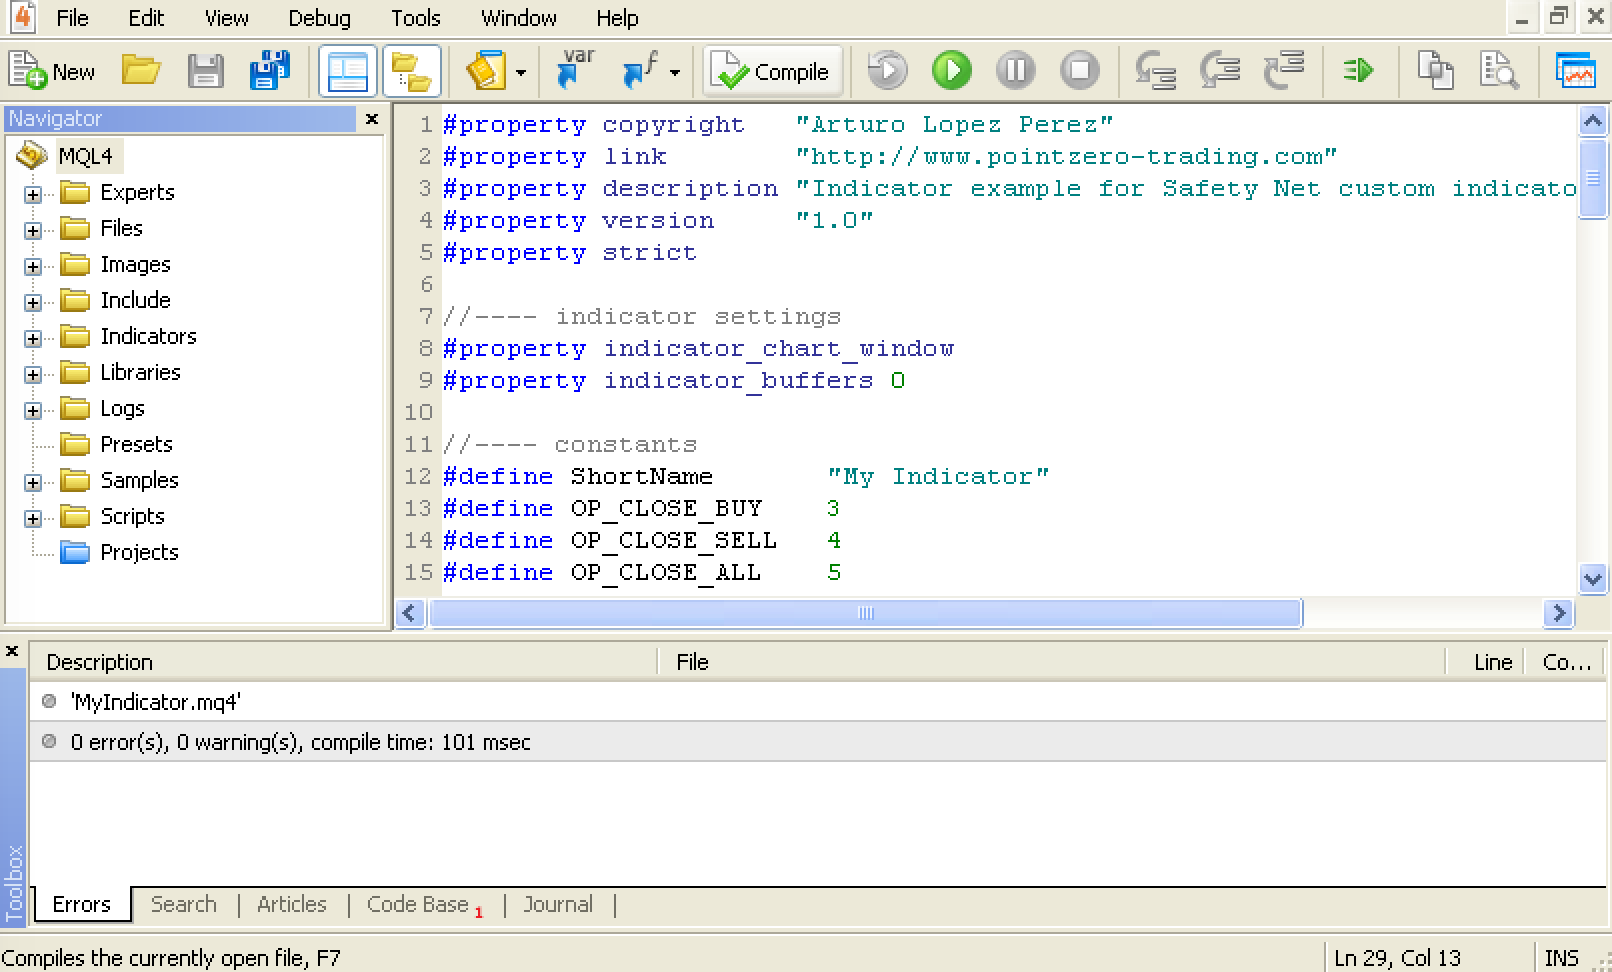
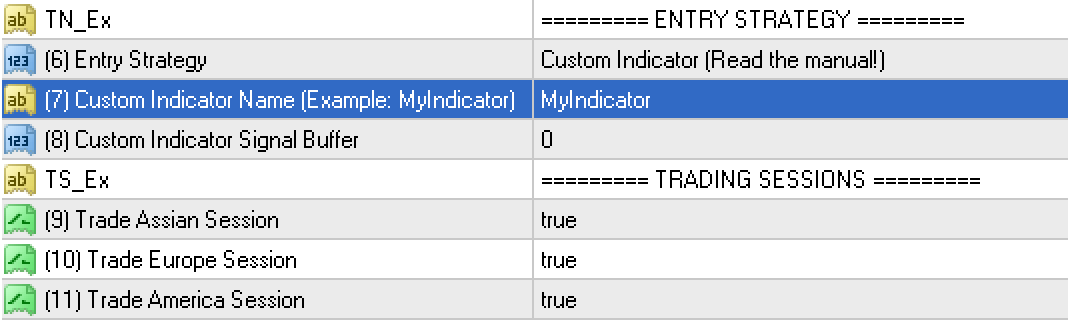
The compiler should compile the indicator without errors, making the indicator usable. To use it in the EA, select “Custom Indicator” as entry strategy, type the indicator name (MyIndicator) in the Custom Indicator parameter and set the signal buffer number to 0.
As you work with other indicators to make them compatible with this EA, the signal buffer number will change. For instance if you edit an indicator which has 5 buffers used, you'll have to add an additional buffer and enter the correct buffer number in the EA. You can make unlimited indicators, as complex as you want, for the EA to trade.
12. Trading sessions
To avoid starting trades in sessions you don't want to trade, you can enable or disable the following sessions in the indicator inputs. These sessions are evaluated only to take the initial trade, not to perform recovery trades. The session filter is evaluated when you are using a custom indicator too.

13. The recovery process
The recovery process starts when the second trade of the trade plan is executed. When this happens, the EA displays two lines on the chart, which weren't there before. The thick line represents the average price of the deal: it will be blue for long deals and red for short deals. A dotted line of the same color appears on the chart and represents the profit target price.
As soon as the price touches the dotted line, the EA will close the deal completely. Other interesting thing to pay attention to is the amount of trades executed and the transaction costs incurred to far, both present on the chart comment you see at the left side of the chart.
The EA converts accumulated transaction costs into pips internally, and accounts for them in the recovery process. As mentioned previously, swap costs can pile up very quickly, so make sure to pay attention to them before trading.
14. Closing deals manually
The EA displays a button labeled “Close All” on the top-right corner of the chart. If you click on it, the deal will be completely closed right away, regardless of the profit or loss result of the trades at the current moment.
15. Backtesting
I have intentionally left the backtest of the expert advisor for the end of the user guide, because you must understand the relationship between the recovery settings and the execution risk of the EA before you can run any meaningful backtest. It makes no sense to judge the performance of an EA based on a backtest with dangerous recovery settings, as the EA will surely over-leverage your account or go into a margin call and stop the test at a loss.
To perform a backtest, first you have to find the desired risk profile for the balance of the account you wish to test. To do that, you'll have to first launch the test in visual mode. The visual mode will show you information on the chart as the EA trades, and you'll be able to stop the test and change the settings if the settings are undesirable.
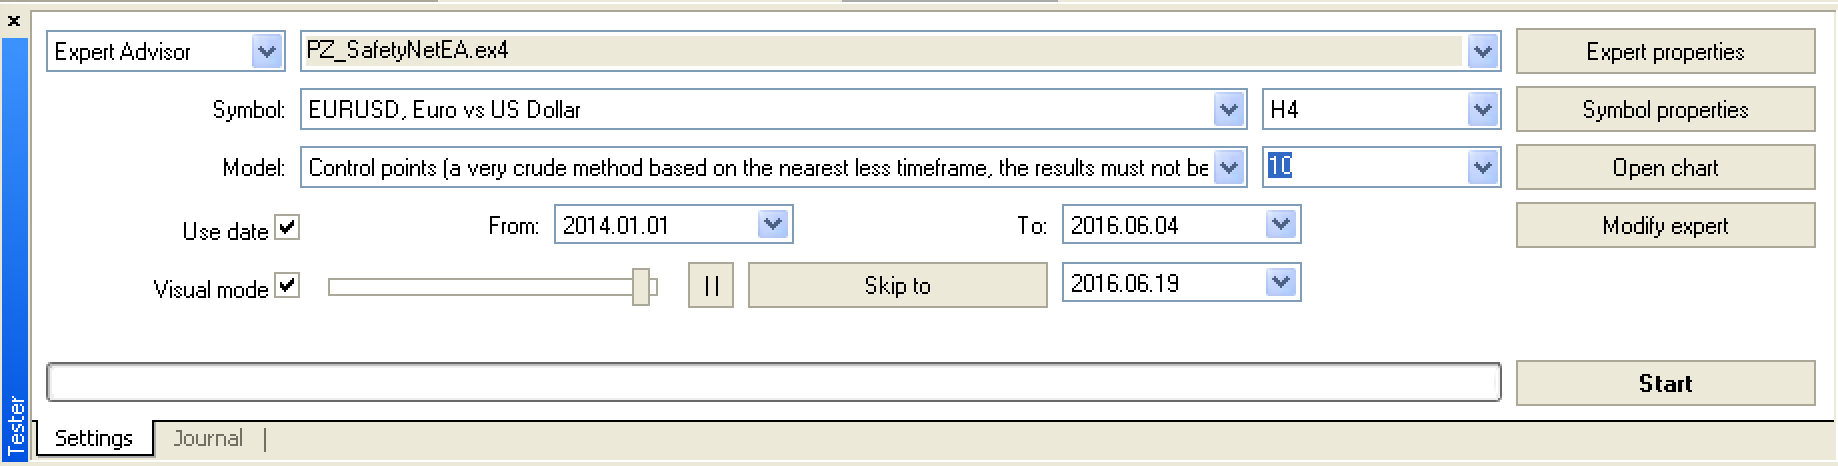
To start the test, select an entry strategy from the EA inputs and click on Start. The EA will either start trading or inform you that the risk allocation is dangerous. If the risk allocation is dangerous, the EA won't trade and you'll be forced to change the recovery settings to start a new backtest.

Once you launch a safe or aggressive test, the EA will take completely random trades until the test stops. It won't reflect true trading activity because in live trading, you will be deciding the trades, but it will give you information about how the recovery process is handled and the expected equity curve you can expect.
You can test any timeframe above M30 or H1 in control points mode. The control points mode generates 8 ticks for each bar in the test, which is more than enough to test this particular expert advisor.
Hopefully you'll test will look very similar to mine. That being said backtests are not the best way to measure the performance of this expert because it needs human decisions to operate: only you can decide what to trade, when to trade it, what settings to use, what symbols to avoid and when and many other things which a machine can never decide for a human being.

16. Input Parameters
- Lotsize for first trade: This parameter controls the size of the initial trade. A smaller lotsize decreases the net exposure of the deal.
- Break-even in pips: This parameter controls at which profit in pips the EA moves the stop-loss above/below the open price securing profits. This parameter only affects the first trade, not during the recovery process.
- Break-even Behavior: Upon break-even, the EA can secure half the profits of the trade or move the SL to the open price, as you wish. If you want to let profits run and maximize the first trade, choose the latter.
- Trailing Stop: Percentage of the max. favorable excursion (MFE) used as trailing-stop. A small value is a tight stop, and a big value is a wide stop. This parameter only affects the first trade, not during the recovery process.
- Trailing Step in pips: Minimum increase in pips for the trailing stop value and, at the same time, the minimum distance from the new stoploss and the current market price. This parameter only affects the first trade, not during the recovery process.
- Take Profit in pips: Steath take-profit for the first trade. Not used during the recovery process.
- Entry Strategy: The EA implements a set of automated entry strategies to provide some degree of automation. Not all entry strategies will greatly perform in all market conditions, but you can switch between them as you see fit. Options are: CCI, ADX, RSI, Bollinger Bands, AC, AO, Alligator, MACD, PSAR, RVI, Stochastic, Heiken Ashi, Turtle Trading, Breakouts, Buy Constantly and Sell Constantly.
- Custom Indicator Name: If you choose to trade using your own custom indicator, type the indicator name in this parameter. The EA will call it via iCustom() internally. For more information about this, read the user guide.
- Custom Indicator Signal Buffer: If you choose to trade using your own custom indicator, type the signal buffer number in this parameter. The EA will call it via iCustom() internally. For more information about this, read the user guide.
- Trade Asian Session: If enabled, the EA will start trades during the Asian Session.
- Trade European Session: If enabled, the EA will start trades during the European Session.
- Trade American Session: If enabled, the EA will start trades during the American Session.
- Blocks of Trades: Amount of blocks of trades to place during the recovery process. When a trade block ends, the lot size and spacing are incremented using the multipliers specified below.
- Trades per Block: Amount of trades for each block. Each trade is separated from each other using the Spacing.
- Spacing: Distance in pips between trades of the same block.
- Profit Target in Pips: Profit target in pips for the recovery process. When the target is met, all trades are closed at the same time, at a net profit.
- Lotsize Multiplier: Lotsize multiplier from one block to another block.
- Spacing Multiplier: Spacing multiplier from one block to another block.
- Magic Number: The magic number allows the EA to identify its own trades when reloaded or the platform restarts. As a rule of thumb, never change it.
- Custom Comment: Enter your custom comment for all trades here.
17. Questions
This is the end of the user guide. I have covered the usage of the EA in the simplest way I could and still came up with a lengthy guide. If you have any questions about this expert advisor, please post your question below, send me a private message or open a support ticket at help [at] pointzero-trading.com. Thanks for reading!


 Trading Guide")

")