User Guide: Trade Direction (Direction Filter) in the Trading System


What is Trade Direction?
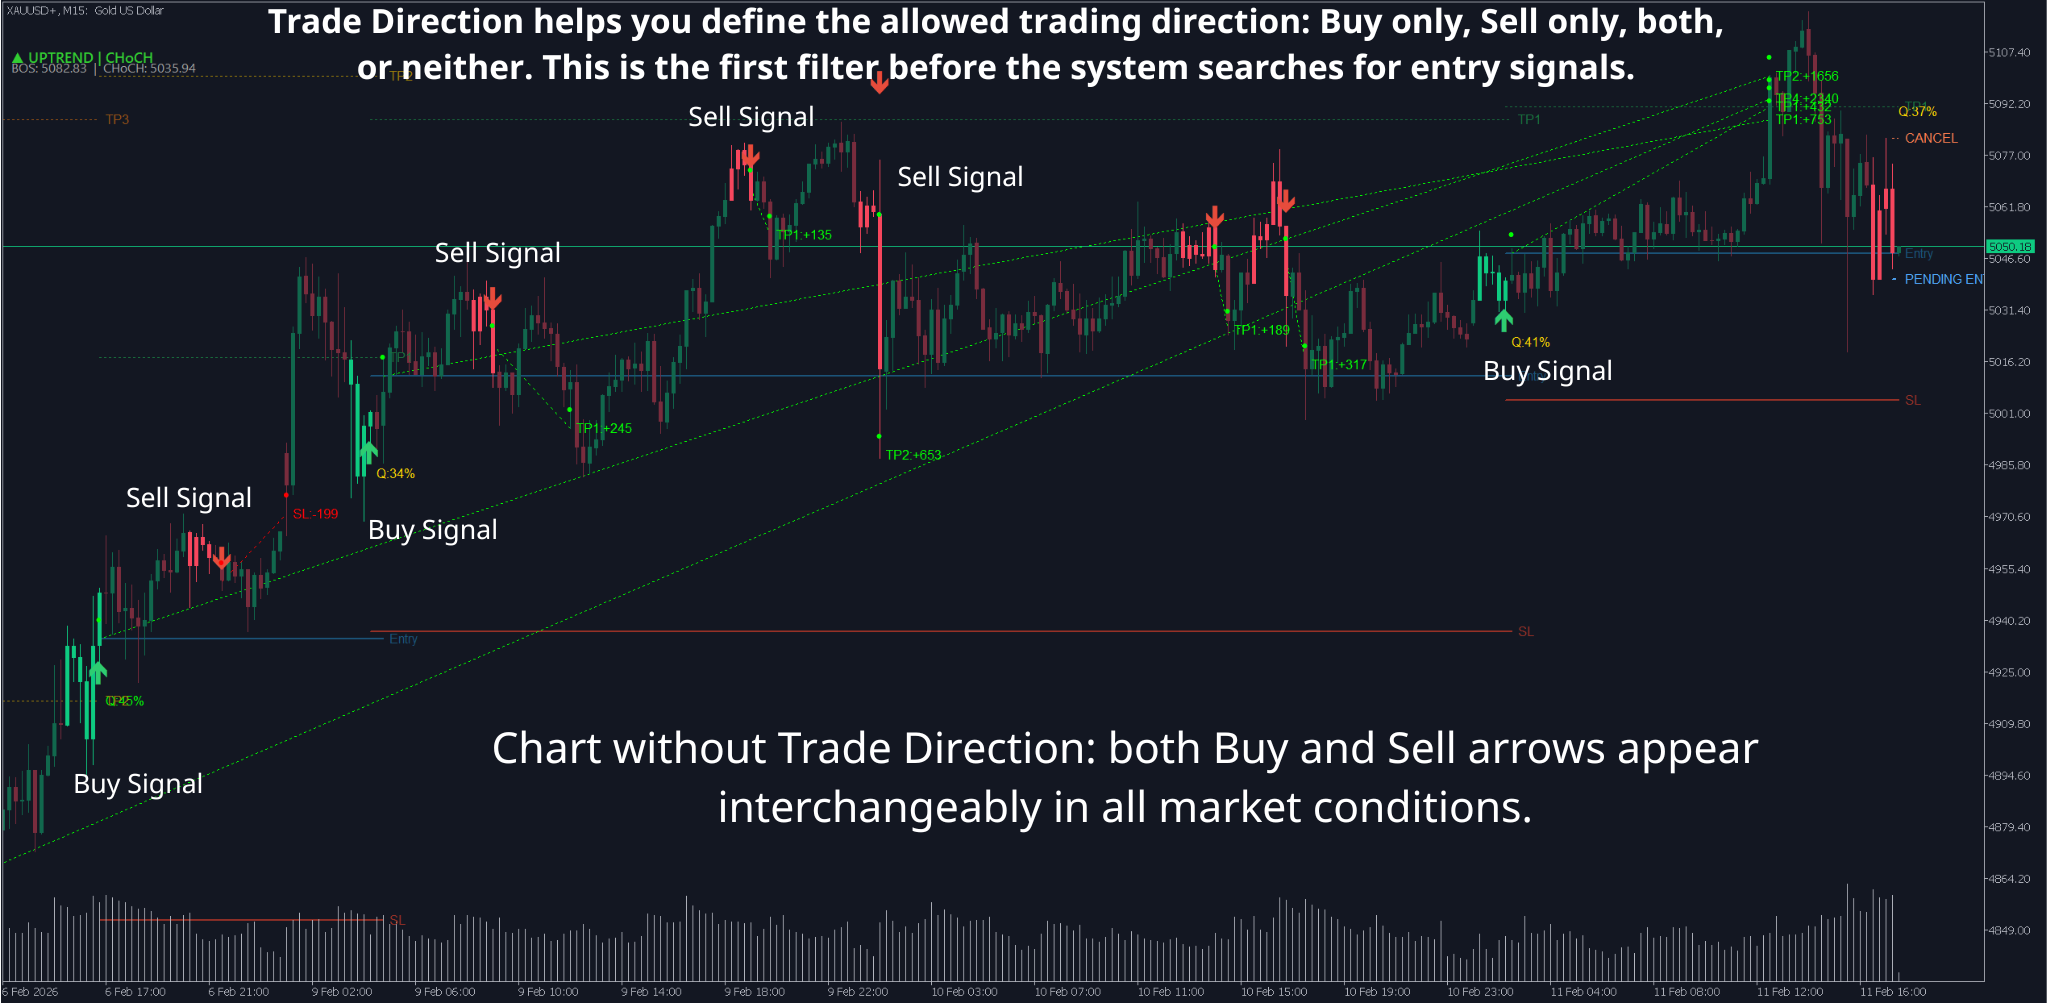
Trade Direction helps you define the allowed trading direction: Buy only, Sell only, both, or neither. This is the first filter before the system searches for entry signals.
Simply put:
-
Market is trending up → Trade Direction allows only Buy → system only displays buy signals
-
Market is trending down → Trade Direction allows only Sell → system only displays sell signals
-
Market is sideways → Trade Direction can block all (no trading) or allow depending on your choice
Trade Direction is a shared feature, built into multiple systems: systems using the standard template. Usage is the same regardless of which system you use.

How to enable Trade Direction
Where to find Trade Direction?
Trade Directi is located in the Input Parameters section of the indicator or EA. To open:
-
Right-click the indicator on chart → select Properties (or press F7)
-
Switch to Inputs tab
-
Scroll to the parameter group labeled "Trade Direction" or "═══ DIRECTION FILTER ═══"

How to enable
By default, Trade Direction is in Off state (disabled). To enable:
-
Click the value box to the right of Trade Direction row → select Custom or Follow Structure Trend
| Mode | Meaning |
|---|---|
| Off | Disabled — all signals are displayed (default) |
| Custom | You manually choose to allow Buy, Sell, or both |
| Follow Structure Trend | Automatically follows Market Structure trend (recommended) |
Note: Follow Structure Trend mode requires Market Structure to be running. Market Structure is always enabled by default, so you don't need to do anything extra.
Input parameters explained
1. Trade Direction — Operating mode
| Info | Details |
|---|---|
| Name in indicator | Trade Direction |
| Default | Off (disabled) |
| Values | Off / Custom / Follow Structure Trend |
Meaning: This is the main switch, determining how Trade Direction operates.
Three modes in detail:
Off (Disabled)
-
Trade Direction does not interfere with any signals
-
All Buy and Sell signals are displayed normally
-
Suitable when you want to evaluate trading direction yourself
Custom (Manual selection)
-
You decide which direction to allow using 2 sub-parameters: Allow BUY signals and Allow SELL signals
-
Example: you believe the market will rise → enable Buy, disable Sell → only see Buy signals on chart
-
Suitable when you already have your own market direction assessment
-

Follow Structure Trend (Follow structure trend)
-
Trade Direction automatically reads data from Market Structure to decide
-
If Market Structure identifies Uptrend → only allow Buy
-
If Market Structure identifies Downtrend → only allow Sell
-
If Ranging (sideways) → depends on When Sideways parameter
-
-
Recommended for most users — no need for manual assessment, system analyzes automatically
-

2. Allow BUY signals — Allow Buy signals
| Info | Details |
|---|---|
| Name in indicator | Allow BUY signals (or ├─ Allow BUY signals) |
| Default | true |
| Values | true / false |
| Only works when | Trade Direction = Custom |
Meaning: When in Custom mode, this parameter determines whether to display buy signals.
-
true → Buy signals are displayed
-
false → Buy signals are completely hidden
Note: This parameter has no effect when Trade Direction is in Off or Follow Structure Trend mode.
3. Allow SELL signals — Allow Sell signals
| Info | Details |
|---|---|
| Name in indicator | Allow SELL signals (or ├─ Allow SELL signals) |
| Default | true |
| Values | true / false |
| Only works when | Trade Direction = Custom |
Meaning: When in Custom mode, this parameter determines whether to display sell signals.
-
true → Sell signals are displayed
-
false → Sell signals are completely hidden
Combining Allow BUY + Allow SELL:
| Allow BUY | Allow SELL | Result |
|---|---|---|
| true | true | Display both Buy and Sell (like filter disabled) |
| true | false | Display Buy only |
| false | true | Display Sell only |
| false | false | No signals displayed (stand aside) |
4. When Sideways — Action when market is ranging
| Info | Details |
|---|---|
| Name in indicator | When Sideways (or └─ When Sideways) |
| Default | No Trading |
| Values | No Trading / Allow Both / Buy Only / Sell Only |
| Only works when | Trade Direction = Follow Structure Trend |
Meaning: When the system detects a sideways market (Ranging — no clear trend), this parameter decides the action.
| Value | Meaning |
|---|---|
| No Trading (default) | Block all signals — stand aside waiting for clear trend |
| Allow Both | Allow both Buy and Sell (trade within range) |
| Buy Only | Allow Buy only (prefer buying in range) |
| Sell Only | Allow Sell only (prefer selling in range) |
When to use which value?
-
No Trading (recommended): Safest — ranging markets are usually unpredictable, standing aside avoids losses
-
Allow Both: When you have experience trading in ranges (buy lows, sell highs) and combine with other filters
-
Buy Only / Sell Only: When you have specific reasons to believe the range will break out in a particular direction
Reading Trade Direction signals on chart
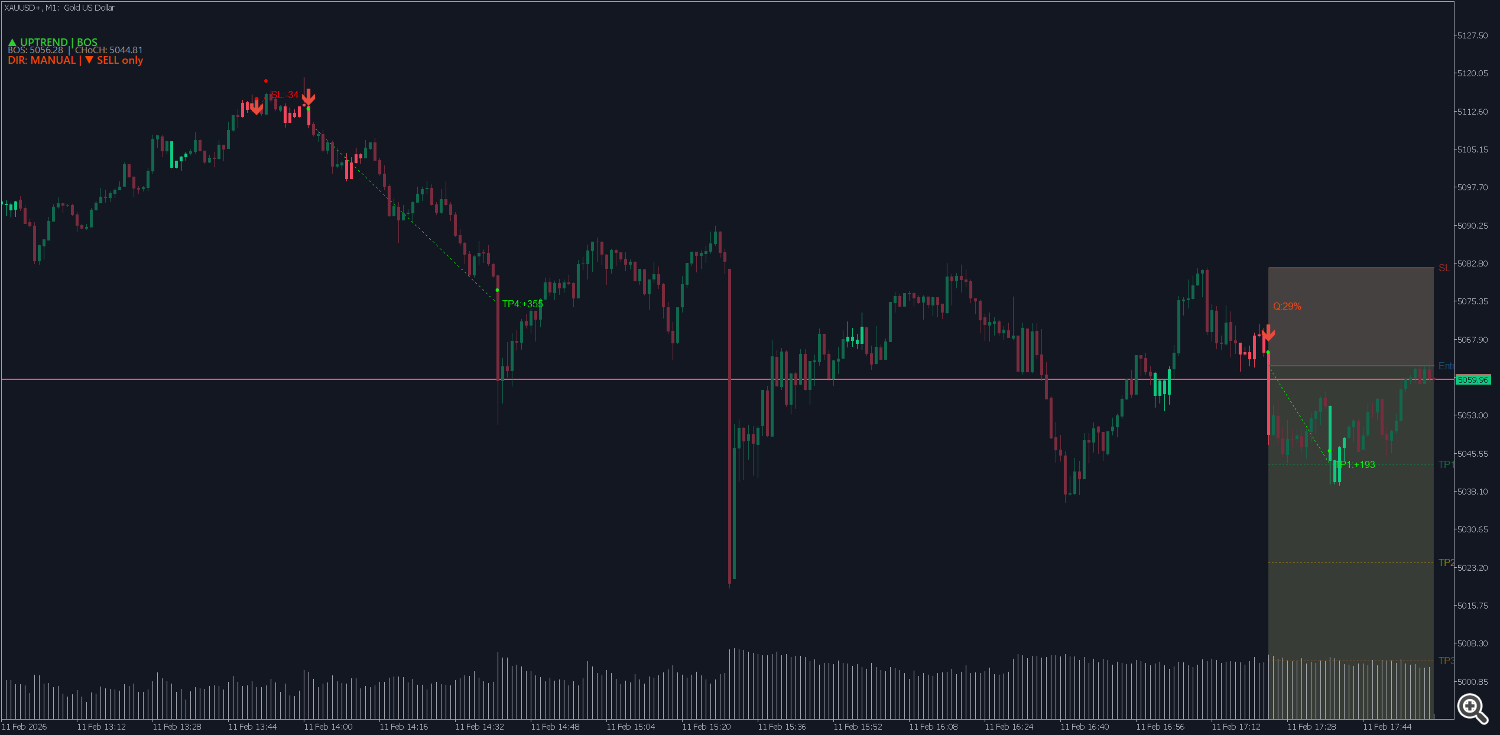
Status Label
When Trade Direction is enabled (Custom or Follow Structure Trend), you'll see a small text line in the top-left corner of the chart, below the Market Structure label. This line shows which direction the system is allowing.
Displayed statuses
| Label on chart | Color | Meaning |
|---|---|---|
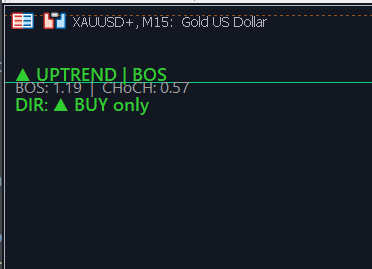
| DIR: ▲ BUY only | Green | Buy only allowed — Sell signals hidden |
| DIR: ▼ SELL only | Orange/Red | Sell only allowed — Buy signals hidden |
| DIR: MANUAL ▏ ▲ BUY + ▼ SELL | Yellow | Custom mode, both allowed |
| DIR: MANUAL ▏ ▲ BUY only | Green | Custom mode, Buy only |
| DIR: MANUAL ▏ ▼ SELL only | Orange/Red | Custom mode, Sell only |
| DIR: MANUAL ▏ BLOCKED | Gray | Custom mode, both disabled (stand aside) |
| DIR: ◆ RANGING ▏ BLOCKED | Gray | Auto + ranging market + No Trading |
| DIR: ◆ RANGING ▏ ▲ BUY + ▼ SELL | Gray | Auto + ranging + Allow Both |
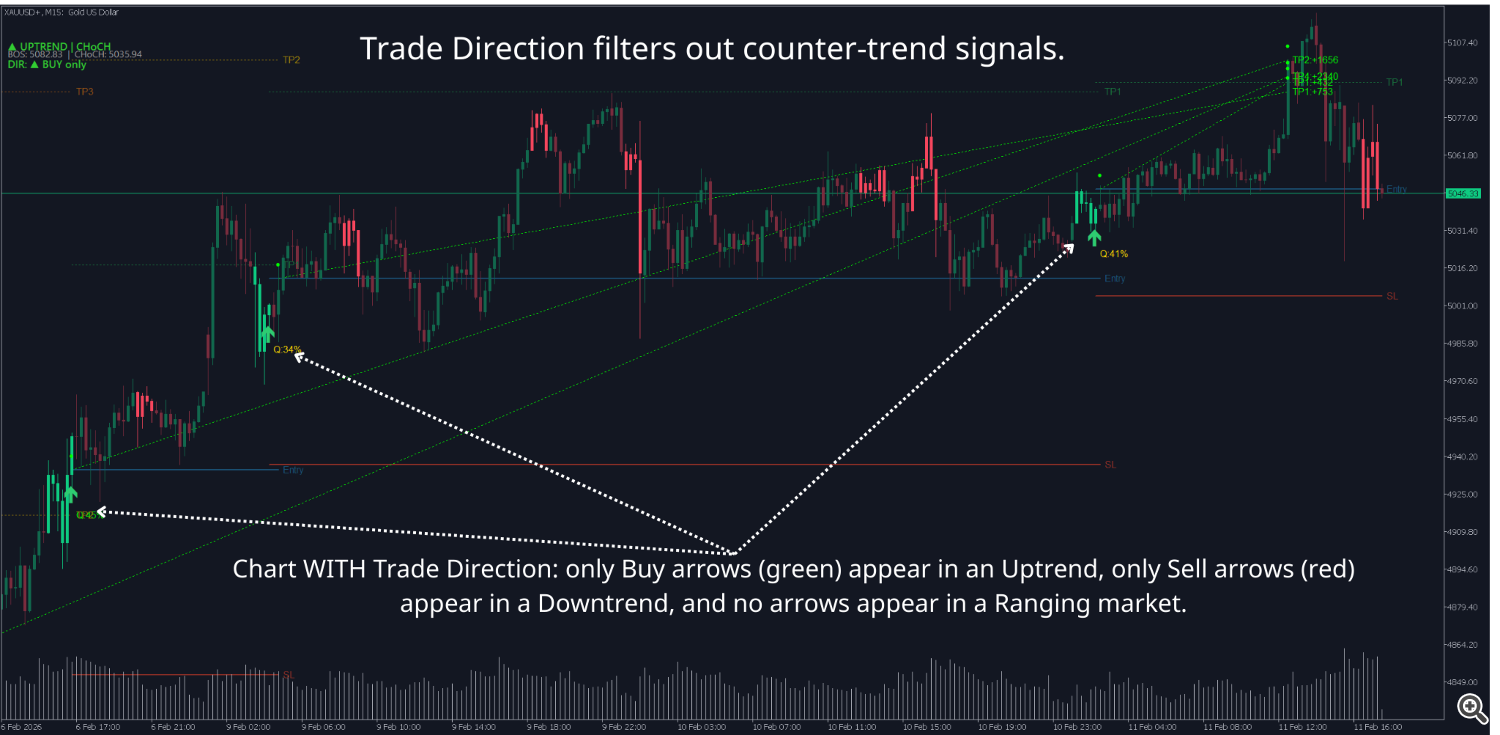
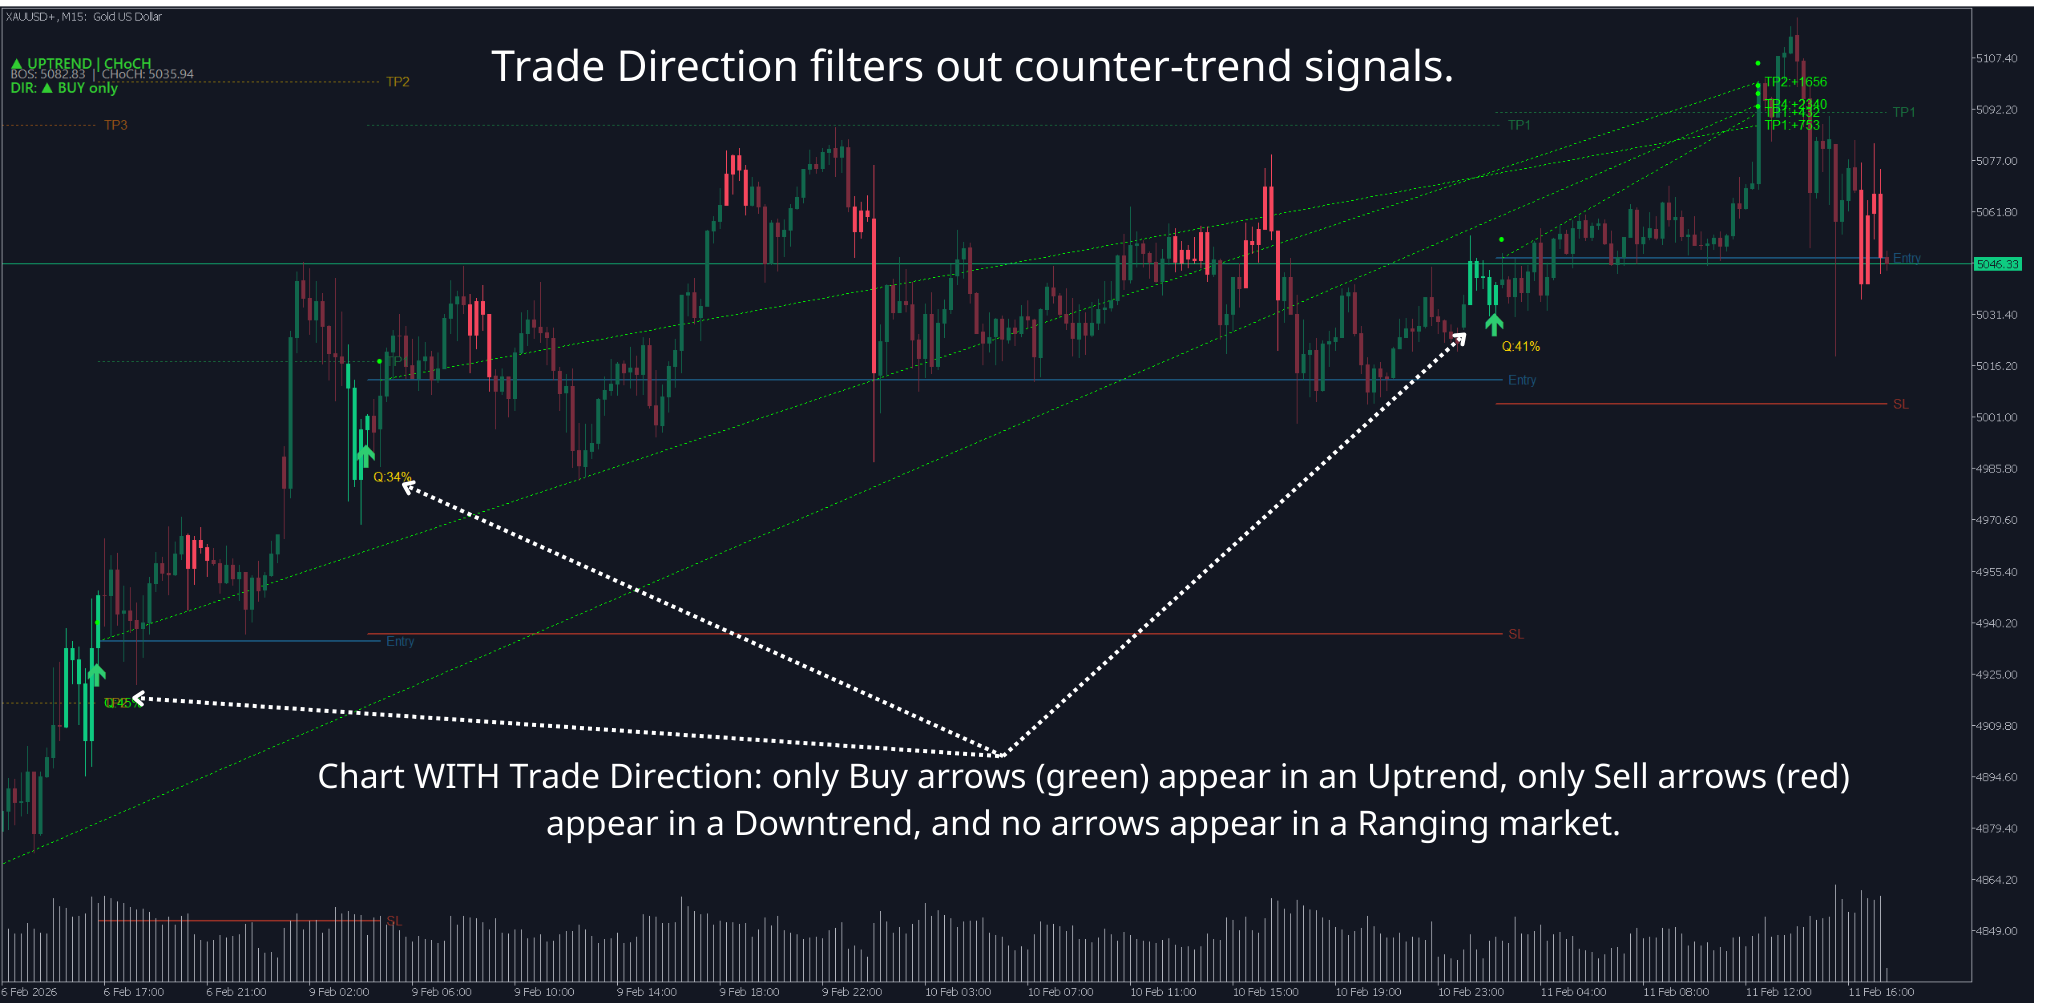
Trade Direction is a hidden filter — it doesn't create additional arrows or lines on the chart. Instead, it blocks or allows pattern signals (Fakey, PinBar, Inverted Hammer...) to be displayed.
-
Signal in correct direction → displays normally (arrow, zone fill, trading line...)
-
Signal in opposite direction → disappears completely (not displayed on chart)
Example: Trade Direction shows "DIR: ▲ BUY only" → system detects Fakey Bearish (Sell signal) → this signal is blocked → you don't see anything on chart.
How to know signal was blocked
Enable Debug Mode in indicator parameters → open MT5 → View → Toolbox → Expert tab. You'll see logs:
text
Trading scenarios (examples)
Scenario 1: Follow Structure Trend in Uptrend
-
You set Trade Direction = Follow Structure Trend, When Sideways = No Trading
-
Market Structure identifies ▲ UPTREND → label shows "DIR: ▲ BUY only" in green
-
System detects Buy pattern (Fakey Bullish) → displays on chart ✓
-
System detects Sell pattern (Fakey Bearish) → blocked, not displayed ✗
-
You only see Buy signals → trade with the uptrend → safer
-
Scenario 2: Custom for specific trading session
-
You analyze that during today's London session price will fall
-
Set Trade Direction = Custom, Allow BUY = false, Allow SELL = true
-
Label shows "DIR: MANUAL | ▼ SELL only" in orange/red
-
System only displays Sell signals → you focus on sell trades
-
End of session, change Trade Direction back to Off or Follow Structure Trend
-
Scenario 3: Ranging — stand aside
-
Trade Direction = Follow Structure Trend, When Sideways = No Trading
-
Market Structure shows ◆ RANGING → label "DIR: ◆ RANGING | BLOCKED" gray
-
System doesn't display any signals — even if patterns appear
-
You stand aside waiting for clear trend → when Market Structure switches to Uptrend or Downtrend, signals will reappear
Trade Direction usage tips
Tip 1: Start with Follow Structure Trend + No Trading
This is the safest setting for beginners:
-
Trade Direction = Follow Structure Trend
-
When Sideways = No Trading
System automatically allows only Buy in Uptrend, Sell in Downtrend, and blocks all when Ranging. You don't need to assess trend yourself.
Tip 2: Don't "chase price" when Trade Direction just changed direction
When DIR label changes from "BUY only" to "SELL only" (or vice versa), don't rush to enter immediately. Wait for:
-
Pattern signal to appear (Buy/Sell arrow)
-
Current candle to close
-
Spread not too wide (avoid low liquidity times)
Direction change is just a "green light" to allow trading — you still need a specific entry signal.
Tip 3: Only use Custom when you have clear reason
Custom mode is suitable when:
-
You've analyzed news/fundamentals and are confident of direction
-
You're backtesting only one direction
-
You want to temporarily "lock" direction during a specific trading session
Avoid: Using Custom then forgetting to change back → missing signals when market changes direction.
Tip 4: Always combine with stop loss and money management
Trade Direction helps filter direction, but doesn't guarantee every signal will win. Risks still exist:
-
Trend can reverse right after you enter
-
Buy signal in Uptrend can still lose if entering wrong price zone
-
Always set stop loss and don't risk more than 2–3% of capital per trade
Tip 5: Don't constantly adjust parameters
Trade Direction has only 4 simple parameters — shouldn't change constantly during the day:
-
Choose one mode (recommended: Follow Structure Trend) and keep it
-
Only change when there's specific reason (session change, backtesting...)
-
Avoid "flipping back and forth" between Custom and Auto → causes confusion, misses signals
Tip 6: Accept missing signals
When Trade Direction blocks a direction, you'll miss some counter-trend signals that could have been profitable. This is an intentional trade-off:
-
Lose a few small counter-trend opportunities
-
In exchange: avoid many losing counter-trend trades (usually larger losses than profits)
-
Long term, direction filtering improves overall results
Tip 7: Prefer H1 timeframe and above when starting
On small timeframes (M1, M5), trend changes fast → Trade Direction "flips" frequently → causes confusion. On H1, H4 and above:
-
Trend is more stable
-
Trade Direction changes less → easier to follow
-
Fewer signals but higher quality
Combining Trade Direction with other features
Trade Direction works most effectively when used with other signal filtering modules in the system. Here are combination methods:
Combination 1: Trade Direction + Market Structure (overall trend)
This is the most natural combination — when you choose Follow Structure Trend mode, Trade Direction automatically reads data from Market Structure.
-
Market Structure determines: Uptrend / Downtrend / Ranging
-
Trade Direction becomes: BUY only / SELL only / BLOCKED
Tip: Enable Show BOS/CHOCH Lines in Market Structure to see trend change points on chart. When you see CHoCH → prepare for Trade Direction to change direction.
Combination 2: Trade Direction + Signal Zone Filter (structure price zones)
-
Trade Direction filters direction: Buy only or Sell only
-
Signal Zone Filter filters position: signal must be near swing zone or BOS/CHoCH event
-
Result: signal is both correct direction and correct position → highest quality
Example: Uptrend → Trade Direction allows Buy → Signal Zone Filter checks: "Is this Buy near swing HL?" → Yes → display. No → hide.
Combination 3: Trade Direction + Quality Filter / Extreme Zone Filter
-
Trade Direction filters direction
-
Quality Filter filters pattern quality (keeps only clear, beautiful patterns)
-
Extreme Zone Filter filters overbought/oversold zones
-
Three layers: Correct direction → Beautiful pattern → Reasonable price zone → extremely selective signals
Combination 4: Trade Direction + entry signal (candlestick pattern)
Use Trade Direction as the first filtering step:
-
Step 1: Which direction does Trade Direction allow? → Buy only
-
Step 2: Is there a valid candlestick pattern? → Yes (Fakey Bullish)
-
Step 3: Does that pattern pass other filters? → Yes
-
Step 4: Enter Buy trade with calculated stop loss and TP
Important: Trade Direction is the "first filter", other filters are "additional confirmation". Don't use in reverse (don't see beautiful pattern then ignore Trade Direction blocking it).
Combination 5: Choose suitable trading session
Trade Direction is most effective during high liquidity hours:
-
London session (15:00–23:00 VN time): Forex volatile, clear trends
-
New York session (20:00–04:00 VN time): Gold and forex volatile
Avoid: Session transition hours (11:00–14:00 VN) — low liquidity, unclear trend, Trade Direction may "flip" back and forth
Optimize by trading style
| Style | Trade Direction | When Sideways | Notes |
|---|---|---|---|
| Scalp (M1–M15) | Follow Structure Trend | Allow Both | Need many opportunities, accept trading in range |
| Intraday (M15–H1) | Follow Structure Trend | No Trading | Recommended — balanced safety + opportunity |
| Swing (H4–D1) | Follow Structure Trend | No Trading | Trade only when trend is clear |
| News-based | Custom | — | Manually choose direction based on fundamental analysis |
Quick summary
| If you want to... | Do this |
|---|---|
| Enable Trade Direction | Change Trade Direction from Off to Follow Structure Trend |
| Manually choose direction | Change Trade Direction to Custom → adjust Allow BUY / SELL |
| Block trading when sideways | Set When Sideways = No Trading |
| Allow both directions when sideways | Set When Sideways = Allow Both |
| Disable Trade Direction | Change back to Off |
| View current status | Look at "DIR: ..." label in top-left corner of chart |
| Know which signals were blocked | Enable Debug Mode, read [DIR-FILTER] logs in Expert tab |
Frequently Asked Questions (FAQ)
Q: After enabling Trade Direction, all signals disappeared?
A: Possibly market is Ranging + When Sideways = No Trading. Or trend is opposite to common signals on chart. Try changing When Sideways to Allow Both to see if signals appear.
Q: Does Trade Direction draw anything on chart?
A: Yes — a small text line in top-left corner (e.g., "DIR: ▲ BUY only"). Otherwise doesn't draw additional arrows or lines. Blocked pattern signals simply won't display.
Q: Does Trade Direction require Market Structure?
A: Only when using Follow Structure Trend mode. Custom and Off modes don't need Market Structure. Market Structure is always enabled by default, so no need to worry.
Q: Should I use Custom or Follow Structure Trend?
A: Follow Structure Trend for most users — system analyzes automatically, no manual assessment needed. Custom for experienced traders who want to "lock" direction based on their own analysis.
Q: Is Follow Structure Trend delayed?
A: Yes — Trade Direction reacts according to Market Structure, and Market Structure needs a few candles to confirm trend change. This is an intentional trade-off: slower but fewer false signals. If you want faster reaction, decrease CHoCH Confirm Bars in Market Structure section.
Q: I use MTF Dashboard, does Trade Direction apply to signals on other symbols/timeframes?
A: Yes. Trade Direction is applied in both LOCAL (current chart) and MTF (multi-timeframe) pathways. Each symbol/timeframe is evaluated independently.


