
优化管理 (第一部分): 创建一个GUI(图形用户界面)

目录
简介
Vladimir Karputov的一篇文章中已经讨论了启动 MetaTrader 终端的替代方法。此外,终端启动步骤和其他替代方法在相关文档中进行了描述。本文中使用了来自这两个来源的数据,但没有一个源包含如何为多个终端同时操作创建方便的 GUI 的描述,这个主题将在我的文章中讨论。
在相关研究的基础上,我为终端创建了一个扩展,使 EA 交易能够在一台计算机内的多个终端上启动优化过程。后续文章中的版本将通过添加新功能增强此扩展的能力,
结果版本的操作可以在视频中查看。本文只提供了GUI创建过程的描述,而扩展的逻辑将在下一部分中演示。
MetaTrader 运行方法和配置文件
在详细考虑创建的扩展之前,让我们简单地回顾一下使用命令行启动的终端(以及其他应用程序)。这种方法看起来有点过时,但它经常被使用,例如在基于Linux的操作系统中,或者它也被用来启动没有图形界面的应用程序。
让我们探讨启动终端的例子,这是一个使用 C++的简单程序:
#include <iostream>

using namespace std;

int main()
{
    cout<<"Hello World";

    return 0;
}
程序编译后,我们得到一个.exe文件。运行该文件,控制台中将显示“Hello World”消息,这是一种常见的行为。请注意,启动函数 “main” 没有任何输入参数,但这是一种特殊情况。如果我们使用另一个“main”函数重载来更改此程序,我们将创建一个控制台应用程序,它接收许多参数:
#include <iostream>

using namespace std;

int main(int argc, char *argv[])
{
    cout << "Hello World" << endl;

    for(int i = 0; i < argc; i ++)
    {
        cout << argv[i] << endl;
    }

    return 0;
}
第一个参数“argc”表示第二个参数数组的长度。
第二个参数是启动时 program 输入参数的列表。这个程序可以从控制台调用,如下所示:
./program "My name" "is Andrey"
其中,./program表示程序名,其他是用空格分隔的参数。这些参数将写入传递的数组。程序执行结果如下:
Hello World
./program
My name
is Andrey
第一条消息来自上一个程序,而所有其他字符串都作为参数传递给字符串的“argv”数组(请注意,第一个参数始终是要启动的应用程序的名称)。我们不会详细分析这个示例,而只是说明如何从命令行启动 MetaTrader应用程序。
使用参数时,通常在每个参数前面指示标志:这些标志指示应接收传递值的参数。C/C++语言具有许多使用标志的函数,这意味着具有可执行文件扩展名(.exe)的简单应用程序可以使用传递的参数从控制台启动,这些参数可以更改应用程序属性。
根据官方说明,使用命令行运行 MetaTrader 有一些特殊的标志和值:
- /login:login number (terminal.exe /login:100000)
- /config:path to the configuration file (terminal.exe /config:c:\myconfiguration.ini)
- /profile:profile name (terminal.exe /profile:Euro)
- /portable (terminal.exe /portable)
这些标志可以组合在一起,例如,使用标志组合,可以使用指定的配置文件以可移植模式启动终端:
terminal.exe /config:c:\myconfiguration.ini /portable
虽然示例 “Hello World” 程序和终端之间的差异很大,但是使用命令行启动它们的方法是相同的,我们将在开发附加组件时使用此功能。
请特别注意配置文件,其路径是使用/config键指定的:由于此文件,终端了解启动时应使用哪个登录名/密码,以及测试仪启动模式,或者通常需要运行测试器。这里我不会复制配置文件的使用指南,不过,让我们探讨一下这些文件的结构。每个配置文件由方括号中指示的一系列片段组成。
[Tester]
该部分后面是一个键值列表,其中包含描述程序启动参数的字段的描述。配置文件还可以包含以字符“;”或“#”开头的注释。除了使用 XAML 标记或 json 文件并能在一个文件中保存大量数据的*.ini之外,现在还提供了新的配置文件格式。但是,MetaTrader只使用*.ini文件。WinApi 支持配置文件操作的函数,在开发包装类时使用配置文件,以便使用所需格式进行操作。用于处理 MetaTrader 配置文件的函数和包装器。
所需附加组件的功能和使用的技术
为了能够使用该项目,您应该安装Visual Studio IDE(集成开发环境)。这个项目是使用社区2019版本创建的。在安装Visual Studio期间,还应安装.NET 4.6.1,它用于开发此加载项。为了帮助那些不精通C#知识的读者理解这个思路,我将详细描述具体的语言问题和我在编程过程中使用的技术。
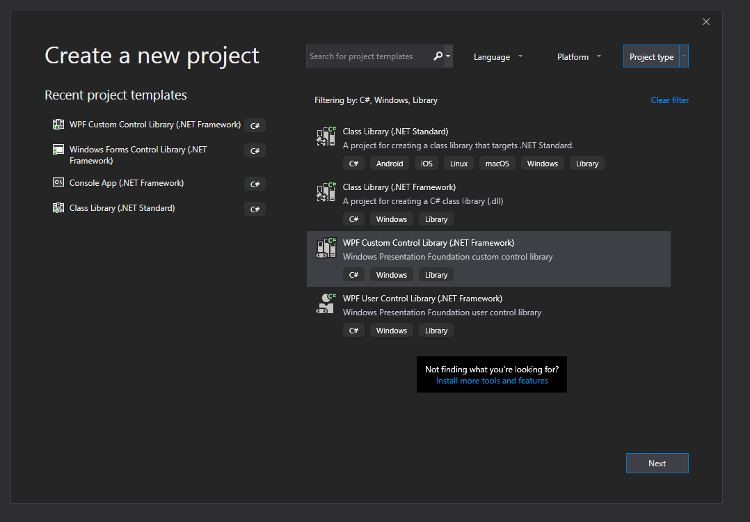
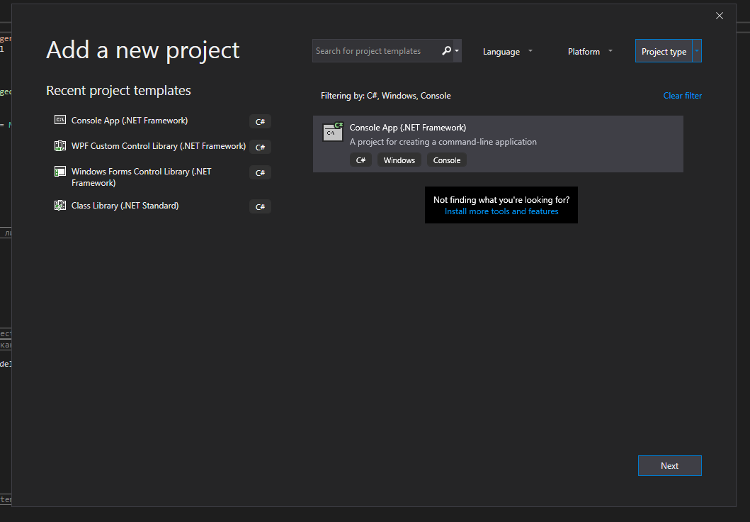
由于创建图形界面最方便的方法是使用C#语言,并且MetaTrader终端支持应用该语言的方便方法,因此我们将使用提供的功能。最近,有几篇文章在本站发布,与使用C#创建GUI相关。这些文章演示了基于Win窗体技术和一个使用反射机制启动图形的连接DLL的GUI创建方法。文章作者使用的解决方案已经足够好了,但对于当前的文章,我决定使用更现代的GUI开发方法:使用WPF技术。因此,我设法避免了连接库,同时在一个DLL中实现了所需的一切。为了解决主要的任务,我们需要创建项目的类型,它允许我们存储使用WPF技术描述的图形对象。该项目应编译到动态库(*.dll文件),然后可以加载到终端。此项目类型存在:WpfCustomControllLibrary。这种类型是专门为创建自定义图形对象而开发的,这方面的一个例子是一个绘制图表的库。我们将把这种类型用于我们的特定目的,即为 MetaTrader 终端创建一个附加组件。创建此项目类型,请从 IDEVisual Studio 中的项目列表中选择它,如下屏幕截图所示:
让我们称我们的项目为“OptimisationManagerExtention”,Themes 文件夹最初是在项目中创建的,它包含一个(*.xaml)文件“Generic.xaml”:此文件将存储设置图形对象的颜色、初始大小、缩进和类似属性的样式。稍后我们将需要这个文件,因此我们还是保留它。另一个自动生成的文件是包含CustomControl1类的文件,我们不需要这个文件,所以我们删除它。由于更多的文章将在此基础上编写,我们需要提供扩展插件的可能性。这意味着我们需要使用MVVM编程模板。如果您不熟悉模式,请阅读此链接中的说明。为了实现一个结构良好的代码,我们创建一个“View”文件夹,并将图形窗口添加到其中。要创建图形窗口,我们需要将 Window(WPF)元素添加到创建的文件夹中(如下图所示):
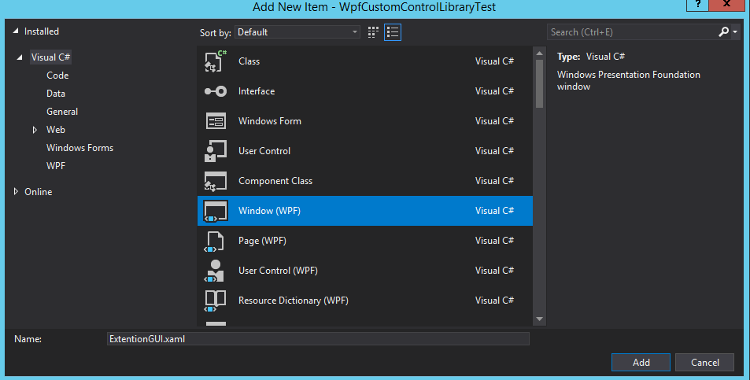
让我们称此窗口位 ExtentionGui.xaml - 这是上面窗口中显示的图形元素。让我们探讨命名空间,我们创建了这个项目,并将其命名为OptimisationManagerExtention 之后,Studio 自动生成了主命名空间:“OptimisationManagerExtention”。与许多其他编程语言一样,在C#中,命名空间用作容器,其中包含我们的对象。命名空间属性可以通过以下示例演示:
以下构造不正确,因为这两个类都声明在同一命名空间中:
namespace MyNamespace
{
    class Class_A
    {
    }

    class Class_A
    {
    }
}
允许使用以下类,因为两个类尽管名称相同,但位于不同的命名空间中:
namespace MyFirstNamespace
{
    class Class_A
    {
    }
}

namespace MySecondNamespace
{
    class Class_A
    {
    }
}
还有所谓的嵌套命名空间,使用这些命名空间时,一个命名空间包含许多其他命名空间。在这种情况下,以下代码也有效:
using System;
using System.Collections.Generic;
using System.Linq;
using System.Text;
using System.Threading.Tasks;

namespace MyNamespace
{
    class Class_A
    {
    }

    namespace Second
    {
        class Class_A
        {
        }
    }

    namespace First
    {
        class Class_A
        {
        }
    }
}
但由于这种形式的记录不方便,C#支持较短的记录,这更便于感知:
namespace MyNamespace
{
    class Class_A
    {
    }
}

namespace MyNamespace.First
{
    class Class_A
    {
    }
}

namespace MyNamespace.Second
{
    class Class_A
    {
    }
}
前面两个示例中提供的代码变体是相同的,但第二个示例更方便。创建了视图文件夹后,我们创建了嵌套的命名空间,因此添加到视图文件夹的对象将添加到“OptimisationManagerExtention.View”命名空间。因此,我们的窗口也有这个命名空间。要使我们在 Generic.xaml 文件中描述的样式应用于整个窗口,我们需要编辑此文件的 XAML 标记。首先,我们需要删除以<Style>标记开头的代码块,因为我们不需要它。其次,我们需要添加一个到窗口命名空间的链接-这是通过“xmlns:local”属性完成的。因此,我们得到以下内容:
<ResourceDictionary
    xmlns="http://schemas.microsoft.com/winfx/2006/xaml/presentation"
    xmlns:x="http://schemas.microsoft.com/winfx/2006/xaml"
    xmlns:local="clr-namespace:OptimisationManagerExtention.View">

</ResourceDictionary>
为了设置窗口的大小/颜色或其他属性,我们需要描述它们的样式。我不会在这里添加有关应用程序美观性的详细信息,但只描述必要的最低要求。您可以添加任何所需的设计、动画或其他功能。编辑后,我们得到一个描述样式的文件,而所有样式都自动应用于窗口的所有元素。这很方便,不是吗?
<ResourceDictionary
    xmlns="http://schemas.microsoft.com/winfx/2006/xaml/presentation"
    xmlns:x="http://schemas.microsoft.com/winfx/2006/xaml"
    xmlns:local="clr-namespace:OptimisationManagerExtention.View">

    <!--Set the window background color-->
    <Style TargetType="{x:Type local:ExtentionGUI}">
        <Setter Property="Background" Value="WhiteSmoke"/>
    </Style>

    <!--
    Set the background color for the dividing strip, by dragging which
    we change ranges of horizontally divided zones in the first tab
    of our window
    -->
    <Style TargetType="GridSplitter">
        <Setter Property="Background" Value="Black"/>
    </Style>

    <!--Set the height of drop-down lists-->
    <Style TargetType="ComboBox">
        <Setter Property="Height" Value="22"/>
    </Style>

    <!--Set the height of calendars-->
    <Style TargetType="DatePicker">
        <Setter Property="Height" Value="22"/>
    </Style>

    <!--Set the height of text boxes-->
    <Style TargetType="TextBox">
        <Setter Property="Height" Value="22"/>
    </Style>

    <!--Set the height of buttons-->
    <Style TargetType="Button">
        <Setter Property="Height" Value="22"/>
    </Style>

</ResourceDictionary>
对于要应用于窗口的样式,请在窗口的 XAML标记中描述到它们的链接:在<Window>开启标记之后,指示以下构造设置文件的路径,其中资源与窗口位置相关。
<!--Connect styles-->
<Window.Resources>
    <ResourceDictionary Source="../Themes/Generic.xaml"/>
</Window.Resources>
除了创建的视图目录外,还要创建一些目录:
- ViewExtention —这里我们将存储一些类,扩展标准XAML标记的可能性;这用于将表单击事件从View(我们的图形)传递到ViewModel(连接图形和模型的层,其中存储应用程序逻辑描述)。
- ViewModel — 此处将存储ViewModel和相关对象。
正如您可能猜测的那样,负责应用程序图形的层是在XAML标记中专门描述的,而不直接使用C#语言。创建了适当的目录之后,我们又创建了两个嵌套的命名空间,这些命名空间应该添加到窗口的XAML标记中,以便能够使用它们。我们还可以在 OptimisationManagerExention.viewModel 命名空间中创建“ExtentionGUI_VM”类。这个类将是我们的连接器对象,但是,为了能够执行所需的函数,它应该从“INotifyPropertyChanged”接口继承。它包含 PropertyChanged事件,通过该事件,图形部分将被通知任何字段值的更改,从而需要更新图形。创建的文件如下:
/// <summary>
/// View Model
/// </summary>
class ExtentionGUI_VM : INotifyPropertyChanged
{
    /// <summary>
    /// The event of a change in any of the ViewModel properties
    /// and its handlers
    /// </summary>
    #region PropertyChanged Event
    public event PropertyChangedEventHandler PropertyChanged;
    /// <summary>
    /// The PropertyChanged event handler
    /// </summary>
    /// <param name="propertyName">Updated variable name</param>
    protected virtual void OnPropertyChanged(string propertyName)
    {
        PropertyChanged?.Invoke(this, new PropertyChangedEventArgs(propertyName));
    }
    #endregion
}
创建窗口并添加所有链接后的XAML标记如下:
<Window x:Class="OptimisationManagerExtention.View.ExtentionGUI"
        xmlns="http://schemas.microsoft.com/winfx/2006/xaml/presentation"
        xmlns:x="http://schemas.microsoft.com/winfx/2006/xaml"
        xmlns:d="http://schemas.microsoft.com/expression/blend/2008"
        xmlns:mc="http://schemas.openxmlformats.org/markup-compatibility/2006"
        xmlns:local="clr-namespace:OptimisationManagerExtention.ViewModel"
        xmlns:viewExtention="clr-namespace:OptimisationManagerExtention.ViewExtention"
        mc:Ignorable="d"
        Title="ExtentionGUI" Height="450" Width="1100">

    <!--Connect styles-->
    <Window.Resources>
        <ResourceDictionary Source="../Themes/Generic.xaml"/>
    </Window.Resources>
    <!--Connect ViewModel-->
    <Window.DataContext>
        <local:ExtentionGUI_VM />
    </Window.DataContext>

    <Grid>


    </Grid>
</Window>
已经完成了为我们的应用程序开发GUI的主要准备工作,因此我们可以继续填充窗口的XAML标记以创建图形层。所有控件都将写入<Grid/>.块中。对于那些在使用XAML标记方面没有足够经验的人,我建议直接从工作室打开它并检查阅读情况。熟悉此工具的人可以使用本文中提供的代码片段。如果我们比较两种GUI创建方法(WinForms/WPF),除了有明显的区别外,它们也有相似之处。记住WinForms接口,其中所有图形元素都作为类实例呈现,并存储在抽象类(如按钮或组合框)的隐藏部分中。
因此,整个WinForms图形应用程序由一组相互连接的对象实例组成。通过分析WPF标记,很难想象它基于相同的原则。例如,每个标记元素“Grid”标记实际上是一个类,因此您可以在不使用XAML标记的情况下重新创建完全相同的应用程序,而只使用相应命名空间中的类。然而,这将是丑陋和笨重的,实际上,通过打开<Grid>标记,我们表示希望创建类实例。然后编译器机制解析我们指定的标记,并创建所需对象的实例。WPF应用程序的这个属性允许创建自定义图形对象或扩展标准功能的对象。此外,我们将考虑如何实现额外的功能。
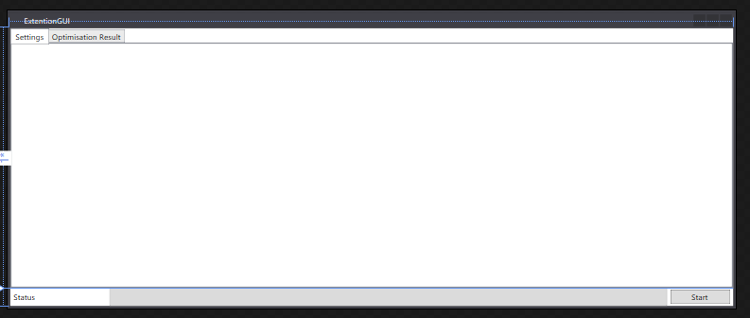
关于图形创建过程,请注意,<Grid/>是一个布局块,这意味着它是为方便放置控件和其他设计块而设计的。从视频中可以看到,在设置选项卡和优化结果选项卡之间更改时,下部(ProgressBar)保持不变。这是通过将主<Grid/>块划分为2行来实现的,在这两行中,面板内放置了主选项卡(TabControl),以及另外一个块<Grid/>被放置,其中包含状态行(Label)、ProgressBar 和 Optimization Start 按钮。但是现在它被水平地划分为三列,每列包含一个控件(Label,ProgressBar,Button)
<Grid>
    <Grid.RowDefinitions>
        <RowDefinition/>
        <RowDefinition Height="27"/>
    </Grid.RowDefinitions>

    <!--Create TabControl with two tabs-->
    <TabControl>
        <!--The tab with robot settings and optimization or single test launch options-->
        <TabItem Header="Settings">

        </TabItem>

        <!--Tab for viewing optimization results and launching a test upon a double-click event-->
        <TabItem Header="Optimisation Result">

        </TabItem>
    </TabControl>

    <!--Container with a progress bar, operation status and a launch button-->
    <Grid Grid.Row="1">
        <Grid.ColumnDefinitions>
            <ColumnDefinition Width="150"/>
            <ColumnDefinition/>
            <ColumnDefinition Width="100"/>
        </Grid.ColumnDefinitions>
        <!--Status of a running operation-->
        <Label Content="{Binding Status, UpdateSourceTrigger=PropertyChanged}"/>
        <!--Progress bar-->
        <ProgressBar Grid.Column="1"
                                     Minimum="0"
                                     Maximum="100"
                                     Value="{Binding PB_Value, UpdateSourceTrigger=PropertyChanged}"/>
        <!--Start button-->
        <Button Margin="5,0,5,0"
                                Grid.Column="2"
                                Content="Start"
                                Command="{Binding Start}"/>
    </Grid>
</Grid>
让我们还探讨与这些控件一起使用的属性,即让我们探讨如何将数据从ViewModel传递到视图中。对于显示数据或允许输入数据的每个字段,将在ExtentionGUI_VM类(我们的 ViewModel 对象)中创建存储其值的单个字段。在创建WPF应用程序时,尤其是在使用MVVM模式时,通常不会直接访问图形元素,这就是为什么我们将使用更方便的值传递过程,这需要最少的代码。例如,使用数据链接技术设置ProgressBar图形元素的 Value 属性,该操作在以下行中完成:
Value="{Binding PB_Value, UpdateSourceTrigger=PropertyChanged}" Binding属性后面是存储数据的字段的名称,而UpdateSourceTrigger属性表示在图形元素中更新数据的方法。通过使用 PropertyChanged 参数设置此属性,我们通知应用程序只有当 ExtentionGUI_VM 类中的 PropertyChanged 事件已触发,并且与之链接的变量的名称为作为此事件的参数之一传递,即“PB_Value”。从XAML标记中可以看到,按钮也有数据链接,但是对于按钮链接,使用命令属性执行,该属性通过 ICommand 接口指向命令(或更确切地说是指向在ViewModel类中定义的方法),该属性在按钮单击时调用事件。这是按钮单击事件和其他事件(如双击优化结果表)的链接。现在我们的图形部分如下:
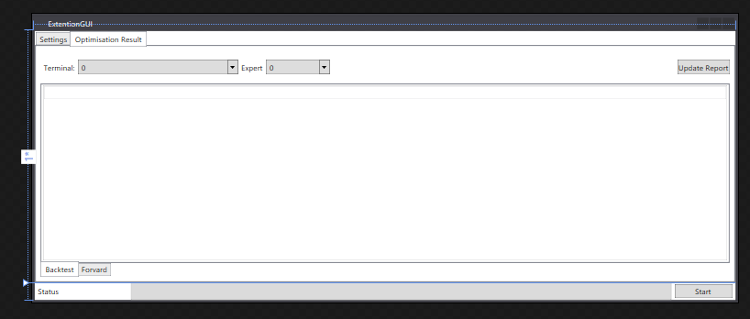
下一个GUI创建步骤是在 OptimisationResults 选项卡中添加控件。此选项卡包含两个用于选择执行优化的终端和专家顾问的组合框,以及“更新报告”按钮。此选项卡还包含一个嵌套的TabControl和两个嵌套的选项卡,每个选项卡都包含一个含有优化结果的表(ListView)。以下是对应的XAML标记:
  <!--Tab for viewing optimization results and launching a test upon a double-click event-->
            <TabItem Header="Optimisation Result">
                <Grid Margin="5">
                    <Grid.RowDefinitions>
                        <RowDefinition Height="50"/>
                        <RowDefinition/>
                    </Grid.RowDefinitions>

                    <Grid VerticalAlignment="Center">
                        <WrapPanel>
                            <Label Content="Terminal:"/>
                            <ComboBox Width="250"
                                  ItemsSource="{Binding TerminalsAfterOptimisation}"
                                  SelectedIndex="{Binding TerminalsAfterOptimisation_Selected, UpdateSourceTrigger=PropertyChanged}"/>
                            <Label Content="Expert"/>
                            <ComboBox Width="100"
                                  ItemsSource="{Binding BotsAfterOptimisation}"
                                  SelectedIndex="{Binding BotsAfterOptimisation_Selected, UpdateSourceTrigger=PropertyChanged}"/>
                        </WrapPanel>
                        <Button HorizontalAlignment="Right"
                            Content="Update Report"
                            Command="{Binding UpdateOptimisationReport}"/>
                    </Grid>
                    <!--Container with the optimization result tables-->
                    <TabControl
                        TabStripPlacement="Bottom"
                        Grid.Row="1">
                        <!--A tab in which the historic optimization results are shown-->
                        <TabItem Header="Backtest">
                            <!--Table with optimization results-->
                            <ListView ItemsSource="{Binding HistoryOptimisationResults}"
                                  viewExtention:ListViewExtention.DoubleClickCommand="{Binding StartTestFromOptimisationResults}"
                                  viewExtention:ListViewExtention.DoubleClickCommandParameter="History"
                                  SelectedIndex="{Binding SelectedHistoryOptimisationRow}" >
                                <ListView.View>
                                    <GridView
                                    viewExtention:GridViewColumns.ColumnsSource="{Binding OptimisationResultsColumnHeadders}"
                                    viewExtention:GridViewColumns.DisplayMemberMember="DisplayMember"
                                    viewExtention:GridViewColumns.HeaderTextMember="HeaderText"/>
                                </ListView.View>
                            </ListView>
                        </TabItem>
                        <!--A tab in which the results of forward optimization
                    passes are shown-->
                        <TabItem Header="Forvard">
                            <!--Table with optimization results-->
                            <ListView ItemsSource="{Binding ForvardOptimisationResults}"
                                  viewExtention:ListViewExtention.DoubleClickCommand="{Binding StartTestFromOptimisationResults}"
                                  viewExtention:ListViewExtention.DoubleClickCommandParameter="Forvard"
                                  SelectedIndex="{Binding SelectedForvardOptimisationRow}">
                                <ListView.View>
                                    <GridView
                                   viewExtention:GridViewColumns.ColumnsSource="{Binding OptimisationResultsColumnHeadders}"
                                   viewExtention:GridViewColumns.DisplayMemberMember="DisplayMember"
                                   viewExtention:GridViewColumns.HeaderTextMember="HeaderText"/>
                                </ListView.View>
                            </ListView>
                        </TabItem>
                    </TabControl>
                </Grid>
            </TabItem>
如前所述,XAML标记中使用的每个标记都是一个类。我们还可以编写自己的类来扩展标准标记的功能或创建自定义图形元素。在当前阶段,我们需要扩展现有标记的功能。具有优化过程结果的表应具有不同的列数和名称:这将是我们的第一个扩展。
第二个扩展是双击到ICommand接口的转换。如果不使用MVVM开发模板,我们可以避免创建第二个扩展,根据该模板,视图模型和模型不能与视图层连接。这样做是为了在必要时方便地修改或重新编写应用程序的图形层。从扩展调用方法中可以看到,它们都位于ViewExtension嵌套命名空间中,后跟冒号和包含扩展的类的名称。“点”运算符后跟要设置值的属性的名称。
让我们考虑每个扩展,从将单击事件转换为ICommand接口的扩展开始。若要创建扩展处理双击事件,请在ViewExtension文件夹中创建partial class ListViewExtension。partial 访问修饰符指示类实现可以在多个文件之间划分,而类的所有方法/字段和其他组件(标记为“partial”,但在两个或多个文件之间划分)将属于同一类。
using System.Windows;

using ICommand = System.Windows.Input.ICommand;
using ListView = System.Windows.Controls.ListView;

namespace OptimisationManagerExtention.ViewExtention
{
    /// <summary>
    /// The class of extensions for ListView, which translates events to commands (ICommand)
    /// the class is marked with keyword 'partial', i.e. its implementation is divided into several files.
    ///
    /// In this class ListView.DoubleClickEvent is translated
    /// into the ICommand type command
    /// </summary>
    partial class ListViewExtention
    {
        #region Command
        /// <summary>
        /// Dependent property - containing a reference to the command callback
        /// The property is set via View in the XAML markup of the project
        /// </summary>
        public static readonly DependencyProperty DoubleClickCommandProperty =
            DependencyProperty.RegisterAttached("DoubleClickCommand",
                typeof(ICommand), typeof(ListViewExtention),
                new PropertyMetadata(DoubleClickCommandPropertyCallback));

        /// <summary>
        /// Setter for DoubleClickCommandProperty
        /// </summary>
        /// <param name="obj">Control</param>
        /// <param name="value">The value to link with</param>
        public static void SetDoubleClickCommand(UIElement obj, ICommand value)
        {
            obj.SetValue(DoubleClickCommandProperty, value);
        }
        /// <summary>
        /// Getter for DoubleClickCommandProperty
        /// </summary>
        /// <param name="obj">Control</param>
        /// <returns>a link to the saved command of type ICommand</returns>
        public static ICommand GetDoubleClickCommand(UIElement obj)
        {
            return (ICommand)obj.GetValue(DoubleClickCommandProperty);
        }
        /// <summary>
        /// Callback which is called after setting property DoubleClickCommandProperty
        /// </summary>
        /// <param name="obj">Control for which the property</param>
        /// <param name="args">events preceding callback</param>
        private static void DoubleClickCommandPropertyCallback(DependencyObject obj, DependencyPropertyChangedEventArgs args)
        {
            if (obj is ListView lw)
            {
                if (args.OldValue != null)
                    lw.MouseDoubleClick -= Lw_MouseDoubleClick;

                if (args.NewValue != null)
                    lw.MouseDoubleClick += Lw_MouseDoubleClick;
            }
        }
        /// <summary>
        /// Callback of the event which is translated to the ICommand type
        /// </summary>
        /// <param name="sender"></param>
        /// <param name="e"></param>
        private static void Lw_MouseDoubleClick(object sender, System.Windows.Input.MouseButtonEventArgs e)
        {
            if (sender is UIElement element)
            {
                object param = GetDoubleClickCommandParameter(element);
                ICommand cmd = GetDoubleClickCommand(element);
                if (cmd.CanExecute(param))
                    cmd.Execute(param);
            }
        }
        #endregion

        #region CommandParameter
        /// <summary>
        /// Dependent property - containing a reference to parameters passed to the callback of type ICommand
        /// The property is set via View in the XAML markup of the project
        /// </summary>
        public static readonly DependencyProperty DoubleClickCommandParameterProperty =
            DependencyProperty.RegisterAttached("DoubleClickCommandParameter",
                typeof(object), typeof(ListViewExtention));
        /// <summary>
        /// Setter for DoubleClickCommandParameterProperty
        /// </summary>
        /// <param name="obj">Control</param>
        /// <param name="value">The value to link with</param>
        public static void SetDoubleClickCommandParameter(UIElement obj, object value)
        {
            obj.SetValue(DoubleClickCommandParameterProperty, value);
        }
        /// <summary>
        /// Getter for DoubleClickCommandParameterProperty
        /// </summary>
        /// <param name="obj">Control</param>
        /// <returns>passed parameter</returns>
        public static object GetDoubleClickCommandParameter(UIElement obj)
        {
            return obj.GetValue(DoubleClickCommandParameterProperty);
        }
        #endregion
    }
}
WPF 图形对象中每个类的每个属性都链接到DependancyProperty类中,此类允许在 View 视图和 ViewModel 视图模型层之间执行数据绑定。要创建类实例,请使用声明DependencyProperty.RegisterAttached方法,该方法返回配置的DependencyProperty类。该方法接受4个参数,有关详细信息,请阅读此处。请注意,所创建的属性必须具有访问修饰符 “public static readonly”(即从类外部可访问),可以在不需要创建类实例的情况下调用此属性,而“static”修饰符设置此特定应用程序中此属性的统一性,以及“readonly”使属性不可更改)。
- 第一个参数设置属性在XAML标记中可见的名称,
- 第二个参数设置将执行绑定的元素的类型,此类型的对象将存储在DependancyProperty类的已创建实例中。
- 第三个参数设置属性所在的类的类型,在我们的例子中,类是ListViewExtention。
- 最后一个参数接受PropertyMetadata类实例-此参数引用事件的处理程序,该处理程序在创建DependancyProperty类实例后调用,需要此回调才能订阅双击事件。
为了能够正确地设置和获取此属性中的值,让我们使用由 DependancyProperty类实例创建期间传递的名称和前缀Set(来设置数值或者 Get 来取得数值) 组成的名称创建方法。两个方法都必须是静态的。本质上,它们封装了预先存在的方法的使用SetValue和GetValue。
与完成依赖属性创建相关的事件的回调,实现对双击表行的事件的订阅,并取消对早期订阅事件的订阅(如果有)。在双击事件处理程序中,按顺序调用传递给视图的ICommand文件中的CanExecute和Execute方法。这样,当双击订阅表的任何行的事件触发时,我们会自动调用事件处理程序,该处理程序包含在该事件发生后执行的逻辑方法的调用。
创建的类实际上是一个中间类,它处理来自ViewModel的事件和调用方法,但不执行任何业务逻辑。这种方法看起来可能比直接从双击事件处理程序调用方法(在WinForms中实现)更令人困惑,但有理由使用这种方法:我们需要观察MVVM模式,该模式说明视图不应该了解任何有关ViewModel的信息,反之亦然。
通过使用中介类,我们减少了类之间的连接,为此我们使用了上述编程模式。现在我们可以编辑ViewModel类。但是,需要指定一个特定的ICommand类型属性,中介类将访问该属性。
扩展还包含将SelectionChanged事件转换为ICommand的属性的实现,以及一个中间类,该类根据存储列名集合的绑定字段自动为表创建列。这两个XAML标记扩展是如上所述实现的,因此我将不再详细介绍。如果您有问题,请在本文的评论中提出。现在我们已经实现了 Optimization Results (优化结果)选项卡标记,我们的窗口如下所示:
下一步是实现 Settings(设置) 选项卡。为了方便起见,我将在这里显示描述基本图形对象的部分,而不是为此选项卡添加完整版本的XAML标记。完整的代码附在下面。
<!--The tab with robot settings and optimization or single test launch options--> <TabItem Header="Settings"> <!--Container with settings and other items--> <Grid> <Grid.RowDefinitions> <RowDefinition/> <RowDefinition Height="200"/> </Grid.RowDefinitions> <!--Container with the list of selected terminals--> <Grid> <Grid.RowDefinitions> <RowDefinition Height="30"/> <RowDefinition/> </Grid.RowDefinitions> <!--Container with the selection of terminals which are determined automatically--> <WrapPanel HorizontalAlignment="Right" VerticalAlignment="Center"> <!--List with terminals--> <ComboBox Width="200" ItemsSource="{Binding TerminalsID}" SelectedIndex="{Binding SelectedTerminal, UpdateSourceTrigger=PropertyChanged}" IsEnabled="{Binding IsTerminalsLVEnabled, UpdateSourceTrigger=PropertyChanged}"/> <!--Terminal adding button--> <Button Content="Add" Margin="5,0" Command="{Binding AddTerminal}" IsEnabled="{Binding IsTerminalsLVEnabled, UpdateSourceTrigger=PropertyChanged}"/> </WrapPanel> <!--List of selected terminals--> <ListView Grid.Row="1" ItemsSource="{Binding SelectedTerminalsForOptimisation}" SelectedIndex="{Binding SelectedTerminalIndex, UpdateSourceTrigger=PropertyChanged}" IsEnabled="{Binding IsTerminalsLVEnabled, UpdateSourceTrigger=PropertyChanged}" > <ListView.View> <GridView> . . . </GridView> </ListView.View> </ListView> </Grid> <!--Container with parameters for editing and optimization settings--> <TabControl Grid.Row="2" Margin="0,0,0,5" TabStripPlacement="Right"> <!--Robot parameters tab--> <TabItem Header="Bot params" > <!--List with robot parameters--> <ListView ItemsSource="{Binding BotParams, UpdateSourceTrigger=PropertyChanged}"> <ListView.View> <GridView> . . . </GridView> </ListView.View> </ListView> </TabItem> <!--Optimization settings tab--> <TabItem Header="Settings"> <Grid MinWidth="700" MinHeight="170" MaxWidth="750" MaxHeight="170"> <Grid.ColumnDefinitions> <ColumnDefinition/> <ColumnDefinition/> <ColumnDefinition/> </Grid.ColumnDefinitions> <Grid.RowDefinitions> <RowDefinition/> <RowDefinition/> <RowDefinition/> </Grid.RowDefinitions> <!--Login seen by the robot--> <StackPanel Margin="2" VerticalAlignment="Center"> <Label Content="Login:"/> <TextBox Text="{Binding TestLogin, UpdateSourceTrigger=PropertyChanged}"/> </StackPanel> <!--Execution type--> <StackPanel Margin="2" VerticalAlignment="Center" Grid.Column="1" Grid.Row="1"> <Label Content="Execution:"/> <ComboBox DataContext="{Binding ExecutionList}" ItemsSource="{Binding ItemSource}" SelectedIndex="{Binding SelectedIndex, UpdateSourceTrigger=PropertyChanged}"/> </StackPanel> <!--Type of history passing for tests--> <StackPanel Margin="2" VerticalAlignment="Center" Grid.Column="2" Grid.Row="1"> <Label Content="Model:"/> <ComboBox DataContext="{Binding ModelList}" ItemsSource="{Binding ItemSource}" SelectedIndex="{Binding SelectedIndex, UpdateSourceTrigger=PropertyChanged}"/> </StackPanel> <!--Optimization criteria--> <StackPanel Margin="2" VerticalAlignment="Center" Grid.Column="2" Grid.Row="2"> <Label Content="Optimisation criteria:"/> <ComboBox DataContext="{Binding OptimisationCriteriaList}" ItemsSource="{Binding ItemSource}" SelectedIndex="{Binding SelectedIndex, UpdateSourceTrigger=PropertyChanged}"/> </StackPanel> <!--Forward period start date--> <StackPanel Margin="2" VerticalAlignment="Center" Grid.Column="1" Grid.Row="0"> <Label Content="Forward date:"/> <DatePicker SelectedDate="{Binding ForvardDate, UpdateSourceTrigger=PropertyChanged}"/> </StackPanel> <!--Deposit--> <StackPanel Margin="2" VerticalAlignment="Center" Grid.Column="0" Grid.Row="1"> <Label Content="Deposit:"/> <ComboBox DataContext="{Binding Deposit}" ItemsSource="{Binding ItemSource}" SelectedIndex="{Binding SelectedIndex, UpdateSourceTrigger=PropertyChanged}"/> </StackPanel> <!--Profit calculation currency--> <StackPanel Margin="2" VerticalAlignment="Center" Grid.Column="0" Grid.Row="2"> <Label Content="Currency:"/> <ComboBox DataContext="{Binding CurrencyList}" ItemsSource="{Binding ItemSource}" SelectedIndex="{Binding SelectedIndex, UpdateSourceTrigger=PropertyChanged}"/> </StackPanel> <!--Leverage--> <StackPanel Margin="2" VerticalAlignment="Center" Grid.Column="1" Grid.Row="2"> <Label Content="Leverage:"/> <ComboBox DataContext="{Binding LaverageList}" ItemsSource="{Binding ItemSource}" SelectedIndex="{Binding SelectedIndex, UpdateSourceTrigger=PropertyChanged}"/> </StackPanel> <!--Whether to use test visualizer--> <CheckBox Content="Visual mode" Margin="2" VerticalAlignment="Center" Grid.Column="2" Grid.Row="0" IsChecked="{Binding IsVisual, UpdateSourceTrigger=PropertyChanged}"/> </Grid> </TabItem> </TabControl> <!--Separator line which allows resizing one area relative to the other one--> <GridSplitter Height="3" VerticalAlignment="Bottom" HorizontalAlignment="Stretch"/> </Grid> </TabItem>
首先,让我们探讨动态可编辑区域的实现。此表单行为是通过在 main<Grid/>中形成两行并添加<Gridsplitter/>元素来实现的。我们拖动它来调整带有终端列表的区域和带有其他表的区域的大小。在生成的表的第一行中,插入新的<Grid/>,我们再次将其分为两部分。第一部分还包含一个布局元素-WrapPanel,其中包含终端列表和用于添加新终端的按钮。第二部分包含一个带有添加终端列表的表。
除了文本之外,该表还包含可更改表中数据的控件。由于数据绑定技术可以更改/向表中添加值,因此我们不必编写任何附加代码,因为该表直接与控制数据的集合相关联。可编辑 <Grid/>块的下部包含TabControl,其中包含检测器设置和一个包含机器人参数列表的表。
这样,我们为这个扩展执行了图形外壳的生成。在继续进行ViewModel描述之前,让我们先考虑表绑定方法。
以下是基于机器人参数表示例的说明,其中应包含以下字段:
- Flag —参数是否需要优化
- 参数名称
- 在测试器中使用的参数值
- 枚举参数起始
- 枚举参数结束
- 枚举参数步长
要将所有这些参数传递给表,我们需要创建一个存储类来存储表行数据。换句话说,这个类应该描述所有表列,这些类的集合将存储整个表。为我们的表创建了以下类:
/// <summary>
/// The class describing rows for the table with the robot parameter settings before optimization
/// </summary>
class ParamsItem
{
    /// <summary>
    /// Class constructor
    /// </summary>
    /// <param name="Name">The name of the variable</param>
    public ParamsItem(string Name) => Variable = Name;
    /// <summary>
    /// The flag showing whether this robot variable needs to be optimized
    /// </summary>
    public bool IsOptimize { get; set; }
    /// <summary>
    /// Variable name
    /// </summary>
    public string Variable { get; }
    /// <summary>
    /// The value of the variable selected for the test
    /// </summary>
    public string Value { get; set; }
    /// <summary>
    /// Parameters enumeration start
    /// </summary>
    public string Start { get; set; }
    /// <summary>
    /// Parameters enumeration step
    /// </summary>
    public string Step { get; set; }
    /// <summary>
    /// Parameters enumeration end
    /// </summary>
    public string Stop { get; set; }
}
此类的每一个属性都包含与特定列相关的信息。现在让我们看看数据上下文是如何更改的。在创建应用程序窗口时,我们在一开始就指出窗口的数据源将是类 ExtentionGUI_VM,它是此窗口的主数据上下文,应该包含与表关联的集合。但是,对于这个特定表的每一个特定行,DataContext都从Extention_GUI类更改为ParamsItem。这是一个重要的点,因此,如果需要从程序代码中更新此表的任何单元格,则必须调用 PropertyChanged 事件,而不是在ExtentionGUI_VM类上,而是在该特定行的上下文类上。
这样,我们已经完成了图形层创建过程的描述,并且可以继续描述连接应用程序和程序逻辑的类。
视图模型以及MetaTrader和实现的dll之间的连接器
程序的下一个组件是负责连接上述图形和逻辑的部分,下一个部分将讨论。在使用的编程模板(Model View ViewModel 或 MVVM)中,此部分称为ViewModel,它位于适当的命名空间(OptimisationManagerExention.ViewModel)中。
在本文的第一章中,我们已经创建了ExtentionGUI_VM类并实现了INotifyPropertyChanged接口-这个类连接了图形和逻辑。请注意,与视图中的数据链接的extentiongui_VM类的所有字段都必须声明为属性,而不是变量。如果您不太熟悉此C#语言结构,请参阅下面的代码和解释:
class A
{
    /// <summary>
    /// This is a simple public field to which you can set values or read values from it
    /// But there is no possibility to perform a check or other actions.
    /// </summary>
    public int MyField = 5;
    /// <summary>
    /// This property allows processing data before reading or writing
    /// </summary>
    public int MyGetSetProperty
    {
        get
        {
            MyField++;
            return MyField;
        }
        set
        {
            MyField = value;
        }
    }

    // This is a read-only property
    public int GetOnlyProperty => MyField;
    /// <summary>
    // This is a write-only property
    /// </summary>
    public int SetOnlyProperty
    {
        set
        {
            if (value != MyField)
                MyField = value;
        }
    }
}
从示例中可以看到,属性是方法和字段的一种混合。它们允许在返回值之前执行特定的操作或验证所记录的数据。属性也可以是只读的或只写的。在实现数据绑定时,我们在视图中引用了这些C#构造。
在实现 ExtentionGUI_VM类时,我将它划分为块(使用 #region #endregion 构造)。在 View 视图中,我们从创建优化结果开始,因此现在让我们考虑创建此选项卡的属性和方法。为了方便起见,我将首先提供负责此选项卡上显示的数据的代码,然后添加解释。
#region Optimisation Result

/// <summary>
/// 历史优化结果的表格
/// </summary>
public DataTable HistoryOptimisationResults => model.HistoryOptimisationResults;
/// <summary>
/// 向前优化结果的表格
/// </summary>
public DataTable ForvardOptimisationResults => model.ForvardOptimisationResults;
/// <summary>
/// 优化栏位列表的集合
/// </summary>
public ObservableCollection<ColumnDescriptor> OptimisationResultsColumnHeadders =>
       model.OptimisationResultsColumnHeadders;

#region Start test from optimisation results
/// <summary>
/// 运行所选优化过程的测试
/// </summary>
public ICommand StartTestFromOptimisationResults { get; }
/// <summary>
/// 使用双击鼠标开始测试的方法
/// </summary>
/// <param name="type"></param>
private void StartTestFromOptimisationResultsAction(object type)
{
    ENUM_TableType tableType = (string)type == "History" ?
        ENUM_TableType.History : ENUM_TableType.Forvard;
    int ind = tableType == ENUM_TableType.History ?
        SelectedHistoryOptimisationRow : SelectedForvardOptimisationRow;

    model.StartTest(tableType, ind);
}
#endregion

/// <summary>
/// Index of the selected row from the historical optimization table
/// </summary>
public int SelectedHistoryOptimisationRow { get; set; } = 0;
/// <summary>
/// Index of the selected row from the forward optimization
/// </summary>
public int SelectedForvardOptimisationRow { get; set; } = 0;

#region UpdateOptimisationReport

#region TerminalsAfterOptimisation
public ObservableCollection<string> TerminalsAfterOptimisation => model.TerminalsAfterOptimisation;
public int TerminalsAfterOptimisation_Selected
{
    get => model.TerminalsAfterOptimisation_Selected;
    set
    {
        model.TerminalsAfterOptimisation_Selected.SetVarSilently(value);
        if (value > -1)
           model.SelectNewBotsAfterOptimisation_forNewTerminal();
    }
}

public ObservableCollection<string> BotsAfterOptimisation => model.BotsAfterOptimisation;
public int BotsAfterOptimisation_Selected
{
    get => model.BotsAfterOptimisation_Selected;
    set => model.BotsAfterOptimisation_Selected.SetVarSilently(value);
}
#endregion
public ICommand UpdateOptimisationReport { get; }

        private void UpdateReportsData(object o)
        {
            model.LoadOptimisations();
        }
        #endregion
        #endregion
让我们考虑一下historical和forward的数据源,以及通过中间类(GridViewColumns)与这两个表的列连接的>列的列表。每个表都有两个唯一的字段:数据源(DataTable 类型)和包含表中所选行索引的属性。所选表行的索引对于显示并不重要,但我们需要它来执行进一步的操作,例如通过双击表行启动测试运行。将数据加载到表中并清除这些数据是由程序逻辑实现的;根据OOP原则,一个特定的类应该负责一个特定的任务,然后在提供有关表组成的数据的属性中,我们简单地引用相应的属于模型的主要类(ExtentionGUI_M)。通过在表字段上单击鼠标自动执行对选定索引的跟踪,因此这些属性不执行任何操作或检查,它们与类字段类似。
还要注意包含列列表的属性使用的数据类型(OptimisationResultsColumnHeaders)-ObservableCollection<T>,这是标准的C#类之一,它存储动态变化的集合。但与列表(List<T>)不同,此类包含CollectionChanged事件,每次更改/删除/添加集合中的数据时都会调用该事件。通过这个类创建了一个属性类型之后,我们会自动收到有关数据源更改的视图通知。因此,我们不需要手动通知图形需要重新写入显示的数据。
现在注意下拉列表中终端和机器人的选择,并继续执行按钮按下和表点击事件处理程序。用于处理下拉列表和加载优化结果的块包含在标记为 #region UpdateOptimisationReport 的区域中。首先,考虑第一个下拉列表的数据源,其中包含终端列表。这是对其执行优化的终端ID的列表,以及所选终端的索引。终端列表是由模型编译的,因此我们可以简单地引用模型中的适当字段。选择终端索引是一项比较复杂的任务。让我们利用属性相对于前面提到的字段的优势。从下拉列表中选择终端后,将调用TerminalAfteroptimization_Selected属性设置器,其中执行以下操作:
- 在模型中保存所选索引
- 更新第二个下拉列表的值,该列表存储在此终端中优化的机器人列表。
扩展存储已执行测试的历史记录,并按机器人和终端对它们进行分组。如果您在同一终端中重新优化同一个机器人,则会重新编写过去的历史记录。这种将事件从 View 视图传递到 ViewModel 视图模型的方法是最方便的方法。然而,这并不总是合适的。
将事件从图形层传递到ViewModel的下一个方法是使用命令。一些图形元素(如按钮)支持命令。使用命令时,我们通过参数化的ICommand类型将“command”属性与ViewModel中的属性链接。ICommand接口是C#语言的标准接口之一,它看起来如下:
public interface ICommand
{
    //
    // 概述:
    //     Occurs when changes occur that affect whether or not the command should execute.
    event EventHandler CanExecuteChanged;

    //
    // 概述:
    //     Defines the method that determines whether the command can execute in its current
    //     state.
    //
    // 参数:
    //   parameter:
    //     Data used by the command. If the command does not require data to be passed,
    //     this object can be set to null.
    //
    // Returns:
    //     true if this command can be executed; otherwise, false.
    bool CanExecute(object parameter);
    //
    // 概述:

    //     Defines the method to be called when the command is invoked.
    //
    // 参数:
    //   parameter:
    //     Data used by the command. If the command does not require data to be passed,
    //     this object can be set to null.
    void Execute(object parameter);
}
单击按钮时,首先触发CanExecute事件,如果返回false,则按钮不可访问,否则调用Execute方法,执行所需的操作。为了使用这个功能,我们需要实现这个接口。我在实现接口时没有发明任何新的东西,只是使用了它的标准实现。
/// <summary>
/// Implementation of the ICommand interface, used for
/// binding commands with methods from ViewModel
/// </summary>
class RelayCommand : ICommand
{
    #region Fields
    /// <summary>
    /// Delegate directly performing the action
    /// </summary>
    readonly Action<object> _execute;
    /// <summary>
    /// Delegate checking for the possibility of performing an action
    /// </summary>
    readonly Predicate<object> _canExecute;
    #endregion // Fields

    /// <summary>
    /// Constructor
    /// </summary>
    /// <param name="execute">The method passed for the delegate, which is a callback</param>
    public RelayCommand(Action<object> execute) : this(execute, null) { }
    /// <summary>
    /// Constructor
    /// </summary>
    /// <param name="execute">
    /// The method passed for the delegate, which is a callback
    /// </param>
    /// <param name="canExecute">
    /// The method passed for the delegate, which checks the possibilities to perform an action
    /// </param>
    public RelayCommand(Action<object> execute, Predicate<object> canExecute)
    {
        if (execute == null)
            throw new ArgumentNullException("execute");
        _execute = execute; _canExecute = canExecute;
    }

    /// <summary>
    /// Checking the possibility to perform an action
    /// </summary>
    /// <param name="parameter">parameter passed from View</param>
    /// <returns></returns>
    public bool CanExecute(object parameter)
    {
        return _canExecute == null ? true : _canExecute(parameter);
    }
    /// <summary>
    /// Event - called whenever the callback execution ability changes.
    /// When this event is triggered, the form calls the "CanExecute" method again
    /// The event is triggered from ViewModel when needed
    /// </summary>
    public event EventHandler CanExecuteChanged
    {
        add { CommandManager.RequerySuggested += value; }
        remove { CommandManager.RequerySuggested -= value; }
    }
    /// <summary>
    /// The method calling a delegate which performs the action
    /// </summary>
    /// <param name="parameter">parameter passed from View</param>
    public void Execute(object parameter) { _execute(parameter); }
}
根据此ICommand接口实现,创建了两个私有只读字段,分别存储delegates和通过其中一个RelayCommand类构造函数重载传递给它们的存储方法。为了使用这种机制,请在ExtentionGUI_VM类构造函数中创建 RelayCommand类 实例。将执行某些操作的方法传递给此实例。UpdateOptimisationReport属性更新优化表中的信息,如下所示:
UpdateOptimisationReport = new RelayCommand(UpdateReportsData);
这里UpdateReportsData是ExtentionGUI_VM类的私有方法,它从ExtentionGUI_M类(即从我们的模型类)调用LoadOptimisations()方法。类似地,StartTestFromOptimisationResults属性与双击用户选择的表行的事件相链接。但是,在这种情况下,双击事件不是通过标准属性(如按钮中的Button类)传递的,而是通过前面描述和实现的解决方案“ListViewExtension.DoubleClickCommand”传递的。从Execute和CanExecute方法签名可以看出,它们可以接受“Object”类型值对于按钮,我们不传递任何值;对于双击事件,我们传递表名:您可以从绑定方法中看到它,在XAML标记中具有这些属性:
viewExtention:ListViewExtention.DoubleClickCommand="{Binding StartTestFromOptimisationResults}"
viewExtention:ListViewExtention.DoubleClickCommandParameter="History"
基于这个参数,我们的模型可以理解运行优化测试的数据应该来自哪个表。
现在让我们考虑使用“Settings”选项卡的属性和回调的实现,其中主要控件位于该选项卡中。让我们从包含选定终端的表的数据源的实现开始。
#region SelectedTerminalsForOptimisation && SelectedTerminalIndex (first LV params)
/// <summary>
/// The list of terminals selected for optimization, which is displayed in the terminals table
/// </summary>
public ObservableCollection<TerminalAndBotItem> SelectedTerminalsForOptimisation { get; private set; } =
    new ObservableCollection<TerminalAndBotItem>();
/// <summary>
/// The index of the selected row
/// </summary>
private int selectedTerminalIndex = 0;
public int SelectedTerminalIndex
{
    get { return selectedTerminalIndex; }
    set
    {
        // Assign the value of the newly selected index
        selectedTerminalIndex = value;

        //((RelayCommand)Start).OnCanExecuteChanged();

        // Fill in the list of parameters of the robot selected in the current row
        if (value == -1)
        {
            return;
        }
        TerminalAndBotItem terminal_item = SelectedTerminalsForOptimisation[value];
        if (terminal_item.Experts.Count > 0)
        {
            FillInBotParams(terminal_item.Experts[terminal_item.SelectedExpert],
                terminal_item.TerminalID);
        }
    }
}
        #endregion
终端列表显示为TerminalAndBotItem类键入的观察到的集合。集合存储在ViewModel类中。ViewModel还包含用于设置和获取所选行的索引的属性:这样做是为了能够对终端选择事件作出反应。如视频所示,单击一行时,将动态加载选定的机器人参数。此行为在SelectedTerminalIndex属性设置器中实现。
还请记住,表中带有所选终端的行包含控件,因此我们需要将TerminalAndBotitem组织为数据上下文类。
首先,从终端列表中删除终端。如上所述,表的数据存储在ViewModel中,而表中的“删除”按钮的回调只能绑定到行数据的上下文,即,使用无法访问此集合的TerminAlandBotitem类。在这种情况下,解决方案是使用 delegates(委托)。我在ExtentionGUI_VM 中实现了一个数据删除方法,然后通过一个构造函数将它作为委托传递给TerminalAndBotItem类。为了清楚起见,在下面的代码中,我删除了所有多余的行。传递一个方法以从外观中删除自身如下
class TerminalAndBotItem
{

    public TerminalAndBotItem(List<string> botList,
        string TerminalID,
        Action<string, string> FillInBotParams,
        Action<TerminalAndBotItem> DeleteCommand)
    {
        // Fill in the delegate fields
        #region Delegates
        this.FillInBotParams = FillInBotParams;
        this.DeleteCommand = new RelayCommand((object o) => DeleteCommand(this));
        #endregion
    }

    #region Delegates
    /// <summary>
    /// Field with the delegate to update selected robot parameters
    /// </summary>
    private readonly Action<string, string> FillInBotParams;
    /// <summary>
    /// Callback for a command to delete a terminal from the list (Delete button in the table)
    /// </summary>
    public ICommand DeleteCommand { get; }
    #endregion

    /// <summary>
    /// index of the selected EA
    /// </summary>
    private int selectedExpert;
    /// <summary>
    /// Property for the index of the selected EA
    /// </summary>
    public int SelectedExpert
    {
        get { return selectedExpert; }
        set
        {
            selectedExpert = value;
            // Run the callback to load parameters for the selected EA
            if (Experts.Count > 0)
                FillInBotParams(Experts[selectedExpert], TerminalID);
        }
    }
}
正如从这段代码中可以看到的那样,另一个C#语言构造是在该任务的实现中使用的:lambda表达式。如果你熟悉C++或C语言,这个代码部分就不会显得奇怪了。Lambda表达式可以被视为相同的函数,但与它们的主要区别在于它们没有传统的声明。这些结构在C#中被广泛使用,您可以在这里阅读它们。回调是使用ICommand执行的。类实现中的下一个有趣点是,从所有机器人的下拉列表中选择新机器人时更新机器人参数。更新robot参数的方法位于模型中,而ViewModel的这个方法包装器的实现在ViewModel中(也有终端删除方法)。同样,我们使用委托,但不是使用ICommand,而是将对新robot选择事件的响应放置到SelectedExpert属性设置器中。
更新EA参数的方法还具有特定的特点,即:它是异步的。
private readonly object botParams_locker = new object();
/// <summary>
/// Get and fill robot parameters
/// </summary>
/// <param name="fullExpertName"> Full EA name in relation to folder ~/Experts</param>
/// <param name="Terminal">ID of the terminal</param>
private async void FillInBotParams(string fullExpertName, string Terminal)
{
    await System.Threading.Tasks.Task.Run(() =>
    {
        lock (botParams_locker)
        {
            model.LoadBotParams(fullExpertName, Terminal, out OptimisationInputData? optimisationData);
            if (!optimisationData.HasValue)
                return;

            IsSaveInModel = false;
            TestLogin = optimisationData.Value.Login;
            IsVisual = optimisationData.Value.IsVisual;
            ForvardDate = optimisationData.Value.ForvardDate;
            CurrencyList.SelectedIndex = optimisationData.Value.CurrencyIndex;
            Deposit.SelectedIndex = optimisationData.Value.DepositIndex;
            ExecutionList.SelectedIndex = optimisationData.Value.ExecutionDelayIndex;
            LaverageList.SelectedIndex = optimisationData.Value.LaverageIndex;
            ModelList.SelectedIndex = optimisationData.Value.ModelIndex;
            OptimisationCriteriaList.SelectedIndex = optimisationData.Value.OptimisationCriteriaIndex;
            IsSaveInModel = true;
        }
    });


    OnPropertyChanged("BotParams");
}
C#有一个易于编写的异步编程模型:Async Await,我们在本例中使用它。呈现的代码段启动异步操作,然后等待其实现完成。操作完成后,将调用OnPropertyChanged事件,该事件将通知View表中的更改以及robot参数列表。为了理解特定的特性,让我们考虑一个使用 Async Await 技术的异步应用程序的例子。
class Program
{
    static void Main(string[] args)
    {
        Console.WriteLine($"Main before Method() = {Thread.CurrentThread.ManagedThreadId}");
        Method();
        Console.WriteLine($"Main after Method() = {Thread.CurrentThread.ManagedThreadId}");

        Console.ReadLine();
    }
    private static async void Method()
    {
        Console.WriteLine($"Before Await = {Thread.CurrentThread.ManagedThreadId}");
        await Task.Run(() => { Thread.Sleep(100); Console.WriteLine($"In Avait 1 = {Thread.CurrentThread.ManagedThreadId}"); });
        Console.WriteLine($"After Await 1 = {Thread.CurrentThread.ManagedThreadId}");
      Thread.Sleep(100);

            await Task.Run(() => { Console.WriteLine($"In Avait 2 = {Thread.CurrentThread.ManagedThreadId}"); });
            Console.WriteLine($"After Await 2 = {Thread.CurrentThread.ManagedThreadId}");
        }

    }
这个简单的控制台应用程序的目的是演示线程的行为,并提供异步的简要说明。在主方法中,我们首先显示主方法正在运行的线程的ID,然后启动异步方法,再次显示主线程的ID。在异步方法中,我们再次显示正在运行此方法的线程的 ID,然后逐个打印异步线程的 ID 和异步线程启动后将在其中执行操作的线程的ID。这个程序最有趣的输出:
Main before Method() = 1
Before Await = 1
Main After Method() = 1
In Await 1 = 3
After Await 1 = 3
In Await 2 = 4
After Await 2 = 4
从上面可以看出,主线程和异步 Method()的第一个输出具有相同的ID。这意味着 Method()不是完全异步的。此方法的异步性在使用 static Task.Run()方法调用异步操作之后开始。如果 Method()是完全同步的,那么在输出下四条消息之后,将再次调用显示主线程ID的下一个事件。
现在我们来看看异步输出。第一个异步输出返回 ID = 3,这是预期的。但是下一个操作等待异步操作的完成(通过使用“await”),并返回 ID = 3。使用第二个异步操作观察到相同的画面。此外,尽管在第一次异步操作后使用的线程ID的输出之后添加了100毫秒的延迟,但顺序不会改变,尽管在另一个线程上开始的第二个操作与第一个分开。
这些是异步等待模型和一般异步的特定特性。如果辅助线程和方法有可能被调用两次,那么我们方法中的所有操作都在上下文中执行,这可能导致错误。lock(locker_object)结构用于此目的。这种设计创建了类似于示例的调用执行队列。与测试示例不同,队列是通过C#机制独立形成的,这里我们使用共享资源作为交换机。如果在lock()构造中使用该方法,那么任何其他方法调用都将被卡在共享资源阶段,直到释放为止。从而避免了双方法调用错误。
现在让我们考虑为优化器参数设置创建数据源。代码如下:
#region Optimization and Test settings

/// <summary>
/// The login visible to the robot during tests (it is required if there is limitation by login)
/// </summary>
private uint? _tertLogin;
public uint? TestLogin
{
    get => _tertLogin;
    set
    {
        _tertLogin = value;

        OnPropertyChanged("TestLogin");
        CB_Action(GetSetActionType.Set_Index);
    }
}
/// <summary>
/// Order execution delay
/// </summary>
public ComboBoxItems<string> ExecutionList { get; }
/// <summary>
/// Type of used quotes (every tick, OHLC, 1M ...)
/// </summary>
public ComboBoxItems<string> ModelList { get; }
/// <summary>
/// Optimization criterion
/// </summary>
public ComboBoxItems<string> OptimisationCriteriaList { get; }
/// <summary>
/// Deposits
/// </summary>
public ComboBoxItems<int> Deposit { get; }
/// <summary>
/// Profit calculation currency
/// </summary>
public ComboBoxItems<string> CurrencyList { get; }
/// <summary>
/// Leverage
/// </summary>
public ComboBoxItems<string> LaverageList { get; }
/// <summary>
/// Forward test start date
/// </summary>
private DateTime _DTForvard = DateTime.Now;
public DateTime ForvardDate
{
    get => _DTForvard;
    set
    {
        _DTForvard = value;

        OnPropertyChanged("ForvardDate");
        CB_Action(GetSetActionType.Set_Index);
    }
}
/// <summary>
/// Indication of tester start in the graphical mode
/// </summary>
private bool _isVisualMode = false;
/// <summary>
/// Indication of tester start in the visual mode
/// </summary>
public bool IsVisual
{
    get => _isVisualMode;
    set
    {
        _isVisualMode = value;

        OnPropertyChanged("IsVisual");
        CB_Action(GetSetActionType.Set_Index);
    }
}
/// <summary>
/// a hidden variable which stores the IsSaveInModel flag value
/// </summary>
private bool isSaveInModel = true;
/// <summary>
/// Shared resource for asynchronous access to the IsSaveInModel property
/// </summary>
private readonly object SaveModel_locker = new object();
/// <summary>
/// Flag; if True - if tester parameters are changed, they will be saved
/// </summary>
private bool IsSaveInModel
{
    get
    {
        lock (SaveModel_locker)
            return isSaveInModel;
    }
    set
    {
        lock (SaveModel_locker)
            isSaveInModel = value;
    }
}
/// <summary>
/// Callback saving changes in tester parameters
/// </summary>
/// <param name="actionType"></param>
private void CB_Action(GetSetActionType actionType)
{
    if (actionType == GetSetActionType.Set_Index && IsSaveInModel)
    {
        model.UpdateTerminalOptimisationsParams(new OptimisationInputData
        {
            Login = TestLogin,
            IsVisual = IsVisual,
            ForvardDate = ForvardDate,
            CurrencyIndex = CurrencyList.SelectedIndex,
            DepositIndex = Deposit.SelectedIndex,
            ExecutionDelayIndex = ExecutionList.SelectedIndex,
            LaverageIndex = LaverageList.SelectedIndex,
            ModelIndex = ModelList.SelectedIndex,
            OptimisationCriteriaIndex = OptimisationCriteriaList.SelectedIndex,
            Deposit = Deposit.ItemSource[Deposit.SelectedIndex],
            Currency = CurrencyList.ItemSource[CurrencyList.SelectedIndex],
            Laverage = LaverageList.ItemSource[LaverageList.SelectedIndex]
        });
    }
}
#endregion
另一个重要的时刻是优化器参数的实现,在这个模型中,为每个机器人存储一个单独的测试仪设置实例。这将启用每个选定终端的单个测试器配置。在每个setter中调用适当的 CB-Action方法,从而在参数发生任何更改时立即将结果保存到模型中。我还创建了ComBoxItems<T>类来存储下拉列表的数据。它实际上是与之相连的组合框的上下文,下面是类实现:
/// <summary>
/// Class - a wrapper for ComboBox list data
/// </summary>
/// <typeparam name="T">Data type stored in ComboBox</typeparam>
class ComboBoxItems<T> : INotifyPropertyChanged
{
    /// <summary>
    /// Collection of list items
    /// </summary>
    private List<T> items;
    public List<T> ItemSource
    {
        get
        {
            OnAction(GetSetActionType.Get_Value);
            return items;
        }
        set
        {
            items = value;
            OnAction(GetSetActionType.Set_Value);
        }
    }
    /// <summary>
    /// Selected index in the list
    /// </summary>
    int selectedIndex = 0;
    public int SelectedIndex
    {
        get
        {
            OnAction(GetSetActionType.Get_Index);
            return selectedIndex;
        }
        set
        {
            selectedIndex = value;
            OnAction(GetSetActionType.Set_Index);
        }
    }

    public event Action<GetSetActionType> Action;
    public event PropertyChangedEventHandler PropertyChanged;

    private void OnAction(GetSetActionType type)
    {
        switch (type)
        {
            case GetSetActionType.Set_Value:
                PropertyChanged?.Invoke(this, new PropertyChangedEventArgs("ItemSource"));
                break;
            case GetSetActionType.Set_Index:
                PropertyChanged?.Invoke(this, new PropertyChangedEventArgs("SelectedIndex"));
                break;
        }
        Action?.Invoke(type);
    }
}
enum GetSetActionType
{
    Get_Value,
    Set_Value,
    Get_Index,
    Set_Index
}
它的特定功能是事件,每次编辑其中一个事件或在其事件中接收数据时都会调用它。另一个功能是自动更新视图关于其属性更改。这样它就能够通知 ViewModel 和 View关于其属性中的更改。因此,在ViewModel中,我们更新模型中的数据,涉及优化器设置的更改属性,并调用自动保存。这也使得代码更容易阅读,因为我们向ViewModel添加了每个组合框的两个属性(选定元素的索引和所有元素的列表)如果没有这个类,扩展的GUI_VM类代码会更大。
总之,让我们看看如何实例化附加组件的模型,以及如何在 MetaTrader 5 终端中运行GUI。数据模型类必须独立于ViewModel,并且ViewModel独立于View。为了测试的可能性,我们将通过 IExtentionGUI_M 接口实现模型。该接口的结构和实现将与数据模型的描述一起考虑。现在请注意,ExtentionGUI_VM 类不知道数据模型的具体实现,而是与 IExtentionGUI_M 接口一起工作,并且模型类按以下方式实例化:
private readonly IExtentionGUI_M model = ModelCreator.Model; 这个实例化过程使用一个静态工厂,ModelCreator类是一个工厂,实现如下:
/// <summary>
/// Factory for substituting a model in a graphical interface
/// </summary>
class ModelCreator
{
    /// <summary>
    /// Model
    /// </summary>
    private static IExtentionGUI_M testModel;
    /// <summary>
    /// Property returning either a model (if it has not been substitutes) or a substitutes model (for tests)
    /// </summary>
    internal static IExtentionGUI_M Model => testModel ?? new ExtentionGUI_M(new MainTerminalCreator(),
                                                                             new MainConfigCreator(),
                                                                             new MainReportReaderCreator(),
                                                                             new MainSetFileManagerCreator(),
                                                                             new OptimisationExtentionWorkingDirectory("OptimisationManagerExtention"),
                                                                             new MainOptimisatorSettingsManagerCreator(),
                                                                             new TerminalDirectory(Path.Combine(Environment.GetFolderPath(Environment.SpecialFolder.ApplicationData), "MetaQuotes", "Terminal")));

    /// <summary>
    /// Model substitution method substitutes a test model so that you can test the graphics separately from the logic
    /// </summary>
    /// <param name="model">test model - substituted from the outside</param>
    [System.Diagnostics.Conditional("DEBUG")]
    public static void SetModel(IExtentionGUI_M model)
    {
        testModel = model;
    }
}
此类具有一个私有字段,由数据模型接口键入。字段最初等于空,我们在编写接收到所请求模型的静态属性时使用了此功能。在上面的代码中执行检查:testModel的现在等于空,实例化并返回包含业务逻辑的模型的实现;如果 testModel不等于空(我们已经替换了模型),则返回被替换的模型,即存储在testModel中的模型。静态方法SetModel用于替代模型。此方法ID由[system.diagnostics.conditional(“DEBUG”)]属性修饰,该属性禁止在该程序的发布版本中使用。
GUI启动过程类似于从DLL运行图形,这在前面的文章中进行了描述。已写入公共 MQLConnector类以实现与 MetaTrader 的连接。
/// <summary>
/// Class for connecting the graphical interface with MetaTrader
/// </summary>
public class MQL5Connector
{
    /// <summary>
    /// Field containing a pointer to a running graphical interface
    /// </summary>
    private static View.ExtentionGUI instance;
    /// <summary>
    /// Method that launches the graphical interface.
    /// Only one interface is launched from one robot.
    /// During launch a check is performed if the GUI has already been started.
    /// If yes, the new one is not started
    /// </summary>
    /// <param name="pathToTerminal">Path to the terminal's mutable folder</param>
    public static void Instance(string terminalID)
    {
        // check if the GUI has already been started
        if (instance == null)
        {
            // Variable of the secondary thread - the GUI thread (graphics are launched in the secondary thread)
            // Its instantiation and passing a lambda expression describing the order of graphics start
            Thread t = new Thread(() =>
            {
                // Instantiation of the GUI class and its display (launch of graphics)
                instance = new View.ExtentionGUI();
                instance.Show();
                // Subscribe to the graphics window closing event - if the window is closed then
                // the field in which the link to the HUI was stored is assigned the null value
                instance.Closed += (object o, EventArgs e) => { instance = null; };

                // Launch GUI thread dispatcher
                Dispatcher.Run();
            });
            MainTerminalID = terminalID;

            // Start secondary thread
            t.SetApartmentState(System.Threading.ApartmentState.STA);
            t.Start();
        }
    }
    /// <summary>
    /// Gets data on whether the window is active
    /// </summary>
    /// <returns>true if active and false if closed</returns>
    public static bool IsWindowActive() => instance != null;
    /// <summary>
    /// Main Terminal ID
    /// </summary>
    internal static string MainTerminalID { get; private set; }
    internal static Dispatcher CurrentDispatcher => ((instance == null) ? Dispatcher.CurrentDispatcher : instance.Dispatcher);
}
这个类必须用公共访问修饰符标记 - 这使得它可以从MetaTrader中的机器人进行访问。此外,要在终端中使用的方法必须是静态的,并且具有公共访问修饰符,因为终端只允许使用静态方法。这个类还有两个带有内部访问修饰符的属性,此访问修饰符将它们隐藏在终端上,因为它们仅用于创建的dll中。从实现中可以看到,我们的窗口应该存储在一个私有静态字段中,因此,可以从其他属性和方法访问它。此解决方案还确保在此终端上的一个机器人中只能创建一个应用程序实例。实例方法实例化图形并打开一个窗口。首先,检查窗口是否在前面实例化,如果是,尝试应该被忽略。然后为运行图形创建第二个线程。图形和运行程序的线程分离用于避免在终端和图形界面中冻结。写入窗口加载后,订阅窗口关闭事件并为窗口加载方案的正确操作分配空值。然后我们需要为调用图形的线程启动调度, 否则,将不会为调用图形的线程启动调度程序。。Dispatcher类是为解决WPF应用程序中的多线程问题而创建的。事实上,图形窗口的所有元素都属于图形窗口线程,当我们试图从另一个线程更改任何图形元素的值时,我们将得到一个“跨线程异常”错误。Dispatcher类启动通过图形接口线程中的委托传递给它的操作,从而避免了错误。完成 lambda 表达式的图形启动描述后,我们需要将线程配置为单线程单元并运行它,从而运行图形。在此之前,必须存储传递的当前终端ID的值。
我们为什么需要这个?这允许我们独立于逻辑调试图形。我们已经创建了一个图形界面,但是,为了调试它,我们需要一个表示模型的类。该模型具有许多特定的实现特性,因此应该与图形分开对其进行调试。既然我们有了替换测试数据模型的方法,我们就可以实现一个测试数据模型类,并通过一个静态工厂在视图模型中替换它。因此,我们有机会使用测试数据调试图形,运行GUI并检查回调、设计和其他细微差别的反应。我是这样做的,首先,我们需要在当前解决方案中创建一个控制台应用程序,以便直接从VisualStudio运行图形:这将提供对调试工具的访问。
称之为“Test”,并添加一个链接到我们的DLL,它是我们为MetaTrader编写的。这样,我们得到了一个控制台应用程序,它可以使用DLL的公共类。但是,我们的dll中只有一个公共类,即 MQL5Connector类,但是,除此之外,我们还需要创建一个假数据模型,并在ViewModel中替换它,如前所述。为此,我们需要访问仅在DLL中可用的类。有一个解决办法,要执行此操作,请在dll的任何位置使用以下属性:
[assembly: InternalsVisibleTo("Test")] 它使DLL的所有内部类在测试构建中(即在测试控制台应用程序中)都可用。这样,我们可以创建一个假模型并使用它来启动我们的应用程序。因此,我们的控制台应用程序应该具有以下实现:
 class Program
 {
    static void Main(string[] args)
    {
        ModelCreator.SetModel(new MyTestModel());

        MQL5Connector.Instance("ID of the main terminal");
    }
}

class MyTestModel : IExtentionGUI_M
{
    //  IExtentionGUI_M 接口的实现
}
现在我们可以将图形与逻辑分开运行,对其进行调试和可视化分析。
结论和附件
我们研究了创建图形应用程序层及其连接器类(ViewModel)中最重要和最有趣的点。在此阶段,我们实现了可以打开和单击的图形,并创建了一个链接类,描述了图形层的数据源及其行为(对按钮按下的反应等)。我们将进一步讨论模型类及其组件,其中将描述附加组件的逻辑以及与文件、终端和计算机目录交互的方法。
本文由MetaQuotes Ltd译自俄文
原文地址: https://www.mql5.com/ru/articles/7029
注意: MetaQuotes Ltd.将保留所有关于这些材料的权利。全部或部分复制或者转载这些材料将被禁止。
本文由网站的一位用户撰写,反映了他们的个人观点。MetaQuotes Ltd 不对所提供信息的准确性负责,也不对因使用所述解决方案、策略或建议而产生的任何后果负责。

 开发跨平台网格 EA 交易(第三部分): 使用马丁格尔的基于修正的网格
你好
我能问你一个问题吗?
社区 2015 版本可以使用吗?
你好,我认为可以。
压缩包中缺少该文件。
不过,可以在这里找到
https://www.mql5.com/ru/articles/download/7029.zip
另外,这篇文章也很不错!
从外部启动 MT5 并进行测试的可能性
再次感谢您。
您好,再次感谢您所做的有用工作。通过将数据记录到 dox、xcl 或 csv 文件来完成整个过程将非常有用。 再次感谢您。
不幸的是,这个项目已经不再支持了。现在我正在开发前行自动优化程序(https://www.mql5.com/zh/articles/7583)