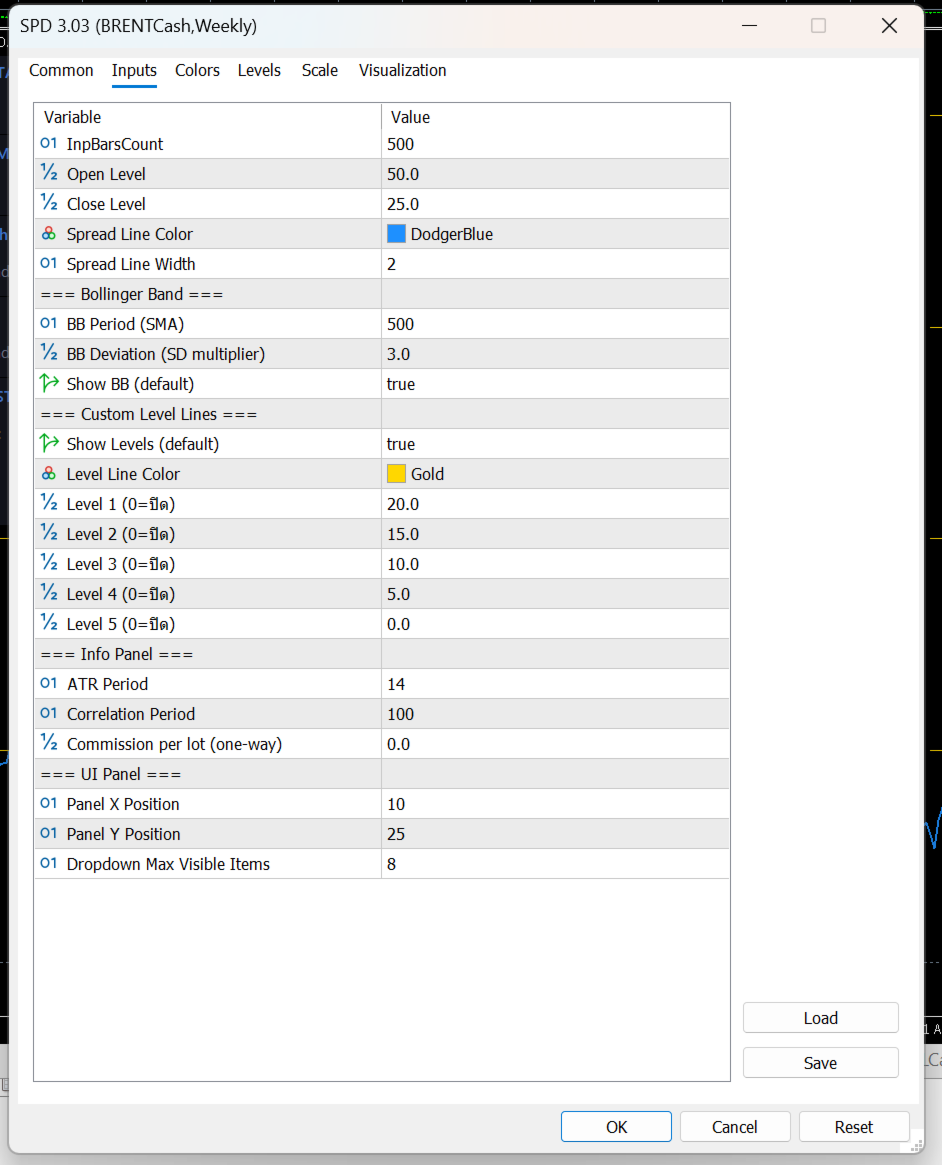
Scout Alpha
- Indicadores
- Versão: 3.3
- Ativações: 10

อินดิเคเตอร์ตัวนี้เป็นเครื่องมือสำหรับดู ส่วนต่างราคา (Spread) ระหว่าง
-
สินทรัพย์ที่เปิดกราฟอยู่
กับ -
สินทรัพย์อีกตัวที่เราเลือก
พูดง่าย ๆ คือช่วยให้เห็นว่า
ตอนนี้ราคาของ 2 สินทรัพย์ “ห่างกันมากหรือน้อย” กว่าปกติหรือไม่
เหมาะกับคนที่ดูคู่สัมพันธ์ของราคา เช่น
-
Pair Trading
-
Spread Trading
-
Arbitrage แนวสถิติ
-
การหาจังหวะที่ราคาสองตัวเบี่ยงออกจากกันมากเกินไป
ตัวอินดิเคเตอร์จะมี 3 ส่วนหลัก
1) เส้น Spread
เป็นเส้นหลักของอินดิเคเตอร์
แสดงค่าความต่างของราคาสองสินทรัพย์
ถ้าเส้นขึ้นสูง
แปลว่า spread กว้างขึ้น
ถ้าเส้นลงต่ำ
แปลว่า spread แคบลง
2) เส้นช่วยตัดสินใจ
มีเส้นสำคัญที่ใช้ดูจังหวะ
Open Level
เป็นระดับที่ใช้มองว่า
spread กว้างพอสำหรับเริ่มเปิดแผนเทรดหรือยัง
Close Level
เป็นระดับที่ใช้มองว่า
spread กลับเข้ามาแล้วหรือยัง เหมาะสำหรับปิดแผน
Bollinger Band
ช่วยบอกว่า spread ตอนนี้อยู่
-
ใกล้ค่าเฉลี่ย
-
สูงเกินปกติ
-
ต่ำเกินปกติ
เหมาะสำหรับคนที่ใช้แนวคิด mean reversion
คือรอให้ spread เบี่ยงออกไปก่อน แล้วคาดหวังให้กลับเข้าหาค่าเฉลี่ย
Level Lines
เป็นเส้นแนวนอนเพิ่มเติม
ไว้กำหนดโซนสำคัญตามสไตล์ของผู้ใช้เอง
เช่น
-
โซนเบา
-
โซนเริ่มน่าสนใจ
-
โซนเข้ม
-
โซนเสี่ยงสูง
3) กล่องข้อมูลด้านขวา
ช่วยสรุปข้อมูลสำคัญแบบดูเร็ว
เช่น
-
spread ตอนนี้อยู่ที่เท่าไร
-
ค่าเฉลี่ย spread
-
ความผันผวนของ spread
-
spread ตอนนี้อยู่สูงหรือต่ำกว่าปกติมากแค่ไหน
-
ความสัมพันธ์ของสินทรัพย์ 2 ตัว
-
ค่า ATR ของแต่ละตัว
-
ค่าสวอป
-
ต้นทุนโดยประมาณต่อวัน
จุดนี้มีประโยชน์มาก เพราะช่วยให้ไม่ดูแค่ “กราฟสวย” แต่ดูเรื่อง ต้นทุนจริงของการถือ pair ด้วย
ใช้งานยังไงแบบง่าย ๆขั้นตอนที่ 1 เปิดกราฟสินทรัพย์หลัก
เช่นเปิดกราฟ
-
XAUUSD
-
EURUSD
-
US30
-
BTCUSD
ตัวที่เปิดกราฟอยู่จะเป็น ตัวหลัก
ขั้นตอนที่ 2 เลือกสินทรัพย์ตัวที่ 2
ที่แผงด้านซ้ายจะมีช่องให้เลือก Symbol
สามารถเลือกได้ 2 แบบ
-
กดปุ่มซ้าย/ขวา เพื่อเลื่อนไปทีละตัว
-
กด dropdown เพื่อเลือกจากรายการ Market Watch
เมื่อเลือกแล้ว อินดิเคเตอร์จะคำนวณ spread ใหม่ทันที
ขั้นตอนที่ 3 ดูเส้น Spread เทียบกับระดับต่าง ๆ
หลักการใช้งานแบบง่ายคือ
-
ถ้า spread ยังอยู่ใกล้ค่าเฉลี่ยมาก → ยังไม่ค่อยมีระยะ
-
ถ้า spread ขยายออกไปไกล → เริ่มน่าสนใจ
-
ถ้า spread กลับเข้ามา → เป็นจังหวะปิดแผนได้
Pair
ใช้เลือกสินทรัพย์ตัวที่ 2 ที่จะเอามาเทียบกับกราฟหลัก
Open/Close ON-OFF
เปิดหรือปิดการแสดงเส้น
-
Open Level
-
Close Level
เหมาะสำหรับคนที่อยากดูเฉพาะ spread อย่างเดียว หรืออยากดูพร้อมระดับตัดสินใจ
BB Band ON-OFF
เปิดหรือปิด Bollinger Band ของ spread
ถ้าเปิด จะช่วยเห็นว่า spread กำลังอยู่ในโซนปกติหรือเริ่มสุดขอบ
Levels ON-OFF
เปิดหรือปิดเส้นระดับเพิ่มเติมที่ตั้งไว้
เหมาะกับคนที่ชอบแบ่งโซนการตัดสินใจหลายชั้น
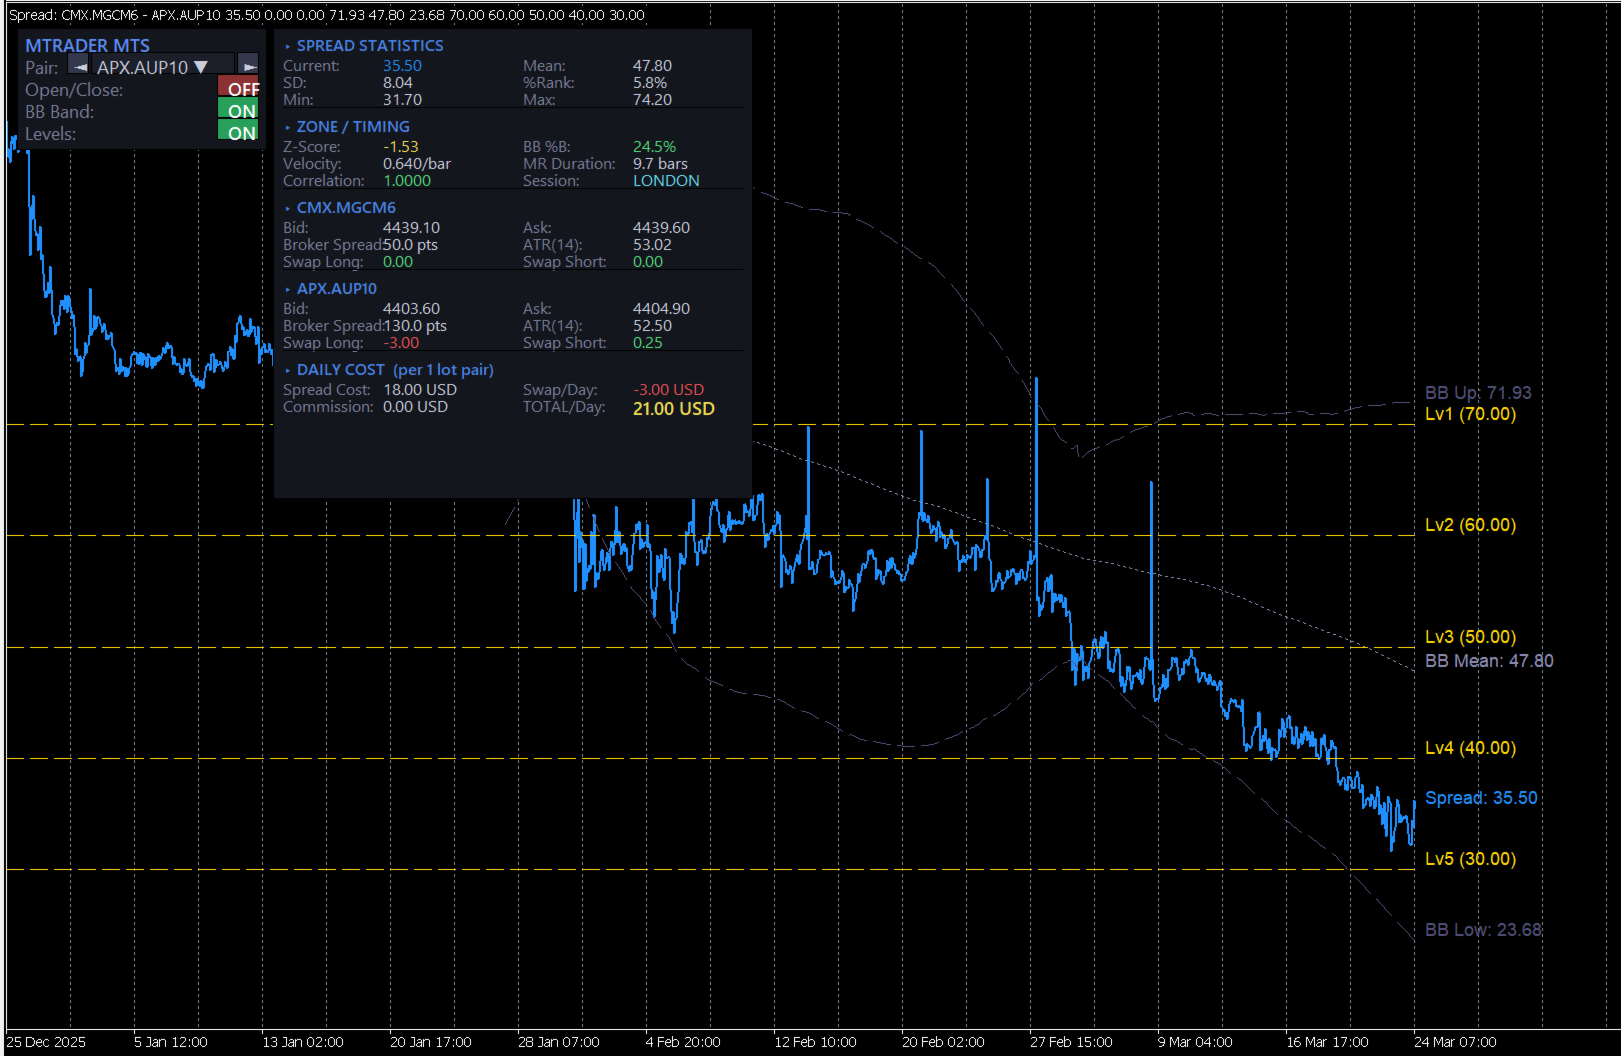
ข้อมูลในกล่องด้านขวาหมายถึงอะไรSPREAD STATISTICS
เป็นสถิติพื้นฐานของ spread
Current
ค่า spread ปัจจุบัน
Mean
ค่าเฉลี่ยของ spread ในช่วงที่คำนวณ
SD
ระดับการกระจายตัวของ spread
ยิ่งมาก แปลว่า spread แกว่งกว้าง
%Rank
บอกว่า spread ตอนนี้อยู่ในระดับสูงหรือต่ำเมื่อเทียบกับอดีต
ตัวอย่าง:
-
%Rank สูงมาก = spread อยู่โซนสูงเมื่อเทียบกับอดีต
-
%Rank ต่ำมาก = spread อยู่โซนต่ำ
Min / Max
จุดต่ำสุดและสูงสุดของ spread ในช่วงที่ใช้วิเคราะห์
ZONE / TIMING
เป็นส่วนช่วยดูจังหวะ
Z-Score
บอกว่า spread ตอนนี้ห่างจากค่าเฉลี่ยมากแค่ไหน
ยิ่งค่าเยอะ
ยิ่งแปลว่า spread เบี่ยงออกจากภาวะปกติมาก
BB %B
บอกตำแหน่ง spread ภายใน Bollinger Band
-
ใกล้กลาง = ปกติ
-
ใกล้ขอบ = เริ่มตึง
-
เกินขอบ = เบี่ยงมาก
Velocity
ความเร็วของ spread ในช่วงล่าสุด
ช่วยดูว่า spread กำลังเร่งตัวหรือเริ่มชะลอ
MR Duration
ค่าเฉลี่ยคร่าว ๆ ว่า spread ใช้เวลากี่แท่งในการกลับเข้าหาค่าเฉลี่ย
Correlation
ดูว่าราคาของสองสินทรัพย์สัมพันธ์กันมากแค่ไหน
ถ้าค่าสูง
มักเหมาะกับการจับ spread มากกว่า
Session
บอกช่วงตลาดปัจจุบัน เช่น Asia / London / New York
ช่วยให้รู้ว่าตอนนี้อยู่ในช่วงตลาดไหน
SYMBOL 1 / SYMBOL 2
เป็นข้อมูลของสินทรัพย์ทั้งสองฝั่ง
มีข้อมูลเช่น
-
Bid
-
Ask
-
Broker Spread
-
ATR
-
Swap Long
-
Swap Short
ช่วยให้ลูกค้าดูได้ว่าแต่ละตัว
-
สเปรดโบรกเกอร์กว้างไหม
-
ผันผวนแค่ไหน
-
ถือข้ามวันต้นทุนดีหรือไม่ดี
DAILY COST
ส่วนนี้สำคัญมากสำหรับสาย pair trade
Spread Cost
ต้นทุนจาก bid/ask ของทั้งสองฝั่งรวมกัน
Swap/Day
ต้นทุนหรือผลตอบแทนจากการถือข้ามวัน
Commission
ค่าคอมมิชชั่นรวมของคู่เทรด
TOTAL/Day
ต้นทุนรวมต่อวันโดยประมาณต่อ 1 lot pair
ส่วนนี้ช่วยให้ลูกค้ารู้ว่า
แม้ spread ดูสวย แต่ถ้าต้นทุนถือแพงเกิน ก็อาจไม่คุ้ม
แนวคิดง่าย ๆ สำหรับลูกค้า
กรณีที่ 1: Spread ขยายออกไปมาก
ถ้าเส้น spread วิ่งออกห่างจากค่าเฉลี่ยมาก
และไปอยู่ใกล้หรือเกิน BB ด้านบน/ล่าง
อาจตีความว่า
-
spread เริ่มเบี่ยงออกมากผิดปกติ
-
มีโอกาสกลับเข้า mean ได้ในอนาคต
เหมาะกับคนที่ใช้แนว mean reversion
กรณีที่ 2: Spread กลับเข้ามาใกล้ค่าเฉลี่ย
ถ้า spread เริ่มย่อกลับเข้ามา
อาจใช้เป็นโซนพิจารณาปิดแผน
กรณีที่ 3: Correlation ต่ำเกินไป
ถ้าสินทรัพย์สองตัวไม่ค่อยสัมพันธ์กัน
spread ที่เห็นอาจไม่นิ่งและตีความยาก
ดังนั้นคู่ที่ correlation สูงกว่ามักใช้งานได้เป็นธรรมชาติกว่า
กรณีที่ 4: ต้นทุนต่อวันสูง
แม้ spread จะดูดี
แต่ถ้า total/day สูงมาก
แปลว่า
-
ถือต่อมีภาระ
-
กลยุทธ์ต้องการการกลับตัวเร็วขึ้น
-
ถ้ากลับช้า อาจโดนต้นทุนกินกำไร
อินดิเคเตอร์นี้เหมาะกับ
-
คนที่เทรดคู่สัมพันธ์ของราคา
-
คนที่ชอบหา spread ที่เบี่ยงจากค่าเฉลี่ย
-
คนที่ต้องการดูทั้ง “สัญญาณ” และ “ต้นทุน”
-
คนที่ต้องการเปรียบเทียบสินทรัพย์ 2 ตัวแบบรวดเร็วบนหน้าจอเดียว
-
เลือกคู่เทียบได้จากหน้าจอทันที
-
เห็น spread แบบเรียลไทม์
-
มีเส้น open / close ช่วยตัดสินใจ
-
มี Bollinger Band ช่วยดูความสุดโต่งของ spread
-
มีข้อมูล correlation, ATR, swap, cost ครบ
-
เหมาะกับการคัดคู่และวางแผน pair trading
อินดิเคเตอร์นี้ ไม่ใช่ระบบส่งคำสั่งอัตโนมัติ
แต่เป็นเครื่องมือช่วยวิเคราะห์
ดังนั้นลูกค้าควรใช้ร่วมกับ
-
แผนการเข้าออกที่ชัดเจน
-
การบริหาร lot
-
การดูต้นทุนจริงของโบรกเกอร์
-
การเลือกคู่ที่มีความสัมพันธ์เหมาะสม
Spread Arbitrage Line is an indicator designed to display the price difference (spread) between:
- the symbol on your current chart
and - another symbol that you choose
In simple terms, it helps you see whether the relationship between two instruments is currently:
- wider than usual
- narrower than usual
- returning back toward normal levels
This makes it useful for traders who work with:
- Pair Trading
- Spread Trading
- Statistical Arbitrage
- Mean Reversion setups
The indicator has 3 main parts:
1) The Spread Line
This is the main line of the indicator.
It plots the difference between the current chart symbol and the second selected symbol.
When the line rises, it means the spread is expanding.
When the line falls, it means the spread is narrowing.
This helps traders quickly see when two instruments are moving away from each other or coming back together.
2) Decision Support Levels
The indicator also includes important reference lines to help with trade planning.
Open Level
This is the level used to identify when the spread has moved far enough to consider opening a spread or pair trade setup.
Close Level
This is the level used to identify when the spread has reverted enough to consider closing the setup.
Bollinger Bands
The Bollinger Bands help show whether the spread is:
- near its normal range
- stretched higher than usual
- stretched lower than usual
This is especially useful for traders using a mean reversion approach, where the idea is to wait for the spread to move away from normal and then look for it to return.
Custom Level Lines
These are additional horizontal levels that can be used as personal reference zones.
For example, they can help define:
- mild deviation
- moderate deviation
- strong deviation
- extreme zones
3) The Information Panel
On the right side, the indicator displays a full information panel with key trading statistics.
This includes:
- current spread value
- average spread
- spread volatility
- how far the current spread is from its usual range
- correlation between the two symbols
- ATR of both symbols
- swap values
- estimated daily holding cost
This is very helpful because it allows the trader to evaluate not only the setup itself, but also the real cost of holding the pair.
How to use itStep 1: Open the main chart
Open the chart of the instrument you want to use as the main symbol.
Examples:
- XAUUSD
- EURUSD
- BTCUSD
- US30
The chart you open becomes Symbol 1.
Step 2: Choose the second symbol
On the left control panel, you can choose another symbol to compare against.
You can do this by:
- clicking the left/right buttons
or - opening the dropdown list and selecting from Market Watch
Once selected, the indicator recalculates the spread automatically.
Step 3: Watch the spread relative to the levels
The basic idea is simple:
- if the spread is near its average, there may be less opportunity
- if the spread moves far away from normal, it may become interesting
- if the spread starts returning, it may be a possible exit zone
Pair
This allows you to select the second symbol used for comparison.
Open/Close ON-OFF
This turns the Open Level and Close Level lines on or off.
Useful for traders who either want:
- a clean spread-only view
or - full entry/exit guidance on the chart
BB Band ON-OFF
This turns Bollinger Bands on or off.
When enabled, it helps show whether the spread is inside its normal range or moving into an extreme zone.
Levels ON-OFF
This turns the custom reference levels on or off.
Useful for traders who want multiple decision zones on the indicator.
What does the information panel mean?SPREAD STATISTICS
This section shows the main statistics of the spread.
Current
The current spread value.
Mean
The average spread over the calculation period.
SD
The standard deviation of the spread.
A higher value means the spread has been moving more widely.
%Rank
This shows where the current spread stands compared to its historical range.
For example:
- a high %Rank means the spread is relatively high versus recent history
- a low %Rank means the spread is relatively low
Min / Max
The lowest and highest spread values within the selected lookback period.
ZONE / TIMING
This section helps evaluate timing.
Z-Score
Shows how far the current spread is from its average.
The larger the absolute value, the more unusual the spread currently is.
BB %B
Shows where the current spread sits inside the Bollinger Band structure.
- near the middle = normal
- near the edge = stretched
- beyond the band = extreme
Velocity
Shows how fast the spread is moving over recent bars.
This helps identify whether the spread is accelerating or slowing down.
MR Duration
This is an estimate of how many bars the spread usually takes to revert around its mean.
Correlation
Shows how strongly the two instruments move in relation to each other.
Higher correlation is generally more suitable for spread-style analysis.
Session
Displays the current market session, such as:
- Asia
- London
- New York
This helps traders understand which trading period they are currently in.
SYMBOL 1 / SYMBOL 2
These sections show real-time information for both instruments.
They include:
- Bid
- Ask
- Broker Spread
- ATR
- Swap Long
- Swap Short
This helps traders evaluate each symbol individually in terms of:
- trading cost
- volatility
- overnight holding conditions
DAILY COST
This section is very important for pair traders.
Spread Cost
The estimated transaction cost from the bid/ask spread of both symbols combined.
Swap/Day
The overnight swap impact of holding the pair.
Commission
The commission cost for both sides of the pair.
TOTAL/Day
The estimated total daily holding cost for a 1-lot pair position.
This is useful because even if a spread setup looks attractive, the daily holding cost may still make it less practical.
How to read it in a simple wayCase 1: The spread moves far away from normal
If the spread line moves strongly away from its average and approaches or exceeds the Bollinger Band edges, it may suggest that the spread is unusually stretched.
For mean reversion traders, this may be a zone worth monitoring.
Case 2: The spread comes back toward the mean
If the spread starts moving back toward normal levels, this may be considered a possible exit area.
Case 3: Correlation is too low
If the two symbols are not closely related, the spread may be less stable and harder to interpret.
Pairs with stronger correlation are usually more natural candidates for this kind of analysis.
Case 4: Daily cost is too high
Even if the spread setup looks good, high daily cost can reduce the attractiveness of the trade.
This means the setup may require faster mean reversion, otherwise costs may eat into the result.
Who is this indicator for?This indicator is suitable for traders who:
- compare two correlated markets
- trade spread or pair opportunities
- look for mean reversion setups
- want both visual signals and cost analysis in one place
- Easy symbol selection directly from the chart
- Real-time spread visualization
- Open and Close reference levels
- Bollinger Bands for spread extremes
- Correlation, ATR, swap, and cost information included
- Useful for pair selection and spread trade planning
This indicator is not an automatic trading system.
It is a decision-support tool designed to help analyze spread opportunities.
It works best when used together with:
- a clear entry and exit plan
- position sizing rules
- broker cost awareness
- proper pair selection