Kestutis Balciunas / 프로필
- 정보
|
no
경험
|
92
제품
|
4
데몬 버전
|
|
0
작업
|
0
거래 신호
|
0
구독자
|
2014년 트레이딩 블로그를 시작한 이후, 월 40,000명 이상의 글로벌 독자층을 구축하며 외환 교육, 알고리즘 트레이딩 및 시장 분석 분야에서 신뢰받는 전문가로서의 명성을 쌓았습니다. 제 지표와 전문가 자문 시스템은 시장에서 체계적이고 규칙 기반의 우위를 추구하는 전 세계 트레이더들이 사용하고 있습니다.
✅ 친구 추가를 하시면 실시간 트레이딩 아이디어, 지표 설정 및 신규 출시 정보를 MQL5 뉴스 피드에서 직접 받아보실 수 있습니다!
메인 블로그: https://forexobroker.com/
MQL5 공개 채널 참여: https://www.mql5.com/en/channels/fxmasters
텔레그램 채널 참여: https://t.me/dominicwalsfxhtrader
전문가 자문 시스템:
✔️ Blaze Synchro MT5©: https://www.mql5.com/en/market/product/172553
✔️ Blaze Synchro MT4©: https://www.mql5.com/en/market/product/172460
✔️ Auric Flow MT5©: https://www.mql5.com/en/market/product/168383
✔️ Auric Flow MT4©: https://www.mql5.com/en/market/product/168377
전문 MT4/MT5 지표:
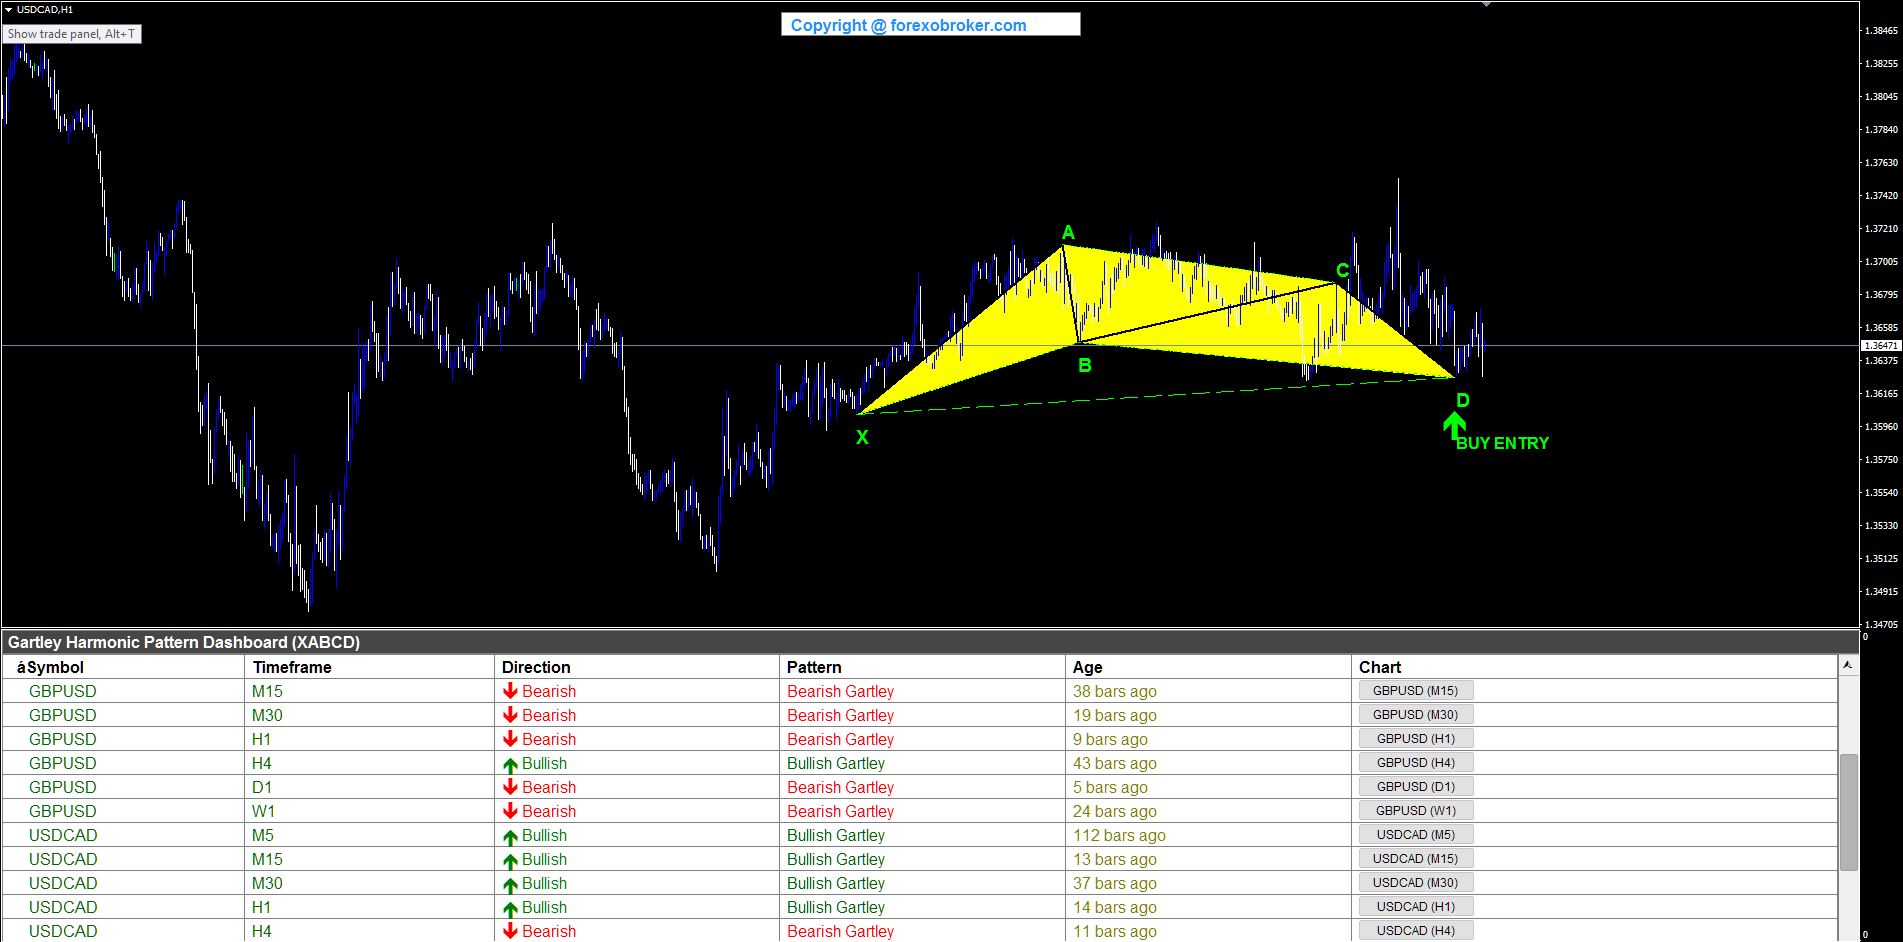
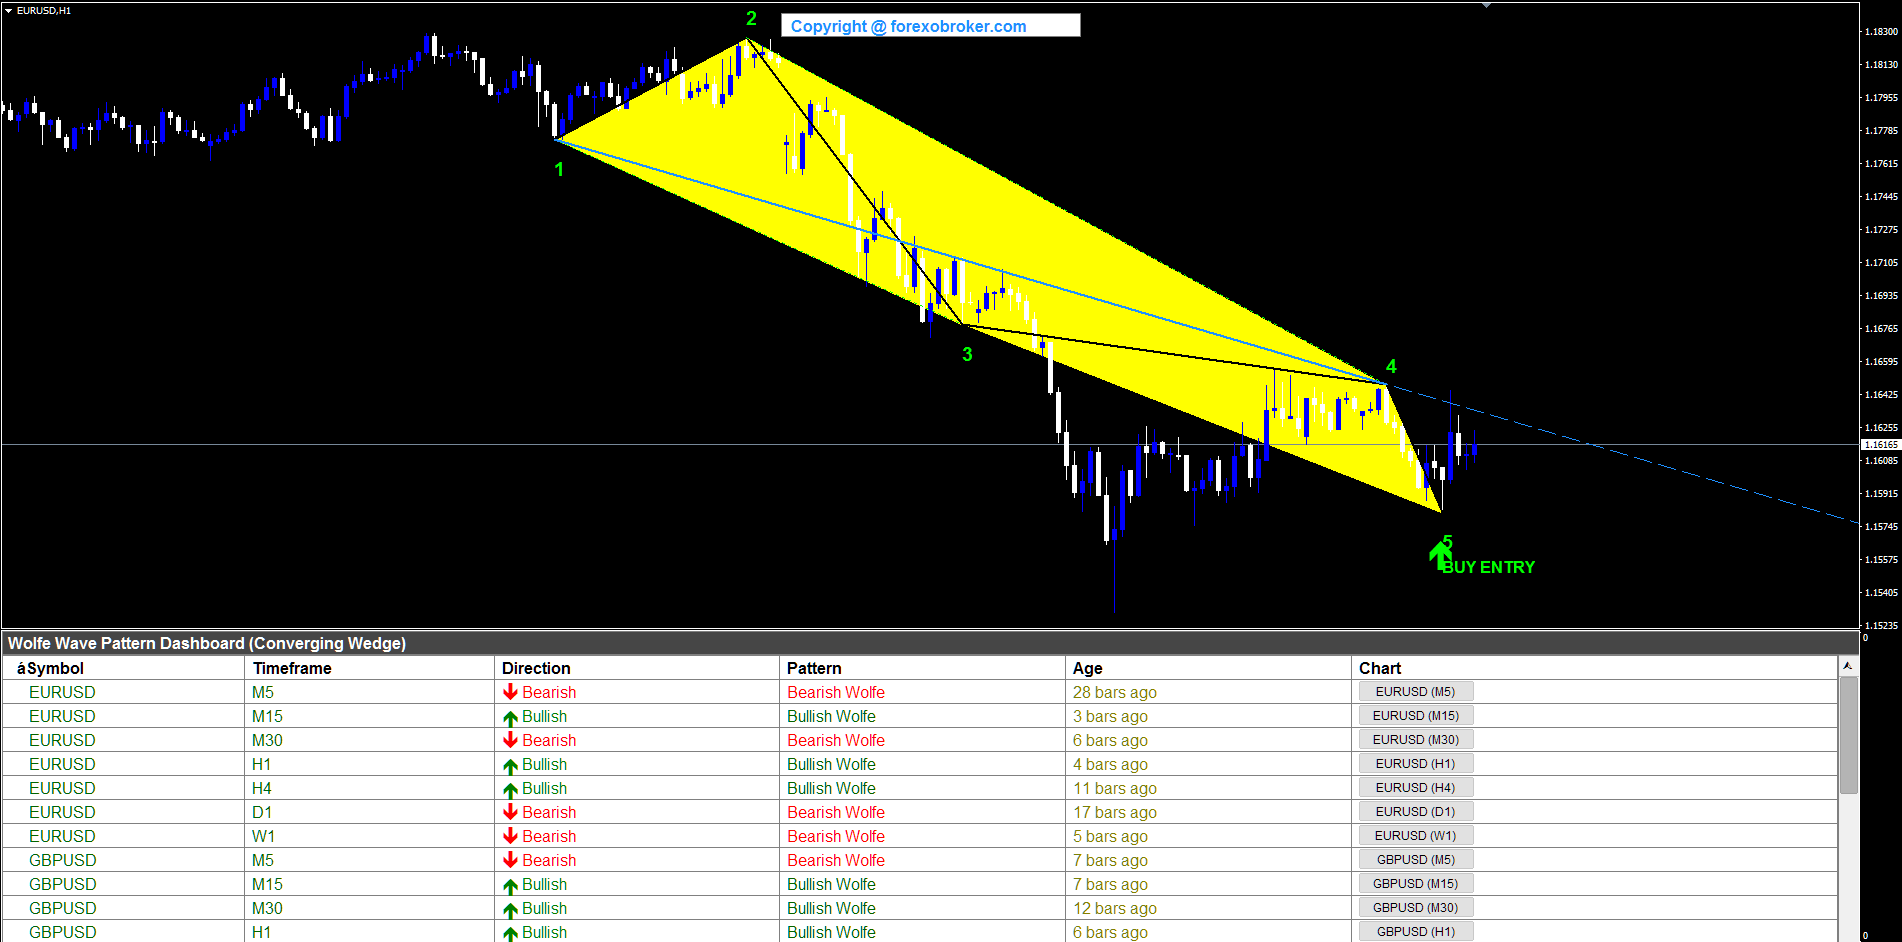
✔️ Wolfe Wave Dashboard MT5©: https://www.mql5.com/en/market/product/167800
✔️ Wolfe Wave Dashboard MT4©: https://www.mql5.com/en/market/product/167805
✔️ Candlestick Reversal Dashboard MT5©: https://www.mql5.com/en/market/product/167689
✔️ Candlestick Reversal Dashboard MT4©: https://www.mql5.com/en/market/product/167678
✔️ Quadra Zone Entries MT5©: https://www.mql5.com/en/market/product/172588
✔️ Quadra Zone Entries MT4©: https://www.mql5.com/en/market/product/172581
✔️ Divergence Dashboard MT5©: https://www.mql5.com/en/market/product/166179
✔️ Divergence Dashboard MT4©: https://www.mql5.com/en/market/product/166178
✔️ Aero Pulse Dashboard MT5©: https://www.mql5.com/en/market/product/166171
✔️ Aero Pulse Dashboard MT4©: https://www.mql5.com/en/market/product/166047
✔️ Volumatic VIDYA Dashboard MT5©: https://www.mql5.com/en/market/product/166955
✔️ Volumatic VIDYA Dashboard MT4©: https://www.mql5.com/en/market/product/166949
🏦 이용 중인 브로커: https://icmarkets.com/?camp=55869
🏦 브로커 1: https://affs.click/2coEm
🏦 브로커 2: https://one.exnessonelink.com/boarding/sign-up/a/c_thuv62ocfq
💻 VPS: https://chocoping.com/processing/aff.php?aff=738
💼 펀딩을 위해 이용하는 회사:
Fundednext: https://fundednext.com/?fpr=kestutis39
The5ers: https://www.the5ers.com/?afmc=16kl
FTMO: https://trader.ftmo.com/?affiliates=nRAyOhmFRnEnFdOpdLeh
소셜 미디어에서 팔로우하세요:
Youtube — https://www.youtube.com/@DominicWalshLearnToTrade
Twitter — https://x.com/DominicWalshFX
Instagram — https://www.instagram.com/dominicwalshfxtrader/
Facebook — https://www.facebook.com/profile.php?id=100092986141016
Visit my profile and send a Friend request so you don't miss new tools and live examples!
✔️ Multi-symbol dashboard — monitor up to 20 instruments from one panel, including Forex, Gold, indices, crypto, and commodities.
✔️ 9 timeframes — M1, M5, M15, M30, H1, H4, D1, W1, and MN scanned continuously in the background.
✔️ Strict Gartley validation — Point B at 61.8% of XA within tolerance, Point C between 38.2% and 88.6% of AB, and Point D at 78.6% of XA within tolerance.
✔️ Proper alternating high/low structure across all five points before any pattern is shown.
✔️ Non-repainting — patterns appear only after Point D is confirmed on a closed candle with the required pivot bars to the right.
✔️ Visual XABCD display — full structure drawn on chart with yellow-filled triangles and labeled X, A, B, C, D points.
✔️ One-click chart navigation — click a dashboard row to jump instantly to that symbol and timeframe.
✔️ 4 alert types — popup, customizable sound, email, and mobile push via MetaQuotes ID.
✔️ Adjustable inputs — symbols, timeframes, left/right pivot bars, XAB ratio, ABC min/max, XAD ratio, Fibonacci tolerance, and visual settings.
✔️ Broker prefix/suffix handling — supports custom symbol naming variations automatically.
How to trade it: Enter at Point D when price confirms the completion zone with a reversal signal. Place the stop beyond Point X — below X for bullish Gartleys and above X for bearish Gartleys. Standard targets are the 38.2% retracement of CD for Target 1 and the 61.8% retracement of CD for Target 2, with some traders also using Point C as a further target on strong moves.
⭐️⭐️⭐️⭐️⭐️ Gartley Harmonic Dashboard MT5: https://www.mql5.com/en/market/product/167791
⭐️⭐️⭐️⭐️⭐️ Gartley Harmonic Dashboard MT4: https://www.mql5.com/en/market/product/167785
📢 MQL5 Channel: https://www.mql5.com/en/channels/fxmasters
💎💎💎💎💎 All Products: https://www.mql5.com/en/users/forexobroker/seller
Visit my profile and send a Friend request so you don't miss new tools and live examples!
✔️ Multi-symbol dashboard — monitor up to 20 instruments from a single panel, broker prefix/suffix handled automatically
✔️ 9 timeframes — M1, M5, M15, M30, H1, H4, D1, W1, MN scanned continuously in the background
✔️ All five pivot points confirmed with bars on both sides before any pattern is displayed
✔️ Geometric convergence validation — lines 1-3 and 2-4 verified to converge to the right, no loose wedge approximations
✔️ Correct alternating high/low structure validated across all five points
✔️ Built-in Target Line — 1-4 line automatically calculated and plotted, mathematically-derived price target, no external tool needed
✔️ Yellow-filled wedge visualization — complete pattern geometry drawn with lines 1-3 and 2-4 clearly displayed
✔️ Non-repainting — signals appear only after full confirmation, never disappear or change after display
✔️ One-click chart navigation — click any dashboard row to jump instantly to that symbol and timeframe
✔️ 4 alert types — popup, sound (customizable file), email, mobile push via MetaQuotes ID, any combination enabled independently
✔️ Entry at Point 5 — price touches or crosses the 1-3 trendline, objective rule-based entry zone
✔️ Stop loss beyond Point 5 — tight and logical, defined by the pattern structure itself
✔️ Time prediction — convergence point of lines 1-3 and 2-4 estimates when price may reach the target
✔️ Adjustable right pivot bars (default 5) — raise for more confirmation, lower to see patterns earlier
✔️ Configurable convergence tolerance, left pivot bars, and all visual settings
✔️ Dashboard corner, wedge colors, label colors, target line color, arrow size, font size all configurable
✔️ All symbols — Forex majors, exotics, XAUUSD, Silver, US30, NAS100, crypto, commodities, stocks
✔️ All timeframes — M1 to MN1
How to trade it: Enter at Point 5 when price touches or crosses the 1-3 trendline and shows a reversal signal. A supporting candlestick reversal pattern at Point 5 adds confirmation. Place the stop beyond Point 5 — below the Point 5 low for bullish patterns, above the Point 5 high for bearish. Use the Target Line (1-4) as the primary profit target. Use the convergence point of lines 1-3 and 2-4 as a time-based reference for when price may reach the target. Wolfe Waves are less common than most patterns because the convergence requirement is strict — fewer signals means higher quality signals.
⭐️⭐️⭐️⭐️⭐️ Wolfe Wave Dashboard MT5: https://www.mql5.com/en/market/product/167805
⭐️⭐️⭐️⭐️⭐️ Wolfe Wave Dashboard MT4: https://www.mql5.com/en/market/product/167800
📢 MQL5 Channel: https://www.mql5.com/en/channels/fxmasters
💎💎💎💎💎 All Products: https://www.mql5.com/en/users/forexobroker/seller
Visit my profile and send a Friend request so you don't miss new tools and live examples!
✔️ EMA9/EMA21 crossover — deliberately simple trigger, edge is in the gate that follows
✔️ 6-factor confluence engine — EMA cross, price vs VWAP, RSI momentum, MACD trend, ADX + EMA alignment, volume burst + candle direction
✔️ Configurable minimum score (default 3) — tune signal frequency directly, disable factors for free point
✔️ True session-anchored daily VWAP — resets at start of every trading day, volume-weighted consensus price, two-color mint/red rendering
✔️ ATR-based stop-loss — risk = ATR(AtrLen) × AtrMult with minimum floor, breathes with volatility, no per-symbol pip tuning
✔️ TP1 / TP2 / TP3 at configurable R-multiples (default 1R / 2R / 3R) — horizontal lines with right-edge price tags
✔️ Live SL/TP hit detection — faded-line progress feedback, wipes on TP3 or SL, TP1-before-SL counts as win
✔️ Signal cooldown — prevents rapid duplicate signals
✔️ Non-repainting — evaluated on confirmed bar close only, keyed by bar timestamp, replay matches live
✔️ 19-row dashboard — 6 sections: Market Context, Momentum Engine, Confluence, Active Signal, Performance, TP/SL tracking
✔️ 13 alert events — BUY, SELL, Any Signal, Bullish/Bearish EMA Cross, VWAP Cross Above/Below, RSI 50 Cross Above/Below, TP1/TP2/TP3 Hit, SL Hit
✔️ 4 alert channels — popup, push, email, sound; master + per-event toggles, no historical flood
✔️ ASCII-only chart labels — full platform and font compatibility
✔️ All symbols — Forex, exotics, indices, gold/silver/oil, stocks, crypto
✔️ All timeframes — M1 to MN1, H1+ fewer higher-conviction entries, M5+ more frequent setups
How to trade it: Enter at the open of the bar after the crossover bar that cleared the minimum confluence score. Place your stop at the drawn ATR-SL line. Scale out at TP1 and TP2, let the remainder run to TP3. Watch the dashboard for live buy/sell scores building before a crossover fires — 5–6 star scores mean all factors agreed. Raise the minimum-confluence input to 5–6 on M5 for only the strongest setups, or set to 3 on H1 majors for balanced setup count.
⭐️⭐️⭐️⭐️⭐️ Sniper Ashfield Pro MT5: https://www.mql5.com/en/market/product/177855
⭐️⭐️⭐️⭐️⭐️ Sniper Ashfield Pro MT4: https://www.mql5.com/en/market/product/177854
📢 MQL5 Channel: https://www.mql5.com/en/channels/fxmasters
💎💎💎💎💎 All Products: https://www.mql5.com/en/users/forexobroker/seller
Visit my profile and send a Friend request so you don't miss new tools and live examples!
✔️ Non-repainting — confirmed closed-bar detection, historical replay matches live
✔️ Close-MA vs Open-MA crossover — encodes smoothed intrabar directional bias, turns earlier than fast/slow dual-MA
✔️ ALMA (default, sigma 5, offset 0.85) — Gaussian-weighted, best lag/smoothness trade-off
✔️ HullMA — fastest turning, earliest possible signal
✔️ TEMA — smoothest, ideal for noisy exotics and crypto
✔️ Optional Heikin Ashi source mode — cleaner trend-aligned signals
✔️ HTF confirmation — second engine on ×8 auto-scaling timeframe, signal prints only when HTF agrees
✔️ Supply and demand zones — swing length 10, ATR-scaled width (factor 2.5), 20 most recent kept
✔️ POI midline through every zone center
✔️ Auto Break-of-Structure conversion — broken supply becomes demand and vice versa
✔️ Filter 1: EMA-144 Trend — BUY only above EMA-144, SELL only below
✔️ Filter 2: RSI(28) Exhaustion — blocks buys when overbought, sells when oversold
✔️ Filter 3: Signal Cooldown — minimum bar gap (default 15), single most effective defense against choppy overtrading
✔️ Auto SL at 0.5%, TP1 at 1.0%, TP2 at 1.5%, TP3 at 2.0% — percentage-based, correct on every instrument
✔️ Trade state machine — flat → entry → TP1 → TP2 → TP3 → flat, or SL → flat
✔️ 40-bar forward projection of most recent signal levels
✔️ Live SL/TP hit tracking with on-chart markers
✔️ Multi-section dashboard — header, market context, active trade with live P&L%
✔️ Full alert package — entries, all TP/SL hits, any-entry/any-exit
✔️ 4 alert channels — popup, email, push; master + per-event toggles, no historical flood, deduplicated
✔️ ASCII-only chart labels — full platform and font compatibility
✔️ All symbols — Forex, gold, indices, crypto, stocks
✔️ All timeframes — Forex majors M15–H4 sweet spot, crypto H1+ with TEMA, 3 tuned presets (Scalping, Swing, Conservative)
How to trade it: Enter at the open of the bar after the signal bar. A signal that prints has already passed HTF confirmation, EMA-144 trend alignment, RSI exhaustion check, and cooldown spacing — every printed signal survived all four quality gates. Place stop at the drawn SL line (0.5%). Scale out at TP1 and TP2, move stop to breakeven after TP1, let the remainder run to TP3. Watch for supply and demand zone levels near your TP targets — a broken zone that converted via BOS in the trade direction is a high-probability continuation area.
⭐️⭐️⭐️⭐️⭐️ Flintridge Trader Pro MT5: https://www.mql5.com/en/market/product/177866
⭐️⭐️⭐️⭐️⭐️ Flintridge Trader Pro MT4: https://www.mql5.com/en/market/product/177865
📢 MQL5 Channel: https://www.mql5.com/en/channels/fxmasters
💎💎💎💎💎 All Products: https://www.mql5.com/en/users/forexobroker/seller
Visit my profile and send a Friend request so you don't miss new tools and live examples!
✔️ Non-repainting — confirmed closed-bar evaluation, historical replay matches live
✔️ Range-filter engine — measures absolute bar-to-bar change, EMA-smoothed twice, scaled by range sensitivity
✔️ Dynamic smooth range — expands in volatile conditions, contracts in quiet ones
✔️ Stateful clamp — range filter line holds until price moves beyond smooth range = volatility void
✔️ Single-logic regime — sticky +1 when above filter, -1 when below one logic for both directions
✔️ BUY on bear-to-bull flip, SELL on bull-to-bear flip — opposite flip closes active trade at market
✔️ One trade at a time — only one BUY or SELL tracked, keeps chart clean
✔️ Hybrid Stop Loss (default) — tighter of ATR-distance stop and recent-swing stop
✔️ Pure ATR mode — entry ± ATR × multiplier
✔️ Recent Swing mode — anchored to last swing high/low with configurable padding
✔️ TP1 / TP2 / TP3 at configurable R-multiples (default 1.0 / 2.0 / 3.5)
✔️ TP3 hit or SL hit closes trade; TP1/TP2 are informational milestones marked by dashboard
✔️ Auto-scaling swing lookback — ~0.4× on M1 → 1.0× on H1+, consistent across timeframes
✔️ 5-layer confluence stars — CCI, ADX/DMI, Accumulation/Distribution, MFI, Momentum
✔️ Star rating display-only — 0–5 stars gauge conviction, never blocks or delays signal
✔️ EMA trend cloud — fast 21 / slow 50 plus range bands, display-only
✔️ 6-section dashboard — Header, Market Context, Range Filter Engine, Confluence, Active Trade, Performance
✔️ Dashboard live state — regime, filter line, smooth range, void state, 5 layers, direction, entry, SL, TP1/2/3, hit markers, W/L tallies
✔️ 8 alert events — BUY, SELL, Any, TP1, TP2, TP3, SL, opposite-flip exit
✔️ 3 alert channels — popup, mobile push, email
✔️ Master enable + per-channel/per-event toggles for full alert control
✔️ ASCII-only chart labels — full platform and font compatibility
✔️ All symbols — Forex, crypto, metals, oil, indices, stocks
✔️ All timeframes — M1 to MN1, auto-scaling ensures consistency
How to trade it: Enter at the open of the bar after the regime flip. Place stop at the drawn SL line. Use Hybrid Swing + ATR mode for the best balance of structural backing and volatility scaling. Scale out at TP1 and TP2 as informational milestones. Close the full position at TP3 or when the opposite regime flip fires. Raising the range-sensitivity input produces fewer, stronger regime breaks; lowering it makes the indicator more responsive on quiet pairs. Use the 5-star confluence rating to gauge setup quality — 4–5 stars mean multiple context layers aligned at the flip moment, but remember the rating never blocks a signal.
⭐️⭐️⭐️⭐️⭐️ Voidbreak Buy Sell Pro MT5: https://www.mql5.com/en/market/product/177827
⭐️⭐️⭐️⭐️⭐️ Voidbreak Buy Sell Pro MT4: https://www.mql5.com/en/market/product/177826
📢 MQL5 Channel: https://www.mql5.com/en/channels/fxmasters
💎💎💎💎💎 All Products: https://www.mql5.com/en/users/forexobroker/seller
Flintridge Trader Pro 는 MetaTrader 5 용 비리페인트(재도색 없음) 신호 + 트레이드 관리 인디케이터 입니다. 대부분의 크로스오버 도구를 망치는 두 가지 문제, 즉 리페인트되는 신호와 손절·목표가 없는 신호를 해결합니다. 엔진은 ‘종가 기반 이동평균’과 ‘시가 기반 이동평균’의 교차에서 진입 시점을 포착하며, ALMA·HullMA·TEMA 중에서 선택 가능한 평활 방식과 상위 시간대 대체 확인 채널을 제공합니다. 확정된 각 신호는 자동으로 1개 손절과 3개 익절 목표를 포함한 완전한 트레이드 플랜으로 변환되고, 내부 상태 머신을 통해 진입부터 청산까지 추적됩니다. 스윙 기반 수급(공급·수요) 존과 자동 Break‑of‑Structure 전환이 구조적 컨텍스트를 제공하고, MetaTrader 전용 3가지 정밀 필터가 저품질 셋업을 제거하며, 다중 섹션 대시보드와 풀 알림 패키지가 항상 시장 상황을 알려 줍니다. MT4 버전 보기:
Flintridge Trader Pro 는 MetaTrader 4 용 비리페인트(재도색 없음) 신호 + 트레이드 관리 인디케이터 입니다. 대부분의 이동평균 크로스 시스템을 망치곤 하는 두 가지 문제, 즉 리페인트되는 신호 와 진입 신호만 있고 손절·목표가 없는 신호 를 해결합니다. 엔진은 ‘종가 기반 이동평균’과 ‘시가 기반 이동평균’의 교차를 이용해 진입 기회를 포착하며, ALMA·HullMA·TEMA 중에서 선택 가능한 평활 방식과 상위 시간대 확인 채널을 지원합니다. 확정된 각 신호는 자동으로 1개의 손절과 3개의 익절 목표를 갖춘 완전한 트레이딩 플랜으로 변환되고, 내부 상태 머신에 의해 진입부터 청산까지 일관되게 추적됩니다. 스윙 고점/저점을 기반으로 한 수급(공급·수요) 존과 자동 구조 전환(BOS) 기능이 구조적 컨텍스트를 제공하고, MetaTrader 전용 세 가지 정밀 필터가 저품질 셋업을 걸러내며, 다중 섹션 대시보드와 알림 패키지가 시장 상황을 항상 시각적으로
Sniper Ashfield Pro 는 MetaTrader 5 용 논리페인트(재도색 없음) EMA 크로스오버 인디케이터 로, 기계적 트레이딩에서 가장 오래된 문제 중 하나를 해결하기 위해 설계되었습니다. 아무런 컨텍스트 없이 “맨몸” 이동평균 크로스만 사용하면, 끝없이 휩쏘(whipsaw)가 발생하기 쉽기 때문입니다. Sniper Ashfield Pro 는 클래식한 EMA9/EMA21 크로스를 사용하되, 그 앞에 6‑요소 컨플루언스 게이트(합류 필터)를 배치합니다. 각 크로스는 서로 독립된 여섯 가지 시장 상태 필터에 대해 점수가 매겨지고, 설정 가능한 최소 점수를 통과한 크로스만 차트에서 BUY 또는 SELL 신호로 승격됩니다. 이 게이트 위에는 세션 기준으로 앵커링된 진짜 데일리 VWAP, ATR 기반 스톱로스, 설정 가능한 리스크‑리워드 배수(기본 1R / 2R / 3R)를 사용하는 세 개의 테이크프로핏 타깃, 모든 구성요소의 실시간 상태를 보여주는 19‑행 대시보드, 그리고
Sniper Ashfield Pro 는 MetaTrader 4 용 논리페인트(재도색 없음) EMA 크로스오버 인디케이터 로, 기계적 트레이딩에서 가장 오래된 문제 중 하나를 해결하기 위해 설계되었습니다. 바로 아무런 컨텍스트 없이 단순 이동평균 크로스만 쓰면, 가차 없는 잦은 페이크 신호(휩쏘)를 양산한다는 점입니다. Sniper Ashfield Pro 는 클래식한 EMA9/EMA21 크로스를 사용하되, 그 앞에 6‑요소 컨플루언스 필터 게이트를 설치합니다. 모든 크로스는 6 개의 독립적인 시장 상태 필터에 대해 점수가 매겨지고, 설정한 최소 점수를 넘긴 크로스만 차트 위에서 BUY 또는 SELL 신호로 승격됩니다. 이 게이트 위에는 세션 기준으로 계산되는 데일리 VWAP, ATR 기반 스톱로스, 설정 가능한 리스크‑리워드 배수(기본 1R / 2R / 3R)를 사용하는 3 단계 테이크프로핏 타깃, 각 구성요소의 실시간 상태를 보여주는 19‑행 대시보드, 그리고 4 개 전달 채널에


