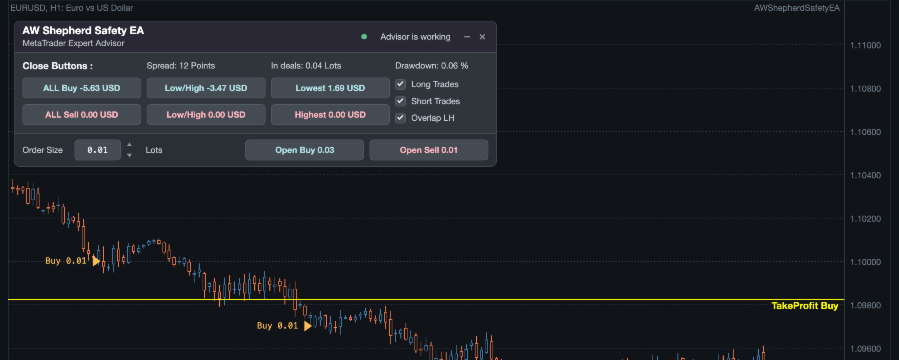

AW Shepherd Safety EA manages open positions: it adds recovery orders with a trend filter, closes a side by TakeProfit, trailing or stop, draws the close levels on the chart and provides buttons for manual control of the basket. The trader opens the first order from the panel, and from then on the EA manages the basket.
The EA has no entry signals. It works with positions on its own symbol that carry its Orders Magic number: opened with the panel buttons, manually or by another EA. Buys and sells are managed separately, so both sides can be open at the same time.
The EA is not multi-currency: it works on the symbol of the chart it is attached to. For several symbols the EA is attached to each chart separately; how to choose the Orders Magic number is covered in section 11.
Both versions work the same way, and this manual covers both.
The article contains the following sections:
- How the EA works
- Testing in the strategy tester
- Recovery orders
- TakeProfit and trailing
- StopLoss and StopOut
- Overlap of the extreme orders
- The panel of the EA
- Levels and marks on the chart
- Filters and limits
- Input settings
- Identifiers and work on several charts
1. How the EA works
Once attached to a chart, the EA builds its panel and shows the Advisor is working status. It opens no orders until the trader opens the first order of a side or hands a position over to it via the Orders Magic number. After that, the basket of the side is managed in the same cycle.
Step 1 - Opening the first order. The volume is entered in the Order Size field on the panel, and the Open Buy or Open Sell button opens a market order. The order gets the Orders Magic number of the EA, and from that moment the side is being managed.
Step 2 - Management. If price moves in the direction of the position, the EA waits for the target set by the Type of orders TakeProfit variable, section 4. If price moves against the position by Minimal step between recovery orders, the EA opens a recovery order in the same direction, but only after the Trend filtering for recovery orders filter has shown a reversal in the direction of the position, section 3. Each recovery order moves the breakeven of the side closer to price, and the target is counted from the breakeven, not from the first order.
Step 3 - Exit. The whole side is closed by TakeProfit or trailing, by the stop from section 5, by pairs of extreme orders from section 6 or with the panel buttons. The close result is labeled on the chart.
Step 4 - A new basket. After a side is closed, the EA waits for the next order from the panel or via the Orders Magic number. The other side is managed independently of the first one all this time.
Does the EA open orders by itself? The first order of a side is always opened by the trader: with a panel button, manually or through another EA. The only orders the EA opens automatically are recovery orders for a side that is already open. This makes the EA suitable both for managing another strategy and as a tool for manual trading from the panel.
What does the EA consider a side? All positions on its symbol with its Orders Magic number in one direction. Buys are one side, sells are the other. Each side has its own breakeven, its own target, its own stop and its own buttons on the panel.
2. Testing in the strategy tester
The EA works in the tester on any symbol and timeframe, but only in visual mode: the first order is opened with a panel button while the test is running. Without visualization there is no panel, no orders are opened in the test, and the report stays empty.
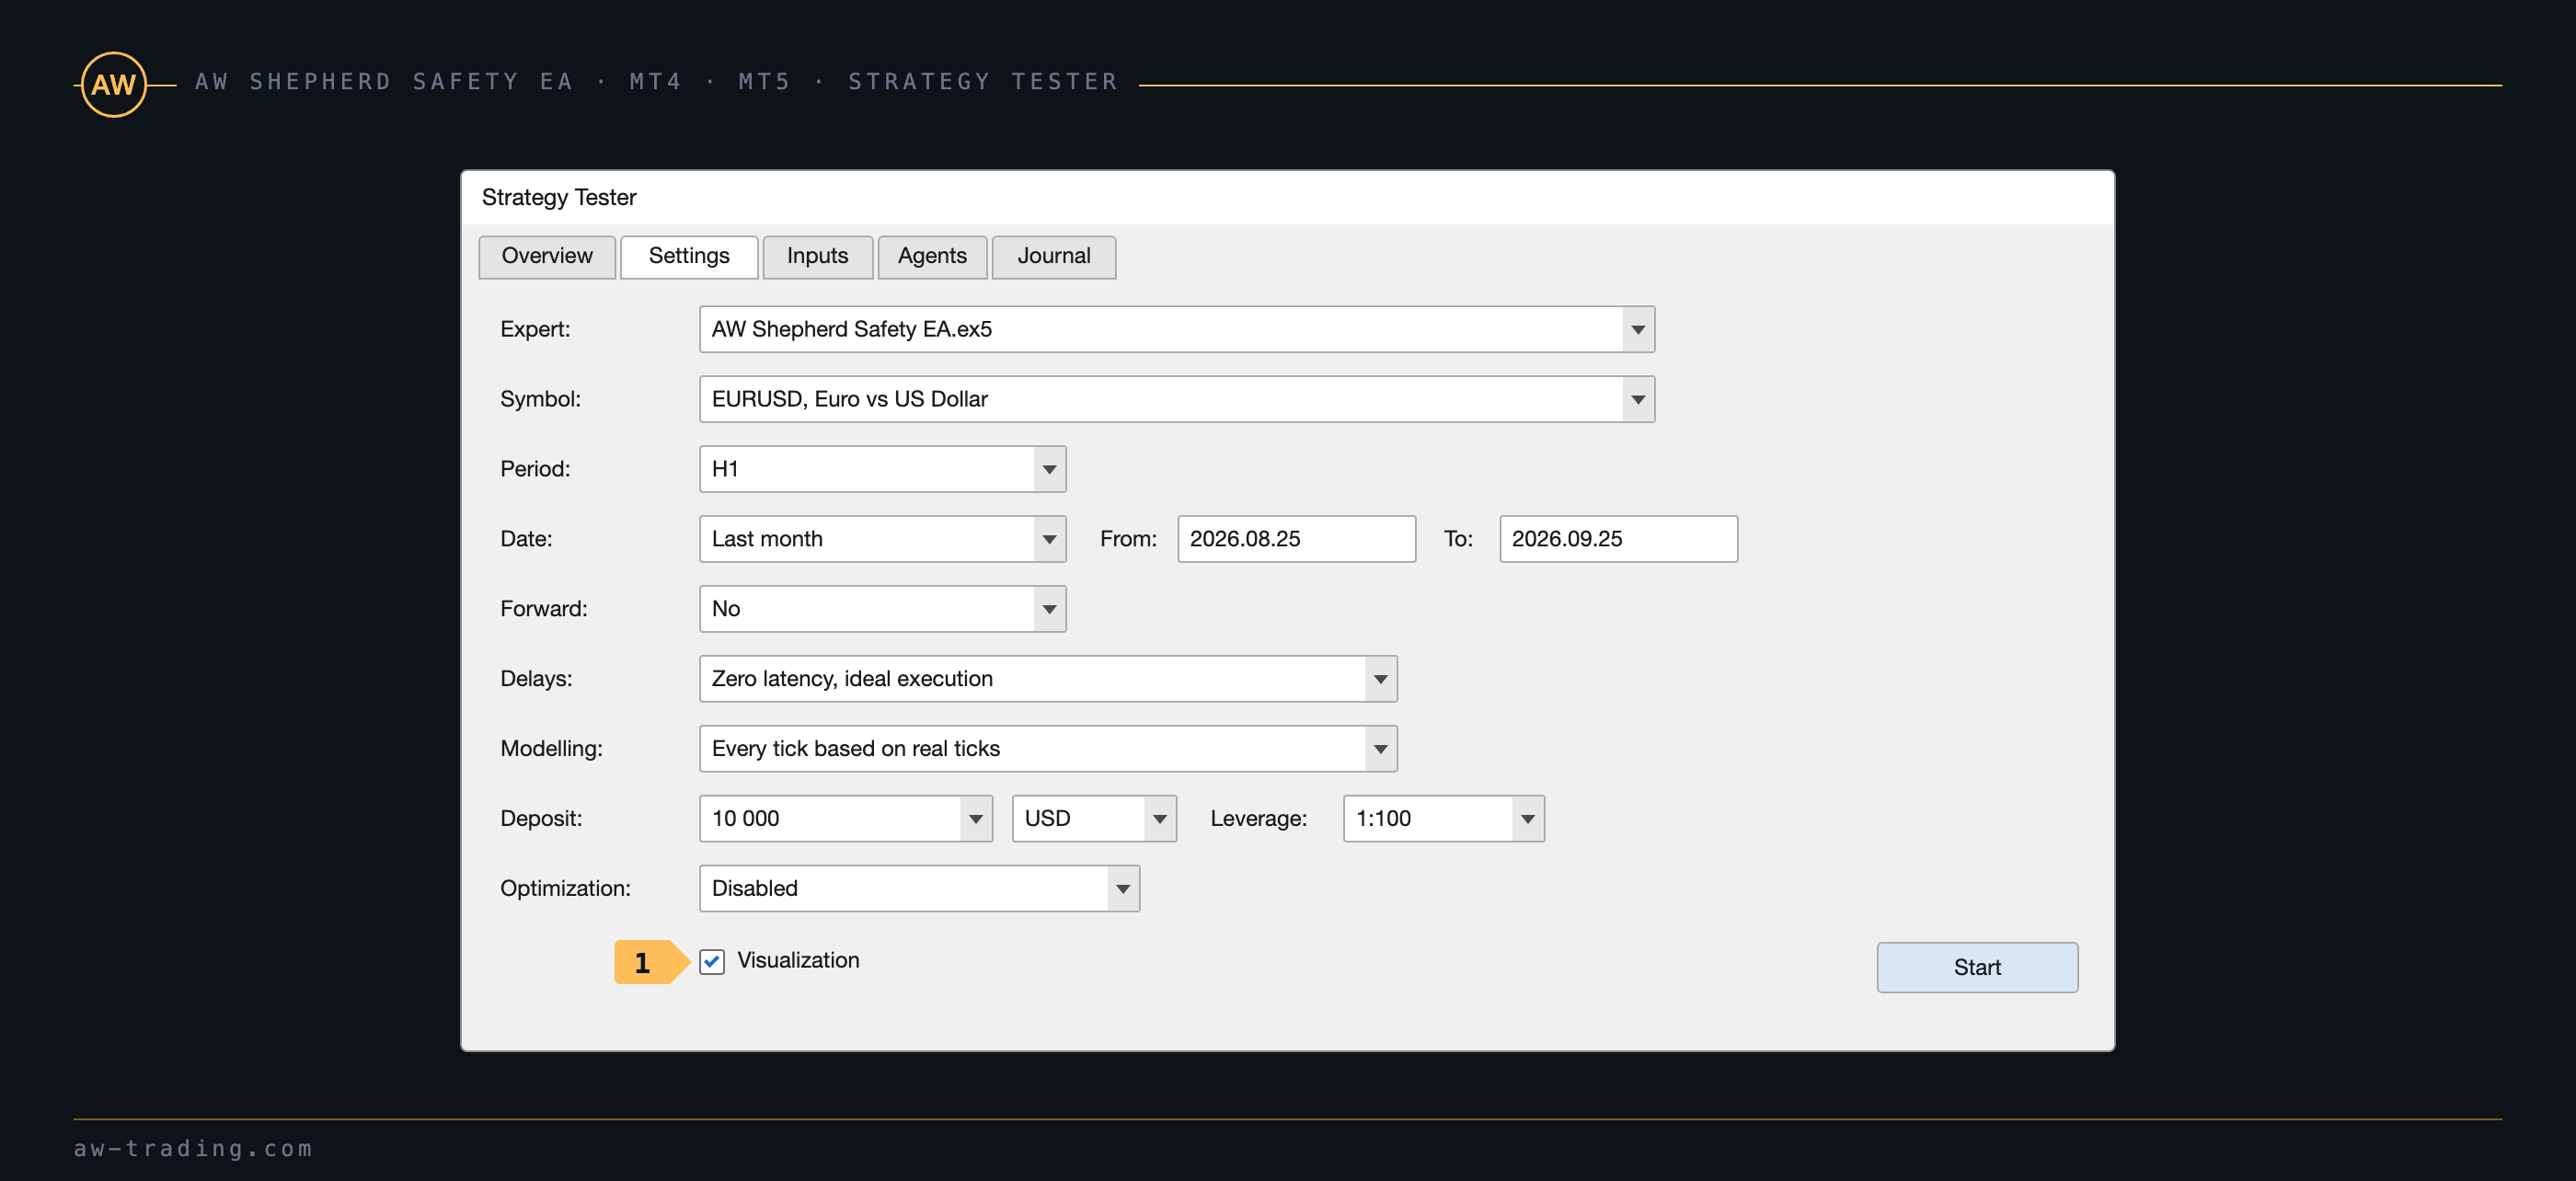
| No. | Tester setting |
|---|---|
| 1 | The Visualization checkbox. Without it the panel is not built and there is no way to open the first order. |
The check sequence before running on an account:
- Select the symbol and timeframe the EA will work on, enable visualization and start the test.
- Wait for the panel to appear on the tester chart, enter the volume in the Order Size field and press Open Buy or Open Sell. The entry moment is chosen manually, for example against the move, to see the recovery orders at work.
- Watch how the EA manages the basket: the Next Buy or Next Sell line shows the price of the next recovery order, the TakeProfit line shows the target, and the mark on the bar shows the close result.
- Compare the maximum drawdown in the tester report with what the deposit can take, and adjust Minimal step between recovery orders, Multiplier for size of orders and Maximum number of orders. The volume calculation is in section 3.
The close buttons, the permission checkboxes and the Order Size field work in the tester the same way as on an account. The only thing that does not work is the cross that removes the EA: the confirmation dialog is not shown in the tester.
3. Recovery orders
A recovery order is an order in the direction of an open position that the EA opens when price has moved against it. It reduces the distance from the breakeven of the side to price, so to close in profit, price only has to return to the breakeven, not to the first order. There are three conditions for opening: the price step, permission from the trend filter and the limits from section 9.
Step. A recovery buy is opened when the Bid price has dropped below the lowest Buy of the side by Minimal step between recovery orders. A recovery sell is opened when Bid has risen above the highest Sell by the same step. The step is fixed and is counted from the extreme order of the side, not from the first one.
Price of the next Buy = the lowest Buy of the side - Minimal step between recovery orders. Price of the next Sell = the highest Sell of the side + Minimal step between recovery orders.
For example, with Minimal step between recovery orders at 300 on a five-digit quote and the first Buy at 1.10000, the second order waits for 1.09700, the third for 1.09400, and so on up to Maximum number of orders.
Trend filter. The Trend filtering for recovery orders variable in the RECOVERY SETTINGS section defines when the order is actually opened after the step has been passed. The point of the filter is to avoid averaging into a falling price: the recovery order waits for a sign of a reversal in the direction of the position.
| Mode | When a recovery Buy is opened | When a recovery Sell is opened |
|---|---|---|
| Without filtering | Right after the step is passed | Right after the step is passed |
| Parabolic SAR | The Parabolic SAR dot is below price | The Parabolic SAR dot is above price |
| Two MA | The fast MA is above the slow one | The fast MA is below the slow one |
| Bullish Bearish candles | The last closed bar of the chart is bullish | The last closed bar of the chart is bearish |
Parabolic SAR is configured in the INDICATORS - PARABOLIC SAR SETTINGS section: the SAR timeframe, Step SAR and Maximum SAR. The moving averages are configured in the INDICATORS - 2MA SETTINGS section: the MAs timeframe, the Fast MA period and Slow MA period, the methods and the applied prices. The Current value of a timeframe means the timeframe of the chart. The Bullish Bearish candles mode always looks at the bars of the chart the EA is attached to.
Volume. The Type of increase orders variable defines how the volume of recovery orders grows. In all modes the base is Size of the first order, not the volume of the previous order, so rounding to the broker's volume step does not accumulate from order to order.
| Mode | Volume of the Nth recovery order |
|---|---|
| Multiplier lots | Size of the first order × Multiplier for size of orders to the power of N, where N is the number of orders of the side already open. If after rounding the volume is not larger than the largest order of the side, that order multiplied by the multiplier is used instead |
| Add to lots | Size of the first order + Increase for Add_Lots × N |
| Static lots | Size of the first order, all orders are the same |
The volume of any order, including orders from the panel buttons, is capped by Maximum size of orders and by the broker's maximum volume for the symbol.
For example, Size of the first order 0.01 and Multiplier for size of orders 1.3: the second order is 0.01 × 1.3 = 0.013, which rounds to the volume step as 0.01 again; the third is 0.01 × 1.3 × 1.3 = 0.0169, that is 0.02; then 0.03, 0.04, 0.05. The first two orders are the same because of rounding, and the growth starts from the third one. In the Add to lots mode with Increase for Add_Lots at 0.02 the volumes go 0.01, 0.03, 0.05, 0.07.
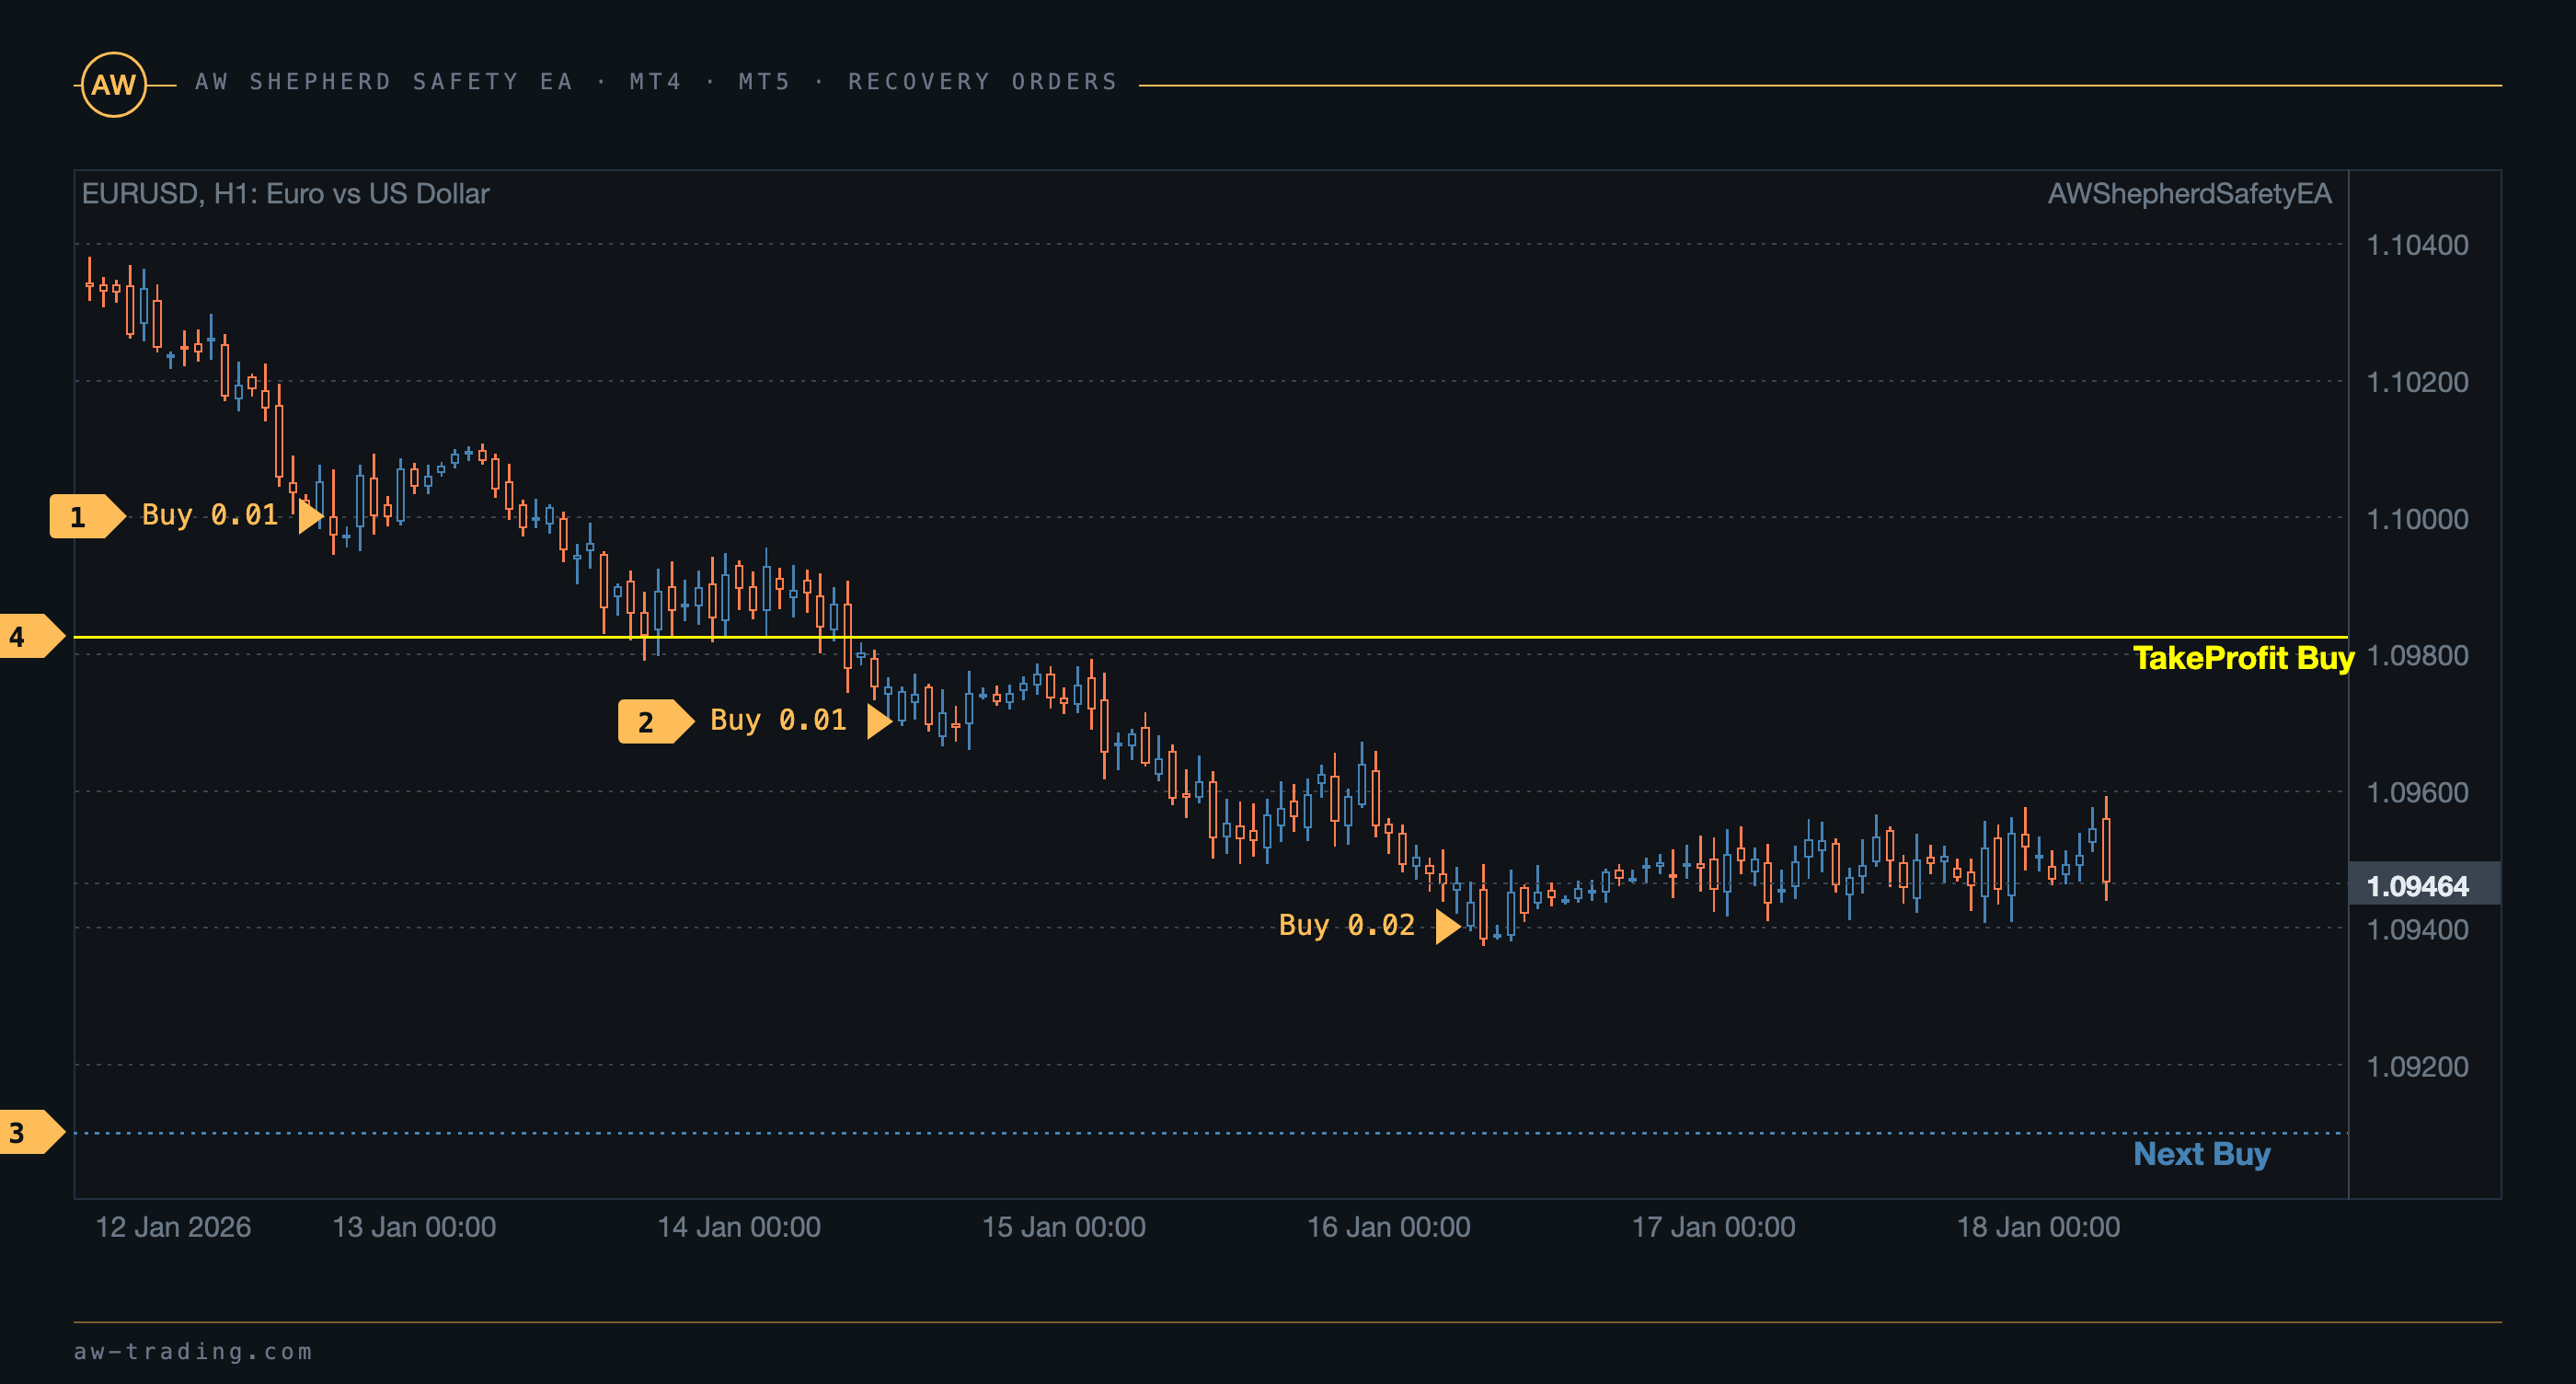
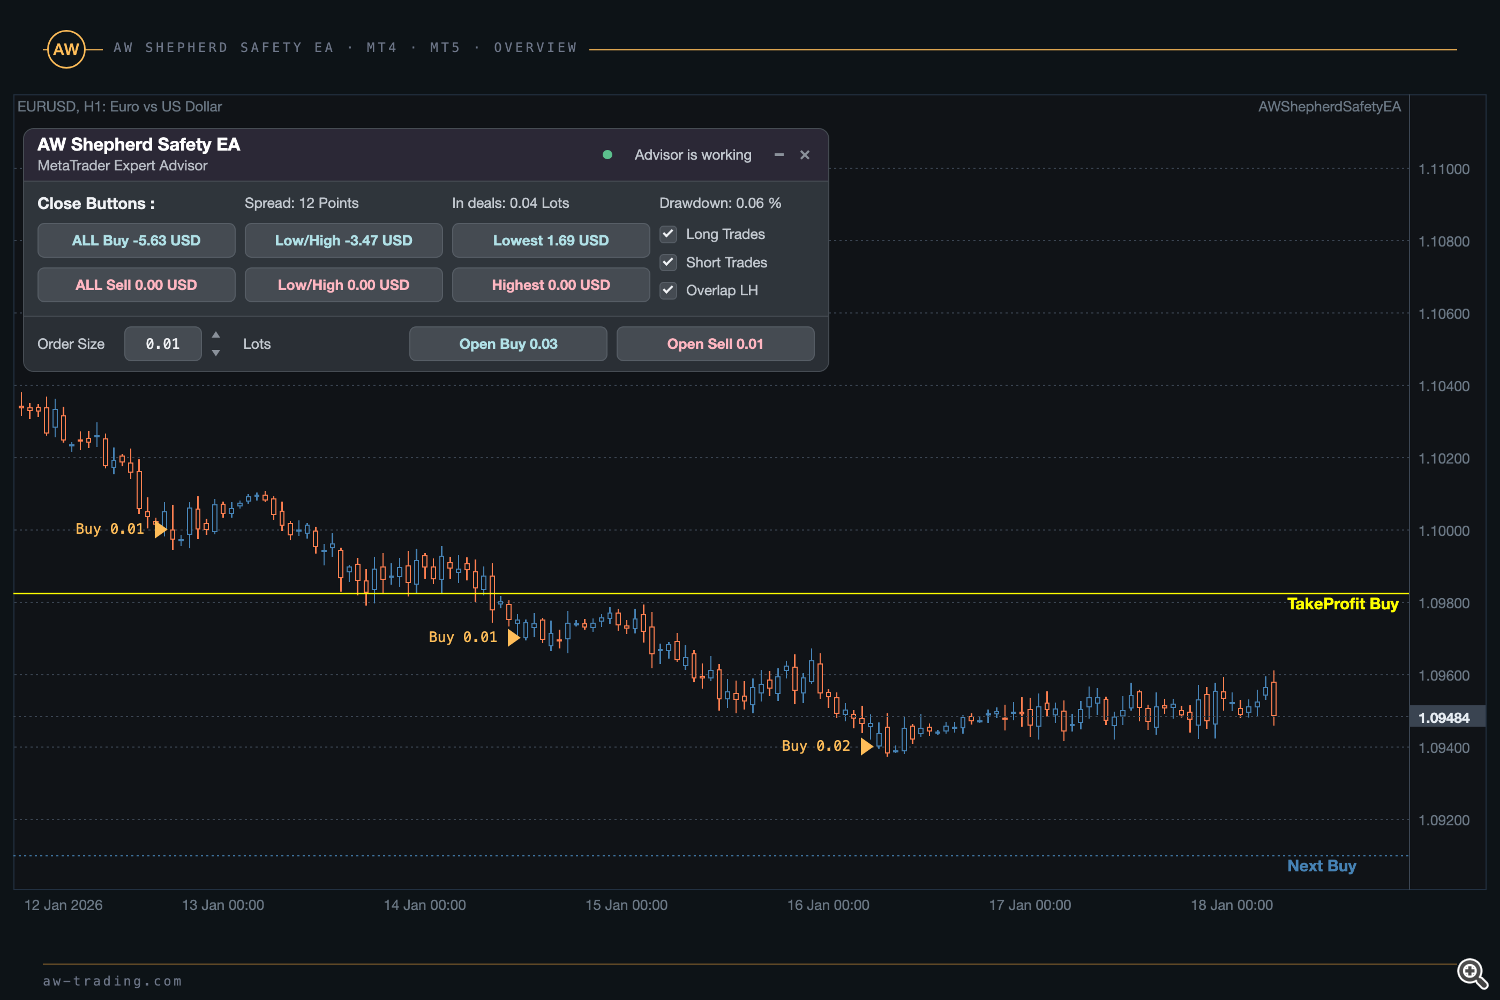
| No. | On the chart |
|---|---|
| 1 | The first Buy, opened with the Open Buy button. |
| 2 | Two recovery orders: each one Minimal step between recovery orders below the previous one, on the bar after which the filter allowed the entry. |
| 3 | The Next Buy line: the price at which the next recovery order will be opened. |
| 4 | The TakeProfit Buy line: the target counted from the breakeven of the whole basket. With each recovery order it moves down closer to price. |
Why was the recovery order not opened although price has passed the step? There are several possible reasons: the trend filter has not shown a reversal yet, an order of this side has already been opened on this bar, the number of orders of the side has reached Maximum number of orders, the spread is above Maximum spread in points, there is not enough margin on the account, it is outside the working hours on Monday or Friday, or the side is turned off with the Long Trades or Short Trades checkbox. The EA writes each refusal to send an order to the Experts log of the terminal with the reason.
Basket risk. The drawdown is determined by the step, the multiplier and the maximum number of orders. For low risk the step is larger, the multiplier is closer to 1.2 and the maximum number of orders is small; for high risk the step is smaller and the multiplier is higher. The step is set in points, and on gold and indices price covers a different number of points per bar than on currency pairs, so for them the step is selected again in the tester.
Recovery orders in brief. An order is opened after a step against the position and after a reversal by the filter, the volume is counted from the first order, the target is counted from the breakeven of the whole side, and the side is closed all at once.
4. TakeProfit and trailing
The Type of orders TakeProfit variable in the TAKE PROFIT SETTINGS section selects one of five ways to close a side in profit. Four of them work with the basket as a whole, and one places a target in each order.
| Mode | When the side is closed | Variables |
|---|---|---|
| TakeProfit in money | The floating result of the side has reached the set amount in the account currency | TakeProfit in money value |
| Separate Order TakeProfit in points | Each order is closed by the broker at its own TakeProfit in points from the open price | TakeProfit in points value |
| Basket TakeProfit in points | Price has moved away from the breakeven of the side by the set number of points | TakeProfit in points value |
| Trailing in money | The result of the side has reached the trailing start and then pulled back by a step from the level reached | Trailing start in money, Trailing step in money |
| Trailing in points | A StopLoss that follows price is placed in the orders of the side; the broker closes the orders at this stop | Trailing start in points, Trailing step in points |
Breakeven of the side. This is the price at which the result of all orders of the side is zero, swaps included. While there is only one order, the breakeven coincides with its open price. Each recovery order shifts the breakeven toward the current price. The Basket TakeProfit in points and Trailing in points modes are counted from the breakeven, and so are the lines on the chart for the money modes.
TakeProfit in money. The EA adds up the result of all orders of the side, swaps included, and closes the side when the sum has reached TakeProfit in money value. Buys and sells are counted separately: the target for buys and the target for sells is the same amount, but each side works toward it on its own.
Basket TakeProfit in points. The side is closed when price has moved away from the breakeven by TakeProfit in points value. Buys are checked against the target by the Bid price, sells by the Ask price.
Buy target = buy breakeven + TakeProfit in points value. Sell target = sell breakeven - TakeProfit in points value.
For example, two 0.01 Buys are open at 1.10000 and 1.09700, and the breakeven of the side is 1.09850. With TakeProfit in points value at 100 the side is closed when Bid reaches 1.09950, even though the first order is still at a loss at that moment.
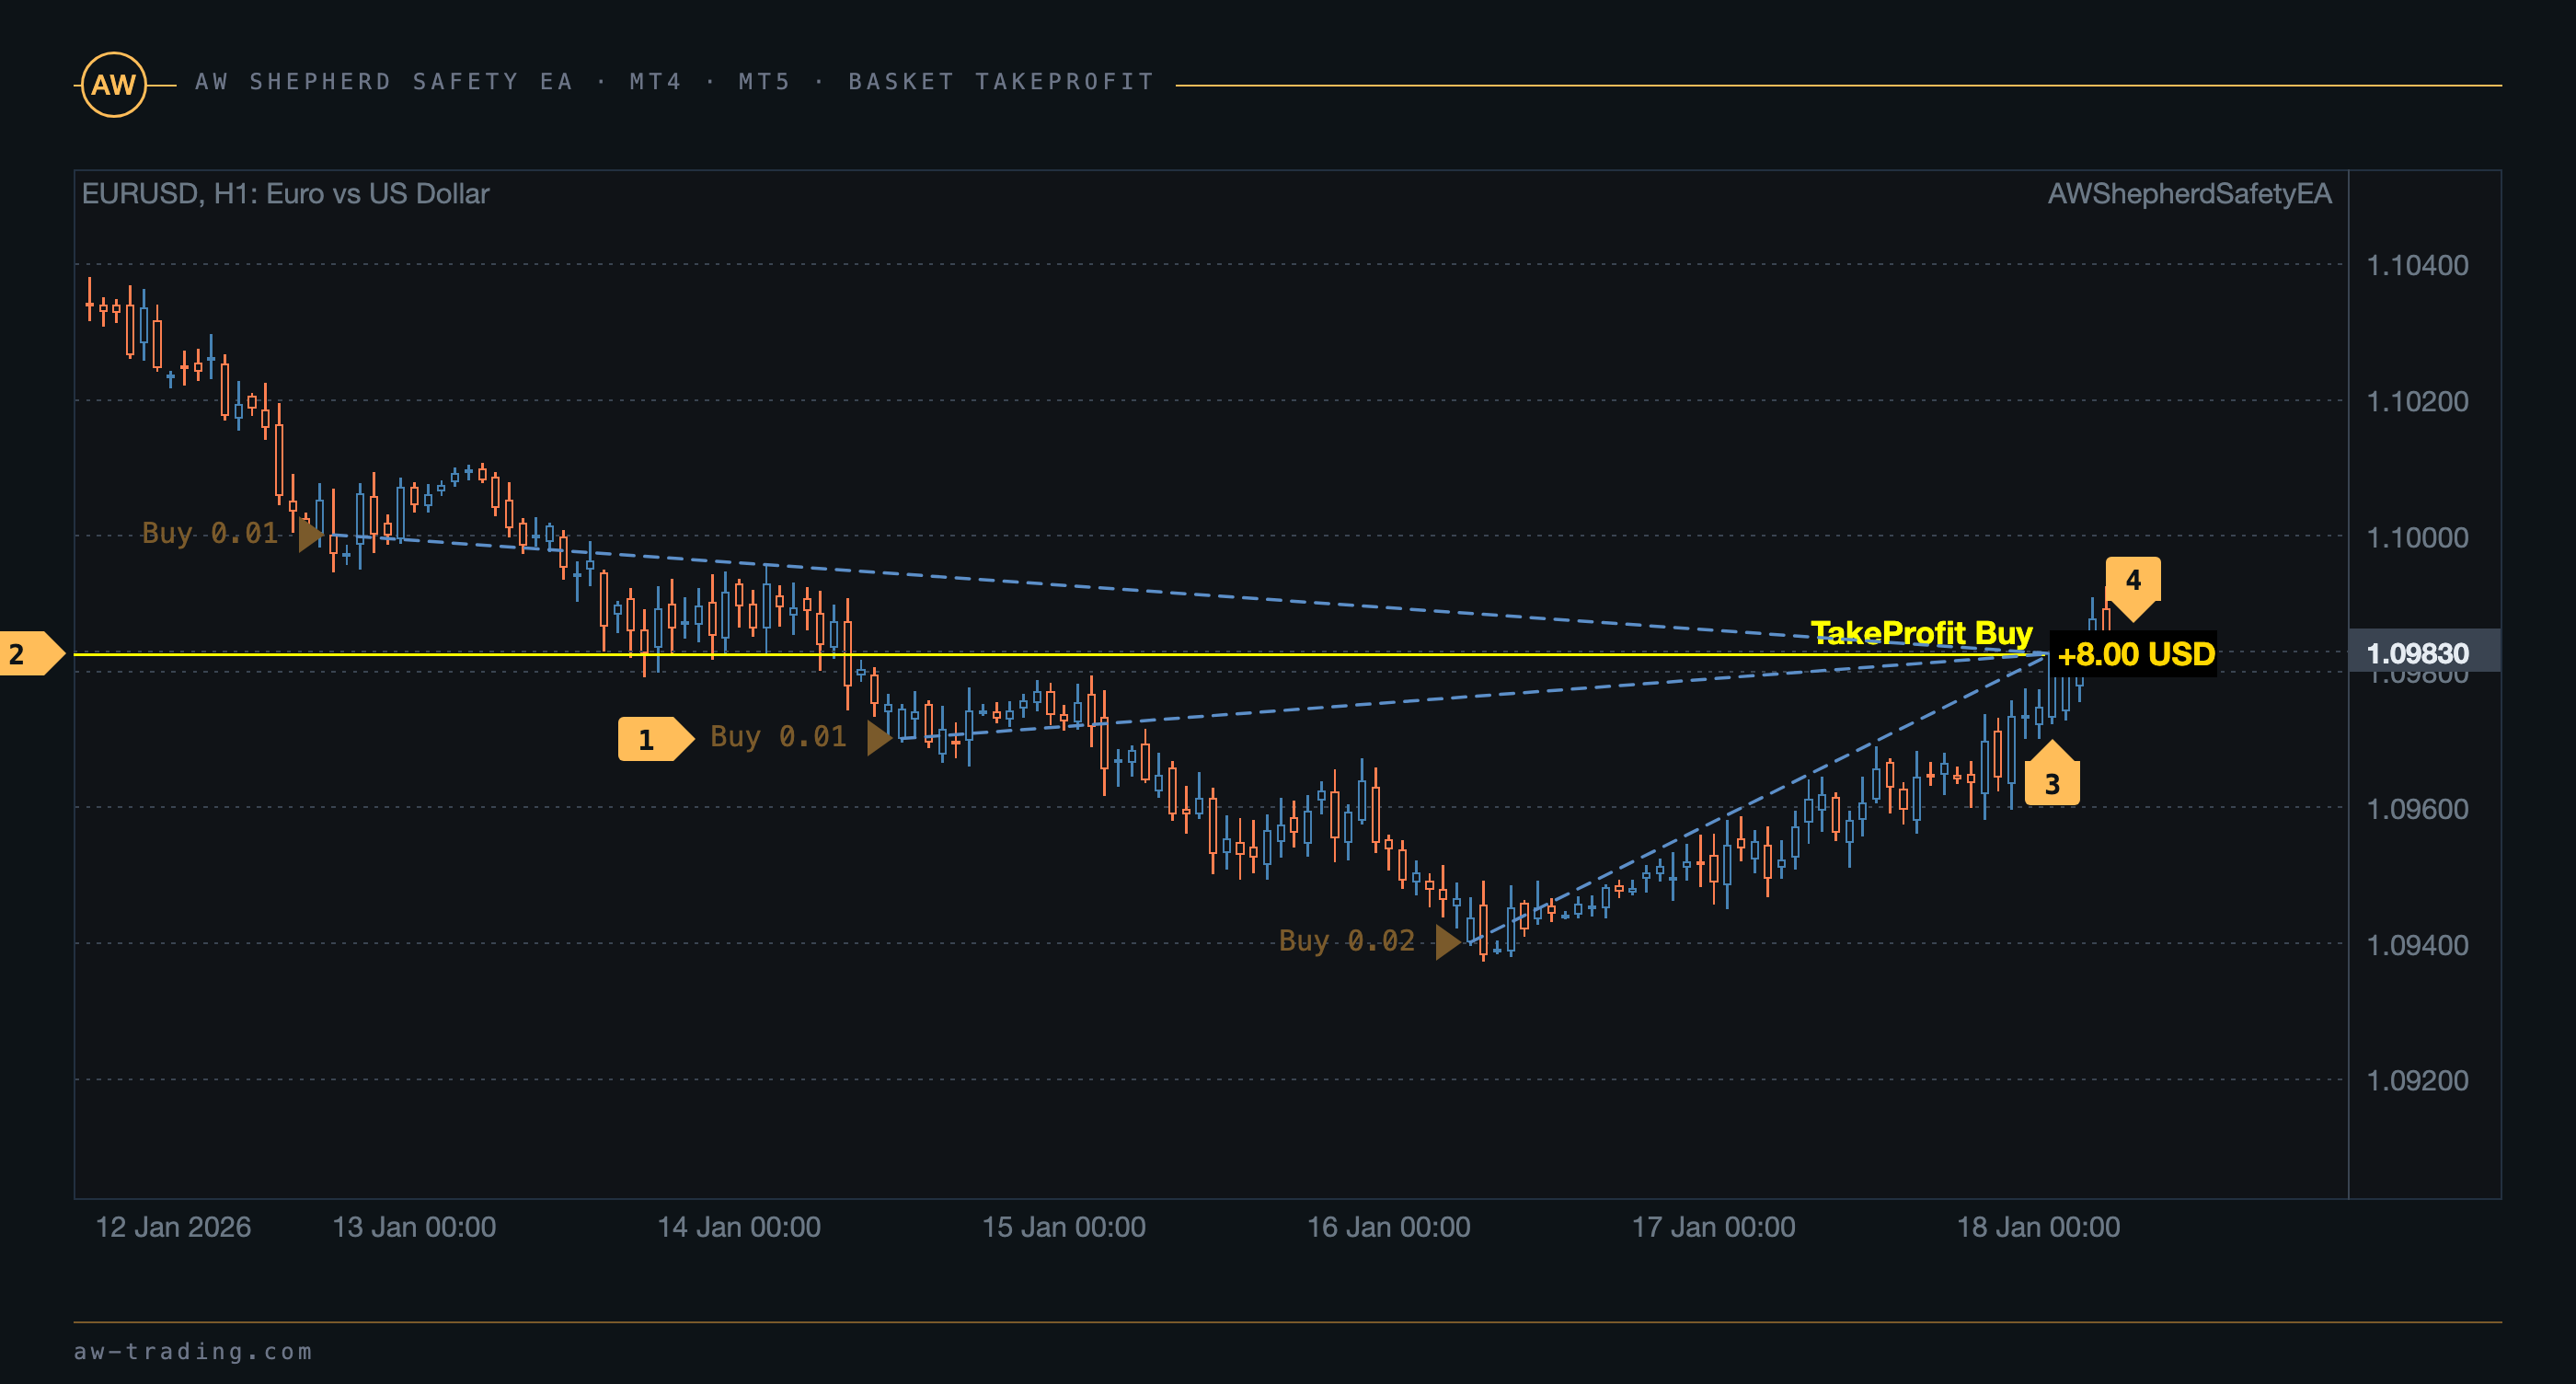
| No. | On the chart |
|---|---|
| 1 | A basket of three Buys: the first order and two recovery orders. |
| 2 | The TakeProfit Buy line at the breakeven of the basket plus TakeProfit in points value. |
| 3 | The bar on which Bid reached the line: all three orders are closed at once, a dotted line runs from each order to the close point. |
| 4 | The close mark with the result of the side in the account currency. |
Separate Order TakeProfit in points. The EA places a TakeProfit in each order of the side at TakeProfit in points value from the open price of that order, including the orders handed over to it via the Orders Magic number if they had no target. After that the broker closes the orders one by one, the basket is not closed as a whole, and the breakeven plays no part here. The mode suits the case when each order has to close at its own target independently of the others.
Trailing in money. A virtual trailing of the result of the side. When the result has reached Trailing start in money, the EA stores a level Trailing step in money below the result. While the result grows, the level follows it: each time the result exceeds the level by a step, the level is moved to a step below the result. The level never moves back. When the result has pulled back a step below the level and is still above zero, the side is closed.
For example, Trailing start in money 3.00 and Trailing step in money 0.50. The result of the side has reached 3.00 - the level is 2.50. The result has grown to 3.60 - the level is 3.10. The result has pulled back to 2.60 - the side is closed with a result of about 2.60.
Trailing in points. The only mode in which the target sits in the orders themselves. Until price has moved away from the breakeven of the side by Trailing start in points plus Trailing step in points, there are no stops. Then each order of the side gets a StopLoss at Trailing start in points from the current price. The stop is moved when price has gone farther from it than the start plus the step, and is placed again at the start distance from price. The stop never moves back, and the orders are closed by the broker.
For example, Trailing start in points 150, Trailing step in points 30, buy breakeven 1.10000. The trailing starts when Bid has risen above 1.10180: at 1.10181 the stop is placed at 1.10031. The next move comes when Bid has gone 180 points above the stop, that is, at 1.10212 the stop moves to 1.10062. If price turns around, the orders are closed at the last stop.
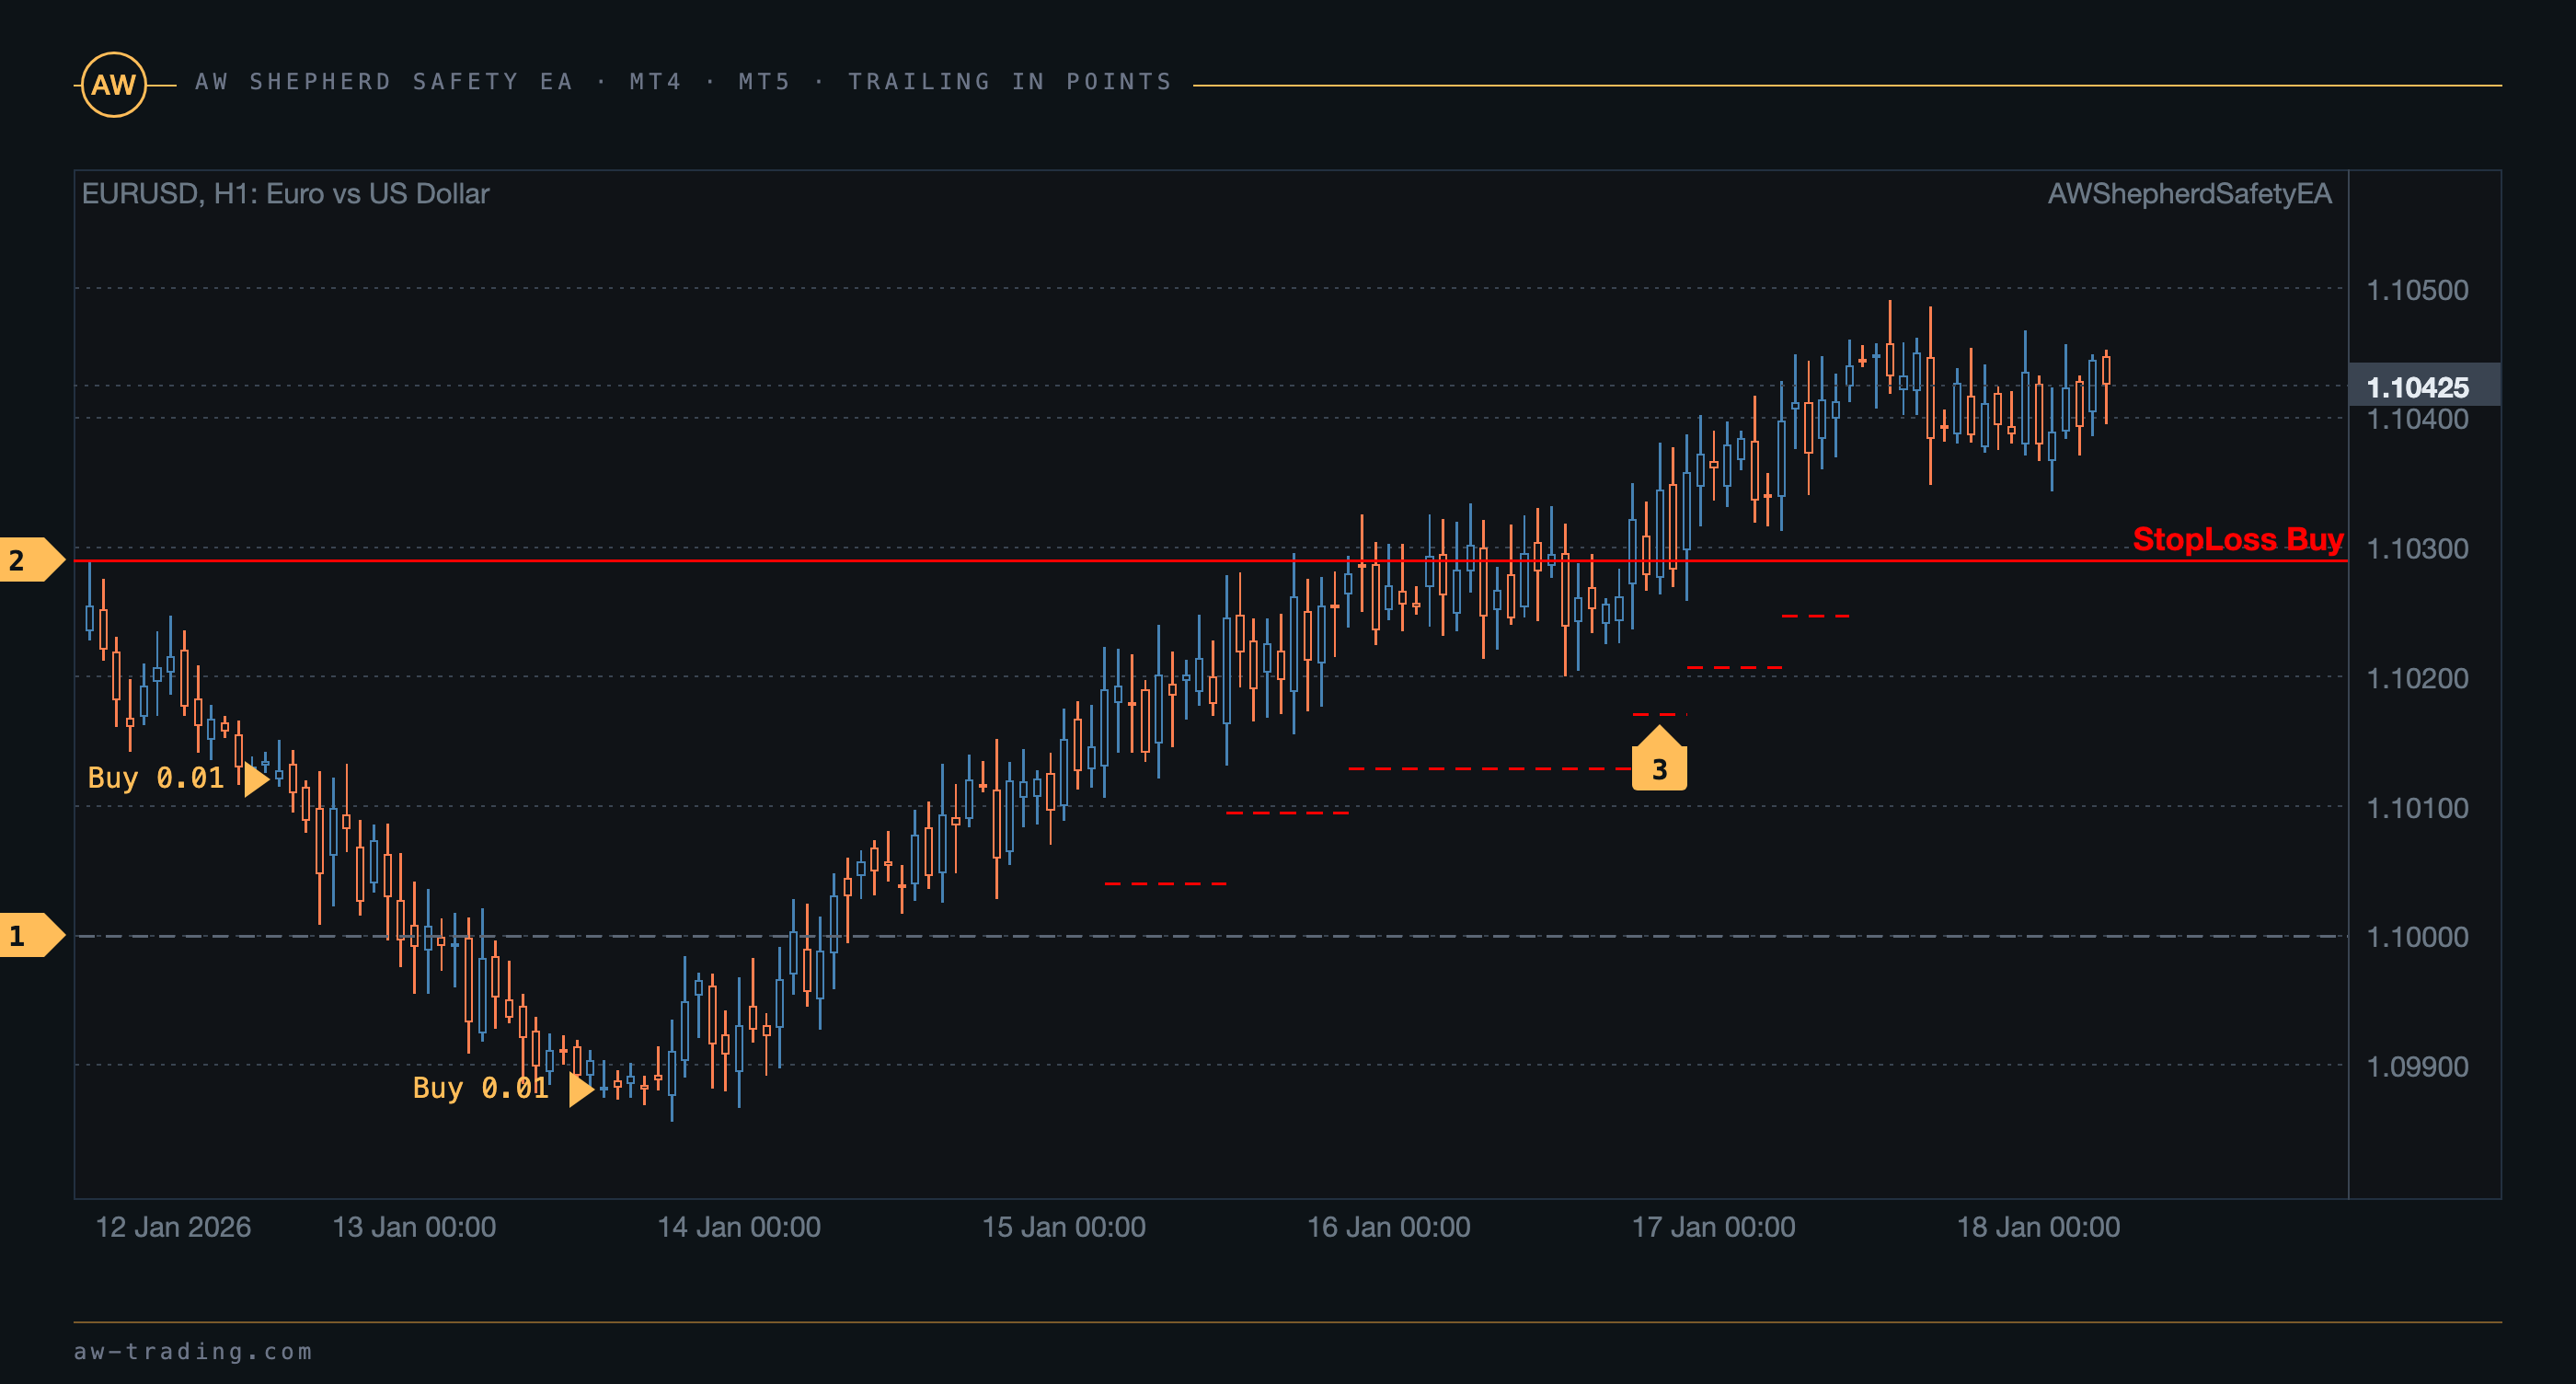
| No. | On the chart |
|---|---|
| 1 | The breakeven of the Buy basket, the trailing start is counted from it. |
| 2 | The StopLoss Buy line: the stop already placed in the orders, Trailing start in points below price. |
| 3 | The steps of the stop moves: each one after price has moved by the start plus the step from the previous stop. |
Why was the side not closed although price has reached the TakeProfit line? Buys are checked against the line by the Bid price, sells by the Ask price, while the candles on the chart are built by Bid, so sells are closed when price on the chart has gone past the TakeProfit Sell line by the size of the spread. In the TakeProfit in money and Trailing in money modes the line is the money target converted into a price at the current volume of the side; swaps and a change of volume shift it.
Are the broker's stop limits taken into account? Yes. The stops and targets that the EA places in orders are checked against the minimum StopLevel distance of the symbol. If the broker has rejected a level, the EA retries on the next tick and writes the reason to the log.
5. StopLoss and StopOut
The Type of orders StopLoss variable in the STOP LOSS SETTINGS section selects the protection against further growth of the loss. The stop works independently of the selected TakeProfit.
| Mode | What it does | Variables |
|---|---|---|
| Without StopLoss | No stop. The side is closed only by TakeProfit, trailing, overlap or a panel button | |
| StopLoss in money | The whole side is closed when its floating result has reached the set loss in the account currency | StopLoss value in money |
| Separate StopLoss in points | Each order gets a StopLoss in points from its open price, and the broker closes the orders one by one | StopLoss value in points |
| StopOut in money | All the EA's orders on the symbol are closed, both sides at once, when their total loss has reached the set amount | StopOut value in money |
StopLoss in money. Counted per side: buys are closed when the result of the buys has dropped to minus StopLoss value in money, sells by their own result. The other side stays active. The StopLoss Buy or StopLoss Sell line on the chart shows the price at which the side reaches this loss at the current volume.
Separate StopLoss in points. The EA places a StopLoss in each order of the side at StopLoss value in points from its open price, including the orders handed over via the Orders Magic number. The stop in the order is executed by the broker, so it triggers even with the terminal turned off.
StopOut in money. Overall account protection for this symbol: when the sum of the results of all the EA's orders on the symbol, buys and sells together, has dropped to minus StopOut value in money, the EA closes everything. The mode is meant for the case when recovery orders have not brought the side into profit and the drawdown keeps growing.
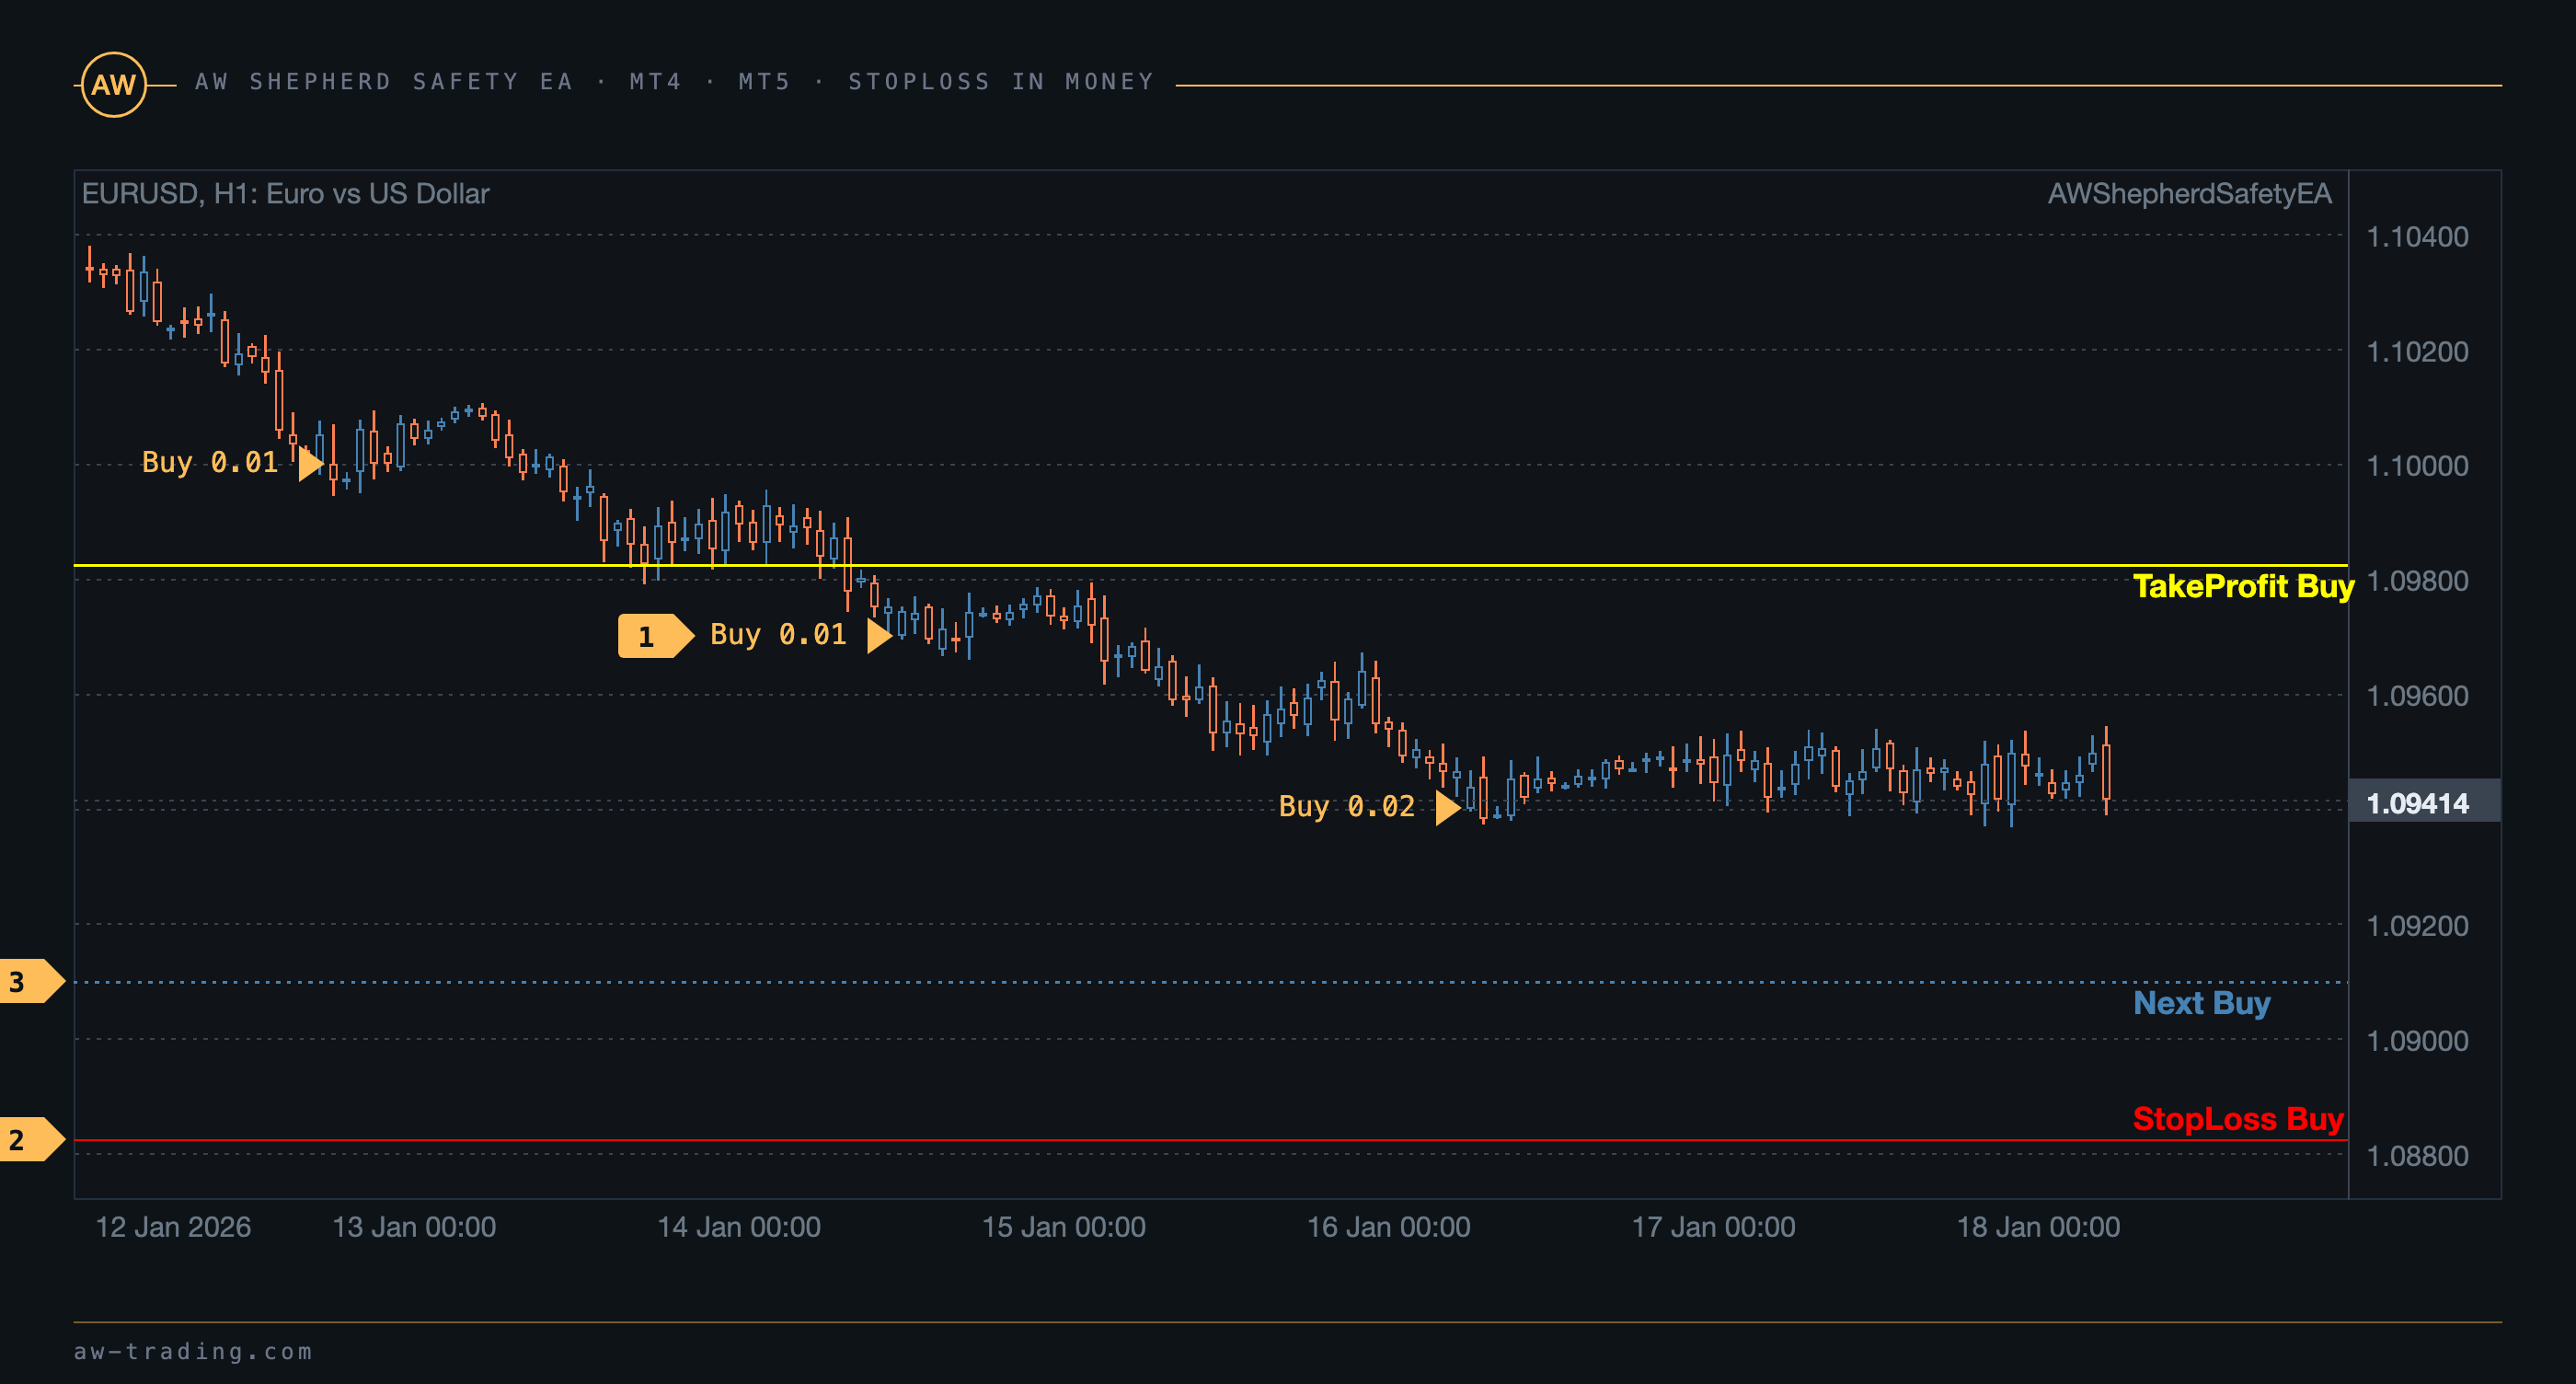
| No. | On the chart |
|---|---|
| 1 | A Buy basket of the first order and recovery orders. |
| 2 | The StopLoss Buy line: the price at which the result of the side equals minus StopLoss value in money at the current volume. |
| 3 | The Next Buy line between price and the stop: the next recovery order will open before the stop triggers, and after it the stop line will shift. |
Please note. In the Without StopLoss mode the drawdown of a side is limited only by Maximum number of orders and Maximum size of orders: the EA keeps adding recovery orders until it reaches the limit, and then waits for the target. Each recovery order increases the volume of the side, so as the basket grows, the money stop ends up closer and closer to price: the StopLoss line on the chart shows this in advance.
The close mark and broker stops. The result on the bar is labeled when the side is closed by the EA: by the target, by trailing in money, by the stop in money, by StopOut or by overlap. Closes by the TakeProfit and StopLoss placed in the orders themselves are executed by the broker, and they get no mark.
6. Overlap of the extreme orders
Overlap unloads a long basket in pairs without waiting for the target of the whole side. It is enabled by the Allow overlap last and first recovery orders variable in the ORDERS SETTINGS section and by the Overlap LH checkbox on the panel. It works with any Type of orders TakeProfit.
When the side has more orders than Allow overlap after number of orders, the EA watches a pair: the order nearest to price and the one farthest from it. For buys in a drawdown these are the lowest Buy, usually the last recovery order, and the highest Buy, usually the first order. After a pullback of price the nearest order is already in profit, the farthest one is still at a loss, and their combined result grows.
The combined result of the pair is tracked by the same trailing in money as in section 4, with the Trailing start in money and Trailing step in money variables: when the result of the pair has reached the start, a level one step below is stored, the level follows the growth, and a pullback by a step closes both orders. If the step is set larger than the start, the start is used as the step. The loss of the farthest order is covered by the result of the nearest one, the basket becomes two orders shorter, and its breakeven and target are recalculated.
Pair = the order of the side nearest to price + the farthest order of the side. The pair is closed when the side has more orders than Allow overlap after number of orders and the combined result of the pair has triggered the trailing in money.
The Low/High button on the panel shows the current result of this pair and closes it manually, regardless of the overlap settings.
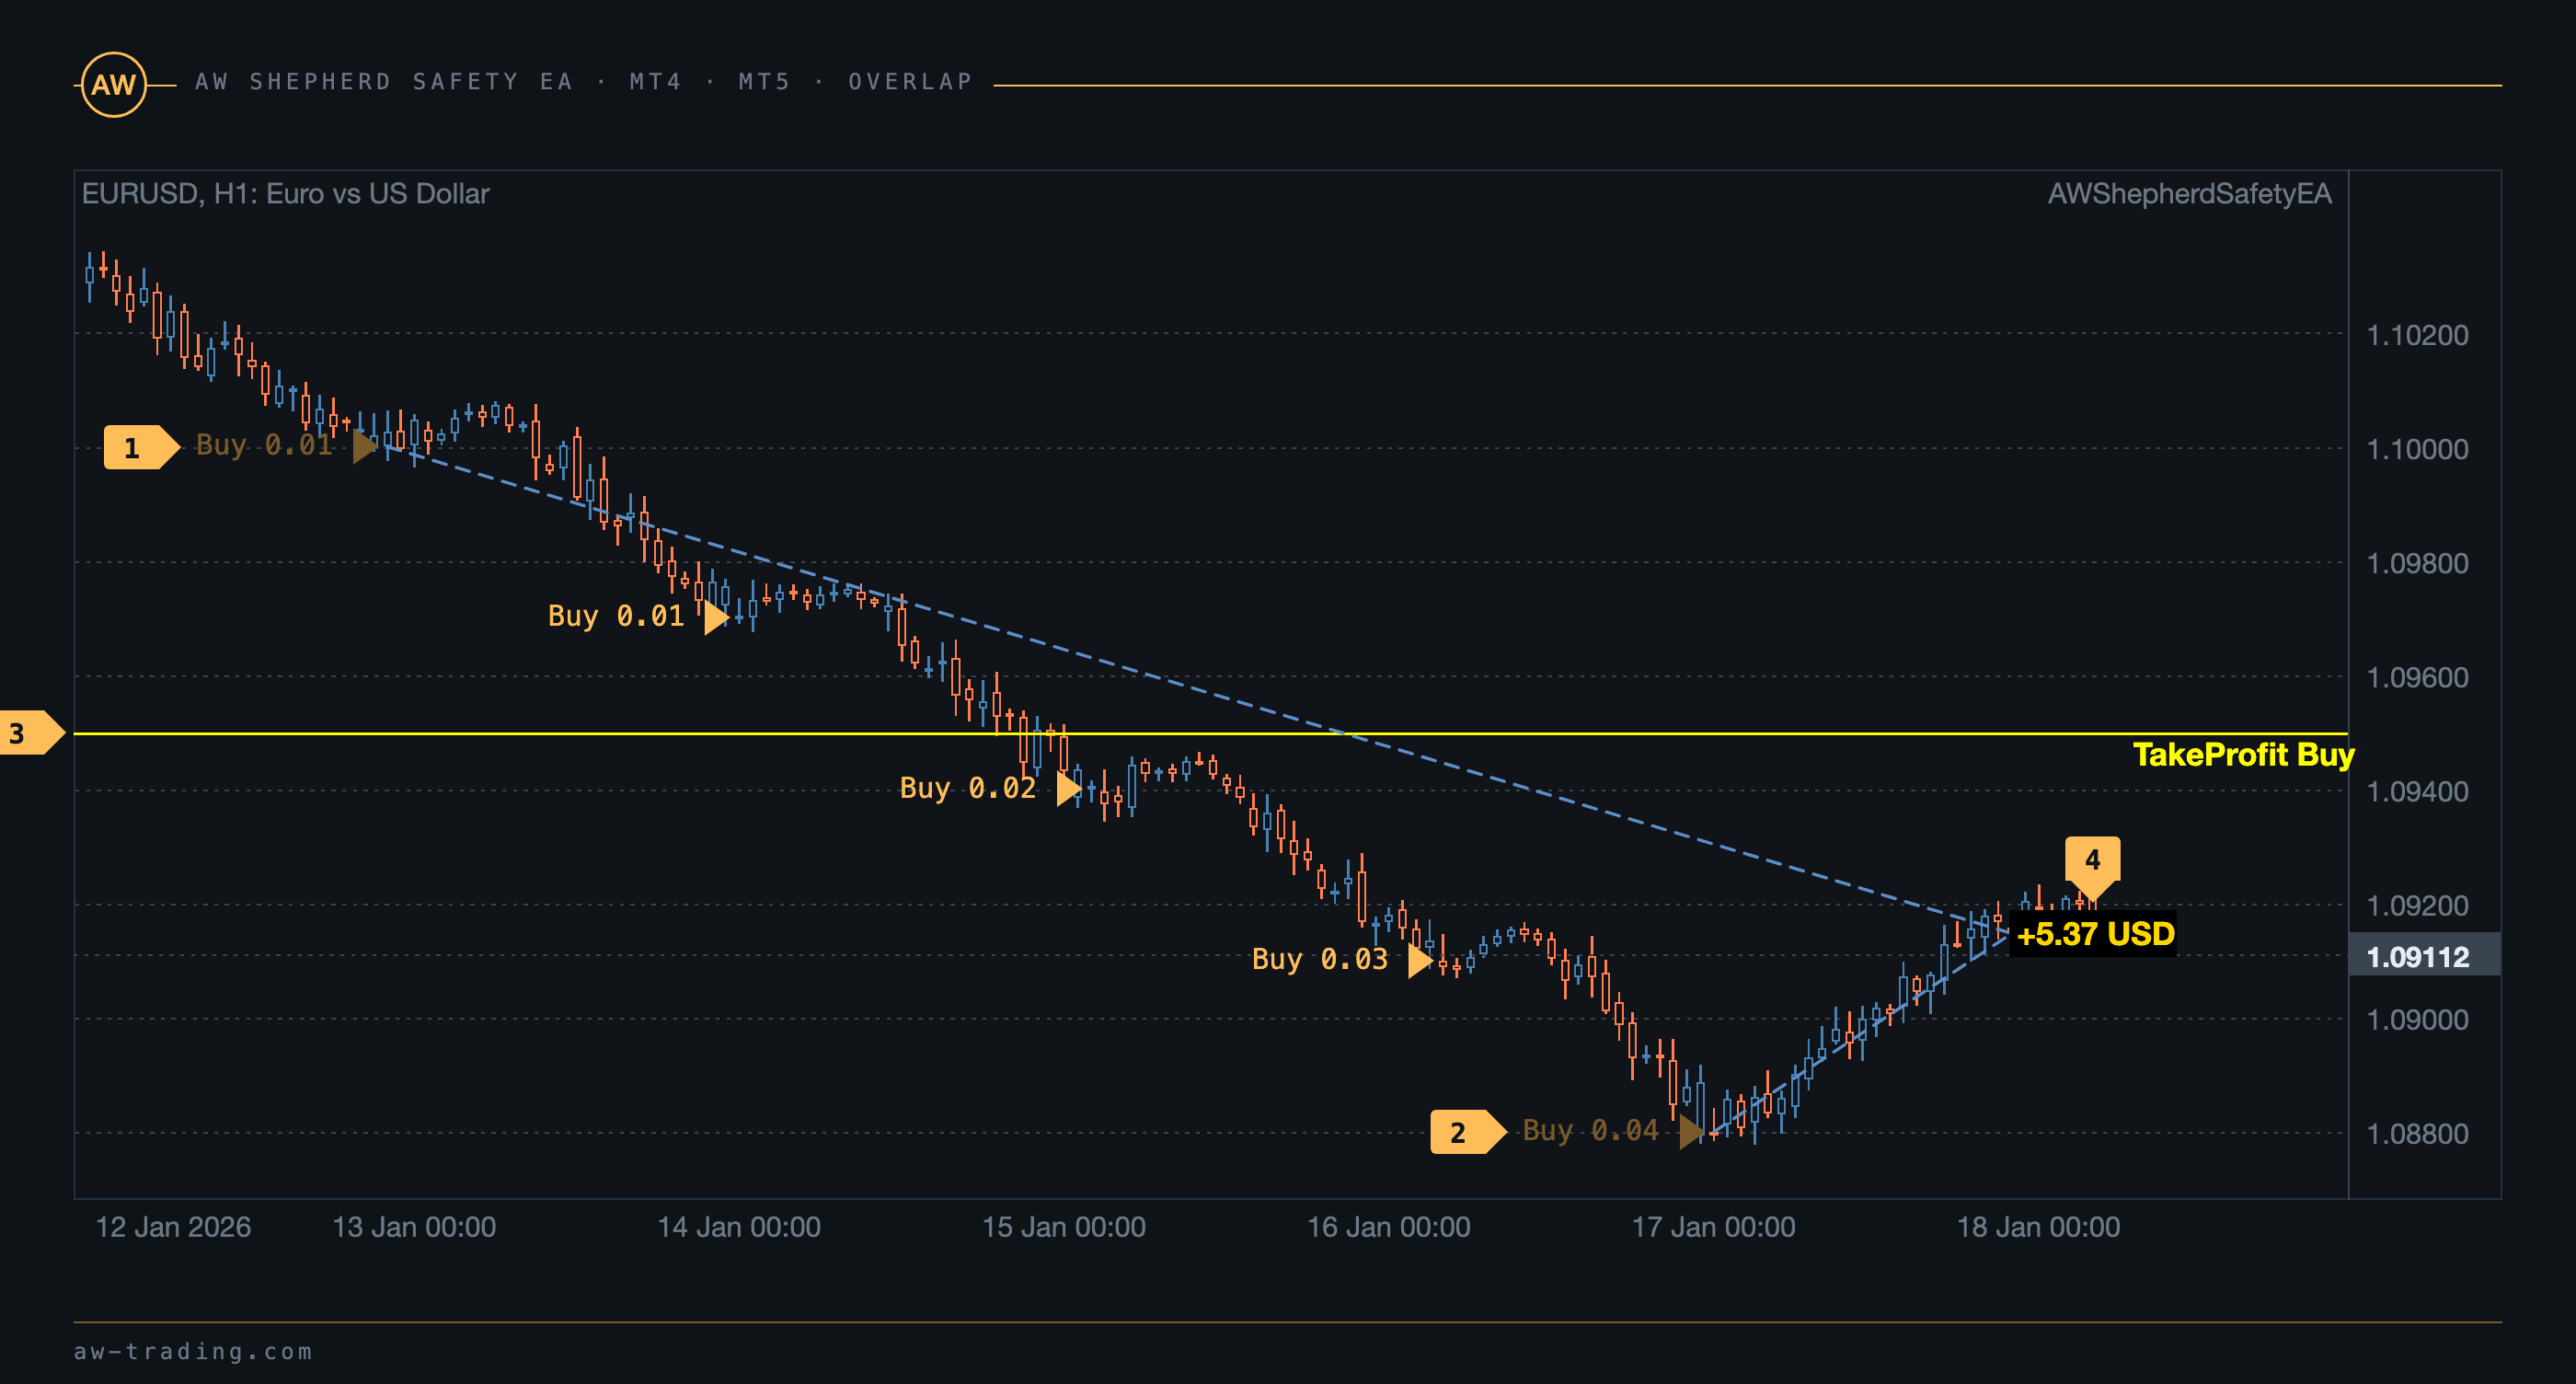
| No. | On the chart |
|---|---|
| 1 | The first Buy of the basket: the farthest from price, closed at a loss. A dotted line runs from it to the close point of the pair. |
| 2 | The last recovery order: the nearest to price, closed in profit, which covered the loss of the first one. A dotted line runs to the same point. |
| 3 | The orders between them stay open and have no dotted line, and the TakeProfit Buy line is recalculated for the new basket. |
| 4 | The close mark with the result of the pair. |
7. The panel of the EA
The panel sits in the upper left corner of the chart. All values are updated once a second and on every tick, and the buttons act without a confirmation dialog.
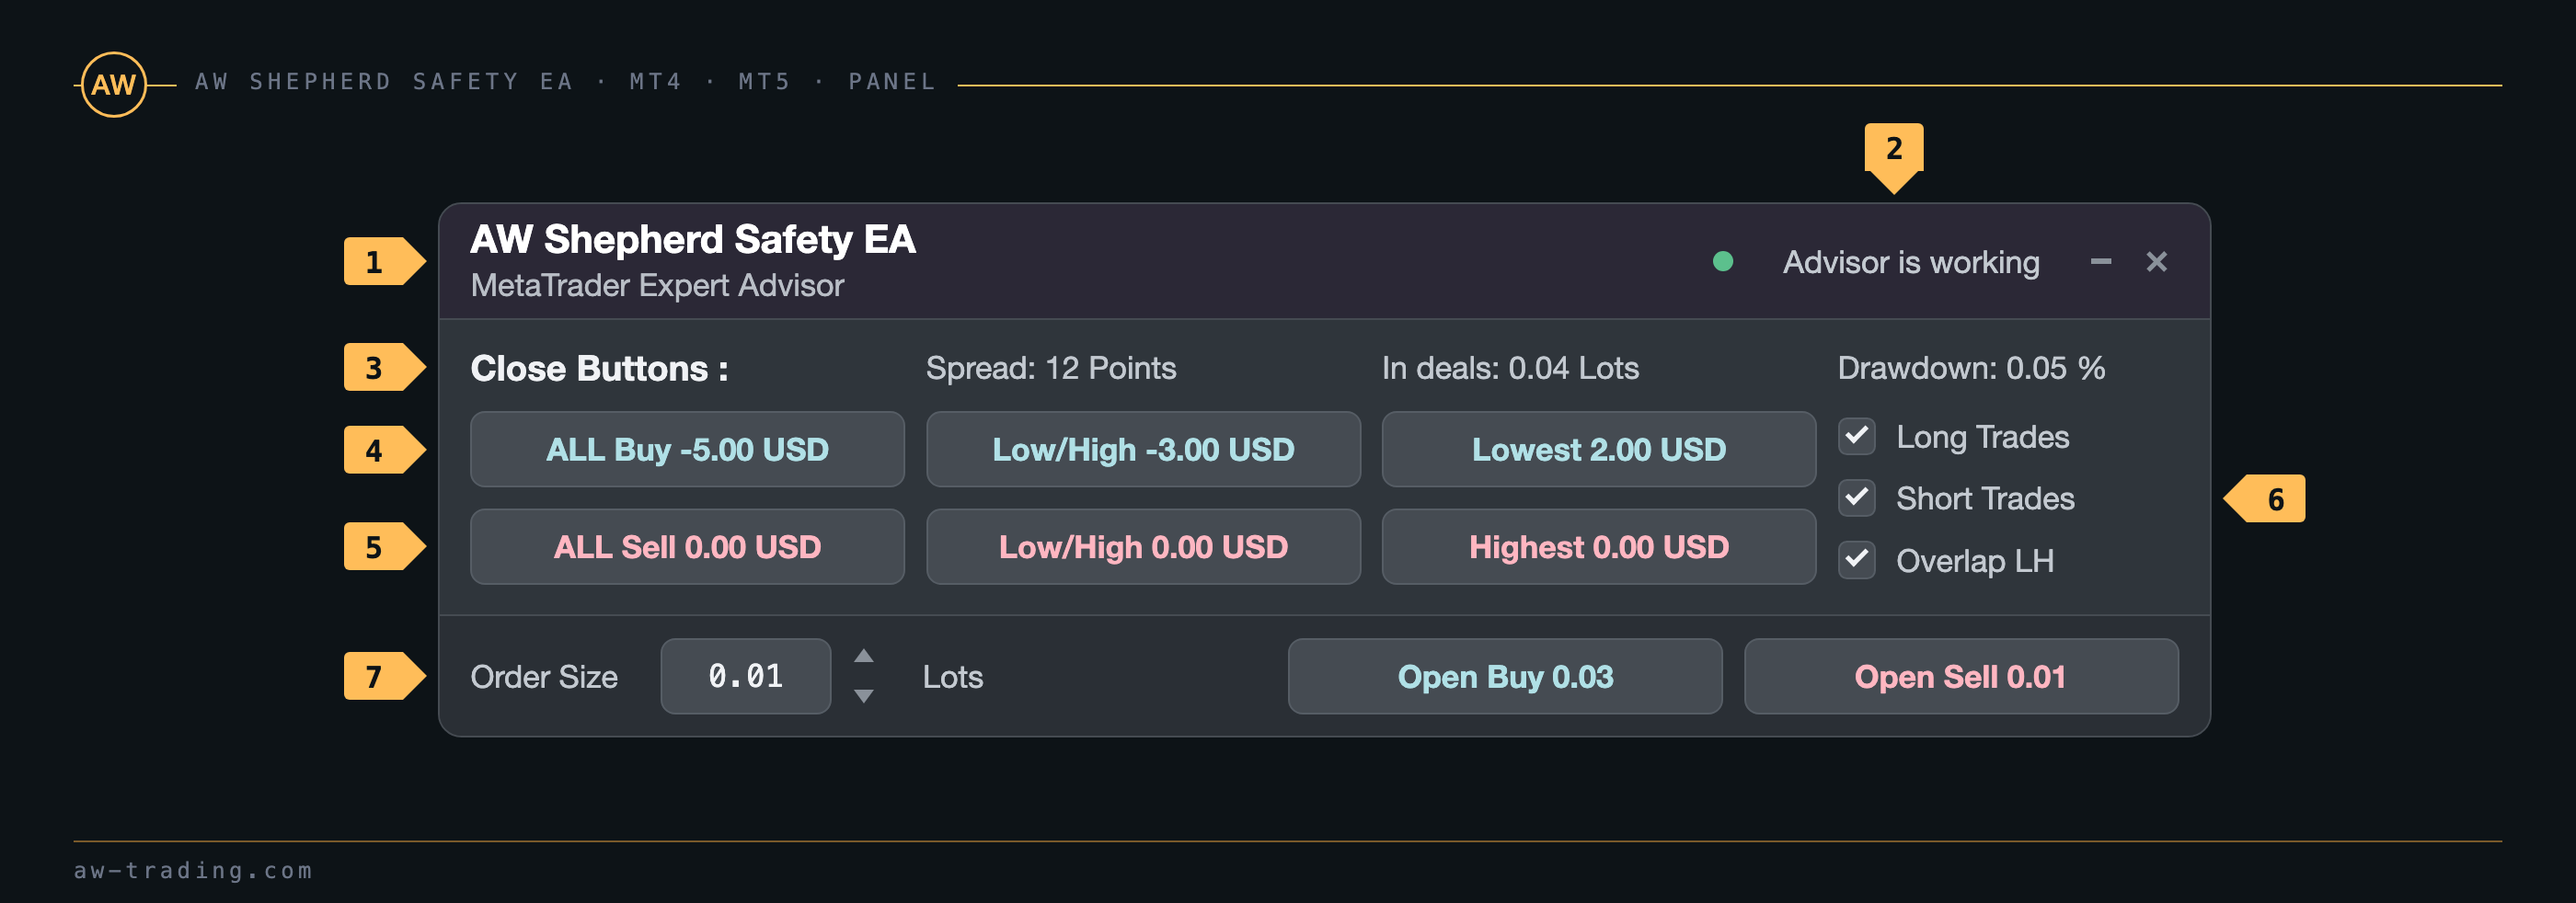
| No. | Panel block |
|---|---|
| 1 | The header and the window buttons. The dash collapses the panel into a pill, the cross removes the EA from the chart after confirmation in a dialog. The open orders stay on the account. |
| 2 | The status with the LED: Advisor is working when trading is allowed, Trades are not allowed when the AutoTrading button in the terminal is off or the EA is not allowed to trade. When trading is not allowed, the panel frame and the LED turn to the alarm color. |
| 3 | Spread in points, In deals - the total volume of the EA's orders on the symbol in lots, Drawdown - the floating loss of these orders as a percentage of the balance. When the orders are in profit, the field shows Growth. |
| 4 | The buy buttons. ALL Buy shows the result of all buys and closes them all. Low/High shows the result of the pair of the lowest and the highest Buy and closes both, section 6. Lowest shows the result of the lowest Buy, which in a drawdown is the last recovery order, and closes it alone. |
| 5 | The sell buttons, mirrored: ALL Sell, Low/High and Highest - the highest Sell, which in a drawdown is the last recovery order of the sells. |
| 6 | The checkboxes. Long Trades and Short Trades allow the EA to open recovery orders in their direction; at startup they follow Allow to open OP_BUY orders and Allow to open OP_SELL orders. Overlap LH enables the overlap of the extreme orders, section 6. A change takes effect immediately and lasts until the EA is restarted. |
| 7 | The open block. At startup the Order Size field holds Size of the first order; the value is entered from the keyboard or with the arrows in increments of the broker's volume step. Open Buy and Open Sell open a market order: if the side has no orders - with the volume from the field, if the side is already open - with the volume of the next recovery order, without waiting for the step and the trend filter. The button label always shows the volume that a click will open. |

| No. | The pill |
|---|---|
| 1 | The logo. The pill sits in place of the panel and does not cover the chart. |
| 2 | The button that expands the panel back. |
| 3 | The status LED: green while working, red when trading is not allowed. The frame of the pill changes color together with the LED. |
The GRAPHICS SETTINGS section sets the color scheme with Color Cheme for Panels, the panel size with Panel size and the font size with Font size; Panel size set to Auto picks the scale by the screen DPI. The panel is shown when Show panel of advisor in the ORDERS SETTINGS section is on: without the panel the EA manages the basket just the same, but the first order can only be opened manually or from another EA.
The button did not open an order. The reason is written to the Experts log: the spread is above Maximum spread in points, there is not enough margin, the volume is outside the symbol limits, it is outside the working hours on Monday or Friday, or the account order limit has been reached.
8. Levels and marks on the chart
The EA draws up to three lines per side on the chart. The lines are recalculated on every tick and move together with the basket; when a side has no orders, its lines are removed.
| Line | Look | What it shows |
|---|---|---|
| TakeProfit Buy, TakeProfit Sell | Solid, gold | The price at which the side closes in profit. In the Basket TakeProfit in points mode - the breakeven plus the points; in the TakeProfit in money and Trailing in money modes - the price at which the side reaches the target amount or the trailing start at the current volume. In the Separate Order TakeProfit in points and Trailing in points modes there is no line: the targets and stops sit in the orders, and the terminal shows them |
| StopLoss Buy, StopLoss Sell | Solid, red | The price at which the side closes at a loss: the StopLoss in money or StopOut in money level at the current volume, or the stop nearest to price that is already placed in the orders after trailing in points or a separate stop |
| Next Buy, Next Sell | Dashed, blue for buys and orange for sells | The price of the next recovery order. The line disappears when the side is turned off with its checkbox or the number of its orders has reached Maximum number of orders |
Close marks. The Show closed profit on chart variable sets how the result of a closed side is labeled: Show images on chart - a badge with the result that stays readable over any candles; Show text on chart - text without a badge; Not Used - no mark. The buy mark is placed above the close bar, the sell mark below it. The marks stay when the panel is collapsed and are removed when the EA is removed from the chart or its settings are changed.
The color of the TakeProfit line and of the marks follows Color Cheme for Panels: on the dark scheme the gold is brighter, on the light one it is deeper, so that it stays readable on a white chart.
9. Filters and limits
Everything below is set in the PROTECTION SETTINGS section and applies to any order the EA sends: both recovery orders and orders from the panel buttons. The limits do not apply to closing orders.
Monday and Friday hours. Start of work time on Mondays and End of work time on Fridays are set in server time in the HH:MM format. On Monday before the start and on Friday after the end the EA opens no orders, to avoid entering on the gaps after and before the weekend. From Tuesday to Thursday there is no time limit. Closes by target and stop work at any time.
Spread. An order is not sent while the current spread is above Maximum spread in points. The check runs on every tick: when the spread is back to normal, a recovery order opens with a delay, while an order from a button has to be sent again.
Slippage. Maximum slippage in points - the allowed deviation of the execution price when opening and closing.
One order per bar. Enable One_recovery_order_per_bar_filter does not allow two recovery orders of one side to be opened on the same bar: the next one waits for a new bar, even if the step and the filter already allow the entry. On lower timeframes this holds back a series of additions on a single price spike.
Basket limits. Maximum number of orders - the largest number of orders of one side, the first one included. Maximum size of orders - the cap on the volume of a single order, including recovery orders and the panel buttons; the volume is also capped by the broker's maximum volume for the symbol.
Margin. Before sending, the EA calculates the margin for the new order and does not send it if there are not enough free funds. The refusal is written to the Experts log with the reason.
10. Input settings
The variable names are given as they appear in the settings window.
ORDERS SETTINGS
| Variable | What it does |
|---|---|
| Size of the first order | The volume of the first order of a side, the initial value of the Order Size field and the base for the volume of recovery orders |
| Orders Magic number | The identifier of the EA's orders, section 11. With a value of 0 the EA manages positions opened manually |
| Comments of the EA's orders | The comment of the EA's orders |
| Allow to open OP_BUY orders | Allows recovery buy orders, the initial state of the Long Trades checkbox |
| Allow to open OP_SELL orders | Allows recovery sell orders, the initial state of the Short Trades checkbox |
| Allow overlap last and first recovery orders | Enables closing the pair of extreme orders, section 6, the initial state of the Overlap LH checkbox |
| Allow overlap after number of orders | Overlap works when the side has more orders than this number |
| Show panel of advisor | Show the panel |
RECOVERY SETTINGS
| Variable | What it does |
|---|---|
| Trend filtering for recovery orders | Without filtering, Parabolic SAR, Two MA or Bullish Bearish candles, section 3 |
| Type of increase orders | Multiplier lots, Add to lots or Static lots, section 3 |
| Minimal step between recovery orders | The step in points from the extreme order of the side to the next recovery order. The smaller the step, the more frequent the additions and the faster the volume of the side grows |
| Multiplier for size of orders | The volume multiplier in the Multiplier lots mode. The larger it is, the faster the breakeven catches up with price and the higher the load on the deposit |
| Increase for Add_Lots | The volume added for each order in the Add to lots mode |
TAKE PROFIT SETTINGS
| Variable | What it does |
|---|---|
| Type of orders TakeProfit | TakeProfit in money, Separate Order TakeProfit in points, Basket TakeProfit in points, Trailing in money or Trailing in points, section 4 |
| TakeProfit in money value | The target of the side in the account currency in the TakeProfit in money mode |
| TakeProfit in points value | The target in points: from the breakeven of the side in the Basket TakeProfit in points mode, from the open price of each order in the Separate Order TakeProfit in points mode |
| Trailing start in money | The result of the side from which Trailing in money starts; the threshold for the pair in the overlap of the extreme orders |
| Trailing step in money | The step of the level move and the allowed pullback in Trailing in money and in the overlap |
| Trailing start in points | The distance of the stop from price in the Trailing in points mode; together with the step it defines when the trailing starts |
| Trailing step in points | The step of the stop move in the Trailing in points mode |
STOP LOSS SETTINGS
| Variable | What it does |
|---|---|
| Type of orders StopLoss | Without StopLoss, StopLoss in money, Separate StopLoss in points or StopOut in money, section 5 |
| StopLoss value in money | The loss of the side in the account currency at which it is closed in the StopLoss in money mode |
| StopLoss value in points | The stop in points from the open price of each order in the Separate StopLoss in points mode |
| StopOut value in money | The total loss of all the EA's orders on the symbol at which everything is closed, the StopOut in money mode |
PROTECTION SETTINGS
| Variable | What it does |
|---|---|
| Maximum slippage in points | The allowed slippage when opening and closing |
| Maximum spread in points | An order is not sent while the spread is above this value |
| Enable One_recovery_order_per_bar_filter | No more than one recovery order of a side per bar, section 9 |
| Maximum size of orders | The cap on the volume of a single order, including recovery orders and the panel buttons |
| Maximum number of orders | The largest number of orders of one side, the first one included |
| Start of work time on Mondays | Server time HH:MM before which no orders are opened on Monday |
| End of work time on Fridays | Server time HH:MM after which no orders are opened on Friday |
INDICATORS - 2MA SETTINGS
| Variable | What it does |
|---|---|
| MAs timeframe | The timeframe of both moving averages of the Two MA filter. Current gives the timeframe of the chart |
| Fast MA period | The period of the fast MA. The smaller it is, the earlier the filter sees a reversal and the more often it gives false permissions |
| Fast MA method | The calculation method of the fast MA |
| Fast MA applied price | The applied price of the fast MA |
| Slow MA period | The period of the slow MA |
| Slow MA method | The calculation method of the slow MA |
| Slow MA applied price | The applied price of the slow MA |
INDICATORS - PARABOLIC SAR SETTINGS
| Variable | What it does |
|---|---|
| SAR timeframe | The timeframe of Parabolic SAR for the filter. Current gives the timeframe of the chart |
| Step SAR | The acceleration step of Parabolic SAR. The larger it is, the faster the dots catch up with price and the more often a reversal occurs |
| Maximum SAR | The acceleration limit of Parabolic SAR |
GRAPHICS SETTINGS
| Variable | What it does |
|---|---|
| Color Cheme for Panels | Dark scheme or Light scheme; together with the panel it changes the color of the TakeProfit line and of the marks |
| Panel size | Auto by screen DPI, Small 100%, Medium 125%, Large 150% |
| Font size | The same scale for the font, Auto follows the panel size |
| Show closed profit on chart | The result mark on the close bar: Show images on chart, Show text on chart or Not Used, section 8 |
11. Identifiers and work on several charts
The EA manages only the orders of its own symbol with the Orders Magic number from the settings. It does not count, add to or close orders with a different Magic on the same symbol, including with the panel buttons. Orders from the panel buttons get the EA's Magic automatically.
Positions opened manually. Manual positions have a Magic of 0. To hand them over to the EA, Orders Magic number is set to 0: from that moment the EA manages all manual positions of the symbol as its own, adds recovery orders to them and closes them by target and stop. Positions opened manually before the EA was attached are picked up the same way.
Positions of another EA. AW Shepherd Safety EA is given the same Orders Magic number as the EA that opens the orders. The second EA must not manage these orders itself: its own TakeProfit, trailing or grid must be turned off, otherwise two EAs will manage one basket by different rules.
On several charts of the same symbol the EA is attached with different Orders Magic numbers, otherwise two copies will manage one basket. On different symbols the Magic can be the same. An MT5 account must be a hedging account: each recovery order is a separate position, while on a netting account the orders merge into one position, and the order counters and the Low/High and Lowest buttons lose their meaning.
Please note. When the EA is removed from the chart, the open orders stay on the account, while the lines, marks and panel are deleted. After a restart the EA picks up the orders with its Magic and continues managing the basket. The TakeProfit and StopLoss already placed in the orders themselves are executed by the broker even without the EA; the targets and stops that the EA calculates itself will not trigger without it.
Buy AW Shepherd Safety EA:
MT5 version
👉 https://www.mql5.com/en/market/product/49436
MT4 version
👉 https://www.mql5.com/en/market/product/25418

AW Trading Software