|


ApeX Trading Console is a professional MT5 Trade Manager, Trade Assistant, Risk Manager, and Position Size Calculator for MetaTrader 5 , with a Built-in Telegram system.
Tab "Trade"
The Trade tab has 3 cards: Account, Market, + New Zone.
All values refer to the symbol of the chart the EA is attached to.
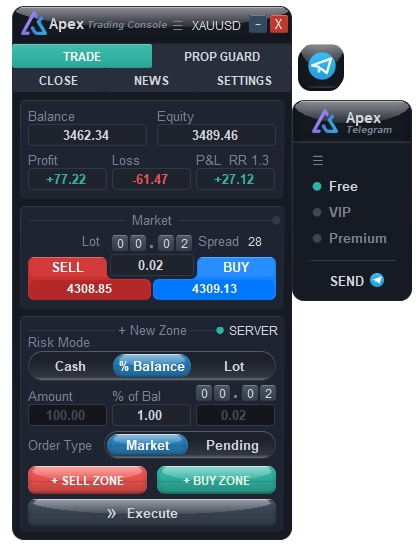
1. Account
- 1.1 Balance — Account balance (excludes floating P/L). Read-only. This is the base for the % Balance risk mode.
- 1.2 Equity — Balance + floating P/L of all open positions (all symbols). Read-only.
- 1.3 Profit — Projected profit if all open trades on this symbol reach their TP — not the current P/L. Includes partial TP levels. Shows "-" if no TP is set.
- 1.4 Loss — Projected loss if those trades hit their SL. Includes partial SL levels. Shows "-" if no SL is set.
- 1.5 P&L — Current floating P/L on this symbol (EA trades + manual trades). The RR in the header = Profit ÷ |Loss|.
2. Market — instant orders
Fires immediately, no confirmation, and sends without SL/TP.
- 2.1 Lot — Lot for the SELL/BUY cards only — independent from the New Zone sizing. Type a value; it is clamped to the symbol's min/max lot.
- 2.2 Digit buttons (4) — Each button is one digit of the lot (tens, units, 0.1, 0.01). Click one to open a 0-9 numpad.
- 2.3 Spread — Current spread of the symbol, in points.
- 2.4 SELL / Bid — Click anywhere on the red card to open a market Sell at the current price with the lot above. The lower number is the live Bid.
- 2.5 BUY / Ask — Click anywhere on the blue card to open a market Buy. The lower number is the live Ask.
- 2.6 Grey dot on the right divider — Drag it to set the panel opacity, 10% (transparent) to 100% (solid).
3. + New Zone — planned trades
Draw the plan first (a draggable Entry / TP / SL box on the chart), then press Execute.
- 3.1 SERVER / VIRTUAL — Where the new zone keeps its SL/TP. Green = SERVER (levels sent to the broker). Orange = VIRTUAL (the EA holds the levels and closes the trade itself). Click to open the Set Virtual dialog — Emergency SL and Virtual Entry are set there. Virtual mode requires MT5 to stay running.
- 3.2 Risk Mode — How the lot of the new zone is calculated. The selected mode enables its input box below; the other two grey out. The final lot is always rounded to the broker's lot step and clamped to min/max.
- Cash — risk a fixed money amount per trade. The lot is derived from the Entry-to-SL distance, so a wider SL means a smaller lot.
- % Balance — risk a percentage of Balance; sized the same way.
- Lot — fixed lot, the SL distance is ignored.
- 3.3 Amount — Money risked per trade — used by Cash mode.
- 3.4 % of Bal — Percent of Balance risked per trade — used by % Balance mode.
- 3.5 Lot value + digit buttons — The fixed lot used by Lot mode. Type it, or set each digit from the numpad. The buttons turn blue while Lot mode is active.
- 3.6 Order Type — Decides what Execute sends.
- Market — fill now; the Entry line follows the live price.
- Pending — wait at the Entry price you dragged to. The EA picks Limit or Stop automatically from where that price sits.
- 3.7 + SELL ZONE / + BUY ZONE — Creates the draft box; nothing is sent yet. Its default SL distance and RR come from the Setting tab. Press the same button again to cancel it, the opposite one to flip direction.
- 3.8 Execute — Sends the draft as a real order, using the lot from the Risk Mode (not the Market card's lot). Grey and inert when there is no draft. Blocked while the Prop Firm Guard lock is active.
━━━━━━━━━━━━━━━━━━━━━━━━━━━━━━
Tab "Prop Guard"
Watches the rules of a funded / prop-firm account and can step in before a rule is broken.
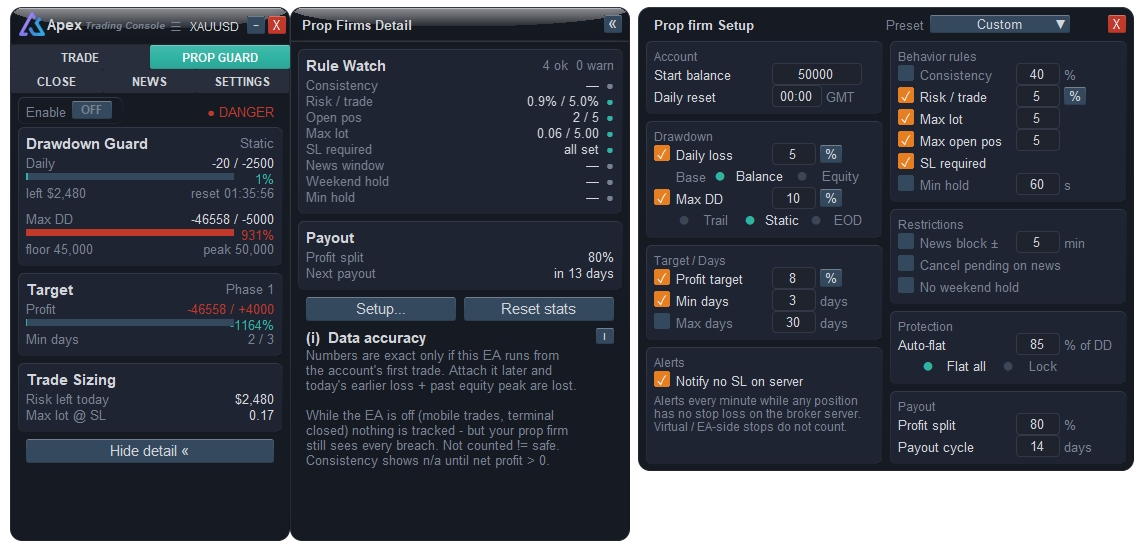
It has three parts: the panel (always visible on this tab), the Prop detail wing (button More detail »), and the Setup window where the rules are configured.
What is enforced and what is only watched — worth knowing before you rely on it.
Only one thing ever acts on your account: Protection (see 6.8 and 7).
- Flat all — closes every position on the account and cancels all pending orders.
- Lock trading — blocks new trades and leaves open ones alone.
- These two are alternatives — you pick one in Setup, not both.
- The pre-trade check (7.3) also refuses orders in advance, and it runs whichever mode you chose.
Only two things can trigger Protection: Daily loss and Max DD. Nothing else does.
One more thing blocks on its own: the News window (6.7). While a high-impact release for that symbol's currencies is inside the ± minutes you set, no new trade can be opened. Positions you already hold are left alone. Tick Cancel pending on news as well and your resting orders on the affected currencies are cleared before that window opens (6.7).
The other seven Rule Watch rules are display only (Consistency, Risk / trade, Open pos, Max lot, SL required, Weekend hold, Min hold). They show you where you stand so you can decide for yourself — they never block a trade and never close one.
1. Top row
- 1.1 Enable — Master switch. ON = the guard monitors and enforces (auto-flat / trade block). OFF = nothing is enforced. Saved immediately.
- 1.2 Status — Overall state, taken from whichever drawdown limit is closest to being hit: SAFE (below 70% of the limit), CAUTION (70-89%), DANGER (90% and above).
2. Drawdown Guard
- 2.1 Mode — Top-right badge showing the Max DD type from Setup: Trailing, Static or EOD.
- 2.2 Daily — Loss so far today / your daily limit. The live side is always equity, so floating losses count too; the reference snapshot taken at the daily reset is either Balance or Equity depending on what you set in 6.3.
- 2.3 Daily bar and % — How much of the daily limit is used. Green, then orange, then red as it fills.
- 2.4 left $ — Money you can still lose today before the daily limit is reached.
- 2.5 reset — Countdown to the next daily reset (reset time is set in Setup, server time).
- 2.6 Max DD — Total drawdown / your maximum limit. It is measured from the start balance (Static) or from the highest equity ever reached (Trailing / EOD).
- 2.7 Max DD bar and % — How much of the maximum limit is used.
- 2.8 floor — The equity level that must not be breached — hit it and the account is gone.
- 2.9 peak — Highest equity recorded; the reference a trailing drawdown follows.
3. Target
- 3.1 Phase — The challenge phase shown on the right of the card title.
- 3.2 Profit — Profit since the start balance / your profit target (equity-based, so floating profit counts).
- 3.3 Bar and % — Progress towards the target.
- 3.4 Min days — Days on which you held at least one position / days required. Turns green once the requirement is met.
4. Trade Sizing
- 4.1 Risk left today — Money still available before the daily limit. Shows an em dash when the daily rule is off.
- 4.2 Max lot @ SL — The largest lot you may take with your Default SL distance, using the risk-per-trade budget, never more than the daily remainder, and capped by the Max lot rule.
5. More detail » (Prop detail wing)
- 5.1 Rule Watch — Eight rules with a live value and a dot: green = within the rule, red = breached, orange = warning, grey = rule switched off. Click a row and its explanation appears at the bottom of the wing.
Seven of the eight rules below are display only. They do not stop a trade or close a position — a red dot still lets you open orders normally. The exception is News window, which really does block new orders (details in its entry below). Automatic closing only ever comes from Protection, triggered by Daily loss or Max DD (see 7).
- Consistency — your best day's profit as a percentage of total profit. The cap is set in 6.6; going over breaks your prop firm's payout rule (fix it by trading more days so total profit grows). Shows n/a until total profit is positive, and refreshes every 30 seconds.
- Risk / trade — the open trade with the largest loss-at-SL, against your per-trade limit.
- Open pos — number of open positions against the maximum.
- Max lot — total volume open against the maximum.
- SL required — "all set", or how many open trades have no stop loss.
- News window — four states:
- blocked (red) — you are inside the ± minutes around a high-impact release, and new trades really are refused through every route: Execute, the Market card, hotkeys, Fill now and Virtual Entry. A message tells you why.
- in 25m — time until the next release, turning orange as the window approaches.
- clear (green) — the calendar answered and there is nothing in the window.
- no data (grey) — there is no calendar to ask (your broker does not provide one, or it has not synced). Nothing can be watched, and nothing is blocked — watch out for yourself.
- Every blocked attempt raises a Trade blocked notification card (toggle it in Notify & Sound) — it lands in your notification history and can reach your phone. Automatic Virtual Entry attempts alert once per blocked window, not once per tick.
Note: it blocks opening only — positions you already hold are not closed for you. - Weekend hold — time left before the weekend while trades are still open.
- Min hold — age of your newest trade against the minimum holding time.
- 5.2 Payout — Your profit split and the countdown to the next payout date.
- 5.3 Setup — Opens the configuration window.
- 5.4 « — Folds the wing away; the panel keeps working.
6. Setup window
- 6.1 Preset — Loads a firm's rule set (FTMO, The5ers, FundedNext, E8 Funding, Alpha Capital, FundingPips, Blueberry Funded, The Funded Trader). Change any value yourself and the preset becomes Custom.
- 6.2 Account — Start balance of the account, and the daily reset time in server time.
- 6.3 Daily loss — On/off, the limit as % or $, and whether it is measured against Balance or Equity.
- 6.4 Max DD — On/off, the limit as % or $, and the type (Trailing / Static / EOD-Trailing). Trailing and EOD measure from your equity high; Static measures from the starting balance.
- 6.5 Target — Profit target (% or $), minimum trading days, maximum trading days.
- 6.6 Behaviour rules — Consistency %, risk per trade, max lot, max open positions, stop loss required, minimum holding time.
- 6.7 Restrictions — News block ± minutes around high-impact events (this one really blocks new orders — see 5.1), Cancel pending on news, and no weekend holding (watch only). No weekend hold is watch-only: it has a live Rule Watch row but never closes a position for you. There is no "no overnight hold" rule in this version.
Cancel pending on news
Deliberately a separate switch from News block ±: the one above only stops you opening something new — this one deletes orders you already placed. You have to tick it yourself; no preset turns it on.
Why delete them: a resting order left in the book when the release lands can fill inside the news minute, which breaks most prop firm rules.
How it runs
- 30 seconds before the news window opens, a window appears listing how many orders will go and which releases caused it. You can drag it out of the way.
- When it reaches zero the orders are cancelled — finished before the window opens, not once you are already inside it.
- Each cancelled order raises a Pending Expired notification.
Two buttons: Cancel pending now does it immediately without waiting out the 30 seconds; Keep my pending keeps everything and skips that release entirely.
Scope
- Only orders whose currencies match the release — a USD event clears gold and EURUSD, while an unrelated EURJPY order stays.
- Covers both broker-side orders and Virtual Entry, including symbols set up from another chart.
- Open positions are never touched — holding through news is still your call.
- With no calendar available (no data) nothing is deleted.
- After Keep my pending, that release stays silent until you re-tick this switch, turn Prop Guard on again, or press Reset stats.
- 6.8 Protection — The percentage of the drawdown limit that triggers protection, and what it does — Flat all or Lock trading.
- 6.9 Alerts — Warn every minute while a trade has no stop loss on the server.
- 6.10 Payout — Your profit split percentage and the payout cycle in days.
7. What protection actually does
- 7.1 Flat all — A countdown window appears for ten seconds, then every position on the account is closed and all pending orders cancelled. The countdown can be stopped three ways:
- Press Cancel while it is running.
- It recovers on its own — when the countdown expires, if drawdown has fallen more than 5 percentage points below your trigger level, it cancels itself (set 90%, recover below 85%, nothing is closed).
- The day rolls over — if the daily reset arrives mid-countdown and the trigger was Daily loss, it cancels itself because a fresh daily budget has started. A Max DD trigger is never cancelled this way, since Max DD does not reset daily.
- 7.2 Lock trading — New trades are blocked at once — Execute and the Market card stop working — while open trades are left alone. The lock clears at the next daily reset.
- 7.3 Pre-trade check — Even before protection triggers, an order is refused if the worst case (current loss + risk of open trades + this new trade) would breach your limit. It checks the Daily loss and Max DD limits only — never the Rule Watch rules.
8. How far the numbers can be trusted
- 8.1 Keep the EA running — Nothing is tracked while the EA is off (terminal closed, trades placed from your phone) — but your prop firm still sees every breach. Not counted is not the same as safe.
- 8.2 Figures are complete only if you start on a fresh account — If you attach part-way through: losses taken earlier today are not counted (that clears tomorrow), and with a Trailing Max DD whose peak was higher before you attached, the drawdown reads lower than it really is. Static is unaffected.
- 8.3 Some values update only while you are looking — Rule Watch, peak and Min days refresh while the Prop Guard tab is open or the wing is unfolded. Leave it closed for a long time and the figures may lag.
- 8.4 Switching accounts — Stored values (peak, daily reference) reset automatically when the login changes.
━━━━━━━━━━━━━━━━━━━━━━━━━━━━━━
Tab "Close"
Closes and cancels trades in bulk, and keeps a watch list that can close them for you.
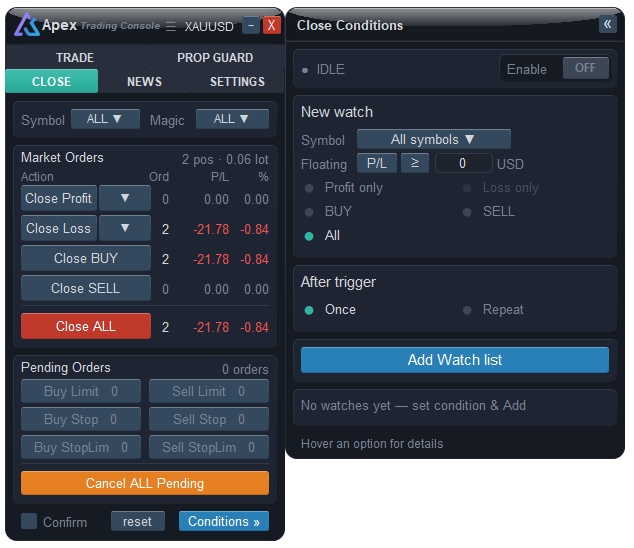
Everything on this tab obeys the filter at the top, and every number is live.
1. Filter
- 1.1 Symbol — ALL, or one symbol. Every count and every button below is limited to it.
- 1.2 Magic — ALL, or one magic number — useful for separating this EA's trades from another EA's or your manual ones.
2. Market Orders
- 2.1 Totals — Next to the card title: how many positions and how much volume match the filter.
- 2.2 Columns — Ord = number of positions in that row, P/L = their money result including swap, % = their Change% exactly as MT5 counts it.
- 2.3 Close Profit — Closes the trades that are in profit.
- 2.4 Condition next to Close Profit — Opens a picker: By USD (20, 50, 100 or your own value) or By % (1, 2, 5 or your own), and All for no threshold. Only trades at or above the threshold are counted and closed.
- 2.5 Close Loss — Closes the trades that are losing, with the same kind of threshold.
- 2.6 Close BUY / Close SELL — Closes that side.
- 2.7 Close ALL — Below the divider, in red: closes every position that matches the filter.
Trades whose market is closed are skipped and reported afterwards.
3. Pending Orders
- 3.1 Type buttons — Buy Limit, Sell Limit, Buy Stop, Sell Stop, Buy StopLim, Sell StopLim, each with its count. Click one to cancel every order of that type. Grey means none of that type. Virtual pending zones are counted and cancelled too.
- 3.2 Cancel ALL Pending — Cancels every pending order that matches the filter.
4. Bottom row
- 4.1 Confirm — Tick it and every close or cancel on this tab asks first, telling you how many trades it will affect.
- 4.2 reset — Puts the filter back to ALL and clears both conditions.
- 4.3 Conditions » — Opens the Close Conditions wing.
5. Close Conditions (auto-close watch list)
Each watch runs on its own and closes trades for you when its condition is met.
- 5.1 Enable — Master switch for the whole list. With it off, watches are kept but never fire.
- 5.2 Symbol — The symbol this watch measures, or All symbols for the whole account.
- 5.3 Floating — What to measure: P/L in money, or % as Change%.
- 5.4 Operator and value — ≥ with a positive value takes profit; ≤ with a negative value cuts a loss.
- 5.5 Scope — Which trades are measured and closed: Profit only (closes winners, leaves losers), Loss only, BUY, SELL, or All (net of everything).
- 5.6 After trigger — Once fires one time and removes the watch; Repeat re-arms and fires again once the condition clears.
- 5.7 Add Watch list — Adds the condition to the table below.
- 5.8 Watch rows — Each row shows its symbol, its condition, Once or Repeat, and a live bar with the current floating value. X deletes the watch.
- 5.9 Help line — Point at any control and the bottom line of the wing explains it.
━━━━━━━━━━━━━━━━━━━━━━━━━━━━━━
Tab "News"
The economic calendar and the alerts that warn you before an event.
1. Economic Calendar
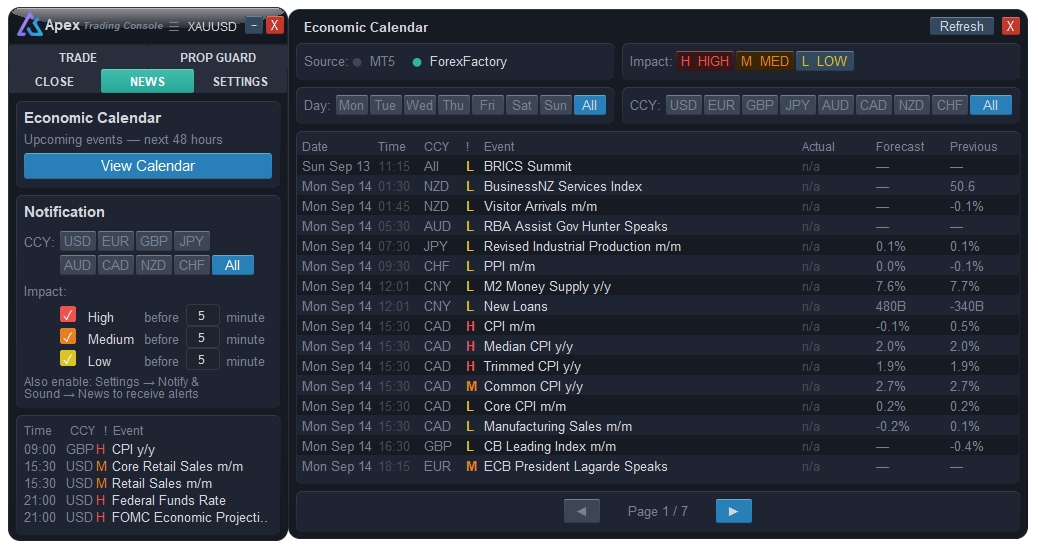
- 1.1 Upcoming events — The card covers the next 48 hours.
- 1.2 View Calendar — Opens the full calendar window: every event with its time, currency, impact, forecast, previous and actual value, with filters and paging. It refreshes itself every three minutes while open.
2. Notification
Alerts you a chosen number of minutes before an event starts.
- 2.1 CCY — The currencies you want to be warned about: USD, EUR, GBP, JPY, AUD, CAD, NZD, CHF. Selected ones are blue.
- 2.2 All — Warn on every currency instead of a hand-picked list.
- 2.3 Impact checkboxes — Turn the alert on separately for High, Medium and Low impact events.
- 2.4 minute — How many minutes before the event that impact level is announced. Each level has its own value, so you can be warned early for High and late for Low.
- 2.5 Reminder line — The alert is only delivered if News is also enabled in Setting → Notify & Sound, where you choose screen card, mobile push and sound.
3. Preview table
- 3.1 Rows — The next five events: time, currency, impact and name — a quick look without opening the calendar window.
━━━━━━━━━━━━━━━━━━━━━━━━━━━━━━
Tab "Setting"
Defaults for new zones, what is drawn on the chart, and the buttons that open the other setup windows.
Every setting here is saved and restored automatically.
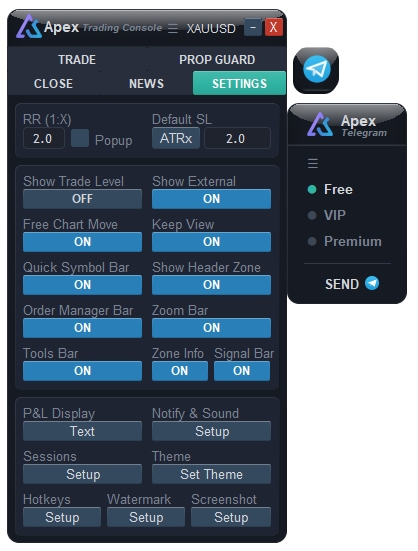
1. Inputs
- 1.1 RR (1:X) — The reward-to-risk a new zone starts with: its TP is placed at the SL distance multiplied by this number.
- 1.2 Popup — Tick it and the Risk:Reward window opens beside every draft zone you create, so you can pick the RR straight away.
- 1.3 Default SL — PT / ATRx — The unit of the stop distance for a new zone. PT = a fixed number of points; ATRx = the ATR of the current timeframe multiplied by your factor, so the box adapts to volatility.
- 1.4 Default SL value — The number of points, or the ATR multiplier, depending on the unit above.
2. Display
- 2.1 Show Trade Level — MT5's own entry, SL and TP lines on the chart.
- 2.2 Show External — Draw zone boxes for trades opened outside this panel, by hand or by another EA.
- 2.3 Free Chart Move — Lets you drag the chart vertically, moving the price scale freely instead of MT5's fixed one.
- 2.4 Keep View — Keeps the same moment centred on screen when you change timeframe or zoom, instead of jumping to the latest bar.
- 2.5 Quick Symbol Bar — A floating bar for switching symbol quickly, listing the ones you have trades in.
- 2.6 Show Header Zone — The header strip on top of every zone box.
- 2.7 Order Manager Bar — The floating bars for open orders, order history and notification history.
- 2.8 Zoom Bar — The floating zoom and fit controls.
- 2.9 Tools Bar — The floating tools bar: indicators, performance table, currency strength, candle and price alerts.
- 2.10 Zone Info — The information overlay drawn inside a zone box.
- 2.11 Watermark — The large symbol and timeframe watermark in the middle of the chart, with the countdown to the bar close.
3. Setup
- 3.1 P&L Display — How the floating result is shown on each zone: Badge (a coloured pill) or Text (plain figures).
- 3.2 Notify & Sound — Opens the notification table: for every event you choose a screen card, a mobile push and a sound. News alerts and price alerts are switched on here as well.
- 3.3 Sessions — Opens the session window: the master switch plus Sydney, Tokyo, London and New York, each with its own colour.
- 3.4 Theme — Opens the theme window: the panel and chart colour scheme, including candle presets and a custom colour picker.
- 3.5 Hotkeys — Opens the hotkey window, where every shortcut can be reassigned or switched off.
- 3.6 Screenshot — Opens the screenshot window: resolution, file format, whether the panel and zones are hidden in the picture, and multi-timeframe capture.
━━━━━━━━━━━━━━━━━━━━━━━━━━━━━━
Popup "Zone Options"
The control centre of a single zone. Open it by clicking the ☰ label on the zone box.
The title shows which zone you are editing, and the buttons change with the zone's state: draft, pending or open position. A green dot on a button means that feature already holds a setting.
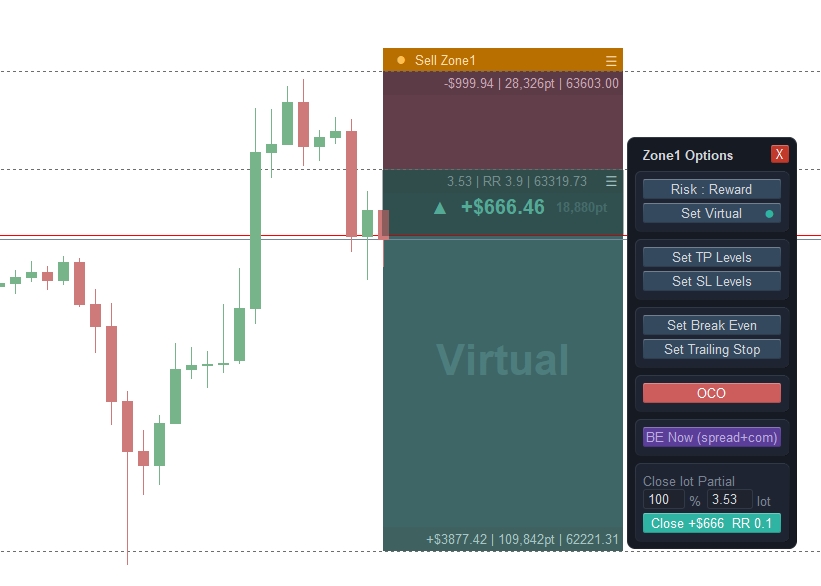
1. Every zone
- 1.1 Risk : Reward — Opens the Risk:Reward window — set the TP from an RR number, or place the SL from ATR .
- 1.2 Set Virtual — Opens the Set Virtual window: whether this zone's stops live on the broker's server or inside the EA. The dot turns green once Virtual is on.
- 1.3 Set TP Levels — Opens the Take Profit table — several partial take-profits with their own lot share.
- 1.4 Set SL Levels — Opens the Stop Loss table — several partial stops.
- 1.5 Set Break Even — Opens the Break Even window: when and how the stop is moved to entry.
- 1.6 Set Trailing Stop — Opens the Trailing Stop window: ten ways to trail the stop behind price.
- 1.7 OCO — Opens the OCO window, where this zone cancels or closes other orders once it fills or closes. Two dots sit on the button: green = this zone owns links, purple = it is tied two-way to another zone, orange = another zone acts on it one-way.
2. Open position only
- 2.1 BE Now (spread+com) — Moves the stop to breakeven immediately, offset far enough to cover spread and commission.
- 2.2 Close lot Partial — Two linked boxes, % and lot: type either one and the other follows. It starts at the full remaining volume, and the value is snapped to the broker's lot step.
- 2.3 Close — Closes the volume set above. The button itself shows what you are about to bank — the money result of that part and the RR reached — and is green or red accordingly.
3. Pending order only
- 3.1 Cancel Pending at Price — ON = the order is dropped by itself once price reaches a chosen level, so a setup that has already run away is not filled late. Drag that level on the chart.
- 3.2 Open at Market — Turns the pending order into a market order right now. If price has left the box, you are asked whether to re-anchor it first.
- 3.3 Cancel Pending — Removes the pending order and its zone.
4. Draft zone
- 4.1 Buttons — A draft that has not been sent yet shows only Risk : Reward, Set Virtual, Set TP Levels and Set SL Levels — everything you plan before the order exists.
- 4.2 Cancel New Zone — Discards the draft box.
━━━━━━━━━━━━━━━━━━━━━━━━━━━━━━
Popup "Risk : Reward"
Sets the take profit from a reward-to-risk number, and can place the stop loss at a volatility distance.
Opened from Risk : Reward in Zone Options, or automatically beside every new draft when Popup is ticked in the Setting tab.

1. RR buttons 1 to 10
- 1.1 Number — Click a number and the take profit jumps to that reward-to-risk, measured from the entry and the current stop distance. On an open trade or a pending order the change is sent to the broker straight away; on a draft the box just redraws.
- 1.2 What the zone remembers — The number you press becomes that zone's RR, so if you later drag the TP or SL across the entry and flip the direction, the box is rebuilt with the same reward-to-risk.
2. Stop Loss
Places the stop where the market suggests, instead of at a fixed distance.
- 2.1 Method — ATR = a volatility distance; ZigZag = the last swing high or low; Fractals = the last fractal point.
- 2.2 Timeframe — Which timeframe the method reads. It starts on the chart's own timeframe.
- 2.3 mult — The ATR multiplier. Greyed out for ZigZag and Fractals, which have no multiplier.
- 2.4 offset — Extra points beyond the level found, so the stop sits behind the swing rather than on it.
- 2.5 Apply — Calculates the level and moves the stop there. The take profit keeps its RR, so it moves with it.
3. Delete
- 3.1 Delete TP — Removes the take profit from this zone, after a confirmation.
- 3.2 Delete SL — Removes the stop loss, after a confirmation. Mind that the trade is then unprotected.
━━━━━━━━━━━━━━━━━━━━━━━━━━━━━━
Popup "Set Virtual"
Decides where a zone's stops and entry actually live: on the broker's server, or inside the EA.
Opened from Set Virtual in Zone Options, or from the SERVER / VIRTUAL button in the Trade tab for the next zone you create.
Anything virtual is watched by the EA, so MT5 must stay running with the EA attached.
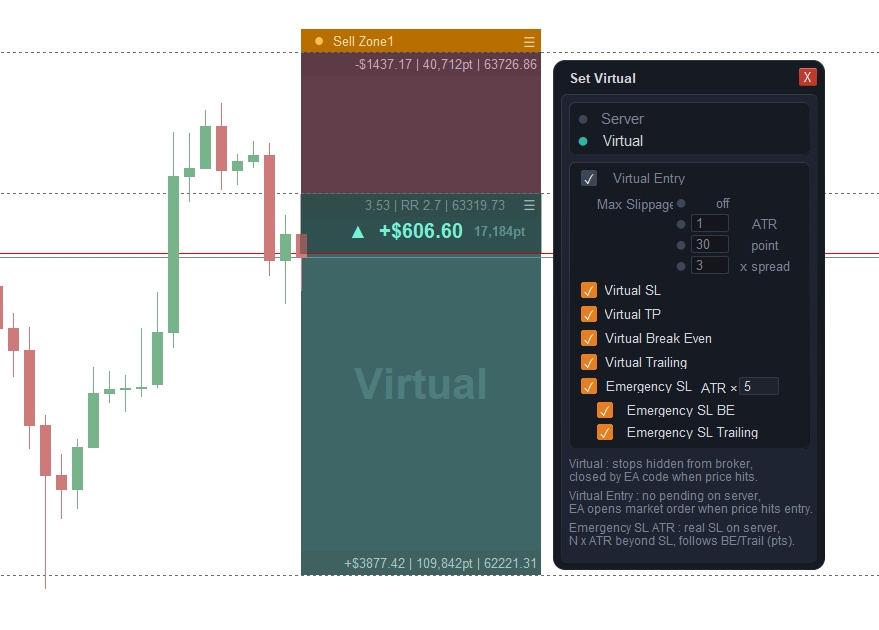
1. Mode
- 1.1 Server — Normal behaviour: the stop loss and take profit are sent to the broker and stay there even if your terminal is closed.
- 1.2 Virtual — The levels are kept by the EA and never reach the broker — nothing on the server shows where you exit. The EA closes the trade itself when price gets there.
2. Virtual mode options
- 2.1 Virtual Entry — For pending orders: no order is placed on the server at all. The EA watches price and opens at market when your entry is reached.
- 2.2 Max Slippage — How far past the entry the EA still accepts a virtual-entry fill: off (always fill), ATR (a multiple of ATR), point (a fixed number of points) or x spread (a multiple of the current spread). Each unit keeps its own value.
- 2.3 Virtual SL — The stop loss stays hidden and is executed by the EA.
- 2.4 Virtual TP — The take profit stays hidden and is executed by the EA.
- 2.5 Virtual Break Even — Break-even moves happen on the hidden stop instead of on the server.
- 2.6 Virtual Trailing — Trailing moves the hidden stop instead of the server one, so the broker never sees it creep.
Anything you leave unticked keeps working the normal way, on the server.
3. Emergency SL
- 3.1 Emergency SL — Available once Virtual SL is on: a real stop is still placed on the server, but far behind your hidden one. It is your safety net if the terminal, the power or the internet dies.
- 3.2 ATR × — How far behind the real stop sits, as a multiple of ATR.
- 3.3 Emergency SL BE — The emergency stop follows break-even moves as well, keeping the same gap.
- 3.4 Emergency SL Trailing — The emergency stop follows trailing moves too.
━━━━━━━━━━━━━━━━━━━━━━━━━━━━━━
Popup "Take Profit Levels"
Splits one trade into several take profits, each closing part of the position.
Opened from Set TP Levels in Zone Options. Every level also draws a draggable line on the chart, and the table follows the line as you move it.

1. Columns
- 1.1 Lv — The level's name, numbered by price: TP1 is the one price reaches first.
- 1.2 Price — Where the level sits. Drag its line on the chart to change it.
- 1.3 Pts — Distance from the entry in points.
- 1.4 Profit — What that level banks in money, for the lot it closes.
- 1.5 RR — The reward-to-risk reached at that price. Type a number here and the level moves to match it.
- 1.6 % — How much of the remaining position this level closes. Editable.
- 1.7 Close lot — The same share written as a lot size. Editable — the two follow each other.
- 1.8 Remain — What is still open after this level is hit, which is the base of the next level.
- 1.9 × — Deletes the level and its line.
2. Below the table
- 2.1 Total — The sum of all shares, with a tick when it is sound and a warning when it goes over 100%.
- 2.2 + Add TP — Adds a level halfway between the current price and the main take profit, ready to be dragged.
3. Good to know
- 3.1 Frozen lots — The lot of a level is fixed when you add or edit it, so changing one level never silently resizes the others.
- 3.2 Triggered levels — A level that has already fired is greyed out and can no longer be edited or deleted.
- 3.3 Shared position — Take-profit and stop-loss levels close the same position, so their lots are counted against one pool.
━━━━━━━━━━━━━━━━━━━━━━━━━━━━━━
Popup "Stop Loss Levels"
Splits the exit on the losing side into several stops, each closing part of the position — a way to scale out of a trade that is going wrong instead of taking the whole loss at once.
Opened from Set SL Levels in Zone Options. Every level draws a draggable line on the chart.

1. Columns
- 1.1 Lv — The level's name, numbered by price: SL1 is the one price reaches first.
- 1.2 Price — Where the level sits. Drag its line on the chart to change it.
- 1.3 Pts — Distance from the entry in points.
- 1.4 Loss — What that level costs in money, for the lot it closes.
- 1.5 RR — The reward-to-risk at that price, shown for reference only.
- 1.6 % — How much of the remaining position this level closes. Editable.
- 1.7 Close lot — The same share written as a lot size. Editable — the two follow each other.
- 1.8 Remain — What is still open after this level is hit.
- 1.9 × — Deletes the level and its line.
2. Below the table
- 2.1 Total — The sum of all shares, with a warning when it goes over 100%.
- 2.2 + Add SL — Adds a level between the current price and the main stop, ready to be dragged. The EA keeps it on the correct side of the entry.
3. Good to know
- 3.1 Executed by the EA — Partial stops are handled by the EA on every tick, not by the broker, so they need MT5 to be running. Your main stop loss stays on the server as usual.
- 3.2 Shared position — Stop and take-profit levels draw from the same volume, so the remaining lot is always counted from what is really left.
━━━━━━━━━━━━━━━━━━━━━━━━━━━━━━
Popup "Break Even"
Moves the stop loss to the entry price once the trade has earned enough, so the position can no longer lose.
Opened from Set Break Even in Zone Options. Every change applies immediately — there is no Save button.

1. Choosing the type
The cards on the left decide what triggers the move. Click one to select it, click it again to clear it.
- 1.1 BE at Points — Move the stop when floating profit reaches N points.
- 1.2 BE at Profit — Move the stop when floating profit reaches N in money.
- 1.3 BE at RR — Move the stop when the reward-to-risk reaches N.
- 1.4 BE at Level — Move the stop when price reaches one of your take-profit levels.
- 1.5 BE at Candle — Move the stop after N candles in a row close beyond the breakeven price on a chosen timeframe — it waits for the move to hold, not just to touch.
2. Top row
- 2.1 Enable — Arms break-even for this zone. Changing the type while it is on asks first, because it switches itself off.
- 2.2 Reset — Puts every field back to its default.
- 2.3 Example — Shows a small diagram of the selected type.
3. BE + Offset
Where the stop actually lands, since the entry price alone still loses the trading costs.
- 3.1 Spread — Points added to cover the spread.
- 3.2 Commission — Money to cover the commission, converted to points for you.
- 3.3 Buffer — Extra points of your own, so the stop sits slightly in profit.
- 3.4 Auto / Manual — Auto reads the spread and commission from MT5 and locks the boxes; Manual lets you type your own numbers.
4. Move Condition
- 4.1 Value — The trigger for the selected type: points, money, R, a TP level number, or a number of candles.
- 4.2 Timeframe — For BE at Candle: which candles are counted. Pick it from the ☰ list.
- 4.3 ☰ picker — For BE at RR and BE at Level: choose the R value or the TP level from a list instead of typing it.
5. Partial Close Break Even (optional)
- 5.1 ON / OFF — Also close part of the position at the moment the stop moves to breakeven — bank something and let the rest run risk-free.
- 5.2 Close lot / % — How much to close, as a lot or as a percentage. The two boxes follow each other.
━━━━━━━━━━━━━━━━━━━━━━━━━━━━━━
Popup "Trailing Stop"
Follows the stop loss behind price as the trade moves your way. Ten methods are available; you pick one per zone.
Opened from Set Trailing Stop in Zone Options. Changes apply immediately. A zone cannot run Break Even and BE + Trailing at the same time — the popup says so and asks you to clear one.
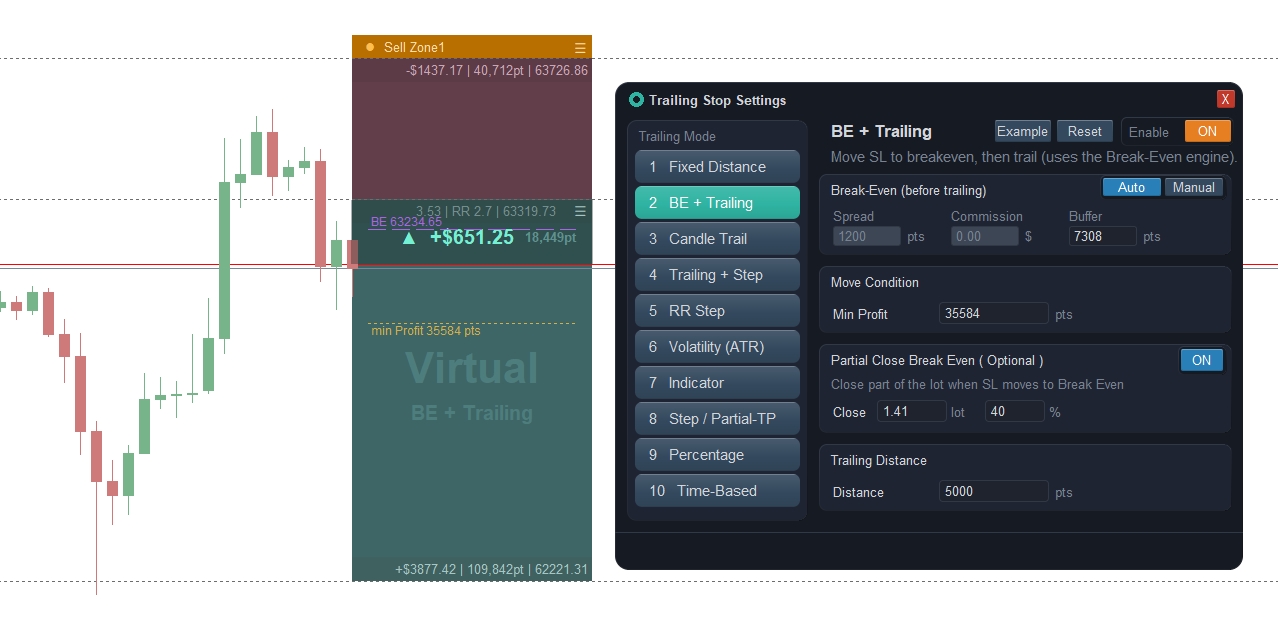
1. Top row
- 1.1 Enable — Arms trailing for this zone. Switching method while it is on turns it off and asks you to arm it again, so a half-finished setting never runs.
- 1.2 Reset — Clears every trailing setting on this zone.
- 1.3 Description line — Under the title, the selected method is explained in one sentence, and warnings appear here in red.
2. Trailing Mode
- 2.1 Fixed Distance — The stop trails a fixed number of points behind price.
- 2.2 BE + Trailing — Move to breakeven first, then trail — it uses the Break Even engine for the first step.
- 2.3 Candle Trail — Put the stop at the low (Buy) or high (Sell) of the last N candles on a chosen timeframe, with an offset for wicks.
- 2.4 Trailing + Step — Trail at a fixed distance, but only re-move the stop once price has advanced a full step — fewer modifications. It can also wait for a bar to close first.
- 2.5 RR Step — Lock the stop one step higher each time price gains a set number of R, keeping it a chosen number of R behind.
- 2.6 Volatility (ATR) — The gap is ATR multiplied by your factor, so it widens in fast markets and tightens in quiet ones.
- 2.7 Indicator — The stop follows an indicator line: MA, Parabolic SAR, ATR band or ZigZag, on a timeframe you choose.
- 2.8 Step / Partial-TP — Move the stop to each take-profit level and close a part of the position as price advances — the amber lines on the chart set where the stop locks after each level.
- 2.9 Percentage — The gap is a percentage of price, so it grows as price rises.
- 2.10 Time-Based — Start trailing, tighten it, or act on the trade after a set time has passed.
3. Fields you will meet
- 3.1 Distance — The gap kept between price and the stop, in points.
- 3.2 Step — How far price must advance before the stop is moved again. A larger step means fewer, bigger moves.
- 3.3 Start trailing — When trailing begins: Immediate, After Profit (once the trade is in profit) or Manual (after a number of points you type).
- 3.4 TF and ☰ — The timeframe used by candle, bar-close and indicator methods; the ☰ button opens the list.
- 3.5 Offset — Extra points beyond the level found, so the stop is not sitting exactly on a high, low or indicator line.
- 3.6 Period and Multiplier — For ATR methods: the bars used to measure volatility, and how many ATRs wide the gap is.
- 3.7 R basis and 1R — For RR Step: Auto takes 1R as entry-to-initial-stop, or you can type a fixed number of points.
- 3.8 Behavior, Time basis, Delay, Duration, Action — For Time-Based: what should happen, measured in minutes or in bars of a timeframe.
━━━━━━━━━━━━━━━━━━━━━━━━━━━━━━
Popup "OCO" — One Cancels / Closes the Other
Links one zone to others, so that when this zone fires the linked orders are cancelled or closed automatically.
Opened from the OCO button in Zone Options. Targets may sit on other symbols — one running EA watches them all and acts by ticket.
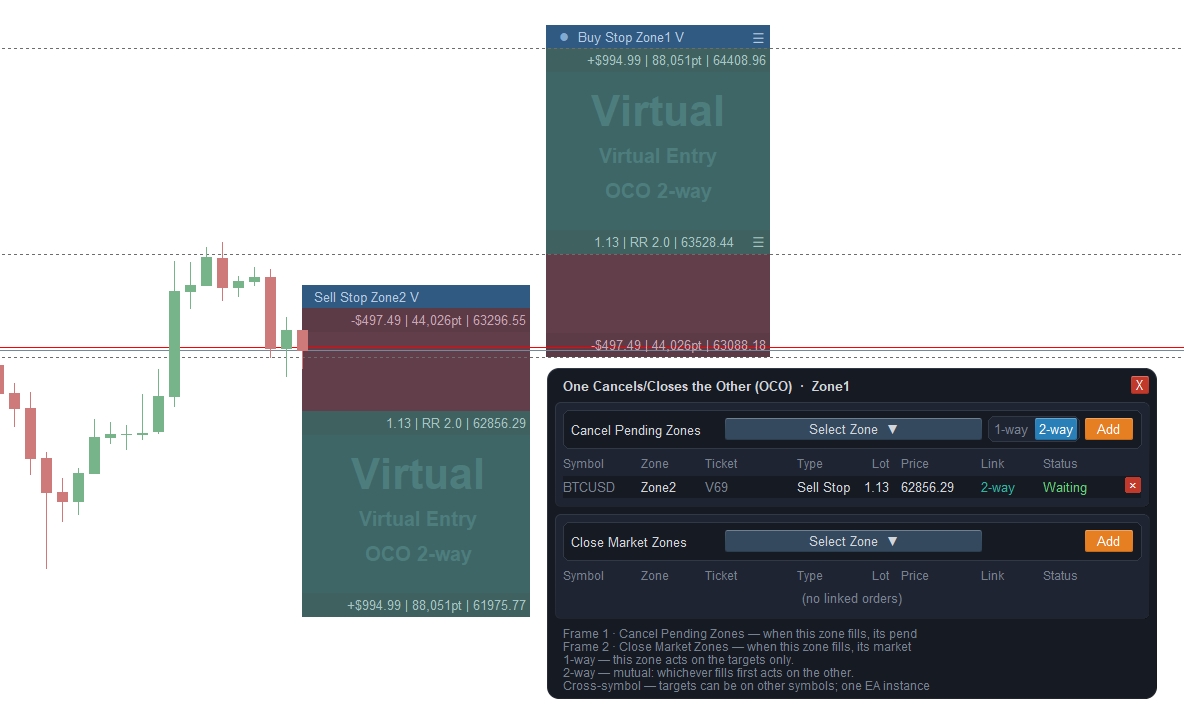
1. The two frames
- 1.1 Cancel Pending Zones — The pending orders listed here are cancelled when this zone fires. Classic use: two setups on the same idea, and whichever triggers first kills the other.
- 1.2 Close Market Zones — The open positions listed here are closed when this zone fires — a reversal order that flattens the old trade as it enters, for example.
2. Adding a target
- 2.1 Select Zone — Opens a picker listing the available zones, grouped by symbol.
- 2.2 Add — Puts the chosen zone into the list of targets.
- 2.3 1-way / 2-way — For a pending zone: 1-way means this zone acts on the target and nothing acts back; 2-way is mutual — whichever fills first acts on the other.
- 2.4 TP / SL — For an open position: which exit fires the link, the take profit or the stop loss. So you can close the other trade only when this one wins, or only when it loses.
3. The target table
- 3.1 Symbol — The target's symbol; grey when it is not the chart you are on.
- 3.2 Zone — The target's zone number.
- 3.3 Ticket — The order or position ticket it is bound to — the link survives renumbering because it follows this.
- 3.4 Type — Buy, Sell, or the pending type.
- 3.5 Lot and Price — The target's volume and its entry price.
- 3.6 Link — 1-way or 2-way.
- 3.7 Status — Whether the link is still armed, or has already fired.
- 3.8 × — Removes that target. On a 2-way link the other side is removed as well.
4. Good to know
- 4.1 Fires once — A link acts a single time; afterwards it is marked as fired and is not repeated.
- 4.2 Needs the EA running — OCO is watched by the EA, not by the broker, so MT5 must stay open.
- 4.3 Virtual orders — Virtual pending zones can be linked exactly like real ones, including across symbols.
━━━━━━━━━━━━━━━━━━━━━━━━━━━━━━
Popup "Order Manager"
One table of everything that is currently live — open positions or pending orders — with filters and a single button to close what the filter selected.
Opened from the ☰O button on the Order Manager bar.
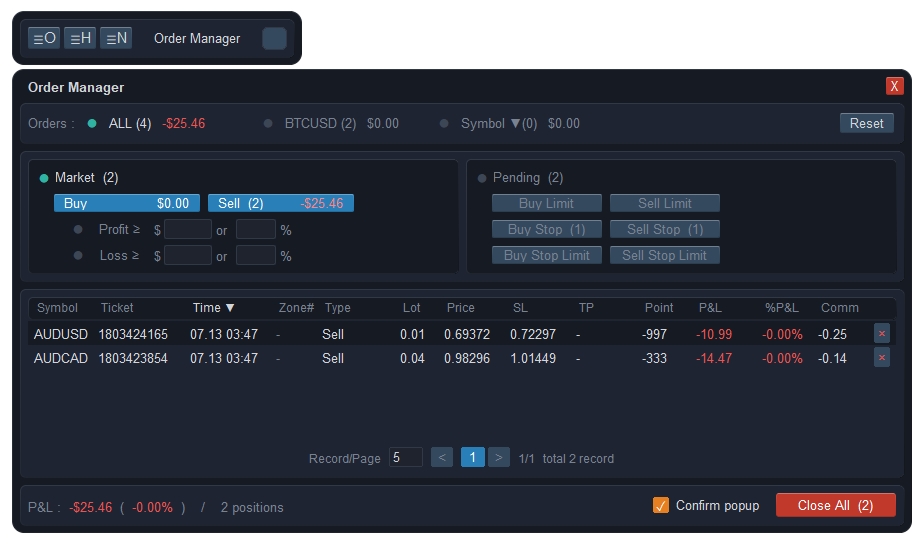
1. Orders (scope)
- 1.1 All — Every symbol in the account.
- 1.2 Current chart — Only the symbol of the chart you are on.
- 1.3 Symbol — One symbol you pick from the list.
- 1.4 Reset — Clears the scope and all filters below.
2. Market
- 2.1 Buy / Sell — Show one side only, or leave both off for everything.
- 2.2 Profit ≥ — Keep only trades earning at least this much, in money or in percent.
- 2.3 Loss ≥ — Keep only trades losing at least this much, in money or in percent.
3. Pending
- 3.1 Type — Buy Limit, Sell Limit, Buy Stop, Sell Stop, Buy Stop Limit, Sell Stop Limit — tick any combination.
4. The table
- 4.1 Columns — Symbol, Ticket, Time, Zone#, Type, Lot, Price, SL, TP, Point, P&L, %P&L and Comm.
- 4.2 Sorting — Click a column header to sort by it; click again to reverse.
- 4.3 × on a row — Closes that position, or cancels that pending order.
- 4.4 Record/Page and < > — How many rows per page, and the page buttons; the total count is shown on the right.
5. Footer
- 5.1 Summary — How many rows the filter matched and their combined result.
- 5.2 Confirm popup — Ask before the bulk button runs.
- 5.3 Close All (N) — Closes or cancels every row the filter matched — the number on the button is exactly what will be acted on.
━━━━━━━━━━━━━━━━━━━━━━━━━━━━━━
Popup "Notify & Sound"
One table deciding how you are told about every event: a card on screen, a push to your phone, a sound, or nothing.
Opened from Setup next to Notify & Sound in the Setting tab.

1. The three columns
- 1.1 Screen — A notification card in the corner of the chart. Cards stack and fade by themselves, and every one of them is also kept in Notify History.
- 1.2 Mobile — A push notification to the MetaTrader app on your phone.
- 1.3 Sound — Click the cell to pick a sound from the terminal's own sound files, or None.
2. Events — Orders
- 2.1 Position Opened — A market position was opened.
- 2.2 Pending Filled — A pending order was triggered.
- 2.3 SL — A stop loss closed a trade.
- 2.4 TP — A take profit closed a trade.
- 2.5 Partial TP — One of your TP levels closed part of a position.
- 2.6 Partial SL — One of your SL levels closed part of a position.
- 2.7 Break Even — The stop was moved to breakeven.
- 2.8 Trailing — Trailing moved the stop.
- 2.9 Pending Expired — A pending order expired or was cancelled.
3. Events — System
- 3.1 Emergency SL — The broker-side safety stop of a virtual setup was hit.
- 3.2 OCO Triggered — An OCO link cancelled or closed its targets.
- 3.3 Failed — An order was rejected, with the broker's reason — worth leaving on.
- 3.4 Alert — One of your price alert lines was crossed.
- 3.5 News — An economic event is approaching, as configured in the News tab.
4. Events — Objects, Time, Prop Guard
- 4.1 Trend Line / Rectangle / Horizontal Line — Price touched a line or box you drew on the chart. The EA's own drawings are ignored.
- 4.2 Candle Close — A candle is about to close, as configured in the Candle Alert window.
- 4.3 No SL on server — Repeats every minute while any open trade has no stop loss on the server.
5. Mobile setup help
- 5.1 How to set up mobile notifications — Opens a panel with the steps: read your MetaQuotes ID from the phone app (Settings > Messages), then in desktop MT5 open Tools > Options > Notifications, tick Enable Push Notifications, paste the ID and press Test.
━━━━━━━━━━━━━━━━━━━━━━━━━━━━━━
Popup "Currency Performance" (☰P)
A grid of the 28 major pairs against several timeframes, so you can see in one glance what is moving and which way.
Opened from ☰P on the Tools bar.
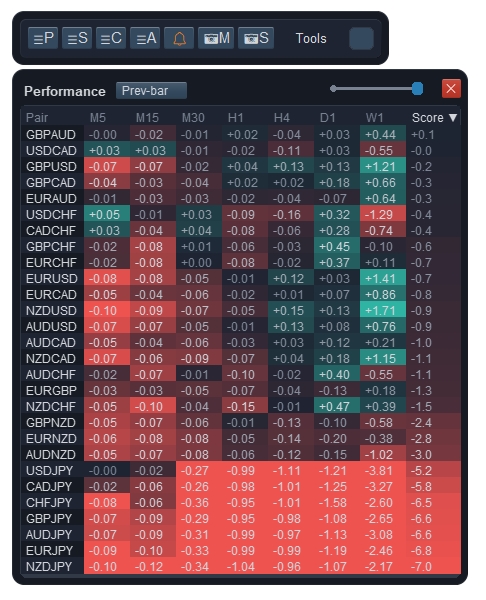
1. The table
- 1.1 Rows — The 28 major currency pairs.
- 1.2 Columns — One per timeframe, showing the change over that period.
- 1.3 Cell colours — Green for a rise, red for a fall, deeper as the move gets bigger — the strong and weak sides of the market stand out without reading numbers.
- 1.4 Sorting — Click a column header to rank the pairs by that timeframe.
2. Header
- 2.1 Opacity slider — The whole window is drawn on canvas, so it can be made semi-transparent and left over the chart while you work.
- 2.2 X — Closes it. Drag the title strip to move it.
3. Good to know
- 3.1 Shared figures — This table and Currency Strength are computed from the same data, refreshed together, so the two never disagree.
- 3.2 Symbols must exist — A pair your broker does not offer is left blank.
━━━━━━━━━━━━━━━━━━━━━━━━━━━━━━
Popup "Currency Strength" (☰S)
Which currencies are strong and which are weak right now, ranked as bars — the quickest way to pick the right side of a pair.
Opened from ☰S on the Tools bar.

1. Controls
- 1.1 Timeframe — The period the strength is measured over, from M5 to W1.
- 1.2 Base — ALL compares each currency against the whole basket; picking one currency shows the others relative to it.
- 1.3 Opacity slider — Makes the window see-through so it can stay over the chart.
2. The bars
- 2.1 Eight currencies — USD, EUR, GBP, JPY, AUD, CAD, NZD and CHF, sorted strongest to weakest.
- 2.2 The zero line — Bars grow right for strength and left for weakness from the centre line.
- 2.3 How it is measured — Every currency is scored across all 28 pairs, with each move normalised by volatility, so a quiet pair cannot dominate a busy one.
3. Reading it
- 3.1 The trade it suggests — The clearest setups sit between the top and the bottom of the list — buy the strongest against the weakest.
- 3.2 Same data as Performance — Both windows are built from the same refreshed figures.
|