GoldHydra: A Complete User Guide
Understanding how the EA thinks, and how to set it up correctly
WHY READ THIS FIRST
Most problems people have with an Expert Advisor are not strategy problems. They are setup problems: the wrong account type, the wrong chart, a balance too small for the settings, or a broker whose gold symbol behaves differently from the one used in testing.
This guide explains what GoldHydra actually does on your chart, and exactly how to configure it so it behaves the way it was designed to. Please read the "Before You Start" checklist even if you skip everything else.
THE IDEA IN ONE PARAGRAPH
Gold spends much of its time inside a range, then leaves that range quickly. GoldHydra does not try to predict which way it will leave. Instead, it finds the recent swing high and swing low on the H1 chart, places a buy stop above the high and a sell stop below the low, and lets the market decide. Whichever side the market breaks, that order becomes the trade. The other order is cancelled immediately.
That is the whole concept. Everything else in the EA exists to decide where those levels are, when it is sensible to place them, and how to manage the trade once it is filled.
HOW ONE TRADE IS BORN
Step 1. At the close of each H1 bar, the EA looks back over a number of bars and finds the highest confirmed swing high and the lowest confirmed swing low.
A swing is only counted if it is confirmed. A high must be higher than the bars on both sides of it (three bars each side by default). This filters out noise and keeps the EA anchored to structure a human trader would also recognise.
Step 2. The EA measures the distance between that high and that low. If the range is too narrow, the setup is skipped. A tight range usually means the market is coiling with no meaningful structure to break.
Step 3. It places two stop orders, one above the high and one below the low, each pushed a little further out by a buffer. This buffer is the fakeout filter. Price must commit past the level, not merely touch it.
Step 4. Both orders carry a fixed stop loss from the moment they are placed. There is never an unprotected position.
Step 5. Each order is given a lifetime. If the market has not reached the level within that window, the order expires by itself and the setup is forgotten. Stale levels are not left sitting on the server for days.
Step 6. When one side fills, the opposite order is cancelled instantly. You are never left holding both directions of the same setup.
THE SIX SUB-STRATEGIES
GoldHydra is not one strategy. It runs six, side by side, each with its own view of structure. They share the same logic but look back over different amounts of history, use different breakout buffers, and give their orders different lifetimes.
Zone A runs on any qualifying account:
A1 short lookback, tight buffer, medium order life. The fastest reader of structure. A2 medium lookback, wider buffer. Waits for slightly more commitment. A3 longer lookback, widest buffer, shortest order life. Trades bigger structure, reduced size.
Zone B activates only once the balance is large enough:
B1 long lookback, tight buffer, long order life. B2 longer lookback, wider buffer, reduced size. B3 longest lookback, widest buffer, smallest size.
Each sub-strategy holds at most one position at a time. When it closes a trade it waits several hours before arming again, so a single choppy level cannot generate repeated entries.
Each sub-strategy also uses its own magic number, derived from the base magic you set. This matters, and it is explained in Common Mistakes below.
HOW A POSITION IS MANAGED
There is no take profit.
This is deliberate, and it is the part new users question most often. A fixed target caps the trade at exactly the moment a breakout is doing what you wanted it to do. Instead, GoldHydra manages the exit dynamically:
Stage 1 The trade opens with a fixed stop loss. Stage 2 Once the trade reaches a set profit, the stop moves to break-even plus a small lock. From this point the trade cannot become a loss under normal conditions. Stage 3 Once further profit is reached, the stop begins trailing behind price at a fixed distance.
The trade then runs until the market takes the trailing stop. A quiet breakout gives back a small win. A strong one is allowed to keep going.
You can change this behaviour with Stop management mode:
Break-even then step trail the full behaviour described above (default) Break-even only protects the trade but never trails Fixed stop only no management at all, the original stop stands
THE PROTECTION FILTERS
These exist to keep the EA out of conditions where a breakout system performs badly.
Spread filter. Gold spreads widen sharply at certain hours. If the spread is above your limit when a bar closes, no new orders are placed.
Session filter. Four sessions can be enabled independently, each with its own start and end hour in GMT: Asia, London, the London/New York overlap, and New York. The EA works out your broker's GMT offset automatically from the server clock, so you do not need to know or configure your broker's timezone.
News filter. GoldHydra reads the economic calendar built into MetaTrader 5 and pauses around high impact events for the currencies you choose. It can close open positions, cancel pending orders, or both. There is also a separate Non-Farm Payrolls guard that works even if the calendar is unavailable.
Daily close protection. Orders are given expiry times that land before your broker's daily rollover, so nothing is left hanging through the daily break.
Weekend protection. Open trades can be closed before the Friday close so nothing carries weekend gap risk.
Daily drawdown stop. Optional, and off by default. Set a percentage and the EA will close everything and stop trading for the rest of the day if equity falls that far from where the day started. Useful for prop firm accounts with daily loss limits.
BEFORE YOU START: THE CHECKLIST
Please confirm all five of these. Four of the five are quick, and getting them wrong causes almost every support question.
- Account type must be HEDGING.
GoldHydra places a buy stop and a sell stop on the same symbol at the same time. On a netting account those two orders cancel each other out and the per-strategy tracking cannot work. The EA will detect a netting account, warn you in the log, and fall back to running a single strategy. It will not behave as designed. Check in the terminal: your account must say Hedging.
- Attach to XAUUSD on the H1 chart.
The EA reads H1 structure regardless of which chart you attach it to, but some internal safety checks use the chart's own timeframe. H1 is what it was built and tested for. Use it.
- Check your symbol name.
Brokers name gold differently: XAUUSD, GOLD, XAUUSD.m, XAUUSD-ECN. Any of these is fine, but the EA will warn you in the log if the symbol does not look like gold. If you attach it to EURUSD by mistake, you will see that warning.
- Two-digit and three-digit brokers are both supported.
Some brokers quote gold as 1234.56, others as 1234.567. GoldHydra detects this and adjusts every point-based setting automatically, so a 3000 point stop loss means 30.00 dollars of price movement on either broker. You do not need to change anything. If you are curious, check the log line at startup: it prints the detected digits and scale.
- Enable algo trading.
Both the AutoTrading button in the terminal and the Allow Algo Trading checkbox in the EA properties. The dashboard will show ALGO OFF in red if either is missing.
QUICK START
For a first run on a demo account:
Symbol XAUUSD Timeframe H1 Account Hedging, 5000 USD or more Lot sizing mode Risk % of balance per trade Risk % 0.5 Everything else leave at default
Let it run on demo for at least two weeks before considering real money. You want to see it handle a news event, a weekend, and a quiet range before you trust it with capital.
CHOOSING YOUR LOT MODE
Fixed lot. Always the same size. Simple and predictable. It does not grow with your account and it does not protect you if the account shrinks. Best for testing.
Auto (per balance step). Adds 0.01 lot for every set amount of balance. Note that this mode never goes below 0.01 lot, so on a small account it will still trade the broker minimum regardless of how small the account is.
Risk % of balance. The EA calculates lot size from your stop loss distance so that a losing trade costs approximately the percentage you chose. This is the recommended mode for live trading, because position size shrinks automatically if the account draws down. Be aware that on smaller accounts it will sit at the broker minimum lot until the balance is large enough for the maths to produce something bigger.
There is also a minimum balance guard. Set it and the EA will refuse to open new trades below that balance, while continuing to manage anything already open. Set it to 0 to disable.
HOW MUCH BALANCE DO YOU NEED?
Zone B strategies only activate above the Zone B threshold, 1000 by default. Below that, only A1, A2 and A3 will trade. The startup log tells you clearly when Zone B is inactive, and those strategies appear greyed out on the dashboard.
Balance is not only about the threshold, though. There is a second limit: margin. With all six strategies armed you can have up to twelve pending orders live at once, and the EA will not commit more than a set fraction of your equity to potential margin. On low leverage accounts, that ceiling is reached before the Zone B threshold matters.
As a practical guide:
Under 1000 Zone A only. Workable, but the account is small relative to the stop size. 1000 to 5000 Zone B activates. On low leverage accounts some orders may still be skipped for margin. 5000 and above Recommended. All six strategies run without margin ever becoming the constraint.
If you want to see the full EA behave as designed, use 5000 or more.
READING THE DASHBOARD
The on-chart panel shows what the EA is thinking:
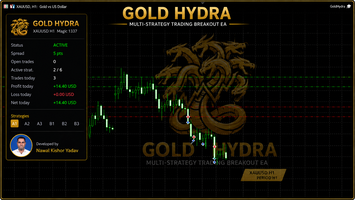
Status ACTIVE, or the reason it is standing aside Spread current spread, green when inside your limit Open trades positions the EA currently holds Active strat. how many sub-strategies are armed or in a trade Today's figures trade count, profit, loss and net for the current day Strategy row A1 to B3, colour coded
Strategy colours: green means in a trade, amber means armed with a live pending order, grey means idle and waiting, dark means switched off or gated by balance.
If a strategy shows dark and you expected it to trade, check the startup log. It will tell you why.
COMMON MISTAKES
Running two copies with similar magic numbers. Each sub-strategy uses your base magic plus one through six. If you set 1337 on one chart and 1340 on another, they will overlap and fight over each other's trades. Leave a gap of at least ten between instances.
Using a netting account. Covered above, but it is the single most common cause of unexpected behaviour. Check first.
Expecting trades every day. This is a breakout system with structure, session, spread and news filters stacked on top. Quiet periods with no qualifying setups are normal and intended. An EA that trades constantly is usually one without filters.
Testing on a small deposit and concluding Zone B does not work. If your test balance never rose above the Zone B threshold, B1, B2 and B3 never placed a single order. Test them with a realistic balance.
Backtesting without downloading the economic calendar. The news filter reads MetaTrader's calendar. If your terminal has never downloaded it, the filter silently has nothing to work with. Open Tools, Options, Community and let it sync before backtesting.
Changing the stop loss without re-checking risk. The stop distance drives the risk % calculation. Halve the stop and your lot size doubles.
FREQUENTLY ASKED
Can I use it on other symbols? It was designed and tuned for gold. It will run elsewhere and warn you in the log, but the default settings assume gold's volatility and spread behaviour.
Why does it place two orders and then delete one? That is the straddle. It is how the EA avoids predicting direction. The deletion is instant once one side fills.
Why is there no take profit? Because a breakout's value is in the ones that keep going. The trailing stop lets those run instead of capping them.
Does it use martingale or grid? No. Each sub-strategy holds one position with a fixed stop loss. Lot size does not increase after a loss.
Can I run it on a prop firm account? Yes, and the daily drawdown stop was built for that. Set it slightly below your firm's daily loss limit. Confirm the firm allows hedging.
Why did a pending order expire instead of being cancelled? That is intentional. Letting orders expire on the server is more reliable than sending cancellations that a broker may refuse when price is near the level.
Which timeframe should the chart be on? H1.
A HONEST NOTE ON RISK
GoldHydra places real orders with real stop losses on one of the most volatile instruments available to retail traders. No configuration removes the possibility of losing money, and no past result guarantees a future one.
Please do three things before going live: run it on a demo account long enough to see it handle a news event and a weekend, backtest it yourself on your own broker's data rather than relying on anyone else's results, and start with a position size small enough that a bad week is uncomfortable rather than damaging.
If something behaves in a way this guide does not explain, check the Experts tab in your terminal first. The EA logs its reasoning at startup and whenever it declines to trade.
This guide covers GoldHydra, available on the MQL5 Market:
https://www.mql5.com/en/market/product/187778
Questions about setup or settings are best posted in the product comments,
where other users can see the answer too.