

One-click trading, automatic risk sizing, and prop-firm rule tracking - in a single, stable on-chart panel.
A free demo version is available in the attachment below
Product link: https://www.mql5.com/en/market/product/180941
Introduction
The Prop Firm Trade Manager is an on-chart utility panel for MetaTrader 5. It places a complete trading cockpit directly on your chart so you can open and manage trades with a single click, while the panel automatically calculates lot size, stop loss, take profit, and keeps a live watch on the risk limits used by proprietary trading firms (daily loss, maximum loss, and profit target).
This guide walks you through everything from attaching the tool to your chart, to understanding each button and value, to using the panel safely during a funded challenge. No programming knowledge is required.
What you will learn:
- How to install the tool and attach it to a chart.
- What every section of the panel does, step by step.
- How automatic lot sizing and SL/TP work.
- How the prop-firm limit tracking and lock protection keep you compliant.
- How to move the panel and why Version 2.0 stays stable with many indicators loaded.
- How to use the panel inside the Strategy Tester.


Figure 1. The full Trade Manager panel attached to a chart (controls on the left, calculations on the right).
Who Is This Tool For?
- Prop-firm traders who must respect strict daily-loss, max-loss, and consistency rules.
- Scalpers and day traders who need fast, one-click entries with pre-calculated risk.
- Discretionary traders who want automatic position sizing instead of manual lot math.
- Anyone learning risk management who wants to see risk, reward, and account limits in real time.
Getting Started: Installation
The tool is an Expert Advisor (EA). Follow these steps once:
- Open MetaTrader 5. In the Navigator window (Ctrl+N), find the Expert Advisors section.
- Locate "Prop Firm Trade Manager MT5 2.0" in the list. If you purchased it from the MQL5 Market, it appears automatically after installation.
- Open the chart and timeframe you want to trade.
- Drag the EA from the Navigator onto the chart, or double-click it.
- In the settings dialog, make sure "Allow Algo Trading" is enabled, review the inputs (explained later), and click OK.
- Confirm that the Algo Trading button in the MT5 toolbar is switched on (it should be green).
When the panel appears on your chart, the installation is complete. The tool remembers your settings and panel position for next time.
Figure 2. Dragging the Expert Advisor onto a chart and enabling Algo Trading.
Important: Enable Algo Trading
One-click trading only works when Algo Trading is enabled in MetaTrader 5. If the BUY and SELL buttons do nothing, check that the Algo Trading toolbar button is green and that "Allow Algo Trading" was ticked in the EA settings.
Panel Overview
The panel is organised into two columns. The left column holds the trading controls; the right column shows live calculations, prop-firm limits, and statistics. You can hide the right column at any time with the CALC button to get a compact panel.
Header (top bar):
- Title / drag handle - grab here to move the panel (see "Moving the Panel").
- LOCK - shows protection status and lets you manually lock or unlock trading.
- CALC - shows or hides the right calculations column.
- Status - displays "TRADING ALLOWED" or "LOCKED" with the reason.
Figure 3. Close-up of the header bar: drag handle, LOCK, CALC, symbol, and status.
Step 1 - Choose Your Lot Sizing
The "RISK / LOT SIZE" section decides how big each trade will be. There are two modes:
RISK % (balance-based, automatic)
Lot size grows with your account balance. The default rule is 0.01 lot for every $500 of balance, multiplied by your Risk %. This keeps your sizing consistent and is independent of the timeframe or stop-loss distance. Use the - / + buttons or type a value into the Risk % box to adjust.
FIXED LOT (manual)
You set an exact lot size that never changes automatically. Use the - / + buttons or type into the Lot box.
Tip: The active mode is highlighted in blue. The "Lot to trade" value in the right column always shows the exact lot the next trade will use.
Figure 4. The Risk / Lot Size section showing RISK % selected, with Risk % and Lot input boxes.
Step 2 - Set Stop Loss and Take Profit
The "STOP LOSS / TAKE PROFIT" section controls where your protective stop and target are placed. Take Profit is always calculated from your chosen Reward-to-Risk (R:R) ratio.
AUTO (ATR) - volatility based
The stop loss adapts to current market volatility using the Average True Range (ATR) indicator. In fast markets the stop is wider; in calm markets it is tighter. This is the recommended default for most traders.
MANUAL - fixed points
You set a fixed stop-loss distance in points using the SL pts box or the - / + buttons.
The R:R box sets your reward target. For example, R:R = 2.0 means the take profit is twice the stop-loss distance. The "SL / TP" line in the right column shows the exact distances that will be used.

Figure 5. The Stop Loss / Take Profit section with AUTO (ATR) mode and the R:R box.
Step 3 - Place a Trade (One Click)
Above the large BUY and SELL buttons, an order summary line shows exactly what will happen: the lot size, the SL and TP in points, and the money you are risking. When you are happy with it:
• Click BUY to open a long position at market.
• Click SELL to open a short position at market.
The stop loss and take profit are attached automatically using your chosen settings. There is no need to type prices manually.
Figure 6. The order summary line and the large BUY / SELL one-click buttons.
Step 4 - Manage Open Trades
The "TRADE MANAGEMENT" grid gives you one-click control over positions on the current symbol:
Button What it does
CLOSE ALL Closes every open position on this symbol immediately.
CLOSE WIN Closes only the positions currently in profit.
CLOSE LOSS Closes only the positions currently in loss.
BREAKEVEN Moves the stop loss to the entry price (plus a small offset) once price has moved in your favour.
CLOSE 50% Closes part of each position (the partial-close percentage set in the inputs).
TRAIL ON/OFF Toggles an ATR-based trailing stop that follows price as the trade moves into profit.

Figure 7. The Trade Management grid: Close All / Win / Loss, Breakeven, Close 50%, and Trail.
Reading the Account Section
The left column also shows a live account summary so you always know where you stand:
- FLOATING P/L - the large coloured number; your current open profit or loss.
- Balance / Equity - account balance and live equity.
- Floating P/L - open profit or loss in money.
- Daily P/L - closed profit today plus current floating profit.
- Open pos / lots - number of open positions and total lots on this symbol.
The "Next Trade" Calculations
At the top of the right column, the panel previews your next trade before you click anything:
- Lot to trade - the exact lot size that BUY/SELL will use.
- Risk - Reward - the money you risk versus the money you target.
- SL / TP - stop and target distances in points.
- Spread / ATR - current spread and market volatility.
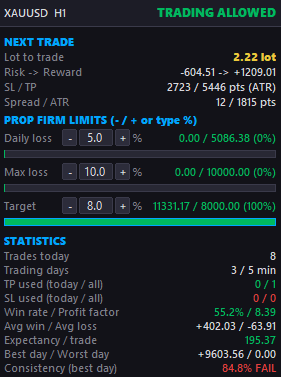
Figure 8. The Next Trade calculations panel showing lot, risk-to-reward, SL/TP, and spread/ATR.
Prop Firm Limits and Lock Protection
This is the heart of the tool for funded traders. The "PROP FIRM LIMITS" section tracks three values against your firm’s rules, each with an editable percentage and a colour progress bar:
Limit Meaning
Daily loss How much you may lose in a single trading day before the day is locked.
Max loss The total drawdown from your starting balance before the account is locked.
Target Your profit goal for the challenge, shown as progress toward the target.
Each percentage can be changed with the - / + buttons or by typing a value, so you can match the exact rules of any prop firm. The progress bars change colour from green to orange to red as you approach a limit.
Automatic lock protection
If a daily-loss or max-loss limit is reached, the panel locks trading: the BUY and SELL buttons are disabled and the status shows "LOCKED" with the reason. Optionally, the tool can also close all open positions automatically when a limit is breached. This helps you avoid breaking a funded-account rule in the heat of the moment.
Manual lock / unlock
The LOCK button lets you take manual control. When trading is locked, clicking LOCK can override the protection for the rest of the day (use with caution). When protection is armed, the same button shows the current state so you always know whether the guard is active.
Note: Always confirm the exact rules with your prop firm. This tool helps you monitor and respect limits, but you remain responsible for compliance.
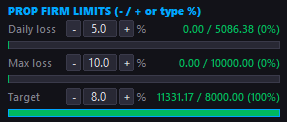
Figure 9. Prop Firm Limits with editable percentages and green/orange/red progress bars; panel in LOCKED state.
Performance Statistics
The "STATISTICS" block summarises your trading history so you can judge consistency at a glance:
- Trades today and total trading days (versus the minimum required).
- TP and SL hits, today and all-time.
- Win rate and profit factor.
- Average win and average loss.
- Expectancy per trade.
- Best day, worst day, and a consistency check (best-day share of total profit).
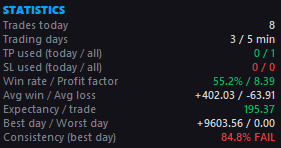
Figure 10. The Statistics block showing win rate, profit factor, expectancy, and consistency.
Moving the Panel (New in 2.0)
You can now place the panel anywhere on the chart:
7. Move your mouse over the title bar at the top of the panel (the drag handle).
8. Press and hold the left mouse button.
9. Drag the panel to any position on the chart and release.
The panel stays inside the chart area and remembers its position for next time. While you drag, the chart will not scroll underneath, so positioning is smooth and predictable. If you ever resize the chart or the window, the panel automatically stays fully visible.
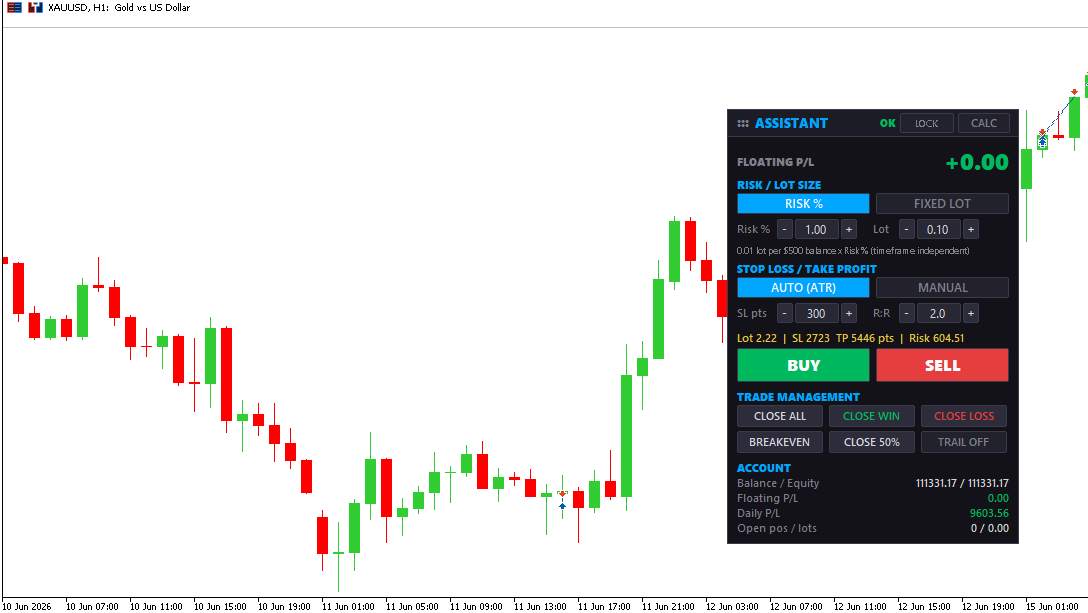
Figure 11. Dragging the panel by its title bar to a new position on the chart.
Built for Stability with Many Indicators
Version 2.0 was rebuilt so the panel stays smooth and responsive even when several indicators are running on the same chart. In practice this means:
- No blinking. The panel only redraws when a value actually changes, so it will not flicker against other indicators.
- No lag or hanging. Heavy history calculations are spread out and only run when a trade actually closes, so the chart stays fast.
- No freezing under load. Refresh cycles are protected so they never pile up, even during busy market conditions.
You can fine-tune responsiveness with the panel refresh and history-scan settings in the inputs if you wish, but the defaults are suitable for most setups.
Using the Panel in the Strategy Tester
The panel is fully interactive in the MetaTrader 5 Strategy Tester visual mode, which is ideal for practising without risk. Because the tester does not deliver keyboard input to value boxes, every value has - / + buttons next to it. Use those buttons to change Risk %, lot, SL points, R:R, and the prop-firm percentages during a visual backtest.
Input Parameters Reference
When you attach the tool, you can review these inputs. All of them also have sensible defaults.
Trading
Input Purpose
Magic number Identifies trades opened by this panel.
Lot sizing mode Risk % (balance-based) or Fixed lot.
Risk multiplier % Scales the balance-based lot size.
Fixed lot size Lot used in Fixed mode.
SL/TP mode Auto (ATR) or Manual.
Manual SL points Stop distance in Manual mode.
Reward:Risk Take-profit multiple of the stop distance.
Max slippage Allowed price deviation when ordering.
Prop Firm Limits
Input Purpose
Daily loss % Daily loss limit.
Max loss % Overall maximum loss limit.
Profit target % Challenge profit goal.
Minimum trading days Required active trading days.
Challenge start balance Starting balance (0 = detect automatically).
Auto close on breach Close all positions when a limit is hit.
Block when locked Prevent new trades while locked.
Panel / Stability
Input Purpose
Allow dragging Enable moving the panel by its title bar.
Panel refresh interval How often the panel updates (higher = lighter).
History rescan throttle How often heavy statistics are recalculated.
Apply chart style Optional clean white chart theme.
Quick-Start Workflow
- Attach the tool to your chart and enable Algo Trading.
- Set your prop-firm Daily loss, Max loss, and Target percentages to match your firm.
- Choose RISK % or FIXED LOT and set the value.
- Choose AUTO (ATR) or MANUAL stop loss and set your R:R.
- Check the order summary line above BUY / SELL.
- Click BUY or SELL to enter; manage with Breakeven, Close 50%, Trail, or Close buttons.
- Watch the limit progress bars - stop trading before you reach a red zone.
Tips and Best Practices
- Set your prop-firm percentages slightly tighter than the real limits to give yourself a safety buffer.
- Use AUTO (ATR) stops in volatile sessions so your risk adapts to the market.
- Keep an eye on the consistency value if your firm enforces a consistency rule.
- Practise in the Strategy Tester visual mode before trading a live challenge.
- Leave the automatic lock protection enabled so a bad day cannot break your account rules.
Risk Disclaimer
This tool is a trade-management and risk-monitoring utility; it does not predict markets and does not guarantee any profit or protection from loss. You are solely responsible for your trading decisions and for complying with the specific rules of your broker and proprietary trading firm. Always test thoroughly on a demo account before using real funds.
Download trial version for demo account:
A free demo version is available in the attachment below. Please note that the demo works exclusively on the MetaQuotes-Demo account and is intended for testing and evaluation purposes only. To use the demo, log in to a MetaQuotes-Demo account within MetaTrader 5 and attach the product to your chart.


")