Smart Alert Manager for MetaTrader 5
Create custom alerts and advanced alerts based on price and indicator data, setup dynamic alert messages, and send these MT5 alerts to Telegram, Discord, webhooks, mobile, and more.
Stay in control of your trades with Smart Alert Manager, a powerful utility for MetaTrader 5 that lets you create fully customizable alerts. Whether you’re tracking price action or monitoring indicator signals, this tool ensures you never miss an opportunity. It’s easy to set up, flexible to customize, and reliable across multiple delivery channels — Smart Alert Manager is built for traders who want smarter, faster decisions.
I - Key Features
1. Create Alerts Based On Indicator Data
Not just price levels, Smart Alert Manager also allows you to create alerts based on any standard indicator supported by MQL5.
2. Flexible Comparations
Many advanced comparisons are supported, not just simple ones. Works with price vs price, price vs indicator, or indicator vs indicator.
3. Customizable Alert Message
Make your alert messages dynamic and informative by using placeholders. Real market data will be filled in automatically when the alert is triggered.
4. Multi-Channel Delivery
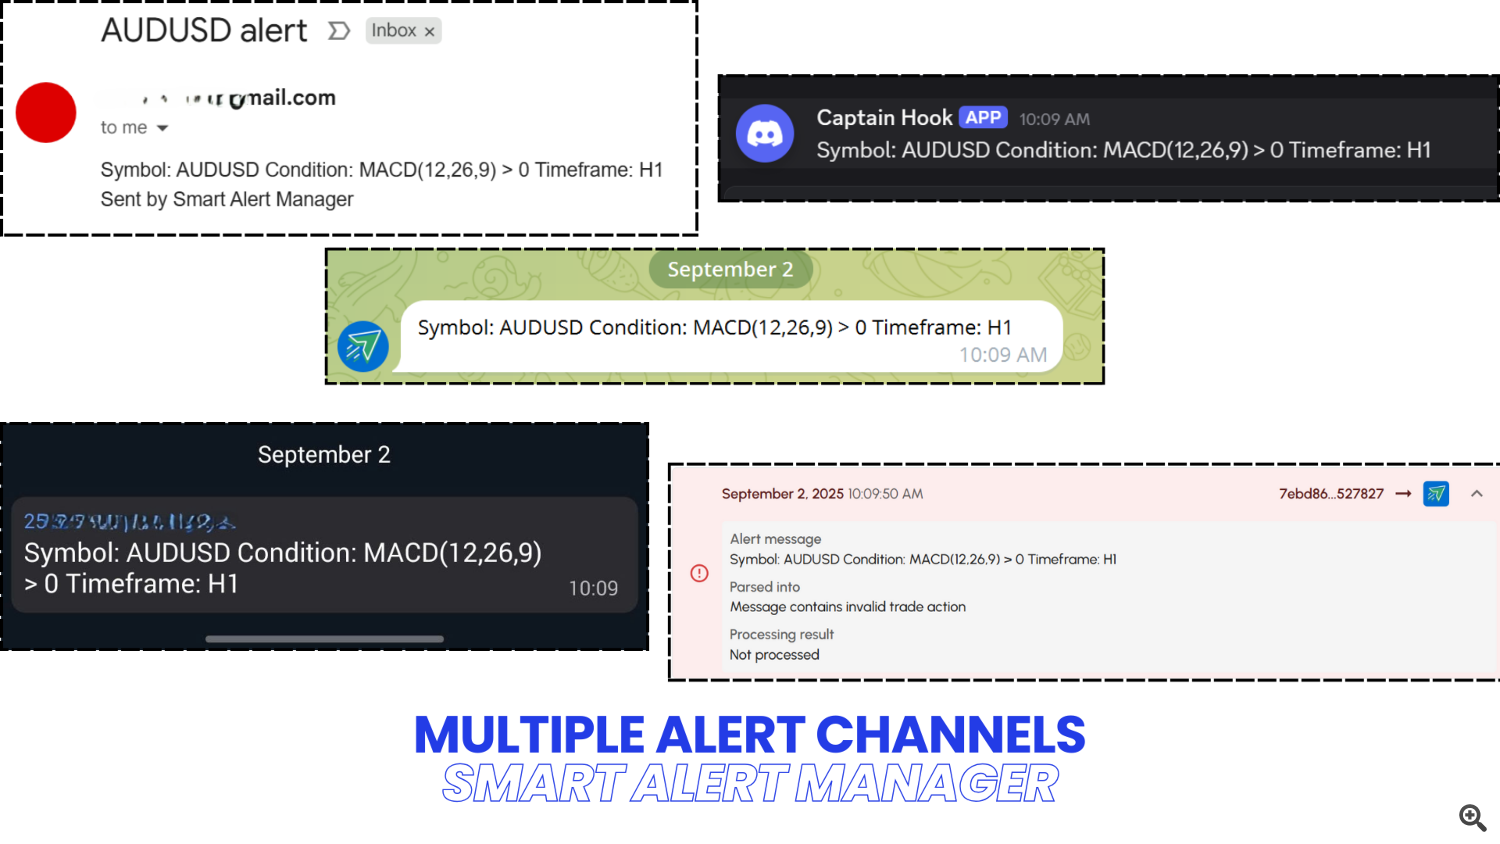
You can receive alert messages via multiple channels, including webhooks, Telegram and Discord.
II - Manage Alerts
1. Add new alert
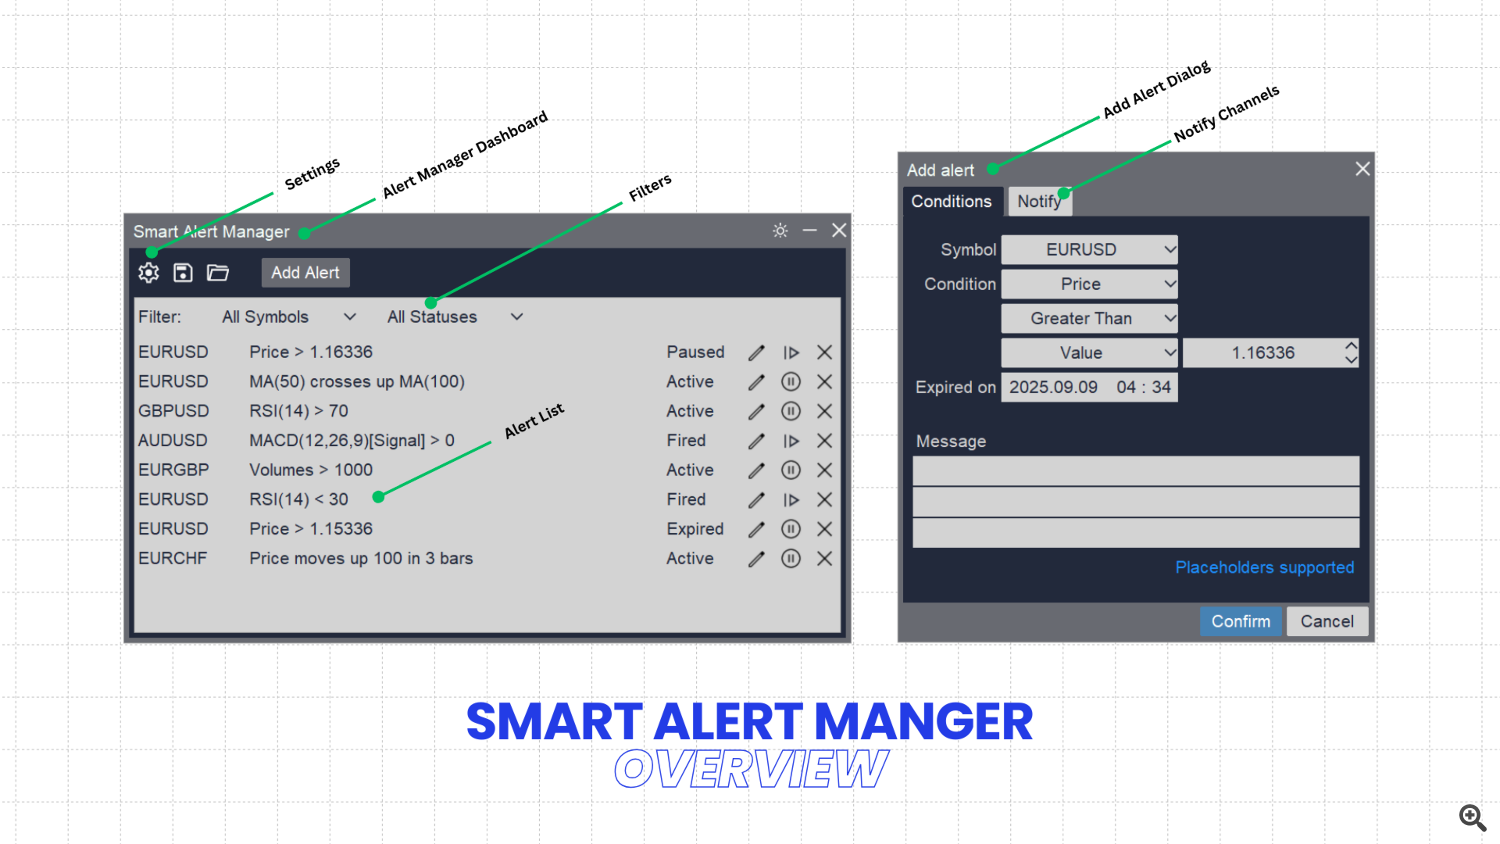
Adding a new alert is easy and straightforward. Just follow these steps:- Click the Add Alert button to add new alert
- Select the symbol you want to monitor.
- Choose the condition for the alert.
- Set the expiry date for the alert.
- Enter your alert message (optional).
- Open the Notify tab and select the channels where the alert should be sent.
- Click Save to finish.
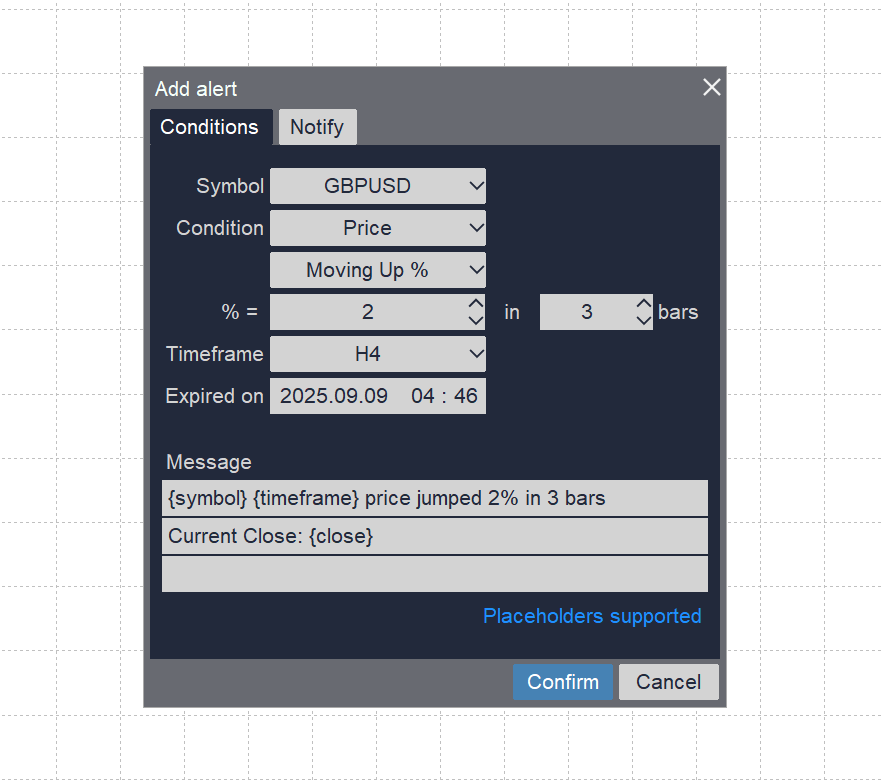
However, let's discover more details about each step above:
1.1 Alert symbol
This is easy to understand, pick the alert you want to fire alert here. It's the chart symbol by default but you can pick any other symbol in your watch list here.
1.2 Alert condition
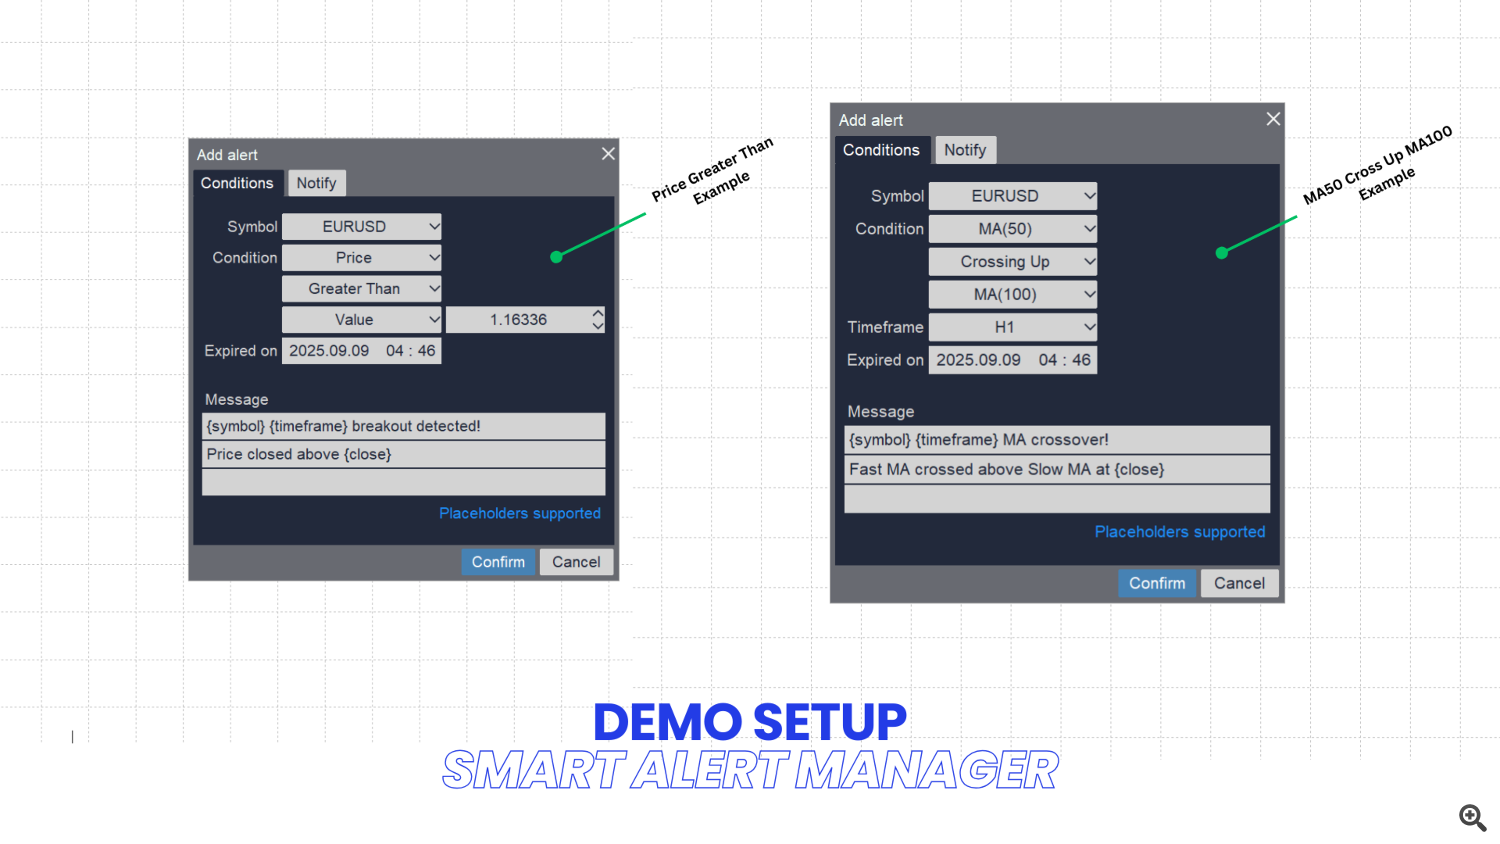
You can pick the condition is price level or value of any standard indicators provided my MQL5 here.
- If the only option you see is "Price", it means there are no standard indicators on your chart. To use indicators, add the ones you want to the chart first, then reopen the Add Alert dialog.
- When you select "Price" as the condition, the alert will use the closing price to evaluate the condition.
- When you select an indicator condition, if the indicator provides more than one line value, a dropdown box will appear next to it. Use this dropdown to choose which line you want to use as the condition value.
- When you select an indicator condition, you’ll also see a timeframe option below it. By default, it uses the current chart timeframe, but you able to pick another timeframe.
1.3 Comparing operation
These comparing operations are supported:
- Greater, Less, Equal mean the selected value is greater than ( > ), less than ( < ), or equal to ( = ) a value you specify.
For example: Close = 1.1000 or RSI < 30. - Between means the selected value lies between two values you set.
For example: Close BETWEEN 1.0950 and 1.1050. - Cross means the selected value crosses another value in either direction.
For example: Close CROSS 1.1000. - Cross Up means the selected value crosses upward.
For example: MA(20) CROSS UP MA(50). - Cross Down means the selected value crosses downward.
For example: RSI CROSS DOWN 70. - Move Up means the selected value moves upward by a minimum number of ticks or a specific value in X bars.
For example Close MOVE UP 50 ticks in 2 bars. - Move Down means the selected value moves downward by a minimum number of ticks or a specific value in X bars.
For example MACD Signal line MOVE DOWN 0.001 in 2 bars. - Move Up % mean the selected value moves up by a percentage you specify in X bars.
For example Close MOVE UP 2% in 3 bars. - Move Down % mean the selected value moves down by a percentage you specify in X bars.
For example Close MOVE DOWN 1% in 3 bars.
1.3 Comparing value
You can compare the Price or indicator line value you selected above with a specific value or another indicator line value.
- If you want to compare condition value with a specific value, pick Value option and specific the value you want to compare
- If you want to compare condition value with another line of indicator or another indicator value, pick the indicator and the line you want to compare in the list.
Depending on the selected comparison operator and condition, the input fields will adjust automatically.
- For example, if you choose the Between operator, two fields will appear for the lower and upper values instead of a single field.
- If you choose Move Up, Move Down, Move Up %, or Move Down %, additional inputs for the number of bars and timeframe will be shown.
- And if the condition is set to Price with one of the Move operators, the input will be in ticks, while other conditions will use a value.
1.4 Timeframe
Timeframe input is shown in these cases:
- When you use indicator value as condition or comparing value
- When you choose Move Up, Move Down, Move Up %, or Move Down % as comparing operator
Timeframe input allow you to calculate indicator values or number of bars in another timeframe, not the current char timeframe.
1.5 Expiration date
Specific the expiration date of alert here. The alert is valid until that time. After that, it will be marked as expired (and not fire alert) or auto deleted (if you turn on this option in Settings)
1.6 Alert Message:
Make your alert messages dynamic and informative by using these placeholders. (Real market data will be filled in automatically when the alert is triggered):- {symbol}
- {timeframe}
- {time}
- {open}
- {high}
- {low}
- {close}
- {bid}
- {ask}
- {spread}
- {realvolume}
- {tickvolume}
If no alert message is setup, alert fill be fired with basic information about the alert setup.
Important note: In the Message field, you’ll see three input lines. This is due to MQL5’s 63-character limit for text fields, while your alert message may be longer. To handle this, simply split your message across the three lines. The tool will automatically join them together and send the full message to your channels. We apologize for the inconvenience, but this is the only way to support longer messages (189 characters max instead of just 63) within MQL5’s limitations.
2. Setup Alert Channels
On the Add New Alert dialog, click on the Notify tab and select channels you want to receive alert.
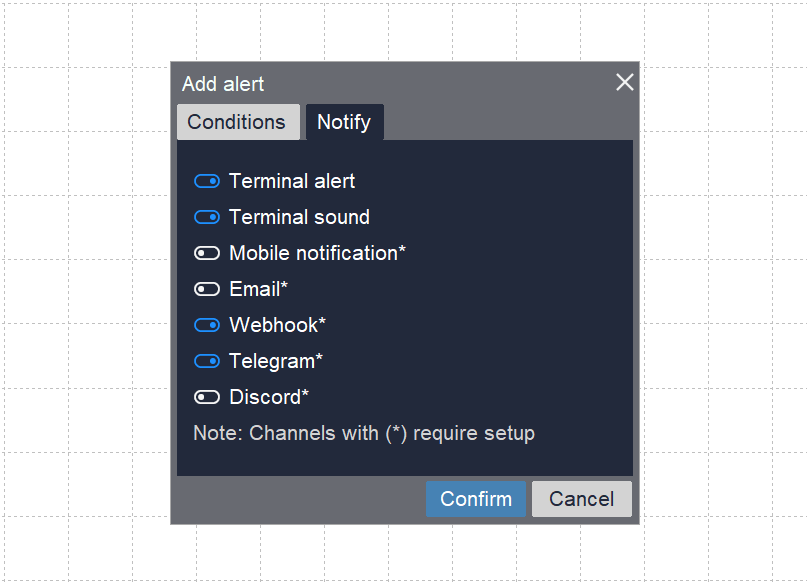
Smart Alert Manager allows you to receive alerts in 7 channels at the same time, turn on channels you want in the dialog:
- Terminal alert: It shows a popup on MT5 terminal when alert is trigged.
- Terminal sound: It plays a sound on MT5 terminal when alert is trigged.
- Mobile notification: Receive MT5 alert in your mobile app as a push notification when alert is trigged. MetaTrader 5 app installed and setup required.
- Email: Receive MT5 alert in your mail box when alert is trigged. Email configuration in MT5 required.
- Webhook: Receive MT5 alert in your webhook for additional advanced actions when alert is trigged. Webhook configuration required.
- Telegram: Receive MT5 alert in your Telegram chat, group or channel when alert is trigged. Telegram configuration required.
- Discord: Receive MT5 alert in your Discord channel when alert is trigged. Discord configuration required.
This alert manager is powerful and very flexible on alert channels. You can use this tool to send MT5 alert to email, send MT5 alert to webhook, send MT5 alert to Telegram, send MT5 alert to Discord... for additional actions you want. Multi channels in the same time, supper fast and everything is own by you.
Important notes:
- Channels with (*) marked require setup to able to receive alerts. Please read the Alert Settings section below for more details
- You can pre-setup default channels you want to receive alerts in Settings, check below section.
3. Manage alerts
3.1 Edit alert
In the alert list, click Edit icon to edit alert.
3.2 Pause/Resume alert
In the alert list, click Pause/Resume icon to pause or resume alert. When the alert in in active status, it can be paused. When the alert is in paused/fired or expired status, it can be resume.
3.3 Delete alert
In the alert list, click Delete icon to delete alert.
III - Alert Settings
The Smart Alert Manager is ready to use right away. Simply install the indicator on your chart and no initial configuration needed. However, please aware that some alert channels need additional configurations. Please read below sections for more details. On the main Dashboard, click the Settings icon to open the Settings Panel. Inside the panel, use the tabs to configure the alert channels you want to activate. You only need to set up the channels you plan to use, any others can be left blank.
1. Webhook Settings:
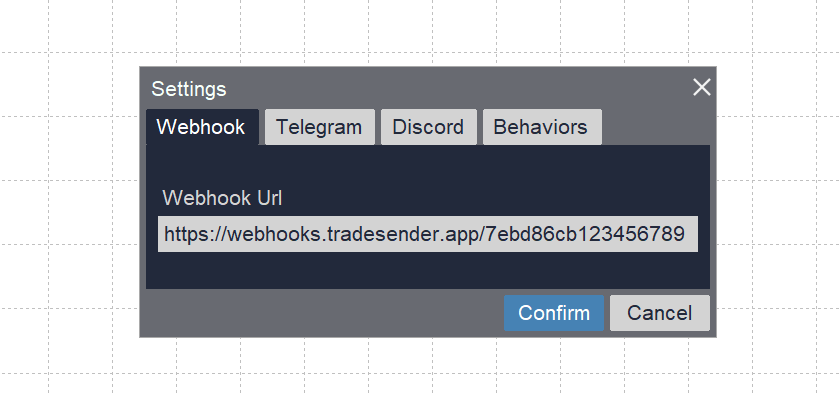
- Copy the Webhook URL where you want to receive alert here. The Webhook URL is typically looks like this: https://webhooks.example.com/DGGG3iZdQsAIIP
- The message will be sent to your destination webhook with POST method, in JSON format, with this structure: {"message":"Here is the content of alert message"}.
- Webhook URL is limit at 63 characters.
Important note: You MUST add the Webhook URL you want to use above into "Allow WebRequest for listed URL" to let the Webhook Channel works:
- In your MT5 Terminal, click Tools\Options. Select Expert Advisors tab.
- Pick Allow WebRequest for Listed URL
- Add above Webhook URL into the list
- Click Ok
2. Telegram Settings:
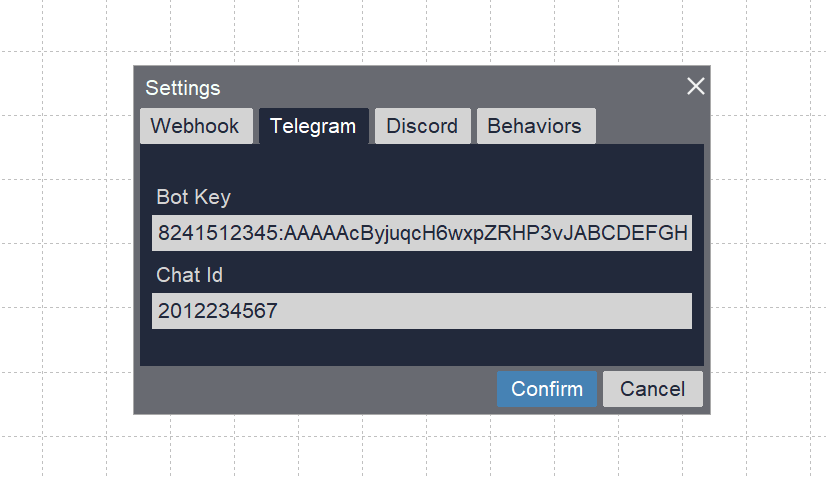
Your alert messages will be send directly to your Telegram chat by your own bot. So you need to create a Telegram bot, then provide the bot key below. Learn how to create a Telegram bot here.
- Copy and Paste the Telegram Bot key in the Bot Key field
- Copy and Paste the Chat Id where you want to receive alert messages in the Chat Id field.
- Add https://api.telegram.org into the "Allow WebRequest for Listed URL" as above
- If you want to receive alert messages in a private group or channel, please also remember to set the bot you just created above to that private group/channel and set it as an admin.
3. Discord Settings:
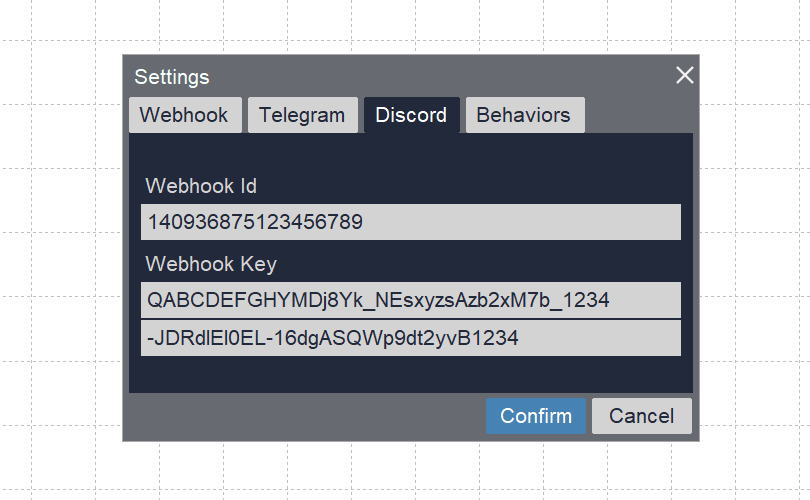
Your alert messages will be send directly to your Discord Webhook to show it in any channel you want. Learn how to create a Discord Webhook and get Id/Key here.
- Copy and paste Discord Webhook Id you created in Webhook Id field
- Copy and paste Discord Webhook Key you created in Webhook Key
- Add https://discordapp.com into the "Allow WebRequest for Listed URL" as above
Important note: In the Webhook Key field, you’ll notice two input lines. This is because MQL5 limits text fields to 63 characters, while a Discord Webhook Key is longer than that. To use it, simply split the key into two parts and paste them across the two lines. You can break the key at any point—just ensure the entire key is included between the two fields. We apologize for the inconvenience, but this is the only way to support Discord’s webhook format within MQL5’s limitations.
4. Email Settings:
There is no Email settings tab in Smart Alert Manager, because email delivery is a standard feature handled directly by the MT5 terminal. If you want to receive alerts via email, please ensure that your email is configured correctly in MQL5. You can follow the guidelines here.
5. Mobile Notification settings:
There is no Mobile settings tab in Smart Alert Manager, because mobile notifications are a standard feature handled directly by the MT5 terminal. If you want to receive alerts on your phone, please install the MetaTrader mobile app, set up your MetaQuotes ID correctly, and ensure that app notifications are enabled. You can follow the guidelines here.6. Behaviors Settings
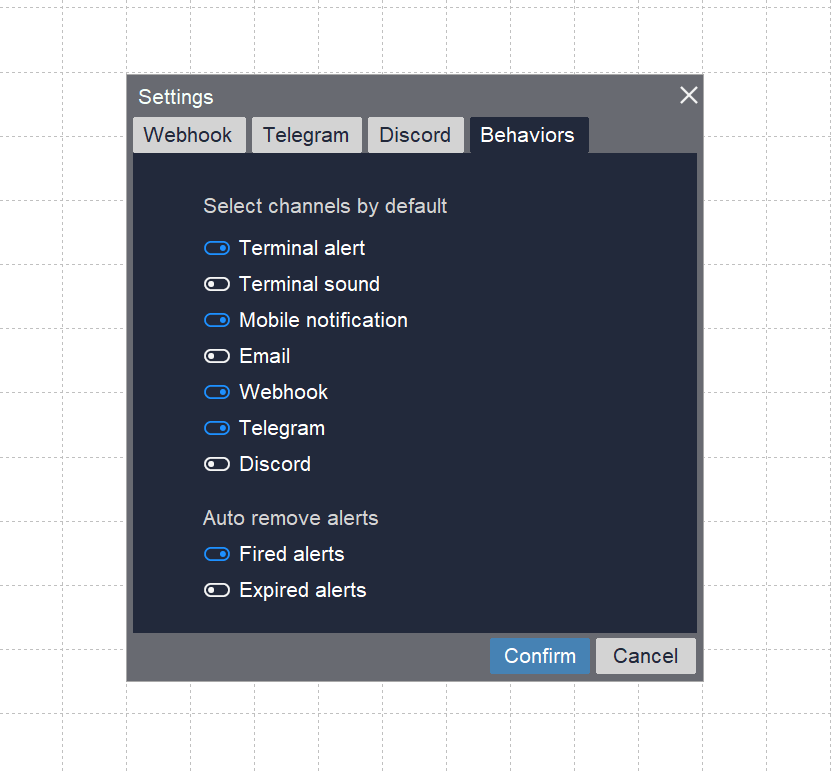
On the main Dashboard, click Setting icon to open Setting Panel. On the Setting panel, click on Behaviors tab to see available options.
- You can toggle on/off alert channels by default when you create an alert here. These options can be override by each alert later if you want.
- Choose to auto delete fired alerts or not
- Choose to auto delete expired alerts or not
IV - Other Helpful Features
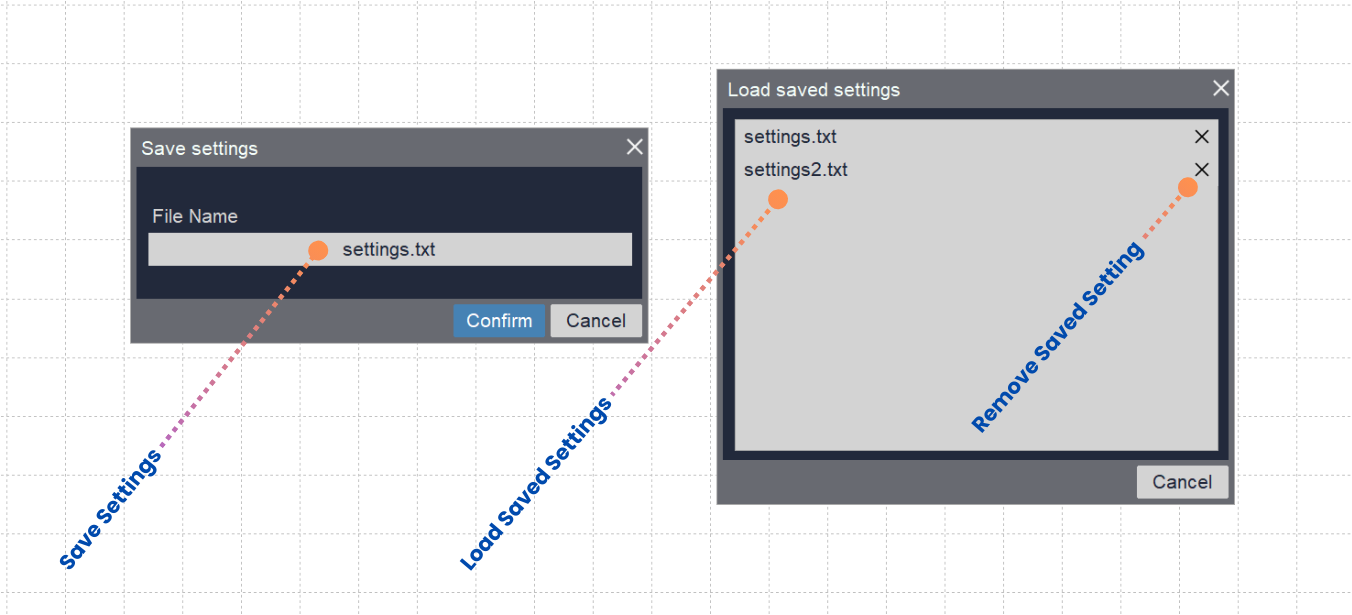
1. Save Settings
Use Save Setting feature to save your setup and alerts for further use
- Click on Save icon in controls bar to open Save dialog
- Enter name you want to use
- Click Confirm to save
2. Load Saved Settings
Use Load Saved Settings feature to load setup and alerts you stored
- Click on File Open icon in controls bar to open Load dialog
- Select setting file you stored (if any)
- Click Confirm to load
Note: On load settings dialog, you can click on Cross icon to remove your saved settings file
3. Light & Dark mode switch
Simply click the "Mode" toggle button in the top-right corner of the Dashboard to switch between Light and Dark modes to protect your eyes.
Thank you for reading! Be Safe & Happy Trading!
